
DWF45DZ - Fridge DIMPLEX - Free user manual and instructions
Find the device manual for free DWF45DZ DIMPLEX in PDF.


| Product Type | Compact Refrigerator |
| Brand | Dimplex |
| Model | DWF45DZ |
| Capacity | 45 Liters |
| Dimensions (H x W x D) | 850 mm x 500 mm x 550 mm |
| Weight | 25 kg |
| Power Supply | 220-240 V, 50 Hz |
| Energy Class | A+ |
| Temperature Range | 0°C to 8°C (refrigerator compartment) |
| Thermostat | Mechanical dial, adjustable |
| Interior Lighting | LED light |
| Defrosting | Manual defrost required |
| Cleaning | Wipe with damp cloth; do not use abrasive cleaners |
| Replacement Parts | Available through Dimplex customer service or authorized dealers |
| Warranty | 2 years (standard) |
Frequently Asked Questions - DWF45DZ DIMPLEX
User questions about DWF45DZ DIMPLEX
0 question about this device. Answer the ones you know or ask your own.
Ask a new question about this device
Download the instructions for your Fridge in PDF format for free! Find your manual DWF45DZ - DIMPLEX and take your electronic device back in hand. On this page are published all the documents necessary for the use of your device. DWF45DZ by DIMPLEX.
USER MANUAL DWF45DZ DIMPLEX
Important Safety Instructions.... 3
Disposal....4
Safety & Warning....5
Before Using Your Wine Cooler....7
Installation of Your Wine Cooler....7
Connect Wine Cooler to Power Source....8
Know About Wine Cooler....9
Installation of Handle.... 10
Level the Wine Cooler.... 12
Turn on the wine cooler and set up temperature....13
Hints for Operation 14
Placement of Wine Bottle....14
Effective Cubage.... 15
Temperature Area in Chilling Cabinet.... 15
Placement of Wine cooler.... 15
Practical Skills for Storage of Wine....15
Drinking Temperature....16
Power-off & Stop Using of Wine Cooler....17
Cleaning Wine Cooler 17
Energy Saving....17
Operation Noise....18
Troubleshooting ....18
Contact Details....19
Important Safety Instructions
| WARNING | To reduce the risk of fire, electrical shock, or injury when using your Wine Cooler, follow these basic precautions: |
| - .This appliance is not intended for use by persons (including children) with reduced physical, sensory or mental capabilities, or lack of experience and knowledge, unless they have been given supervision or instruction concerning use of the appliance by a person responsible for their safety.WARNING: Keep ventilation openings, in the appliance enclosure or in the built-in structure, clear of obstruction.- WARNING: Do not use mechanical devices or other means to accelerate the defrosting process, other than those recommended by the manufacturer.Never clean Wine Cooler parts with flammable fluids. The fumes can create a fire hazard or explosion.Do not store or use gasoline or any other flammable vapors and liquids in the vicinity of this or any other appliance. The fumes can create a fire hazard or explosion.WARNING--- Use two or more people to move refrigerator.--- The appliance is not intended for use by young children or infirm persons without supervision.--- If the supply cord or other components damaged, it must be replaced by the manufacturer, or a qualified technician in order to avoid a hazard.CAUTION: Do not use extension cord.DANGER:Risk of child entrapment. Before you throw away your old refrigerator or freezer:Take off the doorLeave the shelves in place so that children may not easily climb inside.-Save these instructions- | |
Disposal

Disposal of Waste Package
The package is used to protect the wine cooler during transportation.

Warning
For the discarded wine cooler:
- Please remove plug from power source.
- Please remove plug and cord.
The wine cooler contains cooling agent and the insulation layer contains gas. The cooling agent and the insulated gas must be disposed by professional personnel. Please do not damage the loop pipeline of the cooling agent before it's disposed by professional personnel.

DANGER or WARNING: Risk of child entrapment.
- Before you throw away your old Wine Cooler: take off the doors. Leave the shelves in place so that children may not easily climb inside.
Safety & Warning Before
Operation of Wine Cooler Please read the User Manual carefully!
It contains some important information on placement, use and maintenance of the wine cooler.
Do not dispose of instruction manual.
In case of refrigerant leak
- Any flame or fire source should be kept away from the wine cooler.
- Please ventilate the room thoroughly for several minutes.
- Pull out the power plug.
• Inform after-sales service personnel.
The more cooling agent the wine cooler has, the bigger the space to place the wine cooler should be. For every 8g cooling agent, there must be at least 1m^3 of space in the room. The quantity of wine cooler is marked on the nameplate at the back-plate of the wine cooler.
- The replacement of power cord and other repair activities can only be carried out by authorized service agents/repairers as advised by manufacturer. Improper installation or repair may cause harm to users.
During Use
- Do not use electric appliance (such as: heater, electric ice maker, etc.) within the inside of the wine cooler.
Danger of Electric Shock!
- Don't remove frost or ice layers with sharp or keen-edged object. Otherwise, the cooling agent pipeline may be damaged. The ejected
cooling agent may cause injury to eyes.
- Do not store products that contains combustible gas (such as: aerosol cans) or explosive materials in the wine cooler.
Danger of Explosion!
- Do not use steam type cleaning equipment to clean the wine cooler or defrost. Steam may enter the electric elements and cause a short circuit.
- Do not use the base or the door of the wine cooler as footplate or support.
- When you defrost or clean the wine cooler, please pull out the power plug. When you pull out the power plug, please hold the plug rather than pull the power cord.
- Wine with high alcohol content must be sealed and stored vertically.
- Avoid contamination of grease to the plastic components and the door sealing components of the wine cooler, or the plastic components and the door sealing components of the wine cooler will disintegrate.
- Do not envelop or close the ventilation or exhaust holes.
- Do not store or use gasoline or any other flammable vapors and liquids in the vicinity of this or any other appliance. The fumes can create a fire hazard or explosion.
- Do not use extension cords.
Children
- Do not give packaging or other components to children for play. The folded paperboard and the plastic film may cause danger of suffocation.
- Never allow children to operate, play with, or crawl inside the Wine Cooler.
- The appliance is not intended for use by young children or infirm persons without supervision; young children should be supervised to ensure that they do not play with the appliance
Before Using Your Wine Cooler
Remove the exterior and interior packing.
Check to be sure you have all of the following parts:
5 Shelves
1 Bottle/Can Basket
1 Instruction Manual
Before connecting the Wine Cooler to the power source, let it stand upright for approximately 2 hours. This will reduce the possibility of a malfunction in the cooling system from handling during transportation.
Clean the interior surface with lukewarm water using a soft cloth.
Installation of Your Wine Cooler
Place your Wine Cooler on a floor that is strong enough to support it when it is fully loaded. To level your Wine Cooler, adjust the adjustable legs at the bottom of the unit.
Allow 3cm of space between the back and sides of the unit, which allows the proper air circulation to cool the compressor.
Locate the Wine Cooler away from direct sunlight and sources of heat (stove, heater, radiator, etc.). Direct sunlight may affect the acrylic coating and heat sources may increase electrical consumption. Extreme cold ambient temperatures may also cause the unit not to perform properly.
Avoid locating the unit in moist areas.
Plug the Wine Cooler into an exclusive, properly installed-earthed wall outlet. Do not under any circumstances cut or remove the third (earth) prong from the power cord. Any questions concerning power and/or earthing should be directed toward a certified electrician.
After plugging the appliance into a wall outlet, allow the unit to cool down for 2-3 hours before placing items in the compartment.
The wine cooler should be placed in dry and ventilated room. The location of the wine cooler should not be placed in direct sunshine. The wine cooler should be far away from heating sources, such as: cooking stove or heating radiator. If the wine cooler has to be placed near heating source, please adopt proper heating insulation board for insulation or keep the wine cooler at least the following minimum distances away from the heating sources:
For electric stove: 3 cm. For oil or coal stove: 30 cm.
To ensure proper ventilation for your wine cooler, allow for 3cm space on each side between walls, 3cm space between back of your wine cooler and the wall, and 3cm space between counter top and the roof or ceiling.
Notice
If the room temperature is lower than +16°C, the wine cooler may not be able to work normally, because if the room temperature is too low, the temperature sensitive goods might be damaged.
If the room temperature and humidity is too high, the glass door of the wine cooler may have condensation.
Connect Wine Cooler with Power Source
Warning
Improper use of the earthed plug can result in the risk of electrical shock. If the supply cord is damaged, it must be replaced by the manufacturer, its service agent or similarly qualified persons in order to avoid a hazard.
After placing the wine cooler, please wait for at least two hours before the wine cooler can be operated. This is because the engine oil in the compressor may flow into the cooling system during the transportation process.
Before the first running, please clean the inside chambers of the wine cooler (Please see the section on cleaning).
The power socket should be reachable. The wine cooler should be connected with 220-240V/50Hz AC power.

Warning!
In any case, please do not connect the wine cooler to an electronic energy saving power plug or the converter (such as: solar energy equipment, ship's electric grid) that convert DC into 220-240V AC.
Know About Wine Cooler
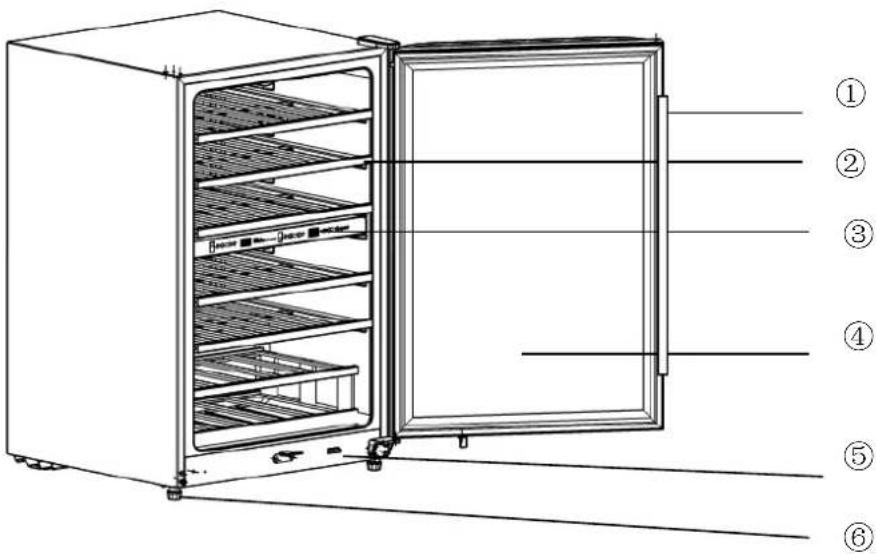
Fig. 1
The illustration might be different from the actual products.
① Handle
② Wooden Shelf Made of Beech
③ Control Panel
④ Glass Door
⑤ Control Switch of Lamp
⑥ Adjustment Leg
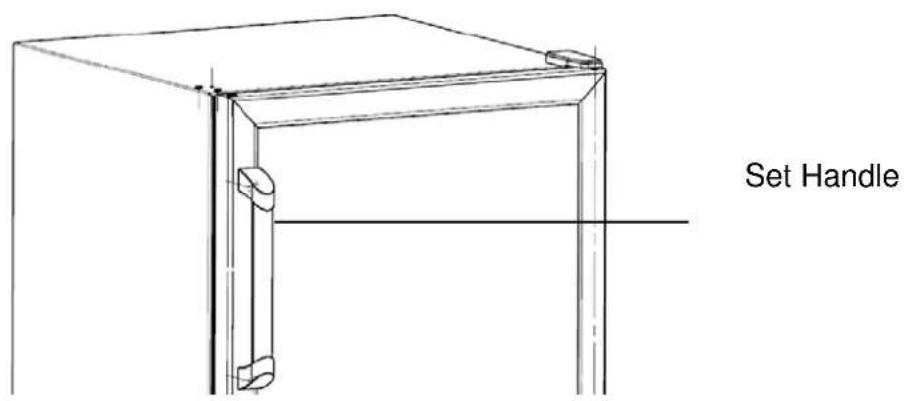
Installation of Handle
Please choose the following handle installation instruction according to your actual needs.
- Set the handle on the fixing shaft.
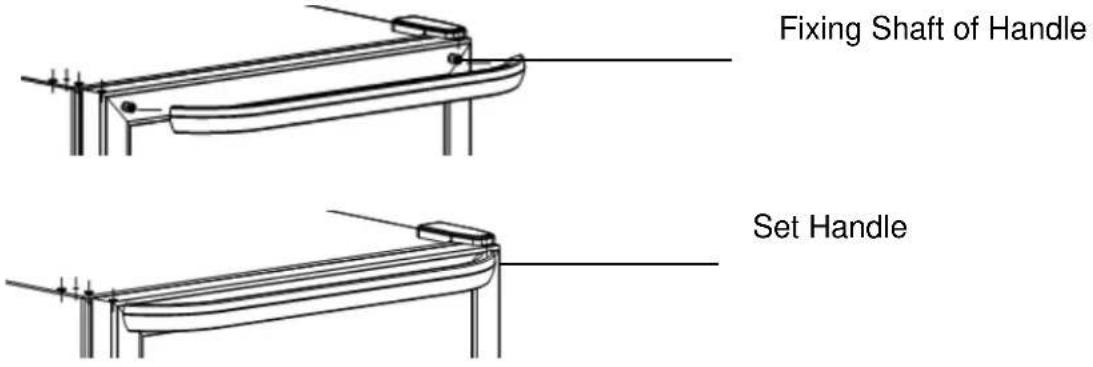
Fixing Shaft of Handle
Set Handle
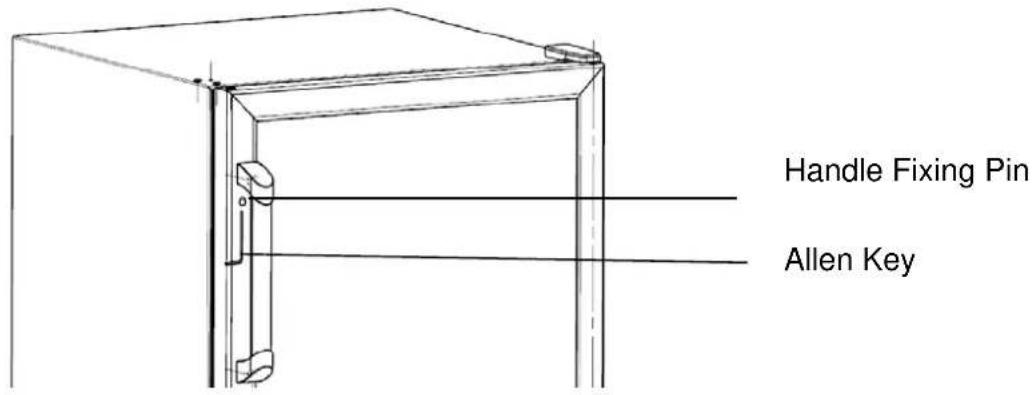
- Screw down the fixation pins of the handle with screw driver.
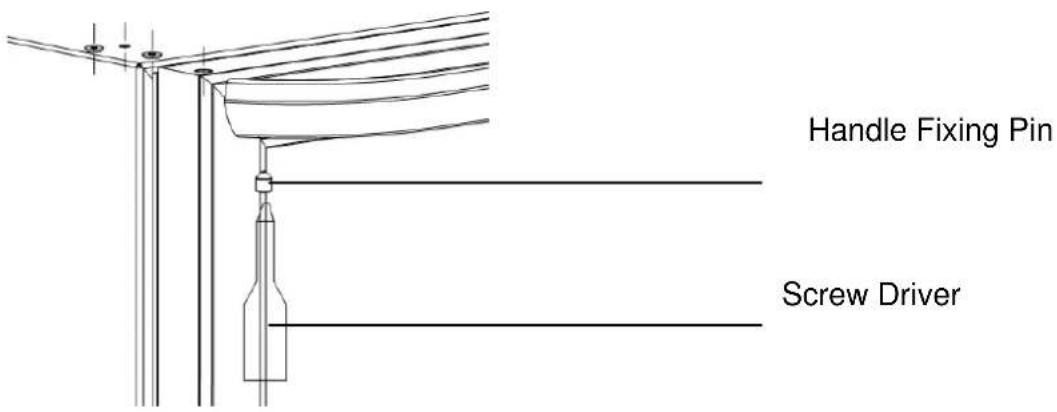
Handle Fixing Pin
Screw Driver
- Set the handle on the fixation shaft.
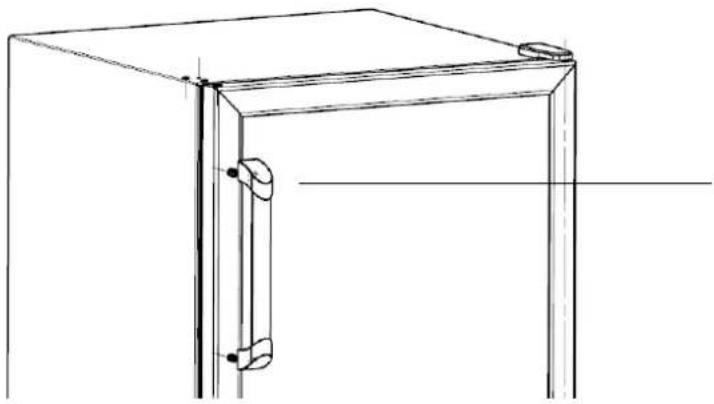
natural_image
Line drawing of a simple wooden cabinet or support structure with no text or symbolsFixing Shaft of Handle
- Screw down the fixing pins of the handle with screw driver.
- Set the handle on the fixing shaft. Fixing Shaft of Handle
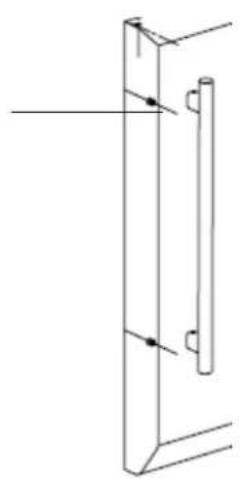
natural_image
Pure technical line drawing of a vertical panel or bracket with no text, numbers, or symbolsSet Handle
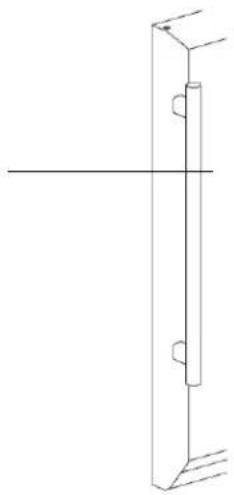
natural_image
Pure technical line drawing of a vertical structural component with mounting holes and a horizontal centerline (no text or symbols)- Screw down the fixing pins of the handle with screw driver.
Handle Fixing Pin Allen Key

natural_image
Pure technical line drawing of a vertical mechanical component with no text or symbolsLevel the Wine Cooler
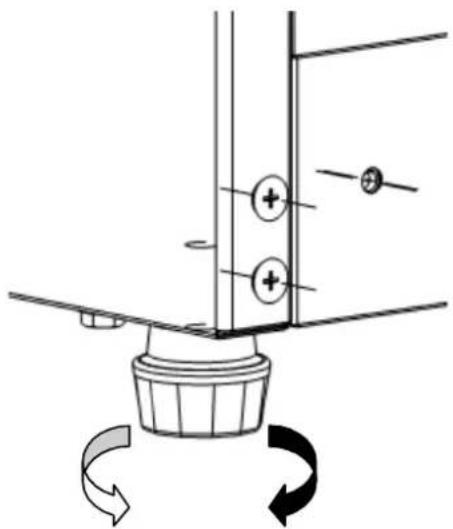
Place the wine cooler on the planned location and level it.
The front screw leg is adjustable.
natural_image
Diagram of a mechanical assembly with rotating components and directional arrows (no text or symbols)Turn on the wine cooler and set up temperature
The screen is shown as the following picture:

Indication of Temperature in Lower Zone
^ : Press this button once and the temperature will increase 1°C.
V: Press this button once and the temperature will decrease 1°C.
Indication of Temperature in Upper Zone
A : Press this button once and the temperature will increase 1°C.
V: Press this button once and the temperature will decrease 1°C.
88: Temperature display.
LIGHT: Lighting button for LED lamp; it controls the on/off of lamp.
POWER: On/off button used to turn on/off the wine cooler.
Press LIGHT and POWER together for 2 seconds and you can convert between Fahrenheit temperature and Celsius temperature.
Notice!
- The upper zone temperature range is 5\~14°C, the lower zone temperature range is 10\~18°C. The default temperature is both 10°C, and the temperature after power failure will be the temperature set before the power failure.
- To extend the service life of compressor, please wait for at least 5 minutes before starting the wine cooler after power failure.
- Failure display
- If there is failure on the sensor, the screen may display a failure code, such as: E and F. When the screen displays these errors, please do not disassemble unit. You should contact local after-sales service personnel for repair.
- If the temperature in the cooler is too low, it will display "L".
When the temperature in the cooler is too high, the screen will display "H" and will flash; under this state, the buzzer will buzz once every second for 30 seconds; one minute later, the buzzer will continue to alarm for the next 30 seconds; after the alarm has activated for three times, it will not sound. You
can press any key to cancel sound alarm.
- When you put a lot of wine together in the cooler, the temperature in the cooler may rise temporarily.
Hints for Operation
In the operation of compressor, the back wall of the chilling chamber will form ice or frost. You do not need to defrost or wipe off water drops because the back wall is able to defrost automatically. The defrosted water will be collected in to the discharge channel and the water will flow to the water receiver above the compressor and will be vaporized there.
When there is too much frost at the back of inner side of cabinet, pls turn off the power until the defrosting is finished.
Placement of Wine Bottle
When you place the Wine bottles, please note:
- The capacity for bottle storage in the wine cabinet is based on the following marked bottle size. Oversized bottle may have an impact on the number of bottle storage in the wine cabinet.
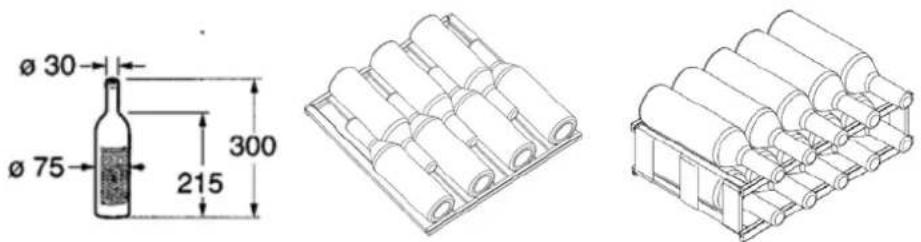
- To maintain the perfect air ventilation in the wine cooler, the bottle should not touch the back wall of the chilling chamber.
- The number of bottles might be different for different bottles with different shapes and sizes.
- Because some space is occupied by the compressor, the lower part of the wine cooler is comparatively low and it can be used to place cans or short wine bottles.
Effective Cubage
Please see the model nameplate on the wine cooler for the description on effective cubage.
Temperature Area in Chilling Cabinet
Due to the air circulation in the wine cooler, some areas with different temperatures are generated:
The upper area has the lowest temperature
The lower area has the highest temperature
Placement of Wine cooler
Please store different wines according to the following sequence from up to down:
- Strong red wine
- Rose wine and gentle red wine
- White wine
• Champagne and light sparkling wine
Practical Skills for Storage of Wine
- The bottled wine should not be stored in the chilling chamber in a whole case or box.
- When old bottles are placed in the wine cooler, please make sure that the bottle cork is moist. Do not leave space between the wine and the bottle cork.
- Before you drink the wine, allow the wine to “breathe” with the top removed: For example, you can place the rose wine or red wine on the table respectively 2-5 hours or 4-5 hours before you drink, for a proper drinking temperature. On the contrary, white wine can be placed on the table directly from the cooler. The Champagne should be stored in the wine cooler until you want to drink.
- Please make sure that the temperature of the wine is always lower than
the ideal drinking temperature because when you pour the wine into glass,
the temperature of the wine will increase 1 - 2°C immediately!
- Drinking Temperature
The correct temperature of pouring wine determines the smell of wine, as well as the taste of wine.
We recommend you pour wines into glass at the following drinking
temperatures:
| Wine Type Drinking Temperature | |
| Bordeaux red 18°C | |
| Côtes du Rhône red/Barolo | 17°C |
| Burgundy red/Bordeaux red | 16°C |
| Port | 15°C |
| Young Burgundy red | 14°C |
| Young red wine 12°C | |
| Young Beaujolais/all white wines with little residual sugar | 11°C |
| Old white wines/Chardonnay | 10°C |
| Sherry | 9°C |
| Young white wines from late vintage | 8°C |
| White wines Loire/Entre-deux-Mers 7°C | |
Power-off & Stop Using of Wine Cooler
Turn off Wine Cooler
Pull out the power plug, and the wine cooler will be turned off.
Stop Using Wine Cooler
If you're not going to use the wine cooler for a long time:
- Pull out power plug
- Clean the wine cooler
- Open the door of wine cooler.
Cleaning Wine Cooler
You should do the following operation:
- Pull out power plug!
- Wipe the door seals only with clean water and dry water off thoroughly.
- Please clean the wine cooler with slightly warm water and a little detergent.
Do not splash water on to the operation control element or the lighting system on the glass door. - Reconnect the wine cooler with power source after it has been cleaned.
Hints
Do not use detergent or solvent containing sands or acid.
Please regularly clean the scupper, so the dew can be discharged. You can use a small stick or similar objects to clean the scupper.
Energy Saving
Please place the wine cooler in dry and ventilated room. The wine cooler should not be placed on the location where can be directly exposed to sunshine or where it is close to heating sources, such as: heating radiator or cooking stove, etc. If necessary, you can use heating insulation board.
- Keep the time the door is open to a minimum
Operation Noise
Normal Noise
Hum – the noise is caused by operation of the refrigeration unit.
Coo, rumbling or gurgle – the noise is caused by the flow of cooling agent in the pipeline.
Noise that can be removed easily
The noise caused by uneven of placement of wine cooler
You can use a level to correct and level the wine cooler. Use the adjustable leg.
The noise generated when the wine cooler leans against other furniture.
Move the wine cooler away from the furniture or equipment.
The noise caused by mutual touch of vessels
Slightly separate the bottles or vessels from each other's
Troubleshooting By Yourself
Before you call the after-sales service phone number, please check if you are able to remove the failures according to the following hints.
| Failures Possible Causes | Remediation Measures | |
| Temperature is quite different from setting value | Sometimes, the problem can be removed if you just turn off power of the wine cooler for 5 minutes and then restart it.If the temperature is too high, you can check it several hours later to see if the temperature is consistent with the setting value.If the temperature is too low, you can check the temperature again thenext day. | |
| The inside of wine cooler is not cold | You open the door of wine cooler very often; You place too many Wine bottles in it Wait for | Reduce the frequency of opening the door of wine cooler.4 – 5 hours. |
| The wine cooler doesn’t cool down | The wine cooler is disconnected from power source power; the power plug is not inserted firmly | Press POWERbutton; Check if power supply is connected. |
| LED lamp is not on | LED lamp is damaged Please contact the local after-sales service personnel for repair | |
| Glass door may have condensation | Indoor temperature and humidity is too high, temperature of wine cooler was set too lower. | Properly turn up the setting temperature of wine cooler, while dry off dew on the glass door |
Reversing the Door Swing
The glass door can be opened from left to right and vice versa. Should you desire to change the opening direction, please follow these instructions.
- Remove top cap. Remove the three screws that hold the upper hinge (right side) to the top of the cabinet. Remove the Criterion logo on the top of glass door. See Fig. 1.
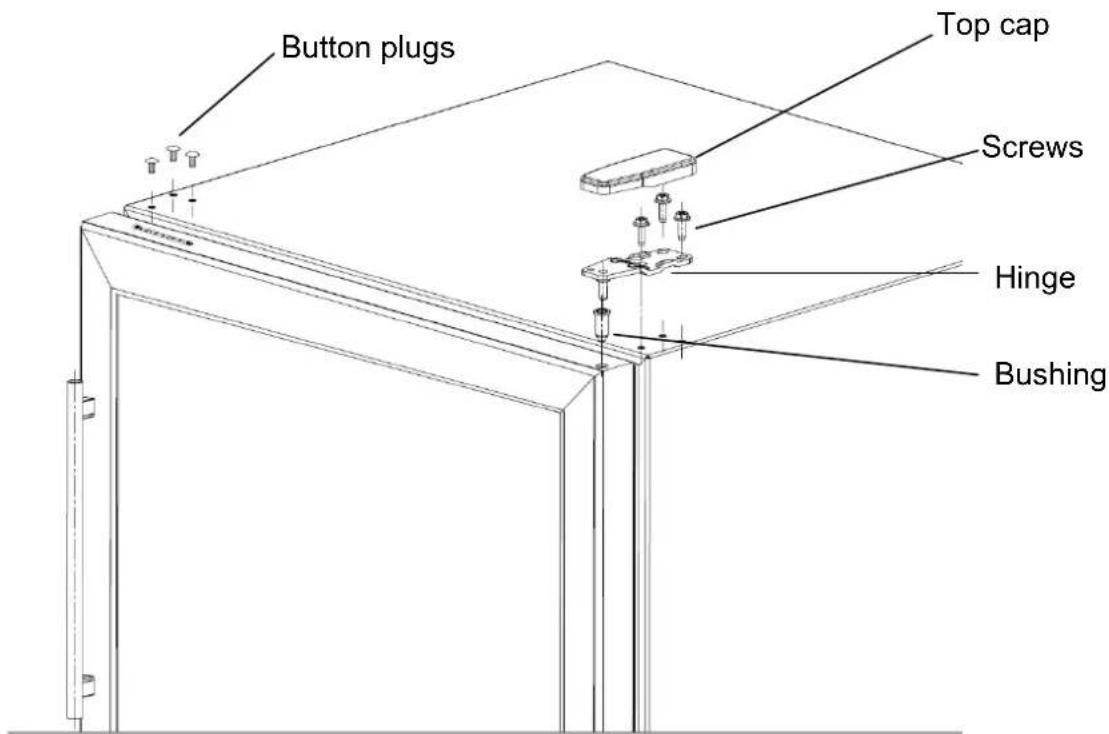
Fig. 1
- Gently open the beverage cooler door, lift the door and then put it on a padded surface to prevent scratching. see Fig 2.
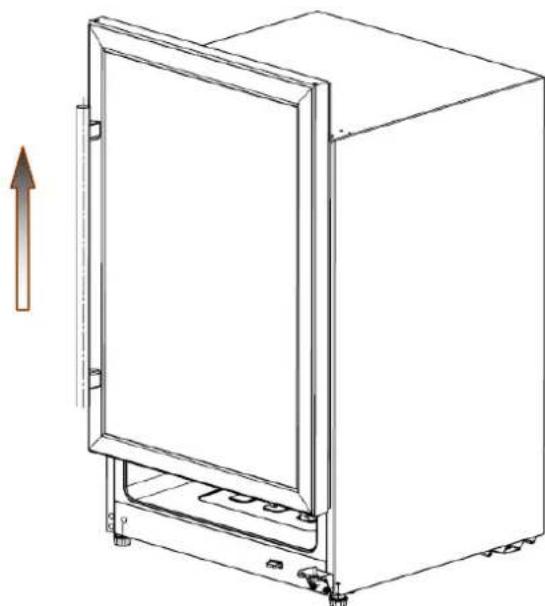
natural_image
Line drawing of a refrigerator with lid and side-mounted base (no text or symbols)Fig. 2
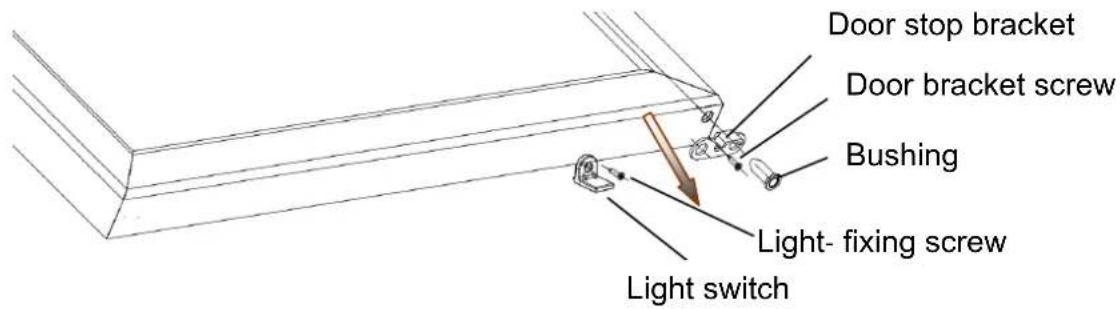
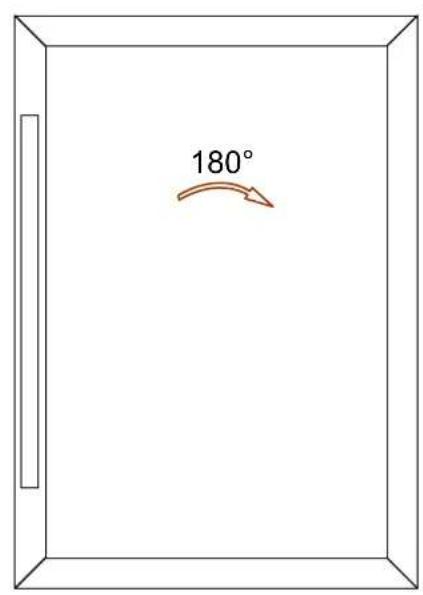
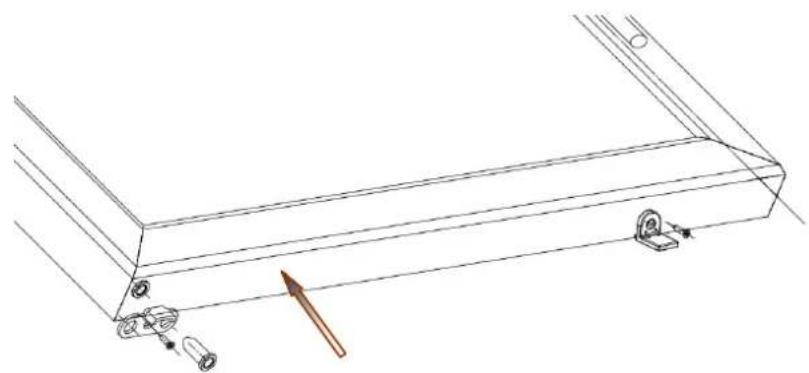
- On bottom edge of door, transfer door stop bracket, screws and bushing etc. to holes on the left hand after 180^ reversing. Then place the door on a padded surface to prevent scratching. See Fig. 3.
natural_image
Technical line drawing of a mechanical assembly with mounting holes and a directional arrow (no text or symbols)Fig. 3
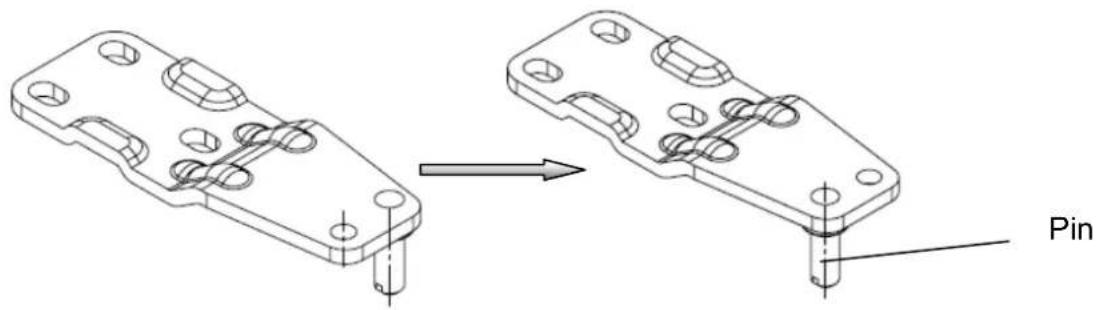
4, Move the pin on the upper hinge to opposite hole, see Fig. 4.
natural_image
Technical illustration of a mechanical component being inserted into a pin (no text or symbols present)Fig. 4
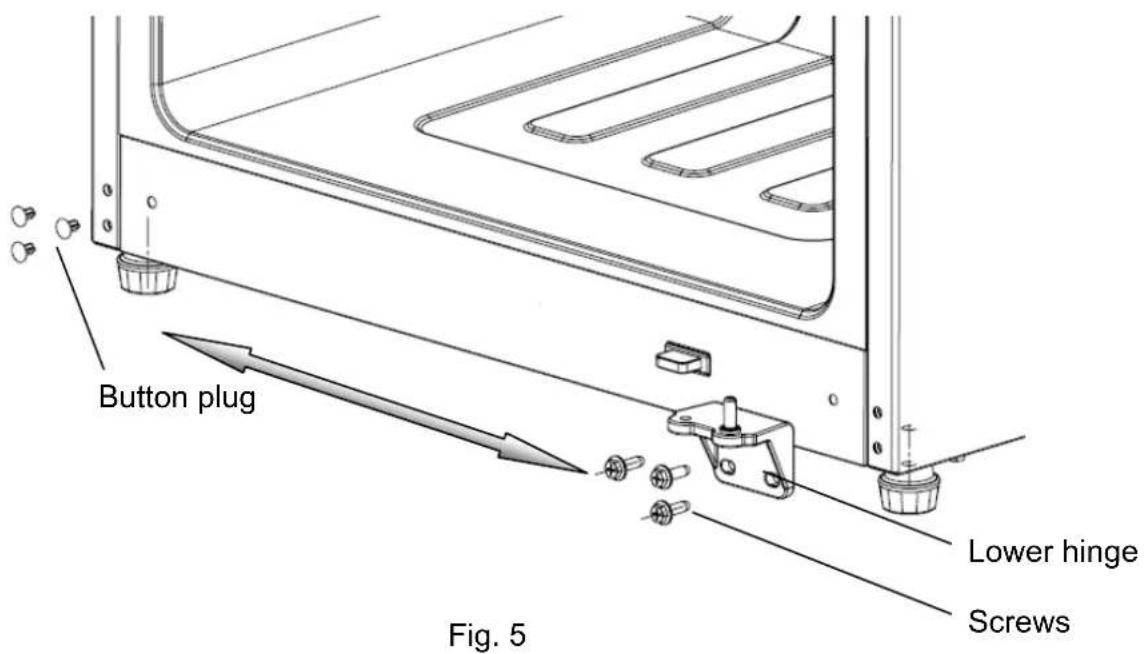
- Remove three screws that hold the bottom hinge to lower end of cabinet. Remove the three button plugs from lower LH corner and transfer to holes where bottom hinge was just removed. See Fig. 5.
6, Move lower hinge pin to opposite hole, see Fig. 6.
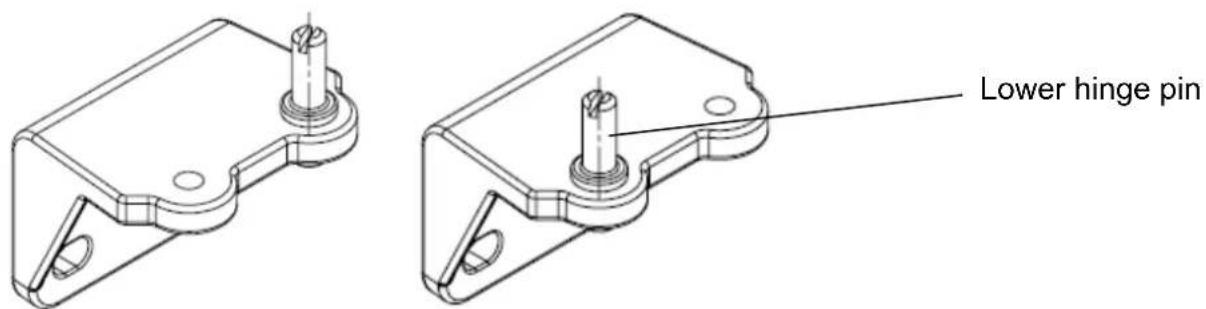
Fig. 6
7, Fix the three button plugs, lower hinge and screws at new positions (switched position with each other). See Fig. 7.
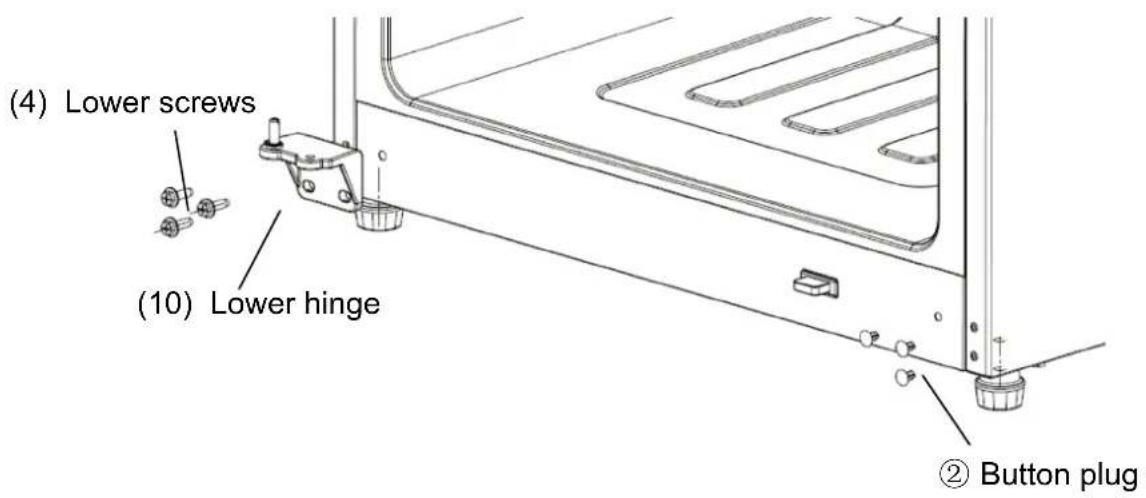
Fig. 7
- Place bottom LH corner of door onto lower hinge, then install bushing and top hinge to cabinet. Make sure door is level and it seals properly against cabinet, then securely fasten three screws. Snap top cap back onto hinge. See Fig. 8.
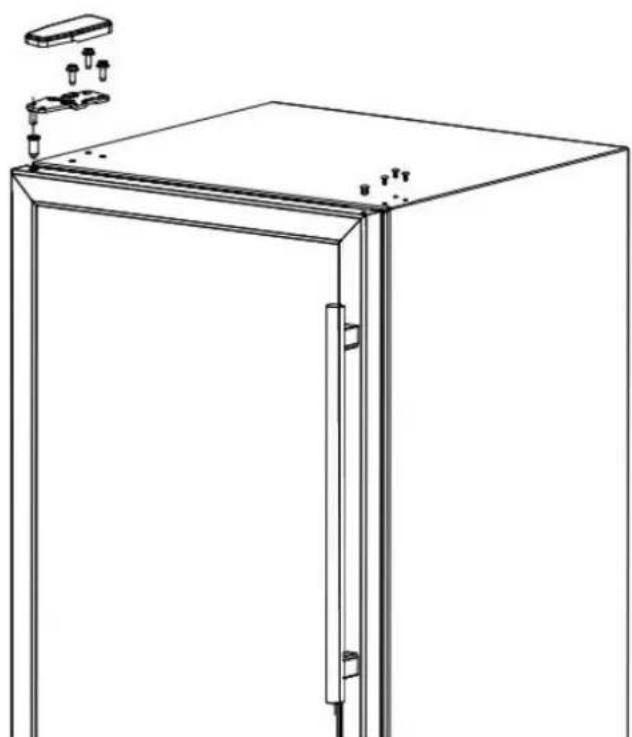
natural_image
Line drawing of a cabinet or enclosure with mounting hardware and a small electronic device attached (no text or symbols)Fig. 8
9, Put the Criterion label over the hole on door-top.
Glen Dimplex Australia Pty Ltd
1340 Ferntree Gully Road
Scoresby Vic 3179
Ph: 1300 556 816
Fax: 1800 058 900
Web: www.glendimplex.com.au
Glen Dimplex New Zealand Ltd
38 Harris Road
East Tamaki
Auckland New Zealand
Ph: 09 274 2865
Fax: 09 274 8472
Web: www.glendimplex.co.nz
- Important Safety Instructions
- Disposal
- Disposal of Waste Package
- Warning
- DANGER or WARNING: Risk of child entrapment.
- Safety & Warning Before
- In case of refrigerant leak
- During Use
- Danger of Electric Shock!
- Danger of Explosion!
- Children
- Before Using Your Wine Cooler
- Shelves
- Installation of Your Wine Cooler
- Notice
- Connect Wine Cooler with Power Source
- Warning!
- Know About Wine Cooler
- Installation of Handle
- Level the Wine Cooler
- Turn on the wine cooler and set up temperature
- Notice!
- Hints for Operation
- Placement of Wine Bottle
- Effective Cubage
- Temperature Area in Chilling Cabinet
- Placement of Wine cooler
- Practical Skills for Storage of Wine
- - Drinking Temperature
- Power-off & Stop Using of Wine Cooler
- Turn off Wine Cooler
- Stop Using Wine Cooler
- Cleaning Wine Cooler
- Hints
- Energy Saving
- Operation Noise
- Normal Noise
- Noise that can be removed easily
- Troubleshooting By Yourself
- Reversing the Door Swing
Brand : DIMPLEX
Model : DWF45DZ
Category : Fridge