GGSCG6004 - Cooker Sôlt - Free user manual and instructions
Find the device manual for free GGSCG6004 Sôlt in PDF.


| Product Type | Freestanding Electric Cooker |
| Brand | Sôlt |
| Model | GGSCG6004 |
| Width (cm) | 60 |
| Height (cm) | 85 |
| Depth (cm) | 60 |
| Net Weight (kg) | 50 |
| Power Supply | 230 V / 50 Hz |
| Oven Type | Electric Fan Oven |
| Hob Type | 4-Zone Electric Ceramic Hob |
| Grill Function | Yes |
| Oven Capacity (L) | 65 |
| Energy Efficiency Class | A |
| Child Lock | Yes |
| Automatic Shut-Off | Yes |
| Cleaning Method | Wipe with damp cloth; avoid abrasive cleaners |
| Spare Parts Availability | Contact manufacturer or authorized dealers |
| Control Type | Knobs and digital display |
| Timer | Yes |
| Warranty | 2 years (subject to terms) |
Frequently Asked Questions - GGSCG6004 Sôlt
User questions about GGSCG6004 Sôlt
0 question about this device. Answer the ones you know or ask your own.
Ask a new question about this device
Download the instructions for your Cooker in PDF format for free! Find your manual GGSCG6004 - Sôlt and take your electronic device back in hand. On this page are published all the documents necessary for the use of your device. GGSCG6004 by Sôlt.
USER MANUAL GGSCG6004 Sôlt
Congratulations on purchasing your new 60cm Gas Cooktop.
Sôlt is proudly distributed within Australia by Residentia Group Pty Ltd.
Please refer to the warranty card at the rear of this manual for information regarding your product's parts and labour warranty, or visit us online at:
→ www.residentiagroup.com.au
At Residentia Group, we are customer obsessed and our Support Team are there to ensure you get the most out of your appliance. Should you want to learn more about your unit or how to take care of it, our Support Team are here to help.
You can use our online Support Centre at any time by visiting:
→ http://support.residentiagroup.com.au
Or you can contact us via phone by dialling: 1300 11 HELP (4357).
It is important that you read through the following use and care manual thoroughly to familiarise yourself with the installation and operation requirements of your appliance to ensure optimum performance.
Again, thank you for choosing an Sôlt appliance and we look forward to being of service to you.
Kind Regards,
The Residentia Team
Contents
Safety Information 04
Installation Instructions 06
Your Cooktop 14
Operating Instructions 15
Cleaning & Maintenance 16
Troubleshooting 17
Technical Specifications 18
Purchase Details 19
Warranty Information 20
Customer Care
Sôlt recommends the use of original spare parts.
When contacting our customer service team by calling 1300 11 4357, or by e-mailing support@residentiagroup.com.au, please ensure that you have the following information at hand, which can be found on your appliances' rating plate:
- Model Number
- Serial Number
Safety Information
Conditions of Use
This appliance is intended to be used in household and similar applications such as farm houses or by customers in serviced apartments, holiday apartments and other residential type of environments.
Installation
- Disconnect the appliance from the electricity supply before carrying out any work or maintenance on it.
- Connection to a good earth wiring system is essential and mandatory.
- Means for disconnection must be incorporated in the fixed wiring in accordance with the wiring rules.
• Alterations to the domestic wiring system must only be made by a qualified electrician.
- Failure to follow this advice may result in electrical shock or death.
•Take care—panel edges are sharp.
- Failure to use caution could result in injury or cuts.
- Read these instructions carefully before installing or using this appliance.
- No combustible material or products should be placed on this appliance at any time.
- Please make this information available to the person responsible for installing the appliance as it could reduce your installation costs.
- In order to avoid a hazard, this appliance must be installed according to these instructions for installation.
- This appliance is to be properly installed and earthed only by a suitably qualified person.
- This appliance should be connected to a circuit which incorporates an isolating switch providing full disconnection from the power supply.
- Only use hob guards designed or recommended by the manufacturer. The use of inappropriate guards may result in an accident or cause damage to the appliance.
- Failure to install the appliance correctly could invalidate any warranty or liability claims.
- For further information regarding installation including a step-by-step guide, please refer to pages 06-13. For more information regarding operating instructions, please refer to page 15.
Operation & Maintenance
•The use of a gas cooking appliance results in the production of heat and moisture in the room in which it is installed. Ensure that the kitchen is well ventilated and that the cooktop is installed beneath a rangehood.
- Prolonged intensive use of the appliance may call for additional ventilation. For example opening a window, or additionally increasing the extraction level of your rangehood if possible.
• In the event of burner flames being accidentally extinguished, turn off the burner control and do not attempt to re-ignite the burner for at least one minute.
- During use, accessible parts of this appliance will become hot enough to cause burns.
- Do not let your body, clothing or any item other than suitable cookware contact the cooktop's surface until it has cooled down.
- Avoid using or storing large cloths, tea towels or similar textile items, as loose ends could touch the flames and create a fire.
- Do not use or store flammable materials in the storage drawer near this appliance.
- Do not spray aerosols in the vicinity of this appliance while it is in operation.
- Perishable food, plastic items and aerosols may be affected by heat and should not stored above or below the appliance.
•Metallic objects such as knives, forks, spoons and lids should not be placed on the hob surface since they can get hot, and may become a safety hazard.
- Handles of saucepans may be hot to touch. Check the saucepan handles do not overhang other cooking zones that are on. Keep handles out of reach of children.
- Failure to follow advice could result in burns and scalds.
- Failure to use caution could result in injury or cuts.
• Under no circumstances should you leave the appliance unattended when in use. Boilover causes smoking and greasy spillovers that may ignite.
- Never use your appliance as a work or storage surface.
- Never leave any objects or utensils on the appliance.
- Never use your appliance for heating up the home.
- Do not modify this appliance.
- Do not use this appliance as a space heater.
•After use, always turn off the cooking zones as described in this manual (i.e. by using the knob controls). - Do not allow children to play with the appliance, sit, stand, or climb on it.
- WARNING: The appliance and its accessible parts become hot during use.
•Take care to avoid touching heating elements.
•Children less than 8 years of age shall be kept away unless continuously supervised.
- Children shall not play with the appliance. Cleaning and user maintenance should never be undertaken by children without supervision.
- Do not store items of interest to children in cabinets above the appliance. Children climbing on the cooktop could be seriously injured.
- Do not leave children alone or unattended in the area where the appliance is in use.
•This appliance is not intended for use by children or other persons whose physical, sensory or mental capabilities or lack of experience and knowledge prevents them from using the appliance safety without supervision or instruction by a responsible person to ensure that they can use the appliance safety.
- Do not repair or replace any part of the appliance unless specifically recommended in the manual. All other servicing should be done by a qualified technician.
- Do not place or drop heavy objects on your cooktop.
- Do not stand on your cooktop.
- Do not use pans with jagged edges or drag pans across the glass surface as this can scratch the surface, or present a spilling or tipping hazard.
- Before attempting to clean the appliance, it should be disconnected from the mains and cooled.
- Do not use scourers or any other harsh abrasive cleaning agents to clean your cooktop, as these can scratch the surface material.
- If the supply cord is damaged, it must be replaced by the manufacturer, its service agent or similarly qualified person in order to avoid a hazard.
- This appliance is intended to be used in a domestic household environment only. Commercial use of any kind is not covered under the manufacturer's warranty.
-
Do not use a steam cleaner to clean the cooktop.
-
WARNING: Unattended cooking on a hob with fat or oil can be dangerous and may result in fire. NEVER try to extinguish a fire with water, but switch off the appliance and then cover flame e.g. with a lid or a fire blanket.
- WARNING: Danger of fire—do not store items on the cooking surfaces.
- CAUTION: The cooking process has to be supervised. Regardless of whether cooking for long or short periods, the cooking process must be supervised continuously.
- Never try to move a pan of hot fat, especially a deep fat fryer. Wait until the fat is completely cool.
- To minimise the possibility of burns, ignition of flammable materials and spillage, turn cookware handles toward the side or center of the top plate without extending over adjacent burners.
•The appliance is not intended to be operated by means of an external timer or separate remote-control system. - The bottom surface and the power cord of the hob should not accessible after installation is complete.
Disposal
- This appliance is labeled in compliance with European directive 2012/19/EC for Waste Electrical and Electronic Equipment (WEEE). By ensuring that this appliance is disposed of correctly, you will help prevent any possible damage to the environment and to human health, which might otherwise be caused if it were disposed of in the wrong way.
•The symbol on the product indicates that it may not be treated as normal household waste. It should be taken to a collection point for the recycling of electrical and electronic goods. - This appliance requires specialist waste disposal. For further information regarding the treatment, recover and recycling of this product please contact your local council, your household waste disposal service, or the shop where you purchased it.
- For more detailed information about treatment, recovery and recycling of this product, please contact your local city office, your household waste disposal service or the shop where you purchased the product.

Installation Instructions
Positioning the Cooktop
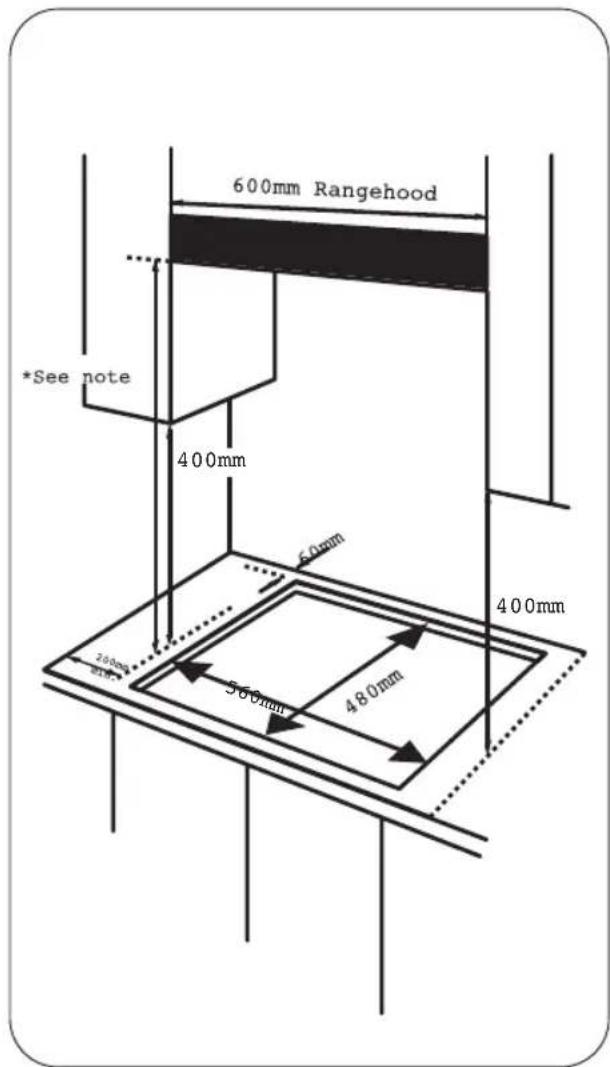
- This appliance is to be built into a kitchen unit or 600mm worktop, providing the following minimum distances are allowed;
•The edges of the hob must be a minimum distance of 60mm from a side or rear wall. - 400mm between the hob surfaces, providing that the underside of the horizontal surface is in line with the outer edge of the hob. If the underside of the horizontal surface is lower than 400mm, then it must be at least 50mm away from the outer edges of the hob.
Preparing the Cut-Out
- Cut out the work surface according to the sizes shown in the diagram to the right.
- For the purpose of installation and use, ensure you leave a minimum of 5cm space around the cut out.
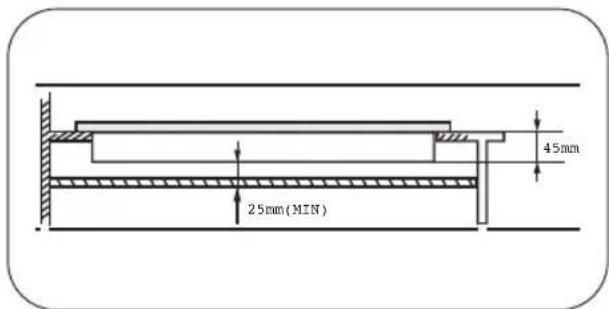
- Be sure the thickness of the work surface is at least 30mm. Please select heat-resistant and insulated work surface material (Wood and similar fibrous or hygroscopic material shall not be used as work surface material unless impregnated) to avoid the risk of electrical shock and larger deformation caused by the heat radiation from the hotplate. As shown below:
NOTE: Regarding adjacent walls, cupboards and protection against combustible materials: Ensure that the appliance is installed in accordance with AS/NZS 5601.1, or AS/NZS 5601.2 with regard to clearances to combustible surfaces and materials, and clearances to rangehoods and exhaust fans.
- Please refer to your rangehood's user manual for exact minimum clearances from the top of the cooktop surface to your rangehood.
- 50mm clearance around the appliance and between the hob surface and any combustible materials.
- You must have a gap of at least 25mm and at most 74mm between the underneath of the appliance and any surface that is below it.
- Your oven must have forced ventilation in order to install your Sôlt cooktop above it.
- Sôlt recommends the wearing of protective gloves when carrying out installation.
Installing the Cooktop
- Remove the pan supports, the burner lid and flame spreader and carefully turn the appliance upside down and place it on a cushioned mat.
•Take care that the Ignition devices and flame supervision devices are not damaged in this operation. - Carefully apply the sponge provided around the edge of the appliance.
-
Ensure you do not leave a gap in the sealing agent or overlap the thickness.
-
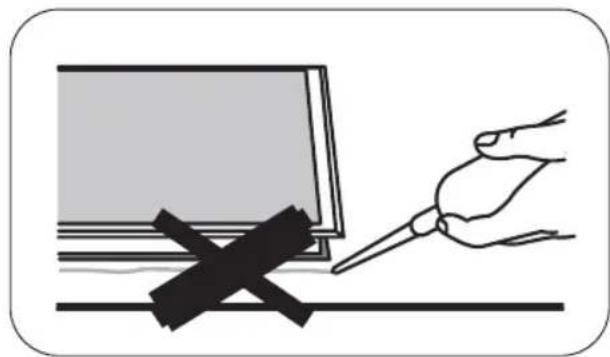
CAUTION: Do not use a silicon sealant to seal the appliance against the aperture. This will make it difficult to remove the appliance from the aperture in future, particularly if it needs to be serviced.
- Place the bracket (B) over the holes that match the size of the screws. There are one set of screw holes in each corner of the hob (H). Slightly tighten a screw (C) through the bracket (B) so that the bracket is attached to the hob, but so that you can still adjust the position.
- Carefully turn the hob back over and then gently lower it into the aperture hole that you have cut out.
- On the underneath of the hob, adjust the brackets into a position that is suitable for your worktop.
• Afterwards, fully tighten the screws (C) to secure the hob into position.
natural_image
Illustration of a hand using a screwdriver to mark a black cross on a flat surface (no text or symbols)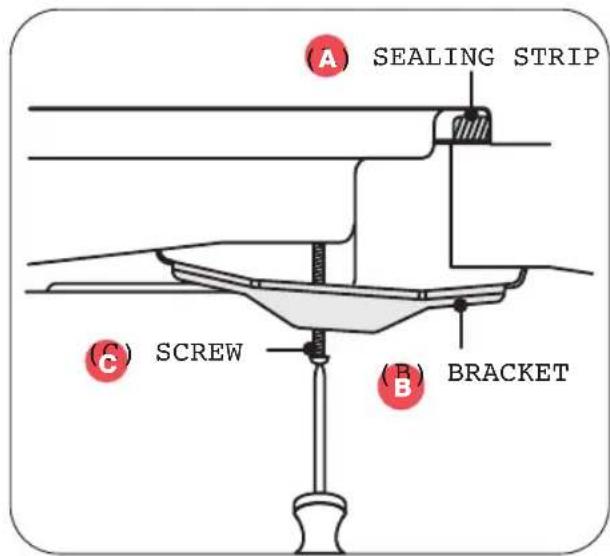
Suggested Tools for Installation
| Item Purpose Diagram | ||
| Screw Driver Used for the assembly and disassembly of all screws. |  | |
| Tubing Wrench For the assembly and disassembly of tubing to the burner cap. |  | |
| 7mm Vox Driver Used for the assembly and disassembly of the injector nozzle. |  | |
| Torque Wrench For elbow installation and removal. |  | |
Installation Instructions (continued)
Gas Connection
- This appliance must be installed and connected in accordance with installation regulations in force in the country in which the appliance is to be used.
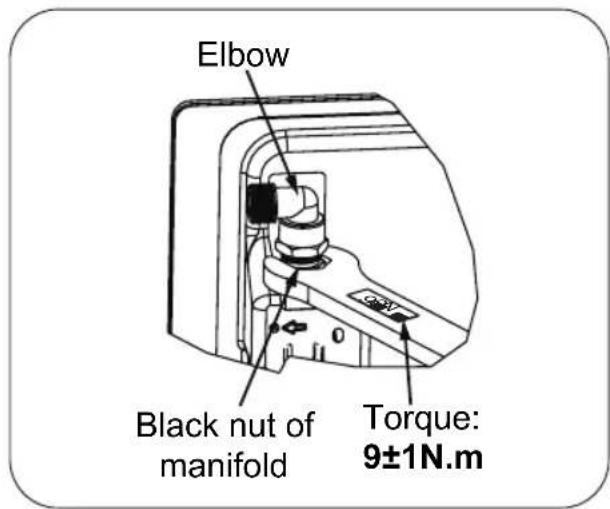
•This appliance is supplied to run on LPG and natural gas. Conversion for use on LPG and natural gases must only be undertaken by a qualified service technician. - During installation, if it is deemed necessary to adjust or install the elbow, it is possible only with a torque wrench with 9 ± 1 N.m, and to be applied via the black nut of the manifold instead of on the elbow.
- Sõlt recommends the wearing of protective gloves when carrying out installation.
Adjusting the Direction of Elbow
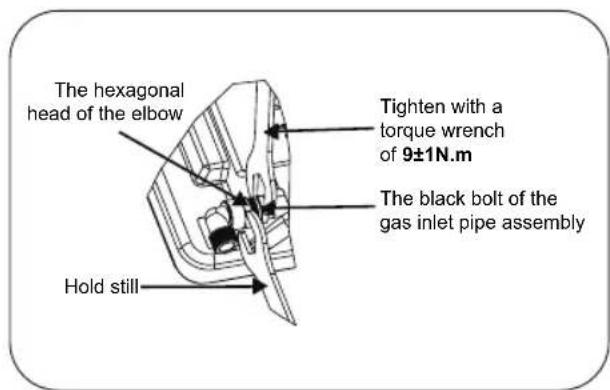
•After loosening the elbow, adjust the elbow interface to the required direction as required, and keep the hexagonal head of the elbow motionless with a wrench. Use a 9±1N.m torque wrench to tighten the black bolt of the gas inlet pipe assembly. Ensure that the torque of the wrench is within the required range to prevent elbow breakage or damage caused by excessive force.
• After the installation is tightened, check whether the parts are in good condition and test the air tightness to ensure the tightness of the installation. The installer is responsible for the results of the process.
Installation Safety Warnings
- Beware of leaks. If any connection is handled throughout installation, you must check each seal is properly connected. The manufacturer is not liable for any connection leaking after being handled.
- For your personal safety and that of the appliance, ensure that you turn off the power and close the middle valve to prevent gas leakage during installation.
- Ensure that you keep flammable materials far away from the appliance during and after the installation process. Before commencing installation, always wear gloves and proper protection for your own safety.
• CAUTION: Cool off the appliance for a while after using the appliance for your safety
•After each use of the appliance, ensure that you allow the surface to cool off before cleaning, as the burner emit high temperatures during cooking that are capable of causing burns even after the appliance is turned off.
- Please note that the use of a gas cooking appliance results in the production of heat and moisture in the room in which it is installed. Before installation, ensure that the kitchen is well ventilated and that the cooktop is installed beneath a rangehood.
Replacement of Gas-Type Fitting
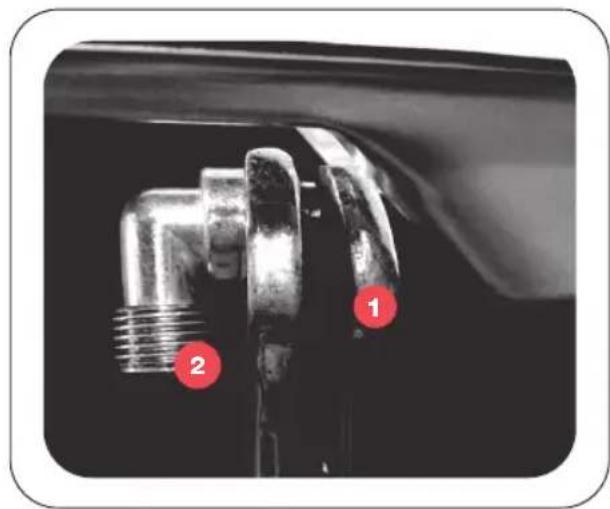
- Using a wrench, carefully disassemble the gas-type fittings from the main gas tube. When you disassemble or assemble a gas connection, it is best to use two spanners. One spanner is for fixing the gas connection elbow, the other for tightening the gas hose.
-
Tightly secure a replaceable gas-type fitting onto the main gas tube.
-
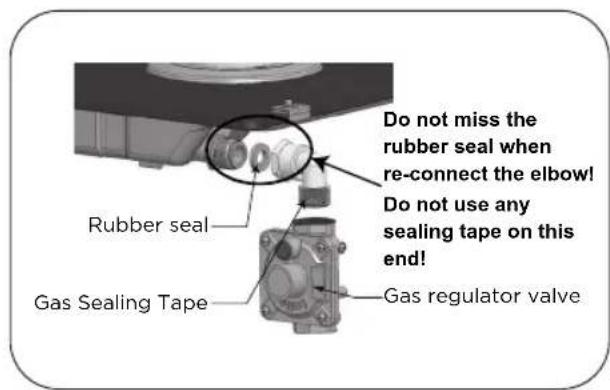
WARNING: Only use the elbow provided. Do not use another elbow as it may lead to gas leakage.
- WARNING: Never under any circumstances should you use seal tape that is NOT intended for gas use. Sôlt recommends AS4623 certified Teflon tape.
Statutory Requirements
•Manufacturer's installation instructions
- Local gas fitting regulations
•Municipal building codes
•AS/NZS 5601.1 Gas Installation
•S.A.A. wiring code
- Local electrician regulations
• Any other statutory regulations
Preparing to Install
- Refer to AS/NZS 5601.1 for piping size details. This built-in cooktop is intended to be inserted in a benchtop cutout. Only an authorised technician should connect the appliance. Before beginning, turn off the gas and electricity supply.
Installation Instructions (continued)
Gas Connection Safety
• A full operational test and a test for possible leakages must be carried out by the fitter after installation.
- Access to the whole length of the connection hose must be possible. The gas hose must be replaced before its use before the end of service life (indicated on the hose.)
•Before finishing, ensure that you check all connections for gas leaks with soap and water.
- DO NOT: Do not use a naked flame for detecting leaks. Ignite all burners both individually and concurrently to ensure correct operation of gas valves, burners and ignition. Turn gas taps to low flame position and observe stability of the flame for each burner individually and all together. Adhere the duplicate data plate to an accessible location near the hotplate. When satisfied with the hotplate, please instruct the user on the correct method of operation. In case the appliance fails to operate correctly after all checks have been carried out, refer to the authorised service provider in your area.
- FLEXIBLE HOSE: If installing with a hose assembly, it must comply with AS/NZS 1869, 10mm ID, class B or D, no more than 1.2m long and installed in accordance with AS/NZS 5601.1.
- Ensure that the hose does not contact the hot surfaces of the hotplate, oven, dishwasher or any other appliance that may be installed underneath or next to the hotplate. The hose should not be subjected to abrasion, kinking or permanent deformation and should be able to be inspected along its entire length with the cooktop in the installed position. Unions compatible with the hose fittings must be used and all connections tested for gas leaks. The supply connection point shall be accessible with the appliance installed.
- WARNING: Ensure that the hose assembly is restrained from accidental contact with the flue outlet of an underbench oven.
Gas Connection
Ensure installation is in accordance with relevant gas standards and/or codes of practice applicable.
Connect the elbow fitting to the appliance gas manifold connection, and check that seals between the elbow and manifold connection are in place and in good condition.
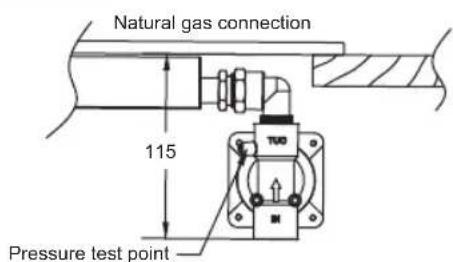
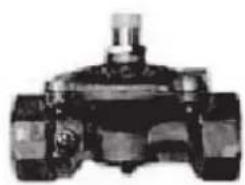
- FOR NATURAL GAS: Connect the natural gas appliance regulator (pictured opposite) with integral test point using approved gas thread tape or compound to the elbow fitting.
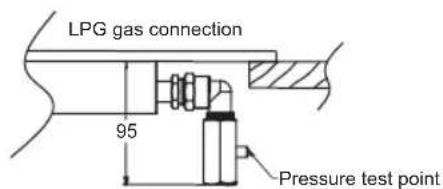
FOR UNIVERSAL LPG: connect the brass test point adapter (pictured opposite) using approved gas thread tape or compound to the elbow fitting.
Ensure the supply connection point, test point and natural gas regulator adjustment screw (for Natural gas installation) are accessible for testing and/or adjustment with the hotplate in the installed position.
natural_image
Mechanical valve component (no visible text or symbols)Natural Gas Ragulator
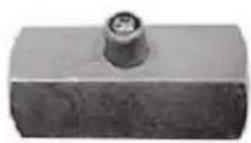
Brass test point adaptor
Gas Specification
| Gas Type & Pressure | Heat Input & Orifice Size (mm) | ||
| Rapid Burner Semi-Rapid Burner Auxiliary Burner | |||
| 10.8 MJ/h 6.3 MJ/h 4.3 MJ/h | |||
| Universal LP Gas 2.75 kPa | 0.90 0.68 0.58 | ||
| Natural Gas 1.0 kPa | 1.50 1.15 0.93 | ||
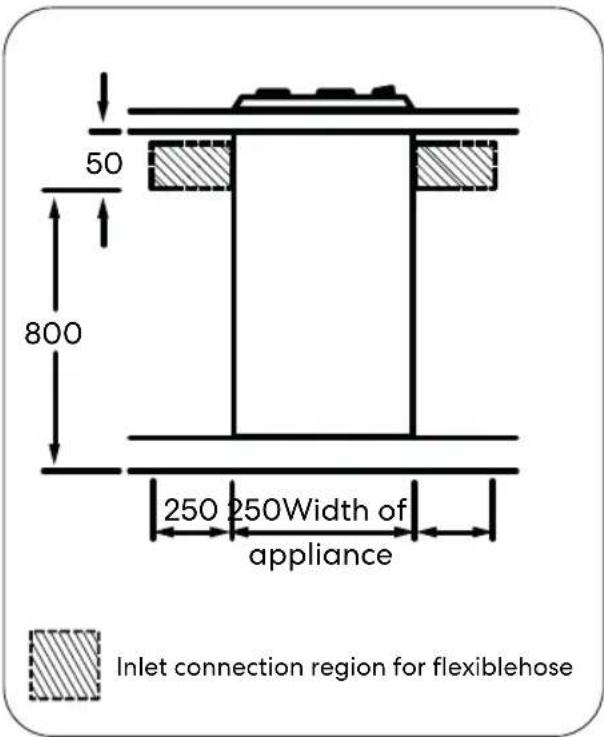
Flexible Hose Assembly
Where a flexible hose assembly is used, ensure it is approved to AS/NZS 1869, Class B. Any hose assembly used must be restrained from accidental contact with the flue outlet of an under bench oven.
This hose assembly shall be suitable for connection to a fixed consumer piping outlet located as follows:
Hotplates at a point 800mm to 850mm above the floor and in the region outside the width of the appliance to a distance of 250mm.
A full operational test and a test for possible leakages must be carried out by the technician after installation.
WARNING: After connecting to gas, check for leaks using a soapy water solution, never a naked flame.
Installation Instructions (continued)
Electrical Connection
•This appliance must be earthed correctly.
- This appliance is designed to be connection to a 220–240V, 50–60Hz AC electricity supply.
•The wires in the mains lead are coloured in accordance with the following code:
Green/Yellow = Earth | Blue = Neutral | Brown = Live
- WARNING: The wire which is coloured green and yellow must always be connected to the terminal which is marked with the letter E or by the earth symbol.
NOTE: In the event that the power cord is damaged, it must always be replaced by the manufacturer, an authorised service agent or a similarly qualified person.
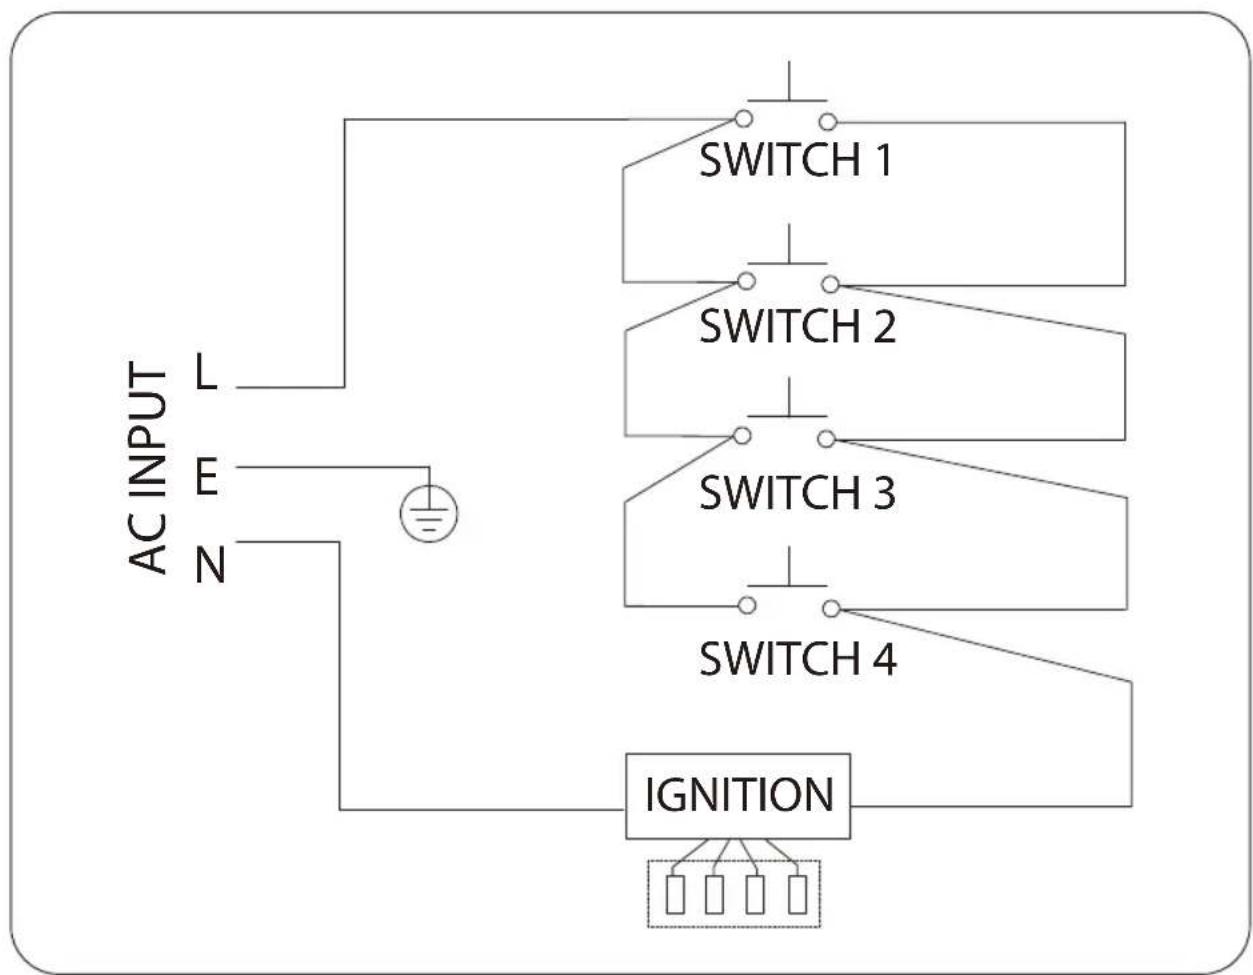
Wiring Diagram
flowchart
graph TD
    A["AC INPUT"] --> B["L"]
    A --> C["E"]
    A --> D["N"]
    B --> E["Switch 1"]
    C --> F["Switch 2"]
    D --> G["Switch 3"]
    E --> H["Switch 4"]
    F --> I["Switch 4"]
    G --> J["Switch 4"]
    H --> K["IGNITION"]
    I --> K
    J --> K
    K --> L["Ground"]
Gas Adjustment
•Take precautions on the operations and adjustments to be carried out when converting from one gas to another.
- All work must be carried out by a qualified technician.
•Before you begin, ensure that you have turned off the gas and electricity supply to the appliance.
•Always wear proper protection during maintenance.
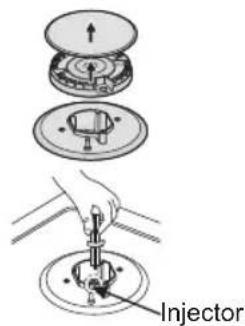
Changing the Injector of the Burners
- Remove the pan support, burner lid and flame spreader
- Unscrew the injector using a 7mm box spanner and replace it with the stipulated injector for new gas supply.
- Carefully reassemble all of the components.
- After injectors are replaced, it is advisable to strongly tighten the injector in place.
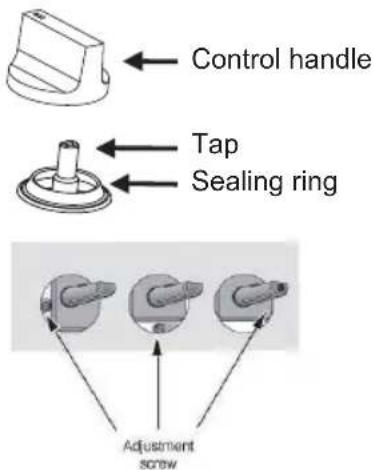
Adjustment of Minimum Level of the Flame
- Turn the taps down to minimum.
- Remove the knob from the tap and place a small bladed screwdriver in the center of the adjustment screw.
- The correct adjustment is obtained when the flame has a length of about 3-4mm.
For butane/propane gas, the adjusting screw must be tightly screwed in.
Refit the control knob. Make sure that the flame does not go out by quickly turning from maximum flow to minimum flow. If it does, then remove the control knob and make further adjustments to the gas flow, testing it again once the adjustment has been made.
- Repeat this process for each one of the gas taps.
- A full operational test, and a test for leakages must be carried out after gas conversion. A suitable test may include using a soapy water solution, or alternatively a gas detector. NEVER test with a naked flame.
- Do not dismantle the tap in the event of a malfunction, instead change the whole tap.
- A full operational test, and a test for leakages must be carried out after gas conversion. A suitable test may include using a soapy water solution, or alternatively a gas detector. NEVER test with a naked flame. - Do not dismantle the tap in the event of a malfunction, instead change the whole tap.
- Before placing the burners back on the top place, make sure that the injector is not blocked.
- After completing the conversion, the qualified technician or installer must mark V on the right gas category to match with the setting stated in the rating plate. Remove the previous setting's V mark.
- Before placing the burners back on the top place, make sure that the injector is not blocked. - After completing the conversion, the qualified technician or installer must mark V on the right gas category to match with the setting stated in the rating plate. Remove the previous setting's V mark.
Your Cooktop
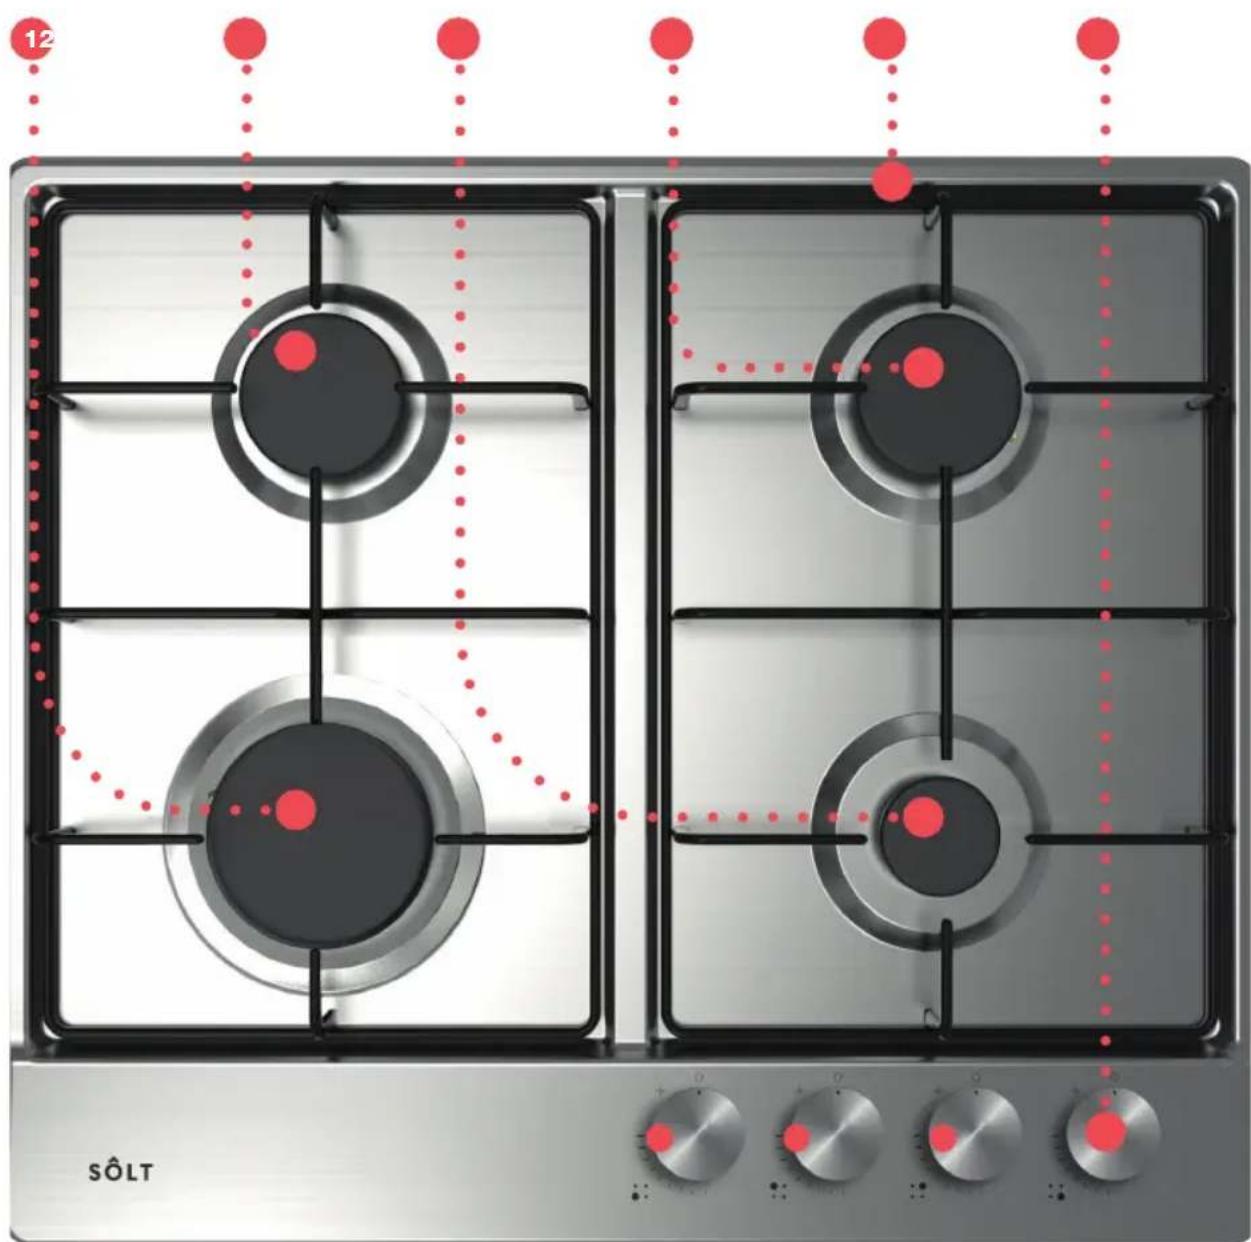
Cooktop Key
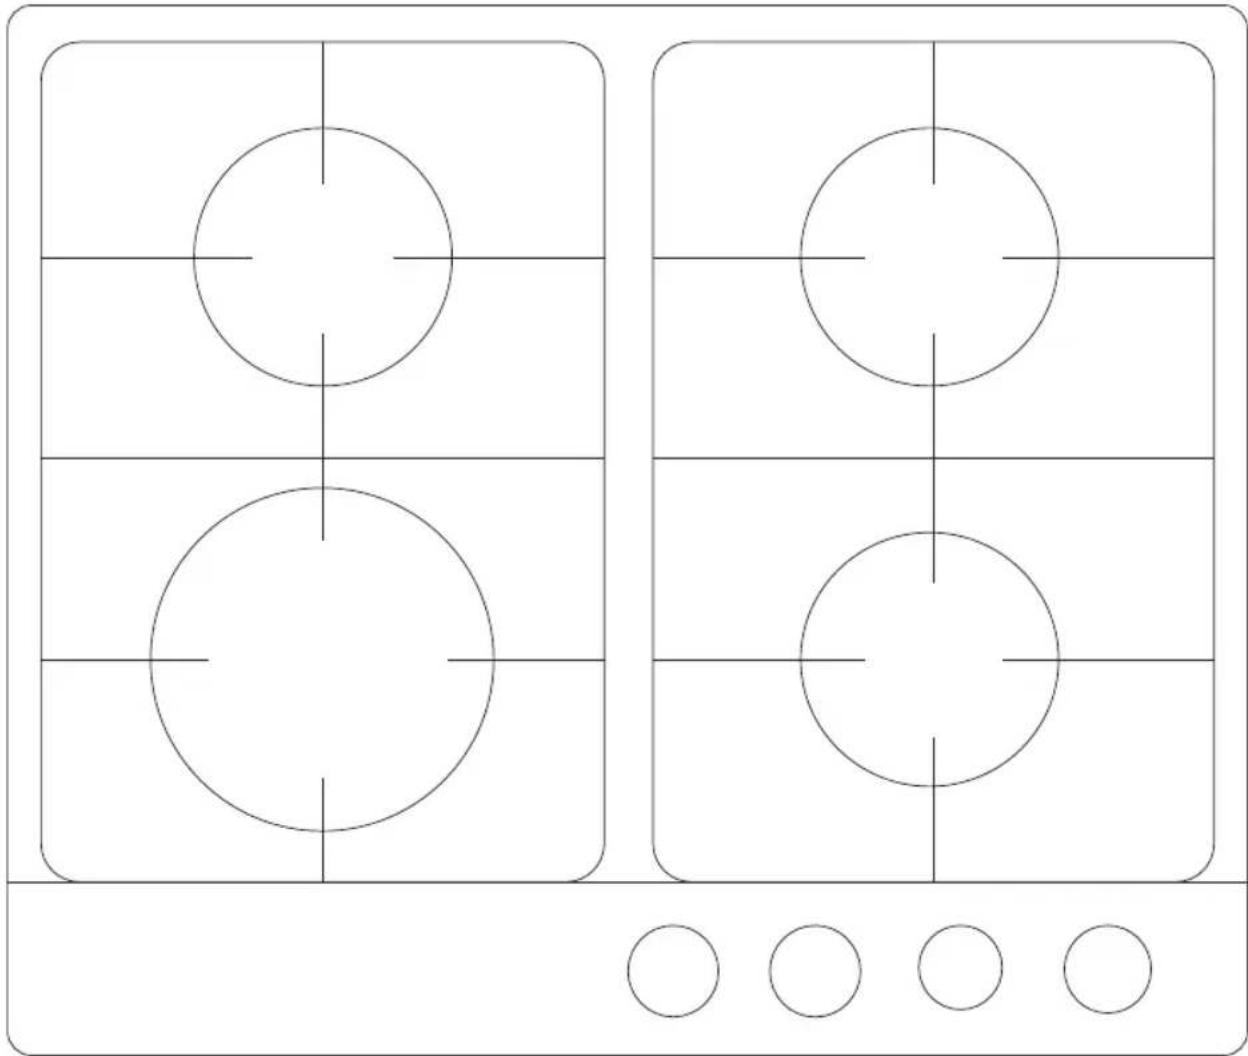
- 10.80 MJ/h Rapid Burner
- 6.30 MJ/h Semi-Rapid Burner
- 4.30 MJ/h Auxiliary Burner
-
6.30 MJ/h Semi-Rapid Burner
-
Cast Iron Trivet (s)
- Control Knobs
Incl. Accessories
- 4 × Bracket
- 4 × Sponge
- 4 × Screw
-
4 × Injector
-
1 × Pressure Joint
- 1 × Gas Regulator Valve
-1 × Elbow
natural_image
Modern SOLT gas stove with four burners and red indicator lights, no visible text or symbols on the main components.Operating Instructions
Understanding the Control Knobs To Ignite a Burner
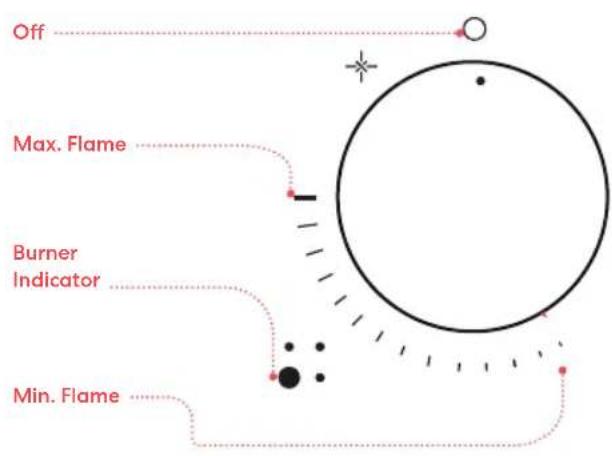
•The minimum setting is at the end of the anti-clockwise rotation of the control knob.
- All operation positions must be selected between the maximum and minimum position.
•The group of 4 circles next to the control knob will indicate which burner it operates.
- Press in the control knob of the burner that you wish to light and turn it anti-clockwise to the maximum position.
- If you keep the control knob depressed, the automatic ignition for the burner will operate.
- You should hold down the control knob for 15 seconds after the flame on the burner has lit. If after 15 seconds the burner has not lit, stop operating the device and open the compartment door and/or wait at least 1 min before attempting a further ignition of the burner.
•After this 15-second interval, to regulate the flame you should continue turning the control knob anti-clockwise until the flame is at a suitable level. The operating position MUST be at a position between the maximum and minimum position.
• To switch the burner off, turn the control knob fully clockwise to the gas off position.
• In case of power failure, the burners can be lit by carefully using a match.
•The appliance is fitted with a flame failure safety device on each burner, which is designed to stop the flow of gas to the burner head in the event of the flame going out.
Choosing the Right Cookware
- Do not use cookware with jagged edges, coarse surfaces or a curved base.
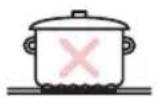
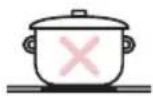
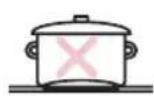
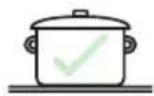
• Make sure that the base of your pan is smooth, sits flat against the trivets, and is the same size as the cooking zone. Always center your pan on the cooking zone.
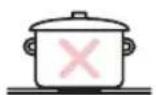
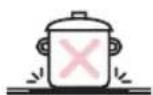
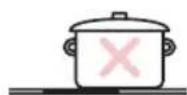
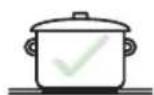
• Always lift pans off the hob—do not slide them, as over time this will scratch the trivets.
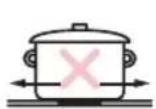
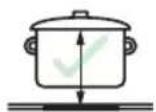
CAUTION: Always handle cookware carefully when they are on a burner.
Cleaning & Maintenance
Hints & Tips
- Cleaning operations must only be carried out when the appliance is completely cool.
- Avoid using excessive amounts of water during cleaning.
•The appliance should be disconnected from your mains supply before commencing any cleaning process. - It is highly recommended the cooktop be cleaned each time after use to avoid build-up of mess.
- Abrasive cleaners or sharp objects will damage the cooktop's surface; ensure that your cleaner is compatible and that you are using a soft cloth.
•Examples of incompatible cleaning items include: metal and nylon brushes, steel wool, edible oil, overly acid or alkaline detergent, spirits, thinners or benzenes.
Cleaning the Trivets and Control Knobs
- Carefully lift off each trivet, one at a time. In the interim, place the trivet onto some paper towel to avoid cooking residue on your counter-top.
• To clean the trivets, simply wash with a soft cloth or sponge and some liquid detergent, ensuring all soap has been rinsed before drying with a clean soft cloth. - For stubborn soiling, soak beforehand for 5–10 minutes.
•Always dry trivets with a towel or soft cloth after cleaning; drip-drying is not recommended.
•To clean the control knobs, carefully wipe the knobs with a soft cloth and compatible cleaning solution until clean.
Cleaning the Cooktop Surface
- Remove the trivets and place them on some paper towel for the interim. Wipe the cooktop surface using a soft cloth alongside a compatible cleaning solution.
•Dry the top plate thoroughly after cleaning.
•Thoroughly remove salty foods or liquids from the hob as soon as possible to avoid the risk of corrosion or food burning onto the cooktop and setting in place. - It is normal for stainless steel to become discoloured over time. This is due to high temperatures from cooking.
Cleaning the Cooktop Burners
- Remove the burner lids and flame spreaders by pulling them upwards and away from the cooktop. Then soak in hot water, wash with detergent, a soft cloth or sponge.
•After cleaning and washing them, wipe and dry them carefully. Make sure that the flame holes are clean and completely dry. Wipe the fixed parts of the burner cup with a damp cloth and dry afterwards.
•Gently wipe the ignition device and flame supervision device with a well wrung-out cloth and wipe dry with a clean cloth. - Before placing the burners back on the top plate, make sure that the injector is not blocked, and that all the components are completely dry.
NOTE: Replace the burner components in the correct order after cleaning. Do not mix up the placement order. The locating pins must fit exactly into the notches.
Reassembling the Cooktop Burners
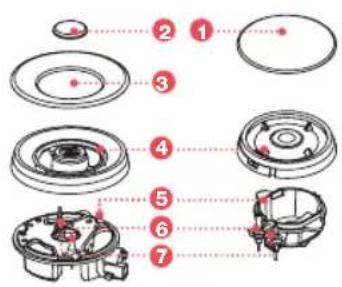
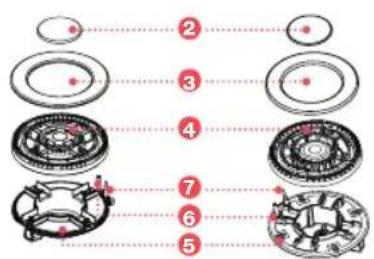
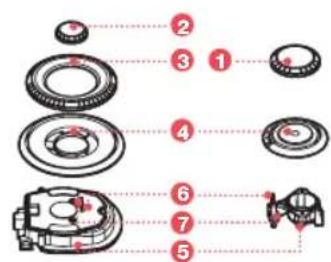
- Carefully place the flame spreader (4) on to the burner cup (5) so that both the ignition device and the flame supervision device extend through their respective holes in the flame spreader. The flame spreader must click back into place correctly.
- Position the burner lid (1), (2), and (3) onto the flame spreader (4) so that the retaining pins fit into their respective recesses.
Troubleshooting
Hints & Tips
| Problem Possible Cause Solution | ||
| Burner is not igniting. No spark is emitting | from the ignition. Check your electricity supply is on. | |
| The burner lid may be poorly fitted. Refit the lid correctly and try again. | ||
| The gas supply may be closed. Open the gas supply completely. | ||
| Burner is poorly ignited. The gas supply | may not be fully open. Open the gas supply completely. | |
| The burner lid may be poorly fitted. Refit the lid correctly and try again. | ||
| The ignition plug may have been contaminated with an salient substance. | Wipe alien substance with a soft, dry cloth until clean. | |
| The burners may be wet. Dry the burners' lids carefully. | ||
| The holes in the flame spreader may have been clogged. | Clean the flame spreader, ensuring the holes are clear. | |
| There is a strange noise made when the burner combusts and is ignited. | The burner lid may be poorly fitted. Refit the lid correctly and try again. | |
| Burner flames go out whilst in use. The flame supervision device may be contaminated with an alien substance. | Carefully clean the flame supervision device with a soft, dry cloth. | |
| Your dish may have boiled over and extinguished the burner's flame. | ||
| A strong draught of wind may have blown the flame out. | ||
| Burner flame is yellow. The holes in the flame spreader may have been clogged. | Clean the flame spreader, ensuring the holes are clear. | |
| Incorrect source of gas may be in use. Check if you are using the right gas. | ||
| Burner flame is unstable. The burner lid may be poorly fitted. Refit the lid correctly and try again. | ||
| Cooktop is emitting a gas smell. | This may be the result of a gas leak. | Stop using the product and close the middle valve. Open the window to ventilate. Contact our service centre by using a phone outside of the home. |
Technical Specifications
| Model GGSCG6004 | |
| Burners 1 × Rapid, 2 × Semi-Rapid, 1 × Auxiliary | |
| Electric Supply 220–240V~, 50Hz–60Hz, 2W | |
| ΣQn 27.7MJ/h | |
| Ignition Device Continuous Ignition Type | |
| Gas Connection G 1/2 Thread | |
| Product Dimensions (W × D × H mm) 590 × 510 × 90 mm | |
| Cut-Out Dimensions (W × D mm) 560 × 480 mm |
natural_image
Four circular target diagrams arranged in a 2x2 grid, each with a central crosshair and horizontal lines, below a row of empty circles (no text or symbols)Purchase Details
For future reference, please record the following information which can be found on the rating plate and the date of purchase which can be found on your sales invoice.
STORE DETAILS
STORE NAME
ADDRESS
TELEPHONE | PURCHASE DATE
PRODUCT DETAILS
MODEL NO.
SERIAL NO.*
Attach Your Receipt Here

Warranty Information
WARRANTY TERMS AND CONDITIONS GAS COOKTOP
This document sets out the terms and conditions of the product warranties for Residentia Group Appliances. It is an important document. Please keep it with your proof of purchase documents in a safe place for future reference should you require service for your Appliance.
1. IN THIS WARRANTY
(a) ‘acceptable quality’ as referred to in clause 10 of this warranty has the same meaning referred to in the ACL;
(b) 'ACL' means Trade Practices Amendment (Australian Consumer Law) Act (No.2) 2010;
(c) 'Appliance' means any Residentia Group product purchased by you accompanied by this document;
(d) 'ASR' means Residentia Group authorised service representative;
(e) 'Residentia Group' means Residentia Group Pty Ltd of 165 Barkly Ave, Burnley VIC 3121, ACN 600 546 656 in respect of Appliances purchased in Australia;
(f) ‘major failure’ as referred to in clause 10 of this warranty has the same meaning referred to in the ACL and includes a situation when an Appliance cannot be repaired or it is uneconomic for Residentia Group, at its discretion, to repair an Appliance during the Warranty Period;
(g) 'Warranty Period' means:
(i) where the Appliance is used for personal, domestic or household use (i.e. normal single family use) as set out in the instruction manual, the Appliance is warranted against manufacturing defects for 24 months, following the date of original purchase of the Appliance;
(h) 'you' means the purchaser of the Appliance not having purchased the Appliance for re-sale, and 'your' has a corresponding meaning.
-
This warranty only applies to Appliances purchased and used in Australia and is in addition to (and does not exclude, restrict, or modify in any way) any non-excludable statutory warranties in Australia.
-
During the Warranty Period Residentia Group or its ASR will, at no extra charge if your Appliance is readily accessible for service, without special equipment and subject to these terms and conditions, repair or replace any parts which it considers to be defective. Residentia Group or its ASR may use remanufactured parts to repair your Appliance. You agree that any replaced Appliances or parts become the property of Residentia Group. This warranty does not apply to light globes, batteries, seals, filters or similar perishable parts.
-
Parts and Appliances not supplied by Residential Group are not covered by this warranty.
-
You will bear the cost of transportation, travel and delivery of the Appliance to and from Residentia Group or its ASR. If you reside outside of the service area, you will bear the cost of:
(a) travel of an authorised representative;
(b) transportation and delivery of the Appliance to and from Residentia Group or its ASR, in all instances, unless the Appliance is transported by Residentia Group or its ASR, the Appliance is transported at the owner's cost and risk while in transit to and from Residentia Group or its ASR.
-
Proof of purchase is required before you can make a claim under this warranty.
-
You may not make a claim under this warranty unless the defect claimed is due to faulty or defective parts or workmanship. Residentia Group is not liable in the following situations (which are not exhaustive):
(a) the Appliance is damaged by:
(i) accident
(ii) misuse or abuse, including failure to properly maintain or service
(iii) normal wear and tear
(iv) power surges, electrical storm damage or incorrect power supply
(v) incomplete or improper installation
(vi) incorrect, improper or inappropriate operation
(vii) insect or vermin infestation
(viii) failure to comply with any additional instructions supplied with the Appliance;
(b) the Appliance is modified without authority from Residentia Group in writing;
(c) the Appliance's serial number or warranty seal has been removed or defaced;
(d) the Appliance was serviced or repaired by anyone other than Residentia Group, an authorised repairer or ASR.
-
This warranty, the contract to which it relates and the relationship between you and Residentia Group are governed by the law applicable where the Appliance was purchased.
-
To the extent permitted by law, Residentia Group excludes all warranties and liabilities (other than as contained in this document) including liability for any loss or damage whether direct or indirect arising from your purchase, use or non use of the Appliance.
-
For Appliances and services provided by Residentia Group in Australia, the Appliances come with a guarantee by Residentia Group that cannot be excluded under the Australian Consumer Law. You are entitled to a replacement or refund for a major failure and for compensation for any other reasonably foreseeable loss or damage. You are also entitled to have the Appliance repaired or replaced if the Appliance fails to be of acceptable quality and the failure does not amount to a major failure. The benefits to you given by this warranty are in addition to your other rights and remedies under a law in relation to the Appliances or services to which the warranty relates.
-
At all times during the Warranty Period, Residentia Group shall, at its discretion, determine whether repair, replacement or refund will apply if an Appliance has a valid warranty claim applicable to it.
-
Missing parts are not covered by warranty. Residentia Group reserves the right to assess each request for missing parts in a case by case basis. Any parts that are not reported missing in the first week after purchase will not provide free of charge.
-
To enquire about claiming under this warranty, please follow these steps:
(a) carefully check the operating instructions, user manual and the terms of this warranty;
(b) have the model and serial number of the Appliance available;
(c) have the proof of purchase (e.g. an invoice) available;
(d) telephone the numbers shown below.
- You accept that if you make a warranty claim, Residentia Group and its ASR may exchange information in relation to you to enable Residentia Group to meet its obligations under this warranty.
IMPORTANT
Before calling for service, please ensure that the steps in point 13 have been followed.
CONTACT SERVICE
→ Please call 1300 11 HELP (4357)
The Australian Consumer Law requires the inclusion of the following statement with this warranty:
Our goods come with guarantees that cannot be excluded under the Australian Consumer Law. You are entitled to a replacement or refund for a major failure and for compensation for any other reasonably foreseeable loss or damage. You are also entitled to have the goods repaired or replaced if the goods fail to be of acceptable quality and the failure does not amount to a major failure.
Notes
Notes
T. 1300 11 4357
E. support@residentiagroup.com.au
www.solt.house
- Contents
- Customer Care
- Safety Information
- Conditions of Use
- Installation
- Operation & Maintenance
- Disposal
- Installation Instructions
- Positioning the Cooktop
- Preparing the Cut-Out
- Installing the Cooktop
- Installation Instructions (continued)
- Gas Connection
- Adjusting the Direction of Elbow
- Installation Safety Warnings
- Replacement of Gas-Type Fitting
- Statutory Requirements
- Preparing to Install
- Gas Connection Safety
- Flexible Hose Assembly
- Electrical Connection
- Gas Adjustment
- Changing the Injector of the Burners
- Adjustment of Minimum Level of the Flame
- Your Cooktop
- Cooktop Key
- Incl. Accessories
- Operating Instructions
- Choosing the Right Cookware
- Cleaning & Maintenance
- Hints & Tips
- Cleaning the Trivets and Control Knobs
- Cleaning the Cooktop Surface
- Cleaning the Cooktop Burners
- Troubleshooting
- Technical Specifications
- Purchase Details
- STORE DETAILS
- PRODUCT DETAILS
- Attach Your Receipt Here
- Warranty Information
- WARRANTY TERMS AND CONDITIONS GAS COOKTOP
- IN THIS WARRANTY
- IMPORTANT
- CONTACT SERVICE
- Notes
Brand : Sôlt
Model : GGSCG6004
Category : Cooker