GGSBF91DS - Freezer Sôlt - Free user manual and instructions
Find the device manual for free GGSBF91DS Sôlt in PDF.


| Product Type | Freezer |
| Model | GGSBF91DS |
| Brand | Sôlt |
| Installation Type | Freestanding |
| Defrost System | Automatic (auto defrost during compressor cycle) |
| Temperature Control | Adjustable (MIN to MAX settings) |
| Interior Light | Yes (replaceable by qualified technician) |
| Door Reversibility | Yes (left or right opening) |
| Refrigerant | Flammable (R600a, typical) |
| Storage Features | Glass shelves, bottle rack, vegetable and fruit crisper |
| Power Supply | 220-240V ~ 50Hz |
| Cleaning Instructions | Use weak bicarbonate soda solution for interior |
| Warranty | 24 months parts and labour for domestic use |
| Customer Service | 1300 11 HELP (4357), support@residentiagroup.com.au |
| Safety Features | Warnings: keep ventilation clear, do not damage refrigerant circuit |
Frequently Asked Questions - GGSBF91DS Sôlt
User questions about GGSBF91DS Sôlt
0 question about this device. Answer the ones you know or ask your own.
Ask a new question about this device
Download the instructions for your Freezer in PDF format for free! Find your manual GGSBF91DS - Sôlt and take your electronic device back in hand. On this page are published all the documents necessary for the use of your device. GGSBF91DS by Sôlt.
USER MANUAL GGSBF91DS Sôlt
Congratulations on purchasing your new refrigerator. The Solt brand is proudly distributed within Australia by Residentia Group Pty Ltd.
Please refer to the warranty card at the rear of this manual for information regarding your product's parts and labour warranty, or visit us online at:
→ www.residentiagroup.com.au
At Residentia Group, we are customer obsessed and our Support Team are there to ensure you get the most out of your appliance. Should you want to learn more about your unit such as the various temperature guides or importantly taking care of the appliance, our Support Team are here to help.
You can use our online Support Centre at any time by visiting:
→ http://support.residentiagroup.com.au
Or you can contact us via phone by dialling: 1300 11 HELP (4357).
It is important that you read through the following use and care manual thoroughly to familiarise yourself with the installation and operation requirements of your appliance to ensure optimum performance.
Again, thank you for choosing an Solt appliance and we look forward to being of service to you.
Kind Regards,
The Residentia Team
Contents
| Safety Warnings | 04 |
| Installation Instructions 05 | |
| Product Overview | 08 |
| Operation | 08 |
| Cleaning | 09 |
| Maintenance | 09 |
| Troubleshooting | 10 |
| Tips for Energy Saving 10 | |
| Disposal | 11 |
| Warranty | 14 |
Customer Care
Solt recommends the use of original spare parts. When contacting our customer service team on 1300 11 4357, please ensure that you have the following information at hand (which can be found on your appliances' rating plate).
- Model Number
- Serial Number
SÔLT
1. Safety Warnings
1) WARNING—Keep ventilation openings, in the appliance enclosure or in the built-in structure, clear of obstruction.
2) WARNING—Do not use mechanical devices or other means to accelerate the defrosting process, other than those recommended by the manufacturer.
3) WARNING—Do not damage the refrigerant circuit.
4) WARNING—Do not use electrical appliances inside the food storage compartments of the appliance, unless they are of the type recommended by the manufacturer.
5) The appliance has to be unplugged after use and before carrying out user maintenance on the appliance.
6) This appliance can be used by children aged from 8 years and above and persons with reduce physical sensory or mental capabilities or lack of experience and knowledge if they have been given supervision or instruction concerning use of the appliance in a safe way and understand the hazards involved. Children shall not play with the appliance. Cleaning and user maintenance shall not be made by children without supervision.
7) If the supply cord is damaged, it must be replaced by the manufacturer, its service agent or similarly qualified persons in order to avoid a hazard.
8) Please abandon the refrigerator according to local regulators for it use flammable blowing gas and refrigerant.
9) Please according to local regulations regarding disposal of the appliance for its flammable refrigerant and blowing gas. Before you scrap the appliance, please take off the doors to prevent children trapped.
10) This appliance is intended to be used in household and similar applications such as
– staff kitchen areas in shops, offices and other working environments;
– farm houses and by clients in hotels, motels and other residential type environments;
- bed and breakfast type environments;
– catering and similar non-retail applications.
11) Do not store explosive substances such as aerosol cans with a flammable propellant in this appliance.

IT IS HAZARDOUS FOR ANYONE OTHER THAN AUTHORISED SERVICE PERSONNEL TO CARRY OUT SERVICING OF REPAIRS WHICH INVOLVE THE REMOVAL OF COVERS.

TO AVOID THE RISK OF AN ELECTRICAL SHOCK DO NOT ATTEMPT REPAIRS YOURSELF.
SÔLT
2. Installation Instructions
2.1 Location
When selecting a position for your unit you should make sure the floor is flat and firm, and the room is well ventilated. Avoid locating your unit near a heat source, e.g. cooker, boiler or radiator. Also avoid direct sunlight as it may increase the electrical consumption. Extreme cold ambient temperatures may also cause the unit not to perform properly. This unit is not designed for use in a garage or outdoor installation. Do not drape the unit with any covering.
When installing the unit, ensure that 20 cm of free space is left at both sides, 15 cm at the rear and 20 cm at the top of the unit. This will allow cold air to circulate around the wine cooler and improve the efficiency of the cooling process. The door can be opened to the right or the left, depending on what better suits the location. Please ensure there is adequate space for the door to fully open.
2.2 Reversing the Door Swing
Tools Required: Phillips style screwdriver / Flat blated screwdriver / Hexagonal spanner

If you want to have the door swing reversed, we recommend that you contact a qualified technician. You should only try to reverse the door yourself if you believe that you are qualified to do so.
◆ Ensure the unit is unplugged and empty.
◆ Adjust the two levelling feet to their highest position.
◆ To take the door of it is necessary to tilt the unit backwards. You should rest the unit on something solid so that it will not slip during the door reversing process.
◆ All parts removed must be saved to do the reinstallation of the door.
◆ Do not lay the unit fat as this may damage the coolant system.
◆ We recommend that 2 people handle the unit during assembly.
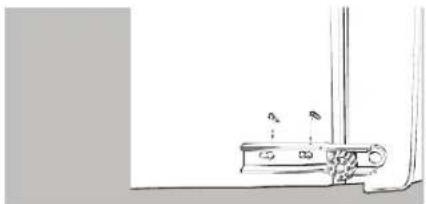
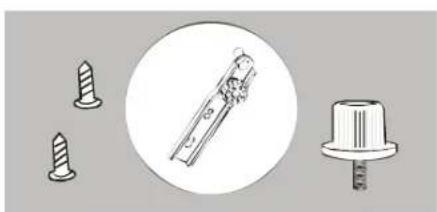
1) Start by removing the bracket from the bottom of the refrigerator. Unscrew the two screws from the bottom bracket. Remove the foot from opposite side.
natural_image
Simple line drawing of a wall-mounted device with two small components, no text or symbols present2) Self-Tapping Screws/Bottom Bracket/Foot
natural_image
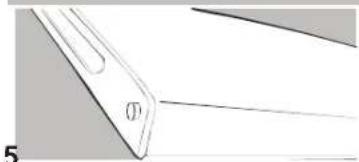
Illustration of mechanical components including screw, pin, and knob (no text or symbols)3) Slide the door down, away from the hinge pin located on the top of the door.
natural_image
Pure technical line drawing of a mechanical component or tool (no text or symbols)SÔLT
4) Remove the plastic cover from door hinge first. Then unscrew the two screws from top bracket and replace on the other side.
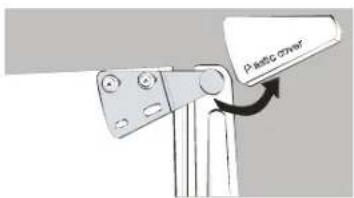
5) To install the bracket on the left side of the appliance, screw the two screws through the bracket and into the top of the appliance.Slide the door back on to the top hinge.Ensure the door is face up.Replace the plastic cover on the top bracket by pressing down until it clicks into position.
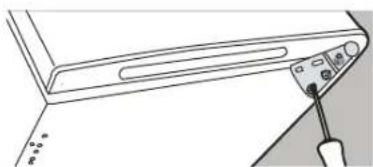
natural_image
Line drawing of a device with a screwdriver inserted, showing no text or symbols6) Screw the bottom hinge into place on the new side. Replace the foot on the other side.
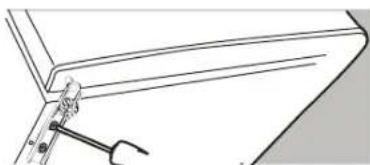
natural_image
Pure technical line drawing of a mechanical assembly without any text, numbers, or symbols7) Check that the door is aligned horizontally and vertically and that the seals are closed on all sides before finally tightening the bottom hinge. Readjust the leveling feet.
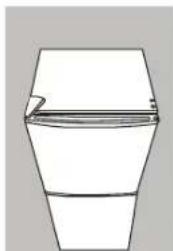
natural_image
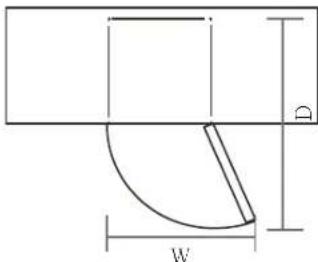
Simple line drawing of a 3D geometric shape resembling a truncated pyramid or frustum (no text or symbols)2.3 Door Space Requirements
The unit's door must be able to open fully as shown. W × D ≥slant 800mm × 780mm
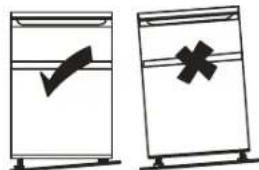
2.4 Levelling the Unit
To do this adjust the two levelling feet at the front of the unit. If the unit is not level, the door and magnetic seal alignments will not be covered properly.
SÔLT
2.5 Cleaning Before Use
Wipe the inside of the unit with a weak solution of bicarbonate soda. Then rinse with warm water using a 'Wrung-out' sponge or cloth. Wash the shelves and salad bin in warm soapy water and dry completely before replacing in the unit. Clean the exterior of the unit with a damp cloth. If you require more information refer to the Cleaning section.
2.6 Before Using Your Unit
Before placing any food in your unit, turn it on and wait for 24 hours, to make sure it is working properly and to allow it time to fall to the correct temperature. Your unit should not be overfilled.

Before Plugging in
You must check that you have a socket which is compatible with the plug supplied with the unit.
Before Turning On!
Do not turn on until two hours after moving the unit. The coolant fluid needs time to settle.
2.7 Interior Accessories
Various glass or plastic storage shelves are included with your appliance - different models have different combinations.
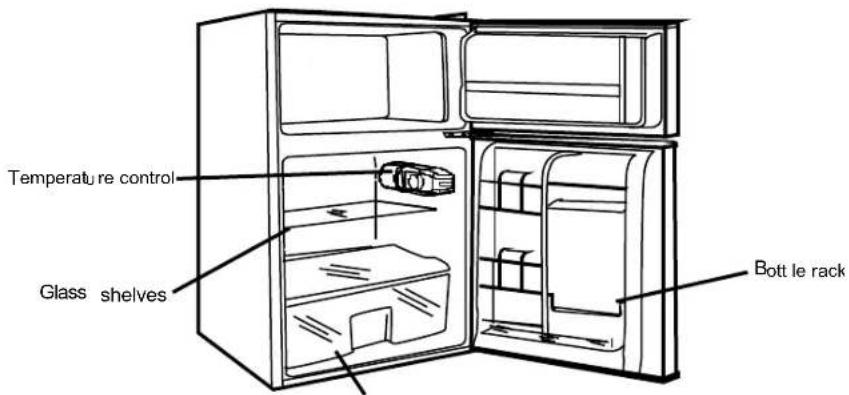
You should always slide one of the full size glass storage shelves into the lowest set of guides, above the fruit and vegetable containers, and keep it in this position. To do this, pull the storage shelf forward until it can be swivelled upwards or downwards and removed.
Please do the same in reverse to insert the shelf at a different height.

In order to make the most of the volume of the fresh food storage compartment and frozen-food storage compartment, the user can remove one or more shelves, drawers, out of the appliance, according to your daily use.
SÔLT
3. Product Overview
Vegetable and fruit crisper
*All images in this instruction manual are for indication only; please refer to your individual unit for details.
4. Operation
4.1 Adjusting the Temperature
When using the refrigerator-freezer for the first time or after defrosting, turn the temperature control to set "MAX" for at least two hours before introducing the food to be stored. All frozen food products you purchase should be placed in the freezer compartment as soon as possible to avoid the frozen food from defrosting.
In Winter or low temperature surrounded condition, please switch the temperature controller to large settings, like:MAX.
Storage recommendation printed on the packaging of frozen food by the manufacturers should be always be followed.
Be careful that the drawer mustn't mangle the refrigeration pipeline.
4.2 Noise Inside the Unit!
You may notice that your unit makes some unusual noises. Most of these are perfectly normal, but you should be aware of them!
These noises are caused by the circulation of the refrigerant liquid in the cooling system. It has become more pronounced since the introduction of CFC free gases. This is not a fault and will not affect the performance of your unit. This is the compressor motor working, as it pumps the refrigerant around the system.
4.3 Tips for Keeping Food in the Unit
◆ Cooked meats/fishes should always be stored on a shelf above raw meats/fishes to avoid bacterial transfer. Keep raw meats/fishes in a container which is large enough to collect juices and cover it properly. Place the container on the lowest shelf.
Leave space around your food, to allow air to circulate inside the unit. Ensure all parts of the unit are kept cool.
To prevent transfer of favours and drying out, pack or cover the food separately. Fruit and vegetables do not need to be wrapped.
◆ Always let pre-cooked food cool down before you put in the unit. This will help to maintain the internal temperature of the unit.
SÔLT
To prevent cold air escaping from the unit, try to limit the number of times you open the door. We recommend that you only open the door when you need to put food in or take food out.
5. Cleaning
5.1 Defrosting
Frost may accumulate on the inner rear surface of the appliance which will automatically defrost during the cycle of the compressor.
Water is channelled via the drain hole to the collection tray above the compressor where it will evaporate.
Please ensure the drain hole is checked and cleaned on a regular basis so water can exit the storage compartment.
5.2 Cleaning the Interior and the Exterior of the Unit
◆ Remove all the shelves and the salad bin. To remove the salad bin first remove the lower door shelf.
◆ Wipe the inside of the unit with a weak solution of bicarbonate soda and then rinse with warm water using a “wrung-out” sponge or cloth. Wipe completely dry before replacing the shelves and salad bin.
Use a damp cloth to clean the exterior, and then wipe with a standard furniture polish. Make sure that the door is closed to avoid the polish getting on the magnetic door seal or inside the unit.
◆ The grille of the condenser at the back of the unit and the adjacent components can be vacuumed using a soft brush attachment.
5.3 Cleaning Tips
Condensation may appear on the outside of the unit. This may be due to a change in room temperature. Wipe of any moisture residue. If the problem continues, please contact a qualified technician for assistance.
6. Maintenance
6.1 Changing the Internal Light
Lamp replacement by professionals.
6.2 Care When Handling / Moving Your Unit
Hold the unit around its sides or base when moving it. Under no circumstances should it be lifted by holding the edges of the top surface.
6.3 Servicing
The unit should be serviced by an authorized engineer and only genuine spare parts should be used. Under no circumstances should you attempt to repair the unit yourself. Repairs carried out by inexperienced persons may cause injury or serious malfunction. Contact a qualitatively
SÔLT
technician.
6.4 Switching Of for Long Periods of Time
When the unit is not in use for a long period of time, disconnect it from the mains supply, empty all food and clean the appliance, leaving the door ajar to prevent unpleasant smells.
7. Troubleshooting
The following simple issues can be handled by the user. Please call the after-sale service department if the issues are not settled.
| Inoperation | Whether the freezer is plugged and connected to power;Low voltage;Failure power or tripping circuit |
| Odor | Odorous foods should closely wrapped;Whether foods are rotten;Whether the interior shall be cleaned. |
| Long-term operation of compressor | It is normal that refrigerator operates for longer time in summer when the ambient temperature is higher;Do not put too much food in the freezer at one time;Do not put foods until they are cooled;Frequent opening of refrigerator door. |
| Illuminating light does not shine | Whether the refrigerator is connected to power,whether the illuminating light is damaged. |
| The refrigerator door can not be properly closed. | The freezer door is stuck by food packages;Too much food;Tilt refrigerator. |
| Loud noises | Whether the food is leveled, whether the refrigerator is balanced;Whether the refrigerator parts are properly placed. |
7.1 Warm tips:
◆The refrigerator enclosure may emit heat during operation specially in summer, this is caused by the radiation of the condenser, and it is a normal phenomenon.
◆Condensation: condensation phenomenon will be detected on the exterior surface and door seals of the freezer when the ambient humidity is large, this is a normal phenomenon, and the condensation can be wiped away with a dry towel.
◆Buzz: Buzz will be generated by running compressor specially when starting up or shutting down.
8. Tips for Energy Saving
Try not to open the door too often, especially when the weather is wet and hot. Once you open the door, close it as soon as possible.
Every now and then check if the appliance is sufficiently ventilated (adequate air circulation
SÔLT
behind the appliance).
In normal temperature conditions, please arrange the thermostat at the middle setting.
Before loading the appliance with packages of fresh food, make sure they are cooled to ambient temperature.
Ice and frost layer increase energy consumption, so clean the appliance as soon as the layer is 3-5 mm thick.
◆ The appliance should be located in the coolest area of the room, away from heat producing appliances or heating ducts, and out of the direct sunlight.
Let hot foods cool to room temperature before placing in the appliance. Overloading the appliance forces the compressor to run longer. Foods that freeze too slowly may lose quality, or spoil.
◆ Be sure to wrap foods properly, and wipe containers dry before placing them in the appliance. This cuts down on frost build-up inside the appliance.
◆ Appliance storage bin should not be lined with aluminum foil, wax paper, or paper toweling. Liners interfere with cold air circulation, making the appliance less efficient.
◆ Organize and label food to reduce door openings and extended searches. Remove as many items as needed at one time, and close the door as soon as possible.
9. Disposal
Old units still have some residual value. An environmentally friendly method of disposal will ensure that valuable raw materials can be recovered and used again. The refrigerant used in your unit and insulation materials require special disposal procedures. Ensure that none of the pipes on the back of the unit are damaged prior to disposal. Up to date information concerning options of disposing of your old unit and packaging from the new one can be obtained from your local council office.
When disposing of an old unit break of any old locks or latches and remove the door as a safeguard.
| Correct Disposal of this product | |
| Correct Disposal of this productThis marking indicates that this product should not be disposed with other household wastes throughout the EU. To prevent possible harm to the environment or human health from uncontrolled waste disposal, recycle it responsibly to promote the sustainable reuse of material resources. To return your used device, please use the return and collection systems or contact the retailer where the product was purchased. They can take this product for environmental safe recycling. | |
For more information, please contact the local authority or your retailer where you purchased the product.
SÔLT
This page is intentionally left blank
SÔLT
This page is intentionally left blank
SÔLT
Warranty Information
WARRANTY TERMS AND CONDITIONS REFRIGERATION APPLIANCES
This document sets out the terms and conditions of the product warranties for Residentia Group Appliances. It is an important document. Please keep it with your proof of purchase documents in a safe place for future reference should you require service for your Appliance.
1. IN THIS WARRANTY
(a) ‘acceptable quality’ as referred to in clause 10 of this warranty has the same meaning referred to in the ACL;
(b) 'ACL' means Trade Practices Amendment (Australian Consumer Law) Act (No.2) 2010;
(c) 'Appliance' means any Residentia Group product purchased by you accompanied by this document;
(d) 'ASR' means Residentia Group authorised service representative;
(e) ‘Residentia Group’ means Residentia Group Pty Ltd of 165 Barkly Ave, Burnley VIC 3121, ACN 600 546 656 in respect of Appliances purchased in Australia;
(f) ‘major failure’ as referred to in clause 10 of this warranty has the same meaning referred to in the ACL and includes a situation when an Appliance cannot be repaired or it is uneconomic for Residentia Group, at its discretion, to repair an Appliance during the Warranty Period;
(g) 'Warranty Period' means:
(i) where the Appliance is used for personal, domestic or household use (i.e. normal single family use) as set out in the instruction manual, the Appliance is warranted against manufacturing defects for 24 months, following the date of original purchase of the Appliance;
(h) ‘you’ means the purchaser of the Appliance not having purchased the Appliance for re-sale, and ‘your’ has a corresponding meaning.
2. This warranty only applies to Appliances purchased and used in Australia and is in addition to (and does not exclude, restrict, or modify in any way) any non-excludable statutory warranties in Australia.
3. During the Warranty Period Residentia Group or its ASR will, at no extra charge if your Appliance is readily accessible for service, without special equipment and subject to these terms and conditions, repair or replace any parts which it considers to be defective. Residentia Group or its ASR may use remanufactured parts to repair your Appliance. You agree that any replaced Appliances or parts become the property of Residentia Group. This warranty does not apply to light globes, batteries, seals, filters or similar perishable parts.
4. Parts and Appliances not supplied by Residentia Group are not covered by this warranty.
SÔLT
- You will bear the cost of transportation, travel and delivery of the Appliance to and from Residentia Group or its ASR. If you reside outside of the service area, you will bear the cost of:
(a) travel of an authorised representative;
(b) transportation and delivery of the Appliance to and from Residentia Group or its ASR, in all instances, unless the Appliance is transported by Residentia Group or its ASR, the Appliance is transported at the owner's cost and risk while in transit to and from Residentia Group or its ASR.
6. Proof of purchase is required before you can make a claim under this warranty.
7. You may not make a claim under this warranty unless the defect claimed is due to faulty or defective parts or workmanship. Residentia Group is not liable in the following situations (which are not exhaustive):
(a) the Appliance is damaged by:
(i) accident
(ii) misuse or abuse, including failure to properly maintain or service
(iii) normal wear and tear
(iv) power surges, electrical storm damage or incorrect power supply
(v) incomplete or improper installation
(vi) incorrect, improper or inappropriate operation
(vii) insect or vermin infestation
(viii) failure to comply with any additional instructions supplied with the Appliance;
(b) the Appliance is modified without authority from Residentia Group in writing;
(c) the Appliance's serial number or warranty seal has been removed or defaced;
(d) the Appliance was serviced or repaired by anyone other than Residentia Group, an authorised repairer or ASR.
8. This warranty, the contract to which it relates and the relationship between you and Residentia Group are governed by the law applicable where the Appliance was purchased.
9. To the extent permitted by law, Residentia Group excludes all warranties and liabilities (other than as contained in this document) including liability for any loss or damage whether direct or indirect arising from your purchase, use or non use of the Appliance.
- For Appliances and services provided by Residentia Group in Australia, the Appliances come with a guarantee by Residentia Group that cannot be excluded under the Australian Consumer Law. You are entitled to a replacement or refund for a major failure and for compensation for any other reasonably foreseeable loss or damage. You are also entitled to have the Appliance repaired or replaced if the Appliance fails to be of acceptable quality and the failure does not amount to a major failure. The benefits to you given by this warranty are in addition to your other rights and remedies under a law in relation to the Appliances or services to which the warranty relates.
- At all times during the Warranty Period, Residentia Group shall, at its discretion, determine whether repair, replacement or refund will apply if an Appliance has a valid warranty claim applicable to it.
- Missing parts are not covered by warranty. Residentia Group reserves the right to assess each request for missing parts in a case by case basis. Any parts that are not reported missing in the first week after purchase will not provide free of charge.
- To enquire about claiming under this warranty, please follow these steps:
(a) carefully check the operating instructions, user manual and the terms of this warranty;
(b) have the model and serial number of the Appliance available;
(c) have the proof of purchase (e.g. an invoice) available;
(d) telephone the numbers shown below. - You accept that if you make a warranty claim, Residentia Group and its ASR may exchange information in relation to you to enable Residentia Group to meet its obligations under this warranty.
IMPORTANT
Before calling for service, please ensure that the steps in point 13 have been followed.
CONTACT SERVICE
→ Please call 1300 11 HELP (4357)
T. 1300 11 4357
E. support@residentiagroup.com.au
www.solt.house
- Contents
- Customer Care
- SÔLT
- Safety Warnings
- Installation Instructions
- Location
- Reversing the Door Swing
- Door Space Requirements
- Levelling the Unit
- Cleaning Before Use
- Before Using Your Unit
- Before Plugging in
- Before Turning On!
- Interior Accessories
- Product Overview
- Operation
- Adjusting the Temperature
- Noise Inside the Unit!
- Tips for Keeping Food in the Unit
- Cleaning
- Defrosting
- Cleaning Tips
- Maintenance
- Switching Of for Long Periods of Time
- Troubleshooting
- Warm tips:
- Tips for Energy Saving
- Disposal
- Warranty Information
- WARRANTY TERMS AND CONDITIONS REFRIGERATION APPLIANCES
- IN THIS WARRANTY
- IMPORTANT
- CONTACT SERVICE
Brand : Sôlt
Model : GGSBF91DS
Category : Freezer