
SDV501 - Tumble dryer Simpson - Free user manual and instructions
Find the device manual for free SDV501 Simpson in PDF.


User questions about SDV501 Simpson
0 question about this device. Answer the ones you know or ask your own.
Ask a new question about this device
Download the instructions for your Tumble dryer in PDF format for free! Find your manual SDV501 - Simpson and take your electronic device back in hand. On this page are published all the documents necessary for the use of your device. SDV501 by Simpson.
USER MANUAL SDV501 Simpson
natural_image
3D rendering of a white front-loading washing machine with a circular vent and ventilation grille (no text or symbols visible)Clothes Dryer Instruction Booklet
Congratulations on your choice of clothes dryer which will give you many years of easy loading and easy drying in the Simpson tradition
Contents
| Important Safety Information | Quick 5 Step Operating Guide | page 5 | |
| Dryer Safety | page 2 | Useful Hints | page 5 |
| Fire Hazards | page 2 | Useful Hints (continued) | page 6 |
| Cleaning the Lint Filter | page 3 | Troubleshooting | page 6 |
| Drying Guide | page 3 | Accessories | page 6 |
| Installation Instructions | page 4 | Warranty | page 7 |
| Purchase Details | page 8 |
Important Safety Instructions
DRYER SAFETY
Failure to follow these safety instructions could damage the dryer or your clothes.
You may then not be covered by warranty for this damage.
Only plug this appliance directly into an AC power supply, which is properly earthed and has the correct voltage. See the serial number sticker located on the top of the door opening for voltage information.

natural_image
Simple line drawing of a switch and bulb on a wall, with a checkmark symbol (no text or labels)CAUTION: If this appliance is supplied from a cord extension set or electrical portable outlet device, the cord extension set or electrical portable outlet device must be positioned so that it is not subject to splashing or ingress of moisture. For safety reasons we strongly advise against the use of double adaptors, extension cords or power boards.

natural_image
Three black-and-white illustrations showing electrical plug, cable, and power plug symbols (no text or labels)This appliance is not intended for use by persons (including children) with reduced physical, sensory or mental capabilities, or lack of experience and knowledge, unless they have been given supervision or instruction concerning use of the appliance by a person responsible for their safety.
Children should be supervised to ensure that they do not play with the appliance.
IMPORTANT:
- If the electrical cord of this appliance is damaged, it must be replaced by the Manufacturer, Authorised Service Agent or similarly qualified person in order to avoid a hazard.
• These dryers are for drying clothes, towels and linen at home. Do not use them for any other purpose. - Lint must not be allowed to accumulate around the tumble dryer.
- Do not dry unwashed items in the tumble dryer.
WARNING: Never stop a tumble dryer before the end of the drying cycle unless all items are quickly removed and spread out so that the heat is dissipated.
FIRE HAZARDS
Some fabrics are not suitable for tumble drying. The following MUST NOT be placed in your dryer due to the risk of a fire or an explosion:
- Items that have been spotted or soaked with vegetable oil, cooking oil, suntan oil, linseed oil, salad oil, lubrication oil or grease. Oil affected items can ignite spontaneously, especially when exposed to heat sources such as in a tumble dryer. The items become warm, causing an oxidation reaction in the oil. Oxidation creates heat. If heat cannot escape, the items can become hot enough to ignite. Piling, stacking, or storing oil-affected items can prevent heat from escaping and create a fire hazard. If it is unavoidable that fabrics that contain vegetable or cooking oil, or have been contaminated by hair care products be placed in a tumble dryer, they should first be washed in hot water with extra detergent - this will reduce, but not eliminate the hazard. The 'cool down' cycle of tumble dryers should be used to reduce the temperature of the items. They should not be removed from the tumble dryer or piled while hot.
- Items that have previously been cleaned in, washed in, or spotted with petrol/gasoline, industrial chemicals used only for cleaning, dry-cleaning solvents or other flammable or explosive substances. Highly flammable substances commonly found around the house include acetone, (nail polish remover) denatured alcohol, petrol/gasoline, kerosene, some spot removers, turpentine, waxes and wax removers. Items containing foam rubber (also known as latex foam) or similarly textured rubber-like materials. Foam rubber materials can produce fire by spontaneous combustion when heated.
- Rubber-backed articles, clothes fitted with foam rubber pads, pillows, rubber boots and rubber-coated sports shoes.
For your safety, and to reduce the risk of fire or an explosion, DO NOT store or use petrol or other inflammable vapours and liquids near your dryer.
Important Safety Instructions
LINT BUILD-UP IS A FIRE HAZARD
A clean lint filter reduces drying times, saves energy and avoids overheating. Overheating may also damage your clothes.
What happens if I forget to clean the lint filter?
Drying Time
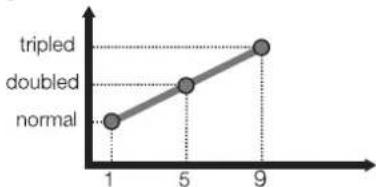
line
| X | Y | |---|---| | 1 | tripled | | 5 | doubled | | 9 | normal |Number of usages with an unclean lint filter (based on laboratory tests using a load of new towels)
The lint filter is located at the front of your dryer at the bottom of the door opening.

You must clean this lint filter after every load.

natural_image
Close-up of a hand pressing down on a circular device component (no visible text or symbols)Open apart the lint filter and wipe or peel off the lint.
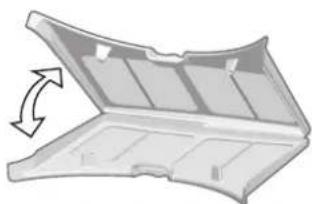
To remove the lint filter open the door and press the two pads together. Pull the lint filter out of the pocket.
natural_image
Illustration of an open laptop with a curved arrow indicating rotation (no text or symbols)Ensure the lint filter 'clicks' when replacing. It can be inserted into the pocket either way.
• Never operate your dryer without the lint filter.
• Do not allow lint to build up around your dryer.
- A torn or damaged lint filter must be replaced immediately.
• Overloading can increase lint build-up because the airflow is reduced.
To avoid potential fire hazards, we recommend that you pay a qualified service technician to periodically clean your dryer. You must do this also when you change your mounting from upright to inverted, or vice versa.
DRYING GUIDE
Your load, when dry must not exceed the rated capacity.
• 4kg for the 4kg Machine
• 5kg for the 5kg Machine
• 6kg for the 6kg Machine
(See page 6 for a table of average weights of laundry items)
Always check your labels for the drying symbols which the International Care Labelling Code now uses.

May be tumble dried

Normal drying (high temperature)

Do Not Tumble Dry

Delicate drying (low temperature)
- Permanent press and synthetics - take out as soon as the dryer stops to reduce wrinkles.
- Woollen articles - not recommended. Pull them to their original shape, then dry them flat.
- Woven and loop knit materials - may shrink, by varying amounts, depending on their quality. Do not use the 'hot' setting for these fabrics. Always stretch them out immediately after drying.
- Fibre or leather materials - always check the manufacturer's instructions.
- Baby clothes and night gowns - acrylic clothing or sleepwear use only on the 'warm' setting.
- Rubber and plastics - Do not dry any items made from or containing rubber or plastics, such as aprons, bibs, babies' waterproof napkins, curtains, tablecloths, shower caps, clothes fitted with foam rubber pads, pillows, galoshes, or rubber coated tennis shoes.
- Fibreglass - not recommended. Glass particles left in the dryer could be picked up by your clothes the next time you use the dryer, and irritate your skin.
During the drying cycle, if you want to
• add or take out clothes, or
• check the dryness of the load,
turn down the timer to 'Airing' for at least one minute before opening the door. This is to prevent scorching or possible self combustion of the fabric.
Fabric softeners or similar products should not be used in a tumble dryer to eliminate the effects of static electricity unless this practice is specifically recommended by the manufacturer of the fabric softener or product.
Note: We strongly advise against the use of fabric conditioners of the sheet type that are added to the clothes in the drum. These products may lead to rapid blockage of the lint filter and inefficient operation of your dryer.
Installation Instructions
You can choose to put your dryer:-
• on the floor.
• on a work bench.
- on a wall, upside down or upright, using the included mounting kit.
- on top of a front load washing machine (using a stacking kit available as an optional extra).
The appliance must not be installed behind a lockable door, a sliding door or a door with a hinge on the opposite side to that of the tumble dryer in such a way that a full opening of the tumble dryer door is restricted.
Stacking Kit
You can use a stacking kit if you want to mount your dryer on top of a Simpson front load washing machine. Use the kit part number DKSK03. Refer to the kit instructions on how to install.
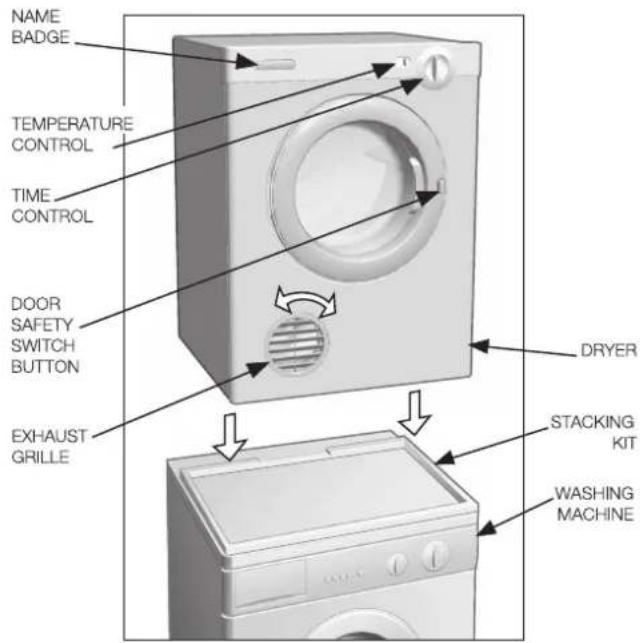
The exhaust grille has a range of positions, which allows you to select the optimum exhaust air angle. Simply hold the grille and rotate it until it hits the built-in stop.

natural_image
Close-up of a white ventilation duct with a circular vent and airflow direction arrow (no text or symbols)removable exhaust grille
Name Badge
You can invert the name badge when you want to mount your dryer upside down on the wall.
Use a suitable tool (such as a thin bladed tool). Unclip the badge from the panel, invert and clip back.
Do not install your dryer in a cupboard or small un-vented laundry unless you are using a venting kit.
There are 2 VENTING OPTIONS
- front
• rear - using a venting kit (optional extra)
Venting Kit
DVK005 - Through the wall
DVK006 - Universal flexible hose
Important: Use only kits approved by Electrolux Home Products Pty Ltd with your dryer. Contact the Electrolux Home Products Pty. Ltd. Spare Parts Centre for the list of approved kits. The exhaust duct must not exceed 2 metres in length and 100mm in diameter.
If connecting the dryer to a common ducting system, safety advice should be requested from the manufacturer.
If you choose to use an optional vent kit, the exhaust grille at the front of the dryer will need to be replaced with the outlet cover from the back of the dryer. Gently prise open the grille, using a thin bladed tool. Next, remove the cover from the back and clip it into the grille space at the front. The exhaust grille is not required when using a vent kit.
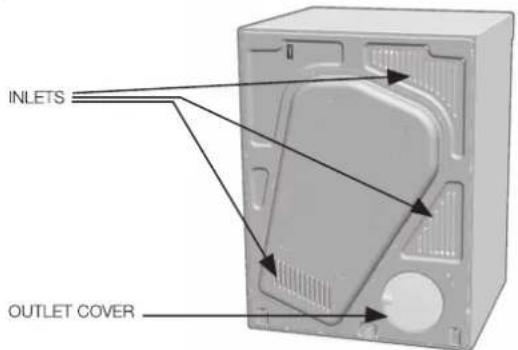
You can position the vent kit at the back of the dryer to remove air upwards or sideways.


Inlet and outlet points need clear airflow to prevent overheating, so ensure there is adequate ventilation. (i.e. open window or external door.)
If a venting kit is used and the exhaust is discharged out of the room, there must be adequate ventilation to avoid the back flow of gases into the room from appliances burning other fuels, including open fires, when operating the tumble dryer. This is not applicable where a venting hose is directed to an open window. The exhaust air must not be discharged into a flue which is used for exhausting fumes from appliances burning gas or other fuels.
Quick 5 Step Operating Guide

Load your dryer loosely until it is no more than TWO THIRDS FULL. Clothes must tumble freely in a dryer. Don't cram them in. Wet clothes fluff up when dry.

natural_image
Illustration of a white front-loading washing machine with open door and ventilation slots (no text or symbols)Overloading will:
- Reduce efficiency
- Increase drying time
• Increase the risk of creasing
Do not load clothes or other articles which are dripping wet into your dryer.

Select one of the two (2) temperature settings.


'Warm' for delicate items which can shrink, such as synthetics, underwear, etc.
'Hot' for heavy, durable items such as towels and flannelette sheets.

Select the drying time.
Turn the knob control in the direction of the arrow only (clockwise). Turning the knob in opposite direction (counterclockwise) will damage the timer. This damage will not be covered by product warranty.

Switch On
The dryer will not operate unless the safety button on the door is fully pressed in.


Clean Lint Filter
After every load clean the lint filter located at the front of your dryer to reduce drying times and avoid overheating.
STANDARD FEATURES
Reversing Action
The drum is designed to turn one minute in each direction, clockwise and anti-clockwise. This reduces tangling and gives more even drying in a shorter time.
Cooling Down
At the end of the drying cycle, there is automatically a time of no heat, to cool down the load and minimise creasing.
Useful Hints
- Never tumble dry the following: Delicate items such as net curtains, woollen, silk, fabric with metal trim, nylon tights, bulky materials such as anoraks, blankets, eiderdown sleeping bags, feather quilts and any item containing rubber foam or materials similar to foam rubber.
- Do not place in your dryer undergarments such as bras and corsets that contain metal reinforcements. Your dryer may be damaged if metal parts were to come loose from the garment. Place such items in a bag designed for this purpose.
- For nylon socks and other small light items, place them in a bag designed for this purpose. This will stop these items being caught in the lint filter cavity.
- Check and empty pockets. Clips, pens, nails and pins can damage both the dryer and your clothes. Other items such as matches or cigarette lighters will cause a fire.
- Close all press studs, hooks, eyes and zips that may catch on something else. Tie all belts and apron strings to prevent tangling.
-
Drying time will depend on fabric type and construction, load size and wetness. Save time and money and always spin the load as dry as possible in your washing machine.
-
Drying time will also be affected by voltage fluctuations, room temperature and humidity. Clothes will dry more slowly on a cool or humid day.
- For best results, sort the load according to fabric types. Such as heavy items which may take longer to dry, eg towels, flannelette sheets etc, than ones which dry quickly, eg poly/cotton shirts and sheets.
- Avoid drying dark clothes with light coloured items such as towels as lint will show on the dark clothes.
Note: Some fabrics will collect lint from other clothes and items. Separate the lint 'givers' and the lint 'collectors' to minimise this problem.
Clothes that give lint include towels, nappies, chenille. Clothes that collect lint include corduroy, synthetics and permanent press garments.
- If individual items are still damp after drying, set a 30 minute post drying time. This will be necessary particularly for multilayered items (eg collars, pockets, etc).
- Always clean the lint filter - this will reduce drying time and save you money.
Useful Hints, Troubleshooting & Accessories
USEFUL HINTS (continued)
- The laundry must be thoroughly spun before tumble drying.
- Easy-care items eg shirts, should be briefly pre-spun before drying (depending on the crease resistance approximately 30 seconds)
- To avoid static charge when drying is completed, use either a fabric softener when you are washing the laundry or a fabric conditioner specifically for tumble dryers.
- Remove the laundry when the dryer has finished drying.
- Do not over-dry laundry, this avoids creasing and saves energy.
- Clothes or towels containing sand or grit should be washed first.
To help you, here is a list of the average weights of some common laundry items.
| Sheet | 700 - 1000g |
| Tablecloth | 400 - 500g |
| Kitchen towel | 70 - 120g |
| Table napkin | 50 - 100g |
| Towelling hand towel | 150 - 250g |
| Bathrobe | 1000 - 1500g |
| Men's shirt | 200 - 300g |
| Pillowcase | 100 - 200g |
| Men's pyjamas | 400 - 500g |
| Ladies nightdress | 200 - 250g |
| Bath towel | 300 - 400g |
TROUBLESHOOTING
Check the points listed here before you call for help, and make sure that you have followed the Important Safety Information on pages 2 & 3.
If you can't start your dryer, check these probable causes.
• Plug is not firmly in socket, or power not turned on.
- You have blown a fuse. Check that power point with another appliance.
- You have not closed the dryer door or pushed in the door safety switch button.
- You have not turned the control knob to the setting you want.
If your clothes are still wet:
- The selected drying time was insufficient. Turn the control knob to a longer time setting.
- Longer time may be needed when the room temperatures is 10^ or less.
- Check that the lint filter is not blocked.
- Check to see that you have read all the instructions carefully.
- Contact the Service Centre if you are still having problems. Write down the model and serial numbers and the date of purchase before you ring. The Service Centre will need this information.
Important
To operate efficiently the clothes dryer must have an unrestricted air supply and exhaust ventilation.
Service calls resulting from installation where ventilation is restricted are not covered by warranty.
THE COST OF THIS TYPE OF CALL WILL BE CHARGED TO THE CUSTOMER.
Should you require further instructions in the use and care of your clothes dryer please contact the CUSTOMER CARE CENTRE on the phone numbers listed:
Australia.... 1300 363 640 8am to 7pm EST & 8pm EDST Monday to Friday
New Zealand...(09) 573 2384 8am to 5pm Monday to Friday
If you have a warranty or spare parts enquiry you should call the number listed on page 7.
ACCESSORIES
You can buy both the venting kits and the stacking kit (as mentioned on page 4) from you local appliance shop or Electrolux Home Products Pty. Ltd. Spare Parts Distributor.
This document sets out the terms and conditions of the product warranties for Electrolux Appliances. It is an important document. Please keep it with your proof of purchase documents in a safe place for future reference should you require service for your Appliance.
1. In this warranty:
(a) 'acceptable quality' as referred to in clause 10 of this warranty has the same meaning referred to in the ACL;
(b) 'ACL' means Schedule 2 to the Competition and Consumer Act 2010;
(c) 'Appliance' means any Electrolux product purchased by you and accompanied by this document;
(d) 'ASC' means Electrolux authorised service centres;
(e) 'Electrolux' means Electrolux Home Products Pty Ltd of 163 O'Riordan Street, Mascot NSW 2020, ABN 51 004 762 341 in respect of Appliances purchased in Australia and Electrolux (NZ) (collectively 'Electrolux') Limited of 3-5 Niall Burgess Road, Mount Wellington, in respect of Appliances purchased in New Zealand;
(f) 'major failure' as referred to in clause 10 of this warranty has the same meaning referred to in the ACL and includes a situation when an Appliance cannot be repaired or it is uneconomic for Electrolux at its discretion, to repair an Appliance during the Warranty Period;
(g) 'Warranty Period' means the Appliance is warranted against manufacturing defects in Australia for 24 months and in New Zealand for 24 months, following the date of original purchase of the Appliance;
(h) 'you' means the purchaser of the Appliance not having purchased the Appliance for re-sale, and 'your' has a corresponding meaning.
-
This warranty only applies to Appliances purchased and used in Australia or New Zealand and used in normal domestic applications and is in addition to (and does not exclude, restrict, or modify in any way) any non-excludable statutory warranties in Australia or New Zealand.
-
During the Warranty Period Electrolux or its ASC will, at no extra charge if your Appliance is readily accessible for service, without special equipment and subject to these terms and conditions, repair or replace any parts which it considers to be defective. Electrolux or its ASC may use remanufactured parts to repair your Appliance. You agree that any replaced Appliances or parts become the property of Electrolux. This warranty does not apply to light globes, batteries, filters or similar perishable parts.
-
Parts and Appliances not supplied by Electrolux are not covered by this warranty.
-
To the extent permitted by law, you will bear the cost of transportation, travel and delivery of the Appliance to and from Electrolux or its ASC. If you reside outside of the service area, you will bear the cost of:
(a) travel of an authorised representative;
(b) transportation and delivery of the Appliance to and from Electrolux or its ASC.
In all instances, unless the Appliance is transported by Electrolux or an Electrolux authorised representative, the Appliance is transported at the owner's cost and risk while in transit to and from Electrolux or its ASC.
-
Proof of purchase is required before you can make a claim under this warranty.
-
You may not make a claim under this warranty unless the defect claimed is due to faulty or defective parts or workmanship. Electrolux is not liable in the following situations (which are not exhaustive):
(a) the Appliance is damaged by:
(i) accident
(ii) misuse or abuse, including failure to properly maintain or service
(iii) normal wear and tear
(iv) power surges, electrical storm damage or incorrect power supply
(v) incomplete or improper installation
(vi) incorrect, improper or inappropriate operation
(vii) insect or vermin infestation
(viii) failure to comply with any additional instructions supplied with the Appliance;
(b) the Appliance is modified without authority from Electrolux in writing;
(c) the Appliance's serial number or warranty seal has been removed or defaced;
(d) the Appliance was serviced or repaired by anyone other than Electrolux, an authorised repairer or ASC.
-
This warranty, the contract to which it relates and the relationship between you and Electrolux are governed by the law applicable where the Appliance was purchased. Where the Appliance was purchased in New Zealand for commercial purposes the Consumer Guarantee Act does not apply.
-
To the extent permitted by law, and subject to your non-excludable statutory rights and warranties, Electrolux excludes all warranties and liabilities (other than as contained in this document) including liability for any loss or damage whether direct or indirect arising from your purchase, use or non use of the Appliance.
-
For Appliances and services provided by Electrolux in Australia, the Appliances come with a guarantee by Electrolux that cannot be excluded under the ACL. You are entitled to a replacement or refund for a major failure and for compensation for any other reasonably foreseeable loss or damage. You are also entitled to have the Appliance repaired or replaced if the Appliance fails to be of acceptable quality and the failure does not amount to a major failure. The benefits to you given by this warranty are in addition to your other rights and remedies under a law in relation to the Appliances or services to which the warranty relates.
-
At all times during the Warranty Period, Electrolux shall, at its discretion, determine whether repair, replacement or refund will apply if an Appliance has a valid warranty claim applicable to it.
-
For Appliances and services provided by Electrolux in New Zealand, the Appliances come with a guarantee by Electrolux pursuant to the provisions of the Consumer Guarantees Act, the Sale of Goods Act and the Fair Trading Act.
-
To enquire about claiming under this warranty, please follow these steps: (a) carefully check the operating instructions, user manual and the terms of this warranty;
(b) have the model and serial number of the Appliance available;
(c) have the proof of purchase (e.g. an invoice) available;
(d) telephone the numbers shown below.
- You accept that if you make a warranty claim, Electrolux and its ASC may exchange information in relation to you to enable Electrolux to meet its obligations under this warranty.
Important Notice:
Before calling for service, please ensure that the steps listed in clause 13 above have been followed.
| FOR SERVICEor to find the address of your nearest stateservice centre in AustraliaPlease call 13 13 49For the cost of a local call(Australia only) | SERVICE AUSTRALIAElectroluxELECTROLUX HOME PRODUCTSwww.electrolux.com.au | FOR SPARE PARTSor to find the address of your nearest statespare parts centre in AustraliaPlease call 13 13 50For the cost of a local call(Australia only) |
| FOR SERVICEor to find the address of yournearest authorised service centrein New ZealandFree call 0800 10 66 10(New Zealand only) | SERVICE NEW ZEALANDElectroluxELECTROLUX (NZ) Limitedwww.electrolux.co.nz | FOR SPARE PARTSor to find the address of yournearest state spare parts centrein New ZealandFree call 0800 10 66 20(New Zealand only) |

SIMPSON
Quality kept simple
EZiloader
Key Feature Guide
Big and easy controls
A big door
Wall mounting kit
Front lint filter
Front venting
Optional rear venting
Economical operation*
Faster drying
Improved safety
for EZI use even when the dryer is wall mounted
32cm wide opening window door for EZI loading and viewing
EZI to install with the included wall mounting brackets
for EZI access and to encourage safe and economical operation
EZI venting of moist exhaust air away from your laundry walls
with our vent tube kit you can exhaust out of your laundry
dry a 4kg load for 40c, a 5kg load for 50c, or a 6kg load for 60c
dry 6kg in the time that 4.5kg dry on others
the heater element is now located away from the drum
*Based on 11.6c/kWh - check with your local energy supplier for your local rate
Product ....Date of Purchase
Model ....Serial Number
Purchaser's Name
Full Postal Address
Retailer (Shop)
Address
Please keep this book and your Proof of Date of Purchase to show the technician if you need service during the warranty period.

From the Electrolux Group. The world's No.1 choice.
KITCHEN, CLEANING AND OUTDOOR APPLIANCES


- Clothes Dryer Instruction Booklet
- Contents
- Important Safety Instructions
- DRYER SAFETY
- IMPORTANT:
- FIRE HAZARDS
- LINT BUILD-UP IS A FIRE HAZARD
- DRYING GUIDE
- Installation Instructions
- Stacking Kit
- Name Badge
- There are 2 VENTING OPTIONS
- Venting Kit
- Quick 5 Step Operating Guide
- Overloading will:
- Switch On
- Clean Lint Filter
- STANDARD FEATURES
- Reversing Action
- Cooling Down
- Useful Hints
- Useful Hints, Troubleshooting & Accessories
- USEFUL HINTS (continued)
- TROUBLESHOOTING
- ACCESSORIES
- This document sets out the terms and conditions of the product warranties for Electrolux Appliances. It is an important document. Please keep it with your proof of purchase documents in a safe place for future reference should you require service for your Appliance.
- In this warranty:
- SIMPSON
- Quality kept simple
- EZiloader
- Key Feature Guide
Brand : Simpson
Model : SDV501
Category : Tumble dryer