
GSP1H-840-SS - Refrigerator Rhino - Free user manual and instructions
Find the device manual for free GSP1H-840-SS Rhino in PDF.


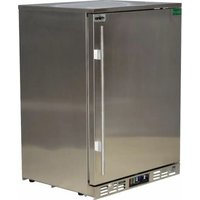
| Product Type | Under-counter beverage cooler |
| Model Number | GSP1H-840-SS |
| Dimensions (H x W x D) | 840 mm x 600 mm x 542 mm |
| Net Weight | 48 kg |
| Gross Weight | 71 kg |
| Net Volume | 115 L |
| Gross Volume | 129 L |
| Power Consumption | 135 W |
| Current | 0.60 A |
| Voltage / Frequency | 220-240 V, 50 Hz |
| Refrigerant | R600a (60 g) |
| Climate Class | 5 (ambient up to 42 °C) |
| Temperature Range (Standard Mode) | 0 to 4 °C |
| Temperature Range (Saving Mode) | 4 to 10 °C |
| Interior Lighting | LED, 1 x 2 W (max) |
| Number of Shelves | 2 adjustable shelves |
| Maximum Shelf Loading | 20 kg per shelf |
| Door Type | Hinged glass door |
| Control Interface | Electronic thermostat with keypad |
| Green Feature | GreenSense Energy Saving Technology, Eco mode |
| Safety Features | Flammable refrigerant R600a; lockable door; automatic defrost; requires 12-hour upright rest before initial use |
| Installation Clearance | Minimum 20 mm at sides and rear for single door models |
| Included Accessories | 2 keys, 8 shelf support clips, shelf |
Frequently Asked Questions - GSP1H-840-SS Rhino
User questions about GSP1H-840-SS Rhino
0 question about this device. Answer the ones you know or ask your own.
Ask a new question about this device
Download the instructions for your Refrigerator in PDF format for free! Find your manual GSP1H-840-SS - Rhino and take your electronic device back in hand. On this page are published all the documents necessary for the use of your device. GSP1H-840-SS by Rhino.
USER MANUAL GSP1H-840-SS Rhino
www.rhinoequipment.eu
Under-Counter Beverage Cooler Instruction Manual

Series Model No:
GSP0H-840; GSP1H-840; GSP2H-840; GSP2S-840; GSP3H-840;
GSP3S-840; GSP0H-865; GSP1H-865; GSP2H-865; GSP2S-865;
GSP3H-865; GSP3S-865; GSP0H-900; GSP1H-900; GSP2H-900;
GSP2S-900; GSP3H-900; GSP3S-900;
Please read this booklet carefully and keep it in a safe place for your future reference.
Thank you for selecting a Rhino product. This appliance has been designed using the latest techniques and incorporates the best components. We hope that you enjoy its use and benefit from its performance. Please read this manual carefully and keep it in a safe place for future reference
IMPORTANT
In the event of a breakdown, please consult the re-seller from whom you purchased this merchandiser
Always insist upon the use of Rhino genuine parts.
For further information please contact:
Rhino Equipment
9 Hunters Walk, Canal Street,
Chester, CH1 4EB, United Kingdom
Telephone: (+44) 01244 321320
Fax: (+44) 01244 322345
Email: sales@staycold.co.uk
www.rhinoequipment.eu
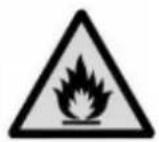
CAUTION: RISK OF FIRE
This merchandiser contains flammable gas within the insulation foam and must be recycled by a specialist according to all applicable local laws and regulations.
For further information, please consult your local Council.

TABLE OF CONTENTS
- Installation....4
- Product description....7
- Pack contents....7
- Operation....8
- Cleaning, care and maintenance.....10
- Troubleshooting....11
- Technical specifications....12
- Wiring diagram....16
- Disposal....19
- Compliance....19
- Spare Parts....20
The information within this booklet was correct at the time of printing.
Specifications and information may alter without notice
1. INSTALLATION
1.1 Safety information
All electrical work must be carried out by suitably qualified persons
When using any electrical appliance, safety precautions should always be observed.
- Do NOT use this appliance for other than its intended use. This product is intended for use as a beverage cooler. It is not suitable for the storage of foodstuffs.
- When used by, or near, young children or infirm persons, close supervision is necessary. Young children should be supervised at all times to ensure that they do not play with this appliance.
- Do NOT cover the front grille or block the rear air entry by placing object up against the cabinet.
- Ensure adequate ventilation.
- Do NOT probe any openings.
- Be careful not to touch any moving parts or hot surfaces.
- Regulations require that all electrical work be carried out by authorized persons. For your own safety and that of others please ensure this is done.
- Do NOT overload the power supply. Always ensure that the power supply is adequate for the electrical requirements specified on the rating label. The rating label is located inside the merchandiser on the right hand side wall. If in doubt, please consult a qualified electrician. Caution: Never use extension leads or multiple adaptors.
- If the mains supply cord is damaged, it must be replaced by the manufacturer, its service agent or similarly qualified and skilled persons in order to avoid hazard. A skilled person is a person having the appropriate technical training and experience necessary to be aware of hazards to which he or she is exposed in performing a task and of measures necessary to minimize the danger to his or herself or other persons.
- Disconnect the mains power supply before attempting any cleaning, removal of any covers, or maintenance work.
- Do NOT store explosive substances, such as aerosol cans with flammable propellant, in this merchandiser.
- WARNING: Do not use mechanical devices or other means to accelerate the defrosting process. Defrosting is performed automatically.
- WARNING:

Do not damage the refrigeration circuit.
- WARNING: Do not use electrical appliances inside the storage compartment of this appliance.
1.2 Assembly
- Remove the appliance from the packaging and peel off any protective film from all surfaces.
- Fit the shelf support clips onto the shelf support strips, making sure that the clips for each shelf are of the same height and that they are securely engaged on the support strip.
- Unwrap each shelf carefully, to prevent damaging their protective coating or surface finish.
- Position the shelves onto the clips.
- Please note the following maximum shelf loading weights: 20Kg.
Please dispose of all waste packaging appropriately and in accordance with all local recycling laws.
1.3 Positioning the chiller

WARNING
Do NOT overload the power supply.
Always ensure that the power supply is adequate for the electrical requirements specified on the rating label and never use extension leads or multiple adaptors.
- Please position the cabinet carefully being careful not to bump it.
- The power supply flex exits the chiller at the bottom right hand side (as viewed from the front). For ease of access, the flex should be retrieved prior to positioning the chiller in its final location.
- The maximum recommended ambient temperature for this chiller is 42°C .
- Avoid positioning the appliance in direct sunlight or damp areas.
- Allow adequate space for the door(s) to fully open.
- Ensure that this chiller is positioned on a level surface, so as to allow the door(s) to shut and seal correctly, as well as to allow proper drainage from the evaporator tray, to prevent any overflow. If necessary, adjust the screw feet of the appliance to make it level.
- Do NOT overload the power supply. Always ensure that the power supply is adequate for the electrical requirements specified on the rating label. The rating label is located inside the chiller, on the right hand side wall. If in doubt, please consult a qualified electrician. Caution: Never use extension leads or multiple adaptors.
Note: If the unit has not been stored or moved in an upright position, let it stand upright for approximately 12 hours before operation. If in doubt allow to stand.
Ventilation
- All models: All models must have clear and unobstructed ventilation from the entire surface area of the front grille.
- The 2 and 3 door models may be built into an enclosure without the need for ventilation other than at the front.
- The single door coolers MUST have a minimum ventilation space of 20mm at sides and rear.
- WARNING: ⚠️ Failure to provide the minimum ventilation space will harm the performance of your chiller, could cause fire and will invalidate the warranty.
- WARNING: ⚠️ Keep clear of obstruction all ventilation openings in the appliance enclosure or in the structure for building in.
2. Product description
| Series Model No | Door's quality Door's type | Lighting | ||
| GSP0H-840 | Single door | Hinged door | 1×2Watt(Max.) | LED light |
| GSP1H-840 | Single door | Hinged door | 1×2Watt(Max.) | LED light |
| GSP2H-840 | Double door | Hinged door | 2×2Watt(Max.) | LED light |
| GSP2S-840 | Double door | Sliding door | 2×2Watt(Max.) | LED light |
| GSP3H-840 | Triple door | Hinged door | 3×2Watt(Max.) | LED light |
| GSP3S-840 | Triple door | Sliding door | 3×2Watt(Max.) | LED light |
| GSP0H-865 | Single door | Hinged door | 1×2Watt(Max.) | LED light |
| GSP1H-865 | Single door | Hinged door | 1×2Watt(Max.) | LED light |
| GSP2H-865 | Double door | Hinged door | 2×2Watt(Max.) | LED light |
| GSP2S-865 | Double door | Sliding door | 2×2Watt(Max.) | LED light |
| GSP3H-865 | Triple door | Hinged door | 3×2Watt(Max.) | LED light |
| GSP3S-865 | Triple door | Sliding door | 3×2Watt(Max.) | LED light |
| GSP0H-900 | Single door | Hinged door | 1×2Watt(Max.) | LED light |
| GSP1H-900 | Single door | Hinged door | 1×2Watt(Max.) | LED light |
| GSP2H-900 | Double door | Hinged door | 2×2Watt(Max.) | LED light |
| GSP2S-900 | Double door | Sliding door | 2×2Watt(Max.) | LED light |
| GSP3H-900 | Triple door | Hinged door | 3×2Watt(Max.) | LED light |
| GSP3S-900 | Triple door | Sliding door | 3×2Watt(Max.) | LED light |
3. Pack contents
The following is included:
All models
•RHINO Back Bar Chiller Plus...
- Instruction manual
- 2 keys for glass door
Single Door model
• 2 adjustable shelves Double Door model
- 8 shelf support clips
• 4 adjustable shelves Triple Door model
- 16 shelf support clips
- 6 adjustable shelves
- 24 shelf support clips
RHINO prides itself on quality and service, ensuring that at the time of packaging the contents are supplied fully functional and free of damage.
Should you find any damage as a result of transit, please contact your RHINO dealer immediately.
4. Operation
This chiller is designed to operate at a recommended ambient temperature of 42° C and as such, is categorized as a Climate Class 5 product. This information is recorded on the rating label, which can be found on the inside right hand wall of the cabinet.
| Climate class | Temperature(°C) | Humidity(% RH) |
| 5 | 40 | 40 |
Control Panel
The control panel is located below the door(s) on the front of the appliance.

Switching on
- Close the door of the appliance.
- Connect the appliance to an appropriate mains power supply.
Working mode
There are two different modes for the electronic thermostat, which are referred to as Standard Mode and Saving Mode.
- Standard Mode: the chiller is optimised for maximum performance and will maintain 0-4C.
- Saving Mode: the chiller is optimised for energy saving. In Saving Mode the interior temperature is allowed to rise to as high as 10C, the air circulating fans are managed for energy saving and the interior lights are switched off.
Switching Between Modes
When the appliance is powered up for the first time, the default mode is Standard Mode. To enter Saving Mode, simply press and hold the UP/ES keypad button for at least 3 seconds. The mode which is about to be entered is displayed as a preview. EnS is displayed for Saving Mode and NOR is displayed for Standard Mode. Upon disconnection and subsequent re-connection to the mains power, the previously selected mode will be remembered and restored.
Switching the Interior Lights ON and OFF
As mentioned above, the lights are automatically turned off in "Saving Mode". To switch the interior lights on or off at any time in either Mode, simply press
and hold the DOWN / LIGHT keypad button for at least 0.5 seconds. The light will be either powered on or off accordingly.
If the compressor light is flashing on the electronic display
The compressor is designed to have a minimum resting period of 6 minutes. If the electronics command the compressor to start, but it is in resting mode, then the compressor light will flash. This is normal and nothing to be concerned about.
Adjusting the temperature of Standard Mode
The appliance is set up to run without interference from the user. It is not recommended for the user to interfere with the complex electronic set up. However if the user wishes to change the temperature of the Standard Mode then it can be done by altering the ST parameter. ST is the lowest temperature that the user wishes the appliance to run at. The appliance will run at ST plus 2 degrees. For example if you wish to have an average temperature of 6 degrees inside the cabinet then you would select ST at a value of 4:
- Press the SET keypad button for at least 3 seconds until "0" is displayed.
- Press the UP / ES keypad button 22 times until "22" is displayed.
- Press the SET keypad button and the display will change to "PS"
- Press the UP / ES keypad button 7 times until "ST" is displayed.
- "0" will appear on the display
- Using the "Down/Light" or "Up / ES" button, select the ST minimum temperature value you prefer.
- Press the "SET" keypad button once again will lock in the parameter change.
5. Cleaning, care and maintenance
- Switch off and disconnect from the power supply before cleaning
- Clean the interior of the appliance using an appropriate sanitising solution in accordance with local hygiene laws and regulations.
- Do not use abrasive cleaning agents which may scratch and harm the delicate interior finishes of your appliance.
• Always wipe dry after cleaning. - A RHINO agent or qualified technician must carry out repairs if required.
Clean the filter of single door back bar chiller
- The filter must be kept clean and free of dust at all times. It is recommended that the cleaning routine be conducted at intervals appropriate to the speed of accretion of dust on the filter and in any event at least every month. Failure to keep the filter clean will damage the refrigeration system and invalidate the warranty.
- Pull the filter upwards to remove it from its locating place under the glass door.
- Use a vacuum cleaner, preferably with a brush attachment, to remove built up dust.
- Refit the filter to its original location to ensure continual efficient operation is maintained.
Clean the condenser
The condenser must be kept clean and free of dust at all times. It is recommended that the cleaning routine be conducted at intervals appropriate to the speed of accretion of dust on the condenser. Failure to keep the condenser clean will damage the refrigeration system and invalidate the warranty.
Warning: The condenser is a delicate component and is easily damaged. Never use a stiff brush or sharp objects to clean it. Never use water.
For full visual details on how to clean your filter and condenser,
please visit : www.cleanme.eu
6. Troubleshooting
If your appliance develops a fault, please check the following table before making a call to the Helpline.
| Fault Probable Cause Action | ||
| The appliance is not working | The unit is not plugged in correctly | Check the unit is plugged in correctly |
| Plug or lead is damaged | Call RHINO agent or qualified technician | |
| Power supply Check power supply | ||
| Internal wiring fault Call | RHINO agent or qualified technician | |
| The appliance turns on, but the temperature is too high/low | Filter or condenser blocked with dust | Clean filter or condenser |
| Doors are not shut properly | Check doors are shut and seals are not damaged | |
| Appliance is located near a heat source or air flow to the condenser is being interrupted | Move the appliance to a more suitable location | |
| Ambient temperature is too high | Increase ventilation or move appliance to a cooler position | |
| Insufficient airflow to the fans | Remove any blockages to the fans | |
| Appliance is overloaded | Reduce the amount stored in the appliance | |
| Factory default parameters adjusted | Call RHINO agent or qualified technician | |
| The appliance is unusually loud | The appliance is touching a neighbouring object | Check installation position and change if necessary |
| The appliance has not been installed in a level or stable position | Check installation position and change if necessary | |
7. Technical specifications
| Body Construction | |
| Exterior Stainless steel / Colour coated galvanized steel | |
| Interior Stainless steel / Aluminium | |
| Insulation 40mm thick, injected, polyurethane foam | |
| Foaming agent Cyclopentane |
| Refrigeration System | ||
| Type | Integral split system | |
| Airflow Induced airflow condenser and evaporator coils | ||
| Refrigerant | R600a | |
| Electrical | |
| Supply 220~240 | Volt a.c.(50Hz.) Single phase |
| SeriesModel No | Power | Current | Temperature range of standard mode | Temperature range of Saving mode | Refrigerant |
| GSP0H-840GSP1H-840GSP0H-865GSP1H-865GSP0H-900GSP1H-900 | 135W | 0.60A | 0~4°C | 4~10°C | R600a 60g |
| GSP2H-840GSP2S-840GSP2H-865GSP2S-865GSP2H-900GSP2S-900 | 140W | 0.65A | 0~4°C | 4~10°C | R600a 48g |
| GSP3H-840GSP3S-840GSP3H-865GSP3S-865GSP3H-900GSP3S-900 | 220W | 1.2A | 0~4°C | 4~10°C | R600a 85g |
7.1. GSP0H-840/GSP1H-840/GSP0H-865/GSP1H-865/
GSP0H-900/GSP1H-900
| SeriesModel No | Width | Height | Depth | GrossWeight | NetWeight | GrossVolume | NetVolume |
| GSP0H-840 | 500mm | 840mm | 542mm | 64Kg | 43Kg | 104L | 93L |
| GSP1H-840 | 600mm | 840mm | 542mm | 71Kg | 48Kg | 129L | 115L |
| GSP0H-865 | 500mm | 865mm | 542mm | 67Kg | 46Kg | 109L | 96L |
| GSP1H-865 | 600mm | 865mm | 542mm | 74Kg | 51Kg | 135L | 120L |
| GSP0H-900 | 500mm | 900mm | 542mm | 70Kg | 49Kg | 113L | 100L |
| GSP1H-900 | 600mm | 900mm | 542mm | 77Kg | 54Kg | 140L | 124L |

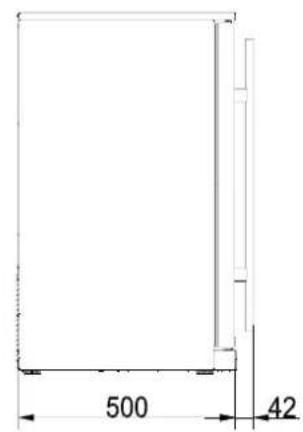
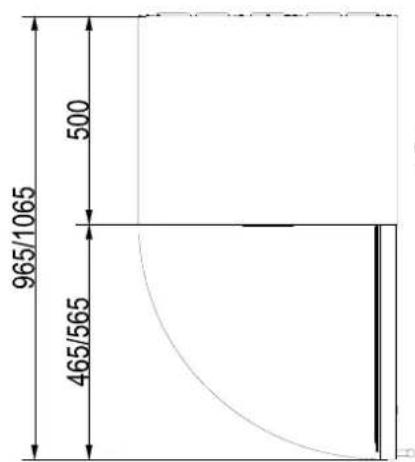
OR
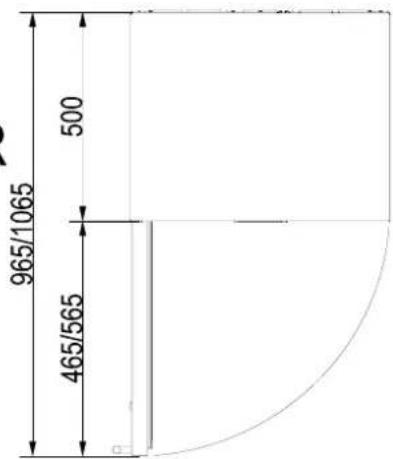
7.2. GSP2H-840 /GSP2H-865/GSP2H-900
| SeriesModel No | Width | Height | Depth | GrossWeight | NetWeight | GrossVolume | NetVolume |
| GSP2H-840 | 900mm | 840mm | 542mm | 94Kg | 65Kg | 201L | 192L |
| GSP2H-865 | 900mm | 865mm | 542mm | 98Kg | 69Kg | 210L | 200L |
| GSP2H-900 | 900mm | 900mm | 542mm | 102Kg | 73Kg | 218L | 207L |


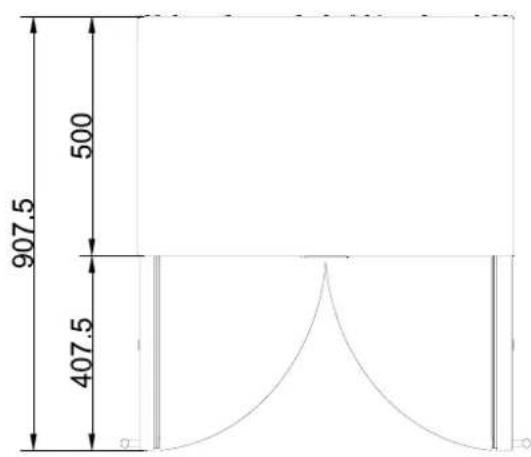
7.3. GSP3H-840 /GSP3H-865/GSP3H-900
| SeriesModel No | Width | Height | Depth | GrossWeight | NetWeight | GrossVolume | NetVolume |
| GSP3H-840 | 1350mm | 840mm | 542mm | 125Kg | 90Kg | 312L | 304L |
| GSP3H-865 | 1350mm | 865mm | 542mm | 130Kg | 95Kg | 325L | 310L |
| GSP3H-900 | 1350mm | 900mm | 542mm | 135Kg | 100Kg | 338L | 316L |


8. Wiring diagram
·GSP0H-840/GSP1H-840/GSP0H-865/GSP1H-865/
GSP0H-900/GSP1H-900

- Power Plug
- Sensor
- Compressor
- Switch Power Supply
-
Evaporator Fan
-
Electronic Thermostat
- Sensor
- Condenser Fan
- LED light
- Motor Protector
·GSP2H-840 /GSP2H-865/GSP2H-900 /GSP2S-840/
GSP2S-865/GSP2S-900

- Power Plug
- Sensor
- Compressor
- Switch Power Supply
-
Evaporator Fan
-
Electronic Thermostat
- Sensor
- Condenser Fan
- LED light
- Motor Protector
·GSP3H-840 /GSP3H-865/GSP3H-900/ GSP3S-840/
GSP3S-865/GSP3S-900

- Power Plug
- Sensor
- Compressor
- Switch Power Supply
-
Evaporator Fan
-
Electronic Thermostat
- Sensor
- Condenser Fan
- LED light
- Motor Protector
9. Disposal
This appliance contains flammable and explosive gas within its sealed system and its insulation foam. This product must ONLY be disposed of and recycled by a professional waste handling organisation that is qualified and registered to recycle refrigeration appliances.
If in any doubt, please consult your Local Authority, contact Rhino or contact the reseller from whom you purchased the appliance.

10. Compliance
RHINO components have undergone strict product testing in order to comply with regulatory standards and specifications set by international, independent, and federal authorities.
RHINO products have been approved to carry the following symbol:

This appliance contains a flammable refrigerant gas called R600a. Please ensure that the refrigeration engineer is qualified in the safe handling of flammable refrigerants.
R600a gas is a very efficient refrigerant that is zero ODP (Ozone Depleting) and has negligible GWP (Global Warming Potential).

All rights reserved. No part of these instructions may be produced or transmitted in any form or by any means, electronic, mechanical, photocopying, recording or otherwise, without the prior written permission of RHINO. Every effort is made to ensure all details are correct at the time of going to press, however, RHINO reserve the right to change specifications without notice.
11. Spare Parts
11.1. GSP0H-840/GSP1H-840/GSP0H-865/GSP1H-865/
GSP0H-900/GSP1H-900 Cabinet Assembly

11.1. GSP0H-840/GSP1H-840/GSP0H-865/GSP1H-865/GSP0H-900/GSP1H-900 Cabinet Assembly
| Item | Part Number | Description |
| 1 | E00002800 | 24V switch power |
| 2 | P000036B0 | plastic drain tray |
| 3 R00001400 drier | ||
| 4 | R31900400 | drier tube |
| 5 | M31404000 | main lead support |
| 6 R00004700 compressor | ||
| 7 | R00004800 | compressor accessory |
| 8 | R31900300 | exhaust tube |
| 9 | M31900800 | stainless steel drain tray |
| 10 | R31900100 | condenser |
| 11 | E00008600 | EC axial fan |
| 12 | P41000400 | plastic LED lamp cover |
| 13 | M31402800 | bottom hinge support |
| 14 | M31901900 | kick panel |
| 15 | E00009000 | electronic ECO controller |
| 16 | P31402100 | plastic controller cover |
| 17 | M31902300 | filter |
| 18 | R31900200 | suction assembly |
| 19 | R31400100 | evaporator |
| 20 | P000037B0 | nylon rivet |
| 21 | M000020S0 | evaporator fan cover |
| 22 | E31000600 | LED light |
| 23 | M31403400 | shelf support |
| 24 | M31403500 | shelf clip |
| 25 | M31902400 | shelf |
| 26 | E00008900 | sensor |
11.2. GSP2H-840/GSP2S-840/GSP2H-865/GSP2S-865/GSP2H-900/GSP2S-900 Cabinet Assembly
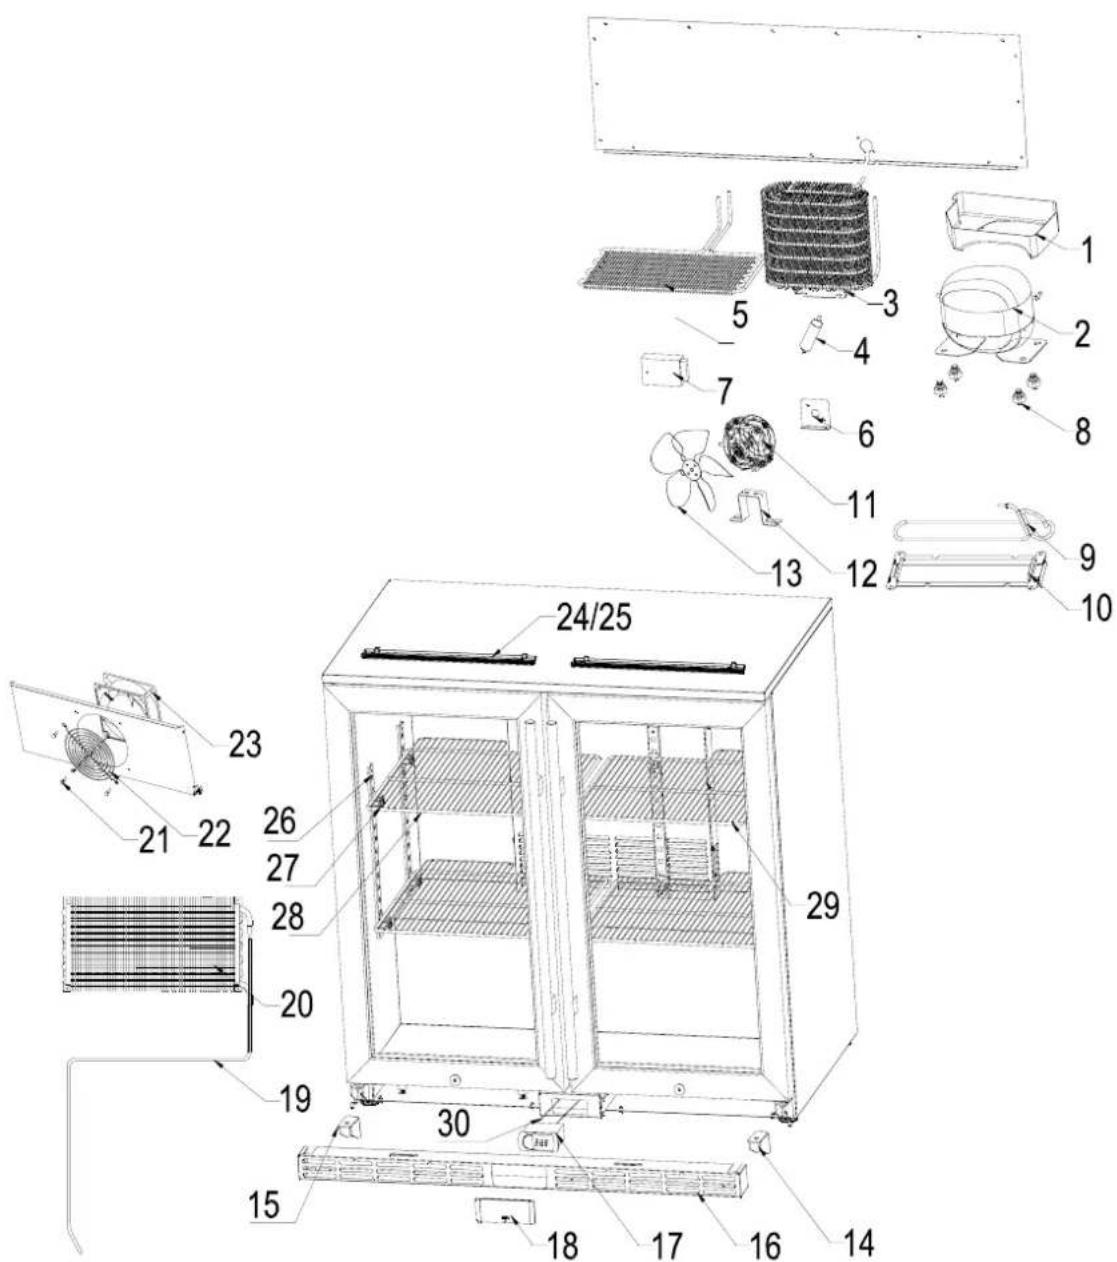
11.2. GSP2H-840/GSP2S-840/GSP2H-865/GSP2S-865/GSP2H-900/GSP2S-900 Cabinet Assembly
| Item | Part Number | Description |
| 1 P000036B0 plastic drain tray | ||
| 2 | R00004700 | compressor |
| 3 | R31400400 | condenser |
| 4 | R00001400 | drier |
| 5 | M31400300 | bottom condenser |
| 6 M31404000 main lead support | ||
| 7 | E00002800 | 24V switch power |
| 8 | R00004800 | compressor accessory |
| 9 | R31400500 | exhaust tube |
| 10 M31403900 stainless steel drain tray | ||
| 11 | E00009200 | EBM IQ motor |
| 12 | M40102000 | motor bracket |
| 13 | M00002400 | 200mm28°fan blade |
| 14 M3140280R right bottom hinge support | ||
| 15 M3140280L left bottom hinge support | ||
| 16 | M31402500 | kick panel |
| 17 E00009000 electronic ECO controller | ||
| 18 P31402100 plastic controller cover | ||
| 19 | R31400200 | suction assembly |
| 20 | R31400100 | evaporator |
| 21 | P000037B0 | nylon rivet |
| 22 M000020S0 evaporator fan cover | ||
| 23 E00008600 EC axial fan | ||
| 24 | E31000600 | LED light |
| 25 P41000400 plastic LED lamp cover | ||
| 26 | M31403400 | shelf support |
| 27 | M31403500 | shelf clip |
| 28 | M3140370L | left shelf |
| 29 | M3140370R | right shelf |
| 30 | E00008900 | sensor |
11.4. Hinged door models Glass Door Assembly
(GSP0H-840/GSP1H-840/GSP0H-865/GSP1H-865/GSP0H-900/
GSP1H-900/GSP2H-840 /GSP2H-865/GSP2H-900/ GSP3H-840/
Date of installation:
Address of first place of installation:
Date of re-installation* :
Address of second place of installation* :
* If resold or relocated to other premises

www.rhinoequipment.eu
Rhino Equipment,
9 Hunters Walk, Canal Street,
Chester, CH1 4EB, United Kingdom
Telephone: (+44) 01244 321320
Fax: (+44) 01244 322345
Email: sales@staycold.co.uk
www.rhinoequipment.eu
Made in China


- UNDER-COUNTER BEVERAGE COOLER INSTRUCTION MANUAL
- IMPORTANT
- RHINO EQUIPMENT
- CAUTION: RISK OF FIRE
- TABLE OF CONTENTS
- INSTALLATION
- 1.1 SAFETY INFORMATION
- ALL ELECTRICAL WORK MUST BE CARRIED OUT BY SUITABLY QUALIFIED PERSONS
- 1.2 ASSEMBLY
- 1.3 POSITIONING THE CHILLER
- WARNING
- VENTILATION
- PRODUCT DESCRIPTION
- PACK CONTENTS
- OPERATION
- CONTROL PANEL
- SWITCHING ON
- WORKING MODE
- SWITCHING BETWEEN MODES
- SWITCHING THE INTERIOR LIGHTS ON AND OFF
- ADJUSTING THE TEMPERATURE OF STANDARD MODE
- CLEANING, CARE AND MAINTENANCE
- CLEAN THE FILTER OF SINGLE DOOR BACK BAR CHILLER
- CLEAN THE CONDENSER
- TROUBLESHOOTING
- TECHNICAL SPECIFICATIONS
- GSP0H-840/GSP1H-840/GSP0H-865/GSP1H-865
- GSP0H-900/GSP1H-900
- GSP2H-840 /GSP2H-865/GSP2H-900
- GSP3H-840 /GSP3H-865/GSP3H-900
- WIRING DIAGRAM
- GSP2H-840 /GSP2H-865/GSP2H-900 /GSP2S-840
- GSP2S-865/GSP2S-900
- GSP3H-840 /GSP3H-865/GSP3H-900/ GSP3S-840
- GSP3S-865/GSP3S-900
- DISPOSAL
- COMPLIANCE
- SPARE PARTS
- GSP0H-900/GSP1H-900 CABINET ASSEMBLY
- GSP0H-840/GSP1H-840/GSP0H-865/GSP1H-865/GSP0H-900/GSP1H-900 CABINET ASSEMBLY
- HINGED DOOR MODELS GLASS DOOR ASSEMBLY
Brand : Rhino
Model : GSP1H-840-SS
Category : Refrigerator