
SC-220AU7TMW - Refrigerator Seiki - Free user manual and instructions
Find the device manual for free SC-220AU7TMW Seiki in PDF.


| Type | Refrigerator with freezer compartment |
| Brand | Seiki |
| Model | SC-220AU7TMW |
| Net Capacity (Refrigerator) | Approx. 150 L |
| Net Capacity (Freezer) | Approx. 20 L |
| Overall Dimensions (H x W x D) | 1450 mm x 550 mm x 600 mm |
| Weight | Approx. 40 kg |
| Energy Class | F |
| Annual Energy Consumption | Approx. 180 kWh |
| Climate Class | N, ST |
| Noise Level | Approx. 40 dB |
| Refrigerant | R600a |
| Defrost Type | Manual (freezer), Auto (refrigerator) |
| Number of Shelves | 3 adjustable glass shelves |
| Door Hinge | Right, reversible |
| Adjustable Feet | Yes |
| Temperature Control | Mechanical thermostat |
| Interior Light | Yes, LED |
| Freezer Star Rating | 3 stars |
| Storage Time in Power Failure | Approx. 10 hours |
| Warranty | 2 years |
| Maintenance | Clean condenser coils annually, defrost freezer when ice is 5 mm thick, check door seal |
Frequently Asked Questions - SC-220AU7TMW Seiki
User questions about SC-220AU7TMW Seiki
0 question about this device. Answer the ones you know or ask your own.
Ask a new question about this device
Download the instructions for your Refrigerator in PDF format for free! Find your manual SC-220AU7TMW - Seiki and take your electronic device back in hand. On this page are published all the documents necessary for the use of your device. SC-220AU7TMW by Seiki.
USER MANUAL SC-220AU7TMW Seiki
INSTRUCTION MANUAL
MODEL: SC-220AU7TMW
CONTENTS
| General | Safety | 4 | |
| Product | Overview | 7 | |
| Installation | 8 | ||
| Operation | 9 | ||
| Reversing | the Door | ||
| Troubleshooting | 12 | ||
| Specifications | 13 | ||
| Customer | Helpline | 16 |
GENERAL SAFETY
IMPORTANT INFORMATION
Read this manual thoroughly before you start using the 221L Top Mount Refrigerator.
The safety precautions instructions reduces the risk of fire, electric shock and injury when correctly complied to.
Please follow all instructions and take notice of all warnings.

Pay close attention to messages that follow this safety alert symbol or the words DANGER, WARNING or CAUTION. These words will be used to alert you of potential hazards that and injure you and others. Following these instruction will tell you how to reduce the chance of injury and the possible dangers if instructions aren't followed.

This symbol alerts you to take care as the appliance contains flammable materials: isobutane as refrigerant and cyclopentane as insulation blowing gas. Do not expose it to high heat, sparks and open flames.
The refrigerant isobutane (R600a) is contained within the refrigerant circuit of the appliance, a gas with a high level of environmental compatibility, which is flammable. During transportation and installation of the appliance, make sure that none of the components of the refrigerant circuit become damaged.
WARNING: Never use an appliance with a damaged refrigerant circuit. If the refrigerant circuit becomes damaged, avoid proximity to open fires and all types of heat and ignition sources. Thoroughly ventilate the room in which the appliance is located.
It is dangerous for anyone other than an authorised service person to work on this appliance. In Queensland, the authorised service person MUST hold a Gas Work Authorisation for hydrocarbon refrigerants to carry out servicing or repairs which involve the removal of covers.
The room for installing the appliance must be at least 1m3 per 8g of refrigerant. The amount and type of refrigerant in the appliance can be found in the Technical Specifications at the back of the manual and on the appliance rating label.
GENERAL SAFETY INSTRUCTIONS (Cont.)
To reduce risk of fire, electric shock or injury, always follow these basic precautions and accident prevention measures when using this appliance, including the below:
INSTALLATION
- Heavy: The product is heavy, be careful when moving it. To avoid back or other injury, have 2 people lift or mechanical aid when installing.
- Damage: When unnoxing, thoroughly inspect the appliance carefully for any damage. If there is any damage, do not install the appliance. Contact our support centre on 1300 296 699 for advice.
- Protection from moisture: Make sure the appliance is installed in an indoor area away from wind, rain, water spray or drips.
- Protect from heat: Do not place the appliance next to an oven, grill or other source of high heat, or where it will be exposed to direct sunlight for long periods of time.
- WARNING: Ventilation: Make sure to have enough ventilation, keep any ventilation openings, in the appliance enclosure or in the built-in structure, clear all obstructions. Make sure plenty of air circulation around the appliance to prevent overheating.
- Level: Install appliance level in order for proper operation.
ELECTRICAL SAFETY
- Voltage: Plug the appliance to a 220-240V, 50Hz, properly earthed power outlet, it must be in good working order.
- Power connection: Do not use an adaptor or an extension cord.
Plug the power plug directly into a separate power point that cannot be accidentally turned off, and that is easily accessible so you can switch it off if needed.
- Power cord: Do not kink or damage the power supply cord. Make sure it is behind the appliance so no one can step on or place anything on the power supply cord or against it. A damaged power plug may overheat and cause a fire.
- Damaged cord: Do not use a cord that shows cracks or abrasion damage. Any damage to the cord may cause a short circuit, fire and/or electric shock. Contact our support centre on 1300 296 699 for advice
- WARNING! The light bulb supplied with this appliance is a special use bulb, which is only for use with this appliance, Do not use for domestic lighting. Do not use the appliance without the lamp installed. Do not touch the light bulb if it has been on for a long period of time.
- Disconnection: Never pull the powercord to unplug appliance. Grip the plug and pull straight out from the power point.
- Electrical work: If the installation of this appliance requires any electrical work, make sure it is carried out by an electrician.
GENERAL SAFETY INSTRUCTIONS (Cont.)
USAGE CONDITIONS AND RESTRICTIONS
- Children: Supervision over children is to ensure that they do not play with the appliance. Never allow them to use, play with or crawl inside the appliance. Cleaning and maintenance must not be done by children.
- Usage restrictions: This appliance can be used by children aged from 8 years and above, and persons with reduced physical, sensory or mental capabilities, or lack of experience and knowledge, if they are being supervised or been given instructions on how to use of the appliance in a safe way and understand the hazards with using this appliance incorrectly.
- Indoor domestic use only: Only for indoor domestic use only, such as in households, kitchen areas in shops, offices and in other working environments, use by clients in hotels, motels, bed and breakfast establishments and in catering and similar non-retail applications. It is not to be used for industrial or commercial use.
- Intended purpose: Do not use this product for anything other than its intended purpose, and only use it as described in this manual. Do not attempt to alter or modify this appliance.
- Intended purpose: Do not use any electrical or electronic appliances inside the food storage compartments of the appliance, unless they are of the type recommended by the manufacturer.
CLEANING AND MAINTENANCE
- Flames: Do not allow open flames or ignition sources enter the appliance.
- Disconnect: Make sure to unplug appliance before cleaning or servicing. Failure to do so can result in electric shock, injury or death. Do not connect or disconnect the plug when your hands are wet.
- Flammable/explosive substances: Do not store flammable or explosive substances such as aerosol cans with flammable propellant in this appliance.
- Solvents: Do not use solvent based cleaning products or abrasives on the interior.
- WARNING! Do not use mechanical devices to accelerate the defrosting process. Never use sharp or metal to remove frost or clean the appliance.
- Service: Never try to repair, modify or replace any part of the appliance, unless this manual says you can do so. All other servicing is to be done by a qualified technician, or contact our support centre on 1300 296 699 for advice.
REPONSIBLE DISPOSAL
- Do not throw this appliance out with your household rubbish. Observe any local regulations regarding the disposal of electrical consumer goods and dispose of it appropriately.
PRODUCT OVERVIEW

INSTALLATION
- Safety first: Before installing your new bar fridge, read all safety instructions in this manual, especially the sections on electrical safety and installation.
- Do not tilt the appliance more than 45° from upright when moving.
- This appliance is designed to be freestanding only and is not be recessed or built in.
- Do not apply force to any part such as the condenser or door.
- Place the bar fridge on a strong, level floor that is solid enough to support the unit when it is fully loaded.
- To fix the balance, Adjust the levelling legs at the bottom of the appliance.
- Ensure there is nothing that could prevent the door from closing.
- SPACING: Allow 10cm clear space between the back and 5cm on the sides of the appliance and your wall or anything else to make sure there is enough air circulation, which is needed to allow for the cooling of the compressor and condenser.
- If you have to position the refrigerator on carpet, use a plastic carpet protector underneath the appliance.

SIDE VIEWTOP VIEW
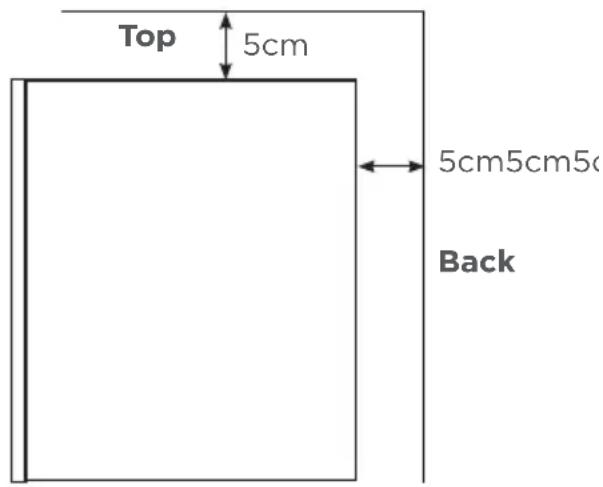
BE SURE TO PLACE APPLIANCE:
- Away from direct sunlight.
- Away from sources of heat (may increase power consumption).
- An area without excessive moisture and high humidity.
WARNING: Before you plug in the appliance, let it stand upright for 2 hours.
This will allow the refrigerant gases to settle into the compressor and reduce the possibility of a malfunction in the cooling system from transportation.
OPERATION
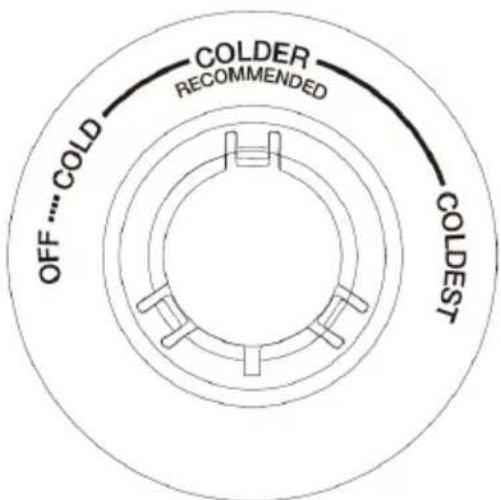
- For first time use, Please make sure to set the thermostat dial to Colder, then leave it powered on for 2-3 hours. then set the thermostat to desired settings and place foods in the appliance.
FREEZER COMPARTMENT TEMPERATURE SETTING
The internal temperature is controlled by a sensor. There are 3 settings: COLD, COLDER (which is recommended) and COLDEST.

FRIDGE COMPARTMENT TEMPERATURE SETTING
The internal temperature is controlled by a sensor. There are 4 settings: OFF, COLD, COLDER (which is recommended) and COLDEST.
REVERSING THE DOOR
This appliance has the capability of opening the door from either the left or right side. The appliance is delivered to you with the door opening from the left side. To change the opening direction, please follow the below instructions. Be sure to unplug the appliance to change the door.
CAUTION: Make sure you have someone there to help you, do not attempt to do this yourself.
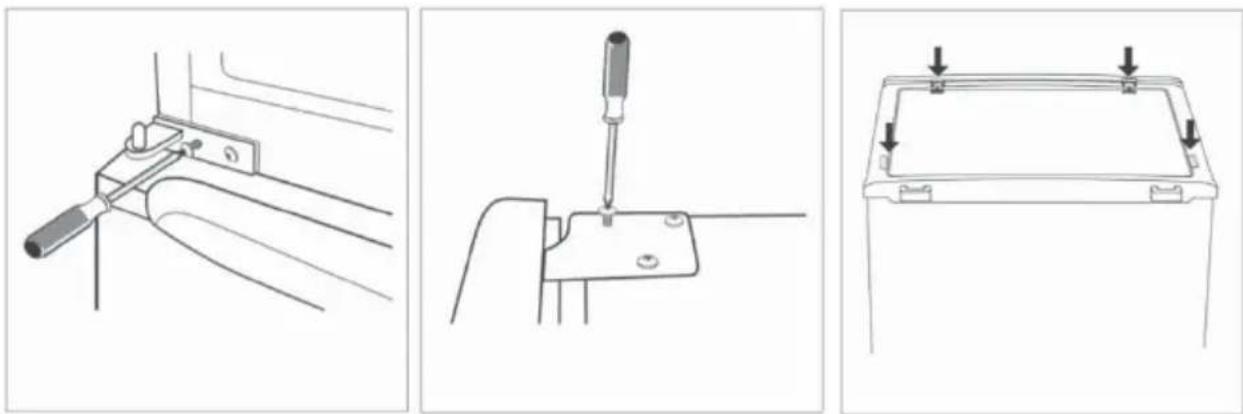
- Remove the upper cover (4 screws) and remove the upper hinge (3 screws).
- Remove the upper door and place in a safe position where it wont get damaged.
- Remove the pin under the upper hinge and screw it into the opposite side.


- Remove the middle hinge
- Remove the lower door and place in a safe position so it doesnt get damaged.
- Take the middle hinge hole covers from the left side of the appliances and fit them into the holes where the middle hinge has just been removed.


REVERSING THE DOOR (Cont.)
- Remove the two adjustable feed and the lower hinge (1 screw).
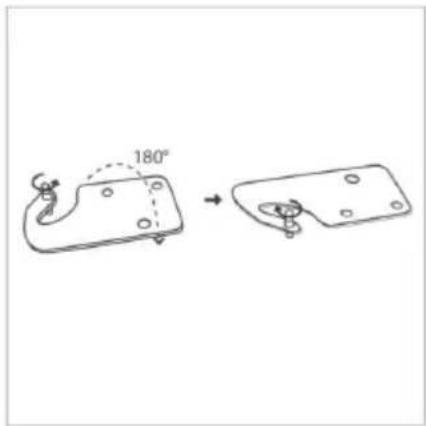
- Unscrew the pin at the end of the lower hinge, flip the hinge over and screw the back into the hinge (it is now on the opposite side).
- Place the lower hinge at the left hand side and refit the two adjustable feet.
- Place the lower door on the lower hinge pin.

- Rotate the middle hinge around 180° , place the lower pin into the lower door and screw it into the left hand side holes.
- Place the upper door on the middle hinge upper pin. Fit the upper hinge pin in the top of the upper door and screw back into place (3 screws).
- Place the upper cover back onto the top of the appliance and screw back into place (4 screws).
TROUBLSHOOTING
| Problem Possible Cause | |
| The appliance does not operate | It is not plugged in. Make sure it is properly plugged in and there is power at the socketThe circuit breaker tripped or has blown a fuse.A general power outage has cut power to your home. |
| The fridge turns on and off frequently. | The room temperature is higher then usualToo much food is within the fridge.Door is open too oftenDoor not closedTemperature set incorrectly. |
| There are vibrations • Appliance is | not level. |
| The fridge seems to make too much noise. | A rattling noise may come from the flow of the refrigerant, which is standard.You may hear gurgling sounds caused by the flow of refrigerant.Contraction and expansion of the internal walls may cause popping and crackling noises. |
| The door will not close properly. | Not LevelThe door was reversed and not installed correctly.The gasket is dirty or bent.The shelves, bins or baskets are out of position. |
| Moisture forms on the inside or outside walls of the bar fridge. | Hot and humid weather increases the rate of frost build-up.Open the door less often |
| Excessive frost and ice has built up. | Door has been left open.Something is preventing the door from closing.The door gasket is dirty or damaged. |
| The compressor runs continuously. | Select a lower setting.The door is open or not closed properly.Too much food is within the fridge. |
SPECIFICATIONS
| Total Gross Volume 221 Litres | |
| Total Storage Volume 197 Litres | |
| Climate Class T | |
| Rated Current 1.2A | |
| Power Supply 220-240V ~ 50Hz | |
| Rated Power of Lamp 1W | |
| Defrost Power 150W | |
| Refrigerant R600a(51g) | |
| Insulation Blowing Gas Cyclopentane |
SEIKI™
CUSTOMER HELPLINE:
1300 296 699
DISTRIBUTED BY:
Ayonz Pty Ltd
V1.0
- INSTRUCTION MANUAL
- CONTENTS
- GENERAL SAFETY
- IMPORTANT INFORMATION
- GENERAL SAFETY INSTRUCTIONS (CONT.)
- INSTALLATION
- ELECTRICAL SAFETY
- USAGE CONDITIONS AND RESTRICTIONS
- CLEANING AND MAINTENANCE
- REPONSIBLE DISPOSAL
- PRODUCT OVERVIEW
- BE SURE TO PLACE APPLIANCE
- OPERATION
- FREEZER COMPARTMENT TEMPERATURE SETTING
- FRIDGE COMPARTMENT TEMPERATURE SETTING
- REVERSING THE DOOR
- REVERSING THE DOOR (CONT.)
- TROUBLSHOOTING
- SPECIFICATIONS
- SEIKI™
Brand : Seiki
Model : SC-220AU7TMW
Category : Refrigerator