
GRP5 - Grill à sandwich GEORGE FOREMAN - Free user manual and instructions
Find the device manual for free GRP5 GEORGE FOREMAN in PDF.


| Product Type | Sandwich Grill / Panini Press |
| Brand | George Foreman |
| Model | GRP5 |
| Dimensions (W x D x H) | 12.0 x 10.5 x 4.5 inches |
| Weight | 3.5 lbs |
| Power | 800 watts |
| Plate Material | Non-stick coated cast aluminum |
| Plate Size | 9 x 9 inches |
| Temperature Control | Fixed thermostat (pre-set) |
| Indicator Light | Yes, power ready light |
| Floating Hinge | Yes, adjusts to thickness of food |
| Drip Tray | Removable, dishwasher safe |
| Cord Length | 30 inches |
| Cleaning | Wipe plates with damp cloth; drip tray dishwasher safe |
| Safety Features | Auto shut-off after 30 minutes; cool-touch handle |
| Warranty | 1 year limited |
| Repairability | Spare parts available through manufacturer |
| Usage | Indoor use only |
Frequently Asked Questions - GRP5 GEORGE FOREMAN
User questions about GRP5 GEORGE FOREMAN
0 question about this device. Answer the ones you know or ask your own.
Ask a new question about this device
Download the instructions for your Grill à sandwich in PDF format for free! Find your manual GRP5 - GEORGE FOREMAN and take your electronic device back in hand. On this page are published all the documents necessary for the use of your device. GRP5 by GEORGE FOREMAN.
USER MANUAL GRP5 GEORGE FOREMAN
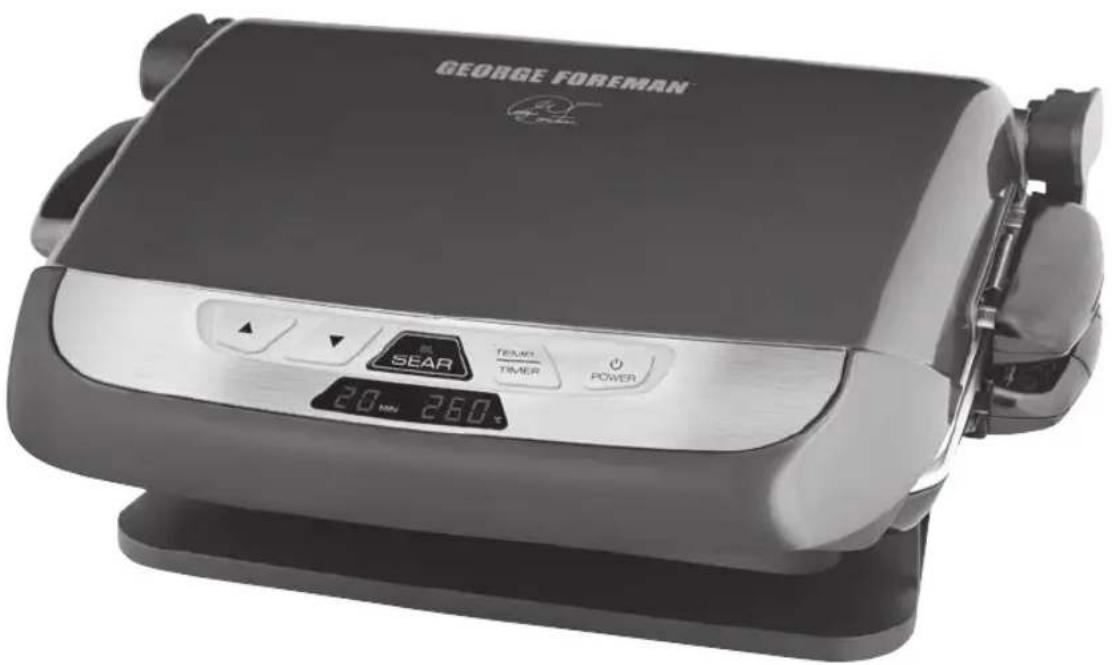
THE CHAMP ALL-IN-ONE GRILL
Instructions & Warranty
Spectrum Brands Australia Pty Ltd
Locked Bag 3004 Braeside
Victoria 3195 Australia
Customer Service in Australia
Toll Free: 1800 623 118
Email: info@spectrumbrands.com.au
Website: www.spectrumbrands.com.au
Spectrum Brands New Zealand Ltd
PO Box 9817 Newmarket
Auckland 1149 New Zealand
Customer Service in New Zealand
Toll Free: 0800 736 776
Email: service@spectrumbrands.co.nz
Website: www.spectrumbrands.co.nz
Spectrum Brands Australia Pty Ltd and Spectrum Brands New Zealand Ltd
Warranty Against Defects

In this warranty:
Australian Consumer Law means the Australian consumer law set out in Schedule 2 to the Competition and Consumer Act 2010;
CGA means the New Zealand Consumer Guarantees Act 1993;
Goods means the product or equipment which was accompanied by this warranty and purchased in Australia or New Zealand, as the case may be;
Manufacturer, We or us means:
- for Goods purchased in Australia, Spectrum Brands Australia Pty Ltd ABN, 78 007 070 573; or
- for Goods purchased in New Zealand, Spectrum Brands New Zealand Ltd, as the case may be, contact details as set out at the end of this warranty;
Supplier means the authorised distributor or retailer of the Goods that sold you the Goods in Australia or in New Zealand; and
You means you, the original end-user purchaser of the Goods.
- Our goods come with guarantees that cannot be excluded under the Australian Consumer Law, or the CGA. You are entitled to a replacement or refund for a major failure and compensation for any other reasonably foreseeable loss or damage. You are also entitled to have the goods repaired or replaced if the goods fail to be of acceptable quality and the failure does not amount to a major failure.
- The benefits provided by this Warranty are in addition to all other rights and remedies in respect of the Goods which the consumer has under either the Australian Consumer Law or the CGA. The original purchaser of the Goods is provided with the following Warranty subject to the Warranty Conditions:
- We warrant the Goods for all parts defective in workmanship or materials from the date of purchase (Warranty Period), for the period of:-
(a) Two (2) years for Russell Hobbs products (see product packaging for details)
(b) Two (2) years with five (5) year motor warranty for Russell Hobbs products (see product packaging for details)
(c) Limited Lifetime, Ten (10) years for Russell Hobbs cookware.
(d) One (1) year for George Foreman.
If the Goods prove defective within the Warranty Period by reason of improper workmanship or material, we may, at our own discretion, repair or replace the Goods without charge.
Warranty Conditions
-
The Goods must be used in accordance with the manufacturer's instructions. This Warranty does not apply should the defect in or failure of the Goods be attributable to misuse, abuse, accident or non-observance of manufacturer's instructions on the part of the user. As far as the law permits, the manufacturer does not accept liability for any direct or consequential loss, damage or other expense caused by or arising out of any failure to use the Goods in accordance with the manufacturer's instructions.
-
Exhaustible components (such as batteries, filters and brushes) of the Goods are included under this Warranty only where there is a defect in workmanship or materials used.
-
The warranty granted under clause 3 is limited to repair or replacement only.
-
Any parts of the Goods replaced during repairs or any product replaced remain the property of the manufacturer. In the event of the Goods being replaced during the Warranty Period, the warranty on the replacement Goods will expire on the same date as for the Warranty Period on the original Goods which are replaced.
-
In order to claim under the warranty granted under clause 3 you must:
(a) Retain this warranty with your receipt/proof of purchase; and
(b) Return the Goods to us at the relevant address or to the Supplier by prepaid freight within the Warranty Period accompanied with (i) the legible and unmodified original proof of purchase, which clearly indicates the name and address of the Supplier, the date and place of purchase, the product name or other product serial number and (ii) this warranty.
- This warranty is immediately void if:
(a) Any serial number or appliance plate is removed or defaced;
(b) The Goods have been serviced or otherwise repaired by a person not authorised to do so by us or where non approved replaced parts are used.
-
The Goods are designed for domestic use only. A limited 90-day Warranty applies to any industrial or commercial use of the Goods. The Goods must be connected to the electrical voltage requirements as specified in the ratings label located on the Goods.
-
This warranty does not cover the cost of claiming under the warranty or transport of the Goods to and from the Supplier or us.
-
This warranty is only valid and enforceable in Australia against Spectrum Brands Australia Pty Ltd and in New Zealand against Spectrum Brands New Zealand Ltd.
Contact us or the Supplier for further details.
Register your product online
If you live in Australia please visit: www.spectrumbrands.com.au/warranty If you live in New Zealand Please visit: www.spectrumbrands.co.nz/warranty Registration of your warranty is not compulsory, it gives us a record of your purchase AND entitles you to receive these benefits: Product information; Hints and tips; Recipes and news; Information on special price offers and promotions.
Any questions? Please contact Customer Service for advice.
Congratulations on the purchase of your George Foreman® appliance. Each unit is manufactured to ensure safety and reliability.
Before using the appliance for the first time, please read the instruction book carefully and keep it for future reference. Pass it on if you pass on the appliance.
When using electrical appliances, basic safety precautions should always be followed.
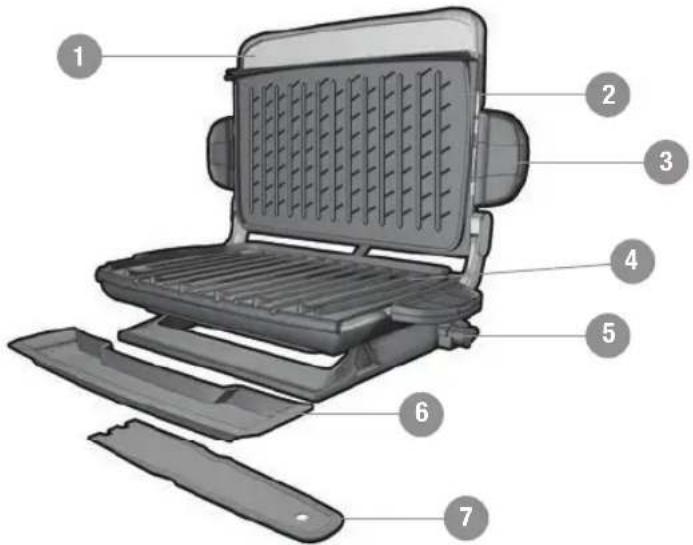
- Integrated handle with cooking guide
- Grill plate (upper)
- Grill plate release handles (both sides)
- Grill plate (lower)
- Adjustable rear foot
- Drip tray
- Spatula
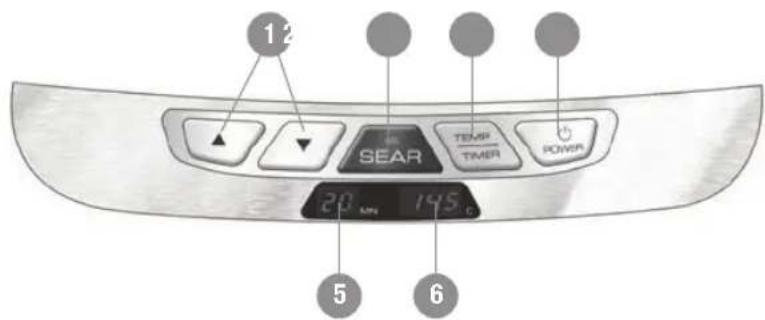
- Up/down selection
- Sear button
- Temp/Timer selector
- Power button
- Time display
- Temp display
-
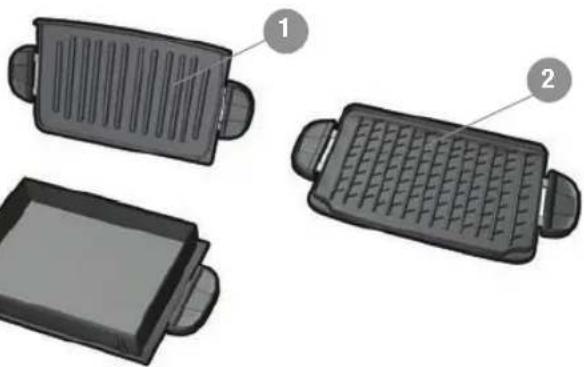
Traditional grill plate (SP-GRP5-TGP)
-
Cross-hatch grill plate (SP-GRP5-CHGP)
-
Deep dish baking pan (SP-GRP5-DDBP)
natural_image
Illustration of three different heat exchanger designs with labeled parts (no text or symbols present)BEFORE USING YOUR GRILL
• Before using your grill for the first time, remove all packaging material and any stickers.
- Wash and dry all the cooking plates and the drip tray as instructed in the 'Cleaning' section of this booklet.
- Wipe over the outer casing of the grill with a soft, damp cloth to remove any dust.
- Place on a flat, level, heat resistant surface, leaving enough space around all sides of the grill to allow heat to flow without damage to cabinets and walls.
- Do not use this appliance near or below any curtains or other combustible materials.
ATTACHING THE REMOVABLE PLATES
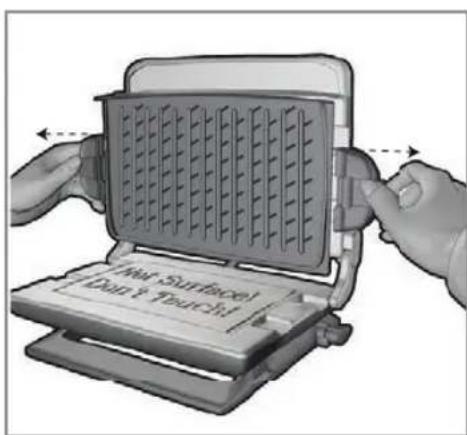
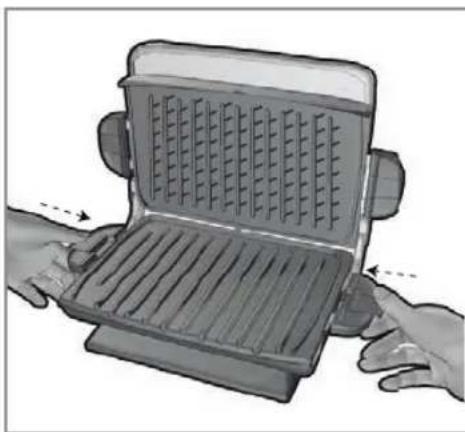
This grill comes with three removable plates. Use the release handles to interchange the plates and remove for easy cleaning.
NOTE: This appliance must always be used with two grill plates securely attached.
CERAMIC GRILL PLATES
- Securely attach the cross-hatch plate to the top of the grill and the traditional plate to the bottom of the grill. The plates can only be inserted into these positions.
TIP: The cross-hatch plate has 'upper' marked on the reverse side and the traditional plate has 'lower'.
- Pulling the lever on the release handles outwards, align each plate with the slots on either side of the grill. Then release the lever to lock the plates firmly into place.
NOTE: When inserting the plates, ensure "lower" printed on the under side of the traditional plate is closest to the front edge of the grill and "upper" printed on the under side of the cross-hatch plate is closest to the top edge.
natural_image
Illustration of hands opening a grater with heat exchanger (no text or symbols)DEEP DISH BAKING PAN
CAUTION: Never activate the rear foot when baking in the deep dish baking pan. The grill must always be in a completely horizontal position during use to avoid spillage of hot oils or hot liquids.
- To use the deep dish baking pan, securely attach the cross-hatch grill plate to the top of the grill and the deep dish baking pan to the bottom of the grill.
NOTE: The cross-hatch plate must be attached with the raised side facing upwards. Otherwise the plate will not lock in.
- Pulling the lever on the handles outwards, align each plate with the slots on either side of the grill. Then release the lever to lock plates firmly into place.
- Do not overfill the deep dish baking pan.
- When finished baking in the deep dish baking pan, remove with an oven mitt or tea towel by pulling the lever on the release handles outwards and gently lifting out of the grill. Place onto a heat-proof mat or rack.
- For suggested cooking times, please see the ‘deep dish baking pan’ cooking chart on page 10.
USING THE REAR FOOT WHEN GRILLING
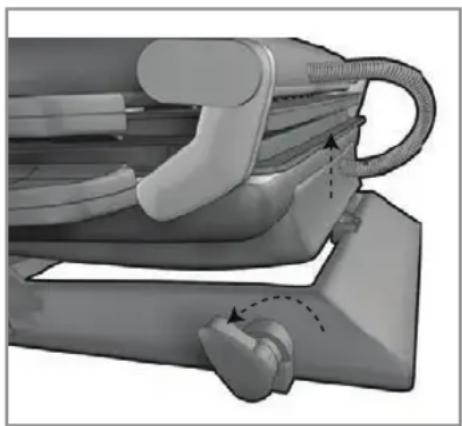
When grilling, you may use the rear foot (lever located on the bottom right side of the grill) to tilt the grill and speed the flow of fat into the drip tray. Activate it by turning the adjustable rear foot lever towards the front of the grill. Alternatively, leave the grill flat to prevent fillings such as melting cheese moving towards the front.
- Grill meat, burgers and anything that exudes fat on the tilt.
- Grill sandwiches, Panini and foods with fluid fillings like melting cheese, on the flat.
- Place the drip tray under the front sloped section of the bottom plate of the grill to catch run-off.
CAUTION: Ensure the lid of the grill is closed when moving the rear foot to prevent it from accidentally closing and causing injury.
natural_image
Mechanical assembly diagram showing a clamping mechanism with no visible text or symbolsPREHEATING THE GRILL
- Place on a flat, level, heat resistant surface, leaving enough space around all sides of the grill to allow heat to flow without damage to cabinets and walls.
- Ensure the top and bottom plates are securely attached (see ‘Attaching the removable plates’).
• Using the handle, close the lid of the grill. - Unwind the cord, and plug it into a wall power outlet. The LCD display will illuminate and show where the time and temperature will be displayed. The grill is now in standby mode.
- Turn the rear foot forwards to tilt the grill if required (see ‘Using the rear foot when grilling’).
- Place the drip tray under the front sloped section of the bottom plate to catch run-off.
- Press the “POWER” button on the grill; ‘5 minutes’ will appear on the timer display and ‘145°C’ will appear flashing on the temperature display.
NOTE: When using your grill for the first time, the unit may give off a fine smoke vapour and scent. This is normal and is caused by the first heating of the new elements and new cooking plates.
- Set and change the temperature at any stage in 15°C increments by tapping ▲r ▼ repeatedly. Temperature settings range from 145°C to 220°C. "SEAR" may also be selected (see 'Searing').
- As the grill is heating, the temperature will flash continuously on the LCD display and then emit an audible alert and glow steadily once it is reached.
- To set the desired cooking time, press the "TEMP/TIMER" function button once. The timer will begin to flash indicating that the time can now be adjusted.
- Set and change the time at any stage in one-minute increments by tapping or repeatedly. The minimum cooking time is 1 minute; the maximum is 20 minutes.
- After 5 seconds of inactivity, the timer will stop flashing and switch back to the temperature setting function. Alternatively, to manually switch back from the timer setting function to the temperature setting function, press the “TEMP/TIMER” button.
- The “TEMP/TIMER” button allows you to toggle between the two functions to adjust the desired grill settings.
NOTE: The temperature display on the grill may flash during cooking as the grill maintains this temperature. For suggested cooking times, see under the handle of the grill for a quick guide, or refer to the grilling charts on page 9.
USING THE GRILL
- Select the time and temperature desired, following directions in ‘Preheating the grill’ above. Allow time for preheating.
- Before first use, if desired, lightly oil the grill plates.
NOTE: Aerosol cooking spray should not be used on ceramic plates. Chemicals expelled from the aerosol may build up and reduce the efficiency of the plates.
- Once the grill has reached temperature (temperature is glowing steadily on the display), lift the lid by the handle using an oven mitt or tea towel. Carefully place items to be cooked on the bottom grill plate.
NOTE: The grill will accommodate two to four servings. Do not overload the grill plate.
- Close the lid, allowing the grill to begin cooking from both sides at once. The grill is designed with a floating hinge to cope with thick or oddly shaped foods.
- Ensure the grill plates are parallel to avoid uneven cooking.
CAUTION: Do not leave this appliance unattended during use.
- Allow food to cook for the selected time. For suggested cooking times, see the grilling charts on page 9.
- During cooking, the timer display will count down. When the selected time has elapsed, the grill will emit an audible alert and 'on' will appear on the timer display. You may continue to cook for longer if required.
CAUTION: The timer in this appliance is an audible warning only and does not switch off the heating elements at the end of the set time. The heating elements will continue to operate until the grill is switched off manually by pressing the "POWER" button or it is unplugged.
NOTE: It is important food is monitored throughout cooking to ensure it is fully cooked and does not burn.
- Turn off the grill manually by pressing the "POWER" button, switch off at the power outlet and remove the plug.
CAUTION: Always ensure the grill is switched off manually by pressing the "POWER" button or it is unplugged, as otherwise the heating elements will continue to operate.
- Using an oven mitt or tea towel, carefully open the lid and remove food using the plastic spatula or a non-metallic utensil.
NOTE: Be sure to always use either silicone, plastic or wooden utensils so as not to scratch the non-stick surface. Never use metal tongs, forks or knives as these can damage the coating of the cooking plates.
- Allow the drip tray (including liquid inside) to cool before removing from under the grill. Wash and dry the drip tray as instructed in the ‘Cleaning’ section of this booklet.
CAUTION: Always allow the plates to cool to room temperature before removing or cleaning. Do not remove grill plates while the grill is hot.
SEARING
Pressing the “SEAR” button will automatically set the grill to the highest temperature (260°C). Upon reaching 260°C, the grill will operate at this temperature for a duration of 90 seconds.
NOTE: "SEAR" can be selected at any stage during the cooking cycle, however always ensure SEAR temperature (260°C) has been reached before loading the grill.
- Press the “SEAR” button, which will illuminate red. 260°C will appear (flashing). When SEAR temperature is reached, the grill will emit an audible alert and 260°C will glow steadily on the temperature display.
- When the grill is at SEAR temperature, place the food on the grill (noting instructions above in 'Using the grill').
- The grill will cook the food at SEAR temperature for a duration of 90 seconds. It will then revert back to the previously selected temperature.
- Following this, food can continue to be cooked at the previously selected temperature or alternative temperature.
- Do not repeat use of the Sear function.
GRILLING RED MEAT, POULTRY, FISH AND SANDWICHES
The following are meant to be used as a guideline only. Times are based on a fully loaded grill. The cooking time will depend upon thickness and the cut being used. Use a cooking thermometer to test the food is cooked properly. If food requires longer cooking, check it periodically to avoid overcooking.
| FOOD TEMPERATURE | COOKING TIME | INTERNAL MEAT TEMPERATURE AND OTHER COMMENTS | |
| Red Meat | |||
| Hamburger (150g) 190-220°C 4-6 minutes | 2cm thick, cooked to medium | 75°C | |
| Skirt Steak (250g) 190-220°C 4-6 minutes | 2cm thick, cooked to medium | 71°C | |
| Porterhouse Steak (185g) 190-220°C | 6-8 minutes 2cm thick, cooked to medium | 71°C | |
| Eyefillet, Beef (150g) 190-220°C 3-5 minutes | 2cm thick, cooked to medium | 71°C | |
| Beef Kebabs 190-220°C 5-7 minutes | 2cm square pieces, cooked to medium 71°C | ||
| Pork loin fillets (no bone) 190-220°C | 4-6 minutes 2cm thick, cooked to well | 77°C | |
| Pork chops (bone in) 190-220°C 5-7 minutes | 3cm thick, cooked to well | 77°C | |
| Thin breakfast sausages or rissoles | 175-190°C 4-6 minutes | 75°C | |
| Kransky or Bratwurst sausages (thick) | 175-190°C 5-7 minutes | 75°C | |
| Bacon | 175-190°C 6-8 minutes | ||
| Lamb loin chops (bone in) | 190-220°C 5-7 minutes | 2cm thick, cooked to medium 71°C | |
| Poultry | |||
| Chicken breast fillet , boneless (200g) | 160-190°C | 9-11 minutes | Cooked to 75°C |
| Chicken tenderloins (4-6 pieces) | 160-190°C 4-6 minutes | 75°C | |
| Chicken burgers (150g) | 160-190°C 4-6 minutes | 75°C | |
| Duck breast fillet, boneless (150g) | 160-190°C | 9-11 minutes | Cooked to 75°C |
| Fish | |||
| White fish eg. Basa, Ling (180g) | 175-190°C 5-7 minutes | Cooked to medium 63°C | |
| Salmon fillet (180g) | 175-190°C 5-7 minutes | medium 63°C | |
| Salmon steak (200g) | 175-190°C 7-9 minutes | medium 63°C | |
| Tuna steak (180g) | 175-190°C 5-7 minutes | medium 63°C | |
| Prawns, large (6-10 cutlets) | 175-190°C 3-4 minutes | medium 63°C | |
| Sandwiches | |||
| Toasted cheese sandwich | 190-220°C | 2-3 minutes | Melted cheese and sandwich is golden |
| Toasted cheese sandwich with tomato, ham, tuna or bacon | 190-220°C 3-4 minutes | Melted cheese and sandwich is golden | |
| Panini or Focaccia 190-220°C 2-3 minutes | Melted cheese, bread lightly | toasted |
NOTE: To be certain your food is fully cooked to Australian & New Zealand Food Safety Standards, we recommend the following guidelines. Use a meat thermometer to test the food is cooked properly by inserting the meat thermometer into the centre of the food. Ensure the thermometer is not touching the bone.
FOOD SAFETY - INTERNAL MEAT, POULTRY & SEAFOOD TEMPERATURES
| FOOD TO BE COOKED MEDIUM FULLY COOKED / WELL DONE | |
| Chicken Breast N/A 75°C | |
| Chicken Thigh N/A 77°C | |
| Beef / Lamb / Veal 71°C 77°C | |
| Pork N/A 77°C | |
| Fish 63°C 68°C |
GRILLING FRUITS AND VEGETABLES
| FOOD TEMPERATURE COOKING TIME | ||
| Asparagus spears 175-190°C 4-6 minutes | ||
| Capsicum, assorted colours cut into 2cm slices | 175-190°C 4-6 minutes | |
| Mushrooms, thickly sliced | 175-190°C 4-5 minutes | |
| Onion slices, 1cm | 175-190°C 5-7 minutes | |
| Potato slices, 1cm | 175-190°C | 15-18 minutes |
| Field mushrooms, 6cm diameter | 160-175°C 4-6 minutes | |
| Zucchini slices, 1cm | 160-175°C 3-4 minutes | |
| Fresh pineapple slices, 1 cm | 175-190°C 2-4 minutes |
DEEP DISH BAKING PAN
| FOOD TEMPERATURE COOKING TIME | ||
| Pasta bake(cooked pasta with sauce) | 190°C | 20-35 minutes |
| Lasagne with fresh pasta sheets | 190°C | 30-50 minutes |
| Brownie, cake slice | 160-175°C | 20-40 minutes |
| Frittata or egg based savoury dish | 160-190°C | 20-40 minutes |
| Vegetable layer bake in sauce , Moussaka | 175-190°C | 40-50 minutes |
GRILLING HINTS & TIPS
- To prevent heat loss and promote even cooking, do not open the grill cover frequently while cooking.
- Do not overload grill; it will hold 2 to 4 servings comfortably.
- Use tender cuts of meat.
- Marinate tougher cuts of meat to tenderise them before cooking.
- Better cooking results may be achieved with boneless cuts of meat, chicken and fish.
- If cooking more than one piece of food, try to have them similar in size and thickness.
- Remember that since the grill is cooking from both sides, cooking time will typically be shorter than expected. It is important food is monitored throughout the process to ensure it is fully cooked and does not burn.
- Adjust the heat setting gradually and only as necessary. Cooking foods at too high a temperature can cause them to burn on the outside without cooking through the middle.
CLEANING
CAUTION: Always unplug from the wall power outlet and allow the grill to cool completely before cleaning. Do not immerse the grill, power cord or plug in water or any other liquid.
- Before cleaning, switch the grill off manually by pressing the "POWER" button and remove the plug from the wall power outlet.
- When cleaning up after grilling, with the drip tray placed at the front of the grill, use the plastic spatula to scrape off any excess fat and food particles left on the grill plates.
- Wipe plates with a damp cloth and a little detergent to remove any grease or char marks.
- Empty the plastic drip tray. Hand wash in warm, soapy water or alternatively place in the dishwasher on the top shelf.
CAUTION: Ensure the open grill cover is held by the handle while cleaning to prevent it from accidentally closing and causing injury.
- Remove the top and bottom plates by pulling the release handles outwards and lifting out of the grill.
- Hand-wash the plates in warm, soapy water or alternatively place in the dishwasher. If washing in a dishwasher, wipe the uncoated side of the plate with a dry towel to prevent discolouration.
NOTE: Dishwasher detergent may cause oxidation on the uncoated side of the grill plate. This is not harmful and can be wiped off with a damp towel.
CAUTION: Do not use scouring pads, scrapers or metal objects to clean the cooking plates. These will damage the ceramic surface. Utilise instead a gentle, non-metallic scrubbing pad or sponge to get rid of stubborn build up.
- Once clean and dry, securely re-attach the plates to the grill.
- To clean the grill cover, wipe with a warm, wet sponge and dry with a soft cloth.
- Any servicing requiring disassembly other than the above cleaning must be performed by a qualified technician.
STORAGE
- Ensure the grill is switched off manually by pressing the “POWER” button and the plug is removed from the power outlet.
- Ensure all parts have been cleaned and dried thoroughly before storing.
- Once the grill has cooled, wrap the cord around the base and store in a clean, dry place.
TROUBLESHOOTING
| PROBLEM POSSIBLE CAUSE SOLUTION | ||
| Ceramic finish on grill plates have cut marks | Metal utensils have been used | Always use silicone, plastic or wooden utensils to avoid scratching the non-stick surface of the grill plates. Never use metal skewers tongs, forks or knives. |
| Grill marks on food are very light | Grill was not fully preheated before use | Always preheat the grill. Ensure the temperature display has stopped flashing and is glowing steady before loading the grill |
| There is a food build-up on the grill plates | Grill was not properly cleaned after use | Use a gentle, non-metallic scrubbing pad or sponge to clean the grill plates. Do not use scouring pads, scrapers, metal objects or abrasive cleaners. |
| Food is dry and burnt Food is overcooked | Because grill is cooking from both sides, food is cooked much faster than in a fry pan or oven. For suggested times, see the quick cooking guide beneath the handle of the grill, or the grilling or deep dish baking pan charts on page 9-10. | |
| Grill does not turn on | Grill is not plugged in or it is in standby mode | Check the appliance is plugged into a working outlet and the grill is switched on manually by pressing the “POWER” button. |
IMPORTANT SAFEGUARDS
When using electrical appliances, basic safety precautions should always be followed.
- To protect against electrical hazards do not immerse the power cord, plug or grill in water or any other liquid.
- Do not use in the bathroom or near any source of water.
- Do not use outdoors.
- Always use the appliances handles as some parts will be hot. The temperature of accessible surfaces/parts may become very hot when the appliance is operating.
- Do not touch the hot cooking surfaces.
- Allow the appliance to cool before attaching or removing any plates or any parts.
- The timer in this appliance is an audible warning only and does not switch off the heating elements at the end of the set time. The heating elements will continue to operate until the grill is switched off manually by pressing the 'POWER' button or it is unplugged.
- This appliance is not intended for use by persons (including children) with reduced physical, sensory or mental capabilities, or lack of experience and knowledge, unless they have been given supervision or instruction concerning use of the appliance by a person responsible for their safety.
- Do not leave the appliance unattended when in use.
- Always turn off and unplug from the wall power outlet when not in use.
- Always turn off and unplug from the wall power outlet before cleaning the appliance.
- To disconnect, turn off the wall power outlet, then grasp the plug and remove from the wall power socket. Never pull by the cord.
- Do not operate this appliance with a damaged cord or plug or after the appliance has malfunctioned, or been dropped or damaged in any manner. Contact Customer service for replacement, examination, repair or adjustment.
- There are no user serviceable parts. If the power cord or appliance is damaged, it must be replaced or repaired by the manufacturer or similarly qualified person in order to avoid a hazard.
- Do not use on an inclined plane or unstable surface.
- Do not move the appliance when in use or immediately after use, as it may contain hot oils or other hot liquids.
- Do not set the rear foot to the tilt position when baking in the deep dish baking pan. The grill must always be in a completely horizontal position when using the pan to avoid spillage of hot oils or hot liquids.
- Do not cover the appliance when in use.
- Take care when opening the lid of the appliance, there may be some steam.
- Always take care when removing food after cooking as it is hot.
- Food may burn. Always monitor when using this appliance.
- Do not use the appliance near or below any curtains or other combustible materials.
- Do not place on or near any heat sources.
-
Keep the appliance and the power cord away from the edge of tables or countertops and out of reach of children and infirm persons.
-
Do not cook food wrapped in plastic film or polythene bags. It will cause a fire hazard.
- Always clean the appliance after use.
- Follow the instructions when cleaning this appliance.
- Do not attempt to fit accessories/components that have not been supplied with or are not specifically designed for use with this appliance.
- Do not attempt to cook food in the appliance without first fitting the cooking plates.
- Do not use appliance for other than its intended purpose.
- This appliance is not a toy. Children should be supervised to ensure they do not play with the appliance.
- Do not leave the appliance unattended when in use or where it may be touched by children or persons with disabilities.
- This appliance is not intended to be operated by means of an external timer or separate remote control system.
- For added safety, electrical appliances should be connected to a power outlet that is protected by a residual current device (RCD), also often referred to as a 'Safety Switch'. Your switchboard may already incorporate an RCD. If unsure, call an electrician for verification and fitting if necessary.
SAVE THESE INSTRUCTIONS
THIS APPLIANCE IS FOR HOUSEHOLD USE ONLY
GEORGE FOREMAN®
HEALTHY COOKING
RECIPES
THE CHAMP ALL-IN-ONE-GRILL
WWW.GEORGEFOREMAN.COM.AU
WWW.GEORGEFOREMAN.CO.NZ
® Registered Trademark of Spectrum Brands, Inc. ("SBI"), or one of its subsidiaries.
© 2013 SBI.
WWW.GEORGEFOREMAN.COM.AU
WWW.GEORGEFOREMAN.CO.NZ
GEORGE FOREMAN and logo are Trade Marks of Spectrum Brands, Inc., or one of its subsidiaries.
2013 Spectrum Brands, Inc.
Manufactured in China to Spectrum Brands specifications.
Recipes are to be used in conjunction with the (GRP5) George Foreman The Champ All-in-One Grill.
All rights reserved. No part of this publication may be reproduced, stored in a retrieval system or transmitted in any form or by any means, electronic, mechanical, photocopying, recording or otherwise, without prior permission of the copyright owner.
RECIPES
ZUCCHINI & TOMATO FRITATTA
Preparation Time: 10 minutes
Cook Time: 20 minutes
Ingredients:
4 free range eggs, lightly beaten
12 cup thickened cream
1 garlic clove, crushed
2 green zucchini, coarsely grated
2 spring onions, finely sliced
4 sprigs fresh thyme, leaves only
12 cup mozzarella cheese, grated
12 cup cheddar cheese, grated
1 cup semi-dried tomatoes
20 fresh basil leaves, torn
Salt & freshly ground black pepper
Canola oil for greasing
Method:
-
Prepare the deep dish baking pan from your George Foreman The Champ All-in-One Grill by rubbing both plates with paper towel dipped in a small amount of canola oil and lining the pan with baking paper. Heat your George Foreman The Champ All-in-One Grill to 160^ C with the deep dish baking pan in it.
-
Using electric beaters or a bench mixer, whisk the egg, cream and garlic together in a large bowl for 1 minute. Gently fold in the zucchini, spring onions, thyme, cheese, tomatoes and basil and season with salt and pepper.
-
Carefully pour the zucchini mixture into the pre-heated pan and cook for 15-18 minutes or until frittata is just firm to touch and set around the edges.
-
Carefully remove from the grill and let sit for 5 minutes. Using the edges of the baking paper, lift the frittata out of the pan. Cut into wedges and serve with a green salad.
Serves 6-8
Tip: You can serve this dish hot or cold.
VEGETARIAN LASAGNE BAKE
Preparation Time: 10 minutes
Cook Time: 30 minutes
Ingredients:
600g jar tomato passata
8 sheets fresh lasagne (not dried)
400g fresh ricotta cheese
1 cup parmesan cheese, shredded
Salt and pepper to taste
4 sprigs fresh thyme, leaves only
1/3 cup milk
120g baby spinach
1 bunch fresh basil, leaves only
12 cup mozzarella cheese, shredded
Canola oil for greasing
Method:
-
Prepare the deep dish baking pan from your George Foreman The Champ All-in-One Grill by rubbing both plates with paper towel dipped in a small amount of canola oil and lining the pan with baking paper. Heat your George Foreman The Champ All-in-One Grill to 175^ C.
-
In a bowl mix the ricotta and parmesan cheeses together with the salt and pepper, thyme and milk.
-
Pour 1/4 of the tomato passata into the tray and top with one layer of lasagne sheets. Top with 1/3 of the spinach, 1/3 of the cheese mixture, a handful of basil leaves and 1/4 of the tomato passata. Cover with a layer of lasagne sheets. Repeat this two more times, ending with the final layer of tomato passata on the top. Make sure you only fill 2/3 of the deep dish baking pan as you don't want the lasagne to spill over during cooking.
-
Close the lid and set the timer to 20 minutes.
-
At the end of the cook time, lift the lid and sprinkle the mozzarella cheese over the lasagne. Close the lid and press the timer to cook at 175^ C for a further 20 minutes. Cool in the deep dish baking pan for at least 15 minutes before serving with a plastic or silicone serving spoon.
Serves 6-8
RECIPES
LOW FAT CHOCOLATE BROWNIES
Preparation Time: 20 minutes
Cook Time: 45 minutes
Ingredients:
220g caster sugar
125g plain flour
60g cocoa
1 tsp baking powder
330ml apple sauce
4 egg whites
2 tsp vanilla
Canola oil for greasing
1 tbs icing sugar for dusting
Method:
- Prepare the deep dish baking pan from your George Foreman The Champ All-in-One Grill by rubbing both plates with paper towel dipped in a small amount of canola oil and lining the pan with baking paper. Pre-heat grill to 160 °C with the deep dish pan in it.
- Sift the sugar, flour, cocoa and baking powder together in a large bowl. Using electric beaters, whisk the apple sauce, egg whites and vanilla for 1 minute. Pour the wet ingredients into the dry ingredients and stir to combine. Don't over mix.
- Pour the batter into the prepared pan and smooth over using a rubber spatula. Place the lid down and bake for 18-20 minutes or until a skewer comes out clean.
- Use the edges of the baking paper to lift the brownie out to rest for at least 15 minutes before slicing. Dust with icing sugar before serving.
Serves 8-10
BANANA BREAD
Preparation Time: 10 minutes
Cook Time: 20 minutes
Ingredients:
1 ½ cups brown sugar
2 eggs
2 bananas, mashed
2 ¼ cups plain flour
1 tsp baking powder
1 tsp bi-carb soda
1 tsp ground cinnamon
1 tsp ground ginger
12 cup canola oil
Canola oil for greasing
Method:
- Prepare the deep dish baking pan from your George Foreman The Champ All-in-One Grill by rubbing both plates with paper towel dipped in canola oil and lining the pan with baking paper. Heat your George Foreman The Champ All-in-One Grill to 160°C.
- Meanwhile, place the sugar and eggs in a bench mixer bowl and beat with a paddle attachment until pale and fluffy (about 5 minutes). Mix in mashed banana to combine.
- Add the flour, baking powder, bi-carb soda, cinnamon and ginger and mix until combined. Pour in the canola oil and beat until all ingredients are well mixed.
- Pour the batter into the prepared deep dish pan and smooth over using a rubber spatula. Place the lid down and bake for 18-20 minutes or until a skewer comes out clean.
- Use the edges of the baking paper to lift the banana bread out to rest for 10 minutes before serving.
RECIPES
NEW YORK REUBEN TOASTIE
Preparation Time: 10 minutes
Cook time: 6 minutes
Ingredients:
2 large dill pickles or gherkins
14 cup whole egg mayonnaise
1 tbs Dijon mustard (or American mustard)
1 cup shredded cabbage
Juice of half a lemon
1 tsp red wine vinegar
250g thinly sliced corned beef or silverside
4 slices Swiss cheese
8 slices thick rye bread
Method:
- With the grill plates inserted into your George Foreman The Champ All-in-One Grill, heat the grill to 175^ C. Meanwhile, finely dice 2 pickles and combine with mayonnaise, mustard, cabbage, vinegar & lemon juice in a bowl.
- Sandwich four slices of bread with cabbage mix, beef and Swiss cheese and place on the grill.
- Toast for 4-6 minutes or until golden and serve immediately.
Serves 4
INDIAN SPICED BEEF KEBABS
Preparation Time: 70 minutes (including marinating time)
Cooking Time: 8 minutes
Ingredients:
800g sirloin, cut into 2cm cubes
12 kebab sticks
Marinade:
2cm fresh ginger peeled & roughly chopped
2 cloves garlic, crushed
12 tsp chilli flakes
14 tsp ground turmeric
2 tbs peanut oil
14 tsp salt
12 tsp pepper
Jasmine rice, yoghurt, lime & coriander to serve
Method:
- Skewer beef onto kebab sticks and place in a shallow baking tray (ensure the kebabs will fit).
- Combine the marinade ingredients in a food processor and blitz for 2 minutes. Pour over beef kebabs and refrigerate for one hour or overnight.
- Pre-heat your George Foreman The Champ All-in-One Grill to 160°C for 5 minutes. Press SEAR and when it reaches temperature, place the kebabs on the hot plate and close the lid. Cook for 5-7 minutes, turning on alternate sides half way through to ensure the kebabs cook evenly.
Serve over jasmine rice with a dollop of yoghurt, squeeze of lime and fresh coriander.
Makes 12
RECIPES
POWER BURGER
Preparation Time: 20 minutes
Cooking Time: 12 minutes
Ingredients:
1/4 cup finely chopped vegetables (eg. spring onions, zucchini, red or green capsicum)
14 cup grated carrot
14 cup whole meal breadcrumbs
1 egg
2 tbs parsley
2 sprigs of thyme, leaves only
750g lean minced steak (5-star)
1 tbs Worcestershire sauce
1 tsp Ground black pepper
8 Wholemeal Hamburger buns
Lettuce, Swiss cheese, sliced tomato and mustard to serve
Method:
- In a large bowl, combine all ingredients and mix well, using clean hands.
- Shape the mixture into eight patties, place onto a plate and refrigerate for 10 minutes.
- Meanwhile, pre-heat your George Foreman The Champ All-in-One Grill to 175°C. Arrange patties on the grill and cook with the lid down for 4-6 minutes, until juices run clear. Make sure you have the drip tray in place.
- Serve on wholemeal hamburger buns with lettuce, Swiss cheese, fresh tomato slices and mustard.
Makes 8 burger patties
CHICKEN SOUVLAKIS
Preparation Time: 30 minutes
Cooking Time: 10 minutes
Ingredients:
2 tbsp fresh lemon juice
2 tbs chopped fresh oregano
2 tbs olive oil
12 tsp salt
2 garlic cloves, minced
400g boneless chicken thighs
4 pita bread pockets
14 iceberg lettuce, shredded
Tzatziki sauce:
12 cup plain Greek yoghurt
100g Greek feta
1 tbs lemon juice
1 garlic clove, minced
1 Lebanese cucumber, seeded, coarsely grated and drained
Sea salt & black pepper
Method:
-
To marinate chicken, combine lemon juice, oregano, oil, salt, garlic and chicken in a shallow bowl. Cover with cling wrap and place in refrigerator for 30 minutes.
-
Meanwhile, for tzatziki sauce, place yoghurt and feta in a bowl and blitz with a stick blender until smooth. Add lemon juice, garlic and blitz again to mix. Add cucumber and stir through. Season with salt and pepper.
-
With your grill plates secured to the grill, heat your George Foreman The Champ All-in-One Grill to 175°C and lightly toast the pita bread pockets. Wrap them in foil until your chicken is done.
-
Remove chicken from bowl; discard marinade. Place drip tray under the grill and cook chicken with the lid down for 4-5 minutes or until done. Rest on a plate for 5 minutes, then cut into bite-size pieces. Place chicken in each pita bread, top with tzatziki sauce and serve with shredded iceberg lettuce.
Quick and easy!
Serves 4
RECIPES
ATLANTIC SALMON SALAD NICOISE
Preparation Time: 10 minutes
Cooking Time: 6 minutes
Ingredients:
| 600g Atlantic Salmon fillets | 3 soft boiled eggs, peeled and quartered |
| 1 tbs baby capers for garnish | 3 ripe tomatoes, quartered |
| Fresh dill fronds for garnish | 12 baby potatoes, boiled and cooled |
| Juice of 1 lemon | 4 anchovies, halved (optional) |
| Sea salt & black pepper | 2 spring onions, sliced on the diagonal |
| Canola oil for greasing | 12 cup continental parsley, chopped |
| Salad Ingredients: | 1 tbs red wine vinegar |
| 100g green beans, blanched and cut in half | 2 tbs extra virgin olive oil |
| 50g black olives | Canola oil for greasing |
Method:
- Heat your George Foreman The Champ All-in-One Grill to 160^ C by rubbing the grill plates with paper towel dipped in a small amount of canola oil. When the grill reaches temperature, place salmon fillets on the grill (gently place the lid down). Cook salmon for 3 minutes, carefully take off the grill and rest on a plate for 2 minutes.
- Meanwhile, place all the salad ingredients in a large bowl and drizzle with olive oil and vinegar, gently toss to combine.
- Transfer the salad to a serving platter and flake the salmon over the top. Drizzle lemon juice over the salad, sprinkle with capers and dill fronds. Add salt and pepper to taste.
Serves 4-6
- THE CHAMP ALL-IN-ONE GRILL
- Spectrum Brands Australia Pty Ltd and Spectrum Brands New Zealand Ltd
- Warranty Against Defects
- Warranty Conditions
- BEFORE USING YOUR GRILL
- ATTACHING THE REMOVABLE PLATES
- CERAMIC GRILL PLATES
- DEEP DISH BAKING PAN
- USING THE REAR FOOT WHEN GRILLING
- PREHEATING THE GRILL
- USING THE GRILL
- CAUTION: Do not leave this appliance unattended during use.
- CAUTION: The timer in this appliance is an audible warning only and does not switch off the heating elements at the end of the set time. The heating elements will continue to operate until the grill is switched off manually by pressing the "POWER" button or it is unplugged.
- NOTE: It is important food is monitored throughout cooking to ensure it is fully cooked and does not burn.
- CAUTION: Always ensure the grill is switched off manually by pressing the "POWER" button or it is unplugged, as otherwise the heating elements will continue to operate.
- NOTE: Be sure to always use either silicone, plastic or wooden utensils so as not to scratch the non-stick surface. Never use metal tongs, forks or knives as these can damage the coating of the cooking plates.
- CAUTION: Always allow the plates to cool to room temperature before removing or cleaning. Do not remove grill plates while the grill is hot.
- SEARING
- NOTE: "SEAR" can be selected at any stage during the cooking cycle, however always ensure SEAR temperature (260°C) has been reached before loading the grill.
- GRILLING RED MEAT, POULTRY, FISH AND SANDWICHES
- GRILLING HINTS & TIPS
- CLEANING
- STORAGE
- IMPORTANT SAFEGUARDS
- SAVE THESE INSTRUCTIONS
- THIS APPLIANCE IS FOR HOUSEHOLD USE ONLY
- GEORGE FOREMAN®
- RECIPES
- THE CHAMP ALL-IN-ONE-GRILL
- ZUCCHINI & TOMATO FRITATTA
- Ingredients:
- Method:
- VEGETARIAN LASAGNE BAKE
- LOW FAT CHOCOLATE BROWNIES
- BANANA BREAD
- NEW YORK REUBEN TOASTIE
- INDIAN SPICED BEEF KEBABS
- Marinade:
- POWER BURGER
- CHICKEN SOUVLAKIS
- Tzatziki sauce:
- ATLANTIC SALMON SALAD NICOISE
Brand : GEORGE FOREMAN
Model : GRP5
Category : Grill à sandwich