
NS-DASH150 - Dash cam INSIGNIA - Free user manual and instructions
Find the device manual for free NS-DASH150 INSIGNIA in PDF.


| Product Type | Dash Cam |
| Brand | Insignia |
| Model | NS-DASH150 |
| Dimensions | Approximately 2.5 x 1.5 x 1.2 inches |
| Weight | Approximately 2.5 oz |
| Power Supply | 12V DC car adapter (included) |
| Video Resolution | 1080p Full HD |
| Viewing Angle | 140° wide angle |
| Loop Recording | Yes |
| G-Sensor | Yes |
| Night Vision | Yes (IR LEDs) |
| Storage | Supports microSD up to 32GB (not included) |
| Display | 2.4 inch LCD |
| Battery | Built-in rechargeable lithium polymer |
| Mount | Suction cup windshield mount |
| Maintenance | Clean lens with soft, dry cloth |
| Safety | Do not install where it obstructs driver's view |
| Spare Parts | Replacement suction mount available |
| Repairability | Not user-serviceable; consult a professional |
| General Information | Records continuously; overwrites oldest files |
Frequently Asked Questions - NS-DASH150 INSIGNIA
User questions about NS-DASH150 INSIGNIA
0 question about this device. Answer the ones you know or ask your own.
Ask a new question about this device
Download the instructions for your Dash cam in PDF format for free! Find your manual NS-DASH150 - INSIGNIA and take your electronic device back in hand. On this page are published all the documents necessary for the use of your device. NS-DASH150 by INSIGNIA.
USER MANUAL NS-DASH150 INSIGNIA
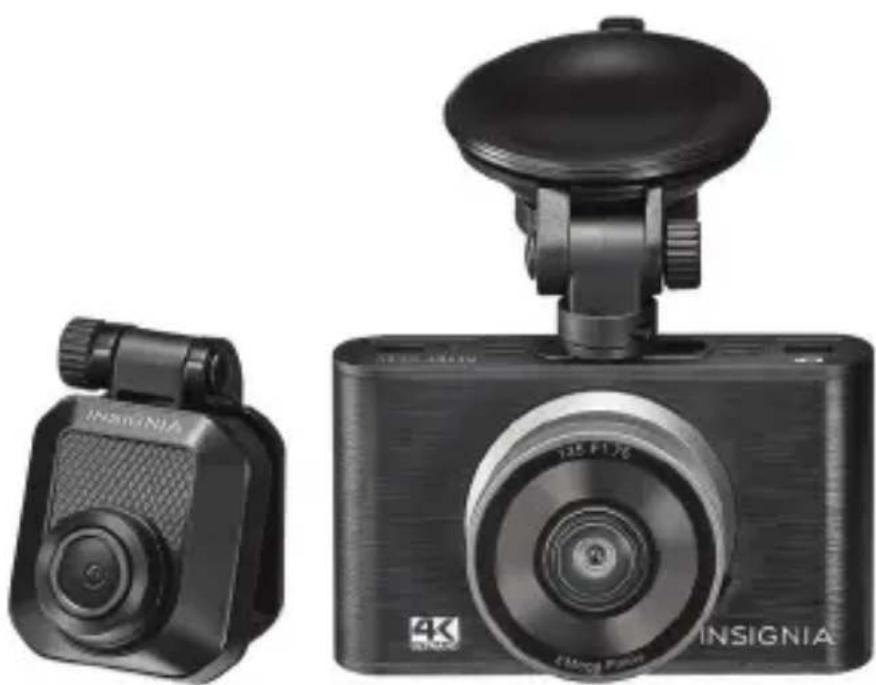
4K Front and Rear Dash Cam System
NS-DASH150
natural_image
Two black digital camera units, one with a sensor and the other a camera module (no visible text or symbols on the devices themselves)Contents
IMPORTANT SAFEGUARDS.... 3
Features.... 3
Package contents 4
Components 5
Installing your dash cam 7
Front camera....7
Rear camera....10
Using your dash cam 11
Formatting a MicroSD memory card ..... 11
Manually turning your dash cam off and on ..... 12
Understanding loop recording....13
Understanding Park mode 13
Recording an emergency video ..... 14
Recording video....14
Taking photos....15
Downloading files to a computer ..... 15
Navigating in the on-screen display ..... 16
Menu options and settings 17
On-screen displays 24
Troubleshooting....33
Specifications 36
ONE-YEAR LIMITED WARRANTY 38
IMPORTANT SAFEGUARDS
- Always read the safety instructions and User Guide carefully.
- Do not drop or allow forceful impacts to your dash cam, or install it in locations exposed to heavy vibrations.
- Do not disassemble or modify your dash cam in any way. Disassembly or modification may not only void the warranty, but may also cause damage.
- Do not use or store your dash cam in damp locations. Liquid entering your dash cam may cause damage or lead to fires or electric shock.
- Do not operate in extreme heat conditions. If your vehicle is parked in a hot sunny climate, let your vehicle cool down before using your dash cam.
Features
- Dual-camera setup records both in front of and behind your vehicle
• 4K Ultra High-Definition video with playback option captures a crystal-clear image - Wide Dynamic Range provides a vivid picture in both bright and dim environments, including at night
- Wide-angle lenses capture everything within a 135^ window in front and a 129^ window in back
- G-sensor detects if a collision has occurred and auto saves the current recording in a 1-, 2-, or 3-minute segment
- Loop recording feature overwrites old video to conserve memory card space (memory card not included)
INSIGNIA
- Temperature-resistant build functions at temperatures from -4^ to 140^ F (-20° to 60°C)
- Suction and adhesive mount attaches securely to your car's windshield (back camera attaches to the rear window with adhesive only)
- Power adapter plugs into your vehicle's 12 V accessory port
- Super Capacitor design makes sure that stored clips are secure during power transitions
Package contents
• 4K Front and Rear Dash Cam System
- 1080p rear camera
- Mounting bracket with suction cup
• Adhesive attachment
• 12-volt power adapter
- Mini USB cable (20 ft. [6 m])
- Micro USB cable (12 ft. [3.6 m])
- Quick Setup Guide
- User Guide
Components
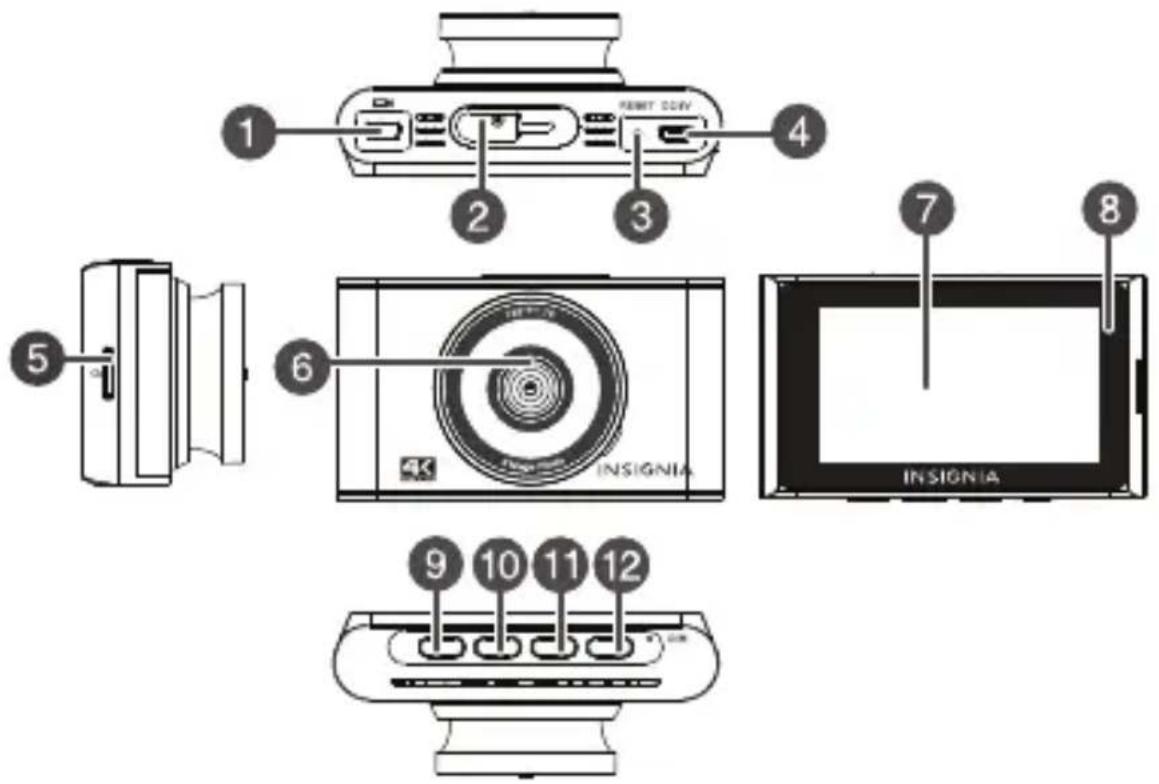
| # | ITEM DESCRIPTION | |
| 1 | USB port | Plug the Mini USB cable into this port and into the mini USB port on the rear camera. |
| 2 | Stent slot | Insert and slide the mounting bracket on the suction cup or adhesive mount into the mounting slot on the top of your dash cam. |
| 3 | Reset button | Press to reset your dash cam to factory defaults. Resetting doesn’t erase your files. |
| 4 | MicroUSB port | Plug the included Micro USB cable into this port and into the USB power adapter connected to your car's 12 V accessory port on your vehicle to provide power to your dash cam. |
| 5 | MicroSD card slot | Insert a 16 GB to 256 GB CLASS 10 or higher MicroSD memory card (not included) into this slot to save videos and photos. |
| 6 | Front lens | 4K Ultra High-Definition lens captures crystal-clear images. |
| 7 | Screen 3.0-inch | high-resolution LCD. |
| 8 | LED status indicator | Blinks when your dash cam is recording. Lights solid when your dash cam is idle. |
| 9 | Emergency Recording/Back button | • Press to save the currently active recording as a locked emergency file.• In the menus, press to return to the previous level. |
| 10 | Photo capture/Up button | • Press to take a photo.• In the Setting menu, p move up in a list of options.• In the Playback mode, press to delete a file. |
| 11 | Mic/Down button | • Press to start or stop recording sound.• In the menus, press to move down in a list of options. |
| # ITEM DESCRIPTION | ||
| 12 | Menu/Power/OK button | Press to open the Setting menu.In playback mode, press to play or pause a video.In the Setting menu, press to confirm selections.On the emergency video screen, press to stop the emergency video recording and enter the Setting menu.Press and hold for three seconds to turn your dash cam on or off. |
Installing your dash cam
Front camera
1 Insert a MicroSD memory card (16 GB to 256 GB memory capacity) (not included) into the card slot. Make sure that the labeled side of the MicroSD card is facing the windshield.
2 Clean and thoroughly dry the windshield area where you want to mount your dash cam.
3 Insert and slide the mounting bracket on the suction cup into the mounting slot on the top of your dash cam.
4 Peel the protective film from the mounting bracket, the dash cam lenses and screen.
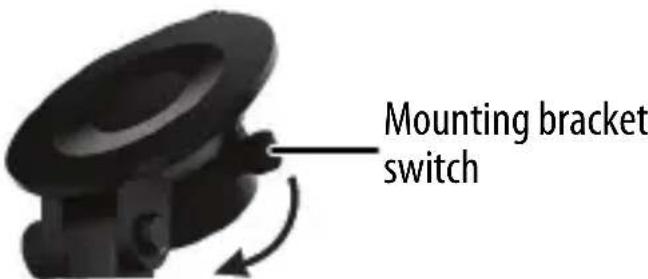
5 Position the suction cup on the center of the windshield, below the rearview mirror, then move the mounting bracket switch clockwise until you hear a click.
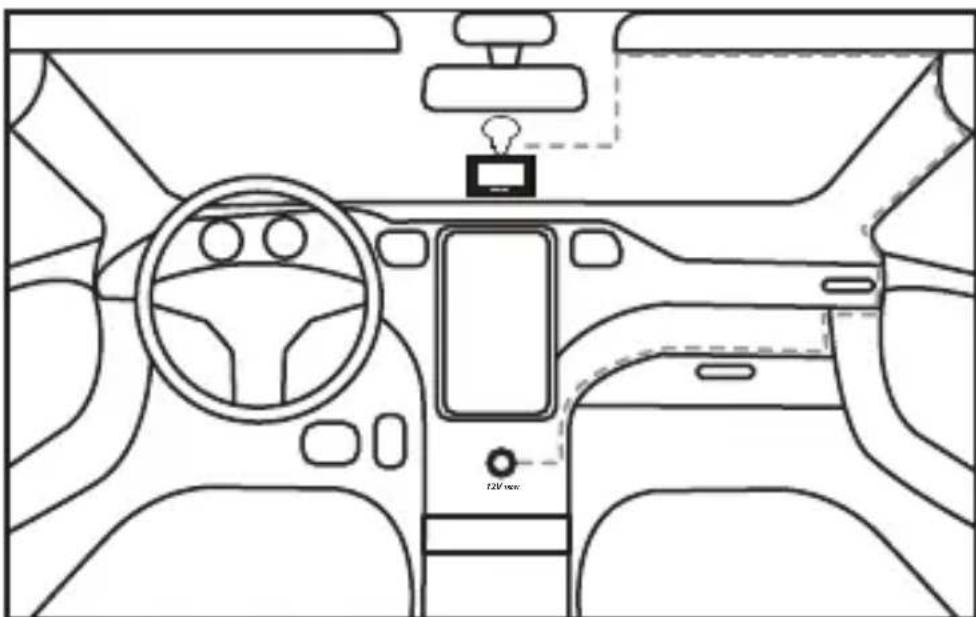
6 Connect the provided USB cable to the MicroUSB port on your dash cam, then thread the cable from your dash cam, around the outer edge of the windshield, and to the area in your car's dashboard where the 12 V accessory port is located.
natural_image
Line drawing of a car interior showing dashboard, steering wheel, and dashboard (no text or symbols)7 Plug the cable into the included USB power adapter, then plug the adapter into the vehicle accessory port and turn on your vehicle. Your dash cam starts automatically.
8 Rotate the mounting bracket to adjust the viewing angle as needed.
9 Follow the on-screen prompts to set up your dash cam. Make sure that you format the memory card during setup. If the card is not formatted, it may not record or play back. See Formatting a MicroSD memory card on page 11.
When you turn on your dash cam for the first time, you are prompted to enter basic setup information, such as Language, Year, Month, and Day. See Menu options and settings on page 17. Your dash cam uses this information when creating file names and when displaying time stamps. Subsequent startups go directly to the video screen.
Rear camera
1 Clean and thoroughly dry the rear window area where you want to mount your rear camera.
2 Connect the Mini USB cable to the Mini port on the front camera.
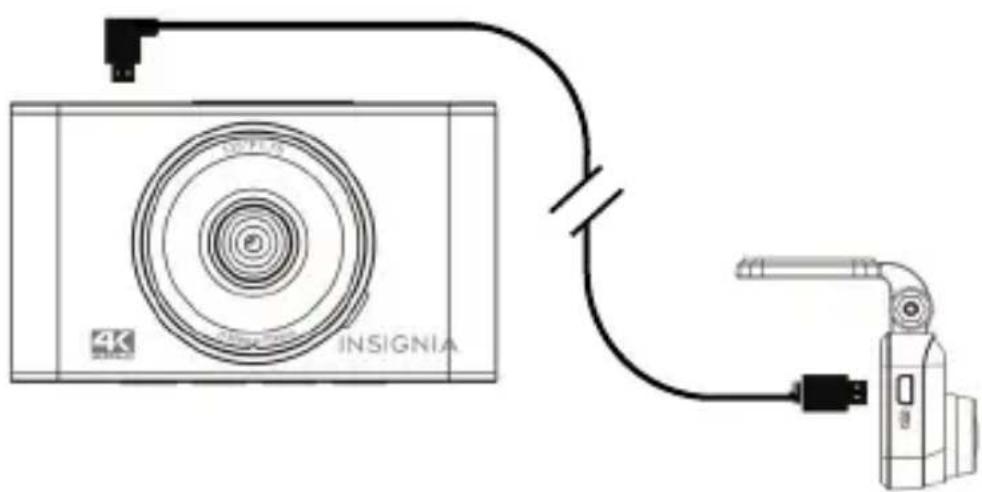
3 Connect the Mini USB cable to the Mini port on the rear camera.
4 Peel the protective film from the rear mounting bracket and camera lens.
5 Position the bracket on the center and inside of the rear windshield, then firmly press the bracket to the windshield.
6 Organize and tuck away the cable to make sure that the cable doesn't obstruct the driver's view.
7 Position the rear camera so that it faces out of the rear window.
Using your dash cam
Formatting a MicroSD memory card
About the MicroSD card
Note: Use a MicroSD card with 16 GB to 256 GB of memory. We recommend using a card with the highest memory capacity available. Higher memory capacity lets you record more.
- Before starting to record, you have to insert a Class 10 or above MicroSD card with up to 256 GB capacity into the slot located on the side of the front camera. If the card is not formatted, a message asks you if you want to format the card.
- Make sure that the memory card has been formatted before you use it.
- Do not remove the memory card during recording. Your dash cam automatically powers off after you remove the memory card.
- When the MicroSD card is full, the oldest footage will be deleted to make way for the new. If you witness something that you don't want to be deleted, press the emergency record button.
CAUTION: When you format an MicroSD card, all files, including emergency recordings, on the card are erased. Save any files you want to keep to another device (like a computer) before you format the card.
1 Turn on your vehicle.
2 Insert a MicroSD card into the MicroSD card slot.
3 Press the Menu button to open the Setting menu.
4 Press the ▲ (up) or ▼ (down) button to select Format SD Card, then press the OK button. A message asks you if you want to format the card.
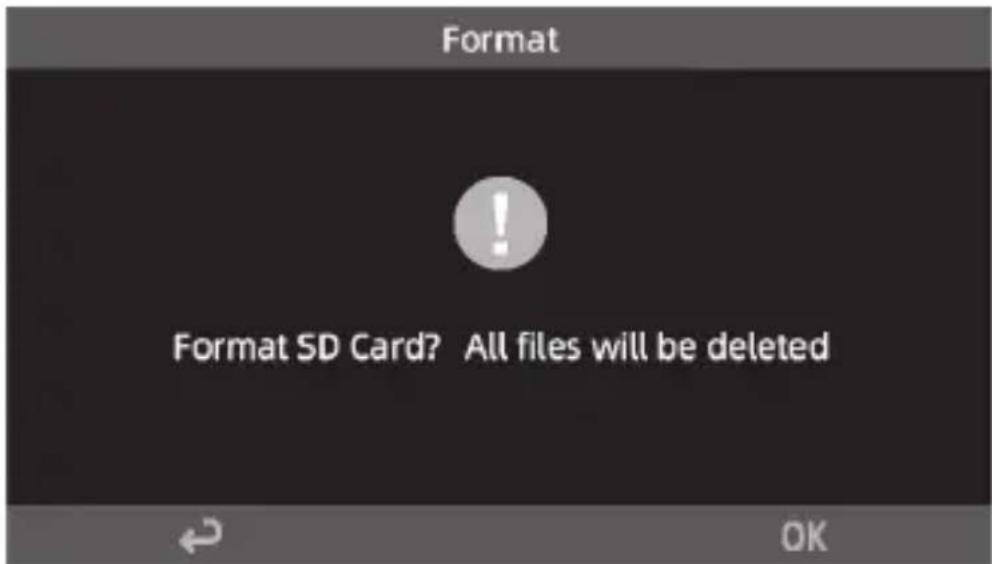
5 Press the OK button. Your dash cam formats the card.
About MicroSD storage
The memory area on the MicroSD card is divided into two partitions, locked files (40%) and unlocked files (60%). Your dash cam uses the unlocked partition for loop recording and the locked partition for storing emergency recordings. For more information, see Understanding loop recording on page 13 and Recording an emergency video on page 14.
Manually turning your dash cam off and on
Your dash cam turns on automatically when you turn on your vehicle. You can manually turn your dash cam off, then turn it back on.
- Press and hold the Menu button for the turn your dash cam off. Press and hold this button again for three seconds to turn it back on.
Understanding loop recording
The MicroSD card is divided into two partitions, locked (40%) and unlocked (60%). When the MicroSD card gets full, your dash cam continuously overwrites the oldest recordings in the unlocked partition with recent recordings. To prevent overwriting an active recording, press the Emergency Recording button. You dash cam moves the selected recording to the locked partition on the MicroSD memory card.
Understanding Park mode
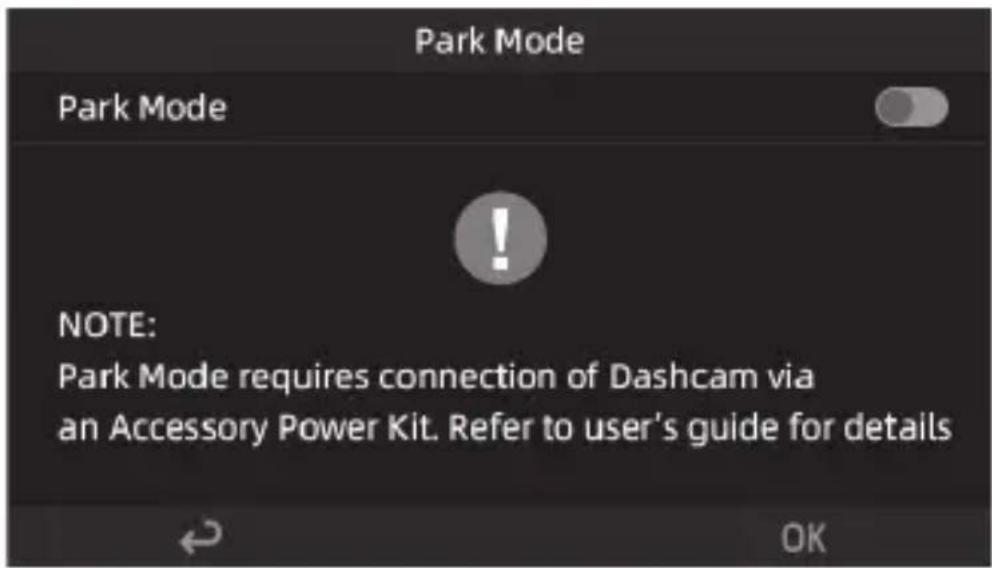
Park mode only functions when your dash cam is powered with a compatible Car Ignition Hardwire Kit (not included) and the vehicle ignition is turned off. Park mode, in combination with the Ignition Power Kit, lets your dash cam go into low power standby mode to preserve your car's battery while still monitoring for any sudden G-forces on the vehicle (for example when the vehicle is impacted by another vehicle while parked).
If you don't install a Car Ignition Hardware Kit and you try to turn on Park mode, a message tells you that you need to install a kit.
If the G-sensor is triggered, your dash cam wakes up and records one minute of emergency video, then returns to sleep mode. Within one minute, your dash cam checks the G-sensor. If the G-sensor is triggered again, your dash cam starts loop recording for five minutes, then it turns off and enters park mode.
Recording an emergency video
An emergency recording automatically starts when the G-Sensor registers an impact. Emergency recordings create protected (locked) files that are not overwritten by the continuous loop recording. In addition, to make sure that important footage isn't lost surrounding an incident, adjacent video clips are locked if the incident happens within 10 seconds of the beginning or end of a clip.
You can manually start and stop an emergency video.
- When your dash cam is turned on, press the Emergency Recording button to start recording. Press this button to stop recording and save the clip. Press this button again to save the next clip in progress.
Note: When the emergency recording partition is full, your dash cam displays Emergency video file is full! Save the files you need to keep to a computer. See Downloading files to a computer on page 15. If you don't clear the emergency clips, each time a new emergency clip is recorded, you see the message and your dash cam deletes the oldest emergency video.
Recording video
1 Make sure that your power cable is connected and the MicroSD card is inserted.
2 After the car is powered on, your dash cam turns on automatically and start recording.
3 Press the Menu button to open the Setting menu. If you leave the Setting menu open for 30 seconds without operation. Your dash cam will return to the recording interface and continue recording.
Taking photos
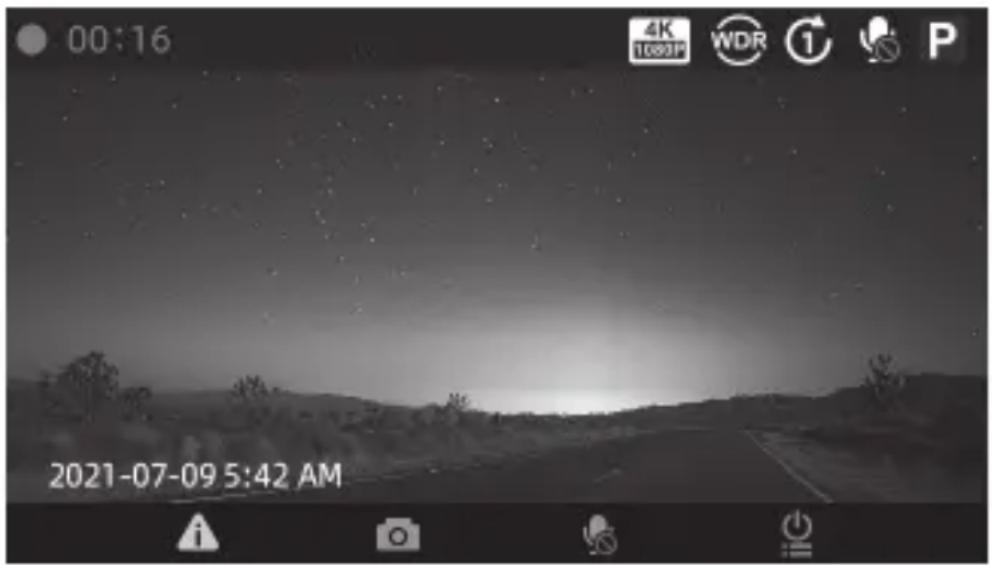
- On the Main screen press the (camera) button to take a photo.
Downloading files to a computer
You can transfer files from your dash cam to a computer.
1 Remove the SD memory card from your dash cam and insert it into a card reader on your computer. The memory card appears as an external disk device in your list of files.
2 Download the files to your computer into a directory you can easily find.
3 On your computer, right-click the device, then select Eject from the option list that appears.
4 Remove the card and put it back in your dash cam.
Note: Your dash cam doesn't support a direct USB connection to the computer for transferring the files.
Navigating in the on-screen display
1 Make sure that your dash cam is turned on and in recording mode. The Main screen opens.
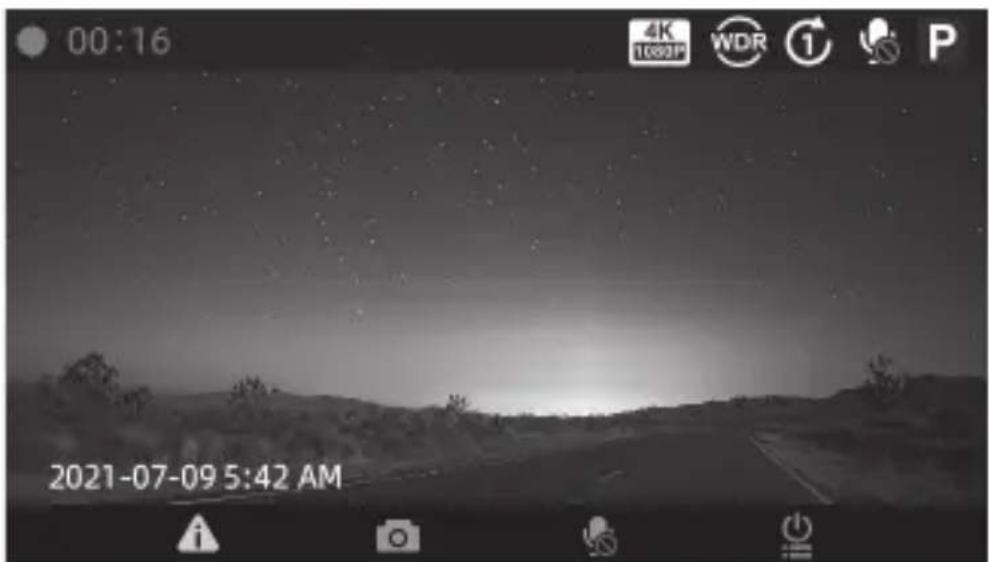
2 Press the Menu button. The Setting menu opens.
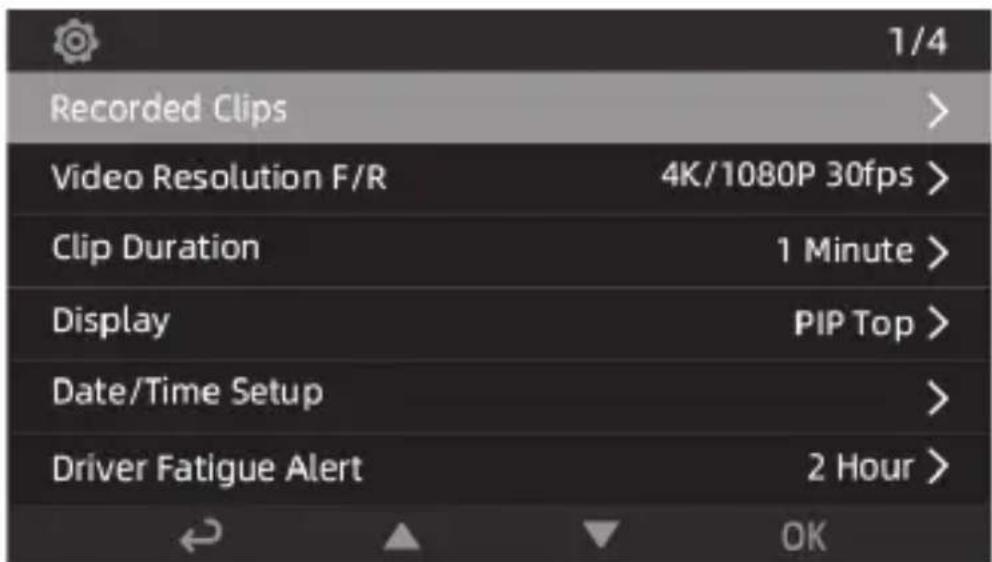
3 Press the ▲ (up) or ▼ (down) button to select an option, then press the OK button.
4 If the option has multiple settings, press the ▲ (up) or ▼ (down) button to select a setting, then press the OK button to confirm your selection.
5 To return to the previous menu, press the (return) button.

Menu options and settings
| OPTION DEFAULT SETTING | ||
| Video Resolution F/R | 4K/1080p 30fps | Note: For each resolution choice, the maximum length of recordings that fit on the MicroSD card is displayed in minutes in the Video Resolution screen.Single camera:4 K 3 0 fps1600p 30fps1080p 30fps1080p 60fps720p 30fps720P 60fpsDual camera:4K/1080P 30fps1600p 30fps/1080p 30fps1080p 30fps/1080p 30fps720p 30fps/720p 30fps1080p 60fps/1080p 30fps720p 60fps/720p 30fps |
| Clip Duration | 1 Minute Sets the duration of each recorded clip. You can select 1 Minute, 3 Minute, or 5 Minut When the memory card is full, your dash cam deletes the oldest recordings to make room for new recordings. Your dash cam doesn't automatically delete emergency recordings. You must delete these recordings manually. | |
| Display PIP (Picture in Picture) | Sets what is displayed on-screen. You can select:• PIP Top(picture-in-picture) to display the front camera video on the full screen and the rear camera video on top left area.• PIP Bottom to display the rear camera video on the bottom of the Main screen and the front camera video on the full screen.• Front Camerato display only the video from the front camera.• Rear Camerato display only the video from the rear camera.• Swap to display the PIP with the rear camera video larger than the front camera video. | |
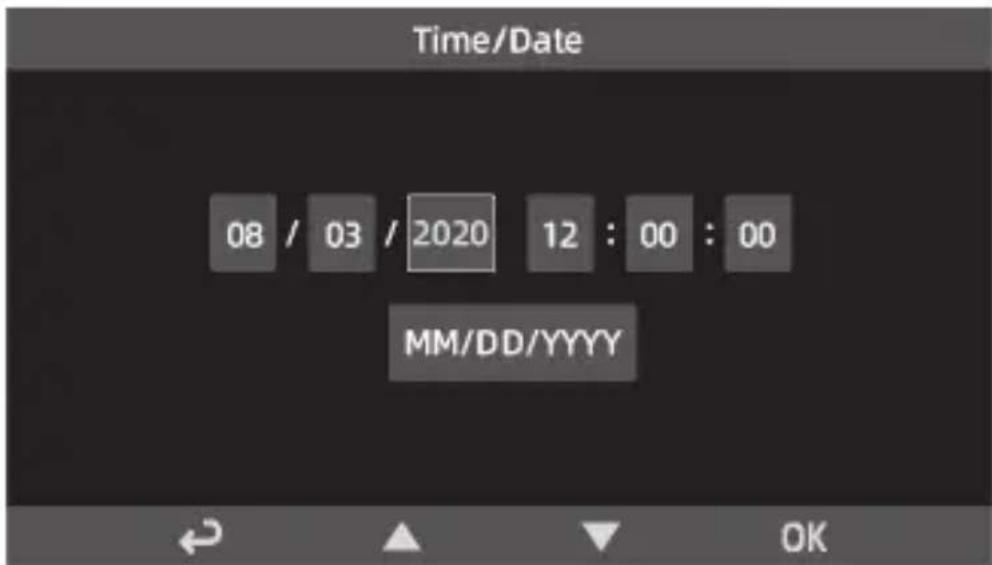
| Date/Time Setup | YYYY/MM/DD | |
| Driver Fatigue Alarm | 2 hours Dis | plays the icon and beeps once to remind you to rest. You can select 1h, 2h, 4h, or Off. If you do not stop for a break, the alarm is repeated every 30 minutes. |
| Headlight Reminder | On If your | dash cam detects a low light situation when you turn on your vehicle, it displays the icon to remind you to turn on your headlights. You can select On or Off. |
| Park Mode Off See Understanding | ding Park mode on page 13. | |
| G-sensor Sensitivity | Medium When the G-Sensor detects an impact, it automatically starts an emergency recording to save the recorded video in a locked file. An emergency file cannot be overwritten by the loop recording. The G-sensor sensitivity option lets you adjust the G-sensor sensitivity. You can select High, Medium, or Low. Note: Selecting High captures a less powerful impact. Selecting the Low setting requires a more forceful impact to trigger a clip capture. | |
| Date/Time Stamp | On When a video is playing, displays the date and time information (the watermark) above the video. You can select On or Off. | |
| Volume Medium Sets the beep and speaker playback volume. You can select High, Medium, Low, or Off. | ||
| Button Beep | On When set to On, a beep sounds each time you press a button. You can select On or Off. | |
| Display Auto Sleep Time | Always On Sets | the amount of time before the LCD switches off. You can select 1 Minute, 3 Minute, 5 Minute, or Always On. |
| Language English Sets the OSD language.You can select English, French, or Spanish. | ||
| WDR On (Wide Dynamic Range)Automatically adjusts the camera exposure. You can select On or Off. | ||
| Format SD Card | Formats the SD memory card. Press the OK button to start formatting.CAUTION: When you format a memory card, it erases all the data on the card. Make sure that you backup any recordings you want to save. See Downloading files to a computer on page 15. | |
| Format Reminder | 30 Days Dis | plays a message that reminds you that your MicroSD card may need to be reformatted. You can select 15 Days, 30 Days, 60 Days, or Off. |
| Restore Defaults | Restores all the dash cam settings to the factory defaults. Press the OK button to reset. No files will be deleted. | |
| About Press | the OK button to | view your dash cam's current software version. D150 INSIGNIA XXXXXXXX Vxxx |
On-screen displays
Main screen
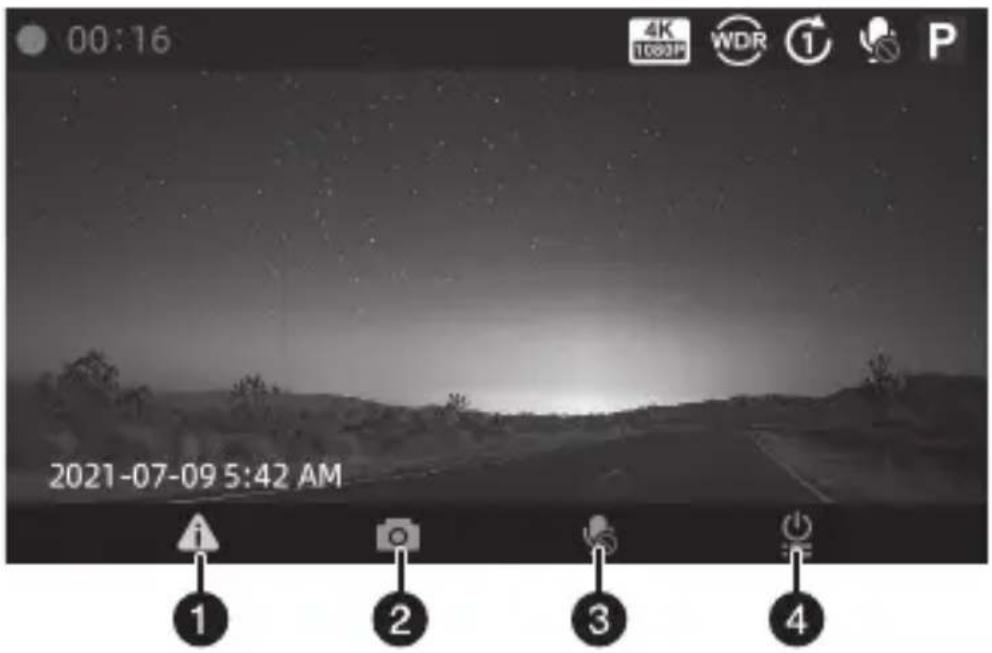
| # | I C | O N | N A M |
 | Resolution | Shows the video resolution. The resolution icon changes based on the selected video resolution. | |
| 1 |  | Emergency recording | Press to start an emergency recording. |
| 2 |  | Photo | Press to capture a photo of the current scene. |
| 3 |  | Sound record | Press to mute or unmute the microphone. |
| 4 |  | Settings | Press to open the Setting menu. Hold for three seconds to turn your dash cam on or off. |
Video recording screen
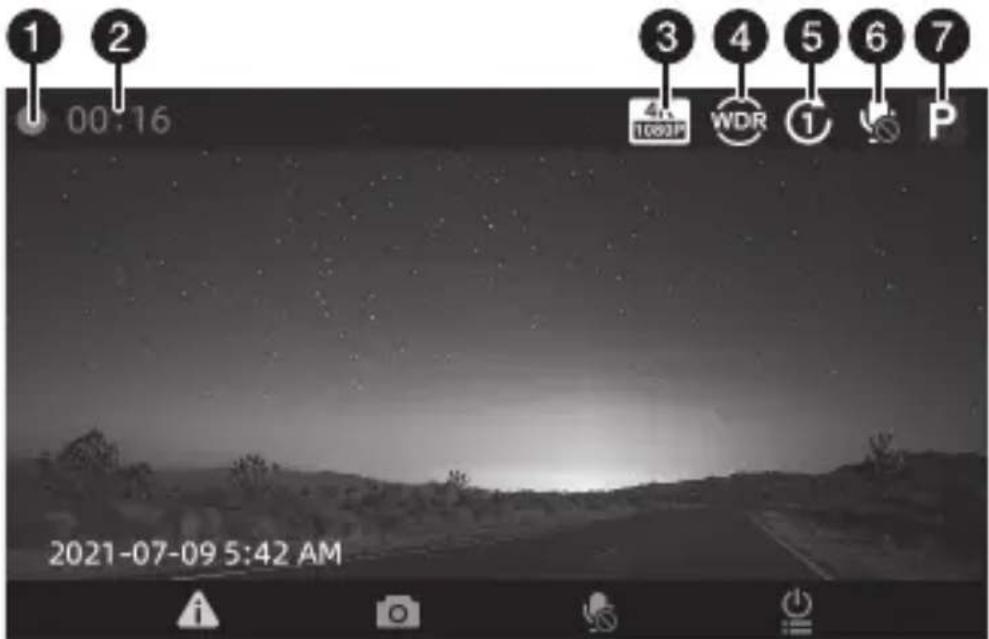
| # | I C | O N | N A | M |
| 1 |  | Recording in progress | Flashes when your dash cam is recording. | |
| 2 | 00:16 | Recording time for the current clip. | Shows how long the current clip has been recording. | |
| 3 Re |  | Shows the video resolution of front and rear cameras. | ||
| 4 W |  | Lights when WDR (Wide Dynamic Range) is turned on. | ||
| 5 Loop time | Shows the loop recording time (1 Minute, 3 Minute, or 5 Minute). | |||
| 6 Mic |  | Shows whether the microphone is turned on or off. | ||
| 7 Parl |  | Shows whether Park mode is turned on or off. When Park mode is turned on, the recorder enters sleep mode. The Park mode feature requires installation of an Ignition Hardwire Kit (not included). | ||
Emergency video screen
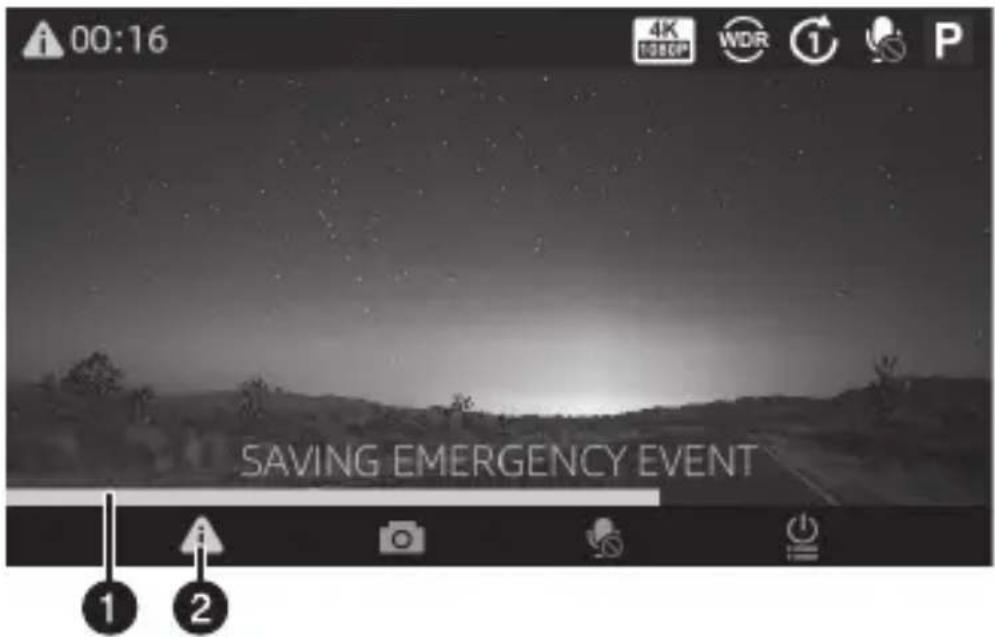
| # | I C | O N | N A M |
| 1 | Emergency video progress bar | Shows the progress of saving the emergency file. | |
| 2 |  | Emergency recording | Press to start an emergency recording.The icon flashes while recording. No other buttons are available while recording. |
Video and photo selection screen
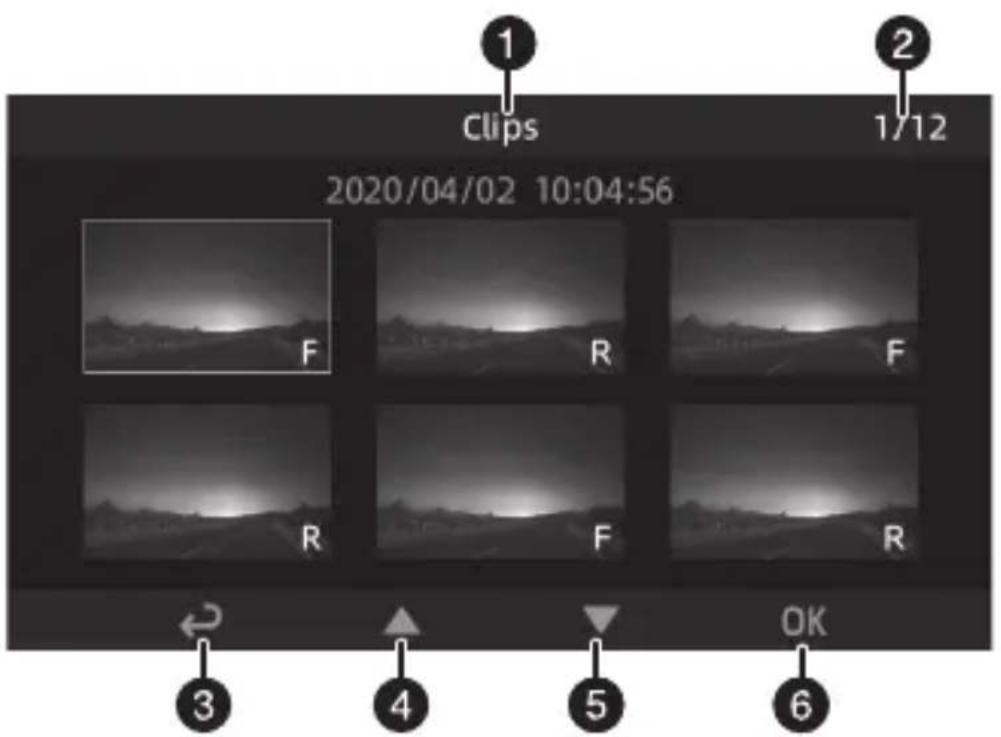
| ICON NAME DESCRIPTION | |||
| 1 | CLIPS | File classification | Indicates the type of file (video or photo) that is currently selected. |
| 2 | 1/12 | Current page/total pages | Shows the current page and the total number of pages of thumbnails. |
| 3 Return | Press to return to the previous screen. | ||
4 Up  | Press to previous thumbnail. | ||
| 5 Down | Press to next thumbnail. | ||
| 6 | OK | OK | Press to open the highlighted thumbnail and video the video or photo. |
Note: The F and R labels on thumbnails correspond to Front and Rear camera clips.
Playback screen
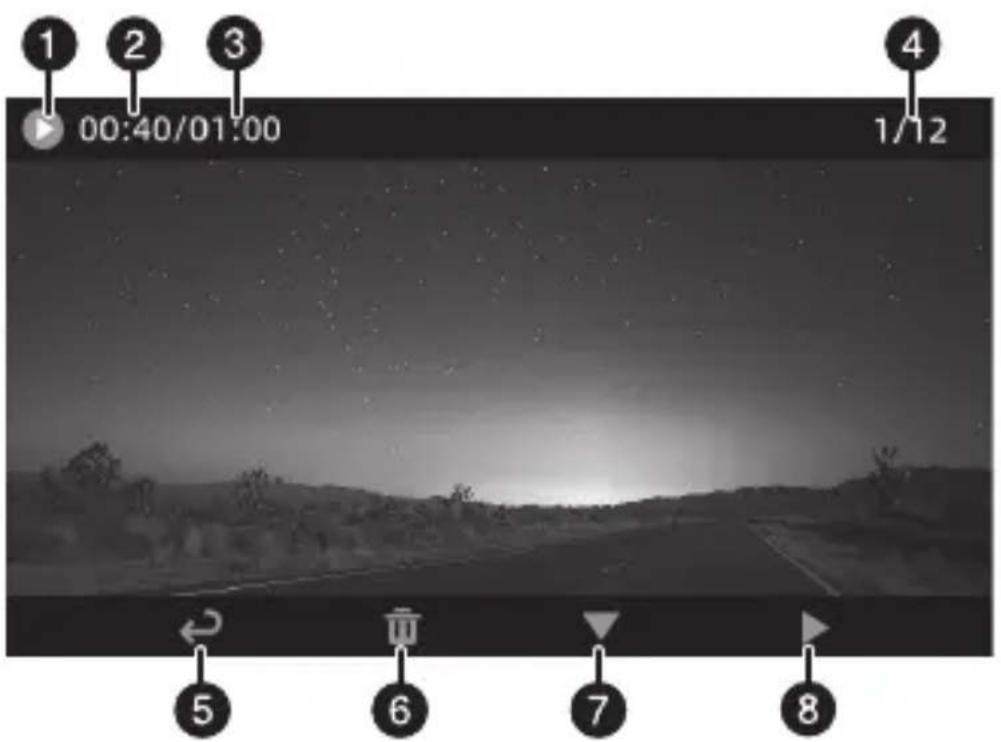
| # | I C | O N | N A M |
| 1 | Playback icon | Lights when your dash cam is playing a file. | |
| 2 | 00:40 | Playback time | Shows the amount of time a file has been playing. |
| 3 | 01:00 | File time | Shows the duration in minutes and seconds. |
| 4 | 1/12 | Number of pages | Shows the current and total number of playback pages. |
| 5 | Return | Press to go to the previous playback page. |
E
| # | I C | O N | N A M |
6 Del  | Press to delete the currently selected file. | ||
7 Sel  | Press to select the next video file. | ||
8 Pla  | Press the play button to start video playback. The icon changes to the (pause) icon. Press the button to pause playback. |
E
Setting menu
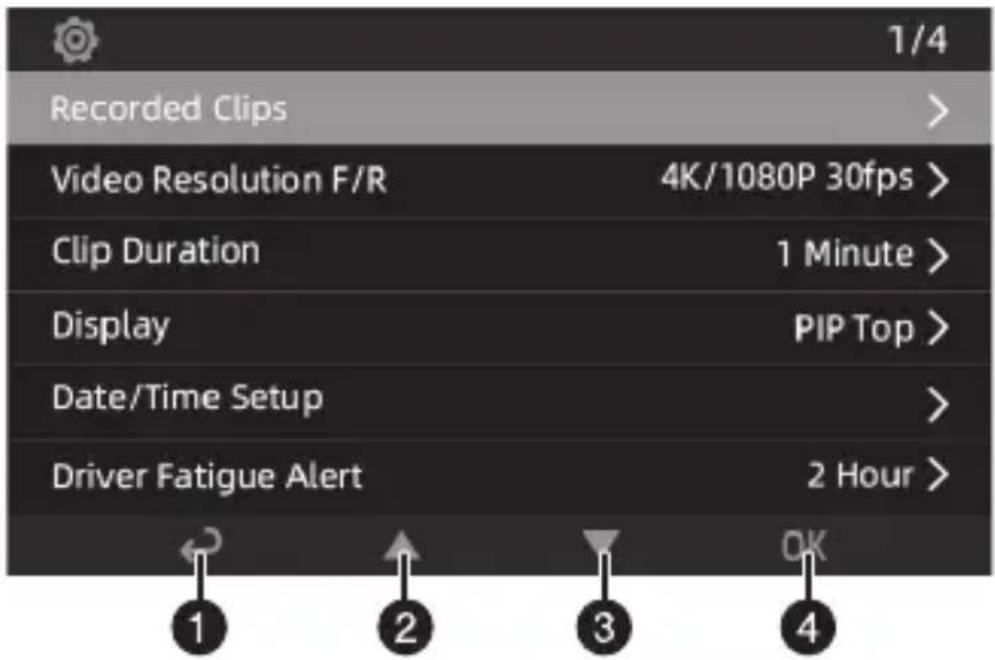
| ICON NAME DESCRIPTION | |||
| 1 | Return | Press to return to the previous menu. | |
| 2 | Up | Press to move up in a list of options or settings. | |
| 3 | Down | Press to move down in a list of options or settings. | |
| 4 | OK | OK | Press to confirm selections. |




Troubleshooting
| PROBLEM SOLUTION | |
| My dash cam won’t turn on. | Make sure that your vehicle is turned on. Some vehicles don’t power the accessory power socket if the vehicle is turned off.Make sure that your vehicle’s power socket is clean and free of corrosion.Make sure that the USB cable is securely connected to your dash cam and the power adapter.Make sure that the power adapter is firmly seated in your vehicle’s power socket and that the status LED is on.Make sure that the memory card is formatted. If the card is not formatted, it can’t record or save. See Formatting a MicroSD memory card on page 11.T h e Display Auto Sleep option may be turned on. Press the Menu button and change the setting. |
| My dash cam seems to be stalled or "hung up." | Press and hold button for three seconds to turn your dash cam off, then press and hold the Menu button again to turn it back on.Unplug the USB cable, then plug it back in.Reset your dash cam by pressing the Reset button (next to the USB power jack on the top right of your dash cam) for one second while your dash cam is turned on. |
| The time isn't correct. | Your dash cam can remember the time for seven days at room temperature while disconnected or not powered. If you have not used your dash cam for an extended time, you may need to reset the time. When your dash cam isn't recording, press the power button to open the menu, then select the Time/Date Setup option. For more information, see Date/Time Setup on page 19. |
| My pictures and video are blurry. | Clean the lens with a lens cloth.Make sure that the protective film on the lens has been removed. |
| The video quality is poor. | Make sure that you set your dash cam to the 1080p or higher resolution. A higher resolution makes the image clearer, sharper, more defined, and more detailed.If objects in motion (moving cars) are blurry, try changing to a resolution with 60fps capture rate. |
| I don’t want some of my videos overwritten. | In recording mode, press to manually activate the emergency video mode.Copy recordings to a computer. |
| The mounting bracket won't firmly mount to the windshield. | Make sure that the glass is not dirty or wet.Make sure that you removed the protective film on the back of mounting bracket.Try using the head attachment. |
| Videos don’t have sound or I don’t want videos to have sound. | Press the (microphone) icon on the Main screen to turn the sound Off or On. |
| I can’t transfer videos or photos to a computer. | Remove the memory card and insert it into a card reader on your computer. |
Specifications
Specifications are subject to change without notice.
| Dimensions (H × W × D) | 3.5 × 2 × 1.5 in. (9 × 5.2 × 3.8 cm) These measurements do not include the mounting bracket or suction cup. |
| Weight 4.9 oz. (140 g) | |
| Temperature Operating temperature: -4° ~ 140°F (-20° ~ 60°C) Storage temperature: -22° ~176°F (-30° ~ 80°C) | |
| Resolution Single camera: · 4 K 3 0 fps · 1600p 30fps · 1080p 30fps · 1080p 60fps · 720p 30fps · 720P 60fps Dual camera: · 4K/1080P 30fps · 1600p 30fps/1080p 30fps · 1080p 30fps/1080p 30fps · 720p 30fps/720p 30fps · 1080p 60fps/1080p 30fps · 720p 60fps / 720p 30fps | |
| Frame rate Front camera: 60fps Rear camera: 30fps | |
| Image format Photo: JPG Recording: MP4 | |
| Display 3.0-in. LCD | |
| Lens angle Front: 135°Rear: 129° | |
| MicroSD card capacity | 16 GB ~ 256 GB |
| OSD languages | English, Spanish, and French |
ONE-YEAR LIMITED WARRANTY
Definitions:
The Distributor* of Insignia branded products warrants to you, the original purchaser of this new Insignia-branded product ("Product"), that the Product shall be free of defects in the original manufacturer of the material or workmanship for a period of one (1) year from the date of your purchase of the Product ("Warranty Period").
For this warranty to apply, your Product must be purchased in the United States or Canada from a Best Buy branded retail store or online at www.bestbuy.com or www.bestbuy.ca and is packaged with this warranty statement.
How long does the coverage last?
The Warranty Period lasts for 1 year (365 days) from the date you purchased the Product. Your purchase date is printed on the receipt you received with the Product.
What does this warranty cover?
During the Warranty Period, if the original manufacture of the material or workmanship of the Product is determined to be defective by an authorized Insignia repair center or store personnel, Insignia will (at its sole option): (1) repair the Product with new or rebuilt parts; or (2) replace the Product at no charge with new or rebuilt comparable products or parts. Products and parts replaced under this warranty become the property of Insignia and are not returned to you. If service of Products or parts are required after the Warranty Period expires, you must pay all labor and parts charges. This warranty lasts as long as you own your Insignia Product during the Warranty Period. Warranty coverage terminates if you sell or otherwise transfer the Product.
How to obtain warranty service?
If you purchased the Product at a Best Buy retail store location or from a Best Buy online website (www.bestbuy.com or www.bestbuy.ca), please take your original receipt and the Product to any Best Buy store. Make sure that you place the Product in its original packaging or packaging that provides the same amount of protection as the original packaging.
To obtain warranty service, in the United States and Canada call 1-877-467-4289. Call agents may diagnose and correct the issue over the phone.
Where is the warranty valid?
This warranty is valid only in the United States and Canada at Best Buy branded retail stores or websites to the original purchaser of the product in the country where the original purchase was made.
What does the warranty not cover?
This warranty does not cover:
- Food, beverage, and or medicine loss/spoilage
- Customer instruction/education
- Installation
- Setup adjustments
- Cosmetic damage
- Damage due to weather, lightning, and other acts of God, such as power surges
- Accidental damage
- Misuse
- A b u s e
- Negligence
- Commercial purposes/use, including but not limited to use in a place of business or in communal areas of a multiple dwelling condominium or apartment complex, or otherwise used in a place of other than a private home.
- Modification of any part of the Product, including the antenna
- Display panel damaged by static (non-moving) images applied for lengthy periods (burn-in).
- Damage due to incorrect operation or maintenance
- Connection to an incorrect voltage or power supply
- Attempted repair by any person not authorized by Insignia to service the Product
- Products sold "as is" or "with all faults"
- Consumables, including but not limited to batteries (i.e. AA, AAA, C etc.)
- Products where the factory applied serial number has been altered or removed
- Loss or Theft of this product or any part of the product
- Display panels containing up to three (3) pixel failures (dots that are dark or incorrectly illuminated) grouped in an area smaller than one tenth (1/10) of the display size or up to five (5) pixel failures throughout the display. (Pixel based displays may contain a limited number of pixels that may not function normally.)
- Failures or Damage caused by any contact including but not limited to liquids, gels or pastes.
REPAIR REPLACEMENT AS PROVIDED UNDER THIS WARRANTY IS YOUR EXCLUSIVE REMEDY FOR BREACH OF WARRANTY. INSIGNIA SHALL NOT BE LIABLE FOR ANY INCIDENTAL OR CONSEQUENTIAL DAMAGES FOR THE BREACH OF ANY EXPRESS OR IMPLIED WARRANTY ON THIS PRODUCT, INCLUDING, BUT NOT LIMITED TO, LOST DATA, LOSS OF USE OF YOUR PRODUCT, LOST BUSINESS OR LOST PROFITS. INSIGNIA PRODUCTS MAKES NO OTHER EXPRESS WARRANTIES WITH RESPECT TO THE PRODUCT, ALL EXPRESS AND IMPLIED WARRANTIES FOR THE PRODUCT, INCLUDING BUT NOT LIMITED TO ANY IMPLIED WARRANTIES OF AND CONDITIONS OF MERCHANTABILITY AND FITNESS FOR A PARTICULAR PURPOSE, ARE LIMITED IN DURATION TO THE WARRANTY PERIOD SET FORTH ABOVE AND NO WARRANTIES, WHETHER EXPRESS OR IMPLIED, WILL APPLY AFTER THE WARRANTY PERIOD. SOME STATES, PROVINCES AND JURISDICTIONS DO NOT ALLOW LIMITATIONS ON HOW LONG AN IMPLIED WARRANTY LASTS, SO THE ABOVE LIMITATION MAY NOT APPLY TO YOU. THIS WARRANTY GIVES YOU SPECIFIC LEGAL RIGHTS, AND YOU MAY ALSO HAVE OTHER RIGHTS, WHICH VARY FROM STATE TO STATE OR PROVINCE TO PROVINCE.
Contact Insignia:
1-877-467-4289
www.insigniaproducts.com
INSIGNIA is a trademark of Best Buy and its affiliated companies.
* Distributed by Best Buy Purchasing, LLC
7601 Penn Ave South, Richfield, MN 55423 U.S.A
©2022 Best Buy. All rights reserved.
www.insigniaproducts.com
1-877-467-4289 (U.S. and Canada)
INSIGNIA is a trademark of Best Buy and its affiliated companies.
Distributed by Best Buy Purchasing, LLC
7601 Penn Ave South, Richfield, MN 55423 U.S.A.
©2022 Best Buy. All rights reserved.
V2 ENGLISH
22-0164
- 4K Front and Rear Dash Cam System
- Contents
- IMPORTANT SAFEGUARDS
- Features
- INSIGNIA
- Package contents
- Components
- Installing your dash cam
- Front camera
- Rear camera
- Using your dash cam
- Formatting a MicroSD memory card
- About the MicroSD card
- About MicroSD storage
- Manually turning your dash cam off and on
- Understanding loop recording
- Understanding Park mode
- Recording an emergency video
- Recording video
- Taking photos
- Downloading files to a computer
- Navigating in the on-screen display
- On-screen displays
- Setting menu
- Troubleshooting
- Specifications
- ONE-YEAR LIMITED WARRANTY
- Definitions:
- How long does the coverage last?
- What does this warranty cover?
- How to obtain warranty service?
- Where is the warranty valid?
- What does the warranty not cover?
Brand : INSIGNIA
Model : NS-DASH150
Category : Dash cam