
SXPG42601 - Lawn mower STANLEY - Free user manual and instructions
Find the device manual for free SXPG42601 STANLEY in PDF.


| Product Type | Petrol Line Trimmer (Curved Shaft) |
| Engine Type | 4-Stroke, Air-Cooled |
| Engine Displacement | 26 cc |
| No Load Speed | 7000 min⁻¹ |
| Idle Speed | 3000 ± 300 min⁻¹ |
| Clutch Engagement Speed | 4500 min⁻¹ |
| Fuel Tank Capacity | 280 ml |
| Fuel Type | 91 Unleaded Petrol (no oil mix) |
| Oil Capacity | 60 ml |
| Oil Type | 4-Stroke Oil SAE 30, 10W-30 or 10W-40 |
| Starting System | Recoil Starter |
| Spark Plug | TORCH CMR5H or NGK CMR5H |
| Cutting Diameter | 430 mm |
| Cutting Line Size | 2.0 mm x 5 m |
| Line Feed | Bump Feed |
| Harness Included | Yes |
| Warranty | 2 Years (domestic use) |
| Weight (approx.) | 5.0 kg |
Frequently Asked Questions - SXPG42601 STANLEY
User questions about SXPG42601 STANLEY
0 question about this device. Answer the ones you know or ask your own.
Ask a new question about this device
Download the instructions for your Lawn mower in PDF format for free! Find your manual SXPG42601 - STANLEY and take your electronic device back in hand. On this page are published all the documents necessary for the use of your device. SXPG42601 by STANLEY.
USER MANUAL SXPG42601 STANLEY
For service, spare parts or product information, please contact Smart Marketing Group Pty. Ltd.
AUST. 1300 660 457 N.Z. 0800 474 876
www.stanleyproducts.com.au
CONTENTS
Section Page
Contents 2
Suggested Applications 2
2 Years Warranty / Serial Number 2
Specifications 3
Introduction 4
Express Warranty Statement 4
Complete Warranty Statement 5
Important Safety Instructions 6 - 8
Section Page
Description & Components 9
Unpacking 10
Assembly 10 - 12
Operation 12 - 15
Maintenance 15 – 17
Trouble Shooting 18
Service Log 19
Contact Information 20
SUGGESTED APPLICATIONS
These are some suggested articles which could be used by this Line Trimmer:
- Edges
- Paths and walkways
• Classic Garden design - Lawn
2 YEARS WARRANTY

YEARS WARRANTY
PLEASE CONTACT CUSTOMER SERVICE
SMART MARKETING GROUP PTY. LTD.
Australia: 1300 660 457
New Zealand: 0800 474 876
Operating times: Monday – Friday
8.00am - 5.00pm Australian Eastern Standard Time (AEST)
Please take note of serial number and write here for ease of reference:
Serial Number:
Date of Purchase: ____
Place of Purchase: ____
Receipt Number: ____
STANLEY®
OWNER'S OPERATING MANUAL PETROL LINE TRIMMER CURVED SHAFT 4 STROKE 26CC MODEL NO. SXPG42601
SPECIFICATIONS
Engine type....4-Stroke, air cooled
Engine displacement....26cc
No Load Speed 7000min ^-1
Engine idle speed....3000+/-300min ^-1
Clutch speed 4500min ^-1
Fuel tank capacity....280ml
Fuel type 91 Unleaded petrol
Oil capacity 60ml
Engine lubricant oil type 4 Stroke oil SAE 30, SAE 10W-30 or SAE 10W-40
Starting system....Recoil starter
Spark plug type.....TORCH CMR5H or NGK CMR5H
Cutting diameter....430mm
Cutting line size 2.0mm x 5m
THANK YOU FOR BUYING A STANLEY 4 STROKE PETROL LINE TRIMMER
Your new Petrol Line Trimmer has been engineered and manufactured to STANLEY's high standard of dependability, ease of operation and operator safety. Properly cared for, it will give you years of rugged, trouble free performance. If you use your Petrol Line Trimmer properly and only for what it is intended, you will enjoy years of safe, reliable service.

CAUTION: Carefully read through this entire owner's manual, paying close attention to the general safety rules and rules for safe operation, before using.
KEEP THIS MANUAL FOR FUTURE REFERENCE
INTRODUCTION
Dear Customer,
Thank you for purchasing this Line Trimmer which has passed through our extensive quality assurance processes. Every care has been taken to ensure that it reaches you in perfect condition. However, in the unlikely event that you should experience a problem, or if you require any assistance please do not hesitate to contact us.

If you have a problem, call customer service, do not return this Line Trimmer to the place of purchase.
CUSTOMER SERVICE
Australia: 1300 660 457
New Zealand: 0800 474 876
Operating times: Monday – Friday
8.00am - 5.00pm
Australian Eastern Standard Time (AEST)
EXPRESS WARRANTY STATEMENT - LINE TRIMMER
You are not required to do anything to register your Line Trimmer purchase. Please attach the purchase receipt to this manual and ensure both are kept safe. We hope you enjoy your new Line Trimmer, and if you have any problems call customer service on the above phone numbers. Do not return to place of purchase.
Smart Marketing Group Pty Ltd (SMG) warrants that this Line Trimmer will be free from manufacturing faults or defects for 2 years from the date of purchase, providing original purchase receipt is kept and shown when needed and is subject to the terms and conditions below.
If a warranty fault appears within the warranty period, SMG reserves the right to replace or repair the product. In the event that SMG chooses to replace the product, this original warranty will expire at the original date. If the product includes various accessories or components, only the defective accessory or component will be replaced or repaired.
SMG reserves the right to replace defective parts of the product with parts and components of similar quality, grade and composition where an identical part or component is not available.
Products presented for repair may be replaced by refurbished products of the same type rather than being repaired. Refurbished parts may be used to repair the products.
What is covered.
• Manufacturing fault or defect.
How to claim under this warranty.
- Call customer service, phone number at the top.
- Ensure you have the following: Original purchase receipt, Model of Line Trimmer, Serial number of Line Trimmer.
- Discuss the issue.
- Customer service will advise which authorised service agent to take the Line Trimmer too, provided the issue is a warranty one.
• Take Line Trimmer to authorised service agent for repair.
What is not covered.
• Commercial use of Line Trimmer.
- Use of Line Trimmer in a commercial premises.
- Damage or deterioration due to transport.
- Damage caused by negligence, misuse or abuse.
• Any corrosion or rusting.
- Damage caused by incorrect set up and start up.
- Replacement parts due to general wear and tear.
- Line Trimmer with serial number defacement, modification or removal.
- Line Trimmer which have been serviced by other than an authorised SMG service agent.
• Line Trimmer with no original purchase receipt.
- Line Trimmer which have been on sold, not original purchaser.
- Damage due to non-servicing of Line Trimmer as is required by this manual.
- Blockages / damage caused by dust, dirt, spiders webs or insects.
- Damage caused by the incorrect fitting of accessories.
- Damage caused by overloading, overworking the Line Trimmer.
- Damage to attached equipment or third party accessories.
- Damage caused by attached equipment or third party accessories.
COMPLETE WARRANTY STATEMENT - LINE TRIMMER
As soon as you have purchased the Line Trimmer, we recommend that you check to make sure it is intact and that you read the operating instructions carefully before using it. The purchase receipt for this product is to be retained and must be presented if making a claim under the terms of the Smart Marketing Group (SMG) warranty. Bank account statements are not acceptable for proof of purchase.
This warranty does not cover Line Trimmer intended for hire or use in commercial applications or in commercial premises. The warranty will under no circumstances extend to reimbursement or payment of damages, whether direct, indirect or consequential. The warranty is void if there is evidence the Line Trimmer has been modified or tampered with in any way or used with unauthorised accessories without our consent.
SMG declines any responsibility or liability whatsoever arising from misuse or abuse, negligent handling of the Line Trimmer or if the product has not been installed or failure to comply with the relevant safety, operating, setting and maintenance instructions (see further in this manual).
The warranty does not extend to installation or disconnection costs.
Any item sent freight forward/collect for repair will be refused. Warranty repairs are free of charge, provided the appliance is delivered to our service department or authorised service agent. The Line Trimmer will need to be returned, adequately protected in a box. SMG will not be responsible for any in-transit loss or damage. Assistance under the warranty will only be made available if the request is made to our customer service team on the contact numbers listed below and proof of purchase is provided.
This is a repair only warranty you will need to take the Line Trimmer to the authorised service agent after contacting our customer service centre.
If the product includes various accessories or components, only the defective accessory or component will be replaced or repaired.
SMG reserves the right to replace defective parts of the product with parts and components of similar quality, grade and composition where an identical part or component is not available.
Products presented for repair may be replaced by refurbished products of the same type rather than being repaired. Refurbished parts may be used to repair the products.
Damage caused by third party accessories is not covered under this warranty.
Damage caused to attached equipment or third party accessories will not be covered under this warranty.
Rust and corrosion are not covered under this warranty.
If a warranty fault is found the freight cost will be credited to the owner. If no fault is found the product will be returned and any costs associated with the service will be charged to the owner.
Blockages caused by spider webs, insects, dirt, accumulated dust or incorrect fuel are not covered by warranty. SMG reserves the right to replace or repair the appliance within the warranty period. Parts found to be defective due to a manufacturing fault will be replaced free of charge.
In the event of SMG choosing to replace the product, the warranty will expire at the original date of purchase. If no warranty fault is found the owner will be advised and the product will be returned and any costs associated with the service will be charged to the owner.
Our goods come with guarantees that cannot be excluded under the Australian Consumer Law. You are entitled to a replacement or refund for a major failure and for compensation for any other reasonably foreseeable loss or damage. You are also entitled to have the goods repaired or replaced if the goods fail to be of acceptable quality and the failure does not amount to a major failure. The benefits of this warranty are in addition to any rights and remedies imposed by Australian State and Federal legislation that cannot be excluded.
In New Zealand, this SMG warranty is in addition to the conditions and guarantees which are mandatory as implied by the New Zealand Consumer Guarantee Act 1993. For service, spare parts or product information please contact customer service:
Australia: 1300 660 457
New Zealand: 0800 474 876
IMPORTANT SAFETY INSTRUCTIONS
The purpose of safety rules is to attract your attention to possible dangers. The safety symbols and the explanations with them, require your careful attention and understanding. The safety warnings do not by themselves eliminate any danger. The instruction or warnings they give are not substitutes for proper accident prevention measures.

SAFETY ALERT SYMBOL
Indicates danger, caution or warning. May be used in conjunction with other symbols or pictures.
Failure to obey a safety warning can result in serious injury to yourself or to others. Always follow the safety precautions to reduce the risk of fire, electric shock and personal injury.
Do not attempt to operate this product until you have read thoroughly and completely understood the safety rules, etc. contained in this manual. Failure to comply can result in accidents involving fire, electric shock or serious personal injury. Save this Owner's Operating Manual and review it frequently for continual safe operation and for instructing others who may use this product.
INTENDED USE
This product should only be used outdoors. The product is intended for cutting long grass, weed and similar vegetation at or about ground level. The cutting plane should be approximately parallel to the ground surface. The product should not be used to cut or trim hedges, bushes or other vegetation where the cutting plane is not parallel to the ground surface.

WARNING
To reduce the risk of injury, the user must read and understand the operator's manual.

WARNING
Do not attempt to operate this trimmer until you have read thoroughly and understood completely all instructions, safety rules etc contained in this manual. Failure to comply may result in accidents involving fire, electric shock or serious personal injury. Save operator's manual and review frequently for continuing safe operation and instructing others who may use this product.
SPECIFIC SAFETY INSTRUCTIONS
Read the instructions with due care. Familiarise yourself with the settings and proper operation of the machine. Like all power equipment, this unit must be handled carefully.
DO NOT EXPOSE YOURSELF OR OTHERS TO DANGER.
Follow these safety rules. Do not permit others to use this unit unless they are thoroughly responsible and have read and understood the Line Trimmer manual and are trained in its operation.
Always wear safety goggles for eye protection. Dress properly. Do not wear loose clothing or jewellery that could become caught in moving parts of the unit. Safe, sturdy, nonskid footwear should always be worn. Long hair should be tied back. It is recommended that legs and feet should be covered to protect from flying debris during operation.
Inspect the entire unit for loose parts (nuts, bolts, screws, etc.) and any damage before start and operation. Repair or replace as necessary before using the machine.
DO NOT USE any attachment with this power head other than the ones recommended by our manufacturer. Serious injury to the operator or bystanders could result as well as damage to the machine.
Keep the handles free from oil and fuel.
Do not operate the unit in insufficient lighting conditions.
Do not operate the unit when you are tired, when your concentration is impaired and/or under the influence of drugs, medication or alcohol.
Always use proper handles when trimming.
Do not smoke while filling tank.
Do not fill fuel in an enclosed room or near open flames. Ensure adequate ventilation.
Always store fuel in a properly marked container that is approved by local codes and ordinances for such usage.
Never remove the fuel tank cap while the engine is running.
IMPORTANT SAFETY INSTRUCTIONS
Never start or run the product inside a closed room or building. Fumes from the exhaust contain dangerous carbon monoxide.
Never attempt to make engine adjustments while the unit is running. Always make engine adjustments with the unit resting on a flat, clear surface and with engine off.
Do not use the unit if it is damaged or poorly adjusted. Never remove the unit's guard. Serious injury to the operator or bystanders could result as well as damage to the machine.
Inspect the area to be cut and remove all debris that could become entangled in the nylon cutting head. Also remove any objects that the unit may throw during cutting.
Keep children away. Onlookers should be kept at a safe distance from the work area, at least 15 metres away.
Never leave the unit unattended while engine is running.
Do not use this unit for any job other than those for which it is intended as described in this manual.
Do not overreach. Keep proper footing and balance at all times. Do not use the unit while standing on a ladder or on any other unstable footing location.
Keep hands and feet in safe distance from the nylon cutting line while unit is in use.
Do not use this type of unit for sweeping away debris.
Use nylon cutting head which is free of damage. If a stone or any other obstacle is hit, stop the engine and check the nylon cutting head. A broken or unbalanced nylon cutting head must never be used.
Follow instructions for assembling and operation.
Do not store the unit in a closed area where fuel vapours can reach an open flame from hot water heaters, furnaces, etc. Store in a locked, well ventilated area only.
Ensure safe and proper performance of your unit. Please only use original accessories. The use of any other accessories or attachments may cause a potential hazard or injury to the user, damage to the unit, and void this warranty.
If the unit will not be used for a long time, clean the unit completely, especially the fuel/oil tank, its surroundings, and the air cleaner.
When refuelling, be sure to stop the engine and confirm that it is cooled down. Never refuel when the engine is running or hot. When gasoline spills, be sure to wipe it up completely and dispose of those materials before starting the engine.
Stay clear of other workers or bystanders by at least 15 metres.
Whenever approaching an operator of the unit, carefully call their attention and confirm that the operator stops the engine. Be careful not to startle or distract the operator which can cause an unsafe situation.
Never touch the nylon cutting head whenever the engine is running. If it is necessary to adjust the protector or nylon cutting head, be sure to stop the engine and confirm that the nylon cutting head has stopped running.
The engine should be turned off when the unit is moved between work areas.
Be careful not to hit the nylon cutting head against stones, or the ground. Unreasonable rough operation will shorten the life of the unit as well as create an unsafe environment for yourself and those around you.
Pay attention to loosening and overheating parts. If there is any abnormality of the unit, stop operation immediately and check the unit carefully. If necessary, have the unit serviced by an authorised service agent. Never continue to operate a unit which may be malfunctioning.
In start-up or during operation of the engine, never touch hot parts such as the muffler, the high voltage wire or the spark plug.
After the engine has stopped, the muffler is still hot. Never place the unit in any place where there are flammable materials (dry grass, etc.), combustible gasses or combustible liquids.
Pay special attention to operation in the rain or just after the rain as the ground may be slippery.
If you slip or fall to the ground, release the throttle lever immediately.
IMPORTANT SAFETY INSTRUCTIONS
Be careful not to drop the unit or hit it against obstacles.
Before proceeding to adjust or repair the unit, be sure to stop the engine and detach the spark plug.
When the machine is placed in storage for a long time, drain fuel/oil from the fuel/oil tank and carburettor, clean the parts, move the machine to a safe place and confirm that the engine has cooled down.
Make periodic inspections to ensure safe and efficient operation. For a thorough inspection of your unit, contact customer service or your nearest authorised service agent.
Keep the unit away from fire or sparks.
Keep your body warm, especially the head, neck, feet, ankles, hands and wrists.
Maintain good blood circulation by performing vigorous arm exercises during frequent work breaks and also avoid cigarette smoking.
Limit the hours of operation.
If you experience discomfort, redness and swelling of the fingers followed by whitening and loss of feeling, consult your physician before further exposing yourself to cold and vibration.
Always wear ear protection. Loud noises for long periods can cause hearing loss, even permanent deafness.
Wear non-slip, heavy duty work gloves to improve your grip on the handle. Gloves also reduce the transmission of machine vibration to your hands.
WARNING: The string head is still dangerous while the machine is coming to a stop.
Do not lay the machine on its side; otherwise the fuel could spill out.
Fuel evaporation during refuelling and exhaust gases are harmful to the operator and people around the unit.
Ensure the fuel evaporation and exhaust gases will not drift to the face of operator and keep other people away from your working area.
Do not allow children or untrained individuals to use this unit.
RESIDUAL RISKS
Even when the unit is used as prescribed it is not possible to eliminate all residual risk factors. The following hazards may arise in connection with the unit's construction and design:
- Damage to lungs if an appropriate dust mask is not worn.
- Damage to hearing if appropriate hearing protection is not worn.
- Health defects may arise from vibration emission if the unit is being used over long periods of time or not adequately managed and properly maintained.
WARNING
This unit produces an electromagnetic field during operation. This field may under some circumstances interfere with active or passive medical implants. To reduce the risk of serious or fatal injury, we recommend persons with medical implants to consult their physician and the medical implant manufacturer before operating this unit.
DESCRIPTION

For information regarding spare parts, please refer to contact details on the front of this manual
- Fuel tank cap
- Primer button
- Air filter with choke button
- Spark plug
- Muffler
- Oil tank cap
- Starter handle
-
Cutting line spool
-
Cutting head shield
- Knob for drive shaft connection
- Front handle
- Rear handle
- Harness hook
- Choke button
- Harness
UNPACKING

CAUTION.
This packaging contains sharp objects. Take care when unpacking. Remove the machine, together with the accessories supplied, from the packaging. Check carefully to ensure that the machine is in good condition and account for all the accessories listed in this manual. Also make sure that all the accessories are complete.
If any parts are found to be missing, please contact customer service (details on page 2 & 4). Do not throw the packaging away, keep it safe throughout the warranty period, then recycle if possible, otherwise dispose of it by the proper means. Do not let children play with empty plastic bags due to the risk of suffocation.
ASSEMBLY
PACKING CONTENTS (FIG. 1)
- Trimmer Assembly (Engine with rear shaft).
- Front handle Assembly.
- Front shaft with cap.
- Cutting line spool.
- Cutting head shield with 1 screw pre-assembly.
- Harness.
- 1pc screw driver.
• 1pc wrench for spark plug. - Bottle of engine oil.
- Operator's manual.

WARNING. To prevent an accidental start that could cause serious personal injury, always
disconnect the engine spark plug wire from the spark plug when assembling parts.

WARNING. Never install, remove, or adjust any attachments while power head is running. Failure to
stop the engine can cause serious personal injury.
INSTALLING THE CUTTING LINE SPOOL
Rotate the hub slowly to align the hole in the hub with the hole in the shaft, Fig.2.
Lock the hub firmly using the screw driver provided by aligning and insert through the two holes as shown in Fig.3. Hold the hub with fingers at all times.
Screw the spool in place and turn the spool clockwise until it cannot rotate any more with the locked hub.

WARNING. The cutting line spool must be fixed firmly with the hub. Failure to fix the cutting line spool with the hub can result in serious personal injury.

natural_image
Technical line drawing of a mechanical device with exploded view and component details (no text or labels)Fig. 1
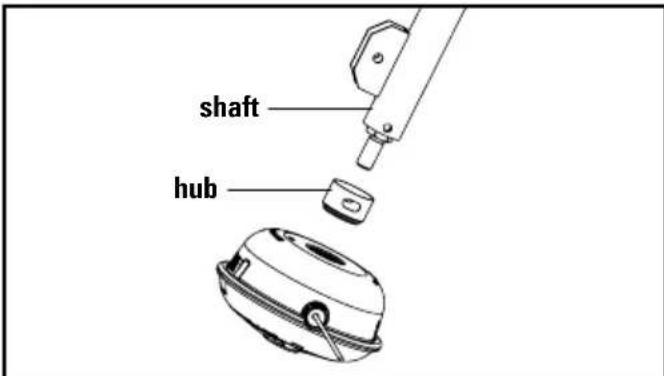
Fig. 2

natural_image
Technical line drawing of a mechanical component with a cylindrical housing and a curved tool above it (no text or symbols)Fig. 3
ASSEMBLY
INSTALLING THE CUTTING HEAD SHIELD

WARNING. The line cut-off blade on the cutting head shield is sharp. Avoid connection with the blade.
Failure to avoid contact can result in serious personal injury.
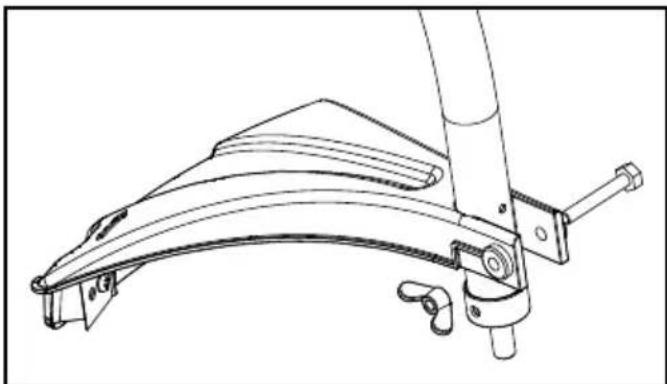
- Locate the bolt, nut and washer used to fix the cutting head shield.
- Align the screw hole in the mounting bracket with the screw hole in the cutting head shield, Fig. 4.
- Push the bolt through the mounting bracket and into the cutting head shield and fix in place with the washer and nut. Ensure it is tightly fitted before use.
CONNECTING THE UPPER AND LOWER SHAFTS
The attachment connects to the power head by means of a coupler device.
- Ensure the engine is not on. Disconnect the spark plug wire
- Turn the knob counterclockwise to loosen the coupler of the power head shaft and remove the end cap from the attachment.
- Insert while rotating the lower shaft into the coupler until the button locks into the positioning hole (the fixing hole is opposite the knob), Fig.5
NOTE: If the button does not release completely in the positioning hole, the shafts are not locked into place. Slightly rotate from side to side until the button is locked into place.
- Turn the knob clockwise to tighten the coupler.

WARNING! Be certain the knob is fully tightened
before operating equipment, check it periodically for
tightness during use to avoid serious personal injury.
REMOVING THE UPPER AND LOWER SHAFTS
- Turn the knob counter clockwise to loosen the coupler.
- Press and hold the release button.
- Pull the attachment straight out of the coupler.
natural_image
Technical line drawing of a mechanical assembly with curved components and mounting brackets (no text or symbols)Fig. 4

Fig. 5

natural_image
Technical line drawing of a mechanical component with flanged ends and a central cylindrical shaft (no text or symbols)Fig. 6
INSTALLING AND ADJUSTING THE FRONT HANDLE
To avoid injury, adjust the auxiliary handle for optimum control and balance. Do not overreach when operating Line Trimmer. Keep proper balance at all times for better control of the product in unexpected situations.
The auxiliary handle can be moved either up and down the shaft or rotated 360^ around the shaft. To find your optimum desired position unscrew the front handle locking knob, Fig.6. Once you have the desired position tighten the front handle locking knob.
ASSEMBLY
INSTALLING THE HARNESS
Connect the latch on the shoulder harness to the strap hanger, Fig 7.
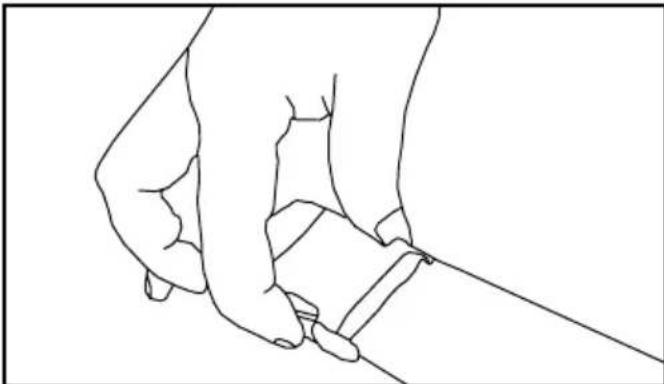
Adjust the strap to a comfortable position, Fig. 8.

WARNING. Do not allow familiarity with this
product to make you careless. Remember that a careless fraction of a second is sufficient to inflict serious injury.

WARNING. Always wear eye protection with side shields marked to comply with ANSI Z87.1, along with hearing protection. Failure to do so could result in objects being thrown into your eyes and other possible serious injuries.

natural_image
Technical line drawing of a mechanical assembly with no visible text or symbolsFig. 7
natural_image
Line drawing of a hand gripping a small object, no text or symbols presentFig. 8
OPERATION

WARNING. Do not use any attachments or accessories not recommended by the manufacturer
of this product. The use of attachments or accessories not recommended can result in serious personal injury.

WARNING. Operation of this equipment could create sparks that can start fires around dry vegetation.
A spark arrestor may be required. The operator should contact local fire agencies for laws or regulations relating to fire prevention requirements.
ADDING/CHECKING ENGINE OIL
NOTE:
- Attempting to start the engine before it has been properly filled with oil will result in equipment failure.
-
Engine oil has a major influence on engine performance and service life. This unit is shipped without engine oil.
-
Always use a good quality 4-stroke engine oil. SAE 30, SAE 10W-30 or SAE 10W-40 are all acceptable oils to use in this product. Non-detergent or 2-stroke engine oil will damage the engine and should not be used.
- Check oil levels before each use.
TO ADD ENGINE OIL: INITIAL USE
- Remove the cap from the empty lubricant bottle provided.
- Pour 60ml 4-Stroke engine oil into lubricant bottle with funnel.
- Unscrew the oil cap from the engine and remove.
- Pour 60ml lubricant oil into oil fill hole. Replace and tighten the oil cap.
OPERATION
TO CHECK ENGINE LEVEL BEFORE EACH USE
- Separate the attachment from the power head.
- Set power head on a flat level surface with shaft parallel to surface.
- Unscrew the oil cap and remove.
- Lubricant level should fall within the top of oil fill hole (the top of screw thread).
- If level is low, add engine lubricant until the fluid level rises to the top of oil fill hole (the top of screw thread) and does not overfill, Fig.9.
- Replace and tighten the oil cap.
NOTE: Do not overfill. Overfilling the crankcase may cause excessive smoke, oil loss and engine damage.
FUELLING AND REFUELLING THE TRIMMER

WARNING. Petrol and its vapours are highly flammable and explosive. To prevent serious personal and property damage, handle it with care.
Keep away from ignition sources and open flames, handle outdoors only, do not smoke and wipe up spills immediately.
Always shut off engine before fuelling.
Never add fuel to a machine with a running or hot engine. Move at least 9 metres from refuelling site before starting engine. Do not smoke cigarettes and stay away from open flames and sparks. Never operate the unit without the fuel cap securely fitted. Failure to safely handle fuel could result in serious personal injury.
Note: Visually inspect to see if fuel level is low. If fuel is low, refill with unleaded fuel carefully without overfilling and tighten the fuel tank cap immediately.
This unit has a 4-Stroke engine. Do not mix oil with petrol.
The use of old fuel is the most common cause of performance problems. Use only fresh, clean unleaded petrol (less than 30 days old).
Dispose of old fuel according to federal, state and local regulations.
Drain the tank and run the engine dry before storing the unit.
Do not use E15 or E85 fuel (or fuel containing greater than 10% ethanol) in this product. It will damage the unit and void your warranty.
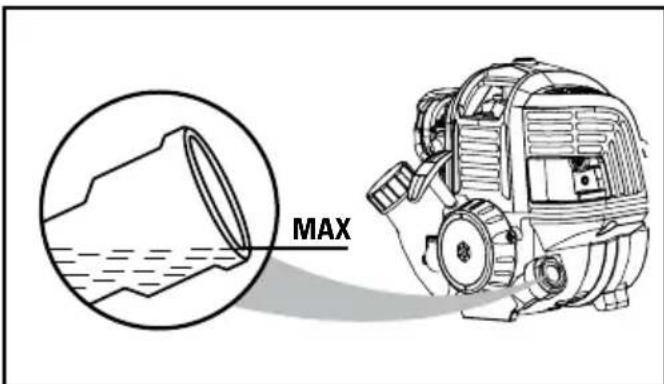
Fig. 9
STARTING AND STOPPING
The Line Trimmer should be laid out on a flat, bare surface for starting.
TO START A COLD ENGINE
Turn switch to "I" ON position.

Slowly press the primer bulb 5-10 times. NOTE: After the 7th press, fuel should be visible in the primer bulb. If it is not, continue to press the primer until you see fuel in the bulb.

Push the choke button in to set the choke to FULL CHOKE position. NOTE: Do not squeeze the throttle trigger because the choke will pop out automatically.

Pull the starter grip /cord until resistance is detected. Rapidly pull 3 to 5 times or until you hear engine turn over or begin to start.

If engine does not start, release choke by squeezing throttle trigger and red choke button pops out.
Engine is now in the run position.
Rapidly pull starter grip/cord until engine starts.
Allow the engine to run for 10 seconds, then squeeze throttle to provide fuel to engine and use for intended task.
Note: The choke button is only used when starting a cold engine. Never push the choke button in once the engine has been turned over or run. Otherwise the engine could be damaged or not run due to FULL CHOKE.
OPERATION
TO RESTART A WARM ENGINE
Do NOT push choke button in.
a. Turn switch to "I" ON position.
b. Ensure primer bulb has fuel inside.
c. Rapidly pull starter/grip until engine starts.
d. Squeeze throttle to provide fuel to engine and use for intended task.
TO STOP THE ENGINE
To stop the engine, depress the STOP switch to the "STOP" position.
WARNING. Engine housing can become hot during operation. Do not rest or place your arm, hand, or any body part against the engine housing during operation.
Only hold the Line Trimmer with all body parts clear of engine housing. Extended contact with the engine housing can result in burns or other injuries.
Always position the unit on the operator's right side. The use of the unit on the operator's left side will expose the user to hot surfaces and can result in possible burn injury.
To avoid burns from hot surfaces, never operate unit with the bottom of the engine above waist level.
STARTING/STOPPING THE CUTTING HEAD SPOOL (FIG. 10)
The cutting head spool will be engaged if the operator squeezes the throttle lever and then squeezes the throttle lever release to increase the engine speed.
The engine will stop when depressing the switch in "STOP" position.
Note: This ignition switch will come back to ON position automatically.
WORKING WITH THE LINE TRIMMER
- Hold the Line Trimmer with your right hand on the rear handle and your left hand on the front handle. Keep a firm grip with both hands while in operation. Line Trimmer should be held at a comfortable position with the rear handle about hip height, Fig.11.
- Keep your body and feet in safety distance to cutting head.
- Squeezing the throttle lever to full speed before cutting.
- The cutting line should run parallel to the ground surface.

Fig. 10

natural_image
Line drawing of a person using a tool to spray or brush on grass, no text or symbols presentFig. 11
TO ADJUST THE TRIMMING LINE LENGTH
The line spool has bump feed function. The line will be extended by tapping the spool head shortly and lightly onto the ground while the unit is running at high speed.
- Run engine at high speed.
- Tap the spool head on bare ground to release line.
- A blade in the cutting head shield will cut the line to the proper length if any excess line is released.
NOTE: Do not hold the spool head on the ground while the unit is running.
The line releases each time the spool head is tapped.
Always keep the trimming line fully extended. Line release becomes more difficult when the cutting line gets shorter.
OPERATION
TIPS FOR TRIMMING
Avoid hot surfaces by always keeping the product away from your body.
Cut all grass from top to down. This will prevent grass from wrapping around the shaft housing and string head which could cause damage from overheating. If grass becomes wrapped around the string head, STOP THE ENGINE, disconnect the spark plug wire, and remove the grass.
Use the tip of line to trim grass; do not force string head into uncut grass.
Avoid trees, flowers, stones, walls and other objects which can cause the line breakage.
Check and feed the line regularly to maintain full cutting width and performance.
MAINTENANCE
CLEANING AND CARE
Correct and regular cleaning is not only important for the safe use of this product, but also extends its life span.

WARNING. Always stop the engine and wait for the engine to cool down.
Please remove dust, grass etc. from machine after every application. Clean the machine with a wet cloth. For cleaning difficult to reach areas, use a brush.
You may use pressurised air to remove persistent dust.
NOTE: Do not use chemical, acid, alkaline, grinding or other aggressive cleaning agents. They could destroy the surface of the product.
MAINTENANCE

WARNING. Always stop the engine and wait for the engine to cool down.
Disconnect spark plug wire and move it away from spark plug.
When servicing, use only identical replacement parts. Use of any other parts could create a hazard or cause product damage.
Always wear eye protection with side shields marked to comply with ANSI Z87.1, along with hearing protection.
Failure to do so could result in objects being thrown into your eyes and other possible serious injuries.
INSPECTION AND MAINTENANCE SCHEDULE
The maintenance interval is only a recommendation for machines in ordinary operating condition. If there are any abnormal signs from the machine, please do the proper inspection and maintenance immediately.
The tightening torque should follow the general screw specification of different size, class and material.
If anything is unclear to you, please contact our service team for help. See Page 2 or 4 for contact details.
All other repairs or maintenances which are not mentioned here shall only be done by our service team or authorised service agent.
| ITEM HOURS OF OPERATION | |
| Engine lubricant oil level Every time before use | |
| Loosened or lost screws Every time before use | |
| Damage of any part Every time before use | |
| Function of control elements Every time before use | |
| Fuel level Every time before use | |
| Leakage of oil or fuel Every time before use | |
| Cutting line Every time before use | |
| Engine oil replacement Every 20 hours | |
| Air filter cleaning | Every 20 hours but every 10 hours if work condition is dusty |
| Spark plug check Every 20 hours | |
ENGINE OIL REPLACEMENT

WARNING. Old engine oil is considered special waste and has to be disposed of according to your local nment protection regulation. Do not pour the oil garbage can, sewer, soil etc.
- The engine oil replacement is easier if engine is warm (NOT HOT!).
- Open the oil tank cap and drain the old oil into an approved container.
- Return the engine to an upright position and refill with lubricant following the instructions in the Adding/Checking Engine Oil section in this manual (Pages 12 & 13).
- Clean the oil dropped on the unit if necessary.
CLEANING THE AIR FILTER
- The air filter elements should be cleaned to provide the engine abundant clean air which benefits the starting, power and life time of the engine.
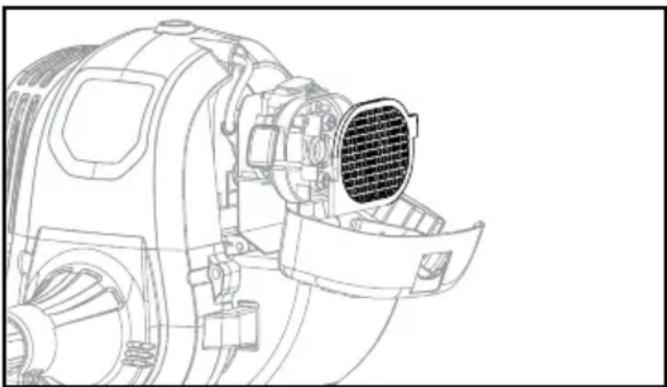
- Remove the air filter cover. To remove, press the Red button on the top of the cover with thumb and gently push up the cover with index finger, Fig.12.
- Remove the air filter
- If only cleaning of the air filter is necessary, take the air filter pad out and clean it with a jet of dry compressed air until all dust is removed. Wear protective goggle and mask to protect your health during this work.
- Reinstall the air filter cover by closing the air filter cover over the button on the housing, then push the cover until it locks securely in place.
NOTE: Make sure the filter is seated properly inside the cover. Installing the filter incorrectly will allow dirt to enter the engine, causing rapid engine wear. If the filter element is lost, contact customer service for a spare part.
SPARK PLUG
Do not attempt to remove the spark plug from a hot engine.
Clean or replace the spark plug if it is soiled with heavy oil deposits.
Replace the spark plug if the centre electrode is worn at the end.
This engine uses either a TORCH CMR5H or a NGK CMR5H spark plug with a 0.6-0.8mm electrode gap, Fig.13. Use an exact replacement and replace annually.
natural_image
Technical line drawing of a mechanical device with a circular component and fan-like components (no text or symbols)Fig. 12

Fig. 13
- Pull out the spark plug cap and clean the dust in the spark plug area.
- Screw out the spark plug with the provided socket wrench.
- Check the ceramic isolation. Replace the spark plug if damaged.
- Clean the electrodes (metal tip) to refresh the surfaces.
- Restore the spark plug and its cap.
MAINTENANCE
REPLACING THE CUTTING LINE SPOOL
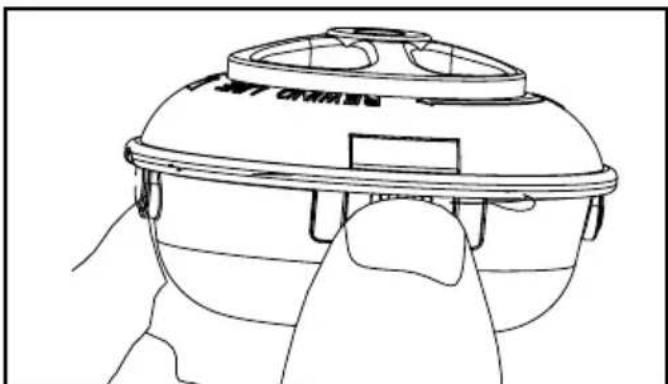
- Open the cutting line spool by pressing two release buttons on the side and take out the winding core (Fig.14 & 15).
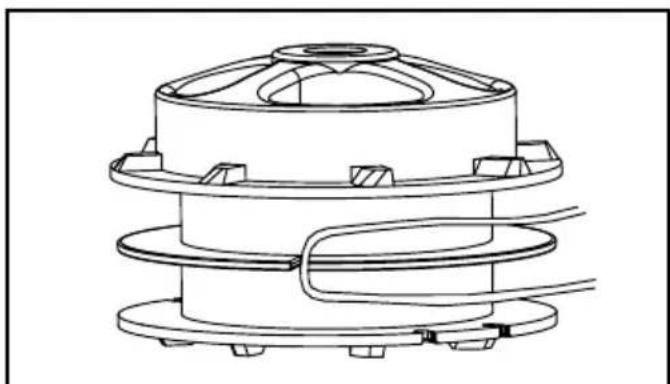
- Divide a spare cutting line in 2 equal halves, fix it in the winding core and start to wind the cutting line in two separated rails (Fig.15). Please follow the indicated winding.
- Fix the 2 line ends (approx. 15cm) at the opening to keep the line wound tightly. (Fig.16)
- Guide the 2 line ends into the holes on the spool housing and restore the spool cover. (Fig.17)
natural_image
Line drawing of a hand holding a helmet with a dome and gear (no text or symbols)Fig. 14
natural_image
Technical line drawing of a mechanical component with concentric rings and mounting flanges (no text or symbols)Fig. 15

natural_image
Technical line drawing of a mechanical component with no visible text or symbolsFig. 16

natural_image
Technical line drawing of a circular mechanical component with four blades and two curved arms (no text or symbols)Fig. 17
| Problem Possible Cause | Solution | |
| Engine will not start | No spark | Check spark. Remove spark plug. Reattach the spark plug cap and lay spark plug on metal cylinder. Pull the starter rope and watch for spark at spark plug tip. If there is no spark, repeat test with a new spark plug. |
| No fuel | Push primer bulb until bulb is full of fuel. If bulb does not fill, primary fuel delivery system is blocked. Contact customer service. If primer bulb fills, engine may be flooded, proceed to next item. | |
| Engine is flooded | Set the choke lever to the FULL CHOKE position. Squeeze the trigger and pull the rope repeatedly until the engine starts and runs.NOTE: Depending on the severity of the flooding, this may require numerous pulls of the rope. | |
| Engine does not reach full speed and emits excessive smoke | Air filter is dirty | Clean air filter. Refer to “Cleaning the Air Filter” earlier in this manual. |
| Spark arrestor screen is dirty Contact customer service. | ||
| Spark plug fouled | Clean or replace spark plug. Reset spark plug gap. Refer to “Spark Plug” section earlier in this manual. | |
| Engine starts, runs, and accelerates but will not idle. | Idle speed screw on carburettor needs adjustment. | Turn idle speed screw clockwise to increase idle speed. |
| Engine emits too much smoke. | Too much oil in crankcase. | Drain oil and refill with correct amount of 10W-30 engine lubricant. See “Adding/Checking Engine Oil” in the Operation section of this manual. |
| Line will not advance. | Line welded to itself. Lubricate with silicone spray. | |
| Not enough line on spool Install a new spool | ||
| Line is worn too short. | Pull lines while alternately pressing down on and releasing spool retainer. | |
| Line is tangled on spool. Remove line from spool and rewind. | ||
| Engine speed is too slow Advance Line at full throttle. | ||
| Spool retainer hard to turn. | Screw threads are dirty or damaged | Clean threads and lubricate with grease - if no improvement, replace the spool retainer. |
| Grass wraps around driveshaft housing and string head. | Cutting tall grass at ground level. Cut tall grass from the top down to prevent wrapping. | |
| Operating trimmer at part throttle Operate trimmer at full throttle. | ||
This Service is to be complete within 20 hours or 3 months of purchase, which ever comes first.
Replace Replace
Air filter Spark plug
Oil
Authorised Service Agent
(Name or Company Stamp)
Technician
Date
This Service is to be complete within 40 hours or 6 months of purchase, which ever comes first.
Replace Replace
Air filter Spark plug
Oil
Authorised Service Agent
(Name or Company Stamp)
Technician
Date
This Service is to be complete within 60 hours or 9 months of purchase, which ever comes first.
Replace Replace
Air filter Spark plug
Oil
Authorised Service Agent
(Name or Company Stamp)
Technician
Date
This Service is to be complete within 80 hours or 12 months of purchase, which ever comes first.
Replace Replace
Air filter Spark plug
Oil
Authorised Service Agent
(Name or Company Stamp)
Technician
Date
This Service is to be complete within 100 hours or 15 months of purchase, which ever comes first.
Replace Replace
Air filter Spark plug
Oil
Authorised Service Agent
(Name or Company Stamp)
Technician
Date
This Service is to be complete within 120 hours or 18 months of purchase, which ever comes first.
Replace Replace
Air filter Spark plug
Oil
Authorised Service Agent
(Name or Company Stamp)
Technician
Date
This Service is to be complete within 140 hours or 21 months of purchase, which ever comes first.
Replace Replace
Air filter Spark plug
Oil
Authorised Service Agent
(Name or Company Stamp)
Technician
Date
This Service is to be complete within 160 hours or 24 months of purchase, which ever comes first.
Replace Replace
Air filter Spark plug
Oil
Authorised Service Agent
(Name or Company Stamp)
Technician
Date
For any queries or assistance call

Customer Service
AUST. 1300 660 457
NZ 0800 474 876
www.stanleyproducts.com.au
Hours of operation:
Monday to Friday 8.00am - 5.00pm AEST
Do not return to place of purchase.
Keep your purchase receipt, this will be required to make any claims under the 2 year warranty.
STANLEY.

STANLEY, The STANLEY Logo, The Notched Rectangle and the Yellow and Black Diagonal Package Design are all trademarks of Stanley Black & Decker, Inc. or an affiliate thereof.




- CONTENTS
- Section Page
- SUGGESTED APPLICATIONS
- YEARS WARRANTY
- YEARS WARRANTY
- PLEASE CONTACT CUSTOMER SERVICE
- STANLEY®
- OWNER'S OPERATING MANUAL PETROL LINE TRIMMER CURVED SHAFT 4 STROKE 26CC MODEL NO. SXPG42601
- SPECIFICATIONS
- THANK YOU FOR BUYING A STANLEY 4 STROKE PETROL LINE TRIMMER
- INTRODUCTION
- CUSTOMER SERVICE
- EXPRESS WARRANTY STATEMENT - LINE TRIMMER
- What is covered.
- How to claim under this warranty.
- What is not covered.
- COMPLETE WARRANTY STATEMENT - LINE TRIMMER
- IMPORTANT SAFETY INSTRUCTIONS
- SAFETY ALERT SYMBOL
- INTENDED USE
- WARNING
- SPECIFIC SAFETY INSTRUCTIONS
- DO NOT EXPOSE YOURSELF OR OTHERS TO DANGER.
- RESIDUAL RISKS
- DESCRIPTION
- UNPACKING
- CAUTION.
- ASSEMBLY
- PACKING CONTENTS (FIG. 1)
- INSTALLING THE CUTTING LINE SPOOL
- INSTALLING THE CUTTING HEAD SHIELD
- CONNECTING THE UPPER AND LOWER SHAFTS
- REMOVING THE UPPER AND LOWER SHAFTS
- INSTALLING AND ADJUSTING THE FRONT HANDLE
- INSTALLING THE HARNESS
- OPERATION
- ADDING/CHECKING ENGINE OIL
- NOTE:
- TO ADD ENGINE OIL: INITIAL USE
- TO CHECK ENGINE LEVEL BEFORE EACH USE
- FUELLING AND REFUELLING THE TRIMMER
- STARTING AND STOPPING
- TO START A COLD ENGINE
- TO RESTART A WARM ENGINE
- TO STOP THE ENGINE
- STARTING/STOPPING THE CUTTING HEAD SPOOL (FIG. 10)
- WORKING WITH THE LINE TRIMMER
- TO ADJUST THE TRIMMING LINE LENGTH
- TIPS FOR TRIMMING
- MAINTENANCE
- CLEANING AND CARE
- INSPECTION AND MAINTENANCE SCHEDULE
- ENGINE OIL REPLACEMENT
- CLEANING THE AIR FILTER
- SPARK PLUG
- REPLACING THE CUTTING LINE SPOOL
- Replace Replace
Brand : STANLEY
Model : SXPG42601
Category : Lawn mower