
AINT7000 - Refrigerator Artusi - Free user manual and instructions
Find the device manual for free AINT7000 Artusi in PDF.


| Product Type | Freestanding Refrigerator |
| Model | AINT7000 |
| Brand | Artusi |
| Total Capacity | 250 Litres (approx.) |
| Dimensions (H x W x D) | 1700 x 600 x 650 mm (approx.) |
| Weight | 55 kg (approx.) |
| Energy Efficiency Class | E (approx.) |
| Annual Energy Consumption | 220 kWh (approx.) |
| Noise Level | 42 dB (approx.) |
| Climate Class | N-ST (16°C - 38°C) |
| Defrost Type | Auto Defrost (Frost Free) |
| Shelves | 4 Adjustable Glass Shelves |
| Vegetable Drawer | 1 Crisper Drawer |
| Door Storage | 3 Door Bins and 1 Egg Tray |
| Temperature Control | Mechanical Thermostat |
| Interior Light | LED |
| Power Supply | 220-240 V, 50 Hz |
| Power Cord Length | 1.5 m (approx.) |
| Refrigerant | R600a (Isobutane) |
| Installation | Freestanding, 100 mm Clearance Required |
| Cleaning | Use Mild Detergent and Soft Cloth |
| Safety Features | Child Lock, Overheat Protection |
| Spare Parts Availability | Contact Authorized Service Center |
| Warranty | 2 Years (Parts and Labor) |
Frequently Asked Questions - AINT7000 Artusi
User questions about AINT7000 Artusi
0 question about this device. Answer the ones you know or ask your own.
Ask a new question about this device
Download the instructions for your Refrigerator in PDF format for free! Find your manual AINT7000 - Artusi and take your electronic device back in hand. On this page are published all the documents necessary for the use of your device. AINT7000 by Artusi.
USER MANUAL AINT7000 Artusi
APPLIANCES
FOR LIVING
Congratulations, you are now the proud owner of an ARTUSI cooking appliance. Thank you for purchasing ARTUSI and welcome to the ARTUSI Family.
This instruction manual has been specially created to inform you of the full range of features your ARTUSI appliance has to offer and serves as an introduction to getting the very best out of your ARTUSI appliance.
We present detailed information on each of the features your ARTUSI appliance consists of. Once you have read this section you will be able to choose the most appropriate settings for your appliance when cooking different types of food.
We ask you to read the instructions in this booklet very carefully as this will allow you to get the best results from using your appliance. KEEP THE DOCUMENTATION OF THIS PRODUCT FOR FUTURE REFERENCE.
TO REGISTER YOUR PRODUCT WITH ARTUSI, PLEASE FILL OUT THE WARRANTY CARD AT THE END OF THIS BOOKLET AND POST IT TO: REPLY PAID 83617 LEICHHARDT NSW 2040
Dear Artusi Customer, please read this user manual carefully before using the product and, keep it permanently at your disposal.
Note: This user manual is prepared for more than one model. Some of the features specified in this Manual may not be available on your appliance.
All our appliances are only for domestic use, not for commercial use. Products marked with (*) are optional.
"THIS APPLIANCE SHALL BE INSTALLED IN ACCORDANCE WITH THE REGULA TIONS FORCE AND ONLY USED IN A WELL VENTILATED SPACE. READ THE INSTRUCTIONS BEFORE INSTALLING OR USING THIS APPLIANCE"
"Conforms with the WEEE Regulations."
Contents:
3 Important information
5 Important notes
5 Before first use
6 Important notes on use of the fridge
7 Important notes on use of the freezer
8 Crisper drawer humidity adjustment
9 Storage
10 Control panel
12 Defrosting the freezer
12 Defrosting the fridge
13 Care and cleaning
14 Troubleshooting
16 Installation preparation
17 Cabinet dimensions
17 Ventilation requirements
19 Installation into the cabinet
20 Mounting the fascia doors
22 Reversing the appliance doors
23 Electrical information
25 Climate range
26 Practical tips
Important
The manufacturer cannot be held responsible for injuries or losses caused by incorrect use or installation of this product. Please note that we reserve the right to invalidate the guarantee supplied with this product following incorrect installation or misuse of the appliance.
This appliance is not designed to be used by people (including children) with reduced physical, sensorial or mental capacity, or who lack experience or knowledge about it, unless they have had supervision or instructions on how to use the appliance by someone who is responsible for their safety.
Under no circumstances should any external covers be removed for servicing or maintenance except by suitably qualified personnel.
Appliance information:
Please enter the details on the appliance rating plate below for reference, to assist ...... in the event of a fault with your appliance and to register your appliance for guarantee purposes.
| Appliance Model | |
| Serial Number | |
EU Declarations of Conformity:
This appliance has been designed, constructed and marketed in compliance with safety requirements of EU Directive 2014/35/EU (Low voltage) and requirements of EU Directive 2014/30/EU (EMC).
This appliance has been manufactured to the strictest standards and complies with all applicable legislation, including Electrical safety (LVD) and Electromagnetic interference compatibility (EMC). Parts intended to come into contact with food conform to 1935/2004/EC.
This refrigeration appliance is intended for use as a built-in appliance.
IMPORTANT INFORMATION FOR CORRECT DISPOSAL OF THE PRODUCT IN ACCORDANCE WITH EC DIRECTIVE 2012/19/EU.
At the end of its working life, the product must not be disposed of as urban waste. The refrigeration system contains insulating gases and refrigerants, which require specialised waste disposal. The valuable materials contained in this appliance can be recycle. It must be taken to a special local authority differentiated waste collection centre or to a dealer providing this service.
Before disposing of an old appliance, remove the door seals etc. to reduce the risk of child entrapment.
Disposing of a household appliance separately avoids possible negative consequences for the environment and health deriving from inappropriate disposal and enables the constituent materials to be recovered to obtain significant savings in energy and resources. As a reminder of the need to dispose of household appliances separately, the product is marked with a crossed-out wheeled dustbin.
Important
- Never store inflammable or explosive items and strong corrosive acids or alkalis in the appliance.
- This is a household appliance, which is produced in accordance with the national standard. It is intended for food storage only, not for storage of blood, medicine and biological products.
- To prevent risk of fire, keep the appliance away from petrol or any other inflammables.
- To prevent risk of electromagnetic interference or other accidents, do not place a microwave oven on top of the refrigerator or use any electric appliance inside the refrigerator.
- Do not allow children to play with or near the appliance.
- The internal surface of freezer compartment is very cold when the appliance is running. Do not touch the surface especially when hands are wet.
- Do not splash water onto the appliance. Keep it away from places of high humidity that may have adverse effect on the electric insulation performance.
- This appliance is designed to be used in ambient temperatures between 16 and 43^ . Use outside of this range may cause the appliance to fail.
Before first use
You must allow the fridge to settle for at least twenty four hours prior to switching the power on.
It is recommended that you clean the interior of the appliance prior to first use, using a solution of bicarbonate of soda and warm water and then thoroughly drying the interior.
The fridge may have an odour to it at first use. This will disappear as the appliance cools.
Please note:
If you switch the appliance off, you should allow five minutes before switching it on again to prevent unnecessary damage to the compressor.
Never store inflammable or explosive items and strong corrosive acids or alkalis in the appliance.
This fridge cools your food by making the inside back of the cavity cold. It is normal for frost to build up on this surface; it then dissipates and drains through a small drain at the bottom, where it evaporates harmlessly.
Fridge use
- Never put liquids in the refrigerator uncovered.
- Never put hot foods in the refrigerator. Warm food should be allowed to cool to room temperature before being put into the refrigerator.
- Nothing should rest against the rear wall of the refrigerator, as this will cause frost and possible condensation problems which will be difficult to remove.
- Make sure food is clean and any extra water is wiped away before putting into the fridge.
-
Wrap or cover food before putting into the fridge. This will help prevent the loss of moisture, keep food fresh and avoid unpleasant odours.
-
Sort foods prior to storing. Any foods to be used soon should be stored at the front of the shelf to prevent deterioration caused by the door being open for prolonged periods.
- Do not overfill the fridge. There should be sufficient space between the foods to allow the cool air to circulate.
- Thawing frozen foods in the fridge compartment will help to keep the temperature low and save energy.
- Never store raw meats on shelves above cooked meats or other produce. This will help to prevent juices from raw meat contaminating other foodstuffs.
Freezer use
• The freezer compartments are designed to store only frozen food.
- Never put hot or warm foods in the freezer, allow them to cool fully before putting them into the freezer.
- Follow the instructions on the food packaging for storage of frozen food. If no information is provided, foods should not be stored for more than three months after the purchase date.
- Store food in small packages (ideally less than 1kg). This reduces the freezing time and improves the quality of the food after thawing.
- Wrap food before putting into the freezer. To stop the wrapping sticking together, ensure it is dry.
- Label the food before freezing with information including type of food and dates of storage and expiry.
- Once food is thawed, it must not be refrozen. Only defrost as much food as is required to prevent wastage.
- Bottled or canned drinks should not be stored in the freezer compartments as they could explode.
- The maximum amount of fresh food that can be frozen within a 24 hour period is 3.8 ~kg for this Model
- Do not attempt to freeze more than the maximum amount.
• To freeze fresh food more quickly, switch on the super freeze function a few hours prior to placing the food in the freezer.
Note: If the appliance does not have a freezer compartment ( * * * *)it is not suitable for freezing foodstuffs.
Crisper drawer humidity adjustment
The crisper drawer within this appliance features a humidity level adjustment slider. Vegetables and similar produce that are subject to wilting (e.g. rocket, spinach leaves, herbs such as basil etc.) should be kept in the crisper drawer and the adjustment slider kept closed (fully to the left - high). By keeping the adjustment slider closed, water vapour is held in the drawer and subsequently greens are kept crisper and fresher for longer.
By contrast, fruits that are susceptible to rotting should be stored in the crisper drawer with the humidity adjustment slider fully open (to the right - low). This will allow gases, emitted by certain produce and that accelerate the rotting process, to exit the crisper drawer. The drawer is marked high and low with vegetable and fruit symbols to aid you.
Storage
The fridge section is for short term food storage. Although low temperatures can be maintained, extended periods of food storage is not recommended. As the cold air circulates within the fridge, the temperature can vary between the different sections. As such, foods should be stored in different sections according to type. Section 7 is the coldest part of the fridge.
- Butter, cheeses etc.
- Food in jars and bottles
- Drinks, e.g. milk
-
Cooked food
-
Ready meals etc
- Y ogurts, preserves etc
- Fresh meat and fish
- Fruit and vegetables
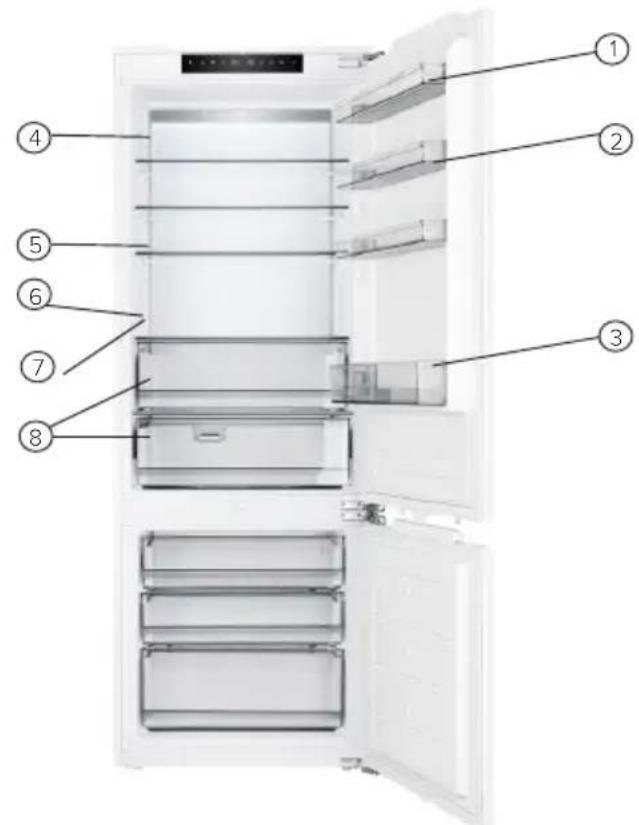
The fridge shelves can be moved according to the storage requirements within the fridge section. To move the shelf, lift up the rear section and then pull it outwards. To replace, slide the shelf back into the slot, and then lower the rear section.
Control Panel
flowchart
graph TD
    A["Display"] --> B["Temperature Icon"]
    C["Control"] --> D["Light Bulb Icon"]
    E["Function"] --> F["Light Bulb Icon"]
    G["Display"] --> H["Light Bulb Icon"]
    I["Control"] --> J["Light Bulb Icon"]
    K["Function"] --> L["Light Bulb Icon"]
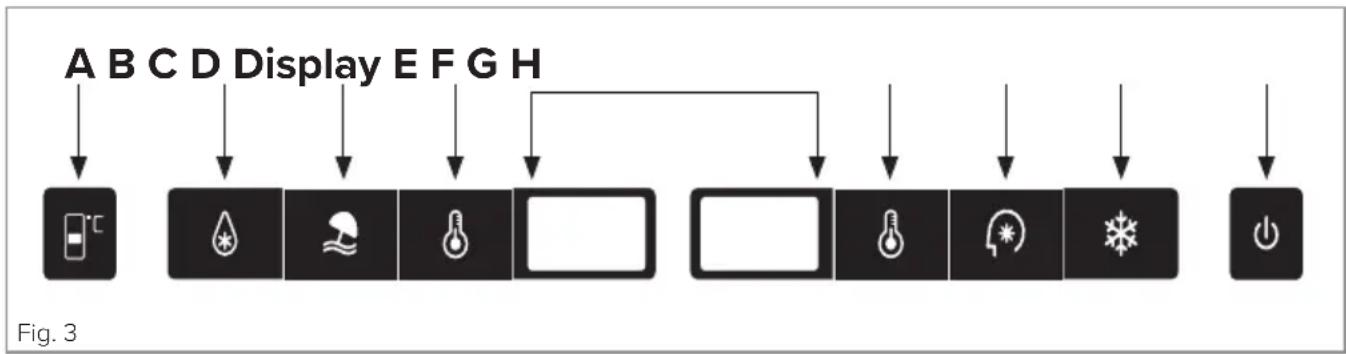
A. Fresh zone temperature adjustment sensor
This button is used to adjust the temperature within the adapt zone. Press this button once to alter the display to show the current temperature in the adapt zone, and then as many times as necessary until the desired level is selected. The settings range from -2^ and 3^
B. Fast cooling function
Pressing this button will cause the fridge to operate at 2^ C and automatically turns off after 2 and a half hours, during this time the button will be illuminated
C. Holiday function
Pressing this button activates the holiday function and the fridge temperature will operate at 17^ C and the freezer at -18^ C
D. Fridge temperature adjustment
This button is used to adjust the temperature within the fridge. Press this button once to activate adjustment, and then as many times as necessary until the desired level is selected
Display
This is where you can see the current temperature in the fridge (left) and freezer (right)
E. Freezer temperature adjustment
This button is used to adjust the temperature within the freezer. Press this button once to activate adjustment, and then as many times as necessary until the desired level is selected
F. Smart function
This button automatically sets the fridge temperature to 5°C and the freezer temperature to -18°C
G. Fast freezing function
Pressing this button automatically starts the freezer working at a temperature of -25°C. After 6 hours the function stops and the temperature will revert back to its previous setting
H. On/off button
Hold this button down for 3 seconds to switch the appliance on or off
Defrosting the freezer
The freezer has a no frost system which is designed to prevent the heavy build up of ice. Under normal use, there should be no need to regularly defrost the freezer system.
To help in times of service or cleaning, the appliance has a forced defrost mode which can be activated by touching and holding sensors E and H in Fig. 3 for approximately 3 seconds. The refrigerator temperature adjustment sensor (A) will flash to confirm that the forced defrost function is active. This function should automatically deactivate once the freezer temperature has reached between 10 and 12°C.
Please note: If you are regularly finding a heavy build up of ice, or pools of water, in the freezer section then it is likely that the door is not sealing properly. This could be due to a defective door seal or an incorrectly fitted, or overly heavy, decor door. For more information see the troubleshooting section on ice on page 14.
Defrosting the fridge
The fridge is self-defrosting. Any water created will run out of the fridge through the channel at the back of the fridge. The defrosted water is collected in the evaporating tray at the back of the appliance and dissipated by evaporation.
Care and cleaning
Always disconnect the appliance from the power supply before any cleaning or maintenance.
The fridge and freezer sections should be cleaned using a solution of bicarbonate of soda and lukewarm water. Do not use abrasive products or detergents. After washing, rinse and dry thoroughly.
Clean the shelves and balconies separately by hand with a mild solution of washing up liquid and water. Do not put them in the dishwasher.
If the appliance is not to be used for prolonged periods of time, unplug and clean the appliance. The doors should be left slightly ajar to prevent the formation of mildew and unpleasant odours.
Troubleshooting
If you have any problems with your appliance, you should check the troubleshooting prior to calling ...Customer Care.
If the appliance is not working, check:
- That there is power to the appliance.
- The house fuses are intact and the fuse in the plug has not blown.
- The fridge has not been turned off (page 10).
- The plug socket is functioning fine. To check this, plug another electrical appliance in to see if the socket is faulty.
If the appliance is working, but not very well, check:
• The appliance is not overloaded.
- The thermostat is set to an appropriate temperature.
• The doors are closing properly.
- The cooling system at the rear of the appliance is clean and free of dust, and not touching the rear wall.
- There is enough ventilation at the side and rear walls.
If the appliance is noisy, check:
• The appliance is level and stable.
- The side and rear walls are clear, and there is nothing resting on the appliance.
- Note: The cooling gas in the refrigerator may make a slight bubbling or gurgling noise, even when the compressor is not running.
If the appliance is beeping, check:
- That the doors are closed. An alarm will sound after 60 seconds of a door being open.
If there's water in the base of the refrigerator compartment, check:
- The drain hole at the back of the compartment is clear (page 11).
If ice has formed on the back wall of the fridge:
- It is normal for some ice droplets to form on the back wall of the fridge. This does not constitute a fault with the appliance.
- Ensure that no items inside the fridge are in contact with the back wall.
- Check that there is some resistance when opening the door of the appliance. If it opens at the slightest touch it may mean that the door seal needs to be replaced.
- Check the door seal for any kinks, debris or damage. If you notice any, and are unable to resolve the issue yourself, contact ...
Customer Care so that the seal can be replaced. - This can be due to the decor door(s) not being properly fitted. If you are at all unsure, ask your fitter to check the decor doors.
If excessive ice has formed in the freezer:
- Check that there is some resistance when opening the door of the appliance. If it opens at the slightest touch it may mean that the door seal needs to be replaced.
- Check the door seal for any kinks, debris or damage. If you notice any, and are unable to resolve the issue yourself, contact ...
Customer Care so that the seal can be replaced. - This can be due to the decor door(s) not being properly fitted. If you are at all unsure, ask your fitter to check the decor doors.
If one or more of the LED units within the appliance is not working:
- Contact ... Customer Care to arrange a service visit.
Installation preparation
This appliance must never be installed close to heat sources, e.g. heating elements or cookers, nor in damp places.
Seek the help of another individual, or two, when installing this appliance. This appliance may have sharp edges. Wear adequate PPE for the task and environment.
- To ensure the appliance is level, you should use the height adjustable feet at the front of the appliance.
- The cooling system at the rear of the appliance must not touch the rear wall. The greater the gap, the better.
- The appliance must be installed with adequate ventilation. Ensure that there is clearance above the appliance to allow air to escape and that there is space between the rear of the appliance and the wall.
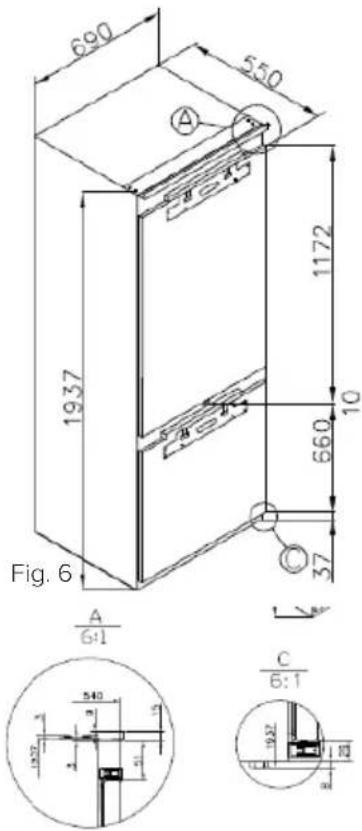
Cabinet dimensions
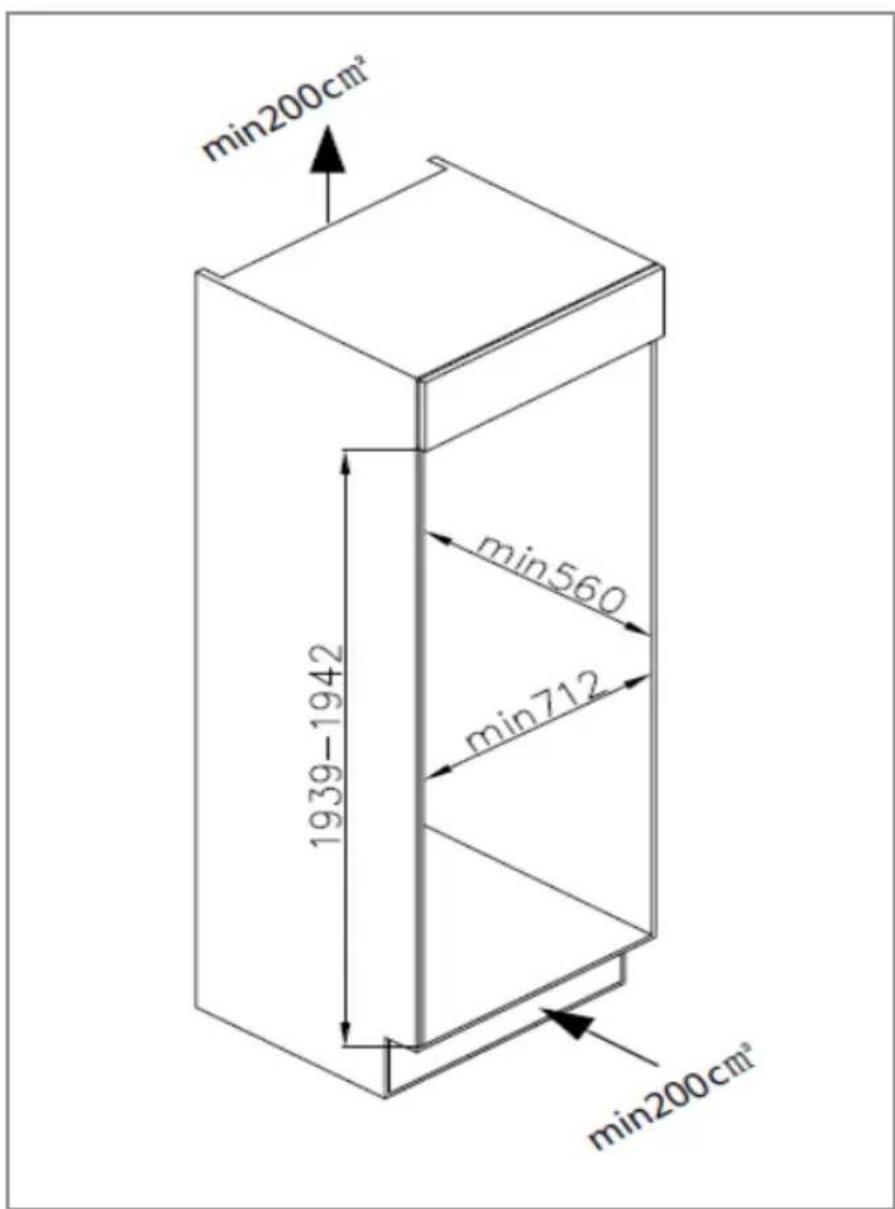
Ventilation
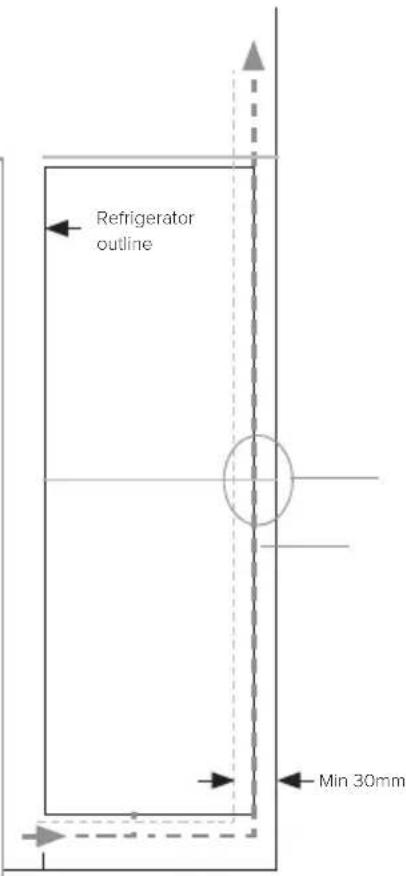
The main consideration when installing any refrigeration unit into a fitted kitchen is ventilation. The heat removed from the cooling compartment needs to be dissipated into the atmosphere. Incorrect ventilation can lead to premature compressor failure, excessive power consumption, total system failure and may invalidate the warranty provided with the appliance. For products intended to be installed into a tall housing unit, the requirements on the following page need to be met:
An air intake should be provided somewhere in the cabinet run to allow free air in. In this example, a plinth vent is shown underneath the refrigerator.
A cutout should be made in the plinth below the fridge/freezer and this finished neatly using the air vent grille supplied.
Alternatively, a thin section of the plinth can be removed to allow air into the unit (recommended 600mm x 10mm).
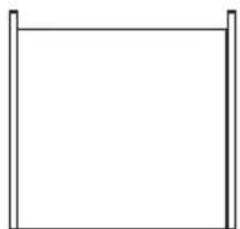
natural_image
Simple line drawing of a rectangular frame with vertical supports (no text or symbols)plan view of rear ventilation gap
The top of the cabinet needs to be vented into the room
Recommended size of vent opening: 500 x 40mm
If the furniture does not allow free air into the room then a plinth vent, or other means of ventilation needs to be provided to ensure a natural flow of air
There should be space at the rear of the cabinet to allow cool air to be drawn over the condenser.
Recommended: 500 x 40mm
Fig. 7
The open channel at the rear is clearly shown. For the correct operation of the appliance it is important that the top of the housing unit is not blocked off. A channel depth of 40-50mm is normal with most units.
A ventilation hole is required in the plinth of the unit; this allows air to
be drawn over the compressor & heat exchange. A decorative grille is supplied with the appliance to finish this vent neatly. Alternatively the required air flow can be achieved by removal of a thin section of plinth (600mm x 10mm minimum).
As a rule, the more air that can get in and out, the better and more efficient the operation of the product.
Installation into the cabinet
To ensure the appliance is level, you should use the height adjustable feet at the front of the appliance. The ventilation system at the bottom of the appliance must not be blocked
Push the appliance carefully into the cavity, make sure the appliance is in the central position of the cavity. Following the steps on the next page to fit the decor door, ensuring the door can be opened and closed properly then tighten the screws on the top, hinge side and the bottom.
Mounting the fascia doors
Fig. 9 - Fitting the decor door bracket
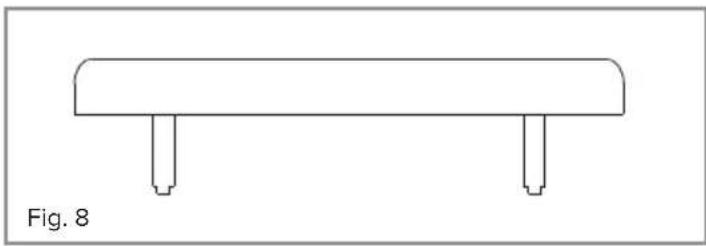
Remove the white decorative cover (Fig. 8) by lifting it upwards. Obtain the below measurements:
Dimension B = Measure from the underside surface of kitchen unit to the bottom of fixing bracket.
natural_image
Simple line drawing of a rectangular object with two vertical supports at the base, labeled Fig. 8 (no text or symbols on the object itself)Dimension C = Measure from the underside surface of kitchen unit to the top of next unit door.
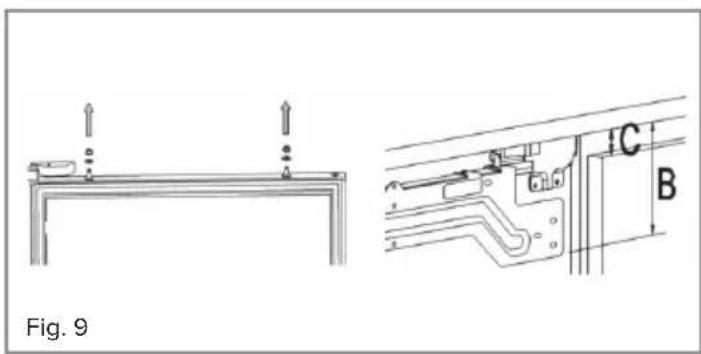
Unscrew and remove the nuts and washers from the top of the appliance door to remove the bracket.
Fig. 10 - Fitting the decor door bracket
Subtract C from B and put the fixing bracket (2) in place using this measurement for vertical position and place to the centre for horizontal position. Secure the fixing bracket (2) using screws(1).
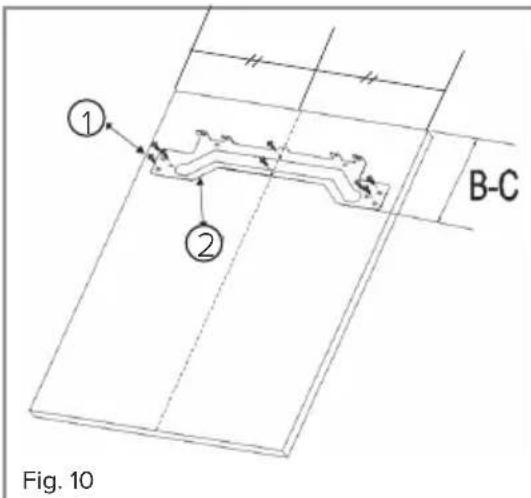
Fig. 11 - Fitting the decor door
Place the decor door onto the appliance door by inserting adjustment bolts into the slots on the fixing bracket.
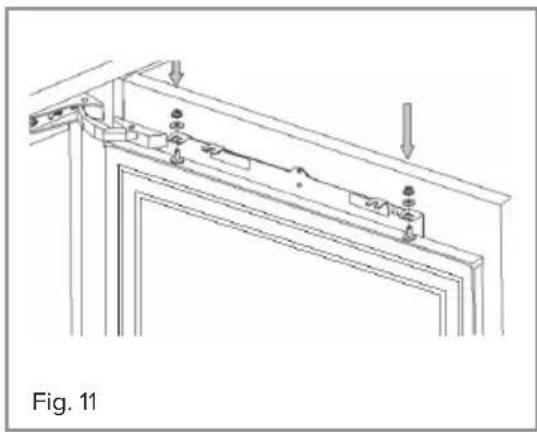
natural_image
Technical line drawing of a mechanical assembly with mounting brackets and mounting holes (no text or symbols)Locate the washers and screw the nuts onto the adjustment bolts.
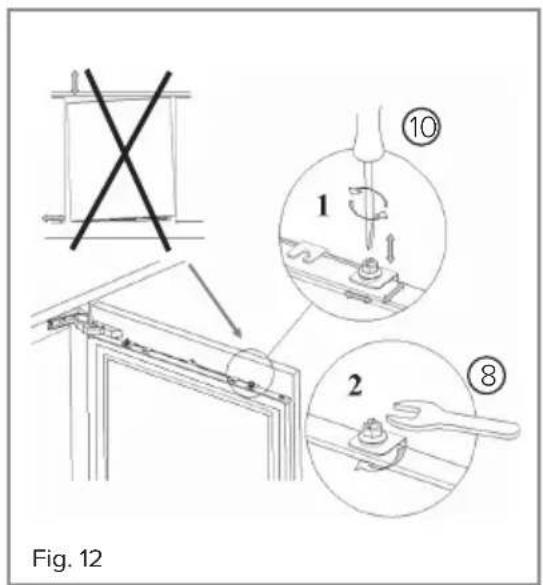
Fig. 12 - Aligning the decor door
Close the door and check the alignment with the other unit doors. Adjust the decor door by screwing or unscrewing the adjustment bolts for vertical adjustment and by the help of the slots on the fixing bracket for other directions. Lock the screws into place as shown in Fig. 12.
Fitting the decor door base fixings
With the appliance door open, locate the metal decor door base fixing brackets and screw the fixings to the decor door. You may need to remove and re-fit these brackets depending upon the decor door used.
Fitting the decorative cover
Re-fit the decorative cover, that you removed in the first step, on to the decor door fixing bracket. Check that the whole door assembly operates smoothly and that the door seal of the refrigerator is still creating a seal.
Important: After completing the installation, check that the appliance is secured within the unit and that the door(s) close and open properly. If there is no resistance from the door seals when opening the doors, then it is probable that the appliance and/or decor doors are not fitted properly.
Reversing the appliance doors
We recommend you seek the help of another individual to support the doors whilst performing this operation.
- Carefully prise off the white cover caps for the side that you wish to switch the hinges to
- With the door closed remove the hinge caps and the screws from the top hinge attaching the hinge to the door, support the door whilst doing this, then remove the screws from the lower hinge
-
Support the door at the bottom and open the hinges away from the appliance door. Carefully lift the appliance door away, ensuring not to damage the hinges or the door. Place the door somewhere safe where it will not cause or receive damage
-
Repeat steps 1 to 3 for the lower door if necessary
-
With the top hinge open, remove the screws that fix the hinge to the appliance cabinet, do the same with the lower hinge.
-
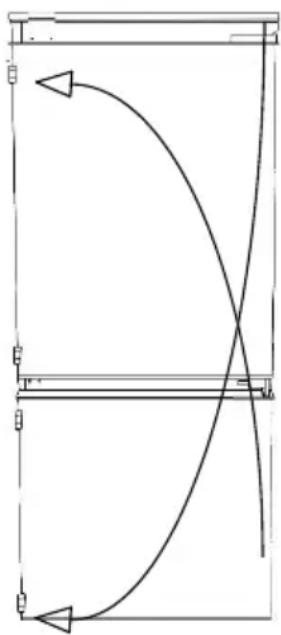
Flip the top hinge 180 degrees and reattach the the hinge on the diagonally opposite corner of the appliance cabinet as shown in fig. 13
-
Swadrepen'sdoming the opposite side at the top. Refit the upper door and the "new" top hinge and fix securely to the appliance. Repeat this process for the bottom door if necessary
-
Fit the central cover caps and top hinge cover pieces in place to complete the process.
flowchart
graph TD
    A["Start"] --> B{Decision}
    B -->|Yes| C["Path 1"]
    B -->|No| D["Path 2"]
Fig. 13
Ensuring the door seals correctly:
It is normal for the seal to be compressed after the door has been reversed. With the door closed, use a hair dryer to expand the seal and fill the gap between the door and the body of the appliance.
Take care not to use the hair dryer too close to the appliance, which could damage the seal. A distance of approximately 10cm should be adequate.
When completed, allow the seal and door to cool before touching them. Once done, the seal should remain in position
Electrical information
Warning! This appliance must be earthed.
If in doubt regarding the electrical connection of this appliance, consult a qualified electrician. Do not shorten the supply cable, the appliance may require removing for servicing.
N.B. Ensure that the plug socket is situated in an easily accessible place after installation.
E & O E. All instructions, dimensions and illustrations are provided for guidance only. ... reserve the right to change specifications without prior notice.

Warning; Risk of fire / flammable materials
This appliance is not intended for use by persons (including children) with reduced sensory or mental capabilities, or lack of experience and knowledge, unless they given supervision or instruction concerning use of the appliance by a person responsible their safety.
Children should be supervised to ensure that they do not play with the appliance
If the supply cord is damaged, it must be replaced by the manufacturer, its serv or similarly qualified persons in order to avoid a hazard.
WARNING: Keep ventilation openings, in the appliance enclosure or in the built-of obstruction.
WARNING: Do not use mechanical devices or other means to accelerate the d other than those recommended by the manufacturer.
WARNING: Do not damage the refrigerant circuit.
WARNING: Do not use electrical appliances inside the food storage compartment appliance, unless they are of the type recommended by the manufacturer.
WARNING: When positioning the appliance, ensure the supply cord is not trapped. WARNING: Do not locate multiple portable socket-outlets or portable power supplier of the appliance.
Do not store explosive substances such as aerosol cans with a flammable propella this appliance.
This appliance is intended to be used in household and similar applications such -staffkitchenareasinshops,officesandotherworkingenvironments; -farmhousesandbyclientsinhotels,motelsandotherresidentialtype -bedandbreakfasttypeenvironments;
-cateringandsimilarnon-retailapplications.
Please according to local regulations regarding disposal of the appliance fo flammable refrigerant and blowing gas.
If the LED lamp is damaged, it must be replaced by the manufacturer, its service similarly qualified persons in order to avoid a hazard
WARNING: To avoid a hazard due to instability of the appliance, it must be with the instructions
Climate range
The information about the climate range of the appliance is provided on the rating plate. It indicates at which ambient temperature (that is room temperature in which the appliance is working) is optimal for the operation of the appliance.
| Climate class Allowable ambient temperature | |
| SN | Extended Temperate This refrigeration appliance is intended for use at an ambient temperature ranging between 10°C and 32°C |
| N | Temperate This refrigeration appliance is intended for use at an ambient temperature ranging between 16°C and 32°C |
| ST | Sub Tropical This refrigeration appliance is intended for use at an ambient temperature ranging between 16°C and 38°C |
| T | Tropical This refrigeration appliance is intended for use at an ambient temperature ranging between 16°C and 43°C |
Practical tips
Due to the natural circulation of the air in the appliance, there are different temperature zones in the refrigerator chamber. The coldest area is directly above the vegetable drawers. Use this area for all delicate and highly perishable food such as:
- Fish, meat, poultry
• Sausage products, ready meals
• Dishes or baked goods containing eggs or cream - Fresh dough, cake mixtures
- Pre-packed vegetables and other fresh food with a label stating it should be stored at a temperature of approximately 4°C
The warmest area is in the top section of the door. Use this area for storing butter and cheese.
To achieve the most effective food preservation for the longest possible time and to avoid wasting any food, position the products as shown on page 9. In addition this figure illustrates the layout of drawers, baskets and shelves, which allows the most efficient use of energy.
Optimal temperature and storage conditions will extend product shelf life and optimise electricity consumption. Optimal storage temperature range should be stated on the food packaging.

ARTUSI
THE ART OF LIVING
Worldwide Appliances Pty Limited
A.B.N. 45868077422
Distributed by Eurolinx pty Ltd
Office:
48-50 Moore Street, Leichhardt N.S.W 2040 Post:
Locked Bag 3000, Annandale, N.S.W 2038
P: 1300 694 583
WARRANTY REGISTRATION
Your ongoing satisfaction with your artusi product is important to us. We ask that you complete the enclosed Warranty Registration Card and return it to us so that we have a record of the artusi product purchased by you.
PRIVACY
Worldwide Appliances respects your privacy and is committed to handling your personal information in accordance with the National Privacy Principles and the Privacy Act 1988 (Cth). A copy of the Worldwide Appliances Privacy Policy is available at www.artusi.com.au. Worldwide Appliances will not disclose any personal information set out in the Warranty Registration Card (“Personal Information”) without your consent unless required by:
-
law;
-
any Worldwide Appliances related company;
- any service provider which provide services to artusi or assist artusi in providing services (including repair and warranty services) to customers. Our purpose in collecting the Personal Information is
to keep a record of the artusi product purchased by you, in order to provide a better warranty service to you in the unlikely event that there is a problem with your artusi product. Worldwide Appliances may contact you at any one or more of the address, email address or telephone numbers set out in the Warranty Registration Card. Please contact artusi on 1300 694 583 should you not wish to be contacted by Worldwide Appliances.
WARRANTY
- Warranty
Worldwide Appliances warrants that each artusi product will remain, for a period of either 12 months or 24 months of warranty. All Warranties are valid from the original date of purchase, And warranty claims must be accompanied by the proof of purchase.
24 months warranty products:
All Built-in Appliances – Limited to Ovens, Gas, Induction and Electric Cooktops, and All Rangehoods. Freestanding Cookers - Gas and Electric Models (900mm Width).
Dishwashers - Freestanding, Fully Integrated, Semi Integrated and built-in. All Wine coolers. All Dryers. Freestanding Cookers - Gas and Electric Models in 50cm, 54cm and 60cm Widths Portable Appliances* – Benchtop Models and Portable Gas Models
- What is not Covered by the Warranty.
The Warranty does not apply if an artusi product is defective by a factor other than a defect arising in the manufacture of the artusi product, including but not limited to:
(a) damage through misuse (including failure to maintain, service or use with proper care), neglect, accident or ordinary wear and tear (including deterioration of parts and accessories and glass breakage);
(b) use for purpose for which the artusi product was not sold or designed;
(c) use or installation which is not in accordance with any specified instructions for use or installation;
(d) use or operation after a defect has occurred or been discovered;
(e) damage through freight, transportation or handling in transit (other than when Worldwide Appliances is responsible);
(f) damage through exposure to chemicals, dusts, residues, excessive voltage, heat, atmospheric conditions or other forces or environmental factors outside the control or Worldwide Appliances;
(g) repair, modification or tampering by the purchaser or any person other than Worldwide Appliances, an employee of Worldwide Appliances or an authorised artusi service contractor ^* ;
(h) use of parts, components or accessories which have not been supplied or specifically approved by artusi.
(i) damage to surface coatings caused by cleaning or maintenance using products not recommended in the artusi product handbook provided to the purchaser upon purchase of the artusi product;
(j) damage to the base of an electric oven due to items having been placed on the base of the oven cavity or covering the base, such as aluminium foil (this impedes the transfer of heat from the element to the oven cavity and can result in irreparable damage); or
(k) damages, dents or other cosmetic imperfections not affecting the performance of the artusi in respect of an artusi product purchased as a “factory second” or from display
The Warranty does not extend to light globes used in artusi products.
- Domestic Use
Each artusi product is made for domestic use. This Warranty may not extend to artusi products used for commercial purposes.
Continued over...
Warranty Card continued
artusi.com.au
4. Time for Claim under the Warranty
You must make any claim under this Warranty within twenty eight (28) days after the occurrence of an event which gives rise to a claim pursuant to the Warranty, by booking a service call on the telephone number below.
5. Proof of Purchase
Customers must retain proof of purchase in order to be eligible to make a warranty claim in respect of an artusi product.
6. Claiming under the Warranty
Customers will bear the cost of claiming under this Warranty unless Worldwide Appliances determines the expenses are reasonable, in which case the customer must claim those expenses by providing written evidence of each expense to Worldwide Appliances at the address on the Warranty Registration Card.
7. Statutory Rights
(a) These terms and conditions do not affect your statutory rights.
(b) The limitations on the Warranty set out in this document do not exclude or limit the application of the consumer guarantees set out in the Act or any other equivalent or corresponding legislation in the relevant jurisdiction where to do so would: (i) contravene the law of the relevant jurisdiction; or
(ii) cause any part of the Warranty to be void.
(c) Worldwide Appliances excludes indirect or consequential loss of any kind (including, without limitation, loss of use of the artusi product) and (other than expressly provided for in these terms and conditions) subject to all terms,
conditions and warranties implied by custom, the general law, the Act or other statute.
(d) The liability of Worldwide Appliances to you
Warranty Card tear off
for a breach of any express or non-excludable implied term, condition or warranty is limited at the option of Worldwide Appliances to:
(i) replacing or repairing the defective part of the artusi product;
(ii) paying the cost of replacing or repairing the defective part of the artusi product;
(iii) replacing the artusi product; or
(iv) paying the cost of replacing the artusi product.
(e) Our goods come with guarantees that cannot be excluded under the Australian Consumer Law. You are entitled to a replacement or refund for a major failure and for compensation for any other reasonably foreseeable loss or damage. You are also entitled to have the goods repaired or replaced if the goods fail to be of acceptable quality and the failure does not amount to a major failure.
8. Defects
Any part of an artusi product deemed to be defective and replaced by Worldwide Appliances is the property of Worldwide Appliances.
Worldwide Appliances reserves the right to inspect and test artusi products in order to determine the extent of any defect and the validity of a claim under the Warranty.
All warranty service calls must be booked via the customer care department. The team can be contacted on 1 300 85 64 11 option 1 or customercare@eurolinx.com.au
01082016

ARTUSI
THE ART OF LIVING
WARRANTY REGISTRATION CARD
01052016
Please complete and send to ARTUSI at: REPLY PAID 83617 LEICHHARDT NSW 2040
| Last Name: First Name: | ||
| Address: | ||
| State: Postcode: Email: | ||
| Home Phone: Mobile: | ||
| Purchase Date: / / (Please attach proof of purchase to validate warranty) | ||
| MODEL NUMBER | SERIAL NUMBER(if you cannot locate the serial number please call ARTUSI on 1300 856 411) |
| 1 | |
| 2 | |
| 3 | |
| 4 |
01082016

ARTUSI
THE ART OF LIVING
DISCLAIMER
Worldwide Appliances PTY LTD, trading as ARTUSI, is continually seeking ways to improve the design specifications, aesthetics and production techniques of its products. As a result alterations to our products and designs take place continually. Whilst every effort is made to produce information and literature that is up to date, this brochure should not be regarded as an infallible guide to the current specifications, nor does it constitute an offer for the sale of any particular product. Product dimensions indicated in our literature is indicative only. Actual product only should be used to define dimension cutouts. Distributors, and retailers are not agents of ARTUSI and are not authorised to bind ARTUSI by any express or implied undertaking or representation.
ARTUSI OFFICES ARE OPEN DAILY FROM 9AM-5PM AND SATURDAYS 10AM-4PM
NSW & ACT (HEAD OFFICE)
48 50 MOORE STREET
LEICHHARDT
FO285694699
VIC.TAS & SA
1211 TOORAK ROAD
CAMBERWELL
F0398092155
QLD
1/42 CAVENDISH ROAD
COORPAROO
F0733970850
WA&NT
UNIT 10/55 HOWE STREET
OSBORNE PARK
F 08 9201 9188
NZ
POBOX11.160
SOCKBURN CHRISTCHURCH
F033445906
- APPLIANCES
- FOR LIVING
- Contents:
- Important
- Appliance information:
- EU Declarations of Conformity:
- IMPORTANT INFORMATION FOR CORRECT DISPOSAL OF THE PRODUCT IN ACCORDANCE WITH EC DIRECTIVE 2012/19/EU.
- Before first use
- You must allow the fridge to settle for at least twenty four hours prior to switching the power on.
- Please note:
- Fridge use
- Freezer use
- Crisper drawer humidity adjustment
- Storage
- Control Panel
- Fresh zone temperature adjustment sensor
- Fast cooling function
- Holiday function
- Fridge temperature adjustment
- Display
- Freezer temperature adjustment
- Smart function
- Fast freezing function
- On/off button
- Defrosting the freezer
- Defrosting the fridge
- Care and cleaning
- Troubleshooting
- If the appliance is not working, check:
- If the appliance is working, but not very well, check:
- If the appliance is noisy, check:
- If the appliance is beeping, check:
- If there's water in the base of the refrigerator compartment, check:
- If ice has formed on the back wall of the fridge:
- If excessive ice has formed in the freezer:
- If one or more of the LED units within the appliance is not working:
- Installation preparation
- Cabinet dimensions
- Ventilation
- Installation into the cabinet
- Mounting the fascia doors
- Fig. 9 - Fitting the decor door bracket
- Fig. 10 - Fitting the decor door bracket
- Fig. 11 - Fitting the decor door
- Fig. 12 - Aligning the decor door
- Fitting the decor door base fixings
- Fitting the decorative cover
- Reversing the appliance doors
- Ensuring the door seals correctly:
- Electrical information
- N.B. Ensure that the plug socket is situated in an easily accessible place after installation.
- Climate range
- Practical tips
- ARTUSI
- THE ART OF LIVING
- PRIVACY
- WARRANTY
- Warranty Card continued
- Time for Claim under the Warranty
- Proof of Purchase
- Claiming under the Warranty
- Statutory Rights
- Warranty Card tear off
- Defects
- DISCLAIMER
Brand : Artusi
Model : AINT7000
Category : Refrigerator