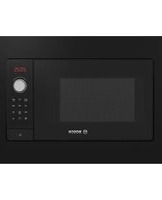
USER MANUAL BEL653MB3A BOSCH
User manual and installation instructions
Table of contents
1 Safety.... 2
2 Preventing material damage 5
3 Environmental protection and saving energy 6
4 Familiarising yourself with your appliance ..... 7
5 Accessories.... 8
6 Before using for the first time 8
7 Basic operation ...... 9
8 Grill 10
9 Memory 11
10 Programmes 11
11 Childproof lock.... 12
12 Basic settings.... 13
13 Cleaning and servicing.... 13
14 Troubleshooting.... 15
15 Disposal.... 16
16 Customer Service.... 16
17 How it works.... 16
18 INSTALLATION INSTRUCTIONS 22
18.2 Safe installation 22

1 Safety
Observe the following safety instructions.
- Read this instruction manual carefully.
- Keep the instruction manual and the product information safe for future reference or for the next owner.
- Do not connect the appliance if it has been damaged in transit.
1.2 Intended use
Only a licensed professional may connect appliances without plugs. Damage caused by incorrect connection is not covered under the warranty.
The appliance can only be used safely if it is correctly installed according to the safety instructions. The installer is responsible for ensuring that the appliance works perfectly at its installation location.
Only use this appliance:
■ To prepare meals and drinks. ■ Under supervision. Never leave the appliance unattended when cooking for short periods. - For household use and similar applications, such as: In kitchens for employees in shops, offices and other commercial sectors; in agriculture; by customers in hotels and other residential facilities; in bed and breakfasts. ■ Up to an altitude of max. 4000 m above sea level.
This appliance complies with the standards EN 55011 and CISPR 11. It is a group 2, class B product. Group 2 means that microwaves are produced for the purpose of heating food. Class B means that the appliance is suitable for private households.
1.3 Restriction on user group
This appliance may be used by children aged 8 or over and by people who have reduced physical, sensory or mental abilities or inadequate experience and/or knowledge, provided that they are supervised or have been instructed on how to use the appliance safely and have understood the resulting dangers.
Do not let children play with the appliance. Children must not perform cleaning or user maintenance unless they are at least 15 years old and are being supervised.
Keep children under the age of 8 years away from the appliance and power cable.
1.4 Safe use
⚠ WARNING – Risk of fire!
Combustible objects that are left in the cooking compartment may catch fire.
▶ Never store combustible objects in the cooking compartment. ▶ If smoke is emitted, the appliance must be switched off or the plug must be pulled out and the door must be held closed in order to stifle any flames.
Loose food remnants, fat and meat juices may catch fire.
Before using the appliance, remove the worst of the food residues and remnants from the cooking compartment, heating elements and accessories.
Overheating of the appliance may cause a fire.
▶ Never install the appliance behind a decorative door or unit door.
⚠ WARNING – Risk of burns!
The appliance and its parts that can be touched become hot during use.
▶ Caution should be exercised here in order to avoid touching heating elements. - Young children under 8 years of age must be kept away from the appliance.
Accessories and cookware get very hot.
▶ Always use oven gloves to remove accessories or cookware from the cooking compartment.
When the cooking compartment is hot, any alcoholic vapours inside may catch fire.
▶ Only use small quantities of drinks with a high alcohol content in food. ▶ Open the appliance door carefully.
⚠ WARNING – Risk of scalding!
The accessible parts of the appliance become hot during operation.
▶ Never touch these hot parts.
- Keep children at a safe distance.
Hot steam may escape when you open the appliance door. Steam may not be visible, depending on the temperature.
▶ Open the appliance door carefully.
- Keep children at a safe distance.
If there is water in the cooking compartment when it is hot, this may create hot steam.
▶ Never pour water into the cooking compartment when the cooking compartment is hot.
⚠ WARNING – Risk of injury!
Scratched glass in the appliance door may develop into a crack.
- Do not use any harsh or abrasive cleaners or sharp metal scrapers to clean the glass on the appliance door, as they may scratch the surface.
The hinges on the appliance door move when the door is opened and closed, which could trap your fingers.
- Keep your hands away from the hinges. Cracks, splinters or breaks in the glass turntable are dangerous.
▶ Never allow hard objects to strike the turntable.
▶ Handle the turntable with care.
⚠ WARNING – Risk of electric shock!
If the insulation of the power cord is damaged, this is dangerous.
▶ Never let the power cord come into contact with hot appliance parts or heat sources. ▶ Never let the power cord come into contact with sharp points or edges. ▶ Never kink, crush or modify the power cord.
⚠ WARNING – Risk of suffocation!
Children may put packaging material over their heads or wrap themselves up in it and suffocate.
- Keep packaging material away from children.
- Do not let children play with packaging material.
Children may breathe in or swallow small parts, causing them to suffocate.
- Keep small parts away from children. ▶ Do not let children play with small parts.
1.5 Microwave
CAREFULLY READ THE IMPORTANT SAFETY INSTRUCTIONS AND KEEP THEM SAFE FOR FUTURE USE
⚠ WARNING – Risk of fire!
Using the appliance for anything other than its intended purpose is dangerous and may cause damage. For example, heated slippers and pillows filled with grain or cereal may catch fire, even several hours later.
▶ Never dry food or clothing with the appliance. ▶ Never heat up slippers, pillows filled with grain or cereal, sponges, damp cleaning cloths or similar with the appliance. - The appliance must only be used to prepare food and drink.
Food and its packaging and containers may catch fire.
▶ Never heat food in heat-retaining packaging. - Do not leave food unattended while it is heating in containers made of plastic, paper or other combustible materials. ▶ Never set the microwave power too high or the cooking time too long. Follow the instructions provided in this user manual. ▶ Never use the microwave to dry food. ▶ Never defrost or heat food with a low water content, such as bread, at too high a microwave power or for too long. Cooking oil may catch fire.
▶ Never use the microwave to heat cooking oil on its own.
⚠ WARNING – Risk of explosion!
Liquids and other food may easily explode when in containers that have been tightly sealed.
▶ Never heat liquids or other food in containers that have been tightly sealed.
⚠ WARNING – Risk of burns!
Foods with peel or skin may burst or explode during heating, or even afterwards.
▶ Never cook eggs in their shell or heat hard-boiled eggs in their shell. ▶ Never cook shellfish or crustaceans. ▶ Always prick the yolk of eggs before microwaving. - The skin of foods that have a peel or skin, such as apples, tomatoes, potatoes and
sausages, may burst. Before heating, prick the peel or skin.
Heat is not distributed evenly through baby food.
▶ Never heat baby food in closed containers. ▶ Always remove the lid or teat. ▶ Stir or shake well after heating. ▶ Check the temperature before giving the food or drink to a child.
Heated food gives off heat. The cookware may become hot.
▶ Always use oven gloves to remove cookware or accessories from the cooking compartment.
Airtight packaging may burst when food is heated.
▶ Always follow the instructions on the packaging. ▶ Always use oven gloves to remove the dishes from the cooking compartment.
The accessible parts of the appliance become hot during operation.
▶ Never touch these hot parts. - Keep children at a safe distance.
Using the appliance for anything other than its intended purpose is dangerous. This is because, for instance, overheated slippers, pillows filled with grain or cereal, sponges and damp cleaning cloths, etc., may cause burns to the skin.
▶ Never dry food or clothing with the appliance. ▶ Never heat up slippers, pillows filled with grain or cereal, sponges, damp cleaning cloths or similar with the appliance. - The appliance must only be used to prepare food and drink.
⚠ WARNING – Risk of scalding!
There is a possibility of delayed boiling when a liquid is heated. This means that the liquid reaches the boiling temperature without the usual steam bubbles rising to the surface. Exercise caution even when only gently shaking the container. The hot liquid may suddenly boil over and splatter.
Always place a spoon in the container when heating liquids. This prevents delayed boiling.

⚠ WARNING – Risk of injury!
Unsuitable cookware may crack. Porcelain or ceramic cookware can have small perforations in the handles and lid. These perforations conceal a cavity below. If moisture penetrates this cavity, it could cause the cookware to crack.
▶ Only use microwave-safe cookware.
Cookware and containers made from metal or cookware with metal edging may lead to sparks being formed during simple microwave operation. The appliance is damaged.
▶ Never use metal containers during microwave-only operation. ▶ Only use microwave-safe cookware or use the microwave in combination with a type of heating.
2 Preventing material damage
2.1 General
ATTENTION!
When the cooking compartment is hot, any water inside it will create steam. The change in temperature may cause damage.
- Never pour water into the cooking compartment when it is still hot.
The prolonged presence of moisture in the cooking compartment leads to corrosion.
▶ Always wipe away the condensation after cooking. - Do not keep moist food in the cooking compartment for a long time with the door closed. - Do not store food in the cooking compartment.
⚠ WARNING – Risk of electric shock!
The appliance uses a high voltage.
Never remove the casing.
WARNING – Risk of serious harm to health!
Inadequate cleaning may destroy the surface of the appliance, reduce its service life, and lead to dangerous situations, such as escaping microwave energy.
- Clean the appliance on a regular basis, and remove any food residue immediately. Always keep the cooking compartment, door and door stop clean.
See "Cleaning and servicing", Page 13
Never operate the appliance if the cooking compartment door is damaged. Microwave energy may escape.
Never use the appliance if the cooking compartment door or the plastic door frame is damaged. Any repair work must only be carried out by the after-sales service.
Microwave energy will escape from appliances that do not have any casing.
Never remove the casing. Contact our after-sales service if maintenance or repair work is needed.
Leaving the appliance to cool down with the door open will damage the front of neighbouring kitchen units over time.
Always allow the cooking compartment to cool down with the door closed after cooking at high temperatures. Take care not to trap anything in the appliance door. Only leave the cooking compartment to dry with the door open if a lot of moisture was produced during operation.
Sitting or placing objects on the appliance door may damage it.
Do not place or hang objects on the appliance door.
2.2 Microwave
Follow these instructions when using the microwave.
ATTENTION!
Metal touching the wall of the cooking compartment will cause sparks, which may damage the appliance or the inner door pane.
▶ Metal (e.g. a spoon in a glass) must be kept at least 2 cm from the cooking compartment walls and the inside of the door.
Placing aluminium containers in the appliance may cause sparks, which will damage the appliance.
- Do not use aluminium containers in the appliance. Operating the appliance without food in the cooking compartment may lead to overloading.
- Do not switch on the microwave unless there is food inside. The only exception to this rule is when performing a short cookware test.
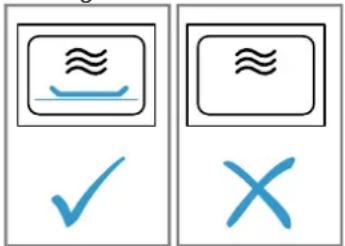
If you prepare several bags of microwave popcorn in immediate succession at a microwave power level that is too high, the cooking compartment may be damaged.
Leave the appliance to cool down for several minutes between each use. ▶ Never set a microwave power level that is too high. ▶ Use a maximum microwave output of 600 watts. ▶ Always place the popcorn bag on a glass plate.
The microwave feed is damaged by the removal of the cover.
▶ Never remove the cover of the microwave feed in the cooking compartment.
Removing the transparent film from the inside of the door damages the appliance door.
- Never remove the transparent film on the inside of the door.
Liquid that penetrates the interior of the appliance may damage the turntable drive.
▶ Monitor the cooking process. - Set a shorter cooking time first and, if necessary, increase the cooking time.
▶ Never use the appliance without the turntable.
Using unsuitable cookware may result in damage.
- When using the grill, the microwave combi mode or the hot air, only use tableware that can withstand the high temperatures.
3 Environmental protection and saving energy
3.1 Disposing of packaging
The packaging materials are environmentally compatible and can be recycled.
- Sort the individual components by type and dispose of them separately.
3.2 Saving energy
If you follow these instructions, your appliance will use less power.
Open the appliance door as little as possible during operation.
- This will maintain the temperature in the cooking compartment and eliminate the need for the appliance to reheat.
Hide the clock in standby mode.
■ The appliance saves energy in standby mode.
Note:
The appliance requires:
■ A maximum of 1 W when the appliance is in operation with the display switched on - A maximum of 0.5 W when the appliance is in operation with the display switched off
4 Familiarising yourself with your appliance
4.1 Control panel
You can use the control panel to configure all functions of your appliance and to obtain information about the operating status.

| 1 | Display Display clock or cooking time. |
| 2 | Rotary selector Set the time, cooking time or automatic programmes. |
| 3 | Buttons Select functions. |
| 4 | Door opener Open the door. |
Door opener
When you press the door opener, the appliance door springs open. You can fully open the appliance door manually.
If you open the appliance door during operation, this pauses operation. When you close the appliance door, the operation does not continue automatically. You must restart the operation.
4.2 Types of heating
Here you can find an overview of the types of heating. You can find recommendations on using the types of heating.
Symbol Name Use
| 90–800 Microwave For defrosting, cooking and heating foods and liquids. |
| Microwave power settings: |
| ■ 90 W |
| ■ 180 W |
| ■ 360 W |
| ■ 600 W |
| ■ 800 W |
Grill: Grill sausages or toast. Gratinate food. Microwave combined operation: Bake and gratins. The dishes are browned. Programmes: There are preprogrammed settings for many dishes.
4.3 Cooling fan
The cooling fan switches on and off as required. The cooking compartment remains cold during microwave operation. Despite this, the cooling fan will still switch on.
Note: The cooling fan may run on even if the oven has been switched off.
4.4 Condensation
Condensation can occur in the cooking compartment and on the appliance door when cooking. Condensation is normal and does not adversely affect appliance operation. Wipe away the condensation after cooking.
5 Accessories
Use original accessories. These have been made especially for your appliance.
Accessories Use
| Wire rack ■ Wire rack for grilling and browning■ Use the wire rack and place the cookware on it |
6 Before using for the first time
Configure the settings for initial start-up. Clean the appliance and accessories.
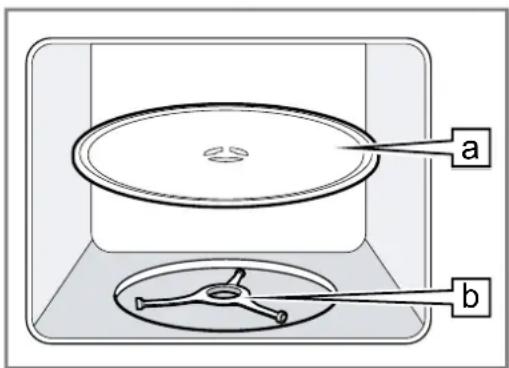
6.1 Fitting the turntable
Only use your appliance when the turntable is fitted.
- Place the turntable a on the roller ring .b
6.2 Cleaning the appliance before using it for the first time
Clean the cooking compartment and accessories before using the appliance to prepare food for the first time.
- Make sure that there is no leftover packaging, accessories or other objects in the cooking compartment.
- Clean the smooth surfaces in the cooking compartment with a soft, damp cloth.
- To eliminate the new-appliance smell, wipe the empty cooking compartment with hot soapy water. → "Cleaning the cooking compartment", Page 14
6.3 Cleaning the accessories
- Clean the accessory thoroughly with soapy water and a soft dish cloth.
6.4 Setting the time
After connecting the appliance to the power supply or following a power cut, the following prompt appears in the display for setting the time.
- Set the time using the rotary selector.
- Press ☐ to confirm the time.
7 Basic operation
7.1 Microwave power settings
This is where you can find an overview of the different microwave power settings and when to use them.
| Microwave power setting in watts | Use |
| 90 Defrost delicate foods. |
| 180 Defrost food and continue cooking. |
| 360 Cooking meat and fish or heating delicate foods. |
| 600 Heat and cook food. |
| 800 Heat liquids. |
Note:
You can set the microwave power settings for a particular cooking time:
■ 800 W for 30 minutes ■ 600 W for 60 minutes ■ 90 W, 360 W, 180 W for 99 minutes
7.2 Microwave-safe cookware and accessories
To heat food evenly and avoid damaging your appliance, it is important to use the right cookware and accessories.
Note: Read the manufacturer's instructions before using any cookware in the microwave. If in doubt, carry out a cookware test.
Microwave-safe
| Cookware and accessories | Reason |
| Cookware made from heat-resistant, microwave-safe material:■ Glass■ Glass ceramic■ Porcelain■ Temperature-resistant plastic■ Fully glazed ceramic without cracks | These materials allow microwaves to pass through. Microwaves do not damage heat-resistant cookware. |
| Metal cutlery Note: You can use metal cutlery, e.g. place a spoon in a glass, to prevent delayed boiling. |
ATTENTION!
Metal touching the wall of the cooking compartment will cause sparks, which may damage the appliance or the inner door pane.
▶ Metal (e.g. a spoon in a glass) must be kept at least 2 cm from the cooking compartment walls and the inside of the door.
Not microwave-safe
| Cookware and accessories | Reason |
| Metal cookware Metal does not allow microwaves to pass through. The food hardly heats up. |
| Cookware with gold or silver decoration | Microwaves can damage gold and silver decoration.Tip: You can only use this kind of cookware if the manufacturer guarantees that it is microwave-safe. |
7.3 Testing cookware for microwave suitability
Test cookware to see whether it is suitable for microwave use. Testing cookware is the only time the appliance should be operated in microwave mode without any food inside.
WARNING – Risk of scalding!
The accessible parts of the appliance become hot during operation.
▶ Never touch these hot parts. - Keep children at a safe distance.
- Place the empty cookware in the cooking compartment.
- Set the appliance to the maximum microwave power setting for 30 seconds to 1 minute.
- Start the operation.
- Check the cookware several times:
- If the cookware is cold or warm to the touch, it is suitable for microwave use.
- If the cookware becomes hot or sparks are created, stop the cookware test. The cookware is not microwave-safe.
7.4 Configuring the microwave settings

WARNING – Risk of scalding!
There is a possibility of delayed boiling when a liquid is heated. This means that the liquid reaches boiling temperature without the usual steam bubbles rising to the surface. Even if the container only vibrates a little, the hot liquid may suddenly boil over and spatter.
▶ Always place a spoon in the container when heating liquids. This will prevent delayed boiling.

ATTENTION!
Operating the appliance without food in the cooking compartment may lead to overloading.
- Do not switch on the microwave unless there is food inside. The only exception to this rule is when performing a short cookware test.

Tip: To ensure optimum use of your appliance, you can refer to the information in the recommended settings. → "How it works", Page 16
- Follow the safety instructions. → Page 4
- Observe the information on how to prevent material damage. → Page 6
- Read the information on microwave-safe cookware and accessories. → Page 9
- Press the button for the microwave power setting that you require.
- Use the rotary selector to set the required cooking time.
- Press start +30 sec
An audible signal sounds once the cooking time has elapsed.
Note: If you open the cooking compartment door while the appliance is in operation, the appliance stops the operation and keeps the set time schedule. If you want to restart the operation, close the door and press start -30 sec
Increasing the cooking time
You can extend the cooking time you have set at any time.
Press start +30 sec. The cooking time is extended by 30 seconds.
Changing the cooking time
You can change the cooking time at any time.
Use the rotary selector to set the required cooking time.
Stopping operation
Open the appliance door and press stop, or press stop twice.
7.5 QuickStart
You can use a button to start the maximum microwave power setting.
Press start +30 sec. The maximum microwave power setting is started for 30 seconds. Press start +30 sec again to extend the cooking time by 30 seconds each time.
8 Grill
You can brown or gratinate your food using the grill.
You can use the grill on its own or in combination with the microwave.
8.1 Setting the grill
- Press
- Use the rotary selector to set the required cooking time.
- Press start +30 sec
An audible signal sounds once the cooking time has elapsed.
Note: If you open the cooking compartment door while the appliance is in operation, the appliance stops the operation and keeps the set time schedule. If you want to restart the operation, close the door and press start -30 sec
Increasing the cooking time
You can extend the cooking time you have set at any time.
Press start +30 sec. The cooking time is extended by 30 seconds.
Changing the cooking time
You can change the cooking time at any time.
- Use the rotary selector to set the required cooking time.
Stopping operation
- Open the appliance door and press the stop button or press the stop button twice.
8.2 Setting the microwave combined operation
- Set the microwave power setting to 90 W, 180 W, or 360 W.
- Press
- Use the rotary selector to set the required cooking time.
4. Press start +30 sec
a An audible signal sounds once the cooking time has elapsed.
Note: If you open the cooking compartment door while the appliance is in operation, the appliance stops the operation and keeps the set time schedule. If you want to restart the operation, close the door and press start 30 sec
9 Memory
You can use the memory function to save the setting for a dish and call it up again at any time.
Tip: If you prepare one dish often, use the memory function.
9.1 Saving memory settings
- Press ☆
- Press the button for the microwave power setting that you require.
- Use the rotary selector to set the required cooking time.
- Press ☆ to confirm.
The setting has been saved.
9.2 Starting the memory
Requirement: The appliance door is closed.
- Press ☆
The saved settings are displayed.
- Press start +30 sec
An audible signal sounds once the cooking time has elapsed.
9.3 Stopping operation
Open the appliance door and press the stop button or press the stop button twice.
10 Programmes
The programmes help you to use your appliance to prepare different dishes by selecting the optimum settings automatically.
10.1 Setting a programme
- Select a programme.
- Press repeatedly until the display shows the required programme number.
- Press kg
The display shows a default weight.
- Turn the rotary selector to specify the weight of the dish.
If it is not possible to enter the exact weight, you should round the weight up or down.
- To start operation, press start +30 sec
- If a signal sounds during the programme, open the appliance door.
- Cut, stir or turn the food.
- Close the appliance door.
- Press start +30 sec
An audible signal sounds once the cooking time has elapsed.
10.2 Stopping operation
- Open the appliance door and press stop, or press stop twice.
10.3 Defrosting with the automatic programmes
You can use the four defrosting programmes to defrost meat, poultry and bread.
Programme Food Cookware Weight range in kg
| P01 Minced meat Open 0.20–1.00 |
| P02 Pieces of meat Open 0.20–1.00 |
| P03 Chicken, chicken pieces Open 0.40–1.80 |
| P04 Bread | Open 0.20–1.00 |
Defrosting food using the automatic programmes
- Take the food out of its packaging. Use food that is stored flat and in portion-sized quantities at -18°C.
- Weigh the food. You require the weight in order to set the programme.
- Place the food in a microwaveable shallow dish, e.g. a glass plate or porcelain plate. Do not put the cover on.
- Set the programme. → Page 11
- Note: Liquid is produced when you defrost meat and poultry.
Drain off any liquid when turning and under no circumstances use it for other purposes or allow it to come into contact with other foods.
- Flat pieces of meat and items made from minced meat should be separated from each other before leaving to stand.
- The defrosted food should be left to stand for an additional 10 to 30 minutes until it reaches an even temperature.
Large pieces of meat require a longer standing time than smaller pieces. For poultry, remove the giblets after the resting time.
- Continue to prepare the food, even though thick pieces of meat may still be frozen in the middle.
10.4 Cooking with the automatic programmes
With the three cooking programmes, you can cook rice, potatoes or vegetables.
| Programme Food Cookware Weight range in kg | Information |
| P05 Rice With lid 0.05–0.20 | ■ For rice, use a large, deep dish. | ■ Do not use any boil-in-the-bag rice.■ For every 100 g rice, add twice to three times the amount of water. |
| P06 Potatoes With lid 0.15–1.00 | ■ For boiled potatoes, cut fresh potatoes into small, equally sized pieces.■ Add one tablespoon of water and a little salt for every 100 g boiled potatoes. | |
| P07 Vegetables With lid 0.15–1.00 | ■ Weigh fresh, washed vegetables scales.■ Cut the vegetables into small, uniform pieces.■ Add one tablespoon of water for every 100 g boiled potatoes. | |
Cooking food with the automatic programmes
- Weigh the food.
You require the weight in order to set the programme.
- Place the food on microwave-safe cookware and cover with a lid.
- Add the volume of water in accordance with the manufacturer's instructions on the packaging.
- Set the programme. → Page 11
- Once the programme has finished, stir the food again.
- The food should be left to stand for an additional 5 to 10 minutes until it reaches a uniform temperature. The cooking results are dependent on the food quality and consistency of the food.
10.5 Combi-cooking programme
With the combi cooking programme, you combine microwave and grill.
| Programme Food Cookware Weight range in kg |
| P08 Frozen bake, up to 3 cm deep Open | 0.40–0.90 |
| Cooking food using the combi cooking programme1. Take the food out of its packaging.2. Weigh the food.You require the weight in order to set the pro-gramme. | 3. Place the food in microwave-safe, heat-resistant cookware that is not too big.4. Set the programme. → Page 115. Once the programme has finished, leave the food to rest for another 5–10 minutes to allow the tempera-ture to even out. |
11 Childproof lock
You can secure your appliance to prevent children from accidentally switching it on or changing the settings.
11.1 Activating the childproof lock
Requirement: The appliance is switched off.
Press and hold the stop button for approximately four seconds.
The control panel is locked. SRF E appears in the display.
11.2 Deactivating the childproof lock
Press and hold the stop button for approximately 4 seconds. The control panel is unlocked.
12 Basic settings
You can configure the basic settings for your appliance to meet your needs.
12.1 Overview of the basic settings
Here you can find an overview of the basic settings and factory settings. The basic settings depend on the features of your appliance.
| Display Basic setting Selection Description |
| 1 Button tone = off | OFFON= on 1 | Switching the button tones on or offNote: You cannot switch off the button tone for and stop ≈ . |
| 2 Demo mode = off | OFFON= on 1 | The appliance is switched off. You can use the buttons and the display. The buttons have no function, meaning that no power arises for the microwave, for example.Dealers predominantly use the demo mode.While the demo mode is activated, the display shows M |
1 Factory setting (may vary according to model)
12.2 Changing basic settings
Requirement: The appliance is switched off.
- Press and hold start and for a few seconds. The display shows ! for the first basic setting.
- To edit the basic setting, press start +30 sec. The selected setting lights up in the display.
- Use the rotary selector to set the required selection.
- To accept the basic setting, press start -30 sec
- To exit the basic setting, press stop
- Use the rotary selector to change to basic setting 2
- To edit the basic setting, press start +30 sec. The selected setting lights up in the display.
- Use the rotary selector to set the required selection.
- To accept the basic setting, press start +30 sec
- To exit the basic setting, press stop
- To exit the basic settings menu, press stop again. Tip: You can change this setting again at any time.
12.3 Changing the signal duration
When your appliance is switched off, you hear an audible signal. You can change the duration of the signal.
Press and hold start for approx. six seconds. The signal duration switches between short and long. The appliance applies the signal duration and displays the time.
12.4 Changing the time
You can change the time on the clock at any time.
- Press Ⓤ
- Set the time using the rotary selector.
- Press ☐ to confirm the time.
12.5 Hiding the clock in standby
You can hide the clock when the appliance is in standby mode.
- Press Ⓤ
- Press stop
Note: Press Ⓜ to display the clock again.
13 Cleaning and servicing
To keep your appliance working efficiently for a long time, it is important to clean and maintain it carefully.
13.1 Cleaning products
Only use suitable cleaning agents.
WARNING – Risk of electric shock!
An ingress of moisture can cause an electric shock.
- Do not use steam- or high-pressure cleaners to clean the appliance.
ATTENTION!
Unsuitable cleaning agents damage the surfaces of the appliance.
- Do not use harsh or abrasive cleaning products.
- Do not use cleaning products with a high alcohol content.
- Do not use hard scouring pads or cleaning sponges.
- Do not use any special cleaners for cleaning the appliance while it is hot. ▶ Only use glass cleaners, glass scrapers or stainless steel care products if recommended in the cleaning instructions for the relevant part.
New sponge cloths contain residues from production.
- Wash new sponge cloths thoroughly before use.
You can find out which cleaning products are suitable for each surface or part of the appliance in the individual cleaning instructions.
13.2 Cleaning the appliance
Clean the appliance as specified. This will ensure that the different parts and surfaces of the appliance are not damaged by incorrect cleaning or unsuitable cleaning products.
⚠ WARNING – Risk of burns!
The appliance and its parts that can be touched become hot during use.
- Caution should be exercised here in order to avoid touching heating elements.
- Young children under 8 years of age must be kept away from the appliance.
WARNING – Risk of fire!
Loose food remnants, fat and meat juices may catch fire.
Before using the appliance, remove the worst of the food residues and remnants from the cooking compartment, heating elements and accessories.
⚠ WARNING – Risk of injury!
Scratched glass in the appliance door may develop into a crack.
- Do not use any harsh or abrasive cleaners or sharp metal scrapers to clean the glass on the appliance door, as they may scratch the surface.
- Read the information on cleaning products.
→ Page 13
- Observe the information on cleaning the appliance components or surfaces.
- Unless otherwise specified:
- Clean the components of the appliance with hot soapy water and a dish cloth.
- Dry with a soft cloth.
13.3 Cleaning the cooking compartment
ATTENTION!
Incorrect cleaning may damage the cooking compartment.
- Do not use oven spray, abrasive materials or other aggressive oven cleaners.
- Read the information on cleaning products.
→ Page 13
- Clean with hot soapy water or a vinegar solution.
- Use oven cleaner to remove very heavy soiling. Only use oven cleaner when the cooking compartment is cold.
Tip: To eliminate unpleasant odours, heat up a cup of water with a few drops of lemon juice for 1 to 2 minutes at maximum microwave power setting. Always place a spoon in the container to prevent delayed boiling.
- Wipe out the cooking compartment with a soft cloth.
- Leave the cooking compartment to dry with the door open.
13.4 Cleaning the front of the appliance
ATTENTION!
Incorrect cleaning may damage the front of the appliance.
- Do not use glass cleaner, metal scrapers or glass scrapers for cleaning. To prevent corrosion on stainless steel fronts, remove any limescale, grease, starch and albumin (e.g. egg white) stains immediately.
- On stainless steel surfaces, use special stainless steel cleaning products suitable for hot surfaces.
- Read the information on cleaning products.
→ Page 13
- Clean the front of the appliance using hot soapy water and a dish cloth. Note: Slight differences in colour on the front of the appliance are caused by the use of different materials, such as glass, plastic and metal.
- For stainless steel appliance fronts, apply a thin layer of the stainless steel cleaning product with a soft cloth. You can obtain the stainless steel cleaning products from the after-sales service or the online shop.
- Dry with a soft cloth.
13.5 Cleaning the control panel
ATTENTION!
Incorrect cleaning may damage the control panel.
▶ Never wipe the control panel with a wet cloth.
- Read the information on cleaning products.
→ Page 13
- Clean the control panel using a microfibre cloth or a soft, damp cloth.
- Dry with a soft cloth.
13.6 Cleaning the accessories
- Read the information on cleaning products.
→ Page 13
- Soften baked-on food remnants with a damp dish cloth and hot soapy water.
- Clean the accessory with hot soapy water and a soft dish cloth or a scrubbing brush.
- Clean the wire rack with stainless steel cleaner or in the dishwasher. Use steel wool or oven cleaner to remove very heavy soiling.
- Dry with a soft cloth.
13.7 Cleaning the door panels
ATTENTION!
Incorrect cleaning may damage the door panes.
▶ Do not use a glass scraper. 1. Read the information on cleaning products.
→ Page 13 2. Clean the door panels with a soft dish cloth and glass cleaner. Note: Shadows on the door panels, which look like streaks, are caused by reflections made by the interior lighting. 3. Dry with a soft cloth.
13.8 Cleaning aid
The cleaning aid is a quick alternative for occasionally cleaning the cooking compartment. The cleaning aid softens dirt by vaporising the soapy water. The dirt can then be removed more easily.
Setting the cleaning aid
- Add a few drops of washing-up liquid to a cup of water.
- Place a spoon in the cup to prevent delayed boiling.
- Place the cup in the centre of the cooking compartment.
- Press and hold 800 clear for approx. four seconds.
- Press start +30 sec
An audible signal sounds once the cooking time has elapsed.
- Wipe out the cooking compartment with a soft cloth.
- Leave the cooking compartment to dry with the door open.
14 Troubleshooting
You can rectify minor faults on your appliance yourself. Read the troubleshooting information before contacting after-sales service. This will avoid unnecessary costs.

WARNING – Risk of injury!
Improper repairs are dangerous.
- Repairs to the appliance should only be carried out by trained specialist staff. If the appliance is defective, call Customer Service.
14.1 Malfunctions
Fault Cause and troubleshooting
| The appliance is not working. | The mains plug of the power cord is not plugged in.► Connect the appliance to the power supply. |
| The circuit breaker is faulty.► Check the circuit breaker in the fuse box. |
| There has been a power cut.► Check whether the lighting in your kitchen or other appliances are working. |
| Malfunction1. Switch off the fuse in the fuse box.2. Switch the fuse back on after approx. 10 seconds.3. If the malfunction occurs again, call after-sales service. |
| Door is not fully closed.► Check whether food remains or foreign material are trapped in the door. |
| Food takes longer than usual to heat up. | The microwave power setting is set too low.► Set a higher microwave power setting. |
| You have placed a larger amount of food than normal in the appliance.► Set a longer cooking time.You need double the time when you have double the amount. |
| The food is colder than usual.► Turn or stir the food from time to time during cooking. |
| Turntable grates or grinds. | Dirt or debris is in the area around the turntable drive.► Clean the roller ring and recess in the cooking compartment. |
| Microwave mode is cancelled. | Appliance has a fault.► If this fault recurs, call the after-sales service. |
| An is shown on the display. | Demo mode is activated.► Deactivate demo mode.→ "Basic settings", Page 13 |
15 Disposal
15.1 Disposing of old appliance
Valuable raw materials can be reused by recycling.
- Dispose of the appliance in an environmentally friendly manner. Information about current disposal methods are available from your specialist dealer or local authority.

This appliance is labelled in accordance with European Directive 2012/19/EU concerning used electrical and electronic appliances (waste electrical and electronic equipment - WEEE). The guideline determines the framework for the return and recycling of used appliances as applicable throughout the EU.
16 Customer Service
Detailed information on the warranty period and terms of warranty in your country is available from our after-sales service, your retailer or on our website.
If you contact Customer Service, you will require the product number (E-Nr.) and the production number (FD) of your appliance.
The contact details for Customer Service can be found in the enclosed Customer Service directory or on our website.
16.1 Product number (E-Nr.) and production number (FD)
You can find the product number (E-Nr.) and the production number (FD) on the appliance's rating plate. You will see the rating plate with these numbers if you open the appliance door.

Make a note of your appliance's details and the Customer Service telephone number to find them again quickly.
17 How it works
Here, you can find the ideal settings for various dishes as well as the best accessories and cookware. We have tailored these recommendations to your appliance.
17.1 What is the best way to proceed?
In this section, you will find out the best way to proceed step-by-step in order to be able to make optimum use of the recommended settings. You will get information on many meals, with details and tips on how to best use and set your appliance.
⚠ WARNING – Risk of burns!
Heated food gives off heat. The cookware may become hot.
- Always use oven gloves to remove cookware or accessories from the cooking compartment.
Note: The times given in the tables are guidelines and depend on the quality, temperature and consistency of the food.
- Before using the appliance, remove all unnecessary cookware from the cooking compartment.
- Select a type of food from the recommended settings.
- Add the food to a suitable tableware.
→ "Microwave-safe cookware and accessories",
Page 9
- Always place the cookware on the turntable.
- Set the appliance according to the recommended settings.
Time ranges are often specified in the recommended settings. Set the shorter cooking time first. If necessary, increase the cooking time. If two microwave power settings and times are specified in the tables, set the first microwave power setting and cooking time first and, after the signal, set the second.
Tip: If you want to cook quantities that deviate from those specified in the tables, set approximately double the time for double the amount.
17.2 Defrosting
With your appliance you can defrost frozen food.
Defrosting food
- Place the frozen food in an open container on the turntable. Delicate parts, such as the legs and wings of chicken or fatty outer layers of roasts, can be covered with small pieces of aluminium foil. The foil must not touch the sides of the cooking compartment.
- Start the operation. You can remove the foil halfway through the defrosting time.
- Note: Liquid is produced when you defrost meat and poultry.
Drain off any liquid when turning and under no circumstances use it for other purposes or allow it to come into contact with other foods.
- Redistribute the food or turn it once or twice as it defrosts.
Turn large pieces of food several times.
- To even out the temperature, leave the defrosted food to stand at room temperature for approx. 10-20 minutes.
You can remove the giblets from poultry at this point. You can continue to cook the meat even if a small section of it is still frozen in the centre.
Defrosting with the microwave
Observe the recommended settings for using the microwave to defrost frozen food.
| Food Weight in g Microwave power | setting in W | Cooking time in mins |
| Whole pieces of beef, veal or pork (on the bone or boned) | 800 1. 180 | 2. 90 | 1. 152. 10–20 |
| Whole pieces of beef, veal or pork (on the bone or boned) | 1000 1. 180 | 2. 90 | 1. 202. 15–25 |
| Whole pieces of beef, veal or pork (on the bone or boned) | 1500 1. 180 | 2. 90 | 1. 302. 20–30 |
| Meat in pieces or slices of beef, veal or pork 200 1. 180 | 2. 90 | 1. 21 2. 4–6 |
| Meat in pieces or slices of beef, veal or pork 500 1. 180 | 2. 90 | 1. 51 2. 5–10 |
| Meat in pieces or slices of beef, veal or pork 800 1. 180 | 2. 90 | 1. 81 2. 10–15 |
| Minced meat, mixed2,3 | 200 90 10 | | 4 |
| Minced meat, mixed2,3 | 500 1. 180 | 2. 90 | 1. 54 2. 10–15 |
| Minced meat, mixed2,3 | 800 1. 180 | 2. 90 | 1. 84 2. 10–20 |
| Poultry or poultry portions5 | 600 1. 180 | 2. 90 | 1. 82. 10–20 |
| Poultry or poultry portions5 | 1200 1. 180 | 2. 90 | 1. 152. 10–20 |
| Fish fillet, fish steak or fish slices5 | 400 1. 180 | 2. 90 | 1. 52. 10–15 |
| Vegetables, e.g. peas 300 180 10–15 | | |
| Fruit, e.g. raspberries5 | 300 180 7–10 | | 6 |
| Fruit, e.g. raspberries5 | 500 1. 180 | 2. 90 | 1. 86 2. 5–10 |
| Butter, defrosting7 | 125 1. 180 | 2. 90 | 1. 12. 2–3 |
| Butter, defrosting7 | 250 1. 180 | 2. 90 | 1. 12. 3–4 |
| Loaf of bread 500 1. 180 | | 2. 90 | 1. 62. 5–10 |
| Loaf of bread 1000 1. 180 | | 2. 90 | 1. 122. 10–20 |
| Cakes, plain, e.g. sponge cake8,9 | 500 90 10–15 | | |
1 Separate any defrosted parts when turning.
2 Freeze the food flat.
3 Remove any meat that has already defrosted.
Turn the food several times.
Separate any defrosted parts.
Carefully stir the food occasionally.
Remove all packaging.
Only defrost cakes without icing, whipped cream, gelatine or custard.
Separate the pieces of cake.
| Food Weight in g Microwave power | setting in W | Cooking time in mins |
| Cakes, plain, e.g. sponge cake8,9 | 750 1. 180 | 2. 90 | 1. 52. 10–15 |
| Cakes, moist, e.g. fruit flan, cheesecake8 | 500 1. 180 | 2. 90 | 1. 52. 15–20 |
| Cakes, moist, e.g. fruit flan, cheesecake8 | 750 1. 180 | 2. 90 | 1. 72. 15–20 |
Separate any defrosted parts when turning. Freeze the food flat. Remove any meat that has already defrosted. Turn the food several times. Separate any defrosted parts. Carefully stir the food occasionally. Remove all packaging. Only defrost cakes without icing, whipped cream, gelatine or custard. Separate the pieces of cake.
17.3 Heating
With your appliance you can heat food.
Heating food
WARNING – Risk of burns!
Heated food gives off heat. The cookware may become hot.
Always use oven gloves to remove cookware or accessories from the cooking compartment.
WARNING – Risk of scalding!
There is a possibility of delayed boiling when a liquid is heated. This means that the liquid reaches boiling temperature without the usual steam bubbles rising to the surface. Even if the container only vibrates a little, the hot liquid may suddenly boil over and spatter.
Always place a spoon in the container when heating liquids. This will prevent delayed boiling.

ATTENTION!
Metal touching the wall of the cooking compartment will cause sparks, which may damage the appliance or the inner door pane.
Metal (e.g. a spoon in a glass) must be kept at least 2 cm from the cooking compartment walls and the inside of the door.
- Take ready meals out of the packaging and place in microwave-safe cookware.
- Distribute the food flat in the cookware.
- Cover the food with a suitable lid, a plate or special microwave foil.
- Start the operation.
- Turn or stir the food several times during cooking. The speed at which different components of the meal heat up may vary.
- Check the temperature.
- To even out the temperature, leave the heated food to stand at room temperature for approx. 2–5 minutes.
Heating frozen food in the microwave
Observe the recommended settings for using the microwave to heat frozen food.
| Food Weight in g Microwave power | setting in W | Cooking time in mins |
| Set menu, plated meal, ready meal with 2–3 components | 300–400 600 8–11 | | |
| Soup 400 600 8–10 | | | |
| Stew 500 600 10–13 | | | |
| Slices or pieces of meat in sauce, e.g. goulash | 500 600 12–17 | | 1 |
| 1 Separate the pieces of meat when stirring. 2 Add a little liquid to the food. 3 Pour water into the dish so that it covers the base. 4 Cook the food without any additional water. |
| Bakes, e.g. lasagne, cannelloni 450 600 10–15 | | |
| Side dishes, e.g. rice, pasta 2 | 250 600 2–5 | | |
| Side dishes, e.g. rice, pasta 2 | 500 600 8–10 | | |
| Vegetables, e.g. peas, broccoli, carrots 3 | 300 600 8–10 | | |
| Vegetables, e.g. peas, broccoli, carrots 3 | 600 600 14–17 | | |
| Creamed spinach 4 | 450 600 11–16 | | |
| 1 Separate the pieces of meat when stirring. 2 Add a little liquid to the food. 3 Pour water into the dish so that it covers the base. 4 Cook the food without any additional water. | | |
Heating in the microwave
Observe the recommended settings for using the microwave to heat food.
| Food Amount Microwave power | setting in W | Cooking time in mins |
| Beverages1 | 200 ml 800 2-3 | | 2,3 |
| Beverages1 | 500 ml 800 3-4 | | 2,3 |
| Baby food, e.g. baby bottles4 | 50 ml 360 Approx. 0.5 | | 5,6 |
| Baby food, e.g. baby bottles4 | 100 ml 360 Approx. 1 | | 5,6 |
| Baby food, e.g. baby bottles4 | 200 ml 360 1.5 | | 5,6 |
| Soup, 1 cup 200 g 600 2-3 | | | |
| Soup, 2 cups 400 g 600 4-5 | | | |
| Set menu, plated meal, ready meal with 2-3 components | 350-500 g 600 4-8 | | |
| Meat in sauce7 | 500 g 600 8-11 | | |
| Stew 400 g 600 6-8 | | | |
| Stew 800 g 600 8-11 | | | |
| Vegetables, 1 portion8 | 150 g 600 2-3 | | |
| Vegetables, 2 portions8 | 300 g 600 3-5 | | |
| 1 Place a spoon in the glass. 2 Do not overheat alcoholic drinks. 3 Check the food occasionally. 4 Heat up baby food without the teat or lid. 5 Always shake the food well after heating. 6 Always check the temperature. 7 Separate the slices of meat. 8 Add a little liquid to the food. | | | |
17.4 Cooking
With your appliance you can cook food.
Cooking food
WARNING – Risk of burns!
Heated food gives off heat. The cookware may become hot.
▶ Always use oven gloves to remove cookware or accessories from the cooking compartment.
- Check whether the cookware fits in the cooking compartment and that the turntable can turn freely.
- For roasting, use a deep dish.
- For bakes or gratins, use large, flat cookware.
- Distribute the food flat in the cookware.
- When cooking with the microwave, cover the food with a suitable lid, a plate or special microwave foil.
- Do not cover the food when grilling.
- Do not cover the food when combining the microwave and grill.
- Always place the cookware on the turntable.
- Always place the wire rack on the turntable when grilling. Do not preheat.
- Start the operation.
- To even out the temperature, leave the heated food to stand at room temperature for approx. 2–5 minutes.
- Leave the meat to sit for 5–10 minutes before cutting it.
- Leave bakes and gratins to stand for five minutes in the appliance while it is switched off.
Tip: Always use wooden skewers for fish skewers or vegetable skewers.
Cooking with the microwave
| Food Amount Accessories Mi- | crowave power setting in W | Type of heating | Cooking time in mins | Information |
| Chicken pieces, e.g. chicken quarters | 800 g Cookware without lid + Wire rack | 360 30-40 Place with the skin side up. |
|
| Chicken wings, mar- inated and frozen | 800 g Cookware without lid + Wire rack | 360 15-25 Do not turn the food. |
| Bacon rashers Ap- prox. 8 pc s | 180 10-15 |
| Meatloaf 750 g Cookware | 1. 600 1. - 2. 360 2. □ 2. 25-35 | Cook the food uncovered. The maximum thickness of the food is 6 cm. |
|
| Fish, e.g. fillet pieces 400 g Cookware without lid | 600 - 10-15 Add a little water, lemon juice or wine to the food. |
| Fish fillet, gratinated 400 g Cookware without lid + Wire rack | 360 10-15 Defrost frozen fish before cooking. |
| Bake, sweet, e.g. quark bake with fruit | 1000 g Cookware without lid | 360 30-35 The maximum thickness of the food is 5 cm. |
| Bake, savoury from raw ingredients, e.g. pasta bake | 1000 g Cookware without lid | 360 30-35 Sprinkle cheese over the food. The maximum thickness of the food is 5 cm. |
| Bake, savoury, made from cooked ingredi-ents, e.g. potato gratin | 1000 g Cookware without lid | 360 30-40 The maximum thickness of the food is 4 cm. |
| Soups, gratinated, e.g. onion soup | 2-4 cups Wire rack - | 10-15 |
| Vegetables, fresh | 250 g Cookware with lid | 600 - 5-10 | Cut the ingredients into equal-sized pieces. Add 1 to 2 tbsp water for every 100 g. Stir the food occa- sionally. |
| Vegetables, fresh | 500 g Cookware with lid | 600 - 10-15 | - |
| Vegetable skewers | 4- 5 pieces Wire rack 180 | 20-25 Use wooden skewers. |
| Potatoes | 250 g Cookware with lid | 600 - 8-10 | Cut the ingredients into equal-sized pieces. Add 1 to 2 tbsp water for every 100 g. Stir the food occa- sionally. |
| Potatoes | 500 g Cookware with lid | 600 - 11-14 | Cut the ingredients into equal-sized pieces. Add 1 to 2 tbsp water for every 100 g. Stir the food occa- sionally. |
1 Carefully stir the food occasionally.
| Food Amount Accessories Mi- | | crowave power setting in W | Type of heating | Cooking time in mins | Information |
| Potatoes 750 g Cookware with | lid | 600 - 15-22 | 1 | Cut the ingredients into equal-sized pieces. Add 1 to 2 tbsp water for every 100 g. Stir the food occasionally. |
| Rice 125 g Cookware with | lid | 1.8002.180 | 1.-2.- | 1.5-72.12-15 | Add double the amount of liquid. |
| Rice 250 g Cookware with | lid | 1.8002.180 | 1.-2.- | 1.6-82.15-18 | Add double the amount of liquid. |
| Toasting bread 2-4 slices | Wire rack - 1st side: | 6-72nd side:5-6 | - |
| Grilling bread 2-4 slices | Wire rack 180 5-10 The cooking time varies de-pending on the topping. |
| Fruit, compote 500 g Cookware with lid | 600 - 9-12 - |
| Sweet food, e.g. pudding, instant | 500 ml | Cookware with lid | 600 - 6-8 Stir the pudding two to three times using the whisk. |
Carefully stir the food occasionally.
17.5 Tips on defrosting, heating and cooking with the microwave next time
Follow these tips for good results when defrosting, heating and cooking with the microwave.
| Issue | Tip |
| Your food is too dry. | ■ Reduce the cooking time or select a lower microwave power setting.■ Cover the food and add more liquid. |
| Issue | Tip |
| The time has elapsed but the food is not defrosted, hot or cooked. | Increase the cooking time. Large quantities and food which is piled high require longer times. |
| The time has elapsed but your food is not yet done on the inside, but is already overdone on the outside. | ■ Stir while cooking. ■ Reduce the microwave power setting and increase the cooking time. |
| After defrosting, the poultry or meat is defrosted on the outside but not defrosted in the middle. | ■ Reduce the microwave power setting. ■ Turn large pieces of frozen food several times. |
17.6 Test dishes
These overviews have been produced for test institutes to facilitate appliance testing in accordance with EN 60350-1:2013 or IEC 60350-1:2011 and EN 60705:2012, IEC 60705:2010.
Cooking with the microwave
| Food | Microwave power setting in W | Cooking time in mins | Note: |
| Custard, 750 g | 1. 3602. 90 | 1. 12–172. 20–25 | Place the Pyrex dish 20 x 25 cm on the turntable. |
| Food Microwave power setting in W | Cooking time in mins Note: |
| Biscuit 600 8–10 Place a 22 cm diameter Pyrex | dish on the turntable. |
| Meatloaf 600 23 - 28 Place a Pyrex dish on the | turntable. |
Defrosting with the microwave
Recommended settings for using the microwave to defrost food.
| Food Microwave power setting in W | Cooking time in mins Note: |
| Meat 1. 180 | | 1. 5–7 | Place the Pyrex dish (22 cm dia-meter) on the turntable. |
| 2. 90 | 2. 10–15 |
Cooking in combination with a microwave
Recommended settings for cooking with the microwave.
| Food Microwave | Type of heating in mins | Cooking time | Note: |
| power setting in W |
| Potato gratin 360 | 35–40 Place a 22 cm diameter Pyrex | | | dish on the turntable. |
18 Installation instructions
Observe this information when installing the appliance.

18.1 Scope of delivery
After unpacking all parts, check for any damage in transit and completeness of the delivery.

18.2 Safe installation
Follow these safety instructions when installing the appliance.
- The appliance can only be used safely if it is correctly installed according to the safety instructions. The installer is responsible for ensuring that the appliance works perfectly at its installation location.
- Check the appliance for damage after unpacking it. Do not connect the appliance if it has been damaged in transit. Before starting up the appliance, remove any packaging material and adhesive film from the cooking compartment and the door. Never remove the transparent film on the inside of the door. Proceed in accordance with the installation sheets for installing accessories. Fitted units must be temperature-resistant up to 90 °C, and adjacent unit fronts up to 65 °C.
- Do not install the appliance behind a decorative door or the door of a kitchen unit. There is a risk of overheating.
- Cut-out work on the units should be carried out before installing the appliance. Remove any shavings. Otherwise, the correct operation of electrical components may be adversely affected. Only a licensed professional may connect appliances without plugs. Damage caused by incorrect connection is not covered under the warranty.
WARNING – Risk of injury!
Parts that are accessible during installation may have sharp edges and may lead to cutting injuries.
Wear protective gloves.
WARNING – Risk of fire!
It is dangerous to use an extended power cord and non-approved adapters.
Do not use extension cables or multiple socket strips.
18.3 Electrical connection
In order to safely connect the appliance electrically, follow these instructions.
WARNING – Risk of electric shock!
Incorrect installation is dangerous.
▶ Only a qualified electrician may route the socket or replace a power cable while taking into consideration the applicable regulations. - Connect the appliance only to a correctly installed, earthed socket. If the plug is no longer accessible following installation, an all-pole isolating unit with a contact clearance of at least 3 mm must be available on the installation side. Contact protection must be ensured by the installation.
18.4 Installation in a wall unit
Observe the installation dimensions and the safety clearances in an upper cabinet.
Only install 20 l appliances in a wall unit.

18.5 Installing in a tall cupboard
Observe the installation dimensions and the safety clearances in a tall unit.

18.6 Preparing the 20 l appliance
- For a cabinet niche of 380+2 mm in height, secure the feet to the bottom of the microwave.
– Secure the spacer to the mounting bracket.

- Route the connecting cable along the back of the appliance so that it does not become hot, kinked or trapped.

18.7 Preparing the 25 l appliance
- Route the connecting cable along the back of the appliance so that it does not become hot, kinked or trapped.

18.8 Preparing the units
▶ Install the tilt protection.
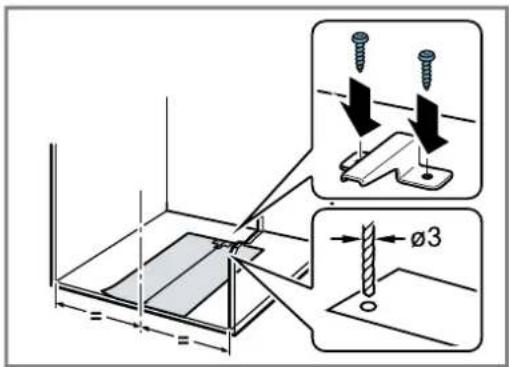
18.9 Installing the appliance
- Centre the appliance.
- Screw the appliance onto the unit.

- For a cabinet niche of 380 +2 mm, use the longer screw.
- For a cabinet niche of 362 +3 mm, use the shorter screw.

Thank you for buying a Bosch Home Appliance!
Register your new device on MyBosch now and profit directly from:
- Expert tips & tricks for your appliance
- Warranty extension options • Discounts for accessories & spare-parts • Digital manual and all appliance data at hand
- Easy access to Bosch Home Appliances Service
Free and easy registration – also on mobile phones:
www.bosch-home.com/welcome
BOSCH HOME APPLIANCES SERVICE
Looking for help? You'll find it here.
Expert advice for your Bosch home appliances, help with problems or a repair from Bosch experts.
Find out everything about the many ways Bosch can support you:
www.bosch-home.com/service
Contact data of all countries are listed in the attached service directory.
BSH Hausgeräte GmbH
Carl-Wery-Straße 34
81739 München, GERMANY
www.bosch-home.com
A Bosch Company

9001625623 (020928)
en
Valid within Great Britain:
Imported to Great Britain by
BSH Home Appliances Ltd.
Grand Union House
Old Wolverton Road
Wolverton, Milton Keynes
MK12 5PT
United Kingdom