
KOH105 - Heating Kambrook - Free user manual and instructions
Find the device manual for free KOH105 Kambrook in PDF.


| Product Type | Oil Column Heater |
| Model | KOH105 |
| Brand | Kambrook |
| Power Supply | 230-240V AC |
| Number of Fins | 5 |
| Heat Settings | 3 (Low, Med, High) |
| Thermostat | Variable, adjustable |
| Safety Features | ThermoGuard overheat protection, tip-over switch (not specified but common) |
| Assembly Required | Yes: castor wheels and mounting bracket |
| Cleaning | Wipe with clean dry cloth; do not immerse |
| Spare Parts & Repairability | No user-serviceable parts; contact Kambrook Service Centre |
| Warranty | 12 months domestic use replacement |
| Use | Indoor household floor use only |
| Not for | Commercial use, outdoors, bathrooms, or near water |
Frequently Asked Questions - KOH105 Kambrook
User questions about KOH105 Kambrook
0 question about this device. Answer the ones you know or ask your own.
Ask a new question about this device
Download the instructions for your Heating in PDF format for free! Find your manual KOH105 - Kambrook and take your electronic device back in hand. On this page are published all the documents necessary for the use of your device. KOH105 by Kambrook.
USER MANUAL KOH105 Kambrook
5 Fin/7 Fin/11 Fin Oil Column Heater
Suitable for KOH105/KOH107/KOH111
Instruction Booklet
Important
Please retain your instruction book for future use.
In the event that you need some assistance with your Kambrook appliance, please contact our Customer Service Department on 1300 139 798 (Australia) or 0800 273845 (New Zealand). Alternatively, visit us on our website at www.kambrook.com.au or www.kambrook.co.nz
Contents
Kambrook Recommends p4
Safety First
Your Oil Column Heater p6
Quick Start Guide p7
Using Your Oil Column Heater p8
Care and Cleaning p11
Warranty p12
Kambrook Recommends Safety First
IMPORTANT: Please retain your instruction book for future use.
At Kambrook, we believe that safe performance is the first priority in any consumer product, so that you, our valued customer can confidently use and trust our products. We ask that any electrical appliance that you use be operated in a sensible fashion with due care and attention placed on the following important operating instructions.
Important Safeguards For Your Kambrook Oil Column Heater
- Carefully read all instructions before operating the Heater and save for future reference.
- Remove any packaging material and promotional stickers before using the Heater for the first time.
- Connect only to a 230V or 240V power point.
- Avoid touching the heater body while it is on, as some parts of the heater are hot. When moving the unit switch off and hold the heater by the handles where provided.
- Always keep combustible materials such as drapes and other furnishing at least 1.7 metres away from the front, sides and rear of the heater.
- To prevent a possible fire or heat damage, allow ample space around the heater (at least 0.5m from the front, top, rear and sides of the heater) and do not totally or partially covered the heater in any manner. Check the unit's openings from time to time for accumulated dust.

WARNING: In order to avoid overheating do not cover the heater.
- Extreme caution and supervision is necessary when this heater is used by or near children or invalids.
- Extreme caution and supervision is necessary when this heater is used near animals.
- Important – this heater is intended for floor use only.
- Do not mount on ceiling or walls.
- Do not leave the heater unattended. Always switch off the heater at the controls and at the power outlet then unplug from the power outlet when not in use.
- Do not use heater to dry your laundry.
- Do not operate heater whilst asleep.
- Do not operate any heater with a damaged cord or plug, or if the heater has been dropped or damaged in any manner. Return the heater to your nearest Kambrook Service Centre for examination, electrical or mechanical adjustment or repair.
- Do not use outdoors. This heater is not intended for commercial use, such as construction sites.
- Do not locate the heater immediately below and in front of a socket outlet when in use.
- Do not use this heater with an external programmer, timer or any other device that switches the heater on automatically. Since a fire risk may exist if the heater is covered or positioned incorrectly.
-
This heater is not intended for use in wet or moist locations. Do not immerse or allow liquids to be spilt on the heater.
-
Do not use this heater in the immediate surroundings of a bath, a shower or a swimming pool.
- This heater has hot and arcing or sparking parts inside. Do not use in areas where petrol, paints, aerosols, or other inflammable substances are used or stored.
- Do not operate the heater with the power cord damaged, frayed or split, wound around any part of the heater, or in contact with heated surfaces of the heater.
- Do not allow materials that have been in contact with oil, petroleum based products or drying fluids to come in contact with the heater.
- Do not run the cord under carpeting or cover the cord with rugs, runners or the like. Arrange the cord away from traffic areas and where it will not be tripped over.
-
To disconnect the heater, switch control to off. Turn off at the power outlet then remove the plug from the outlet.
-
Do not insert or allow foreign objects to pass through the inlet or outlet openings. This may cause an electric shock, fire or damage the heater.
- Do not touch hot surfaces.
- Switch off at the control switch and power outlet, then unplug and allow the heater to cool down before cleaning or storing.
- Use this heater only as described in this instruction manual. Any other use not recommended by the manufacturer may cause fire, electric shock or injury and voids all warranties.
- This heater is filled with precise quantity of special oil. Repairs requiring opening of the oil container are only to be made by the manufacturer or service agent who should be contacted if there is an oil leak.
- When disposing of the heater, follow regulations concerning the disposal of oil in your local council, State or Country.
Important Safeguards For All Electrical Appliances
- Fully unwind the power cord before use.
- Do not let the power cord hang over the edge of a bench or table, touch hot surfaces or become knotted.
- The appliance is not intended for use by persons (including children) with reduced physical, sensory or mental capabilities, or lack of experience and knowledge, unless they have been given supervision or instruction concerning use of the appliance by a person responsible for their safety.
• Children should be supervised to ensure that they do not play with the appliance. -
It is recommended to regularly inspect the appliance. To avoid a hazard do not use the appliance if power cord, power plug or appliance becomes damaged in any way. Return the entire appliance to the nearest authorised Kambrook Service Centre for examination and/or repair, or contact Customer Service on 1300 139 798.
-
Any maintenance other than cleaning should be performed at an authorised Kambrook Service Centre.
- This appliance is for household use only. Do not use this appliance for anything other than its intended use. Do not use in moving vehicles or boats. Do not use outdoors. Misuse may cause injury.
- The installation of a residual current device (safety switch) is recommended to provide additional safety protection when using electrical appliances. It is advisable that a safety switch with a rated residual operating current not exceeding 30mA be installed in the electrical circuit supplying the appliance. See your electrician for professional advice.
Your Oil Column Heater
- Carry handle
- Thermostat control knob
- Heat setting switches
-
Cord storage
-
Castor wheels
- Radiator fins
- 24 hour programmable timer (KOH111 only)

| Turning the heater on after assembly | Setting the heating mode | Setting the thermostat | |
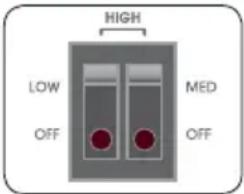 | 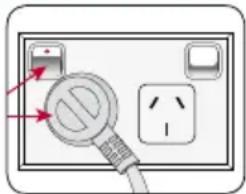 |  |  |
| Switch the Power and Heat setting switches to the off position. For KOH111, make sure that the switch on the timer is set to 'I'. | Plug the cord into a 230V or 240V power point and switch on. | Switch both of the Power and Heat setting switches on. | Turn the Thermostat control knob in a clockwise position until it stops. |
| Turning the heater off | |||
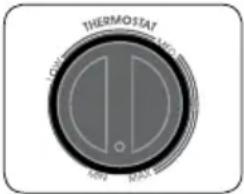 |  | ||
| When the desired room temperature is reached, turn the Thermostat in an anti-clockwise direction until a click sound is heard, then stop. | Turn the heater off by switching both of the Power and Heat setting switches to the off position. |
Hints/Tips to Retain Heat in Your Home
- Don't overheat your home. The temperature of a heated room in winter should be 18-21°C
- Your heater will work more efficiently if you stick to Kambrook's recommended clearance spaces
- Choose the right size heater for the room type you want to heat
-
Zone off unoccupied rooms by closing doors and only heat the main living areas
-
Fit window coverings like curtains to limit winter heat loss
- Put draft stoppers, such as a rolled up towel, at the bottom of outside doorways to keep out cold air
- Keep the heat in and the cold out by installing wall and ceiling insulation.
- Avoid placing items too close to the heater (both at the front and back) for optimal air flow
Using Your Oil Column Heater
Before First Use
Remove any promotional material or packaging from the heater.
The oil heater requires a small amount of assembly before use.
Assembling Your Heater
NOTE: Before operation, please make sure that the castor wheels have been correctly fitted to the castor wheel mounting plate (for KOH105 and KOH107 only) and the castor wheel mounting plate is securely fitted to the body of the oil heater (all models).
Castor Wheel Assembly (KOH105 and KOH107)
-
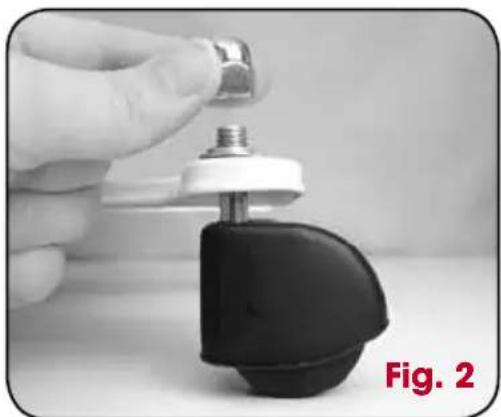
Unpack the castor wheels from the packaging and remove the nut, spring washer and flat washer from the castor wheel shaft.
-
Unpack the castor wheel mounting plate from the packaging. Feed the castor wheel shaft upwards through the underside of the castor wheel mounting plate, and align the rectangular locator on the base of the castor wheel shaft with the slot on the mounting plate. The castor wheel shaft and mounting plate should fit together snuggly.
-
Replace the flat washer and spring washer back on to the castor wheel shaft, over the top of the mounting bracket and secure tightly with the nut provided. The nut may need to be tightened with a spanner.
Mounting Bracket Assembly (all models)
NOTE: Always secure the mounting plate between the last two fins at each end of the oil heater.

NOTE: Make sure that the castor wheels are positioned away from the centre of the heater to provide greater stability.
-
Place the radiator body upside down on a soft surface to avoid damage to the heater. Make sure it is in a stable position and will not fall.
-
Place the mounting plate onto the base of the oil heater, between the last two fins at each end.
- Remove the wing nuts provided from the U bolt assembly.
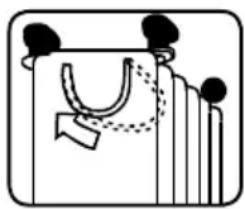

- Hook the U bolt around the body section, joining the last two fins, and feed each end back up through the top of the mounting plate. Secure the U bolt to the mounting plate with the plastic wing nut provided.
- Repeat at the other end of the heater.
- Return the unit to an upright position, and it is now ready for use.
Turning Your Heater On
Always place the heater on a firm, level surface in a stable upright position and unwind the cord to its full length.
Ensure the Heat Setting switches are switched to the 'OFF'.
Plug the cord into a 230V or 240V power point and switch on.
NOTE: To avoid an electrical circuit overload, it is recommended that no other appliances are plugged into the same circuit as your heater, when it is in use.
Setting The Heating Mode
All Kambrook oil heaters operate in manual heating mode only, except for the KOH111 which can also operate using the programmable timer. To operate the KOH111 using the programmable timer, see the 'Setting the Auto-Off Timer' section.
The oil heater has two switches, offering three heat settings.
LOW

MED

HIGH

Your Kambrook oil heater is fitted with a variable thermostat, which is designed to assist you in setting a comfortable room temperature.
Turn the thermostat control knob clockwise to the MAX position. This will ensure that the room heats up as fast as possible.
When the room reaches a comfortable temperature, turn the thermostat control knob slowly in an anti-clockwise direction (towards the MIN position), until a click sound is heard. The oil heater will now continue to cycle on and off, to maintain this room temperature.
Setting the Auto-Off Timer (KOH111 only)
The KOH111 is fitted with a 24 hour programmable timer, which enables the heater to be set to switch ON and OFF automatically, once a heat setting mode has been selected.
The timer will only work when power is supplied to the unit.
The timer has two settings:
- I – ON, the heater can be used manually;
- Timer Operation, the heater can be used in the timer mode and will only operate if some of the pins have been engaged.
To activate the timer operation, select the ⏻ setting on the timer.
Set the current time (using a 24 hour clock) on the timer, by rotating the dial clockwise until the correct time of day is located opposite the arrow.
To set the time you want the heater to turn on, push the red pins outwards and to set the time that you want the heater to switch off, push the pins inwards. Each pin represents a 15 minute period. For example, if you want the heater to operate for 60 minutes at 7pm before switching off again at 8pm, 4 pins will need to be pushed outwards in a row between 19 and 20.
NOTE: The programmed timer can be over ridden at any time by switching the timer back to the 'I' (ON, manual) mode.
NOTE: For the heater to operate in 'Timer' mode, both the timer needs to be set to the Ⓤ' setting, and pins need to have been moved to the outward position.
ThermoGuard Overheating Safety Device
THERMO GUARD
PROTECTED
Your heater is fitted with a safety device that switches off the heater in the event of overheating. Should this heater stop working, turn off the heater and inspect the air inlet and outlet for blockages. Wait for the heater to cool for the protection system to reset before attempting to restart the heater.
Care and Cleaning
Ensure that the heater is switched off and disconnected from the power point before cleaning.
Use a clean, dry cloth to clean the external surfaces of the heater.
Do not attempt to open up any parts of the heater as there are no customer serviceable parts inside.
When not in use, store the heater (preferably in its original box) in a cool, clean and dry location.
Kambrook 12 Month Replacement Warranty
In Australia, this Kambrook Replacement Warranty does not affect the mandatory statutory rights implied under the Trade Practices Act 1974 and other similar State and Territory legislation relating to the appliance. It applies in addition to the conditions and warranties implied by that legislation.
In New Zealand, this Kambrook Replacement Warranty does not affect your mandatory statutory rights implied under the Consumer Guarantees Act 1993 in relation to the appliance. It applies in addition to the conditions and guarantees implied by that legislation.
This Kambrook Replacement Warranty is valid only in the country of purchase, but other statutory warranties may still apply.
This Warranty card and the purchase receipt for this product are to be retained as proof of purchase and must be presented if making a claim under the Kambrook Replacement Warranty. Please note that under any applicable statutory warranty you are not required to produce these documents, but may be required to provide a proof of purchase.
Kambrook warrants the purchaser against defects in workmanship and material for a period of 12 months domestic use from the date of purchase (or 3 months in a commercial situation).
The Kambrook Replacement Warranty does not apply to any defect, deterioration, loss, injury or damage occasioned by, or as a result of, misuse or abuse, negligent handling or if the product has been used other than in accordance with the instructions. The Kambrook Replacement Warranty excludes breakables such as glass and ceramic items, consumable items and normal wear and tear.
This Kambrook Replacement Warranty is void if there is evidence of the product being tampered with by unauthorised persons.
If the product includes one or a number of accessories only the defective accessory or product will be replaced. Subject to your statutory rights, in the event of Kambrook choosing to replace the appliance, the Kambrook Replacement Warranty will expire at the original date, i.e. 12 months from the original date of purchase.
In the event that you need some assistance with your Kambrook appliance, please contact our Customer Service Department on 1300 139 798 (Australia) or 0800 273 845 (New Zealand). Alternatively, visit us on the website at www.kambrook.com.au or www.kambrook.co.nz
Kambrook 12 Month Replacement Warranty
Your Purchase Record (Please Complete)
Attach a copy of the purchase receipt here.
Date Of Purchase ____
Model Number ____
Serial Number
Purchased From ____
(Please don't return purchase record until you are making a claim)
Kambrook - Australia
Building 2, Port Air Industrial Estate
1A Hale Street
Botany NSW 2019
Australia
Customer Service Line 1300 139 798
Customer Service Fax 1800 621 337
www.kambrook.com.au
Kambrook - New Zealand
Private Bag 94411
Botany, Manukau
Auckland 2163
New Zealand
Customer Service Line/Spare Parts 0800 273 845
Customer Service Fax 0800 288 513
www.kambrook.co.nz

- IMPORTANT
- PLEASE RETAIN YOUR INSTRUCTION BOOK FOR FUTURE USE
- CONTENTS
- KAMBROOK RECOMMENDS SAFETY FIRST
- IMPORTANT: PLEASE RETAIN YOUR INSTRUCTION BOOK FOR FUTURE USE
- IMPORTANT SAFEGUARDS FOR YOUR KAMBROOK OIL COLUMN HEATER
- WARNING: IN ORDER TO AVOID OVERHEATING DO NOT COVER THE HEATER
- IMPORTANT SAFEGUARDS FOR ALL ELECTRICAL APPLIANCES
- YOUR OIL COLUMN HEATER
- HINTS/TIPS TO RETAIN HEAT IN YOUR HOME
- USING YOUR OIL COLUMN HEATER
- BEFORE FIRST USE
- ASSEMBLING YOUR HEATER
- CASTOR WHEEL ASSEMBLY (KOH105 AND KOH107)
- MOUNTING BRACKET ASSEMBLY (ALL MODELS)
- TURNING YOUR HEATER ON
- SETTING THE HEATING MODE
- SETTING THE AUTO-OFF TIMER (KOH111 ONLY)
- THERMOGUARD OVERHEATING SAFETY DEVICE
- CARE AND CLEANING
- KAMBROOK 12 MONTH REPLACEMENT WARRANTY
Brand : Kambrook
Model : KOH105
Category : Heating