
AMO25TK - Microwaves Artusi - Free user manual and instructions
Find the device manual for free AMO25TK Artusi in PDF.


| Product Type | Microwave Oven with Grill |
| Brand | Artusi |
| Model | AMO25TK |
| Capacity | 25 Liters |
| Outside Dimensions (W x D x H) | 592 mm x 382 mm x 390 mm |
| Oven Cavity Dimensions (W x D x H) | 330 mm x 330 mm x 212 mm |
| Net Weight | Approx. 15.5 kg |
| Power Supply | 220-240 V ~ 50 Hz, 1400 W (input) |
| Microwave Output Power | 900 W |
| Grill Heater Power | 1200 W |
| Operating Frequency | 2450 MHz |
| Microwave Power Levels | 5 levels (100%, 70%, 50%, 30%, 10%) |
| Grill Modes | 2 modes: G-1 (85% grill), G-2 (50% grill) |
| Combination Modes | 2 modes: C-1 (55% micro + 45% grill), C-2 (30% micro + 70% grill) |
| Auto Menu Programs | 6 menus: Rice, Vegetable, Meat, Spaghetti, Fish, Bread |
| Defrost Function | Auto weight defrost, max 2000 g |
| Timer / Clock | Yes, digital clock with timer function |
| Child Safety Lock | Yes, press two buttons for 2 seconds |
| Control Type | Computer control panel with knobs and buttons |
| Interior Light | Yes, replaceable by dealer |
| Turntable | Glass tray with roller ring |
| Installation | Built-in capable with trim kit (sold separately) |
| Warranty | 24 months for built-in appliances (see manual for details) |
| Compliance | WEEE compliant, Class I equipment |
Frequently Asked Questions - AMO25TK Artusi
User questions about AMO25TK Artusi
0 question about this device. Answer the ones you know or ask your own.
Ask a new question about this device
Download the instructions for your Microwaves in PDF format for free! Find your manual AMO25TK - Artusi and take your electronic device back in hand. On this page are published all the documents necessary for the use of your device. AMO25TK by Artusi.
USER MANUAL AMO25TK Artusi
Congratulations, you are now the proud owner of an ARTUSI cooking appliance. Thank you for purchasing ARTUSI and welcome to the ARTUSI Family.
This instruction manual has been specially created to inform you of the full range of features your ARTUSI appliance has to offer and serves as an introduction to getting the very best out of your ARTUSI appliance.
We present detailed information on each of the features your ARTUSI appliance consists of. Once you have read this section you will be able to choose the most appropriate settings for your appliance when cooking different types of food.
We ask you to read the instructions in this booklet very carefully as this will allow you to get the best results from using your appliance. KEEP THE DOCUMENTATION OF THIS PRODUCT FOR FUTURE REFERENCE.
TO REGISTER YOUR PRODUCT WITH ARTUSI, PLEASE FILL OUT THE WARRANTY CARD AT THE END OF THIS BOOKLET AND POST IT TO: REPLY PAID 83617
LEICHHARDT NSW 2040
Dear Artusi Customer, please read this user manual carefully before using the product and, keep it permanently at your disposal.
Note: This user manual is prepared for more than one model. Some of the features specified in this Manual may not be available on your appliance.
All our appliances are only for domestic use, not for commercial use. Products marked with (*) are optional.
"THIS APPLIANCE SHALL BE INSTALLED IN ACCORDANCE WITH THE REGULA TIONS FORCE AND ONLY USED IN A WELL VENTILATED SPACE. READ THE INSTRUCTIONS BEFORE INSTALLING OR USING THIS APPLIANCE"
"Conforms with the WEEE Regulations."
Important safety instructions
When using electrical appliance basic safety precautions should be followed, including the following:
warning: to reduce the risk of burns, electric shock, fire, injury to persons or exposure to excessive microwave energy:
- Read all instructions before using the appliance.
- Use this appliance only for its intended use as described in this manual. Do not use corrosive chemicals or vapors in this appliance. This type of oven is specifically designed to heat, cook or dry food. It is not designed for industrial or laboratory use.
3.Do not operate the oven when empty.
-
Do not operate this appliance if it has a damaged cord or plug, if it is not working properly or if it has been damaged or dropped. If the supply cord is damaged, it must be replaced by the manufacturer or its service agent or a similarly qualified person in order to avoid a hazard.
-
Warning: when the appliance is operated in the combination mode, children should only use the oven under adult supervision due to the temperatures generated.
-
Warning: only allow children to use the oven without supervision when adequate instructions have been given so that the child is able to use the oven in a safe way and understands the hazards of improper use.
-
To reduce the risk of fire in the oven cavity:
a. When heating food in plastic or paper container, keep an eye on the oven due to the possibility of ignition.
b. Remove wire twist-ties from paper or plastic bags before placing bag in oven.
c. If smoke is observed, switch off or unplug the appliance and keep the door closed in order to stifle any flames.
d.Do not use the cavity for storage purposes. Do not leave paper products, cooking utensils or food in the cavity when not in use.
-
Warning: liquid or other food must not be heated in sealed containers since they are liable to explode.
-
Microwave heating of beverage can result in delayed eruptive boiling, therefore care has to be taken when handle the container.
-
Do not fry food in the oven. Hot oil can damage oven parts and utensils and even result in skin burns.
11.Eggs in their shell and whole hard-boiled eggs should not be heated in microwave ovens since they may explode even after microwave heating has ended.
-
Pierce foods with heavy skins such as pota toes, whole squashes, apples and chestnuts before cooking.
-
The contents of feeding bottles and baby jars should be stirred or shaken and the temperature should be checked before serving in order to avoid burns.
-
Cooking utensils may become hot because of heat transferred from the heated food. Potholders may be
needed to handle the utensil.
-
Utensils should be checked to ensure that they are suitable for use in microwave oven.
-
Warning: it is hazardous for anyone other than a trained person to carry out any service or repair operation which involves the removal of any cover which gives protection against exposure to microwave energy.
-
This product with the class I equipment, the definition of class I which protection against electric shock does not rely on basic insulation only but which includes an additional safety precaution, in that conductive accessible parts are connected to the protective earthing conductor in the fixed wiring of the installation in such a way that conductive accessible parts cannot become live in the event of a failure of the basic insulation. For class b equipment is equipment suitable for use in domestic establishments. For domestic purpose.
-
This appliance is not intended for use by persons (including children) with reduced physical, sensory or mental capabilities, or lack of experience and knowledge, unless they have been given supervision or instruction concerning use of the appliance by a person responsible for their safety.
-
Children should be supervised to ensure that they do not play with the appliance.
-
Warning: do not install oven over a range cooktop or other heat-producing appliance. If installed could be
damaged and the warranty would be avoid.
-
The accessible surface may be hot during operation.
-
The door or the outer surface may get hot when the appliance is operating.
-
The temperature of accessible surfaces may be high when the appliance is operating.
-
The appliance shall be placed against a wall.
-
Warning: if the door or door seals are damaged, the oven must not be operated until it has been repaired by a competent person
-
The instructions shall state that appliances are not intended to be operated by means of an external timer or separate remote-control system.
-
The microwave oven is for household use only and not for commercial use.
-
Never remove the distance holder in the back or on the sides, as it ensures a minimum distance from the wall for air circulation.
-
Please secure the turn table before you move the appliance to avoid damages.
-
Caution: it is dangerous to repair or maintain the appliance by no other than a specialist because under these circumstances the cover have to be removed which assures protection against microwave radiation. This applies to changing the power cord or the lighting as well. Send the appliance in these cases to our service central.
-
The microwave oven is intended for defrosting, cooking and steaming of food only.
- Use gloves if you remove any heated food.
- Caution! Steam will escape, when opening lids or wrapping foil.
- If smoke is emitted, switch off or unplug the appliance and keep the door closed in order to stifle.
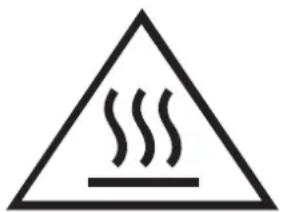
CAUTION: Hot surface.
This appliance can be used by children aged from 8 years and above and persons with educated physical, sensory or mental capabilities or lack of experience and knowledge if they have been given supervision or instruction concerning use of the appliance in a safe way and understand the hazards involved. Children shall not play with the appliance. Cleaning and user maintenance shall not be made by children unless they are older than 8 and supervised.
Keep the appliance and its cord out of reach of children less than 8 years.
SPECIFICATIONS
| Power consumption: | 220-240V~50Hz,1400W |
| Output: | 900W |
| Grill Heater: | 1200W |
| Operating Frequency: | 2,450MHz |
| Outside Dimensions: | 592mm(W) X 382mm(D) X 390mm(H) |
| Oven Cavity Dimensions: | 330mm(W) X 330mm(D) X 212mm(H) |
| Oven Capacity: | 25 litres |
| Uncrated Weight: | Approx. 15.5kg |
BEFORE YOU CALL FOR SERVICE
- If the oven will not perform at all, the display does not appear or the display disappears:
a) Check to ensure that the oven is plugged in securely. If it is not, remove the plug from the outlet, wait 10 seconds and plug it in again securely.
b) Check the premises for a blown circuit fuse or a tripped main circuit breaker. If these seem to be operating properly,
test the outlet with another appliance.
- If the microwave power does not function:
a) Check to see whether the timer is set.
b) Check to make sure that the door is securely closed to engage the safety interlocks. Otherwise, the microwave energy will not flow into the oven.
IF NONE OF THE ABOVE RECTIFIES THE SITUATION, THEN CONTACT THE AUTHORIZED SERVICE AGENT.
Note:
The appliance is for household use for heating food and beverages using electromagnetic energy and for indoor use only.
RADIO INTERFERENCE
Microwave oven may cause interference to your radio, TV, or similar equipment. When interference occurs, it may be eliminated or reduced by the following procedures.
a. Clean the door and sealing surface of the oven.
b. Place the radio, TV, etc. as far away from your microwave oven as possible.
c. Use a properly installed antenna for your radio, TV, etc. to get a strong signal reception.
INSTALLATION
- Make sure all the packing materials are removed from the inside of the door.
- Inspect the oven after unpacking for any visual damage such as:
Misaligned Door
Damaged Door
Dents or Holes in Door Window and Screen
Dents in Cavity
If any of the above are visible, DO NOT use the oven.
- This Microwave Oven weighs 15.5 kg and must be placed on a horizontal surface strong enough to support this weight.
- The oven must be placed away from high temperature and steam.
- DO NOT place anything on top of the oven.
- DO NOT remove the turn -table drive shaft.
- As with any appliance, close supervision is necessary when used by children.
WARNING-THIS APPLIANCE MUST BE EARTHED.
- The plug socket should be within easy reach of the power cord
- This oven requires 1.5 KVA for its input.
consultation with service engineer is
suggested when installing the oven.
CAUTION: This oven is protected internally by ac 250V, 10 Amp Fuse.
IMPORTANT
The wires in this mains lead are coloured in accordance with the following code:
Green-and-yellow : Earth
Blue : Neutral
Brown : Live
As the colours of the wires in the mains leads of the appliance may not correspond with the coloured markings identifying the terminals in your plug, proceed as follows:
The wire which is coloured green-and-yellow must be connected to the terminal in the plug which is marked with the letter E or by the earth symbol coloured green of green-and-yellow.
The wire which is coloured blue must be connected to the terminal which is marked with the letter N or coloured black.
The wire which is coloured brown must be connected to the terminal which is marked with the letter L or coloured red.
IMPORTANT SAFETY INSTRUCTIONS
-WARNING: When the appliance is operated in the combination mode, children should only use the oven under adult supervision due to the temperatures generated; (Only for the model with grill function)
-WARNING: If the door or door seals are damaged, the oven must not be operated until it has been repaired by a competent person;
-WARNING: It is hazardous for anyone other than a competent person to carry out any service or repair operation that involves the removal of a cover which gives protection against exposure to microwave energy;
-WARNING: liquids and other foods must not be heated in sealed containers since they are liable to explode.
-WARNING: Only allow children to use the oven without supervision when adequate instructions have been given so that the child is able to use the oven in a safe way and understands the hazards of improper use;
- The oven must have sufficient air flow. Keep 10 cm space at back; 15 cm at both sides and 30cm from top of the oven. Don't remove oven's feet, do not block air events of the oven.
- Only use utensils that are suitable for use in microwave ovens.
- When heating food in plastic or paper containers, keep an eye on the oven due to the possibility of ignition;
- If smoke is observed, switch off or unplug the appliance and keep the door closed in order to stifle any flames;
- Microwave heating of beverages can result in delayed eruptive boiling, therefore care must be taken when handling the container;
- The contents of feeding bottles and baby food jars shall be stirred or shaken and the temperature checked before consumption, in order to avoid burns;
- Eggs in their shell and whole hard-boiled eggs should not be heated in microwave ovens since they may explode, even after microwave heating has ended;
- When cleaning surfaces of door, door seal, cavity of the oven, use only mild, nonabrasive soaps, or detergents applied with a sponge or soft cloth.
- The oven should be cleaned regularly and any food deposits removed;
- Failure to maintain the oven in a clean condition could lead to deterioration of the surface that could adversely affect the life of the appliance and possibly result in a hazardous situation;
- If the supply cord is damaged, it must be replaced by the manufacturer, its service agent or similarly qualified persons in order to avoid a hazard.
SAFETY INSTRUCTIONS FOR GENERAL USE
Listed below are, as with all appliances, certain rules to follow and safeguards to assure top performance from this oven:
- Always have the glass tray, roller arms, coupling and roller track in place when operating the oven.
- Do not use the oven for any reason other than food preparation, such as for drying clothes, paper, or any other nonfood items, or for sterilizing purposes.
- Do not operate the oven when empty. This could damage the oven.
- Do not use the oven cavity for any type of storage, such a papers, cookbooks, etc.
-
Do not cook any food surrounded by a membrane, such as egg yolks, potatoes, chicken livers, etc without first being pierced several times with a fork.
-
Do not insert any object into the openings on the outer case.
-
Do not at any time remove parts from the oven such as the feet, coupling, screws, etc.
-
Do not cook food directly on the glass tray. Place food in/on proper cooking utensil before placing in the oven.
-
IMPORTANT-COOKWARE NOT TO USE IN YOUR MICROWAVE OVEN
Do not use metal pans or dishes with metal handles.
Do not use anything with metal trim.
Do not use paper covered wire twist-ties on plastic bags.
Do not use melamine dishes as they contain a material which will absorb microwave energy. This may cause the dishes to crack or char and will slow down the cooking speed.
Do not use Centura Tableware. The glaze is not suitable for microwave use. Corelle Livingware closed handle cups should not be used.
Do not cook in a container with a restricted opening, such as a pop bottle or salad oil bottle, as they may explode if heated in a microwave oven.
Do not use conventional meat or candy thermometers.
There are the thermometers available specifically for microwave cooking. These may be used.
-
Microwave utensils should be used only in accordance with manufacturer's instructions.
-
Do not attempt to deep-fry foods in this oven.
-
Please remember that a microwave oven only heats the liquid in a container rather than the container itself. Therefore, even though the lid of a container is not hot to the touch when
FEATURE DIAGRAM
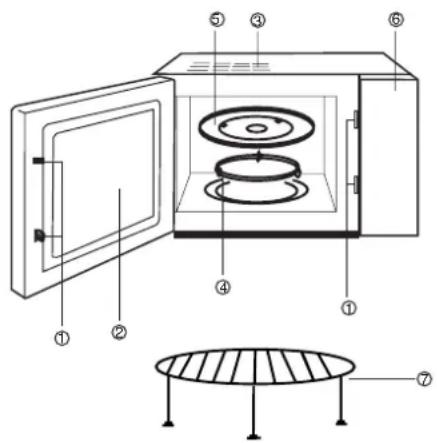
removed from the oven, please remember that the food/liquid inside will be releasing the same amount of steam and/or spitting when the lid is removed as in conventional cooking.
- Always test the temperature of cooked food yourself especially if you are heating or cooking food/liquid for babies. It is advisable never to consume food/liquid straight from the oven but allow it to stand for a few minutes and stir food/liquid to distribute heat evenly.
- Food containing a mixture of fat and water, e.g. stock, should stand for 30-60 seconds in the oven after it has been turned off. This is to allow the mixture to settle and to prevent bubbling when a spoon is placed in the food/liquid or a stock cube is added.
- When preparing/cooking food/liquid and remember that there are certain foods, e.g. Christmas puddings, jam and mincemeat, which heat up very quickly. When heating or cooking foods with a high fat or sugar content do not use plastic containers.
- Cooking utensil may become hot because of heat transferred from the heated food. This is especially true if plastic wrap has been covering the top and handles of the utensil. Potholders may be needed to handle the utensil.
- To reduce the risk of fire in the oven cavity:
(a) Do not overcook food. Carefully attend microwave oven if paper, plastic, or other combustible materials are placed inside the oven to facilitate cooking.
(b) Remove wire twist-ties from bags before placing bag in oven.
(c) If materials inside the oven should ignite, keep oven door closed, turn the oven off at the wall switch, or shut off power at the fuse or circuit breaker panel.
(1) Door Safety Lock System
(2) Oven Window
(3) Oven Air Vent
(4) Roller Ring
(5) Glass Tray
(6) Control Panel
(7) Grill rack
COMPUTER CONTROL PANEL
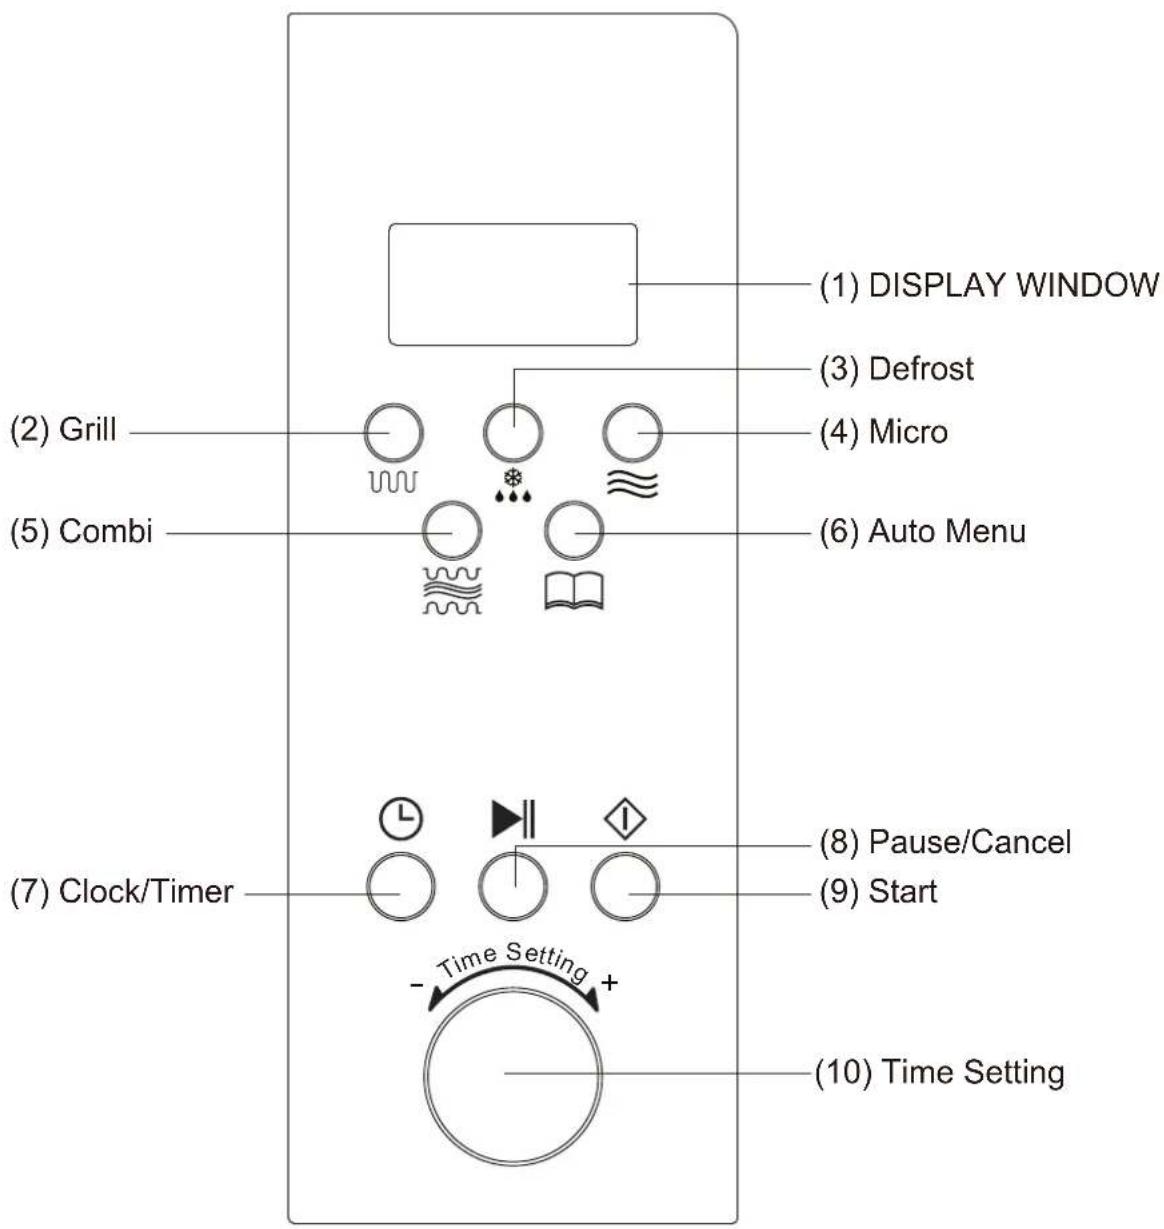
Operation Instruction
1.Single Button Heating
Only with a single press of a button, you can start simple cooking, it is very convenient and quick to heat a glass of water etc.
Example: To heat a glass of water
a) Put a glass of water onto the glass turntable, and close the door.
b) Press the button "◇", the microwave oven will work on 100% power for 1 minutes.
c) You will hear 5 beeps when cooking is complete.
2. Microwave Heating
This function has two options.
1) Quick microwave heating (100% power)
Example: to heat food on 100% power for 5 minutes
a) Rotate the knob "Time setting" to untill "5:00" displayed.
b) Press " ◊".
2) Manual-operation microwave heating
Example: To heat food on 70% power for 10 minutes
a) Press " ≈ " button, select "70%" power;
b) Rotate the knob "Time setting" to untill "10:00" displayed.
c) Press " ◆".
There are 5 power levels and the longest microwave heating time is 60 minutes.
| Touching times | Microwave power | Display |
| 1 | 100% | P100 |
| 2 | 70% | P70 |
| 3 | 50% | P50 |
| 4 | 30% | P30 |
| 5 | 10% | P10 |
3. Auto weight defrost
Select the food type and weight, it will automatically help you to adjust the power level and time.
Example: defrost 500g frozen meat.
a) Press the button " * ", "DEF" will be displayed.
b) Rotate the knob "Time setting" to set the weight 500g.
c) Press "◇"
The weight of food must be less than 2000g.
4. Auto-menu
You only need to select the food type and weight, it will help you to automatically adjust the power and time.
Example: Auto cooking 400g meat.
a) Press "☐" button to choose A-3.
b) Rotate the knob "Time setting" to set weight 400g.
c) Press "◇".
g
| Touching Times\Weight\Menu | A-1 | A-2 | A-3 | A-4 | A-5 | A-6 |
| Rice | Vegetable | Meat | Spaghetti | Fish | Bread | |
| 1 | 100 | 100 | 200 | 1 | 100 | 100 |
| 2 | 200 | 200 | 300 | 2 | 200 | 200 |
| 3 | 300 | 300 | 400 | 300 | 300 | |
| 4 | 400 | 400 | 500 | 400 | 400 | |
| 5 | 500 | 500 | 600 | 500 | 500 | |
| 6 | 600 | 800 | 600 | 600 | ||
| 7 | 1000 | 700 | ||||
| 8 | 800 | |||||
| 9 | 900 | |||||
| 10 | 1000 |
5. Grill
-You may press "###" button to select such functions: (the longest cooking time is 60 minutes).
Pattern 1: 85% grill power, display G-1
Pattern 2: 50% grill power, display G-2
Example: cooking food with G-1 for 20 minutes
A) Press "∪∪∪" until the LED displayed "G-1".
B) Set cooking time "20:00"
C) Press " I "
When grilling, the food isn't heated by microwave, heat is radiated from the metal heater at the top of the oven.
When grill is working, the cooking time has 2 stages. After the 1st half of the cooking, the program will automatically pause and sound 2 beeps, indicating you to open the oven and turn food over, after turning over, close the door, press "◇" button, the cooking will continue for the 2nd half. If you do not want to turn the food over, the oven will re-start after 1 min pause.
6. Combination Cooking
This appliance offers you a choice of two methods of combination cooking.
Option 1 : 55% Micro + 45% Grill), display "C-1"
Option 2 : 30% Micro + 70% Grill), display "C-2"
Example : Cooking food using option 2 for 30 minutes.
a) Press "\~\~\~\~" button to select "C-2"
b) Set cooking time for 30 minutes
c) Press "◇"
- Clock
The oven can be used as a clock.
Example: to input current time 16:30
A) Press "L", the clock symbol will flash in display. Rotate the "Time setting" knob to set "16:00".
B) Press " ℟ " again, rotate the "Time setting" knob to set "16:30"
C) Press " L " again, the clock setting is finished, the time start to go on working.
- Timer
The timer function helps the microwave oven begin automatic cooking at set time, and automatically stop operation after finishing cooking. (You should set the clock before using timer function).
Example: the current time of microwave oven is 16:30, to set cooking at 18:15 on 70% power for
10 minutes.
A) Press " ℏ " and set time to 18:15 (same procedure as setting clock).
B) Press " ≈ " to set 70% power.
C) Input cooking time 10 minutes by rotating the knob "Time Setting".
D) Press "◇".
If you don't set power and cooking time (omit B and C steps), and directly press " ◆ " button, the microwave oven will work only as a clock, there will be 10 beeps at 18:15, but no other function will run.
- Child-safety lock
To activate the child safety lock, press "☐" and "≡" button at the same time for 2 seconds.
Press " ", and " 🔊" button, at the same time for 2 seconds again, it will unlock this function.
- Pause/cancel
a) In the course of operation, pressing "▶" button will stop operation.
b) If any program was set before pressing start, pressing this button will cancel all the set program.
- Turn the oven off and remove the power plug from the wall socket before cleaning.
- Keep the inside of the oven clean. When food splatters or spilled liquids adhere to oven walls, wipe with a damp cloth. The use of harsh detergent or abrasives is not recommended.
-
The outside oven surface should be cleaned with a damp cloth. To prevent damage to the operating parts inside the oven, water should not be allowed to seep into the ventilation openings.
-
Do not allow the Control Panel to become wet. Clean with a soft, damp cloth, Do not use detergents, abrasives or spray-on cleaners on the control Panel.
-
If steam accumulates inside or around the outside of the oven door, wipe with a soft cloth. This may occur when the microwave oven is operated under high humidity conditions and in no way indicates malfunction of the unit.
-
It is occasionally necessary to remove the glass tray for cleaning. Wash the tray in warm sudsy water or in a dishwasher.
-
The roller ring and oven cavity floor should be cleaned regularly to avoid excessive noise. Simply wipe the bottom surface of the oven with mild detergent, water or window cleaner and dry. The roller ring may be washed in mild sudsy water or dish washer. Cooking vapour collect during repeated use but in no way affect the bottom surface or roller ring wheels.
When removing the roller ring from cavity floor for cleaning, be sure to replace it in the proper position.
-
Remove odors from your oven by combining a cup of water with the juice and skin of one lemon in a deep microwaveable bowl. Microwave for 5 minutes, wipe thoroughly and dry with a soft cloth.
-
When it becomes necessary to replace the oven light, please consult a dealer to have it replaced.
SCHEMATIC DIAGRAM
( DOOR OPENED, COOK OFF CONDITION )
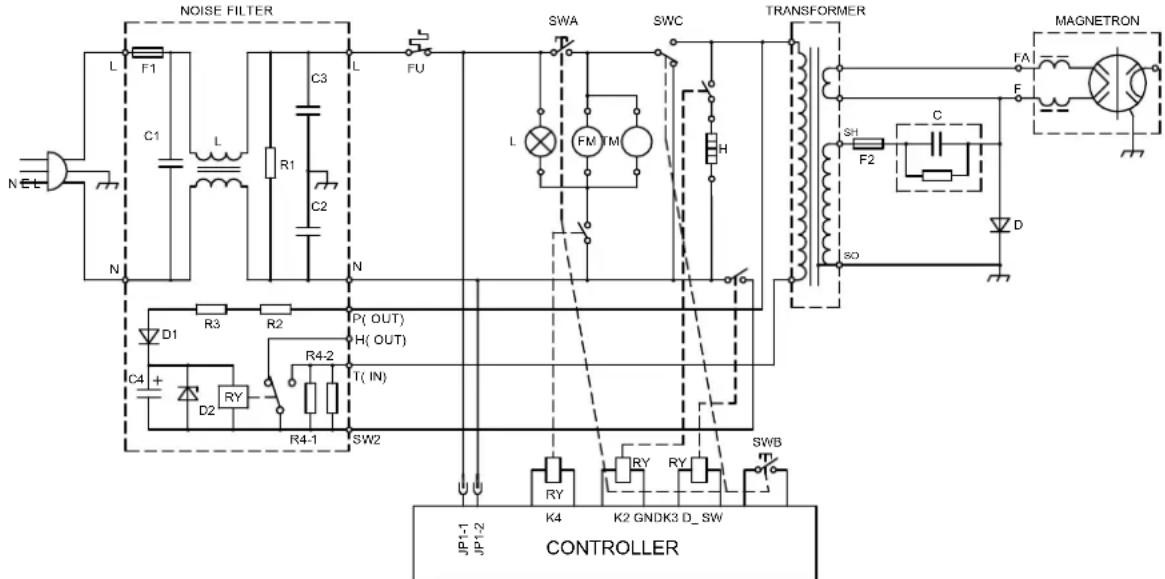
SWA: PRIMARY INTERLOCK SWITCH
SWB: SECONDARY INTERLOCK SWITCH
SWC: THE MONITOR INTERLOCK SWITCH
*CIRCUIT SUBJECT TO CHANGE WITHOUT NOTICE
L: LAMP
FM: FAN MOTOR
TM: TURNTABLE MOTOR
H:HEATER
BUILT-IN MICROWAVE
OVEN INSTALLATION MANUAL
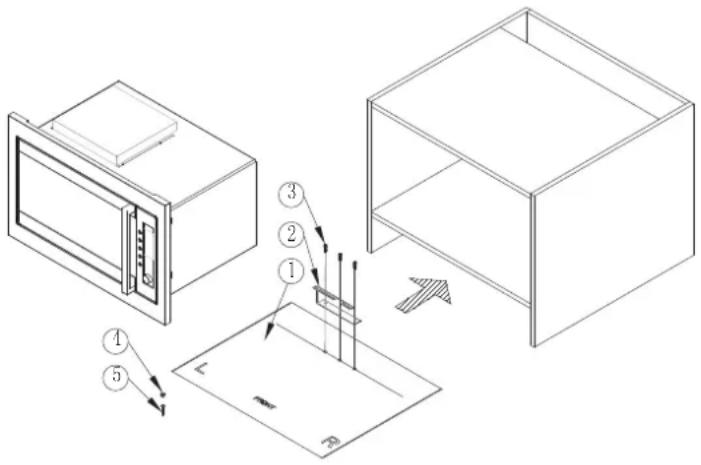
COMPONENTS
1、Plastic buckle setting paper 1PCS
2、orientation 1PCS
3、bolt ∅4X10 3PCS
4、screw cover 1PCS
5、bolt ∅4X35 1PCS
TRIM KIT SPECIFICATIONS
Cavity dimensions
Width 566mm
Height 365mm
Depth 550mm
FRAME dimensions
Width 592mm
Height 390mm
Depth 20mm
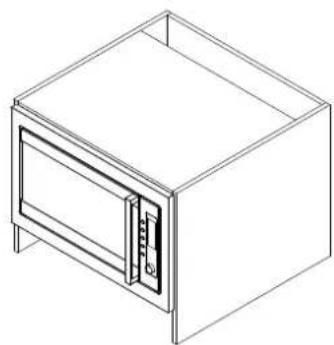
Cabinet measurement Requirements(illustrated above):
- Cabinet's inner dimension in transverse direction is 566mm.
This is the minimum distance from the left batten to right batten. Do not alter. - Cabinet's inner dimension in longitudinal direction is 365mm.
This is the minimum distance from the left batten to right batten. Do not alter. - Cabinet's depth should be no less than 550mm.
- Outside dimension of cabinet should be no less than 596mm, as the frame length is 592mm.
- Cabinet's board less than 15mm or 20mm thick.
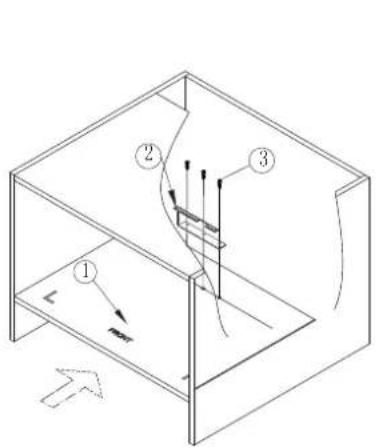
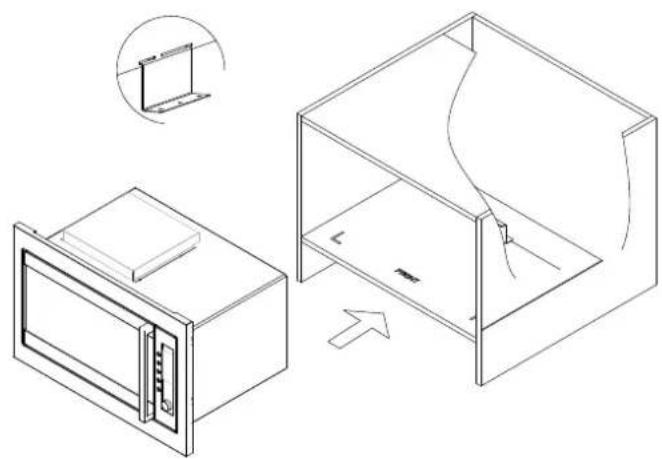
FRAME INSTALLATION STEPS
natural_image
Technical line drawing of a microwave oven and its internal structure, showing front and side views (no text or symbols)-
Cabinet must be finished as per cabinet dimensions. Put the plastic buckle setting paper (Component 1) on the bottom board of cabinet cavity. Keep the paper's front edge and the cabinet outside edge in one line. Then put the orientation (Component 2) on the paper and adjust their holes as per the hole position in the drawing. Then fix the bolt (Component 3).
-
Put the microwave oven into the cabinet and keep the microwave oven in a horizontal direction and keep the edge distance of two side as same. Then fix the orientation on then back of microwave oven.
natural_image
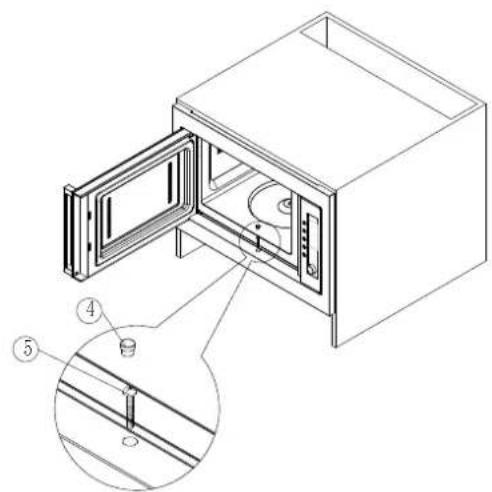
Line drawing of a simple cabinet or storage unit with a double door and side panel (no text or symbols)3、Open the microwave oven, fix the bolt (Component 5) and beat it into the cabinet, then install screw cover (Component 4)
ARTUSI THE ART OF LIVING
Worldwide Appliances Pty Limited
A.B.N. 45868077422
Office:
48-50 Moore Street, Leichhardt N.S.W 2040 Post:
Locked Bag 3000, Annandale, N.S.W 2038
P: 1300 694 583
WARRANTY REGISTRATION
Your ongoing satisfaction with your artusi product is important to us. We ask that you complete the enclosed Warranty Registration Card and return it to us so that we have a record of the artusi product purchased by you.
PRIVACY
Worldwide Appliances respects your privacy and is committed to handling your personal information in accordance with the National Privacy Principles and the Privacy Act 1988 (Cth). A copy of the Worldwide Appliances Privacy Policy is available at www.artusi.com.au. Worldwide Appliances will not disclose any personal information set out in the Warranty Registration Card (“Personal Information”) without your consent unless required by:
- law;
- any Worldwide Appliances related company;
- any service provider which provide services to artusi or assist artusi in providing services (including repair and warranty services) to customers. Our purpose in collecting the Personal Information is
to keep a record of the artusi product purchased by you, in order to provide a better warranty service to you in the unlikely event that there is a problem with your artusi product. Worldwide Appliances may contact you at any one or more of the address, email address or telephone numbers set out in the Warranty Registration Card. Please contact artusi on 1300 694 583 should you not wish to be contacted by Worldwide Appliances.
WARRANTY
1. Warranty
Worldwide Appliances warrants that each artusi product will remain, for a period of either 12 months or 24 months of warranty. All Warranties are valid from the original date of purchase, And warranty claims must be accompanied by the proof of purchase.
24 months warranty products:
All Built-in Appliances – Limited to Ovens, Gas, Induction and Electric Cooktops, and All Rangehoods
Freestanding Cookers - Gas and Electric Models (900mm Width)
Dishwashers - Freestanding, Fully Integrated, Semi Integrated and built-in
12 months warranty products:
Freestanding Cookers - Gas and Electric Models in 50cm, 54cm and 60cm Widths
Portable Appliances* – Benchtop Models and Portable Gas Models
2. What is not Covered by the Warranty.
The Warranty does not apply if an artusi product is defective by a factor other than a defect arising in the manufacture of the artusi product, including but not limited to:
(a) damage through misuse (including failure to maintain, service or use with proper care), neglect, accident or ordinary wear and tear (including deterioration of parts and accessories and glass breakage);
(b) use for purpose for which the artusi product was not sold or designed;
(c) use or installation which is not in accordance with any specified instructions for use or installation;
(d) use or operation after a defect has occurred or been discovered;
(e) damage through freight, transportation or handling in transit (other than when Worldwide Appliances is responsible);
(f) damage through exposure to chemicals, dusts, residues, excessive voltage, heat, atmospheric conditions or other forces or environmental factors outside the control or Worldwide Appliances;
(g) repair, modification or tampering by the purchaser or any person other than Worldwide Appliances, an employee of Worldwide Appliances or an authorised artusi service contractor ^* ;
(h) use of parts, components or accessories which have not been supplied or specifically approved by artusi.
(i) damage to surface coatings caused by cleaning or maintenance using products not recommended in the artusi product handbook provided to the purchaser upon purchase of the artusi product;
(j) damage to the base of an electric oven due to items having been placed on the base of the oven cavity or covering the base, such as aluminium foil (this impedes the transfer of heat from the element to the oven cavity and can result in irreparable damage); or
(k) damages, dents or other cosmetic imperfections not affecting the performance of the artusi in respect of an artusi product purchased as a “factory second” or from display
The Warranty does not extend to light globes used in artusi products.
3. Domestic Use
Each artusi product is made for domestic use.
This Warranty may not extend to artusi products used for commercial purposes.
4. Time for Claim under the Warranty
You must make any claim under this Warranty within twenty eight (28) days after the occurrence of an event which gives rise to a claim pursuant to the Warranty, by booking a service call on the telephone number below.
5. Proof of Purchase
Customers must retain proof of purchase in order to be eligible to make a warranty claim in respect of an artusi product.
6. Claiming under the Warranty
Customers will bear the cost of claiming under this Warranty unless Worldwide Appliances determines the expenses are reasonable, in which case the customer must claim those expenses by providing written evidence of each expense to Worldwide Appliances at the address on the Warranty Registration Card.
7. Statutory Rights
(a) These terms and conditions do not affect your statutory rights.
(b) The limitations on the Warranty set out in this document do not exclude or limit the application of the consumer guarantees set out in the Act or any other equivalent or corresponding legislation in the relevant jurisdiction where to do so would:
(i) contravene the law of the relevant jurisdiction; or
(ii) cause any part of the Warranty to be void.
(c) Worldwide Appliances excludes indirect or consequential loss of any kind (including, without limitation, loss of use of the artusi product) and (other than expressly provided for in these terms and conditions) subject to all terms,
conditions and warranties implied by custom, the general law, the Act or other statute.
(d) The liability of Worldwide Appliances to you
Warranty Card tear off
for a breach of any express or non-excludable implied term, condition or warranty is limited at the option of Worldwide Appliances to:
(i) replacing or repairing the defective part of the artusi product;
(ii) paying the cost of replacing or repairing the defective part of the artusi product;
(iii) replacing the artusi product; or
(iv) paying the cost of replacing the artusi product.
(e) Our goods come with guarantees that cannot be excluded under the Australian Consumer Law. You are entitled to a replacement or refund for a major failure and for compensation for any other reasonably foreseeable loss or damage. You are also entitled to have the goods repaired or replaced if the goods fail to be of acceptable quality and the failure does not amount to a major failure.
8. Defects
Any part of an artusi product deemed to be defective and replaced by Worldwide Appliances is the property of Worldwide Appliances.
Worldwide Appliances reserves the right to inspect and test artusi products in order to determine the extent of any defect and the validity of a claim under the Warranty.
*To locate your closest artusi authorised service agent please contact us on 1300 652 100 or visit www.artusi.com.au
ALL SERVICE CALLS MUST BE BOOKED
THROUGH AN AUTHORISED DEALER OR
WARRANTY DEPARTMENT ON 1300 652 100
OR stokesaps.com.au/artusi-service
0 1 0 3 2

ARTUSI
THE ART OF LIVING
WARRANTY REGISTRATION CARD 01052013
Please complete and send to ARTUSI at:
REPLY PAID 83617
LEICHHARDT NSW 2040
| Last Name: First Name: | ||
| Address: | ||
| State: Postcode: Email: | ||
| Home Phone: Mobile: | ||
| Purchase Date: / / (Please attach proof of purchase to validate warranty) | ||
| MODEL NUMBER | SERIAL NUMBER(if you cannot locate the serial number please call ARTUSI on 1300 694 583) |
| 1 | |
| 2 | |
| 3 | |
| 4 |

ARTUSI
THE ART OF COOKING
DISCLAIMER
Worldwide Appliances PTY LTD, trading as ARTUSI, is continually seeking ways to improve the design specifications, aesthetics and production techniques of its products. As a result alterations to our products and designs take place continually. Whilst every effort is made to produce information and literature that is up to date, this brochure should not be regarded as an infallible guide to the current specifications, nor does it constitute an offer for the sale of any particular product. Product dimensions indicated in our literature is indicative only. Actual product only should be used to define dimension cutouts. Distributors, and retailers are not agents of ARTUSI and are not authorised to bind ARTUSI by any express or implied undertaking or representation.
ARTUSI OFFICES ARE OPEN DAILY FROM 9AM-5PM AND SATURDAYS 10AM-4PM
NSW & ACT (HEAD OFFICE)
48 50 MOORE STREET
LEICHHARDT
FO285694699
VIC.TAS & SA
1211 TOORAK ROAD
CAMBERWELL
F0398092155
QLD
1/42 CAVENDISH ROAD
COORPAROO
FO733970850
WA&NT
UNIT 10/55 HOWE STREET
OSBORNE PARK
F 08 9201 9188
NZ
POBOX11.160
SOCKBURN CHRISTCHURCH
F033445906
- Important safety instructions
- CAUTION: Hot surface.
- SPECIFICATIONS
- BEFORE YOU CALL FOR SERVICE
- Note:
- RADIO INTERFERENCE
- INSTALLATION
- WARNING-THIS APPLIANCE MUST BE EARTHED.
- IMPORTANT
- SAFETY INSTRUCTIONS FOR GENERAL USE
- COMPUTER CONTROL PANEL
- Operation Instruction
- 1.Single Button Heating
- Microwave Heating
- Auto weight defrost
- Auto-menu
- Grill
- Combination Cooking
- COMPONENTS
- TRIM KIT SPECIFICATIONS
- FRAME INSTALLATION STEPS
- ARTUSI THE ART OF LIVING
- PRIVACY
- WARRANTY
- Warranty
- What is not Covered by the Warranty.
- Domestic Use
- Time for Claim under the Warranty
- Proof of Purchase
- Claiming under the Warranty
- Statutory Rights
- Warranty Card tear off
- Defects
- ARTUSI
- THE ART OF LIVING
- THE ART OF COOKING
- DISCLAIMER
Brand : Artusi
Model : AMO25TK
Category : Microwaves