
BT-SB 200 - Saw TAURUS - Free user manual and instructions
Find the device manual for free BT-SB 200 TAURUS in PDF.


| Product Type | Band Saw |
| Model Number | BT-SB 200 |
| Voltage | 230 V ~ 50 Hz |
| Power (S1 continuous) | 180 W |
| Power (S2 15 min) | 250 W |
| Idle Speed | 1400 min-1 |
| Blade Length | 1400 mm |
| Max Blade Width | 8 mm |
| Blade Speed | 900 m/min |
| Max Cutting Height (90°) | 80 mm |
| Max Cutting Height (45°) | 45 mm |
| Throat Depth | 200 mm |
| Table Size | 300 x 300 mm |
| Table Tilt Range | 0° to 45° |
| Max Workpiece Size | 400 x 400 mm |
| Weight | 13.2 kg |
| Sound Pressure Level (LpA) | 82.3 dB(A) |
| Sound Power Level (LWA) | 92.8 dB(A) |
| Dust Extraction Connection | Yes (20 m/s air velocity) |
| Safety Features | Undervoltage release switch, blade guard, emergency stop |
| Included Accessories | Push stick, parallel stop, saw table, hex key |
| Warranty | 1 Year |
Frequently Asked Questions - BT-SB 200 TAURUS
User questions about BT-SB 200 TAURUS
0 question about this device. Answer the ones you know or ask your own.
Ask a new question about this device
Download the instructions for your Saw in PDF format for free! Find your manual BT-SB 200 - TAURUS and take your electronic device back in hand. On this page are published all the documents necessary for the use of your device. BT-SB 200 by TAURUS.
USER MANUAL BT-SB 200 TAURUS
natural_image
Blue industrial milling machine with a cutting tool and control panel (no visible text or symbols)INSTRUCTION MANUAL
MODEL NUMBER BT-SB 200
Band Saw
What your 1 year warranty means
Great care has gone into the manufacture of this product and it should therefore provide you with years of good service when used properly. In the event of product failure within its intended use over the course of the first 1 year after the date of purchase we will remedy the problem as quickly as possible once it has been brought to our attention. In the unlikely event of such an occurrence, or if you require any information about the product, please contact us via our after sales support services, details of which can be found in this manual and on the product itself.
Welcome Section
Congratulations on choosing to buy a TAURUS® product.
All products brought to you by TAURUS ^® are manufactured to the highest standards of performance and safety, and, as part of our philosophy of customer service and satisfaction, are backed by our comprehensive 1 Year Warranty.
We hope you will enjoy using your purchase for many years to come.
Table of Contents
- General Safety Rules Pg. 7
- Special Safety Rules Pg. 8
- Layout Pg. 10
- Items Supplied Pg. 10
- Proper use Pg. 10
- Technical data Pg. 11
- Before putting the machine into operation Pg. 11
- Assembly Pg. 11
-
Control elements Pg. 13
-
Operation Pg. 13
- Transport Pg. 14
- Maintenance Pg. 14
- Ordering spare parts Pg. 14
- Disposal and recycling Pg. 14
natural_image
Person operating a mechanical device with a three-barrel wheel and a small tool, no visible text or symbols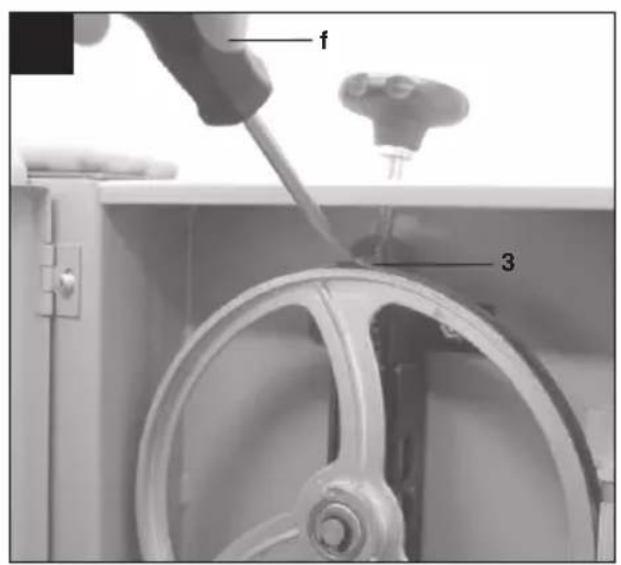
1. General Safety Rules
WARNING! Read all instructions Failure to follow all instructions listed below may result in electric shock, fire and/or serious injury. The term "power tool" in all of the warnings listed below refers to your mains-operated (corded) power tool or battery-operated (cordless) power tool.
SAVE THESE INSTRUCTIONS
1. Work area
a. Keep work area clean and well lit. Cluttered and dark areas invite accidents.
b. Do not operate power tools in explosive atmospheres, such as in the presence of flammable liquids, gases or dust. Power tools create sparks which may ignite the dust or fumes.
c. Keep children and bystanders away while operating a power tool. Distractions can cause you to lose control.
2. Electrical safety
a. Power tools plugs must match the outlet. Never modify the plug in any way. Do not use any adapter plugs with earthed (grounded) power tool. Unmodified plugs and matching outlets will reduce risk of electric shock.
b. Avoid body contact with earthed or grounded surfaces such as pipes, radiators, ranges and refrigerators. There is an increased risk of electric shock if your body is earthed or grounded.
c. Do not expose power tools to rain or wet conditions.
Water entering a power tool will increase the risk of electric shock.
d. Do not abuse the cord. Never use the cord for carrying, pulling or unplugging the power tool. Keep cord away from heat, oil, sharp edges or moving parts. Damaged or entangled cords increase the risk of electric shock.
e. When operating a power tool outdoors, use an extension cord suitable for outdoor use. Use of a cord suitable for outdoor use reduces the risk of electric shock.
3. Personal safety
a. Stay alert, watch what you are doing and use common sense when operating a power tool. Do not use a power tool while you are tired or under the influence of drugs, alcohol or medication. A moment of inattention while operating power tools may result in serious personal injury.
b. Use safety equipment. Always wear eye protection.
Safety equipment such as dust mask, non-skid safety shoes, hard hat, or hearing protection used for appropriate conditions will reduce personal injuries.
c. Avoid accidental starting. Ensure the switch is in the off-position before plugging in. Carrying power tools with your finger on the switch or plugging in power tools that have the switch on invites accidents.
d. Remove any adjusting key or wrench before turning the power tool on. A wrench or a key left attached to rotating part of the power tool may result in personal injury.
e. Do not overreach. Keep proper footing and balance at all times. This enables better control of the power tool in unexpected situations.
f. Dress properly. Do not wear loose clothing or jewellery. Keep your hair, clothing and gloves away from moving parts. Loose clothes, jewellery or long hair can be caught in moving parts.
g. If devices are provided for the connection of dust extraction and collection facilities, ensure these are connected and properly used. Use of these devices can reduce dust-related hazards.
4. Power tool use and care
a. Do not force the power tool. Use the correct power tool for your application. The correct power tool will do the job better and safer at the rate for which it was designed.
b. Do not use the power tool if the switch does not turn it on and off. Any power tool that cannot be controlled with the switch is dangerous and must be repaired.
c. Disconnect the plug from the power source and/or the battery pack from the power tool before making any adjustments, changing accessories, or storing power tools. Such preventive safety measures reduce the risk of starting the power tool accidentally.
d. Store idle power tools out of the reach of children and do not allow persons unfamiliar with the power tool or these instructions to operate the power tool. Power tools are dangerous in the hands of untrained users.
e. Maintain power tools. Check for misalignment or binding of moving parts, breakage of parts and any other condition that may affect the power tools operation. If damaged, have the power tool repaired before use. Many accidents are caused by poorly maintained power tools.
f. Keep cutting tools sharp and clean. Properly maintained cutting tools with sharp cutting edges are less likely to bind and are easier to control.
g. Use the power tool, accessories and tool bits etc. in accordance with these instructions and in the manner intended for the particular type of power tool, taking into account the working conditions and the work to be performed. Use of the power tool for operations different from those intended could result in a hazardous situation.
5. Service
a. Have your power tool serviced by a qualified repair person using only identical replacement parts. This will ensure that the safety of the power tool is maintained.
6. Recommendation
a. We recommend that the tool always be supplied via a residual current device with a rated residual current of 30 mA or less.
2. Special Safety Rules
Important: Whenever you use electric tools it is imperative to take basic safety precautions in order to reduce the risk of fire, electric shock and personal injury. Essential safety precautions include:
- Keep your work area tidy!
- An untidy work area invites accidents.
- Check the working conditions!
- Do not expose electric tools to rain.
- Never use electric tools in damp or wet locations.
- Make sure there is good lighting.
- Do not use electric tools near flammable liquids or gases.
- Guard against electric shock!
- Avoid body contact with earthed components.
- Keep other persons away!
- Do not allow other persons, particularly children, to touch the tool or cable. Keep all persons out of your work area.
- Store tools in a safe place!
- When tools are not in use they should be stored in a dry, locked room out of children's reach.
- Do not overload your tools!
- Tools work better and safer when used within their quoted capacity range.
- Use the right tool!
- Never use tools or attachments with insufficient power for the job in hand.
- Never use tools on jobs for which they were not intended. For example, do not use a hand-held circular saw to cut down trees or lop off branches.
- Wear suitable work clothes!
- Do not wear loose clothing or jewelry as they may get caught in moving parts.
- Non-slip shoes are recommended when working outdoors.
- Wear a hair net if you have long hair.
- Use personal safety equipment!
- Wear safety goggles.
- Use a dust mask when working on dusty jobs
- Connect up a vacuum extraction system!
- If there are provisions for connecting up a vacuum extraction system, make sure that such a system is fitted and in use.
- Do not mis-use the cable!
- Do not carry the tool by its cable or pull on the cable to remove the plug from the socket-outlet. Protect the cable from heat, oil and sharp edges.
- Secure your workpiece!
- Use clamps or a vice to hold the workpiece securely. This is safer than using your hand and will enable you to operate the machine with both hands.
- Avoid abnormal working postures!
- Make sure you stand squarely and keep your balance at all times.
- Look after your tools!
- Keep your tools sharp and clean for better and safer performance.
- Follow the instructions for maintenance work and for changing any attachments.
- Check the plug and cable regularly and, if damaged, have them replaced by an authorized specialist.
- Check the extension cable regularly and replace it if damaged.
- Keep handles dry and free from oil and grease.
- Always pull out the power plug:
- When the tool is not being used, before carrying out any maintenance work and when changing attachments such as blades, bits and cutters of any kind.
- Remove adjusting keys and wrenches!
- Make sure that all keys and adjusting wrenches are removed from the tool before switching it on.
- Avoid unintentional starting!
- Make sure that the switch is in OFF position when inserting the power plug.
- When using an extension cable outdoors:
- Check that it is approved for outdoor duty and is marked accordingly.
- Be alert at all times!
- Watch what you are doing. Use common sense. Do not operate the tool if your mind is not on your work.
- Check the tool for damage!
- Each time before re-using the tool, carefully check that the guards or any slightly damaged parts are working as intended.
- Check that the moving parts are in good working order, that they do not jam, and that no parts are damaged.
- Make sure that all parts are fitted correctly and that all other operating conditions are properly fulfilled.
- Unless otherwise stated in the operating instructions, damaged guards and parts have to be repaired or replaced by an authorised service center.
- Have damaged switches replaced by a customer service workshop.
- Never use any tool if its switch can not be turned off and on.
21. IMPORTANT!
The use of any accessory or attachment other than those recommended may involve a risk of injury for you personally.
- Have repairs carried out only by a qualified electrician!
- This electric tool complies with the pertinent safety regulations. Repairs are to be carried out only by a qualified electrician using original replacement parts or the user may suffer an accident.
- Wear safety gloves whenever you carry out any
maintenance work on the blade!
-
In the case of mitre cuts when the table is tilted, the guide must be positioned on the lower part of the table.
-
When cutting round wood, use a device to stop the workpiece from twisting.
-
When cutting boards in upright position, use a device to prevent kick-back.
-
A dust extraction system designed for an air velocity of 20 m/s should be connected in order to comply with woodworking dust emission values and to ensure reliable operation.
-
Give these safety regulations to all persons who work on the machine.
-
Do not use this saw to cut fire wood.
-
The machine is equipped with a safety switch to prevent it being switched on again accidentally after a power failure.
-
Before you use the machine for the first time, check that the voltage marked on the rating plate is the same as your mains voltage.
-
If you use a cable reel, the complete cable has to be pulled off the reel.
-
Persons working on the machine should not be distracted.
-
Note the direction of rotation of the motor and blade.
-
Never dismantle the machine's safety devices or put them out of operation.
-
Never cut workpieces which are too small to hold securely in your hand.
-
Never remove loose splinters, chips or jammed pieces of wood when the saw blade is running.
-
It is imperative to observe the accident prevention regulations in force in your area as well as all other generally recognised rules of safety.
-
Note the information published by your professional associations.
-
Position the blade guard so it is approx. 3 mm above the material you want to saw.
-
Important! Support long workpieces (e.g. with a roller table) to prevent them sagging at the end of a cut.
-
Make sure the blade guard is in its lower position when the saw is being transported.
-
Safety guards are not to be used to move or mis-use the machine.
-
Blades that are misshapen or damaged in anyway must not be used.
-
If the table insert is worn, replace it.
-
Never operate the machine if either the door protecting the blade or the detachable safety device are open.
- Ensure that the choice of blade and the selected speed are suitable for the material to be cut.
- Do not begin cleaning the blade until it has come to a complete stand still.
- In the case of straight sawing against the parallel stop, a push stick must be used.
- The bandsaw blade guard should be in its lowest position close to the bench during transport.
- For mitre cuts when the table is tilted, the parallel stop must be positioned on the lower part of the table.
- When cutting round timber, use a suitable holding device to prevent the workpiece turning.
- Never use guards to lift or transport items.
- Ensure that the bandsaw blade guards are used and correctly adjusted.
- Keep your hands a safety distance away from the bandsaw blade. Use a push stick for narrow cuts.

Caution
Read the operating instructions to reduce the risk of injury.

Wear ear-muffs.
The impact of noise can cause damage to hearing.

Wear a breathing mask.
Dust which is injurious to health can be generated when working on wood and other materials. Never use the device to work on any materials containing asbestos!

Wear safety goggles.
Sparks generated during working or splinters, chips and dust emitted by the de-vice can cause loss of sight.
Pull the power plug before beginning any repair or maintenance work!
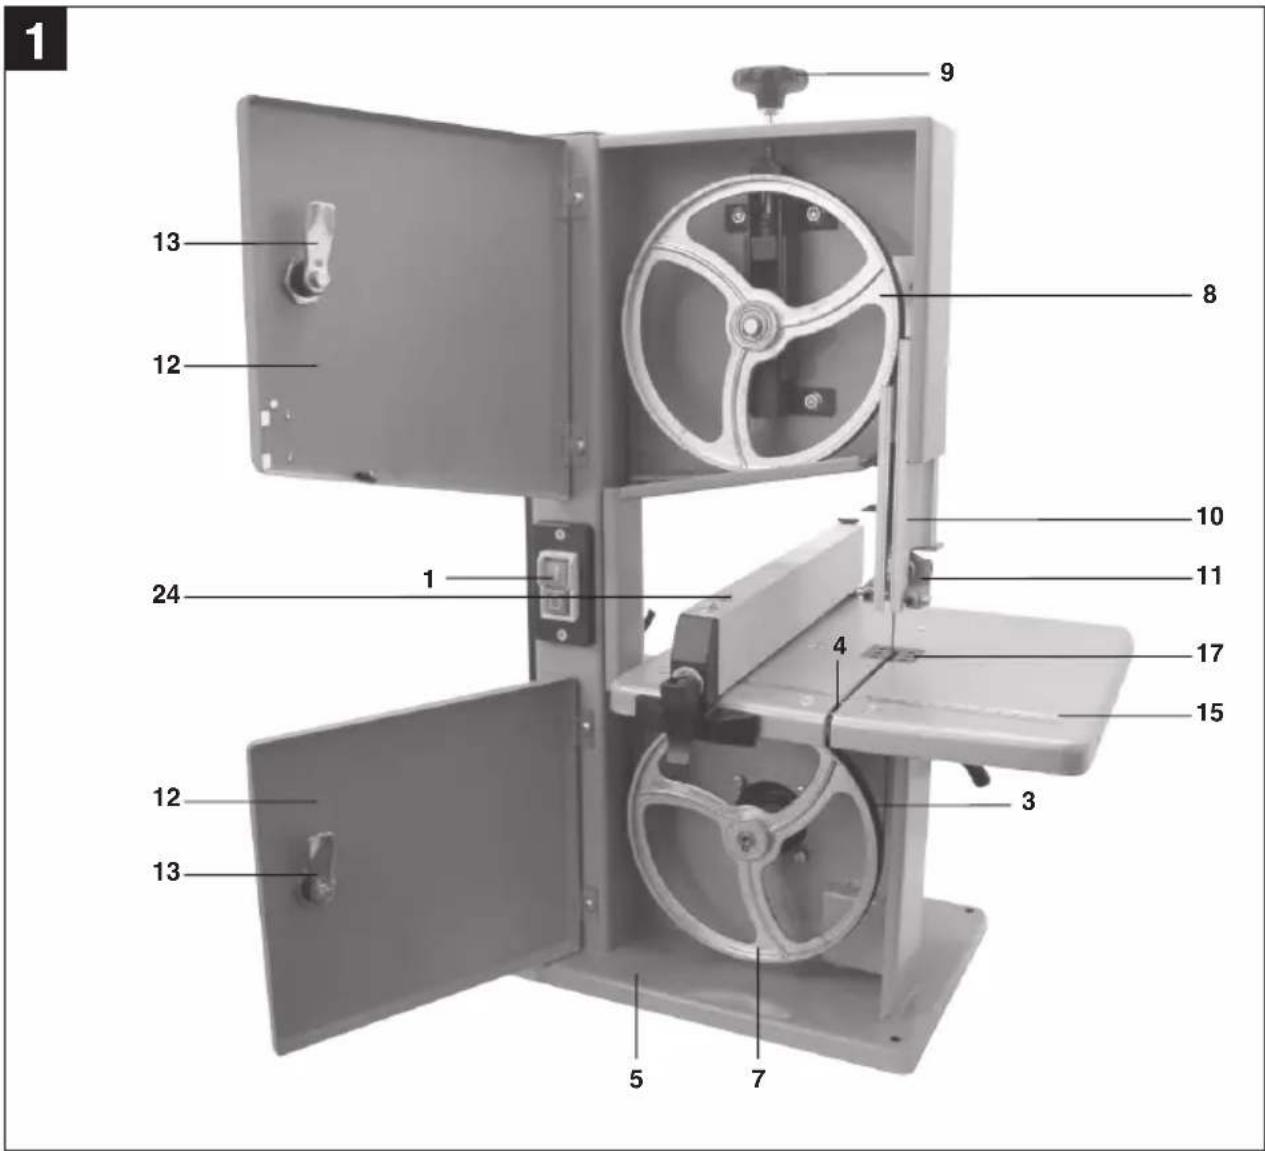
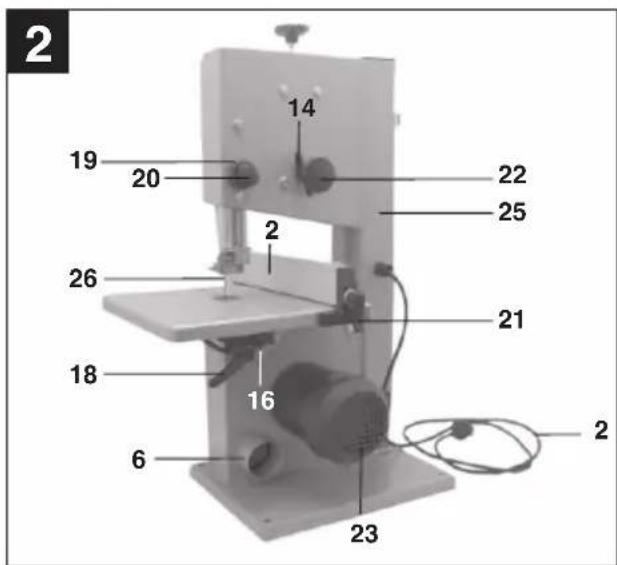
3. Layout (Figures 1/2)
- ON/OFF switch
- Power cord
- Rubber tires
- Web panel
- Machine foot
- Extractor socket
- Lower blade pulley
- Upper blade pulley
- Tightening screw
- Blade guard
- Upper blade guide
- Side cover
- Hood closure
- Retaining screw for upper blade pulley
- Saw table
- Dial scale for tilt angle
- Plastic table insert
- Fixing handles for saw table
- Setting handle for blade guide
- Fixing handle for blade guide
- Clip for parallel stop
- Setting screw for upper blade pulley
- Motor
- Parallel stop
- Machine frame
- Blade
4. Items Supplied
-1xBandsaw
- 1 x Saw table
- 1 x Push stick
- 1 x Parallel stop
- 1 x Instruction Manual
- 1 x Quick Start Guide
-1xWarrantyCard
-1xWarrantySticker
- Open the packaging and take our the equipment with care.
- Remove the packaging material and any packaging and/or transportation braces (if available).
- Check to see if all items are supplied.
- Inspect the equipment and accessories for the transport damage.
- If possible, please keep the packaging until the end of the guarantee period.
Important!
The equipment and packaging material are not toys. Do not let children play with plastic bags, foils or small parts. There is a danger of swallowing or suffocating! Do not let children play with plastic bags, foils or small parts. There is a danger of swallowing or suffocating.
5. Proper use
The bandsaw is designed to perform longitudinal and cross cuts on timber or wood-type materials. To cut round materials you must use suitable holding devices. The machine is to be used only for its prescribed purpose.
Any use beyond that mentioned is considered to be a case of misuse. The user/operator and not the manufacturer shall be liable for any damage or injury resulting from such cases of misuse. The machine is to be operated only with suitable sawblades. To use the machine properly you must also observe the safety regulations, the assembly instructions and the operating instructions to be found in this manual.
All persons who use and service the machine have to be acquainted with this manual and must be informed about the machine's potential hazards. It is also imperative to observe the accident prevention regulations in force in your area.
The same applies for the general rules of occupational health and safety.
The manufacturer shall not be liable for any changes made to the machine nor for any damage resulting from such changes.
Even when the machine is used as prescribed it is still impossible to eliminate certain residual risk factors. The following hazards may a rise in connection with the machine's construction and design:
• Damage to hearing if ear-muffs are not used as necessary
• Harmful emissions of wood dust when used inclosed rooms.
- Contact with the blade in the uncovered cutting zone.
- Injuries (cuts) when changing the blade. Injury from catapulted workpieces or parts of workpieces.
- Crushed fingers.
- Kickback.
- Tilting of the workpiece due to inadequate support.
- Touching the blade.
• Catapulting of pieces of timber and workpieces.
Please note that our equipment has not been designed for use in commercial, trade or industrial applications. Our warranty will be voided if the machine is used in commercial, trade or industrial businesses or for equivalent purposes.
6. Technical data
| Voltage: | 230 V ~ 50Hz |
| Power: | S1 180 W S2 15 min 250 W |
| Ideal speed no: | 1400 min^-1 |
| Blade length: | 1400 mm |
| Max blade width: | 8 mm |
| Blade speed: | 900 m/min |
| Cutting height: | 80 mm / 90° |
| 45 mm / 45° | |
| Throat: | 200 mm |
| Table size: | 300 x300 mm |
| Tilting range table: | 0° to 45° |
| Workpiece size: | 400 x 400 mm |
| Weight: | 13.2 kg |
Noise emission values
Sound and vibration values were measured in accordance with EN 61029.
Cutting
| L_pA | sound pressure level 82.3 dB(A) | |
| K_pA | uncertainty | 3dB |
| L_WA | sound power level 92.8 dB(A) | |
| K_WA | uncertainty | 3dB |
Load factor:
A load factor of S2 15 min (intermittent periodic duty) means that you may operate the motor continuously at its nominal power level (250 W) for no longer than the time stipulated on the specifications label (15 minutes ON period). If you fail to observe this time limit the motor will overheat. During the OFF period the motor will cool again to its starting temperature.
Wear ear-muffs.
The impact of noise can cause damage to hearing.
Keep the noise emissions and vibrations to a minimum.
• Only use appliances which are in perfect working order.
• Service and clean the appliance regularly.
- Adapt your working style to suit the appliance.
• Do not overload the appliance.
• Have the appliance serviced whenever necessary.
- Switch the appliance off when it is not in use.
Residual risks
Even if you use this electric power tool in accordance with instructions, certain residual risks cannot be ruled out.
The following hazards may arise in connection with the equipment's construction and layout:
-
Lung damage if no suitable protective dust mask is used.
-
Damage to hearing if no suitable ear protection is used.
7. Before putting the machine into operation
- Make sure the machine stands securely, i.e. bolt it to a workbench or solid base. There are two holes for this purpose in the machine foot.
• The saw table must be mounted correctly. - All covers and safety devices have to be properly fitted before the machine is switched on.
• It must be possible for the blade to run freely. - When working with wood that has been processed before, watch out for foreign bodies such as nails or screws etc.
- Before you actuate the On/Off switch, make sure that the saw blade is correctly fitted and that the machine's moving parts run smoothly.
- Before you connect the machine to the power supply, make sure the data on the rating plate is the same as that for your mains.
8. Assembly
Caution! Pull out the power plug before carrying out any maintenance, resetting or assembly work on the bandsaw!
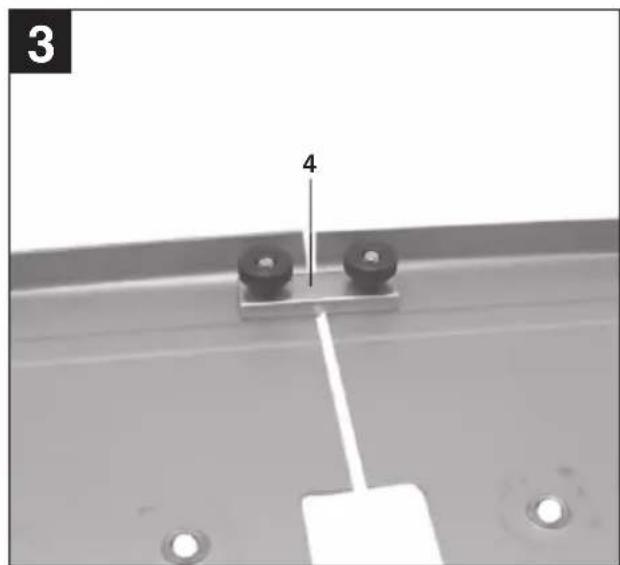
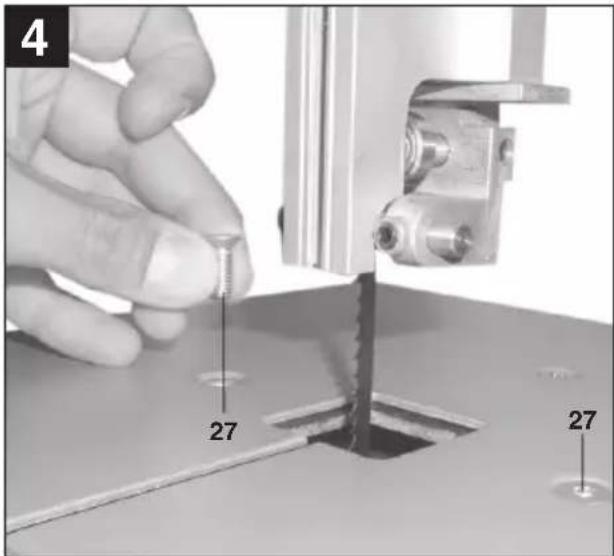
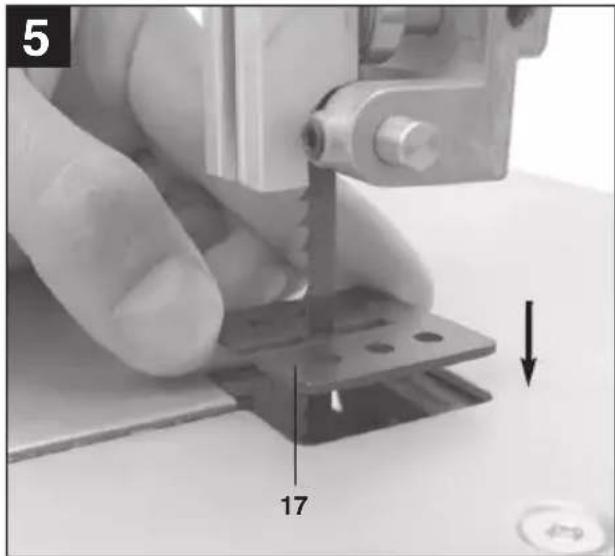
8.1. Mounting the saw table (Fig. 1 - 5)
- Remove the web panel (4).
- Place the saw table (15) on the machine housing (25) from the right and fasten with 3 fixing screws (27). Make sure that the blade (26) is positioned exactly in the center of the saw table.
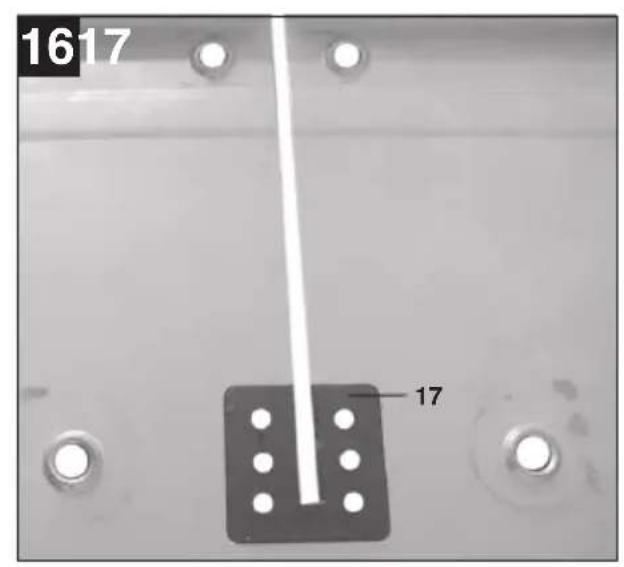
• Re-insert the web panel (4). - Insert the plastic table insert (17) into the table from above. Do this in such a way that a through-going slot is the result.
• To dismantle the saw table, proceed in reverse order.
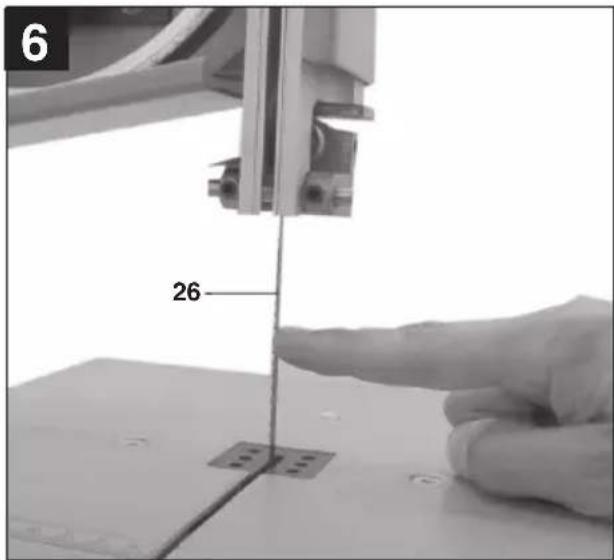
8.2. Tensioning the blade (Fig. 1/6)
- CAUTION! Remove the tension from the blade if the bandsaw is not going to be used for some time. Be sure to re-tension the blade before you start the machine.
- Turn the tightening screw (9) for tensioning the blade (26) in a clockwise direction. The correct blade tension can be checked by applying pressure to the side of the blade with your finger, somewhere in the middle between the two blade pulleys (7 + 8). You should only be able to bend the blade (26) very slightly (approx.1-2 mm).
- IMPORTANT! The blade may break if the tension is too high. BEWARE OF INJURY! If the tension is too low, the powered blade pulley (7) will spin while the blade does not move.
8.3 Adjusting the blade (Fig. 1/2)
- CAUTION! The blade tension has to be set correctly before you can adjust the blade.
-
Undo the fasteners (13) and open the side cover (12).
-
Slowly turn the upper blade pulley (8) clockwise by hand. The blade (26) should run in the middle of the pulley. If it does not, you will have to adjust the tilt of the upper blade pulley (8).
- If the blade (26) tends to run to the back of the blade pulley (8), i.e. towards the machine frame(25), turn the setting screw (22) anti-clockwise while turning the blade pulley (8) by hand until the blade (26) runs in the middle.
- If the blade (26) tends to run to the front edge of the blade pulley (8), turn the setting screw (22) in a clockwise direction.
- After setting the upper blade pulley (8) you need to check the blade (26) position on the lower blade pulley (7). The blade (26) should run in the middle of the blade pulley (7), as above. If it does not, you will have to adjust the tilt of the upper blade pulley (8) again.
- Turn the upper blade pulley several times until the adjustment to the upper blade pulley (8) has an effect on the blade position of the lower blade pulley (7).
• After any adjustments have been carried out, the side covers (12) must be closed again and re-secured with the fasteners (13).
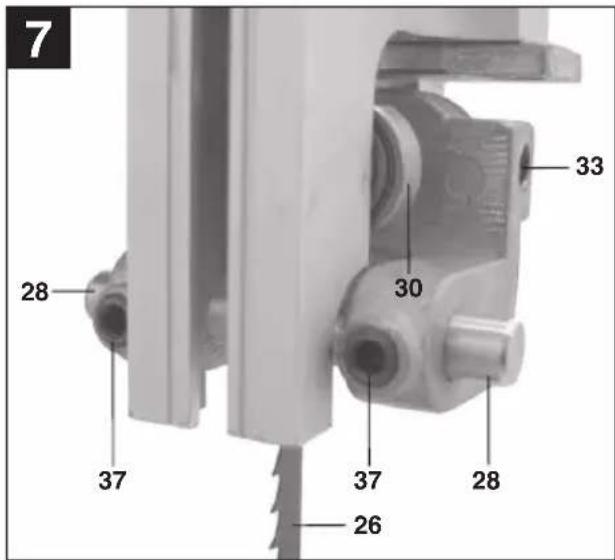
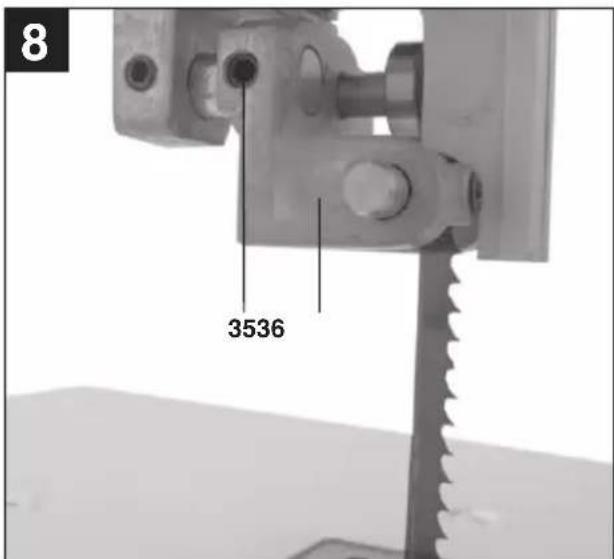
8.4. Setting the blade guide (Fig. 7 - 10)
Whenever you change the blade you must re-set both the support bearings (30 + 31) and the guide pins (28 + 29).
- Undo the fasteners (13) and open the side cover(12).
8.4.1. Upper support bearing (30)
- Undo the screw (33).
- Move the support bearing (30) so that it is no longer touching the blade (26). There should be a maximum gap of 0.5 mm.
• Re-tighten the screw (33).
8.4.2. Adjusting the lower support bearing (31)
• Dismantle the saw table (15).
• Swing the blade guard (34) away.
- Adjust in the same way that the upper support bearing was adjusted. The blade (26) is only supported by the support bearings (30 + 31) during cutting. When idle the blade should not touch the ball bearing.
8.4.3. Adjusting the upper guide pins (28)
• Undo the Allen screw (35)
- Move the mount (36) of the guide pins (28) so that there is a gap of approx. 1 mm between the front edge of the guide pins (28) and the gullet of the blade in front.
• Re-tighten the Allen screw (35).
- CAUTION! The blade will be rendered useless if the teeth touch the guide pins while the blade is running.
• Undo the Allen screws (37).
- Move the guide pins (28) towards the blade so that there is a gap of approx. 0.5 mm between the guide pins (28)
and the blade (26). The blade must not jam.
• Re-tighten the Allen screws (37).
- Turn the upper blade pulley (8) several times in a clockwise direction.
- Check the setting of the guide pins (28) again and re-adjust if necessary.
8.4.4. Adjusting the lower guide pins (29)
• Dismantle the saw table (15).
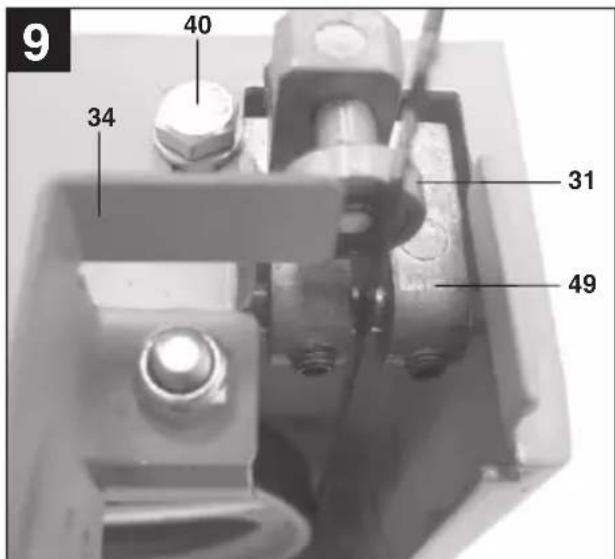
- Undo the screw (40).
- Move the mount (49) of the guide pins (29) so that there is a gap of approx. 1 mm between the front edge of the guide pins (29) and the gullet of the blade in front.
• Re-tighten the screw (40).
- CAUTION! The blade will be rendered useless if the teeth touch the guide pins while the blade is running.
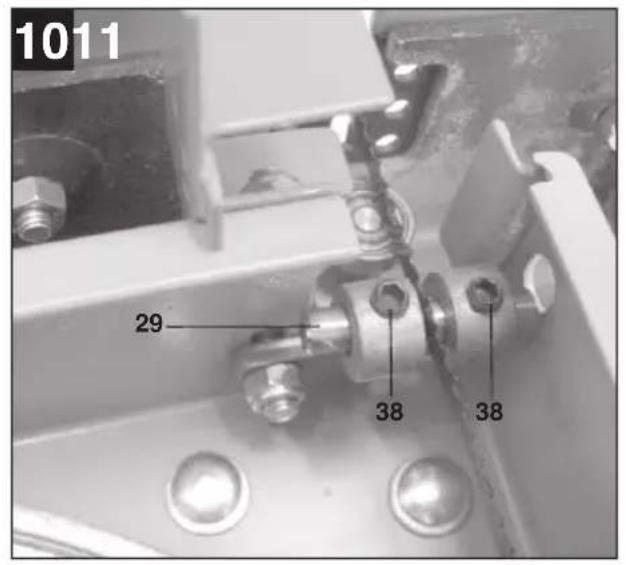
• Undo the Allen screws (38).
- Move the guide pins (29) towards the blade so that there is a gap of approx. 0.5 mm between the guide pins (29) and the blade (26). The blade must not jam.
• Re-tighten the Allen screws (38).
- Turn the lower blade pulley (7) several times in a clockwise direction. Check the setting of the guide pins (29) again and re-adjust if necessary.
CAUTION! When the adjustments have been finished, the blade guard (34) must be closed again.
8.5. Adjusting the upper blade guide (Fig.11/Item 11)
- Undo the fixing handle (Fig.2/Item 20).
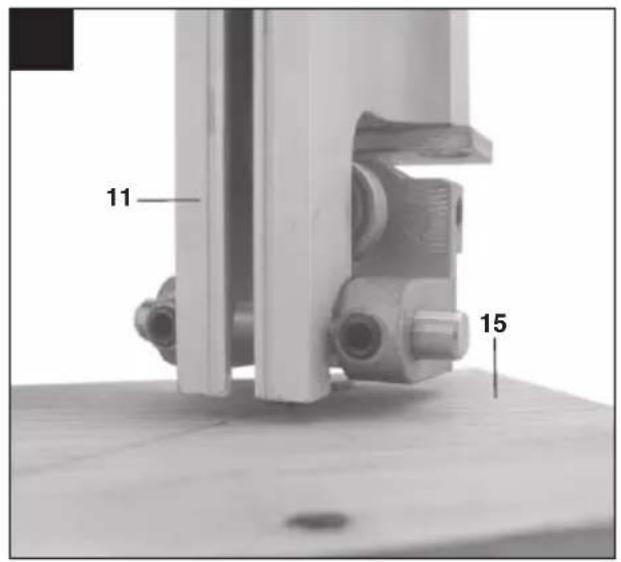
- Turn the setting wheel (Fig.2/Item 19) to lower the blade guide (Fig.11/Item 11) as close as possible to the work piece to be cut. The gap should be approx. 2-3 mm.
• Re-tighten the fixing handle (Fig.2/Item 20). - Check the setting before each cut and re-adjust if necessary.
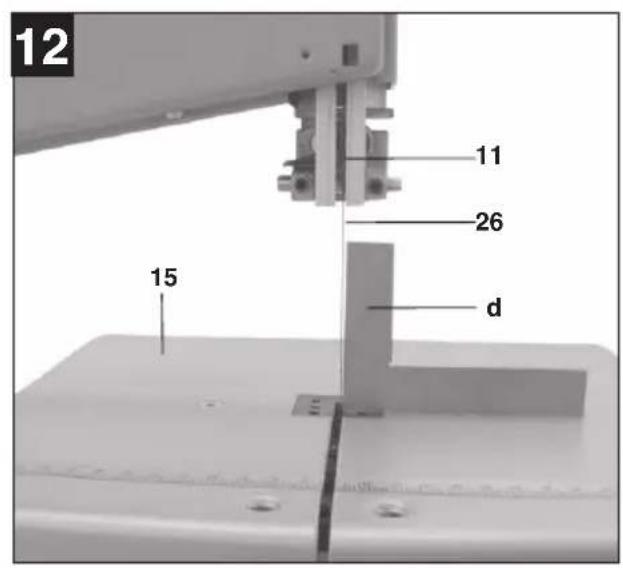
8.6. Adjusting the machine table (Fig.12/Item 15) to 90°
- Move the upper blade guide (Fig.12/Item 11) to the top.
- Undo the fixing handles (Fig.2/Item 8).
- Set the angle (Fig.12/Item 11) between the blade (Fig.12/Item 26) and the table (Fig.12/Item 15).
- Turn the setting wheel (Fig.12/Item 19) to tilt the saw table (Fig.12/Item 15) until it is at an angle of exactly 90^ to the blade (Fig.12/Item 26).
• Re-tighten the fixing handle (Fig.2/Item 18).
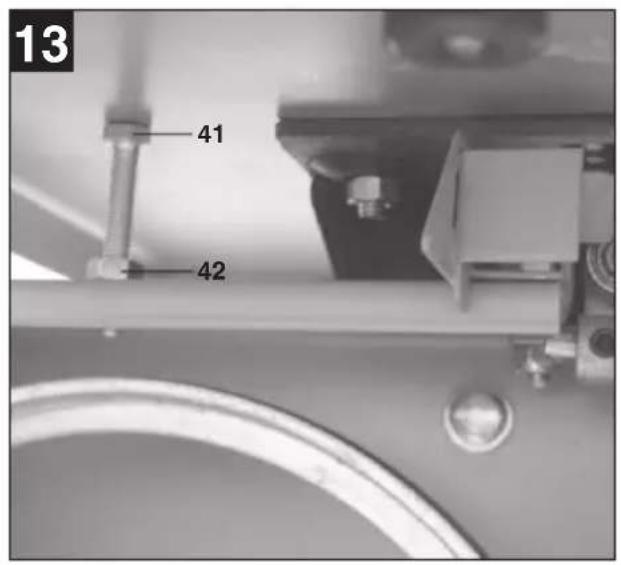
• Undo the nut (Fig.13/Item 42). - Adjust the Allen screw (Fig.13/Item 41) until there is contact with the machine frame.
- Re-tighten the nut (Fig.13/Item 42) to fasten the Allen screw (Fig.13/Item 41).
8.7. Blade selection
The blade supplied with the bandsaw is designed for all-purpose use. When you select a blade you should have regard to the following criteria:
- Use a narrow blade to cut tighter radius than you can with a wider blade.
- Wide blades are used to saw straight cuts. This is particularly important in cutting wood because the blade has a tendency to follow the grain of the wood and there by deviate easily from the cutting line.
- Finely toothed blades provide smoother cuts but are slower than coarse blades.
Important: Never use warped or lacerated blades!
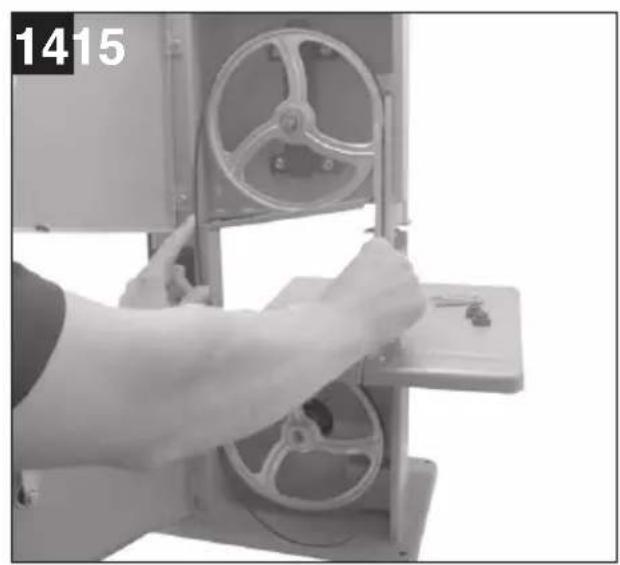
8.8. Changing the blade (Fig.14)
- Move the blade guide (Fig. 1/Item 11) into a position approximately half way between the saw table (Fig.1/Item 15) and the machine housing (Fig.2/Item 25).
- Undo the fasteners (Fig.1/Item 13) and open the side cover (Fig. 1/Item 12).
- Remove the web panel (Fig.3/Item 4).
- Turn the tightening screw (Fig.1/Item 9) anti-clockwise to remove the tension from the blade (Fig.2/Item 26).
- Remove the blade (Fig.2/Item 26) from the blade pulleys (Fig.1/Item 7 & 8) and take out through the slot in the table (Fig.1/Item 15).
- Fit the new blade (Fig.2/Item 26), aligned centrally on the blade pulleys (Fig.1/Item 7 & 8).
- The teeth of the blade (Fig.2/Item 26) must point downwards in the direction of the table.
• Tension the blade (Fig.2/Item 26) (see 8.2) - Close the side cover (Fig.1/Item 12) again.
• Mount the web panel (Fig.3/Item 4) again.
8.9. Changing the rubber tires on the blade pulleys
After a certain time the rubber tires (Fig.15/Item 3) on the blade pulleys (Fig.1/Item 7 & 8) will get worn by the sharp teeth of the blades and must be replaced.
- Open the side cover (Fig.1/Item 12).
- Remove the blade (Fig.2/Item 26) (see 8.7).
- Lift the edge of the tire (Fig.15/Item 3) with a small screwdriver (Fig.15/Item f) and remove from the upper blade pulley (Fig.1/Item 8).
• Repeat for the lower blade pulley (Fig.1/Item 7).
• Fit the new tire (Fig.15/Item 3), replace the blade (Fig.2/Item 26) and close the side cover (Fig.1/Item 12).
8.10. Changing the table insert (Fig.16)
To prevent increased likelihood of injury the table insert (Fig.16/Item 17) should be changed whenever it is worn or damaged.
• Detach the table (Fig.1/Item 15) (see 8.1).
- Lift out the worn table insert (Fig.16/Item 17).
- Fit the replacement table insert by following the above in reverse.
8.11. Extractor sockets
The bandsaw is equipped with extractor sockets (Fig.1/Item 6) for extracting sawdust and chips.
9. Control elements
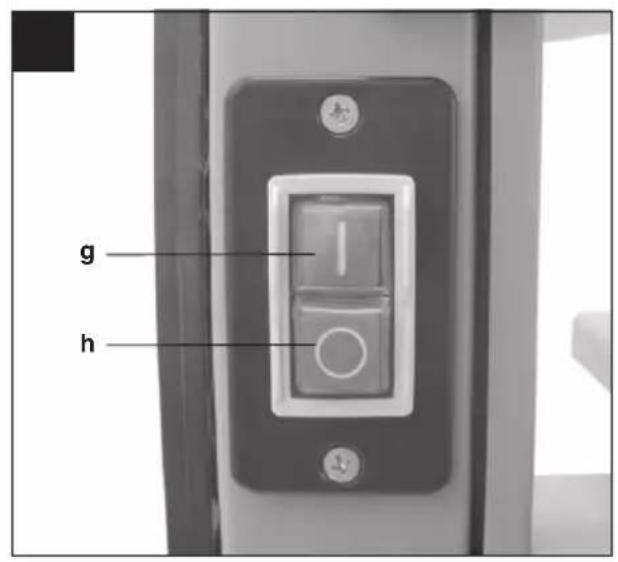
9.1. On/Off switch (Fig.17)
• To turn the machine on, press the green button "l" (g).
• To turn the machine off again, press the red button "0" (h).
- Your bandsaw has a switch with under voltage release. After a power failure you must re-activate the switch.
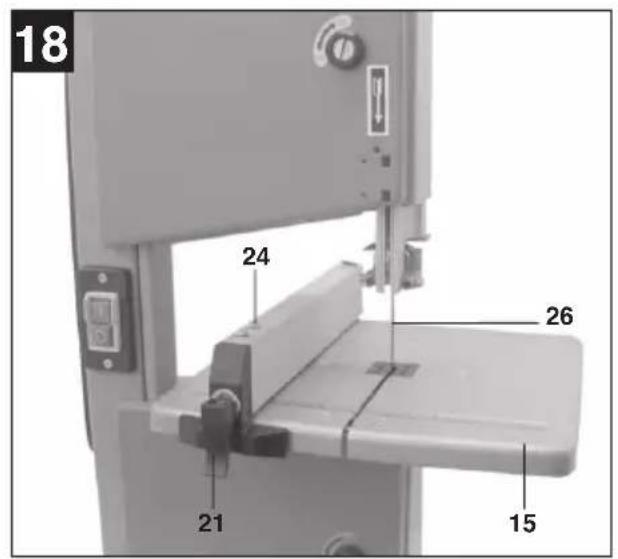
9.2. Parallel stop (Fig.18)
- Push the clip (21) on the parallel stop (24) upwards.
- Move the parallel stop (24) along the table (15), from either the right or left of the blade (26), and position as required.
- Push the clip (21) down to fix the parallel stop (24). If the clip (21) does not give enough hold, turn it clockwise several times until the parallel stop is securely fixed.
- You must always ensure that the parallel stop (24) is positioned parallel to the blade (26).
10. Operation
Caution! After every new adjustment we recommend to make a trial cut in order to check the new settings.
- For all cutting operations it is important to position the blade guide (Fig.1/Item 11) as close as possible to the workpiece (see 8.5).
- Always guide the workpiece with both hands, holding it flat on the table (Fig.1/Item 15) in order to prevent the blade (Fig.2/Item 26) from jamming.
- Feed the workpiece at a uniform speed that enables the blade to cut through the material without difficulty and without blocking.
• Always use the parallel stop (Fig.2/Item 26) on all cuts for which they are intended. - Always aim at making a complete cut in one pass rather than in a stop-and-go operation requiring the workpiece to be withdrawn. If you have to withdraw the workpiece, switch off the bandsaw first and wait for the blade (Fig.2/Item 26) to stop before freeing the workpiece.
- The workpiece must always be guided by the longer side during cutting.
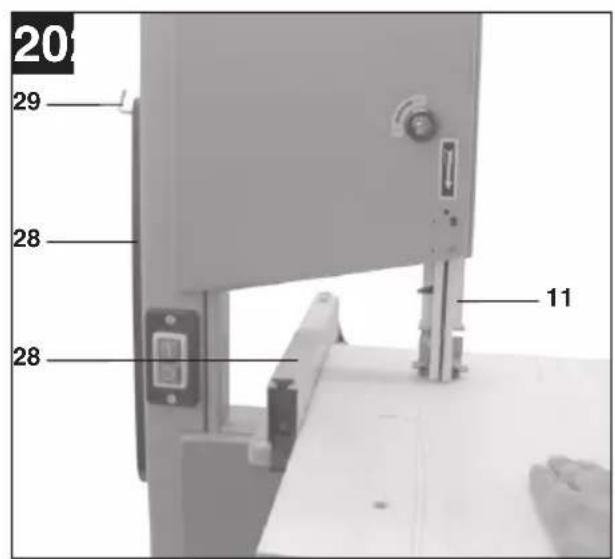
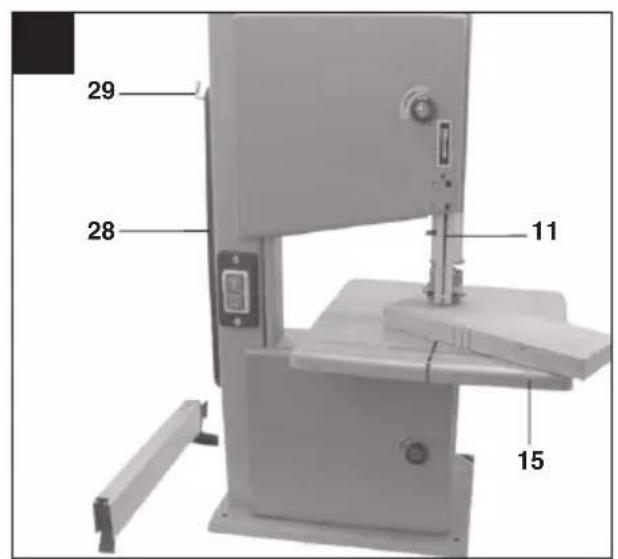
Important! When handling narrower workpieces, it is essential to use a push stick. The push stick (Fig.20/Item 28) must always be kept close at hand at the hook (Fig.20/Item 29) provided for that purpose on the side of the saw.
Longitudinal cutting is when you use the saw to cut along the grain of the wood.
- Place the parallel stop (Fig.20/Item 24) to the left of the blade (Fig.2/Item 26), as far as possible, for the width required.
- Lower the blade guide (Fig.20/Item 11) down to the workpiece (see 8.5).
- Switch on the saw.
- Press the edge of the workpiece with your right hand to hold it securely against the parallel stop (Fig.20/Item 24) and flat on the table (Fig.20/Item 15).
- Guide the workpiece along the parallel stop (Fig.20/Item 24) and through the blade (Fig.2/Item 26) at a uniform speed.
- Important: Long workpieces must be secured against falling off at the end of the cut (e.g. with a roller stand etc.)
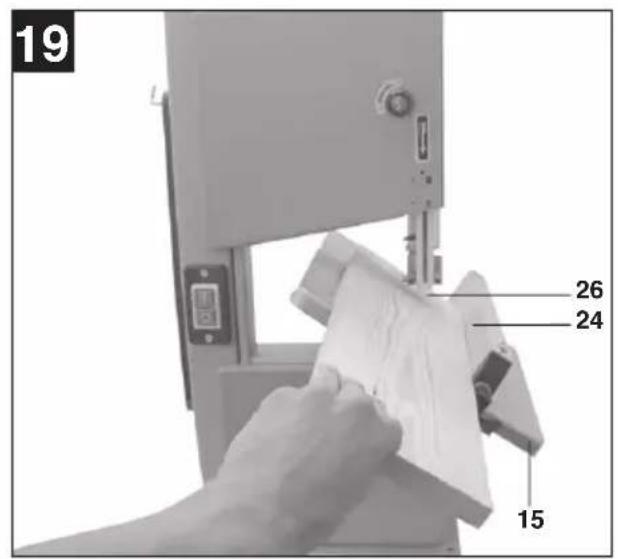
10.2. Angular cuts (Fig.19)
To enable you to perform angular cuts parallel to the blade (Fig.19/Item 26), the table (Fig.19/Item 15) can be tilted forwards between 0^ - 45^ .
- Undo the fixing handles (Fig.2/Item 18).
- Tilt the saw table (Fig.19/Item 15) forwards until the required angle value is set on the dial scale (Fig.2/Item 16).
• Re-tighten the fixing handles (Fig.2/Item 18). - Important: When the table (Fig.19/Item 15) is tilted, place the parallel stop (Fig.19/Item 24) to the right of the blade (Fig.19/Item 26) looking in the direction in which you are working, on the side pointing downwards (provided the workpiece is wide enough in order to stop the workpiece from slipping off).
• Carry out the cut as described in 10.1.
10.3. Freehanded cuts (Figure 21)
One of the most outstanding features of a bandsaw is the ease with which it allows you to make curved cuts and radius.
- Lower the blade guide (Fig.21/Item 11) to the workpiece (see 8.5).
- Switch on the saw.
- Hold the workpiece securely on the table (Fig.21/Item 15) and guide slowly through the blade (Fig.2/Item 26).
- Freehanded cuts should be made at low feed speed so that you can guide the blade (Fig.2/Item 26) along the required line.
- It often pays to first cut off surplus curves and corners up to about 6 mm from the cutting line.
- In the case of curves which are too tight for the blade to cut correctly, it can help to make a series of close-lying cuts at right angles to the curved line. When you saw the radius the material will simply drop off.
11. Transport
To transport the bandsaw, hold the supporting foot (Fig.1/Item 5) with one hand and the frame (Fig.2/Item 25) with the other hand. Important! Never use guards to lift or transport the equipment.
12. Maintenance
• Caution! Pull out the power plug first.
- Remove dust and dirt regularly from the bandsaw. Cleaning is best carried out with a fine brush or a cloth.
- Do not use caustic cleaning agents for cleaning plastic.
13. Ordering spare parts
Contact our After Sales Support on 1300 922 271 and quote the following data when ordering spare parts:
- Type of machine
• Article number of the machine
• Identification number of the machine - Spare part number of the part required
14. Disposal and recycling
The unit is supplied in packaging to prevent its being damaged in transit. This packaging is raw material and can therefore be reused or can be returned to the raw material system.
The unit and its accessories are made of various types of material, such as metal and plastic. Defective components must be disposed of as special waste. Ask your local council.
08/2012
43.080.28_11012
- INSTRUCTION MANUAL
- Band Saw
- What your 1 year warranty means
- Welcome Section
- Table of Contents
- General Safety Rules
- SAVE THESE INSTRUCTIONS
- Work area
- Electrical safety
- Personal safety
- Power tool use and care
- Service
- Recommendation
- Special Safety Rules
- IMPORTANT!
- Caution
- Wear ear-muffs.
- Wear a breathing mask.
- Wear safety goggles.
- Pull the power plug before beginning any repair or maintenance work!
- Layout (Figures 1/2)
- Items Supplied
- Important!
- Proper use
- Technical data
- Noise emission values
- Load factor:
- Keep the noise emissions and vibrations to a minimum.
- Residual risks
- Before putting the machine into operation
- Assembly
- Mounting the saw table (Fig. 1 - 5)
- Tensioning the blade (Fig. 1/6)
- Adjusting the blade (Fig. 1/2)
- Setting the blade guide (Fig. 7 - 10)
- Upper support bearing (30)
- Adjusting the lower support bearing (31)
- Adjusting the upper guide pins (28)
- Adjusting the lower guide pins (29)
- CAUTION! When the adjustments have been finished, the blade guard (34) must be closed again.
- Adjusting the upper blade guide (Fig.11/Item 11)
- Adjusting the machine table (Fig.12/Item 15) to 90°
- Blade selection
- Important: Never use warped or lacerated blades!
- Changing the blade (Fig.14)
- Changing the rubber tires on the blade pulleys
- Changing the table insert (Fig.16)
- Extractor sockets
- Control elements
- On/Off switch (Fig.17)
- Parallel stop (Fig.18)
- Operation
- Angular cuts (Fig.19)
- Freehanded cuts (Figure 21)
- Transport
- Maintenance
- Ordering spare parts
- Disposal and recycling
Brand : TAURUS
Model : BT-SB 200
Category : Saw