
MD18610 - Sewing machine Stirling - Free user manual and instructions
Find the device manual for free MD18610 Stirling in PDF.


| Product Type | Overlock Sewing Machine (Overlocker) |
| Brand | Stirling |
| Model | MD18610 |
| Voltage | AC 220–240 V ~ 50 Hz |
| Power Consumption | Total 105 W, Motor 90 W, Light 15 W |
| Number of Threads | 4 or 3 |
| Number of Needles | 2 or 1 |
| Sewing Speed | Up to 1300 rpm |
| Stitch Width | 7 mm (4 threads); 7 mm or 4 mm (3 threads) |
| Stitch Length | 1.0–5 mm |
| Presser Foot Height | 5 mm |
| Needle Type | 130/705H (sizes 75/11, 90/14, 100/16) |
| Dimensions (L x W x H) | Approx. 320 mm × 280 mm × 320 mm |
| Weight | Approx. 9 kg |
| Foot Control Type | HKT72C |
| Protection Class | II |
| Differential Feed | 0.7 to 2.0 (adjustable) |
| Cutting Width Adjustment | Yes, via knob |
| Safety Switch | Yes, stops operation when front cover is open |
| Waste Container | Yes, included |
| Included Accessories | Tweezers, screwdrivers, hex key, spare upper knife, spool caps, thread nets, dust cover, etc. |
| Cleaning | Soft dry cloth; use sewing machine oil for lubrication |
| Storage | Dry location; use supplied dust cover |
| Warranty | 12 months |
| Repairability | User-replaceable: needles and upper knife; other repairs by qualified service center only |
Frequently Asked Questions - MD18610 Stirling
User questions about MD18610 Stirling
0 question about this device. Answer the ones you know or ask your own.
Ask a new question about this device
Download the instructions for your Sewing machine in PDF format for free! Find your manual MD18610 - Stirling and take your electronic device back in hand. On this page are published all the documents necessary for the use of your device. MD18610 by Stirling.
USER MANUAL MD18610 Stirling
Information about this user manual 8
Key to symbols 8
Proper use 9
Declaration of conformity 9
Safety information 10
Keep electrical appliances away from children 10
Mains cord and mains connection 10
Never carry out repairs yourself 11
General information 11
Handling the appliance with care. 12
Cleaning and storage 13
Package contents 13
Before use 14
Accessories....14
Setting up the telescopic thread guide bar 15
Spool holder 15
Spool caps 15
Spool net 16
Connecting the foot control 16
Controlling the sewing speed 17
Safety switch 17
Fitting the waste container 17
Operation 18
Hand wheel 18
Front cover 18
Edge guide 18
Thread cutter 19
AFTER SALES SUPPORT
AUS 1300 884 987

australia@medion.com
MODEL: MD 18610 PRODUCT CODE: 709475 09/2022
3
Free arm 19
Threading the loopers 20
General information on threading 20
Threading the lower looper 21
Threading the upper looper 23
Threading the needles 24
Test run 26
Adjusting the thread tension 27
Adjusting the thread tension for the needle threads 28
Adjusting the thread tension for looper threads 28
Overview of machine settings 29
Changing the thread 31
Hand grip for carrying 31
Setting the stitch length 32
Setting the stitch length 32
Setting the cutting width 32
The correct cutting width 33
Reducing the cutting width 33
Increasing the cutting width 33
Replacing needles 34
Replacing the knife 35
Disengaging the upper knife 37
Converting to two-thread operation 38
Narrow and wide overlocking with three threads 39
Stitch finger 41
Blind hem, narrow edges or picot edges 42
Differential feed 43
How it works 43
Positive differential feed 44
Negative differential feed 44
Setting the differential feed 45
Setting the presser foot pressure 46
Sewing with cord/decorative yarn 47
Troubleshooting 48
Storage....49
Cleaning and lubrication 49
Disposal 51
Technical specifications 51
Privacy statement 52
Service information 53
Legal Notice 54

natural_image
Two horizontal grayscale color swatches with a central crosshair and horizontal line, no text or symbols present.

6
AFTER SALES SUPPORT

AUS 1300 884 987

australia@medion.com
MODEL: MD 18610 PRODUCT CODE: 709475 09/2022


STIRLING
Overlock Sewing Machine Warranty Details
REGISTER YOUR PURCHASE AT www.aldi.com.au/en/about-aldi/product-registration/TO KEEP UP-TO-DATE WITH IMPORTANT PRODUCT INFORMATION
The product is guaranteed to be free from defects in workmanship and parts for a period of 12 months from the date of purchase. Defects that occur within this warranty period, under normal use and care, will be repaired, replaced or refunded at our discretion. The benefits conferred by this warranty are in addition to all rights and remedies in respect of the product that the consumer has under the Competition and Consumer Act 2010 and similar state and territory laws.
Our goods come with guarantees that cannot be excluded under the Australian Consumer Law. You are entitled to a replacement or refund for a major failure and for compensation for any other reasonably foreseeable loss or damage. You are also entitled to have the goods repaired or replaced if the goods fail to be of acceptable quality and the failure does not amount to a major failure.

AFTER SALES SUPPORT

AUS 1300 884 987

australia@medion.com
MODEL: MD 18610 PRODUCT CODE: 709475 09/2022
7
Information about this user manual

Thank you for choosing our product. We hope you enjoy using it. Please read the safety instructions and the manual carefully before using the appliance for the first time. Note the warnings on the appliance and in the user manual.
Always keep the user manual close to hand. If you sell the appliance or give it away, please ensure that you also pass on this user manual. It is an essential component of the product.
Key to symbols
If a block of text is marked with one of the warning symbols listed below, the hazard described in that text must be avoided to prevent the potential consequences described there from occurring.

DANGER!
Warning: risk of fatal injury!

WARNING!
Warning: risk of possible fatal injury and/or serious irreversible injuries!

CAUTION!
Warning: risk of minor and/or moderate injuries!

NOTICE!
Follow the instructions to avoid property damage.

More detailed information about using the appliance

Take note of the information in the user manual.
8
AFTER SALES SUPPORT
AUS 1300 884 987

australia@medion.com
MODEL: MD 18610 PRODUCT CODE: 709475 09/2022

Protection class II
Protection class II electrical appliances are electrical appliances that have double and/or reinforced insulation throughout and do not have options to connect a protective earth conductor. The insulated enclosure of a protection class II electrical appliance can form the additional or reinforced insulation in part or in full.

Use indoors
Appliances with this symbol are only suitable for use indoors.
Proper use
Your appliance can be used in a range of ways:
The overlock sewing machine (overlocker) can be used to sew together and neaten the seams on light- to medium-weight fabric.
The fabric can be made of textile fibres, composite materials or lightweight leather.
- The appliance is only intended for private use and not for industrial/commercial use.
Please note that no liability will be accepted if the appliance is used for an improper purpose:
- Do not modify the appliance without our express agreement and do not use any accessories that have not been supplied or approved by us.
- Only use replacement parts and accessories supplied or approved by us.
- Observe all the information in this user manual, especially the safety information. Any other use is considered improper and can cause personal injury or property damage.
- Do not use the appliance in extreme environmental conditions.
Declaration of conformity
Medion AG hereby declares that the product conforms to all relevant Australian requirements.

AFTER SALES SUPPORT

AUS 1300 884 987

australia@medion.com
MODEL: MD 18610 PRODUCT CODE: 709475 09/2022
Safety information
Keep electrical appliances away from children
This appliance can be used by children aged 8 years and older and by people with reduced physical, sensory or mental capacity or with a lack of experience and/or knowledge but only with proper supervision or if they have been told how to use the appliance safely and have understood the risks involved if they use it improperly. Children must not be allowed to play with the appliance. Do not allow children to clean the appliance or perform maintenance on it unless they are aged 8 years and older and are properly supervised.
▶ Do not allow children under 8 years of age near the appliance and its power cord.

DANGER!
Choking and suffocation hazard!
Plastic packaging can be swallowed or used improperly, creating a risk of suffocation!
- Keep packaging material such as plastic film or plastic bags away from children.
Mains cord and mains connection
▶ Only connect the appliance to an easily accessible power point (220–240 V \~ 50 Hz) that is close to where you have set up the appliance. The power point must be easily accessible so that you can switch it off and unplug the appliance quickly if necessary.
When you unplug the appliance after switching off the power point, always hold the plug itself, not the cord.
▶ Unwind the cord fully during operation.
▶ Do not allow the cord to come into contact with any hot surfaces.
▶ Switch off the overlocker, switch off the power point and pull out the plug to carry out the following tasks: threading the needle, replacing the needle, adjusting the presser foot, cleaning and maintenance work, at the end of sewing work and when your work is interrupted.
Never carry out repairs yourself
▶ If the appliance or the power cord is damaged, turn off the power point immediately and pull out the plug.
▶ To avoid hazards, do not use the appliance if there is visible damage to the appliance or the mains power cord.

WARNING! Risk of electric shock!
Improper repair of the appliance can create the risk of electric shock.
▶ Under no circumstances should you attempt to repair the appliance yourself.
In the event of a fault, contact our Service Centre or another appropriate professional repair workshop to prevent hazards.
General information
The overlocker must not get wet – there is a risk of electric shock!
▶ Never leave the overlocker unattended when switched on.
▶ Do not use the machine outdoors.
The appliance may only be operated with the supplied type HKT72C foot control.
Light bulb cannot be replaced by user, please contact service centre for replacement.
Handling the appliance with care.
The overlocker has suction feet for stability. Nevertheless, ensure that the machine is placed on a stable, level work surface and that all four feet are touching the work surface.
When the appliance is in use, the air vents must remain free: do not allow any foreign objects (e.g. dust, pieces of thread etc.) to get into the openings.
▶ Never place anything on the foot pedal.
▶ Use only the supplied accessories. Needles are available from specialist retailers.
▶ Only use specialist sewing machine oil to lubricate the machine. Do not use any other liquids.
When sewing, ensure that you do not put your fingers under the needle holder.
▶ Take care when operating the moving parts of the machine, particularly the needle and knife. There is also a risk of injury even when the machine is not connected to the power supply.
▶ Do not use bent or blunt needles.
When sewing, do not hold the fabric tightly and do not pull on the fabric. This could cause the needle to break.
▶ Always leave the needle in the highest position when you have finished sewing.
When leaving the machine and before maintenance work, always switch off the machine and the power point and pull out the plug.
Cleaning and storage
Before cleaning, switch off the power point and pull out the plug. Use a soft, dry cloth for cleaning. Avoid the use of chemical solutions and cleaning products because these may damage the appliance surface and/or the labels on it.
When storing the overlocker, always cover it with the supplied cover to protect the machine from dust.
Package contents
Please check your purchase to ensure that all items are included. If anything is missing, please contact the customer service (see 'Service information' on page 53).
• Overlock sewing machine
- Foot control, type HKT72C
- User manual
- Accessories and accessory bag (overview of contents on next page)

DANGER!
Choking and suffocation hazard!
Plastic packaging can be swallowed or used improperly, creating a risk of suffocation!
- Keep packaging material such as plastic film or plastic bags away from children.
Before use
Accessories\*

34 Two-thread looper* 42 Oil bottle (empty)
35 Stitch finger* 43 Tweezers
36 Needle box* 44 Spool holder (4 ×) (Type 130/705H No. 75 - 100)
37 Cord guide 45 Spool disc (4 ×)
38 Screwdriver (small)* 46 Accessories bag
39 Screwdriver (large) 47 Dust cover
40 Hexagon wrench key 48 Brush*
41 Spare upper cutter 49 Thread net (4 ×)
Accessories not shown
- Thread spool (5 ×, 4 × pre-mounted)
- Thread spool caps (4 × pre-mounted)
- Waste catcher/removable sewing table
Setting up the telescopic thread guide bar
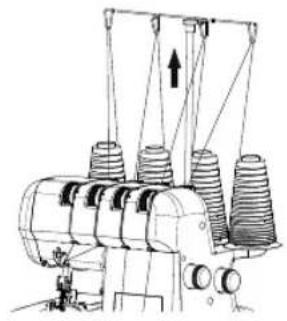
- Pull the telescopic thread guide bar (5) all the way out before threading.
- Turn the telescopic thread guide bar so that the thread guides are directly above the spool pins (6).
Spool holder
Both industrial and domestic spools can be used with this machine.
When using industrial spools with a large diameter, place the spool holder with the wide end upwards. When using spools with smaller diameters, place the spool holder with the narrow end upwards.
Use the spool discs in all cases to guarantee the stability of the spool.
natural_image
Technical line drawing of an electrical substation with insulators and wiring (no text or symbols)
Spool caps
When using non-industrial spools, remove the spool holder and mount the supplied spool caps onto the spools.
Use the spool discs in all cases to guarantee the stability of the spool.
Remove the protective film from the spool discs to ensure that the thread unwinds evenly.

natural_image
Simple line drawing of a cylindrical object with a flange and central port, mounted on a base (no text or symbols)
natural_image
Diagram showing a cylindrical device with a downward arrow and a separate container with a circular pattern (no text or symbols)Spool net
Polyester or coarse nylon threads work loose when unwinding from the spool. Therefore, use the supplied spool net for such thread to ensure the thread feeds uniformly.
– Pull the net over the spool from above.
- Pull the net over the spool to the end and turn up the excess.
Connecting the foot control
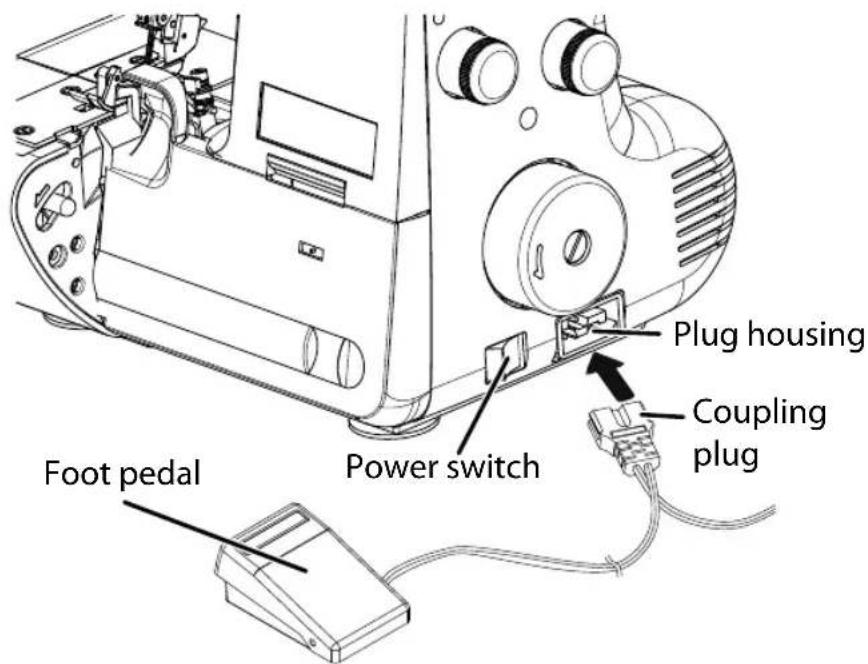
Insert the plug for the supplied foot control into the socket (10) on the machine and then plug the mains plug into the power point and switch the power point on.
The On/Off switch (11) switches on both the machine and the sewing light.
Use only the supplied foot control.
After finishing work or before maintenance work, always switch off the machine and the power point and pull out the plug.
Controlling the sewing speed
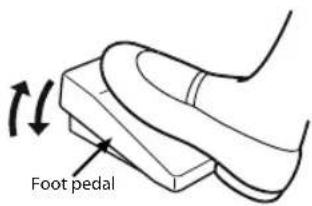
The sewing speed is controlled using the foot control. This means that the sewing speed can be changed by exerting more or less pressure on the foot control.
Safety switch
This machine is equipped with a micro safety switch. Operation shuts off when the front cover is opened.
Close both the front cover (12) and the free arm (13) before you start to sew.
Fitting the waste container
The waste container catches scraps as you sew to keep your workspace tidy.
Insert hook A into the upper of the two openings D, then put hook B into slot C.
After you have finished sewing, detach the waste container by first lifting hook B out of slot C and then pulling the whole waste container away to the right.
For compact storage of the waste container, you can fit it on the machine by inserting hook A into the lower of the two openings D and then putting hook E into slot C.

AFTER SALES SUPPORT

AUS 1300 884 987

www.medion.com.au
MODEL: MD 18610 PRODUCT CODE: 709475 09/2022
Operation
Hand wheel
Always turn the hand wheel (9) towards you, not away from you.

natural_image
Line drawing of a handheld electronic device with a hand operating it (no text or symbols)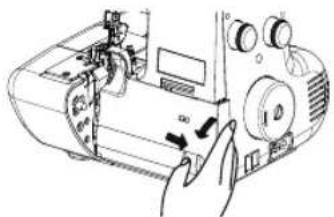
natural_image
Technical line drawing of a sewing machine with no visible text or symbolsFront cover
To open the front cover (12), push the notch as far as possible to the right and then pull the front cover towards you.
Edge guide
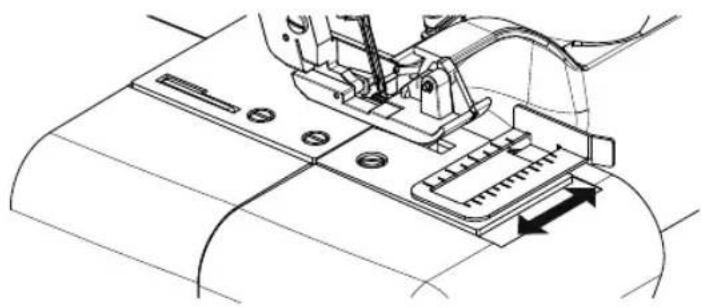
When the edge guide (16) is used, the fabric is trimmed and sewn at a consistent distance from the fabric edge.
- Adjust the width by pulling out the edge guide or pushing it in.
natural_image
Technical line drawing of a sewing machine component with no visible text or symbolsThread cutter
Cut the threads using the thread cutter (33) on the side of the sewing machine or using scissors. Leave approx. 15 cm of thread hanging behind the eye of the needle.

natural_image
Illustration of hands operating a sewing machine with arrows indicating process direction (no text or symbols)Free arm
The free arm (13) must be opened in order to thread the machine.
- Now press the release lever (15) forwards and swing the free arm to the left.

natural_image
Line drawing of a sewing machine with hands operating the mechanism (no text or symbols present)Threading the loopers
General information on threading
Threading is done in the following order:
- STEP 1 lower looper purple
- STEP 2 upper looper blue
- STEP 3 right needle orange
- STEP 4 left needle green
Correct threading is essential to ensure that stitching is even and to prevent the thread from breaking.
A practical guide to threading is located behind the front cover (12).
The thread guides are also marked in different colours.
There is a pair of tweezers in the accessory box to help with threading.

If it is necessary to thread one of the looper threads again later (e.g. if the thread breaks), first unthread the needles to prevent tangling.
Threading the lower looper
- Open the front cover and the free arm (13).
- Turn the hand wheel (9) towards you until the looper (28) is in the most convenient position for threading.

- Pass the thread through the eye on the telescopic thread guide bar (5). (Fig. A)
- Now pass the thread first through the corresponding thread guide. (Fig. B)
- Place the thread between the two discs on the thread tensioner (4). (Fig. C)

The thread must be correctly positioned between the two discs on the thread tensioner.
- Place the thread in the lower thread guide (26).
From this point, follow the thread guide diagram in the machine. (Fig. D)
-
In order to thread the rear eye of the looper, turn the hand wheel until the point when the rear part of the looper appears on the left-hand side of the mechanism. (Fig. E)
-
Pull around 10 cm of thread out of the looper eyes.
Threading the upper looper
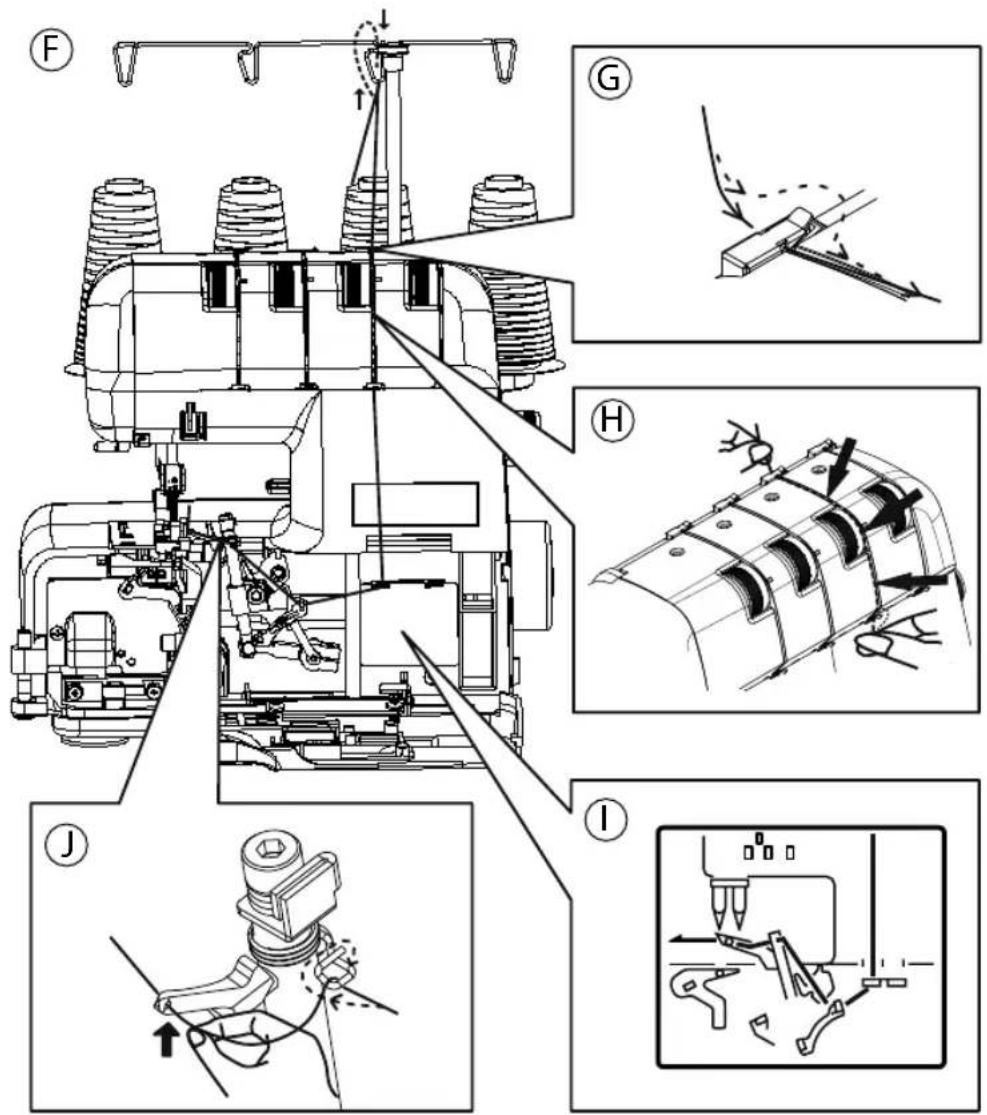
- Pass the thread through the eye on the telescopic thread guide bar and the corresponding thread guide. (Fig. F)
- Now pass the thread first through the corresponding thread guide. (Fig. G)
- Place the thread between the two discs on the thread tensioner (3). (Fig. H)
- Place the thread in the lower thread guide. From this point, follow the thread guide diagram in the machine. (Fig. I)
-
To thread the loopers, turn the hand wheel towards you until the looper is in a convenient position. (Fig. J)
-
Pull around 10 cm of thread out of the looper eyes.
Threading the needles

- Turn the hand wheel towards you until the needles (22) are at their highest position.
- Pass the thread through the eye on the telescopic thread guide bar (5). (Fig. K)
-
Now pass the thread through the corresponding thread guide. (Fig. L)
-
Place the thread between the two discs on the thread tensioner (1) & (2). (Fig. M)
The thread must be correctly positioned between the two discs on the thread tensioner.
- Pass the threads through the respective colour-coded thread guides (19). (Fig. N)
- Pass the thread through the thread guide (18) as illustrated. Then pass the respective thread behind the thread guide of the needle holder as illustrated and then from front to back through the corresponding needle eye. (Fig. O)
- Pull around 10 cm of thread out through the eyes of the needles.
- Raise the presser foot (23) and push the threads under it; then lower the presser foot again.
- After threading, close the free arm and the front cover.


natural_image
Line drawing of a sewing machine with hands operating it (no text or symbols)Test run
If the machine is being threaded for the first time, or if it has been re-threaded after the thread breaks during sewing, proceed as follows:
- Holding the ends of the threads between your left fingertips, turn the hand wheel (9) slowly towards you for two or three turns and check whether the threads can be pulled.
- Then carefully sew a few stitches without the fabric to check whether the threads are tangled.

natural_image
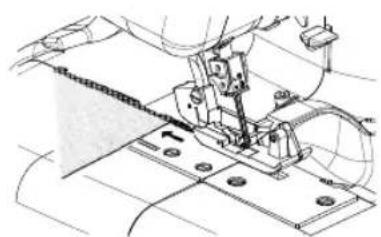
Technical line drawing of a sewing machine needle and base plate (no text or symbols)- Place the fabric for the test run under the presser foot (23), lower the presser foot and begin sewing slowly. The fabric is fed through automatically; only guide the fabric gently.

natural_image
Technical line drawing of a sewing machine needle and fabric (no text or symbols)- When you have finished, continue sewing to form an approx. 5–6 cm long thread chain from the end of the fabric. Cut the threads using the thread cutter (33) on the side of the sewing machine or using scissors.
Adjusting the thread tension
The thread tension required changes depending on the type and thickness of the thread and fabric.
- Examine the seams and adjust the thread tension on the machine accordingly.
Thread tension:
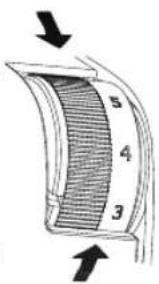
- Turn the thread tension selector (1) - (4) to a lower number: the tension is reduced.
- Turn the thread tension selector (1) - (4) to a higher number: the tension is increased.
Correct thread tension

Increase thread tension
Reduce thread tension
Adjusting the thread tension for the needle threads
Thread on the left needle is too loose.
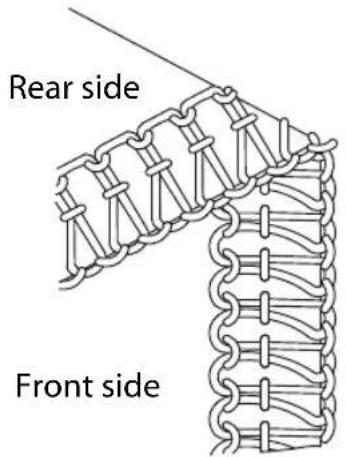
Increase needle thread tension on the left.
Thread on the right needle is too loose.

Increase needle thread tension on the right.
Adjusting the thread tension for looper threads
Lower looper thread is too tight and/or upper looper thread is too loose.

Reduce lower looper thread tension and/or increase upper looper thread tension.
Upper looper thread is too tight and/or lower looper thread is too loose.

Reduce upper looper thread tension and/or increase lower looper thread tension.
Overview of machine settings
The most appropriate thread tension setting for one fabric may not be correct for another fabric.
The thread tension required depends on the stiffness and thickness of the fabric as well as the thread type and thickness.
The following table provides guidance for finding the correct thread tension:
| Fabrics Thread Needles Stitch length | Thread tension | |||
| light cotton & linen: organza; batiste; gingham | cotton no. 100 | for general sewing: type: 130/705 H no. 90 | 2.0–3.5 mm standard: 2.5 mm | A: 2–4B: 2–4C: 2–4D: 2–4 |
| heavy cotton & linen: Oxford, denim, cotton gabardine | cotton no. 60 polyester no. 50–60 | for light fabrics: type: 130/705 H no. 75 | 2.5–4.0 mm standard: 3.0 mm | A: 5–7B: 5–7C: 3–5D: 3–5 |
| light wool: worsteds, wool, poplin | cotton no. 60 polyester no. 80 | 2.0–3.5 mm standard: 2.5 mm | A: 2–4B: 2–4C: 2–4D: 2–4 | |
| serge, flannel, gabardine | cotton no. 60 polyester no. 60–80 | 2.0–3.5 mm standard: 2.5 mm | A: 3–5B: 3–5C: 3–5D: 3–5 | |
| heavy wool: velour, camel-hair, Astrakhan | cotton no. 60 polyester no. 50-60 | for general sewing: type: 130/705 H no. 90 for light fabrics: type: 130/705 H no. 75 | 2.5-4.0 mm standard: 3.0 mm | A: 5-7 B: 5-7 C: 3-5 D: 3-5 |
| light synthetics: crepe de chine, voile, georgette, satin | cotton no. 80-120 polyester no. 80-100 | 2.0-3.5 mm standard: 2.5 mm | A: 2-4 B: 2-4 C: 2-4 D: 2-4 | |
| heavy synthetics: taffeta, twill, denim | cotton no. 60 polyester no. 60 | for general sewing: type: 130/705 H no. 90 for light fabrics: type: 130/705 H no. 75 | 2.5-4.0 mm standard: 3.0 mm | A: 5-7 B: 5-7 C: 3-5 D: 3-5 |
| tricot fabric cotton | no. 60-80 polyester no. 60-80 | 2.0-3.5 mm standard: 2.5 mm | A: 3-5 B: 3-5 C: 3-5 D: 3-5 | |
| jersey cotton | no. 60 polyester no. 50-60 | 2.0-3.5 mm standard: 2.5 mm | A: 3-5 B: 3-5 C: 3-5 D: 3-5 | |
| woollen fabric textured thread polyester no. 50-60 | 2.0-3.5 mm standard: 2.5 mm | A: 3-5 B: 3-5 C: 3-5 D: 3-5 | ||
Changing the thread
The following method makes changing the thread very easy, eliminating the need to completely re-thread.
- Cut the thread above the spindle and knot the ends of the old and new thread together using a reef knot, as shown in the illustration.
- Raise the presser foot (23).
- Move the needles to their lowest position by turning the hand wheel (9) towards you. Pull cautiously on the end of the thread until the joining knots have passed through the needle eye and looper eyes.

natural_image
Technical line drawing of a sewing machine with spools and thread connections, showing mechanical assembly and wire connection diagrams (no text or symbols)Hand grip for carrying
The hand grip for carrying on the top of the back side of the appliance makes your machine easy to transport.

natural_image
Line drawing of a hand using a sponge to clean or store items (no text or symbols)Stitch length dial

natural_image
Technical line drawing of mechanical components including gears and pulleys (no text or symbols)Setting the stitch length
Turn the stitch length dial (7) until the desired length is shown. The higher the number, the longer the stitch.
The stitch length can be set from 1 to 5 mm.
Almost all overlocking tasks are carried out with a stitch length of 2.5 to 3.5 mm.
Setting the stitch length
| Stitches Stitch length | |
| Normal seams | 2.0–4.5 mm(Default setting:3.0 mm) |
| Narrow bindings 1.0–2.0 mm | |
| Rolled hems 1.0–2.0 mm | |
| Picot edge 3.0–4.0 mm | |
Setting the cutting width
The appropriate cutting width varies from fabric to fabric. Examine the seams in each case and adjust the cutting width as follows:
- Turn the cutting width adjustment knob (14) to the desired setting.

The correct cutting width

Reducing the cutting width
Choose a narrower cutting width if the fabric edges curl when sewing.
- To do this, turn the cutting width adjustment knob clockwise.
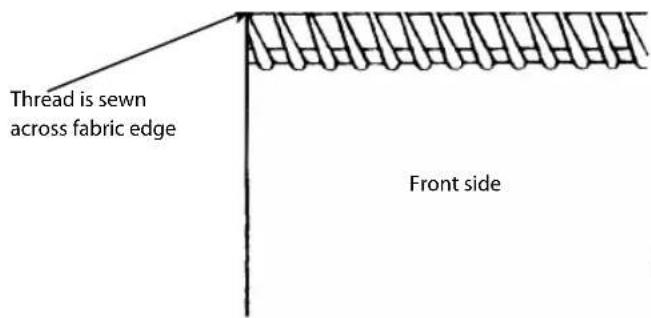
Increasing the cutting width
Select an increased cutting width if the thread is sewn over the edge of the fabric.
- To do this, turn the cutting width adjustment knob anticlockwise.

Replacing needles

This machine is supplied with type 130/705H needles (for domestic machines)

NOTICE! Risk of damage!
Bent or blunt needles can cause damage to the machine and sewing fabric.
▶ Switch off the machine.
▶ Replace the defective needle.
- Turn the hand wheel (9) towards you until the needles (22) are in the highest position.
- Loosen the clamp screw from the needle using the supplied small screwdriver from the accessory compartment and remove the needle: upper screw for the left needle and lower screw for the right needle.
- Push the new needles into the needle holder with the flat side facing backwards. When doing so, ensure that they are pushed in as far as possible.
- Tighten the needle clamp screw again.
If the needles have been inserted correctly, the left needle is positioned slightly higher than the right. If the needles have not been inserted correctly, stitches will occasionally be missed.
Replacing the knife
Switch off the machine and the power point and pull out the plug before replacing the knife.
The lower knife is made of special material and does not need to be replaced.
This is how to replace the upper knife when it becomes blunt:
- Turn the hand wheel (9) towards you until the upper knife (32) is at its lowest position.
- Open the front cover (12) and the free arm (13).
- On the upper side of the knife, push the mechanism down completely to reach a stable position for the distance adjustment.
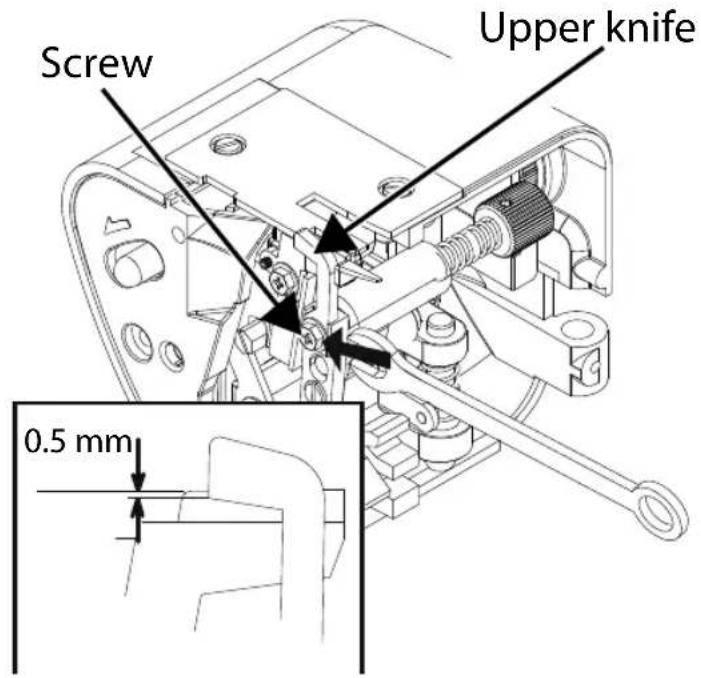
- Use the screwdriver from the accessory box to loosen the screw on the knife mounting (30) and remove the upper knife.
-
Insert a new upper knife and tighten the screw of the mounting slightly.
-
Now position the upper knife in such a way that its blade extends beyond the cover of the cutting edge of the lower knife by 0.5–1.0 mm (see illustration). Close the free arm before checking the gap, and open it again to read the value correctly.
-
Now tighten the screw of the mounting of the upper knife securely and close the free arm and the front cover.
Disengaging the upper knife
If you would like to sew without simultaneously cutting the edges, you can disengage the upper knife.
NOTICE!
Risk of damage!
If the fabric edge is too wide, this can damage the upper looper and the needles.

▶ Make sure that the edge of the fabric is not wider than the seam width you have set.
- Switch off the machine and the power point and pull out the plug.
- Open the front cover (12) and the free arm (13).
- Use one hand to hold the free arm in place, and turn the dial for the knife mounting (30) to the left.
- Then turn the knife mounting forwards until the knife has been rotated by 180irc (see illustration).

Converting to two-thread operation
You can also use your machine solely as a two-thread machine. To do so, use the two-thread looper and the left needle only.
- Switch off the machine and the power point and pull out the plug.
- Open the front cover (12) and the free arm (13).
- Remove the right needle and the threads for that needle and for the upper looper (see also 'Replacing needles' on page 34).
- Take the two-thread converter out of the accessory compartment (27) of the front cover.
- Insert the two-thread converter into the upper looper (25). (see Figure 1)
- To do so, insert the hook on the rear end of the converter into the slot of the upper looper. (see Figure Point A).
- Now insert the hook on the front end of the converter into the eye of the upper looper. (see Figure Point B).
- The converter should now be positioned directly against the upper looper. (see Figure 2)


natural_image
Technical line drawing of a mechanical clamp or bracket assembly (no text or symbols)Narrow and wide overlocking with three threads
This machine can be converted from four to three threads when overlocking.
- Remove either the left or right needle and the corresponding thread (see also 'Replacing needles' on page 34).

natural_image
Illustration of three different types of electrical probes with directional arrows indicating movement (no text or symbols present)The machine is now ready to overlock with three threads.
When using only the right needle the stitch width is 4 mm.

When using only the left needle the stitch width is 6 mm.

Stitch finger
When sewing light fabric with three threads, loops may form on the seams. In that case, change over the stitch finger (35).
- Switch off the machine and the power point and pull out the plug.
- Open the front cover (12) and the free arm (13).
- Release the stitch finger A with the supplied screwdriver and pull it out.
- Take the second stitch finger B out of the accessory box in the front cover.
- Push the stitch finger all the way in.

natural_image
Technical line drawing of a mechanical assembly with directional arrows indicating motion (no text or symbols)
natural_image
Technical line drawing of a mechanical assembly with labeled components (no text or symbols)Blind hem, narrow edges or picot edges
For thin fabrics such as crepe de chine, georgette or silk, rolled hems, narrow hems or picot edges are suitable for creating a clean seam.
Due to the fine nature of these hems, they are not suited to firm or heavy fabrics.
Proceed as follows to set the machine up:
- Raise the presser foot (23).
- Open the front cover (12) and the free arm (13).
- Remove the stitch finger (see 'Stitch finger' on page 41).
- Remove the left needle and the corresponding thread.
- Set up the machine in accordance with the table.

If required, set the stitch length and cutting width.
| Edge Thread | tension Stitch length | Cutting width | |
| Rolled hem | Needle: 4upper looper: 4lower looper 4 | R 4–6 | |
| Narrow hem | Needle: 4upper looper: 4lower looper 0 | 2–2.5 4 | |
| Picot edge | Needle: 4upper looper: 4lower looper 4 | P 4–6 |
Differential feed
The differential feed prevents wavy seams on knit fabrics and stops layers of fabric from slipping. It also prevents lightweight fabrics from puckering.
How it works
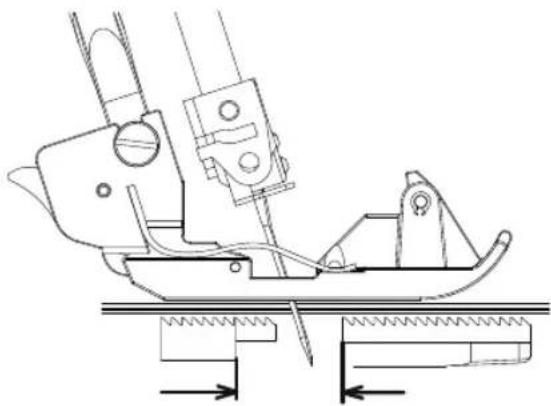
The machine has two sets of feed dogs, one front set (A) and one rear set (B). Both of these sets move independently. Due to the feed motion, both sets of feed dogs can move at different speeds.
The feed can be set from 0.7 (negative feed) to 2.0 (positive feed).

Positive differential feed
With positive differential feed, the front feed dogs (A) move further than the rear feed dogs (B). This 'accumulates' fabric under the presser foot, preventing the fabric from becoming wavy.

natural_image
Technical line drawing of a mechanical assembly with no visible text or symbolsNegative differential feed
With negative differential feed, the front feed dogs (A) do not move as far as the rear feed dogs (B). This stretches fabric under the presser foot, counteracting undesirable puckering of the fabric.
natural_image
Technical line drawing of a sewing machine tool (no text or symbols present)Setting the differential feed
The differential feed is set by turning the differential feed control (8). The feed can also be set while sewing.
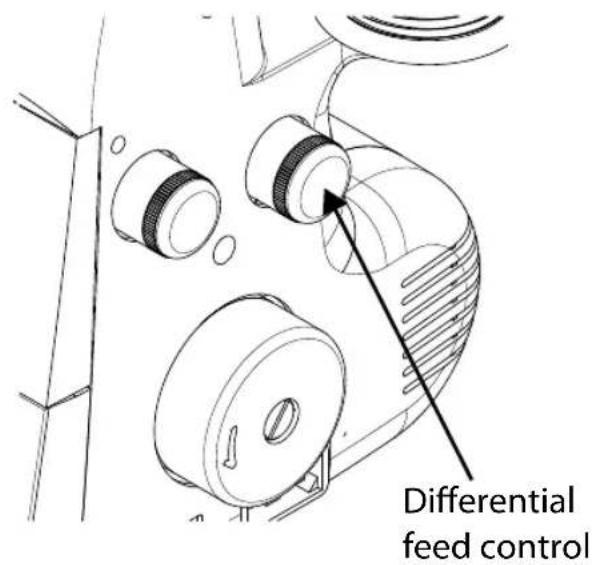
Use the following table to select a setting:
| Application Feed type Setting | ||
| Non-wavy seams, gathering | positive differential feed | 1–2 |
| No differential feed | Neutral feed | 1 |
| pucker-free seams | negative differential feed | 0.7–1 |
Setting the presser foot pressure
The factory-set presser foot pressure is correct for all common sewing tasks and does not need to be adjusted.
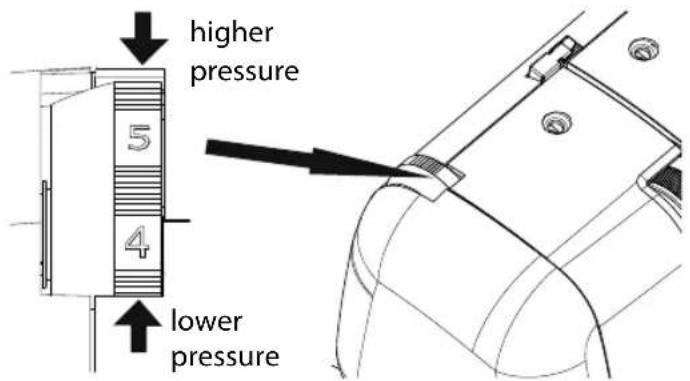
If the pressure of the presser foot needs adjusting despite this, you can regulate it using the dial on the rear of the front cover for regulating presser foot pressure.
- Turn the dial (20) to a higher number to increase the pressure or to a lower value to reduce the pressure.
Sewing with cord/ decorative yarn
Corded seams are used for strength when sewing knit fabric shoulder, sleeve and side seams.
Decorative use of knitting yarn in a contrasting colour can also add an attractive feature to the finished garment.
The machine is equipped with a sewing foot that enables the cord or decorative yarn to be fed to the right or the left of the safety stitch.
To do this, proceed as follows:
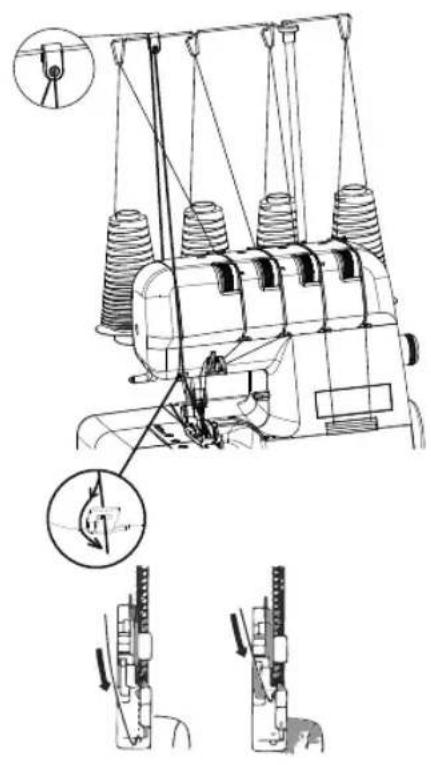
- Place the filler cord, such as crochet yarn, gimp, wool, knitting wool or shirring elastic, behind the spool pins (6).
- Pass the thread through the eye on the telescopic thread guide bar (5).
- Pull the cord through the thread guides (18) and then through the thread guide for the left needle.
- Pass the cord either through the front or rear slot on the presser foot (23) (depending on the sewing method) and lay it under and to the rear of the presser foot.
- Insert the fabric as usual. Sew slowly and check whether the cord is being fed in properly. Then increase your sewing speed.
- When sewing shoulders together or sewing on sleeves, pass the cord through the front slot on the presser foot.
When doing so, ensure that it remains between the right and left needle threads when passing through the front slot on the presser foot.
- To close the side seams, pass the cord through the rear slot on the presser foot, ensuring that it is positioned to the right of the needle thread.
For decorative effects, use a contrasting colour of yarn, which you can thread either through the front or rear slot.
natural_image
Technical line drawing of a sewing machine with three spools and mechanical components, showing structural assembly (no text or symbols)Troubleshooting
Please read this section before contacting our Service Centre.
| Problem Cause | Remedy Page | ||
| Needles break Needles are bent, blunt or the tip is damaged | Insert a new needle 34 | ||
| Needles are inserted incorrectly | Insert the needles correctly in the needle holder | 34 | |
| You pulled too hard on the fabric | Guide the fabric gently using both hands | ||
| The thread breaks | The machine has not been threaded correctly | Thread the machine correctly | 20 |
| Thread tension is too high | Adjust the thread tension | 27 | |
| Needles are inserted incorrectly | Insert the needles correctly in the needle holder | 34 | |
| Stitches are missed | Needles are bent, blunt or the tip is damaged | Insert a new needle 34 | |
| Needles are inserted incorrectly | Insert the needles correctly in the needle holder | 34 | |
| Stitches are missed | The machine has not been threaded correctly | Thread the machine again | 20 |
| Incorrect needles inserted | Use the correct needles (type 130/705H) | 34 | |
| Stitching is uneven | Thread tension is incorrect | Adjust the thread tension | 27 |
| Thread jams Check the route of the individual threads | 20 | ||
| Seams pucker Thread tension is too high | Adjust the thread tension | 27 | |
| The machine has not been threaded correctly | Thread the machine correctly | 20 | |
| Thread is stuck Check the route of the individual threads | route of the individual threads | 20 | |
| Fabric feed has not been adjusted | Set the feed to 0.7 45 | ||
| Fabric is not cut cleanly | Upper knife is blunt or inserted incorrectly | Replace the knife or insert it correctly | 35 |
| The edge of the fabric puckers | Too much fabric in one stitch | Adjust the cutting width | 32 |
| The light is not working | Light bulb is defective Contact our Service Centre. | ||
Storage
Store the sewing machine in a dry location to prevent rust from forming on the metal mechanical parts.
Always use the supplied cover to prevent dust from getting into the sewing machine.
Cleaning and lubrication
To ensure your machine works properly, you must clean the mechanism from time to time using the brush from the accessory box and oil the relevant points.

Use only high-quality sewing machine oil to oil this sewing machine. You can purchase this from specialist retailers.
Use a dry, soft cloth to clean the exterior housing. Do not use chemical solvents or cleaning products because these may damage the appliance's surface and/or labelling.
This machine requires only a little oil because the main components are made of a special material.
- Disconnect the machine from the power supply before opening the machine.
-
Open the front cover (12) and the free arm (13). Remove the accumulated dust and lint using the lint brush (48) provided as an accessory.
-
Apply a couple of drops of oil to the marked points. Use only high-quality sewing machine oil.
- Close the free arm and the front cover.
- For test purposes, now sew with a piece of test fabric to check that the machine is working correctly. The excess oil is eliminated directly without damaging your actual sewing.

Disposal
For more information on recycling visit arl.org.au

PACKAGING
Your overlocker has been packaged to protect it from damage in transit.
Packaging materials are raw materials and can therefore be reused or recycled.
DEVICE
All old appliances marked with the symbol illustrated must not be disposed of in normal household waste. If you can no longer use your electrical device, dispose of it in accordance with the legal provisions applicable in your country. This involves separating the materials in the device for the purpose of recycling and minimising the environmental impact.
Take old devices to a collection point for electrical scrap or a recycling centre. Contact your local waste disposal company or your local authority for more information on this subject.
Technical specifications
Voltage: AC 220–240 V \~ 50 Hz
Power consumption: Total output: 105 W
Motor: 90 W
Light: 15 W (Incandescent)
Foot control: type: HKT72C
Rated voltage:
220-240V \~ 50 Hz
Protection class II

Number of threads: 4 or 3
Number of needles: 2 or 1
Sewing speed: up to 1300 rpm
Stitch width: 7 mm with 4 threads
7 mm or 4 mm with 3 threads
Stitch length: 1.0–5 mm
AFTER SALES SUPPORT

AUS 1300 884 987

australia@medion.com
MODEL: MD 18610 PRODUCT CODE: 709475 09/2022
51
Presser foot height: 5 mm
Needle: 130/705H No. 75/11
130/705H No. 90/14
130/705H No. 100/16
Dimensions (L x W x H): approx. 320 mm × 280 mm × 320 mm
Weight: approx. 9 kg
Privacy statement
Dear customer,
We wish to inform you that we, MEDION AG, Am Zehnthof 77, 45307 Essen, Germany process your personal data as a data controller.
For matters regarding data protection, we are supported by our company data protection officer who can be contacted at MEDION AG, Datenschutz, Am Zehnthof 77, D – 45307 Essen; datenschutz@medion.com. We process your data for the purpose of warranty processing and associated processes (e.g. repairs) and therefore rely on processing your data for the sales contract concluded with us.
Your data will be provided to repairers contracted to us for the purpose of warranty processing and associated processes. We generally store your personal data for a period of three years in order to fulfil your legal warranty rights.
You have the right to be informed of the personal data concerned as well as the right to rectification, deletion, restriction of processing, the right to object to processing, as well as the right to data portability.
In case of access and cancellation rights, restrictions apply according to S 34 and S 35 of BDSG (Federal Data Protection Act) (Art. 23 GDPR). In addition, there is a right of appeal to a competent data protection supervisory authority (Article 77 GDPR in conjunction with S 19 BDSG). The state official for data protection and freedom of information for MEDION AG is Nordrhein Westfalen, P box 200444, 40212 Düsseldorf, Germany. www.ldi.nrw.de.
The processing of your data is necessary for warranty processing: it is not possible to process the warranty without the provision of the required data.
Service information
Please contact our Customer Service team if your device ever stops working the way you want or expect it to. There are several ways for you to contact us:
- In our Service Community, you can meet other users, as well as our staff, and you can exchange your experiences and pass on your knowledge there. You will find our Service Community at community.medion.com.
• Alternatively, use our contact form at www.medion.com/contact. - You can also contact our Service team via our hotline or by post.
| Opening times Hotline number | |
| Mon – Fri:08:30AM to 06:00PM EST | 1 1300 884 987 |
| Service address | |
| MEDION Australia Pty Ltd.Chatswood, NSW 2067Australia | |

You can download this and many other sets of operating instructions from our service portal at www.medion.com/au/contact.php.
You will also find drivers and other software for a wide range of devices there.
You can also scan the QR code on the side of the screen, to download the operating instructions onto your mobile device from the service portal.
Legal Notice
Copyright © 2022
Date: 8. February 2022
All rights reserved.
Version: 2.0
These operating instructions are protected by copyright.
Mechanical, electronic and any other forms of reproduction are prohibited without the written permission of the manufacturer.
Copyright is owned by the company:
MEDION AG
Am Zehnthof 77
45307 Essen
Germany
Please note that you cannot use the address above for returns. Please always contact our Customer Service team first.
54
AFTER SALES SUPPORT

AUS 1300 884 987

australia@medion.com
MODEL: MD 18610 PRODUCT CODE: 709475 09/2022


STIRLING
Overlock Sewing Machine
Repair and Refurbished Goods or Parts Notice
REGISTER YOUR PURCHASE AT www.aldi.com.au/en/about-aldi/product-registration/TO KEEP UP-TO-DATE WITH IMPORTANT PRODUCT INFORMATION
Unfortunately, from time to time, faulty products are manufactured which need to be returned to the Supplier for repair.
Please be aware that if your product is capable of retaining user-generated data (such as files stored on a computer hard drive, telephone numbers stored on a mobile telephone, songs stored on a portable media player, games saved on a games console or files stored on a USB memory stick) during the process of repair, some or all of your stored data may be lost.
We recommend you save this data elsewhere prior to sending the product for repair.
You should also be aware that rather than repairing goods, we may replace them with refurbished goods of the same type of use refurbished parts in the repair process.
Please be assured though, refurbished parts or replacements are only used where they meet ALDI's stringent quality specifications.
If at any time you feel your repair is being handled unsatisfactorily, you may escalate your complaint. Please telephone us on 1300 884 987 or write to us at:
MEDION Australia Pty Ltd
Chatswood, NSW 2067; Australia
Hotline: 1300 884 987
(Opening hours: Mon - Fri 08:30AM to 06:00PM EST)
Internet www.medion.com.au;
E-mail Support australia@medion.com

AFTER SALES SUPPORT

AUS 1300 884 987

australia@medion.com
MODEL: MD 18610 PRODUCT CODE: 709475 09/2022

natural_image
Two horizontal grayscale color swatches with a central crosshair and horizontal line, no text or symbols present.

56
AFTER SALES SUPPORT

AUS 1300 884 987

australia@medion.com
MODEL: MD 18610 PRODUCT CODE: 709475 09/2022

- STIRLING
- Overlock Sewing Machine Warranty Details
- Information about this user manual
- Key to symbols
- DANGER!
- WARNING!
- CAUTION!
- NOTICE!
- Protection class II
- Use indoors
- Proper use
- Declaration of conformity
- Safety information
- Keep electrical appliances away from children
- Choking and suffocation hazard!
- Mains cord and mains connection
- Never carry out repairs yourself
- WARNING! Risk of electric shock!
- General information
- Handling the appliance with care.
- Cleaning and storage
- Package contents
- Before use
- Accessories\*
- Accessories not shown
- Setting up the telescopic thread guide bar
- Spool holder
- Spool caps
- Spool net
- Connecting the foot control
- Controlling the sewing speed
- Safety switch
- Fitting the waste container
- Operation
- Hand wheel
- Front cover
- Edge guide
- Thread cutter
- Free arm
- Threading the loopers
- General information on threading
- Threading the lower looper
- The thread must be correctly positioned between the two discs on the thread tensioner.
- Test run
- Adjusting the thread tension
- Adjusting the thread tension for the needle threads
- Adjusting the thread tension for looper threads
- Overview of machine settings
- Changing the thread
- Hand grip for carrying
- Setting the stitch length
- Setting the cutting width
- Reducing the cutting width
- Increasing the cutting width
- Replacing needles
- NOTICE! Risk of damage!
- Replacing the knife
- Disengaging the upper knife
- Risk of damage!
- Converting to two-thread operation
- Narrow and wide overlocking with three threads
- Stitch finger
- Blind hem, narrow edges or picot edges
- Differential feed
- How it works
- Positive differential feed
- Negative differential feed
- Setting the differential feed
- Setting the presser foot pressure
- Sewing with cord/ decorative yarn
- Troubleshooting
- Storage
- Cleaning and lubrication
- Disposal
- PACKAGING
- DEVICE
- Technical specifications
- Privacy statement
- Service information
- Legal Notice
- MEDION AG
- Overlock Sewing Machine
- Repair and Refurbished Goods or Parts Notice
Brand : Stirling
Model : MD18610
Category : Sewing machine