
ClimaVision 7C-HS-C2W-X - Thermostat CARRIER - Free user manual and instructions
Find the device manual for free ClimaVision 7C-HS-C2W-X CARRIER in PDF.


| Product Type | Thermostat |
| Brand | Carrier |
| Model | ClimaVision 7C-HS-C2W-X |
| Display | Color touchscreen |
| Power Source | 24VAC with battery backup |
| Connectivity | Wi-Fi 802.11 b/g/n, Bluetooth |
| Compatibility | Most single-stage, multi-stage, heat pump systems |
| Functions | Programmable scheduling, remote control, geofencing, energy reports |
| Dimensions (WxHxD) | 4.1 x 4.1 x 1.0 inches |
| Weight | 0.5 lb |
| Maintenance | Clean with dry, soft cloth; do not use liquids or sprays |
| Safety Certifications | UL, CSA, FCC |
| Battery Type | CR2032 coin cell (backup) |
| Warranty | 1 year limited |
| Spare Parts Availability | Not user-serviceable; contact Carrier support |
Frequently Asked Questions - ClimaVision 7C-HS-C2W-X CARRIER
User questions about ClimaVision 7C-HS-C2W-X CARRIER
0 question about this device. Answer the ones you know or ask your own.
Ask a new question about this device
Download the instructions for your Thermostat in PDF format for free! Find your manual ClimaVision 7C-HS-C2W-X - CARRIER and take your electronic device back in hand. On this page are published all the documents necessary for the use of your device. ClimaVision 7C-HS-C2W-X by CARRIER.
USER MANUAL ClimaVision 7C-HS-C2W-X CARRIER
HyperStat is a wall-mount thermostat. Its thoughtful design ensures that it blends into most commercial spaces while still giving a fresh and contemporary feel compared to dated building control interfaces.
PACKAGE CONTENTS
• HyperStat device
- Mounting accessories
SPECIFICATIONS
| Power | Power Source: 24V AC/DC input (+/- 15%)Peak consumption: 1.4VA Maximum |
| Operating range | Temperature 32 to 122°F (0°C to 50°C)Humidity 20-85% non-condensing. |
| Communication | Sensor bus for daisy chained sensor communication and low power 3V dc.4-wire interface for RS 485 communication @ 115200 baud and 5V DC, 100mA power source900-928 MHz Mesh IEEE 802.15.4-compliant, for communications to CCUBluetooth: BLE 4.1 for commissioning, and communication to wireless sensors |
| Onboard Sensors | Temperature range of 32 to 122°F with an accuracy of +/-1°FHumidity 0 to 100% with an accuracy of 2%CO2 sensor with a range of 0 - 40,000 ppm, accuracy of +/-30ppmVOC sensor; Typical Accuracy: 15% of measured value; TVOC: 0 - 60,000 ppb;Occupancy sensor based on passive infrared (PIR) with a detection range of 4m with a 15-degree angleLight Sensor. Ambient light sensor • <100 LUX resolution • High-accuracy UV index sensor • Matches erythermal curveSound sensor with 40-120dB response for 100Hz to 10KHzPM2.5, PM10 sensor (optional). Detection range of 0-1000μg/m3 and accuracy of +/-10μg/m3 (PM2.5, 0-100μg/m3) or +/-25μg/m3 (PM10, 0-100μg/m3). Maximum long-term mass concentration precision limit drift:0 to 100 μg/m3 ±1.25 μg/m3/year100 to 1000 μg/m3 ±1.25 % mV/year |
| Inputs | 2 x 10K Type-2 thermistor inputs with 2% accuracy2 x 0-10V Analog voltage inputs with 2% detection accuracy (2-10V)Touch slider for temperature control along with 3 mechanical buttons |
Scan this QR code to get a more detailed version of the Installation Guide
PRECAUTIONS:
- Failure to wire devices with correct polarity when using a shared transformer, may result in damage to any device powered.
- Never connect or disconnect the wiring with the power ON.
- Do not allow the powered wires to touch the circuit boards.
• Always install complying with all state and local codes. - Do not assemble the front to the back plate while it is powered on.
- Once Installed the HyperStat takes seven days to auto-calibrate and settles at a steady state value.
- Avoid mechanical stress on the CO2 sensor to get accurate readings.
MOUNTING
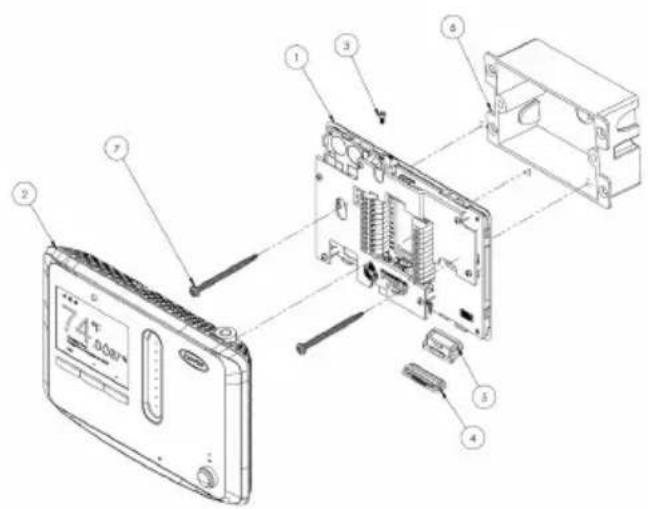
-
HyperStat Interface - Conventional
-
Rubber cover 2
-
HyperStat Main 6. Gang Box
-
Allen head screws
-
PHP screws
-
Rubber cover 1
-
Backplate
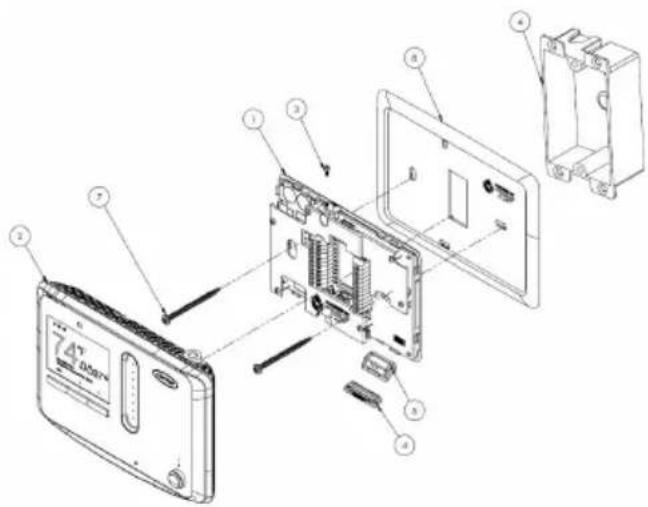
-
HyperStat Interface - Conventional
-
Rubber cover 2
-
HyperStat Main
-
Gang Box
-
Allen head screws
-
PHP screws
-
Rubber cover 1
-
External Antenna
-
Place the HyperStat Interface-Conventional and the back plate (only if the gang box is fixed vertically) on the gang box such that the back plate covers the gang box and fix these two items to the wall gang box with the PHP screws provided in the box.
- Now align the HyperStat main to lock onto the HyperStat Interface-Conventional.
- Use the Allen head screws to make this entire setup tamper-proof.
- Rubber covers 1 and 2 must be fixed to cover the programming pins.
- Connect the antenna to the device as shown in the above figure. Rotate the antenna clockwise to lock it in place.
DIS-ASSEMBLING
- If the HyperStat is mounted on the wall, hold the front plastic with both hands and pull it away from the wall.
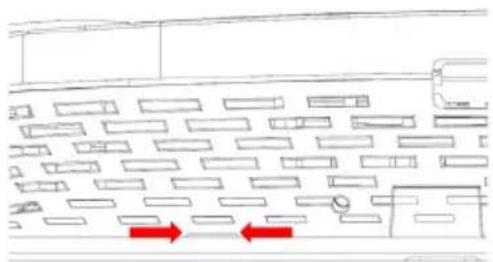
- If you are holding the HyperStat in your hands, insert a flat head screwdriver in the notch provided (marked by the two arrows shown in the image) between the front and back plastic and twist to separate them.
natural_image
Floor plan diagram with red arrows indicating directional movement or pressure points (no text or labels)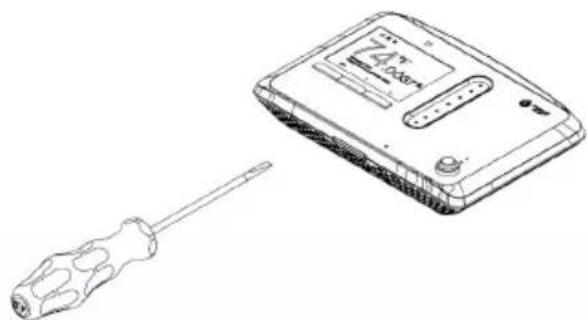
natural_image
Line drawing of a screwdriver and a handheld device (no text or symbols)CARRIER CLIMAVISION TECHNICAL SUPPORT
Installation and servicing of Control Systems can be hazardous due to electrical components. Only trained and qualified service personnel should install, repair or service control system components.
For more information on wiring, commissioning, or usage of the ClimaVision product line, please refer to any documentation provided with the job. If no documentation was provided with the job, please use the ClimaVision Help Center (support.climavision.com) where you can find application specific wiring schematics and helpful user guides and videos or scan the QR code here:
Scan this QR code to get a more detailed version of the Installation Guide
If you need help beyond that, please reach out to your local Carrier distributor for support.
Note:
• Favorable for Pollution degree 2 or the equivalent
- Type action – Type 1. C
- The method of connection/disconnection for screwless terminals is mentioned in the article pointed by the QR label on the box.
• Terminal Identification – In the Operating Manual
• Rated impulse voltage – 330V
• Operating Ambient Temperature: 0°C to 50°C
- Indoor Use Only
• Powered by Class 2 Power Source
Brand : CARRIER
Model : ClimaVision 7C-HS-C2W-X
Category : Thermostat