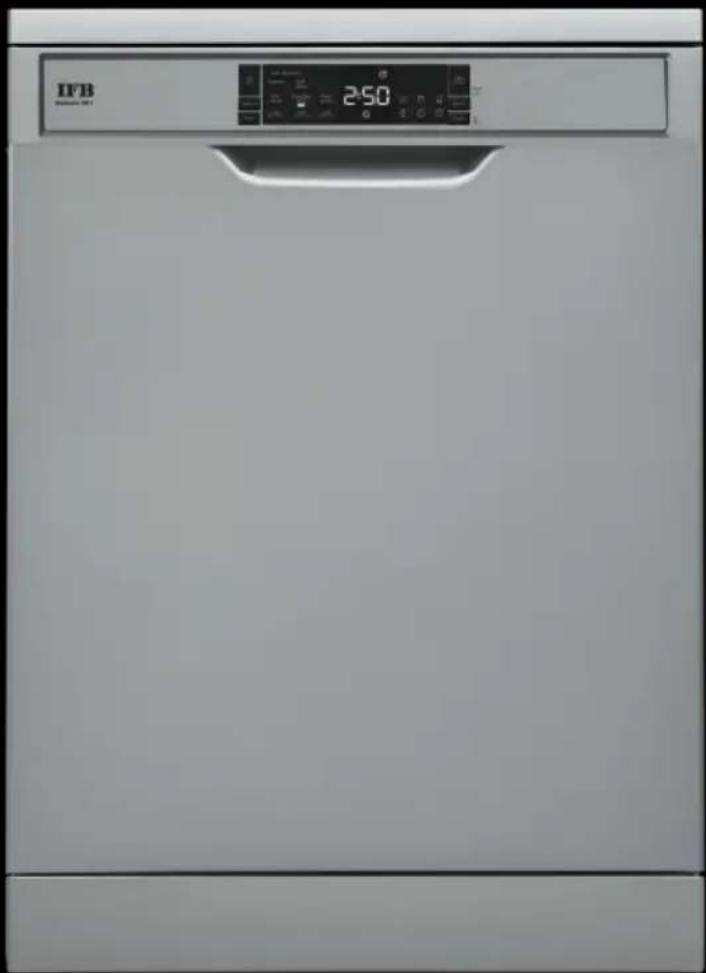
Neptune VX1 - Dishwasher IFB - Free user manual and instructions
Find the device manual for free Neptune VX1 IFB in PDF.


| Product Type | Freestanding Dishwasher |
| Brand | IFB |
| Model | Neptune VX1 |
| Capacity | 12 place settings |
| Dimensions (H × W × D) | 850 × 598 × 598 mm |
| Net Weight | 46 kg |
| Operating Voltage / Frequency | 220-240 V / 50 Hz |
| Total Current | 10 A |
| Total Power | 1900 W |
| Water Supply Pressure | 0.03 - 1 MPa |
| Energy Efficiency Class | A++ |
| Annual Energy Consumption | 258 kWh/year |
| Annual Water Consumption | 2520 L/year |
| Drying Efficiency Class | A |
| Noise Level | 49 dB(A) |
| Standard Programme (Eco) | 222 min at 50 °C |
| Number of Programmes | 7 (Prewash, Quick 30', Eco, Easy Care 60°C, Super 50', Smart 30-50°C, Smart 50-60°C, Smart 60-70°C) |
| Key Features | Water softener, rinse aid dispenser, Active Drying Unit, height-adjustable upper rack, foldable racks, slide cutlery basket, delay start (1-24 h), half load, extra hygiene, extra rinse, extra drying, tablet detergent, child lock |
| Indicators | Salt, rinse aid, tablet, half load, extra hygiene, washing steps (wash, rinse, dry, end) |
| Filter System | Three-stage (micro, coarse, metal) |
| Safety Features | Auto-stop on door open, overheat protection, child lock, pressure relief valve (if needed) |
| Maintenance | Clean filters and spray arms weekly; clean drain pump if clogged; descale as needed |
Frequently Asked Questions - Neptune VX1 IFB
User questions about Neptune VX1 IFB
0 question about this device. Answer the ones you know or ask your own.
Ask a new question about this device
Download the instructions for your Dishwasher in PDF format for free! Find your manual Neptune VX1 - IFB and take your electronic device back in hand. On this page are published all the documents necessary for the use of your device. Neptune VX1 by IFB.
USER MANUAL Neptune VX1 IFB
www.ifbappliances.com

Read Instructions before switching on the Dishwasher.
Observe the safety guidelines for installation.
natural_image
Stacked white ceramic mugs with handles and lids, no visible text or symbolsThank you for choosing this product.
This User Manual contains important information on safety and instructions intended to assist you in the operation and maintenance of your appliance.
Please take the time to read this User Manual before using your appliance and keep this book for future reference.
| Icon Type Meaning | ||
 | WARNING Serious injury or death risk | |
 | RISK OF ELECTRIC SHOCK Dangerous voltage risk | |
 | FIRE | Warning; Risk of fire / flammable materials. |
 | CAUTION Injury or property damage risk | |
| [ZGKS] | IMPORTANT / NOTE Operating the system correctly | |
CONTENTS
1.SAFET INSTRUCTIONS .... 1
1.1. General Safety Warnings ...... 1
1.2. Installation Warnings .... 2
1.3. During Use....3
2.INSTALLATION....6
2.1. Machine Positioning ....6
2.2. Water Connection....6
2.3. Water Inlet Hose....6
2.4. Electrical Connection ....7
2.5. Fitting the Machine Undercounter .....7
3.TECHNICAL SPECIFICATIONS....8
3.1. General Appearance....8
3.2. Technical Specifications ....8
4.BEFORE USING THE APPLIANCE 9
4.1.Preparing your Dishwasher for first use 9
4.2. Salt usage....9
4.3. Fill the salt 9
4.4. Test Strip 10
4.5. Water Hardness Table 10
4.6. Water Softener System 10
4.7. Setting 10
4.8. Detergent Use ...... 10
4.9. Filling with Detergent 11
4.10. Using Combined Detergents 11
4.11. Rinse-Aid Use 11
4.12. Filling the Rinse-aid and Setting.... 11
5.LOADING OUR DISHWASHER....13
5.1. Recommendations.... 13
5.2. Alternative Basket Loads....16
6.PROGRAM TABLE....17
7. THE CONTROL PANEL....18
7.1. Changing a Program ....20
7.2. Cancelling a Program....20
7.3. Switching the Machine Off....20
8.CLEANING AND MAINTENANCE 21
8.1. Filters 21
8.2. Spray Arms 21
8.3. Drain Pump 22
9. TROUBLESHOOTING 23
1. SAFET INSTRUCTIONS
1. General Safety Warnings
- Read these instructions carefully before using your appliance and keep this manual for future reference.
Please check the packaging of your machine before installation and the outer surface of the machine once the packaging has been removed. Do not operate the machine if it appears damaged or if the packaging has been opened. - Packaging materials protect your machine from any damage that might occur during transportation. The packaging materials are environmentally friendly as they are recyclable. Use of recycled material reduces raw material consumption and decreases waste production.
This appliance can be used by children aged from 8 years and above, and by persons with reduced physical, sensory or mental capabilities or lack of experience and knowledge if they have been given supervision or instruction concerning the use of the appliance in a safe way and understand hazards involved. Children should not be allowed to play with the appliance.
⚠️ Remove packaging and keep it out of reach of children.
⚠️ Keep children away from detergents and rinse aids.
There may be some residue left in the machine after washing. Keep children away from the machine when it is open.
2. Installation Warnings
- Choose a suitable and safe place to install your machine.
- Only original spare parts should be used with the machine.

Unplug the machine before installation.
⚠️ Check that the indoor electrical fuse system is connected in line with safety regulations.
All electrical connections must match the values on the plate.

Ensure the machine does not stand on the electrical supply cable.
⚠️ Never use an extension cord or a multiple socket connection.
⚠️ The plug should be accessible after the machine is installed.
• After installation, run your machine unloaded for the first time.
The machine must not be plugged in during positioning.
△! Always use the coated plug supplied with your machine.
△△! If the electrical cable is damaged, it should only be replaced by a qualified electrician.
- Connect the hose directly to the water inlet tap. The pressure supplied by the tap should be a minimum of 0.03 MPa and a maximum of 1 MPa. If the
pressure exceeds 1 MPa, a pressure relief valve must be fitted between the connection.
3. During Usage
- This machine is for domestic use only; do not use
- it for other purposes. Commercial use will void the guarantee.
Do not stand, sit or place loads on the open door of the dishwasher.
⚠️ Only use detergents and rinse aids produced specifically for dishwashers. Our company is not responsible for any damage that may occur due to misuse.
⚠️Do not drink water from the machine.
Due to the danger of explosion, do not place any chemical dissolving agents into the machine's washing section.
- Check the heat-resistance of plastic items before washing them in the machine.
⚠️ Only put items in the machine which are suitable for dishwashing, and take care not to overfill the baskets.
⚠️Do not open the door while the machine is in operation, hot water may spill out. Safety devices ensure the machine stops if the door is opened.
⚠️The machine door should not be left open. It may cause accidents.
⚠️Place knives and other sharp objects in the cutlery basket in a blade-down position.
⚠️ For models with the automatic door-opening system, when the EnergySave option is active, the door will open at the end of a program. To prevent damage to your dishwasher, do not attempt to close
the door for one minute after it has opened. For effective drying, keep the door open for 30 minutes after a program has ended. Do not stand in front of the door after the auto-open signal sounds.
⚠ In the case of a malfunction, repair should only be performed by an authorised service company, otherwise the warranty will be void.
⚠️! Before repair work, the machine should be disconnected from the mains. Do not pull the cable to unplug the machine. Switch off the water tap.
Operation at a low voltage will cause a decline in performance levels.
⚠️For safety, disconnect the plug once a program has finished.
To avoid an electric shock, do not unplug the machine with wet hands.
⚠️! Pull the plug to disconnect the machine from the mains, never pull on the cord.
About E-waste
E-waste or Electronic Waste or Waste Electrical and Electronic Equipment (WEEE) are the terms used to describe old, end-of-life or discarded appliances which are operated using electricity.
Do's and don'ts for customers
Do's
- Always dispose of products that have reached end-of-life by calling an Authorized local E-waste Recycler.
- Always drop off your used/discarded or end-of-life electronic products, batteries or any accessories at your nearest Authorized E-Waste Recycler or E-waste collection center.
- Wherever possible or as instructed, separate the packaging material according to responsible waste disposal and recycling options.
- Check with your nearest dealer or electronic showroom if any scheme is available with return of old and end-of-life electronic item.
Don't
- Do not dismantle your electronic products on your own.
- Do not throw electronics in bins having "Do Not Dispose" sign.
- Do not give E-waste to informal and unorganized sectors like Local Scrap Dealer and Rag Pickers.
- Do not dispose off your product in garbage bins along with municipal waste that ultimately reaches landfills.
Risks of improper handling of E-waste
E-waste usually includes components which if disposed off improperly hold adverse environmental consequences such as air, water, and soil pollution and also pose risks to human health. By ensuring this product is disposed off correctly, you will help prevent potential negative consequences for the environment and human health.
Components and materials used in the manufacture of this product are RoHS compliant.
CE Declaration of Conformity
We declare that our products meet the applicable European Directives, Decisions and Regulations and the requirements listed in the standards referenced.
Packaging and Recycling
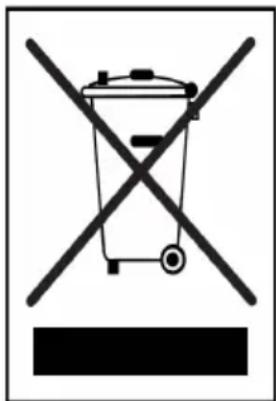
Packaging materials protect your machine from damage that may occur during transportation. The packaging materials are environmentally friendly as they are recyclable. The use of recycled material reduces raw material consumption and therefore decreases waste production. Plastics are marked with the international abbreviations (>PE<, >PP<, etc.). The cardboard parts consist of recycled paper. They can be put into waste paper containers for recycling.
For detailed information and disposal request
Please visit our website https://www.ifbappliances.com/e-waste or Contact IFB Care at 080 458 45678 and provide your details to our representative to raise a request for product to be picked up for recycling and safe disposal.
2. INSTALLATION
2.1. Machine positioning
When positioning the machine, place it in an area where dishes can be easily loaded and unloaded. Do not put the machine in an area where the ambient temperature falls below 0 C.
Read all warnings located on the packaging before removing the packaging and positioning the machine.
Place the machine close to a water tap and drain. Take into consideration that the connections will not be altered once the machine is in position.
Do not hold the machine by its door or panel.
Leave an adequate distance around the machine to allow ease of movement when cleaning.

Ensure the water inlet and outlet hoses are not squeezed or trapped and that the machine does not stand e electrical cable while positioning.
Adjust the feet so the machine is level and balanced. The machine should be placed on flat ground otherwise it will be unstable and the door of the machine will not close properly.
2.2. Water connection
We recommend fitting a filter to your water inlet supply in order to prevent damage to your machine due to contamination (sand, rust, etc.) from indoor plumbing. This will also help prevent yellowing and deposit formation after washing.
Note printing on the water inlet hose If models are marked with 25, the water temperature may be max. 25 C (cold water).
For all other models:
Cold water preferred; hot water max.
temperature 60 C.
2.3. Water inlet hose
natural_image
Illustration of a hand holding a faucet with a valve, no text or symbols present
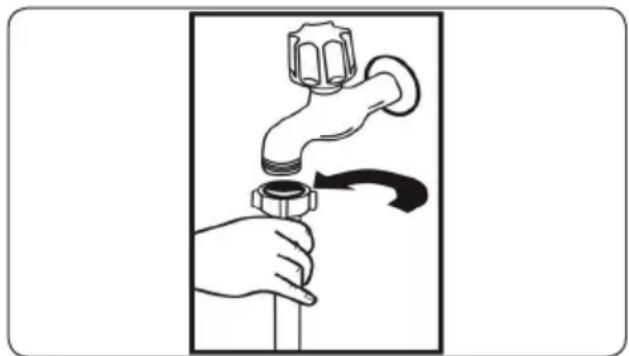
WARNING: Use the new water inlet supplied with your machine, do not an old machine's hose.

WARNING: Run water through the hose before connecting.

WARNING: Connect the hose tly to the water inlet tap. The pressure died by the tap should be a minimum 93 MPa and a maximum of 1 MPa. If pressure exceeds 1 MPa, a pressure valve must be fitted between the section.

WARNING: After the connections are made, turn the tap on fully and check for water leaks. Always turn off the inlet tap after a wash program has bed.
2.4. Drain Hose
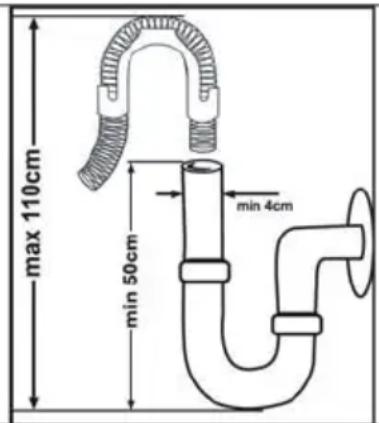
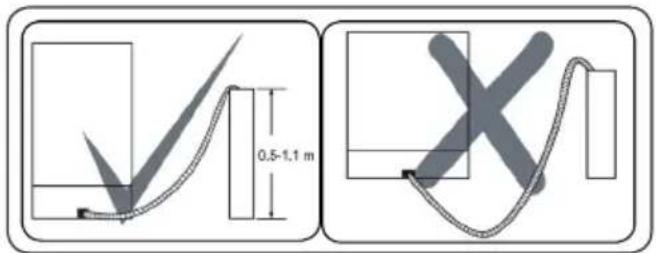
Connect the water drain hose directly to water drain hole or to the sink outlet spigot. This connection should be minimum 50 cm and maximum 110 cm from floor that dishwasher is placed.

NOTE : Do not extend the drain hose. You may insert the drain hose in a drainage system without concealing it.
2.4. Electrical connection
WARNING: Your machine is set to operate at 220-240. If the mains voltage supply to your machine is 110, connect a transformer of 110/220 and 3000 W between the electrical connection.
Connect the product to a grounded outlet protected by a fuse complying with the values in the Technical Specifications table.
The earthed plug of the machine must be connected to an earthed outlet supplied by suitable voltage and current.
In the absence of earthing installation, an authorised electrician should carry out an earthing installation. In the case of use without earthing installed, we will not be responsible for any loss of use that may occur.
The plug on this appliance may incorporate 13A fuse depending on the target country. (For Example UK, Saudi Arabia)
2.5. Fitting the machine undercounter
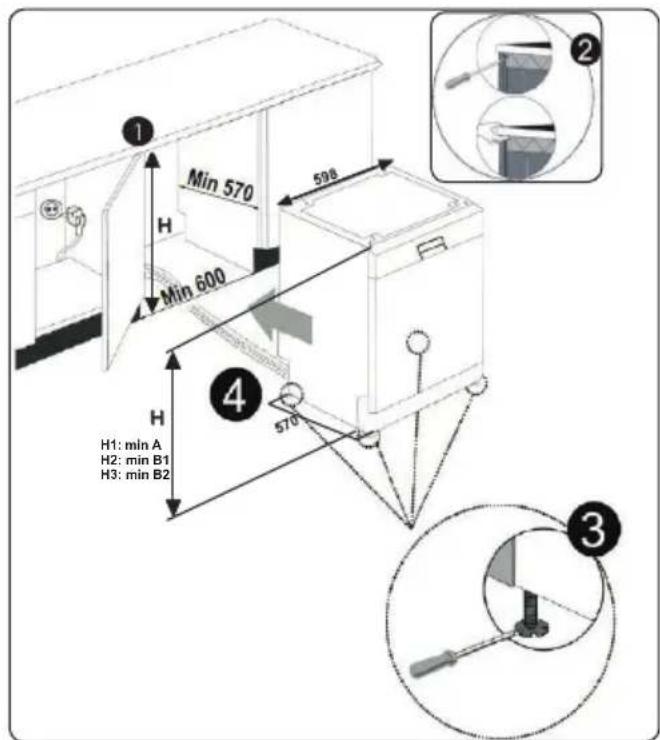
If you wish to fit your machine undercounter, there must be sufficient space to do so and the wiring-plumbing must be suitable to do so (1). If the space under the countertop is suitable for fitting your machine, remove the worktop as shown in the illustration (2).
WARNING: The countertop, of which the machine will be placed under, must be stable in order to prevent imbalance. The top panel of the dishwasher must be removed to fit the machine under the countertop.
To remove the top panel, remove the screws that hold it on, located at the rear of the machine. Then, push the panel 1 ~cm from the front towards the rear and lift it. Adjust the machine feet according to the slope of the floor (3).
Fit your machine by pushing it under the counter taking care not to crush or bend the hoses (4).
WARNING: After removing the top panel of your dishwasher, the machine should be placed in a space of the dimensions shown in the figure below.
| A | B | ||
| All Products | B_1 | B_2 | |
| Product's Height ( 2 mm) 820 mm 830 mm 835 mm | |||
A: If there is no felt on the top of the product; you should take into account this product's height.
B1: If there is felt on the top of the product with 2nd basket; you should take into account this product's height.
B2: If there is felt on the top of the product with 3rd basket; you should take into account this product's height.
3. TECHNICAL SPECIFICATIONS
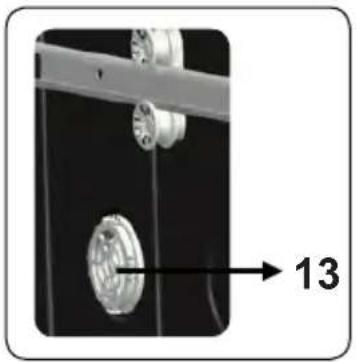
natural_image
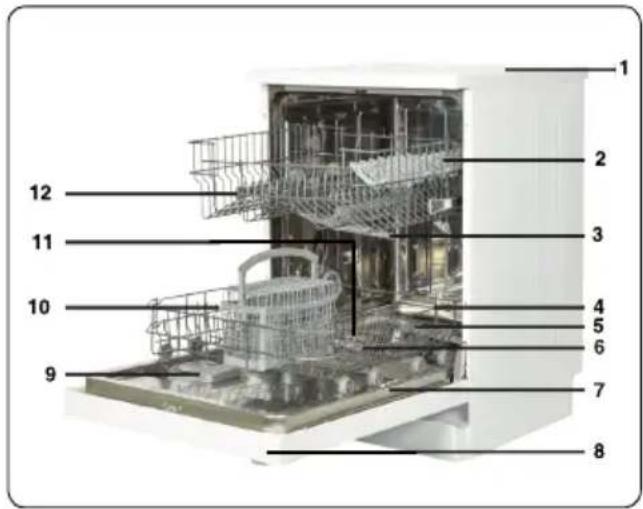
Close-up of mechanical components with a numbered arrow pointing to a circular component (no text or symbols visible)3.1. General appearance
- Worktop
- Upper basket with racks
- Upper spray arm
- Lower basket
- Lower spray arm
- Filters
- Rating plate
- Control panel
- Detergent and rinse-aid dispenser
- Cutlery basket
- Salt dispenser
- Upper basket track latch
- Active Drying Unit: This system provides better drying performance your dishes.
3.2. Technical specifications
| Capacity | 12 place settings |
| Dimensions | |
| Height | 850(mm) |
| Width | 598(mm) |
| Depth | 598(mm) |
| Net weight 46 (kg) | |
| Operating voltage / frequency | 220-24050 (Hz) |
| Total current 10(A) | |
| Total power 1900(W) | |
| Water supply pressure | Maximum:1 (Mpa)Minimum:0.03 (Mpa) |
4. BEFORE USING THE APPLIANCE
4.1. Preparing your dishwasher for first use
- Make sure the electricity and supply water specifications match the values indicated in the installation instructions for the machine.
- Remove all packaging material inside the machine.
- Set the water softener level.
- Fill the rinse aid compartment.
4.2 Salt Usage
For a good washing function, the dishwasher needs soft, i.e. less calcareous water. Otherwise, white lime residues will remain on the dishes and the interior equipment. This will negatively affect your machine's washing, drying and shining performance. When water flows through the softener system, the ions forming the hardness are removed from the water and the water reaches the softness required to obtain the best washing result. Depending on the level of hardness of the inflowing water, these ions that harden the water accumulate rapidly inside the softener system. Therefore, the softener system has to be refreshed so that it operates with the same performance also during the next wash. For this purpose, dishwasher salt is used.
Your machine should only use special dishwasher salt to soften the water. Do not use any small grained or powdered type of salts which are easily soluble. Using any other type of salt can damage your machine.
4.3 Fill the salt
To add softener salt, open the salt compartment cap by turning it counter clockwise. (1) (2) At first use, fill the compartment with 1 kg salt and water (3) until it is almost overflowing. If available, using a funnel (4) will make filling easier. Replace the cap and close it. After every 20-30 Cycles add salt into your machine until it fills up (approx. 1 kg).
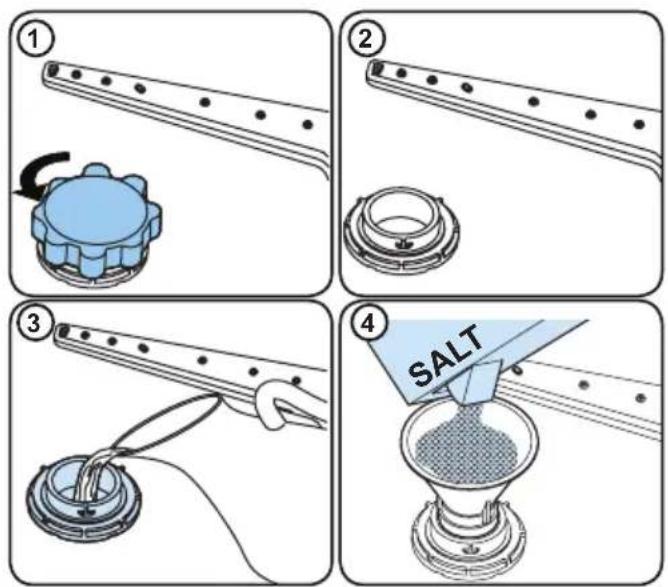
Only add water to the salt compartment on first use.
Use softener salt specifically produced for use in dishwashers.
When you start your dishwasher, the salt compartment is filled with water, therefore put the softener salt in prior to starting your machine.
If the softener salt has overflowed and you do not start the machine immediately, run a short washing program to protect your machine against corrosion.
4.4. Test Strip
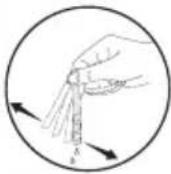
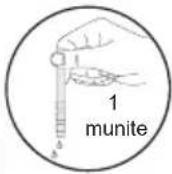
| Run water through the tap (1min.) | Keep the strip in the water (1sec) | Shake the strip. | Wait (1min.) | Set the hardness level of your machine. | |
 | 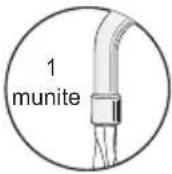 | 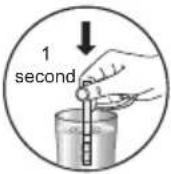 |  |  | 123456 |
NOTE: The level is set to 3 as default. If the water hardness of input water to dishwasher is more than 800PPM, we recommend to use external water softening device / filter (Ion Exchange water softener).
4.5. Water Hardness Table
| Level | German dH | British dE | French dF | PPM Indicator |
| 1 | 0-6 0-90 L1 | shown on the display. | 0-9 | |
| 2 | 7-14 100-20 | is shown on the display. | 0-20 | |
| 3 | 15-21 210-30 | is shown on the display. | 30 | |
| 4 | 22-28 310-40 | is shown on the display. | 40 | |
| 5 | 29-39 410-55 | is shown on the display. | 55 | |
| 6 | 32-50 | 40-49 56 | -90 |
4.6. Water Softener System
The dishwasher is equipped with a water softener which reduces the hardness in the mains water supply. To find out the hardness level of your tap water, contact your water company or use the test strip (if available).
4.7. Setting
- Turn the machine on by pressing the On/Off button.
- Press the Program button for at least 3 seconds immediately after the machine is turned on.
- Release the Program button when "SL" is shown. Next, the last setting level is displayed.
- Press the program button to set the desired level. Each press of the program button increases the level. Once level 6 has been reached, the next press returns the level to 1.
- The last selected water hardness level is stored in the memory by turning the machine off with the On/Off button.
4.8. Detergent usage
Only use detergents specifically designed for domestic dishwashers. Keep your detergents in cool, dry places out of reach of children.
Add the proper detergent for the selected program to ensure the best performance. The
amount of detergent needed depends on the cycle, load size, and soil level of dishes.
Do not fill detergent into the detergent compartment more than required; otherwise you can see whitish streaks or bluish layers on glass and dishes and may cause glass corrosion. Continued use of too much detergent may cause machine damage.
Using little detergent can result in poor cleaning and you can see whitish streaksin hard water.
See the detergent manufacturer's instructions for a further information.
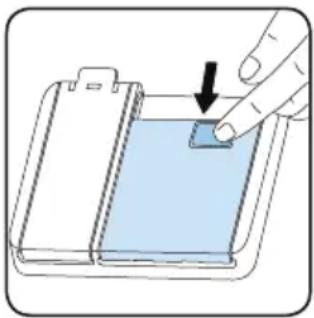
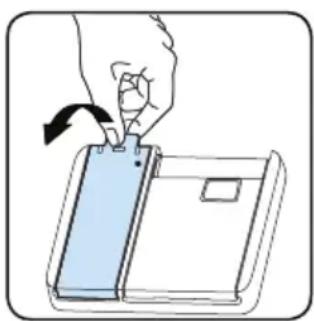
4.9. Filling the detergent
Push the latch to open the dispenser and pour in the detergent.
Close the lid and press it until it locks in place. The dispenser should be refilled just before the start of each programme.
natural_image
Illustration of a hand pressing down on a blue liquid in a container (no text or symbols)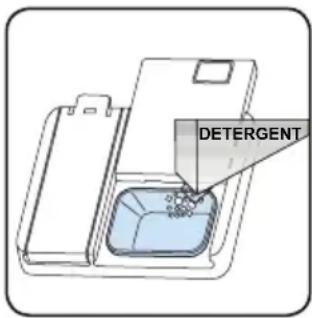
4.10. Using combined detergents
These products should be used according to the manufacturer's instructions.
Never put combined detergents into the interior section or the cutlery basket.
Combined detergents contain not only the detergent but also rinse-aid, salt replacement substances and additional components depending on the combination.
We recommend you do not use combined detergents in short programmes. Please use powder detergents instead.
If you encounter problems when using combined detergents, please contact the detergent manufacturer.
When you stop using combined detergents, make sure that water hardness and rinse aid settings are set to the correct level.
4.11 Rinse-aid usage
The rinse aid helps to dry the dishes without streaks and stains. Rinse-aid is required for stain-free utensils and clear glasses. The rinse aid is automatically released during the hot rinse phase. If rinse aid dosage setting set too low, whitish stains remains on dishes and dishes do not dry and washed clean.
If rinse aid dosage setting set too height, you can see bluish layers on glass and dishes.
4.12. Filling the rinse-aid and setting
To fill the rinse aid compartment, open the rinse-aid compartment cap. Fill the compartment with rinse aid to the MAX level and then close the cap. Be careful not to overfill the rinse aid compartment and wipe up any spills. Rinse aid helps in drying the utensils.
In order to change the rinse aid level, follow the below steps before turning on the machine:
- Turn on the machine by pressing the On/Off button.
- Press the Programme button for at least 5 seconds immediately after the machine is turned on.
- Release the Programme button when "rA" is shown. Rinse aid level setting follows water hardness level setting. Next, the last setting level is displayed.
- Set the level by pushing the programme button.
- Switch off the machine to save the setting.
- The factory setting is "4".
If the dishes are not drying properly or are spotted, increase the level. If blue stains form on your dishes, decrease the level.
natural_image
Illustration of a hand using a tool to press or install a document (no text or symbols visible)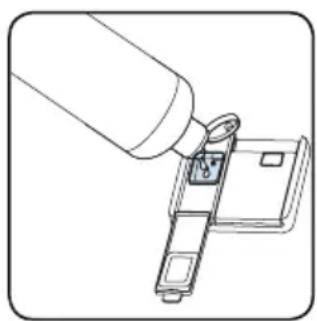
natural_image
Line drawing of a hand inserting a key into a device (no text or symbols)| Level Brightener Dose Indicator | ||
| 1 Rinse-aid not dispensed | r1 is shown on the display. | |
| 2 1 dose is dispensed | r2 is shown on the display. | |
| 3 2 doses are dispensed | r3 is shown on the display. | |
| 4 3 doses are dispensed | r4 is shown on the display. | |
| 5 4 doses are dispensed | r5 is shown on the display. | |
5. LOADING OUR DISHWASHER
For best results, follow these loading guidelines.
Loading the household dishwasher up to the capacity indicated by the manufacturer will contribute to energy and water savings.
Manual pre-rinsing of tableware items leads to increased water and energy consumption and is not recommended. You can place cups, glasses, stemware, small plates, bowls, etc. in upper basket. Do not lean long glasses against one another or they cannot remain steady and may be damaged.
When placing long stem glasses and goblets, lean them against the basket edge or rack and not against other items.
Place all containers such as cups, glasses and pots into the dishwasher with the opening facing downwards otherwise water can collect on items.
If there is a cutlery basket in your machine, you are recommended to use the cutlery grid in order to obtain the best result. Place all large (pots, pans, lids, plates, bowls etc.) and very dirty items in the lower rack.
Dishes and cutlery should not be placed above each other.

WARNING: Take care not to obstruct rotation of spray arms.

WARNING: Make sure after loading shes do not prevent opening of the gent dispenser.
5.1. Recommendations
Remove any coarse residue on dishes before placing the dishes in the machine. Start the machine with a full load.

Do not overload the drawers or place dishes in the wrong basket.

WARNING: To avoid any possible es, place long-handle and sharp- ed knives with their sharp points facing or horizontally on the baskets.
Height Adjustable Rack (peg type)
The height adjustable racks enable glasses and cups to be placed on or under the racks. The racks can be adjusted to 2 different heights. Cutlery and utensils can also be placed on the racks horizontally.
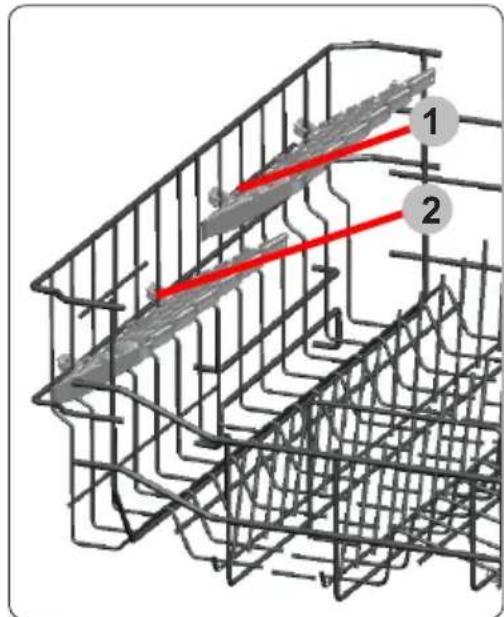
Height Adjustable Rack (peg type)
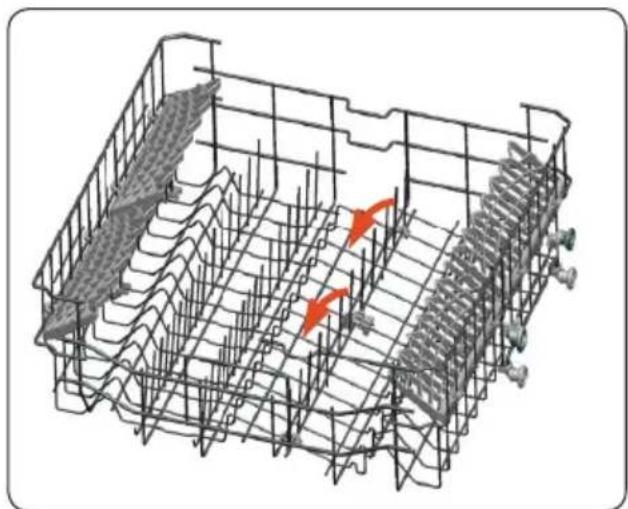
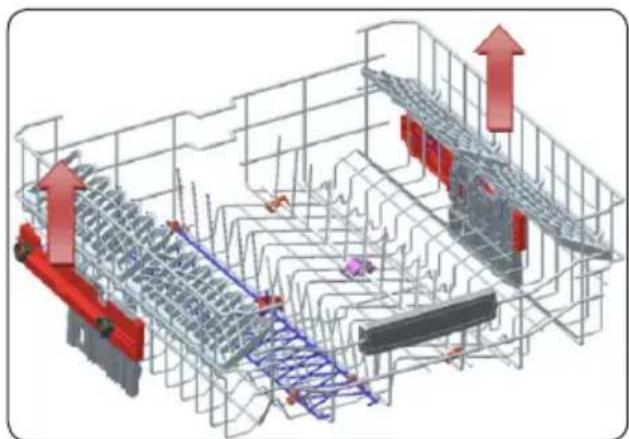
The foldable racks in the upper basket enable the placement of large items such as pots and pans. Each section can be folded separately. The foldable racks can be either raised up or folded down.
natural_image
3D wire mesh diagram of a structural grid with red arrows indicating direction (no text or symbols)Height adjustment
The upper basket includes a mechanism which enables the height of the basket to be adjusted up (1) or down (2) without having to remove the basket. Hold the basket on both sides and pull it up or push it down, ensuring both sides of the upper basket are in the same position.
natural_image
3D architectural or engineering diagram showing structural framework with red and blue arrows indicating upward movement (no text or symbols present)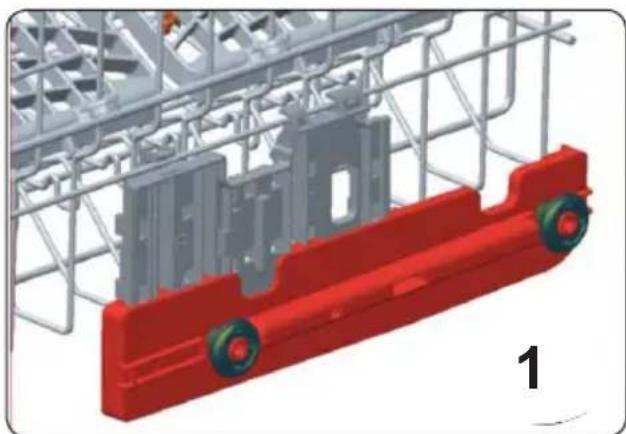
natural_image
3D model of a red and gray toy vehicle chassis with wheels, enclosed within a steel frame structure (no text or symbols visible)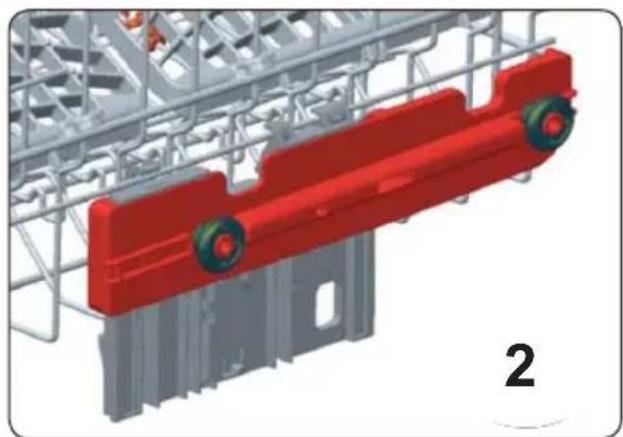
natural_image
3D rendering of a red and gray mechanical component with green wheels, mounted on a metal frame structure (no text or symbols visible)Four Folding Racks (12 ps)
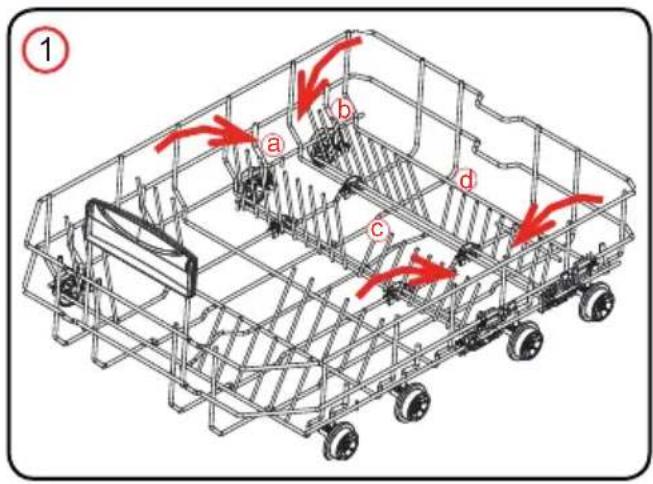
The folding racks are designed so that large items, such as pots and pans, can be easily placed in the dishwasher. Each section can be folded separately. The racks can be folded down or raised up, as shown in the images below.
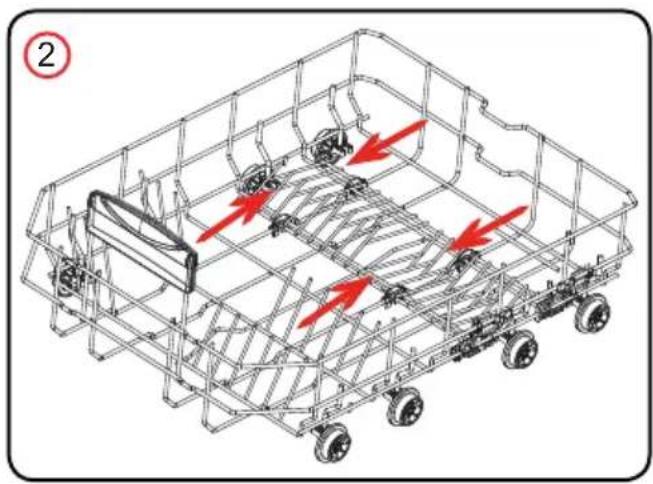
natural_image
Technical line drawing of a car chassis frame with red arrows indicating motion or movement (no text or symbols)Slide Basket
The movable cutlery basket can slide between the front and rear wires of the bottom basket.
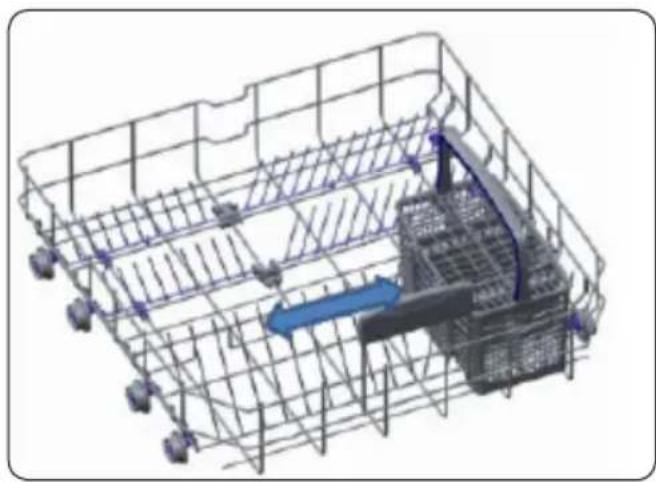
natural_image
3D wireframe model of a warehouse or storage unit with internal components and directional arrows (no text or symbols)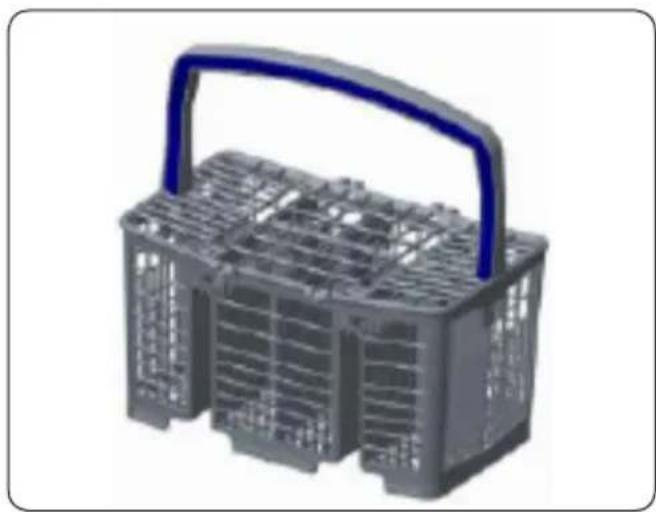
natural_image
3D rendering of a gray plastic basket with a blue handle (no text or symbols visible)5.2. Alternative basket loads Lower basket
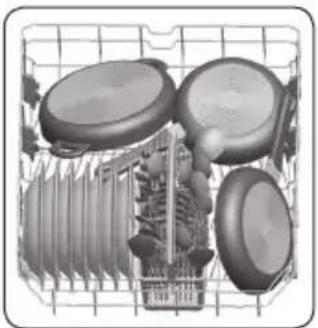
natural_image
Interior view of a kitchen appliance grid with cutlery and a cylindrical container (no text or symbols visible)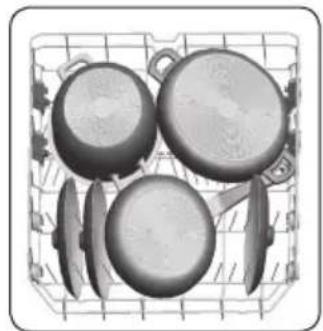
natural_image
Black-and-white illustration of four cooking utensils in a wire basket (no text or symbols)Upper basket
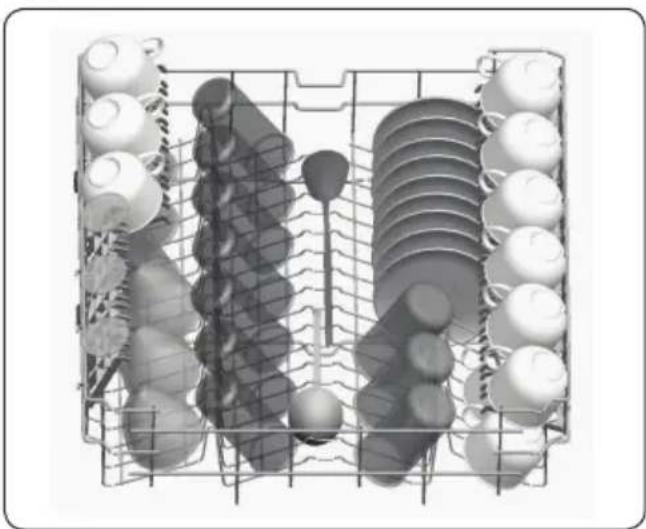
natural_image
3D rendering of a multi-tiered storage unit with circular components and a central rod (no text or symbols visible)Incorrect Loads
Incorrect loading can cause poor washing and drying performance. Please follow the guidelines to get the best washing performance.
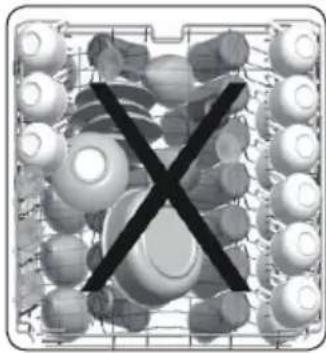
natural_image
Black X symbol overlaying a grid of circular objects, no text or symbols present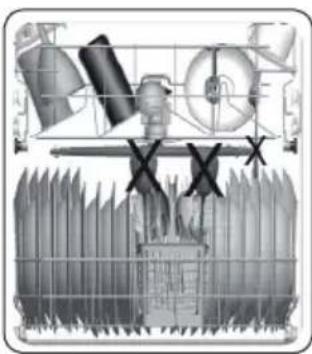
natural_image
Diagram of a mechanical assembly with gears and a base frame, no visible text or symbols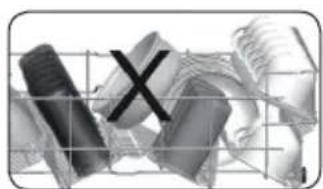
natural_image
Abstract grayscale graphic with geometric shapes and a central 'X' mark, no text or symbols present.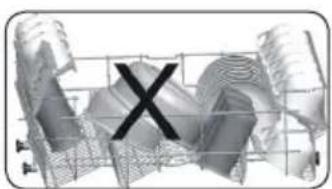
natural_image
Abstract 3D wireframe structure with a black 'X' symbol overlay, no readable text or symbols present.Unsuitable items for dishwashing
• Cigarette ashes, candle leftovers, polish, paint, chemical substances, iron-alloy materials.
- Forks, spoons and knives with wooden, bone, ivory or nacrecoated handles; glued items, items soiled with abrasive, acidic or base chemicals.
• Temperature-sensitive plastics, copper or tincoated containers.
• Aluminium and silver objects.
- Some delicate glasses, ornamental printed porcelains; some crystal items, adhered cutlery, lead crystal glasses, cutting boards, synthetic fibred items.
- Absorbent items such as sponges or kitchen rugs.

IMPORTANT: In future, purchase
dishwasher-proof kitchenware.
Important Note for Test Laboratories
For detailed information required for tests according to EN normatives and a softcopy of the manual, please send the model name and serial number to the following address: dishwasher standardtest.info

NOTE: After loading the dishwasher,
Please check the both spray arm for rotation. It should not be restricted in its path of rotation.
6. PROGRAMME TABLE
| Programme | Duration (min) | Temperature (°C) | Description |
| Prewash 15 - | To rinse the dishes that you wash to plan later. Drying step not included. | ||
| Quick 30' 30 40 | For lightly | soiled utensils. Dry step not included. | |
| Eco 222 50 | Standard program for dishes which are used for daily but not heavily soiled. | ||
| Easy Care 60°C 94 | 60 For dishes which are used daily but are not heavily soiled. | ||
| Super 50' 50 50 | A faster programme for dishes which are used daily but are not heavily soiled. | ||
| Smart 30°C - 50°C 69 | - 92 30 - 50 | Automatic programme for delicate dishes/ glass ware which are not heavily soiled. | |
| Smart 50°C - 60°C | 89 - 121 | 50 - 60 | Automatic programme for dishes which are not heavily soiled. |
| Smart 60°C - 70°C | 97 - 178 | 60 - 70 | Automatic programme for heavily soiled dishes like Kadai, Milk pan, Tea Pan and Pressure cookers, etc.. |

NOTE: THE AUTOMATIC PROGRAMME DURATION MAY CHANGE ACCORDING
TO THEAMOUNT OF DISHES, THE WATER TEMPERATURE, THE AMBIENT TEMPERATURE AND SELECTED ADDITIONAL FUNCTIONS.
- Only use powder detergent for short programmes.
• To assist drying, we recommend slightly opening the door after a cycle is complete.
7. THE CONTROL PANEL
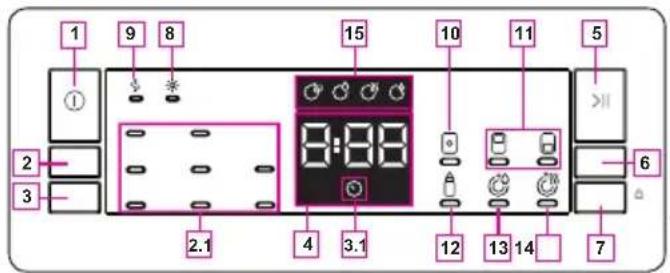
- On/Off button
- Program Selection Button
2.1. Program Indicators - Delay Button
3.1. Delay Indicator - Remaining Time Indicator
- Start/Pause Button
- Options Button
- Select Button
- Rinse Aid Indicator
- Salt Indicator
- Tablet Indicator
- Half Load Indicator
- Extra Hygiene Indicator
- Extra Rinse option
- Extra Drying Indicator
- Washing Step Indicators a- Washing Step Indicator b- Rinse Step Indicator c- Drying Step Indicator d- End Step Indicator
1. On/Off Button
Turn the machine on by pressing the On/Off button.
2. Program Selection Button
Select a suitable programme by pressing the Programme button. The selected program indicator (2.1) will be on. For the details of the programs refer to section Program Table.
3. Delay Button
You can delay the start time of the programme for 1-2...24 hours by pressing the delay button (3) before the programme starts. The delay indicator (3.1) will be on. If you want to change the delay time, first press the Start/Pause button and then the delay button to select a new delay time. To activate the new delay time, press the Start/Pause button. To cancel the delay, you need to switch to 0 hour by using the delay when the machine is paused.
4. Remaining Time Indicator
Programme flow can be monitored via the Wash,Rinse, Dry, End indicators and Remaining Time Indicator.
5. Start/Pause Button
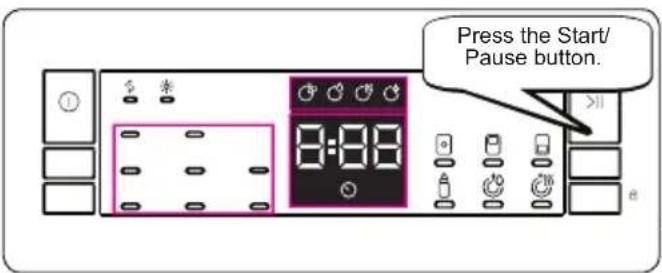
Press the Start/Pause button to start the programme. The wash lamp turns on and the Remaining Time Indicator shows the programme duration. It also indicates the remaining time during the programme flow. If you open the door of your machine when the programme is running the duration of the programme pauses, related washing step indicator blinks.
6. Options Button
Options can be selected by pressing the Options button repeatedly. The chosen option will be indicated by a blinking LED.
7. Select Button
Select the option by pressing the Select button. The LED for the chosen option will then remain lit.
8. Rinse Aid Indicator
When the rinse aid level is low, the rinse aid lack warning indicator turns on and you should fill the rinse aid chamber.
9. Salt Indicator
When there is insufficient softening salt, the salt lack warning indicator turns on and you should fill up the salt chamber.
10. Tablet Indicator
Select the Tablet Detergent function when using a combined detergent that contains salt, rinse aid or other extras. The Tablet Detergent Indicator will remain on for as long as it is selected. This option will change washing temperature and time.
11. Half Load Indicator
Select the Half Load function to choose which area of the dishwasher contains dishes to be washed. You can select both baskets, the upper basket only, or the lower basket only. Press the button until the symbol corresponding to the basket containing the dishes to be washed illuminates. The Half Load Indicator will
illuminate while this function is in operation. Dishes placed in other areas will not be washed.
12. Extra Hygiene Indicator
Select the Extra Hygiene function to increase the wash temperature, for a maximum hygiene washing operation. The Extra Hygiene Indicator will illuminate.
13. Extra Rinse option
If Extra Rinse option is selected,
washing-rinsing steps will be added into the selected program, so you can ensure that your dishes will be extracted cleaner and glosser.
14. Extra Drying Indicator
If Extra Drying option is selected, extra heating and drying steps will be added into the selected program, so you can ensure that your dishes will be extracted dryer.
15. Washing Step Indicators
The display will show the indicator corresponding to the status of the programme in operation. While the Drying indicator is on, the machine will remain silent with respect to the programme you have selected for 15 to 100 minutes.
* Wash
* Rinse
* Dry
* End
NOTE: Child lock is activated/deactivated by pressing select button (7) for about 3 seconds. When it is activated, all leds blink and "CL" is shown on Remaning Time Indicator (4) once. When it is deactivated, all lamps and "CL" blink twice.
NOTE: If you switch the machine to off position after selecting the delay time and the programme has started, the delayed time is cancelled.
NOTE: To save any program as favourite program, press program selection (2) and delay (3) buttons at the same time. To select favourite program, press program selection button (2) for 3 seconds.
7.1. Changing a programme
If you would like to change the programme when the machine is already running.
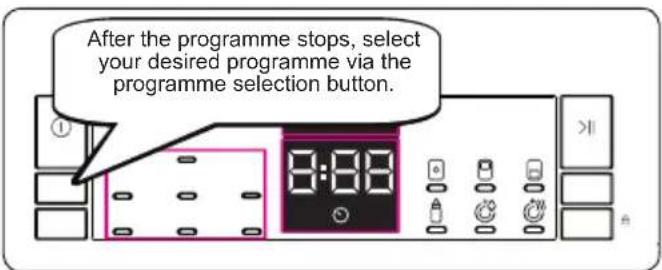
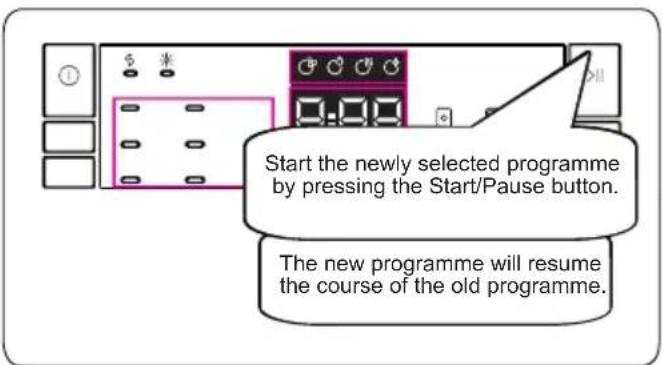
7.2. Cancelling a programme
If you would like to cancel a programme when it is running.
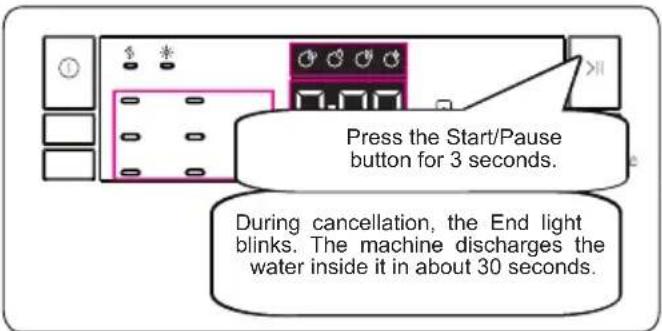
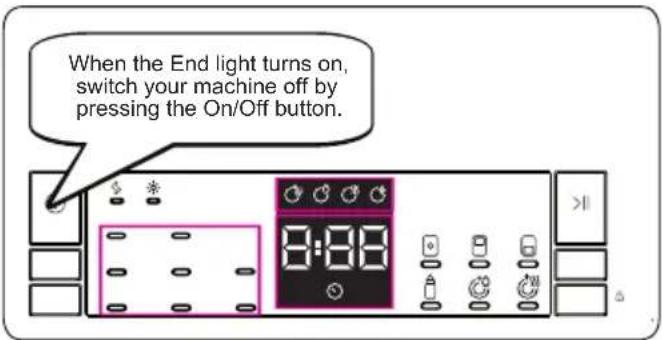
7.3. Switching the Machine Off
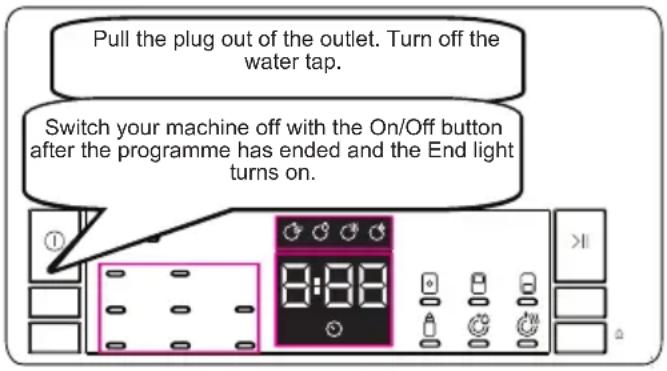
NOTE: Do not open the door before the programme ends.
NOTE: At the end of washing programme, you can leave the door of your machine ajar to hasten the drying.
tt: If the door of machine is opened or power is cut off during washing, the programme will continue when the door is closed or the power is restored.
Buzzer Sound Control (Model Depending)
To change the buzzer sound level, follow the below steps:
- Open the door and press Option (6) and Select (7) buttons at the same time for 3 seconds.
- When sound setting is recognized, buzzer gives a long sound and machine will display last set level, from "S0" to "S3".
- To decrease sound level press Select button (7). To increase sound level, press Options button (6).
- To save the selected sound level, turn off the machine.
"S0" level means all voices are off. Factory setting is "S3".
Save Power Mode
To activate or deactivate save power mode, follow the below steps:
- Open the door and press Program (2) and Option (6) buttons at the same time for 3 seconds.
- After 3 seconds, the machine will display last Setting, "IL1" or "IL0".
- When Save Power Mode is activated, "IL1" will be displayed. On this mode, interior lights (if avaliable) will turn off 2 minutes after the door is opened, and the machine will turn off 15 minutes after any intervention in order to save energy.
- When Save Power Mode is deactivated "IL0" will be displayed. If Save Power Mode is reactive, interior lights will be on as long as the door is open, and the machine will always be on unless it is turned off by user.
- To save the selected setting, turn off the machine.
In factory setting, Save Power Mode is active.
8. CLEANING AND MAINTENANCE
Cleaning your dishwasher is important to maintain the machine's service life. Make sure that the water softening setting is set correctly and the correct amount of detergent is used to prevent limescale accumulation. Refill the salt compartment when the salt sensor light comes on.
Oil and limescale may build up in your Dishwasher over time. If this occurs:
- Fill the detergent compartment but do not load any dishes. Select a program which runs at a high temperature and run the Dishwasher empty. If this does not clean your Dishwasher sufficiently, use a cleaning agent designed for use with dishwashers.
• To extend the life of your dishwasher, clean the appliance regularly each month - Wipe the door seals regularly with a damp cloth to remove any accumulated residue or foreign objects.
8.1. Filters
Clean the filters and spray arms at least once a week. If any food waste remains or foreign objects on the coarse and fine filters, remove them and clean them thoroughly with water.
a) Micro Filter
b) Coarse Filter
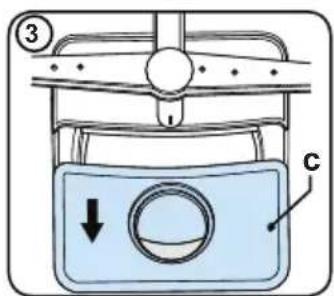
c) Metal Filter
natural_image
Diagram of a mechanical assembly with a central component and a circular housing (no text or symbols)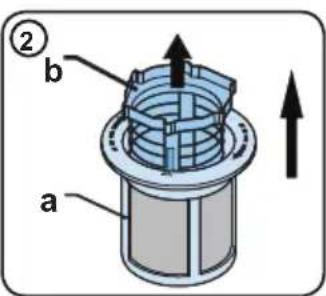
natural_image
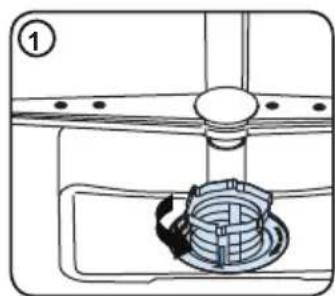
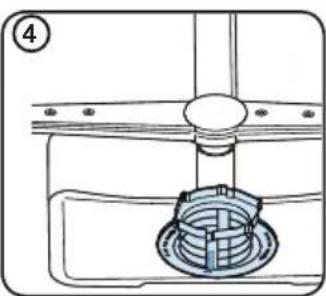
Technical diagram of a mechanical assembly with a central component and a circular base (no text or symbols)To remove and clean the filter combination, turn it counter clockwise and remove it by lifting it upwards (1). Pull the coarse filter out of the micro filter (2). Then pull and remove the metal filter (3). Rinse the filter with lots of water until it is free of residue. Reassemble the filters. Replace the filter insert, and rotate it clockwise (4).
- Never use your dishwasher without a filter.
- Incorrect fitting of the filter will reduce the washing effectiveness.
- Clean filters are necessary for proper running of the machine.
8.2. Spray arms
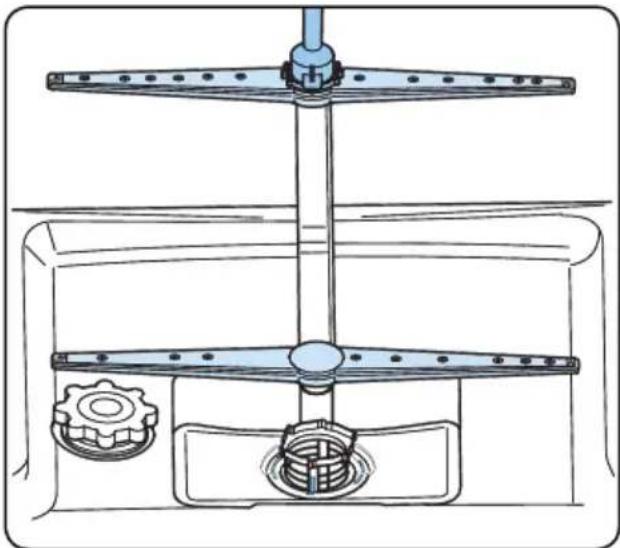
Make sure that the spray holes are not clogged and that no food waste or foreign object is stuck to the spray arms. If there is any clogging, remove the spray arms and clean them under water. To remove the upper spray arm undo the nut holding it in position by turning it clockwise and pulling it downwards. Make sure that the nut is properly tightened when refitting the upper spray arm.
natural_image
Technical line drawing of a mechanical assembly with gears and a central shaft (no text or symbols)8.3 Drain Pump
Large food residues or foreign objects which were not captured by the filters may block the waste water pump. The rinsing water will then be above the filter.

Warning Risk of Injury
When cleaning the waste water pump, ensure that you do not injure yourself on pieces of broken glass or pointed implements.
In this case:
- First always disconnect the appliance from the power supply.
- Take out baskets.
- Remove the filters.
- Scoop out water, use a sponge if required.
- Check the area and remove any foreign objects.
- Install filters.
- Re-insert baskets.
9. TROUBLESHOOTING
| FAULT POSSIBLE CAUSE TROUBLESHOOTING | ||
| The programme does not start. | Your Dishwasher is not plugged in. Plug your Dishwasher in. | |
| Your Dishwasher is not switched on. | Switch your Dishwasher on by pressing the On/Off button. | |
| Fuse blown. Check your indoor fuses. | ||
| Water inlet tap is closed. Turn on the water inlet tap. | ||
| Your Dishwasher door is open. Close the Dishwasher door. | ||
| Water inlet hose and machine filters are clogged. | Check the water inlet hose and machine filters and make sure they are not clogged. | |
| Water remains inside the machine. | Water drain hose is clogged or twisted. | Check the drain hose, then either clean or untwist it. |
| The filters are clogged. Clean the filters. | ||
| The programme is not finished yet. Wait until the programme is finished. | ||
| Machine stops during washing. | Power failure. Check mains power. | |
| Water inlet failure. Check water tap. | ||
| Shaking and hitting noises are heard during a wash operation. | The spray arm is hitting the dishes in the lower basket. | Move or remove items blocking the spray arm. |
| Partial food wastes remain on the dishes. | Dishes placed incorrectly, sprayed water not reaching affected dishes. | Do not overload baskets. |
| Dishes leaning each another. | Place dishes as instructed in the section on loading your dishwasher. | |
| Not enough detergent used. | Use the correct amount of detergent, as instructed in the programme table. | |
| Wrong wash programme selected. | Use the information in the programme table to select the most appropriate programme. | |
| Spray arms clogged with food waste. | Clean the holes in the spray arms with thin objects. | |
| Filters or water drain pump clogged or filter misplaced. | Check the drain hose and filters are correctly fitted. | |
| Whitish stains remains on dishes. | Not enough detergent used. | Use the correct amount of detergent, as instructed in the programme table. |
| Rinse aid dosage and/or water softener setting set too low. | Increase rinse aid and/or water softener level. | |
| High water hardness level. Increase water softerner level and add salt. | ||
| Salt compartment cap not closed properly. | Check that the salt compartment cap is closed properly. | |
| Dishes do not dry. | Drying option is not selected. Select a programme with a drying option. | |
| Rinse aid dosage set too low. Increase rinse aid dosage setting. | ||
| Rust stains form on the dishes. | Stainless-steel quality of the dishes is insufficient. | Use only dishwasher-proof sets. |
| High level of salt in wash water. | Adjust the water hardness level using water hardness table. | |
| Salt compartment cap not closed properly. | Check that the salt compartment cap is closed properly. | |
| Too much salt spilled in the Dishwasher while filling it with salt. | Use funnel while filling salt to the compartment to avoid spillage. | |
| A poor mains grounding. Consult a qualified electrician immediately. | ||
| Detergent remains in the detergent compartment. | Detergent was added when the detergent compartment was wet. | Make sure detergent compartment is dry before use. |
AUTOMATIC FAULT WARNINGS AND WHAT TO DO
| TROUBLE CODE | POSSIBLE FAULT WHAT | TO DO |
| FF | Water inlet system failure | Make sure the water inlet tap is open and water is flowing. |
| Separate the inlet hose from the tap and clean the filter of the hose. | ||
| Contact for service if the error continues. | ||
| F5 | Pressure system failure | Remove the drain extension pipe (if any). Tie the drain hose on the rear top side. Contact service if proper persists. |
| F3 | Continuous water input | Close the tap and contact for service. |
| F2 | Inability to discharge water | Water discharge hose and filters may be clogged. |
| Cancel the program. | ||
| If the error continues, contact for service. | ||
| F8 | Heater error | Contact for service. |
| F1 Overflow | Unplug the machine and close the tap. | |
| Contact for service. | ||
| FE Faulty electronic card Contact for service. | ||
| F7 Overheating Contact for service. | ||
| F9 Diverter position error Contact for service. | ||
| F6 Faulty heater sensor Contact for service. | ||
| HI High voltage failure Contact for service. | ||
| LO Low voltage failure Contact for service. | ||
The installation and repairing procedures should always carried out by the Authorised Service Agent in order to avoid possible risks. The manufacturer shall not be held liable for damages that may arise from procedures carried out by unauthorised persons. Repairs may be carried out by technicians only. If a component has to be replaced, ensure that only original spare parts are used.
Improper repairs or use of non-original spare parts may cause considerable damage and put the user at considerable risk.
Contact information for your customer service can be found on the back of this document.
Function-relevant genuine spare parts according to the corresponding Ecodesign order can be obtained from Customer Service for a period of at least 10 years from the date on which your appliance was placed on the market within the European Economic Area.
11. THE PRODUCT FICHE
| Supplier's trade mark IFB | |
| Supplier's model | Neptune VX1 |
| Capacity of dishwasher 12 | |
| The energy efficiency class A++ | |
| Annual energy consumption in kWh per year (AEc) (280 Cycle)* | 258 |
| Energy consumption (Et) (kWh per cycle) | 0,907 |
| Off-mode power consumption (W) (Po) 0,50 | |
| Left-on mode power consumption (W) (Pt) 1,00 | |
| Annual water consumption in litres per year (AWc) (280 Cycle)** | 2520 |
| Drying efficiency class*** A | |
| Standard programme name**** Eco | |
| Programme time for standard cycle (min) | 222 |
| Duration of the left-on mode (T1) (min) - | |
| Airborne acoustical noise emissions (dB(A) re 1 pW) | 49 |
| Freestanding/Built-in Freestanding |
* Energy consumption 258 kwh per year, based on 280 standard cleaning cycles using cold water fill and the consumption of low power modes. Actual energy consumption will depend on how the appliance is used.
** Water consumption 2520 litres per year based on 280 standard cleaning cycles. Actual water consumption will depend on how appliance is used.
*** Drying efficiency class A on a scale from G (least efficient) to A (most efficient).
**** The “Eco” is the standard cleaning cycle to which the information in the label and the fiche relates. This programme is suitable to clean normally soiled tableware and it is the most efficient programme in terms of combined energy and water consumption.
CUSTOMER COPY
Mr./Mrs./Ms.
Address.
Telephone No.:
Model Name:
Serial No.:
Date of Purchase:
Cash Memo No.:
Dealer Name and:
Address Stamp:
Service Station Copy
Mr./Mrs./Ms
First Name Middle Name Last Name
Address:
Pin Code:
Telephone No.: (R) (____ O)
E-mail Address:
Model Name:
Serial No.:
Date of Purchase:
Cash Memo No.:
Products Owned by the customer:(Please tick in the appropriate box.)
□
Washing Machine
□
Refrigerator
[NO TEXT]
Color TV
[NO TEXT]
100% Clothes Dryer
[NO TEXT]
Dishwasher
□
Music System
Oven
Toaster Grill
2 Wheeler
Car
Air Conditioner
[NO TEXT]
WARRANTY
IFB IndustriesLtd. ("TheCompany") warrantstotheoriginal domesticpurchaserofthis dishwasher ("Appliance") that it isfreefromdefectsinworkmanshipandmaterials.During monthsfromthedateofpurchaseofthenewall dishwasher thepartsofthewhdishwasheobedefectivein workmanshipand/ormaterialsshallbereplacedorrepairedfree of charge on intimation to the company/ company's authorized servicecentrenearesttotheplacewheretheappliance is installed. This warranty is subject to limitations of warranty.
24
LIMITATIONSOFWARRANTY
- This warranty is not valid in case of the following events:
a) If the warrant card is not fully and properly filled in and signed at the time of purchase/installation by the company's authorized dealer/service engineer.
b) If the completed warranty card is not presented to the authorized personnel at the time of service/repair.
c) If the appliance is not used in accordance with manufacturer's instructions given in the "OperatingManual".
d) If the has disk waste, serviced, repaired, opened or tampered by any unauthorized personnel.
e) If defect sa rise/ caused by accidents, alteration, misuse, neglect, abuse, substitution of original components with spurious/nongenuine components, attacked by household pest/ rodents, fire, flood, earthquake, lightning and/or any other act sof God/natural, calamities.
f) If defects arising with optional accessories like trolleys, rat mesh, machine cover, on-line filter, inlet/exhaust extension hoses, tap adapter, extended power supply cable, adjustment feet cover, etc. thereof.
g) If damages occur by improper electrical circuits outside the dish was by any electrical supply thereof.
h) If themachineserialnumberontheapplianceisdefaced, missingoraltered.
i) If seawateror anysubstandarddetergenthasbeenusedintheappliance.
j) If the appliance is taken out of India.
-
This warranty does not cover any type of painting, plating including rusting etc., or defect thereof.
-
The company is not liable for any incidental or consequential damages.
-
Parts replaced or repaired under this warranty are warranted throughout the remaining of the original warranty period.
-
The company is not liable for any delay in servicing due to reasons beyond the control of the company or any of its authorized service centre.
-
This warranty is not applicable, if the dishwasher is used for commercial purpose or places like institutions, hostels, hospitals, community halls and other similar applications.
-
For anyservice under this warranty beyond city/town/municipallimits from the company/authorized service centre, a fixed charge of Rs. 250/- will be collected from the customers in addition to the actual to and fro charges by the shortest route. Alternatively, the customer can bring the appliance to the nearest service centre for carrying out the necessary repairs, at customer's own cost.
- During the warranty period, whenever the appliance is shifted from the original city of purchase to another city/town where service is provided by the company's authorized service agent, a warranty transfer charge of Rs.300/-will be collected from the customer by the company's authorized service agent. The above charges also include there installation charges of the appliance. However, incase of transfertoacity where the company provides direct service, an nominal charge of Rs.250/-only will be collected from the custom towards reinstallation. The Company, however, shall not undertake responsibility of shifting / transferring the appliance from the location where the appliance is originally installed.
- This warranty is issued subject to the jurisdiction of Calcuttacourts and/or other judicial/ quasijudicialforumshavingjurisdiction over theregistered office of the company.
- This is the ONLY WARRANTY covering the appliance given by the company.
OVER 7 MILLION SATISFIED CUSTOMERS
Microwave Oven
Built in Oven
Dishwasher
natural_image
Stacked kitchen appliances including a double boiler, gas stove, and fan (no visible text or labels)Chimney I Built in Hob
Top Load
Front Load
100% Clothes Dryer
Air Conditioner

wysiwyg.co.in | June 2021
Shop 24x7 @ www.ifbappliances.com | Email customerservice@ifbglobal.com | 080458 45678 Our lines remain open 24/7

www.facebook.com/IFBappliances

twitter.com/IFBAppliances

www.instagram.com/ifbappliances/

www.youtube.com/channel/UCJTIHxPTfez4mrbVBIQLb9Q
10794755
- www.ifbappliances.com
- Thank you for choosing this product.
- CONTENTS
- 1.SAFET INSTRUCTIONS .... 1
- 2.INSTALLATION....6
- 3.TECHNICAL SPECIFICATIONS....8
- 4.BEFORE USING THE APPLIANCE 9
- 5.LOADING OUR DISHWASHER....13
- 6.PROGRAM TABLE....17
- THE CONTROL PANEL....18
- SAFET INSTRUCTIONS
- General Safety Warnings
- Installation Warnings
- During Usage
- About E-waste
- Do's and don'ts for customers
- Do's
- Don't
- Risks of improper handling of E-waste
- CE Declaration of Conformity
- Packaging and Recycling
- For detailed information and disposal request
- INSTALLATION
- Machine positioning
- Water connection
- Water inlet hose
- Drain Hose
- Electrical connection
- Fitting the machine undercounter
- TECHNICAL SPECIFICATIONS
- General appearance
- Technical specifications
- BEFORE USING THE APPLIANCE
- Preparing your dishwasher for first use
- Salt Usage
- Fill the salt
- Only add water to the salt compartment on first use.
- Test Strip
- Water Hardness Table
- Water Softener System
- Setting
- Detergent usage
- Filling the detergent
- Using combined detergents
- Rinse-aid usage
- Filling the rinse-aid and setting
- In order to change the rinse aid level, follow the below steps before turning on the machine:
- LOADING OUR DISHWASHER
- Recommendations
- Height Adjustable Rack (peg type)
- Height adjustment
- Four Folding Racks (12 ps)
- Slide Basket
- Alternative basket loads Lower basket
- Incorrect Loads
- Unsuitable items for dishwashing
- Important Note for Test Laboratories
- PROGRAMME TABLE
- THE CONTROL PANEL
- On/Off Button
- Program Selection Button
- Delay Button
- Remaining Time Indicator
- Start/Pause Button
- Options Button
- Select Button
- Rinse Aid Indicator
- Salt Indicator
- Tablet Indicator
- Half Load Indicator
- Extra Hygiene Indicator
- Extra Rinse option
- Extra Drying Indicator
- Washing Step Indicators
- Changing a programme
- Cancelling a programme
- Switching the Machine Off
- Buzzer Sound Control (Model Depending)
- Save Power Mode
- CLEANING AND MAINTENANCE
- Filters
- Spray arms
- Drain Pump
- Warning Risk of Injury
- TROUBLESHOOTING
- THE PRODUCT FICHE
- CUSTOMER COPY
- Service Station Copy
- WARRANTY
- LIMITATIONSOFWARRANTY
- OVER 7 MILLION SATISFIED CUSTOMERS
Brand : IFB
Model : Neptune VX1
Category : Dishwasher