
PRX535 - Speaker JBL - Free user manual and instructions
Find the device manual for free PRX535 JBL in PDF.


| Product Type | Self-powered 15\" three-way bass-reflex loudspeaker |
| Frequency Range (-10 dB) | 39 Hz - 20 kHz |
| Frequency Response (±3 dB) | 46 Hz - 20 kHz |
| Coverage Pattern | 90° x 50° nominal |
| Crossover Frequencies | 430 Hz, 2.6 kHz (DSP controlled 24 dB/octave) |
| System Power Rating | 650 W continuous, 1300 W peak |
| Amplifier Power (LF / MF / HF) | Class-D: 400 W / 150 W / 100 W continuous at driver impedance |
| Maximum SPL Peak | 134 dB |
| Drivers | LF: 1 x JBL 265F 15\" Differential Drive® woofer; MF: 1 x JBL 195H 6.5\" woofer; HF: 1 x JBL 2414H 1\" annular polymer diaphragm neodymium compression driver |
| Enclosure Material | 18 mm plywood with polypropylene end caps |
| Finish | Anthracite DuraFlex™ |
| Grille | Powder coated anthracite 18 gauge perforated steel with acoustically transparent black foam backing |
| Input Connectors | Balanced XLR / 1/4\" combo jack with XLR loop through |
| Dimensions (H x W x D) | 1070 mm x 440 mm x 465 mm (42 in x 17.25 in x 18.25 in) |
| Net Weight | 33.5 kg (74 lb) |
| Power Requirements | 100 V - 240 V, 50/60 Hz, 600 W (with voltage selector) |
| Suspension / Mounting | 36 mm pole socket |
| Transport | 2 die-cast handles with backing cup |
| EQ Modes | Flat or Boost presets |
| Input Sensitivity Range | Mic: -25 dBu to 0 dBu; Line: +10 dBu to +28 dBu |
| Input Impedance | 64 kΩ balanced, 32 kΩ unbalanced |
| Distortion | Less than 0.1% at rated power |
| Indicators | Overload (red LED), Signal (green LED) |
| Warranty | 5 years on drivers, 3 years on amplifier, 2 years on enclosure |
Frequently Asked Questions - PRX535 JBL
User questions about PRX535 JBL
0 question about this device. Answer the ones you know or ask your own.
Ask a new question about this device
Download the instructions for your Speaker in PDF format for free! Find your manual PRX535 - JBL and take your electronic device back in hand. On this page are published all the documents necessary for the use of your device. PRX535 by JBL.
USER MANUAL PRX535 JBL
Important Safety Instructions 4
Precautions 5
Suspension of Loudspeaker Systems 5-7
Watch for These Symbols 8
The PRX500Series Power Amplifier 10-11
Introduction To The PRX500Series 12
System Specifications 13 - 18
System Setup 19-22
Setting Input Sensitivity 23-24
Setting The Gain 24
Application Examples 25-28
Reference 29
Cables and Connectors 30
Troubleshooting 31-32
Contact Information 33
Warranty Information 34
- Read these instructions.
- Keep these instructions.
- Heed all warnings.
- Follow all instructions.
-
Do not use this apparatus near water.
-
Clean only with dry cloth.
-
Do not block any ventilation openings. Install in accordance with the manufacturer's instructions.
-
Do not install near any heat sources such as radiators, heat registers, stoves, or other apparatus (including amplifiers) that produce heat.
-
Do not defeat the safety purpose of the polarized or grounding-type plug. A polarized plug has two blades with one wider than the other. A grounding-type plug has two blades and a third grounding prong. The wide blade or the third prong is provided for your safety. If the provided plug does not fit into your outlet, consult an electrician for replacement of the obsolete outlet.
-
Protect the power cord from being walked on or pinched, particularly at plugs, convenience receptacles, and the point where they exit from the apparatus.
-
Only use attachments/accessories specified by the manufacturer.
-
Use only with the cart, stand, tripod, bracket, or table specified by the manufacturer, or sold with the apparatus. When a cart is used, use caution when moving the cart/apparatus combination to avoid injury from tip-over.
-
Unplug this apparatus during lightning storms or when unused for long periods of time.
-
Refer all servicing to qualified service personnel. Servicing is required when the apparatus has been damaged in any way, such as power supply cord or plug is damaged, liquid has been spilled or objects have fallen into the apparatus, the apparatus has been exposed to rain or moisture, does not operate normally, or has been dropped.
-
If Service Instruction in Owner's Manual: "CAUTION - THESE SERVICING INSTRUCTIONS ARE FOR USE BY QUALIFIED SERVICE PERSONNEL ONLY. TO REDUCE THE RISK OF ELECTRIC SHOCK DO NOT PERFORM ANY SERVICING OTHER THAN THAT CONTAINED IN THE OPERATING INSTRUCTIONS UNLESS YOU ARE QUALIFIED TO DO SO."
-
To completely disconnect this apparatus from the ac mains, disconnect the power supply cord plug from the ac receptacle.
-
"WARNING – TO REDUCE THE RISK OF FIRE OR ELECTRIC – SHOCK, DO NOT EXPOSE THIS APPARATUS TO RAIN OR MOISTURE."
-
Do not expose this equipment to dripping or splashing and ensure that no objects filled with liquids, such as vases, are placed on the equipment.
-
The main plug of the power supply cord shall remain readily operable.
Care And Cleaning
PRX500 series systems may be cleaned with a dry cloth. Do not get moisture into any of the openings in the system. Ensure that the system is unplugged from the AC outlet before cleaning. In the event the DuraFlex finish is damaged a touch up kit can be obtained from JBL Professional (part number 363972-001).
THIS APPARATUS CONTAINS POTENTIALLY LETHAL VOLTAGES. TO PREVENT ELECTRIC SHOCK OR HAZARD, DO NOT REMOVE CHASSIS, INPUT MODULE OR AC INPUT COVERS. NO USER SERVICEABLE PARTS INSIDE. REFER SERVICING TO QUALIFIED SERVICE PERSONNEL.


The PRX500 series speakers covered by this manual are not intended for use in high moisture environments. Moisture can damage the speaker cone and surround and cause corrosion of electrical contacts and metal parts. Avoid exposing the speakers to direct moisture. Keep speakers out of extended or intense direct sunlight. The driver suspension will prematurely dry out and finished surfaces may be degraded by long-term exposure to intense ultra-violet (UV) light. PRX500 series speakers can generate considerable energy. When placed on a slippery
surface such as polished wood or linoleum, the speaker may move due to its acoustical energy output.
Precautions should be taken to assure that the speaker does not fall off a stage or table on which it is placed.
Stand Mounting Safety Precautions
Some PRX500 series models include a 36 mm receptacle cup to allow mounting on tripod stands or on a pole over subwoofers. When using stands or poles, be sure to observe the following precautions:
- Check the stand or pole specification to be certain the device is designed to support the weight of the speaker. Observe all safety precautions specified by the manufacturer.
- Always verify that the stand (or subwoofer/pole) is placed on a flat, level and stable surface and be sure to fully extend the legs of tripod type stands. Position the stand so that the legs do not present a trip hazard.
- Route cables so that performers, production crew, and audience will not trip and topple the speakers over.
- Inspect the stand (or pole and associated hardware) before each use and do not use equipment with worn, damaged or missing parts.
- Do not attempt to place more than one PRX500 series speaker on a stand or pole.
- Always be cautious in windy, outdoor conditions. It may be necessary to place additional weight (i.e. sandbags) on the base of the stand to improve stability. Avoid attaching banners or similar items to any part of a speaker system. Such attachments could act as a sail and topple the system.
- Unless you are confident that you can handle the weight of the speaker, ask another person to help you get it onto the tripod stand or pole.
Suspension of Loudspeaker System
Before attempting to suspend your JBL loudspeakers, read and understand the following safety information.
IMPORTANT SAFETY WARNING!
The information in this section has been assembled from recognized engineering data and is intended for informational purposes only. None of the information in this section should be used without first obtaining competent advice with respect to applicability to a given circumstance. None of the information presented herein is intended as a representation or warranty on the part of JBL. Anyone making use of this information assumes all liability arising from such use.
All information presented herein is based upon materials and practices common to North America and may not directly apply to other countries because of differing material dimensions, specifications, and/or local regulations. Users in other countries should consult with appropriate engineering and regulatory authorities for specific guidelines.
Correct use of all rigging hardware is required for secure system suspension. Careful calculations should always be performed to ensure that all components are used within their working load limits before the array is suspended. Never exceed the maximum recommended load ratings.
Before suspending any speaker system always inspect all components (enclosure, rigging frames, pins, eyebolts, track fittings, etc.) for cracks, deformations, corrosion, missing, loose or damaged parts that could reduce strength and safety of the array. Do not suspend the speaker until the proper corrective action has been taken. Use only load-rated hardware when suspending JBL suspendable loudspeaker models.
Are You New to Rigging?
If you are new to rigging, you should do the following:
- Read and study JBL Technical Note Volume 1, Number 14: Basic Principles for Suspending Loudspeaker Systems (available at http://www.jblpro.com/catalog/support/getfile.aspx?docid=296&doctype=3).
- Know the rules for safe rigging.
- Attend a safe rigging seminar, such as that presented by professionals like Rigging Seminars™ or by Chain Motor Hoist manufacturers like Columbus McKinnon Corp. (manufacturers of the C/M Lodestar).
- Meet and establish a relationship with a licensed mechanical or structural engineer. Get in the habit of asking them questions instead of guessing about their answers. Learn from what they tell you.
- Meet and discuss this aspect of your business with your Insurance Agent.
- Research and understand the codes, practices, and requirements in the venues where you intend to operate your sound system.
General Hardware Information
Any hardware used in an overhead suspension application must be load rated for the intended use. Generally, this type of hardware is available from rigging supply houses; industrial supply catalogs and specialized rigging distributors. Local hardware stores do not usually stock these products. Hardware that is intended for overhead suspension will comply with ASME B30.20 and will be manufactured under product traceability controls. Compliant hardware will be referenced with a working load limit (WLL) and a traceability code.
Attachment to Structures
A licensed Professional Engineer must approve the placement and method of attachment to the structure prior to the installation of any overhead object. The following performance standards should be provided to the Professional Engineer for design purposes; Uniform Building Code as applicable, Municipal Building Code as applicable, and Seismic Code as applicable.
The installation of the hardware and method of attachment must be carried out in the manner specified by the Professional Engineer. Improper installation may result in damage, injury or death.
Inspection & Maintenance
Suspension systems are comprised of mechanical devices and, as such, they require regular inspection and routine maintenance to insure proper function ability. JBL suspendable loudspeakers must be inspected for fatigue at least annually. The inspection shall include a visual survey of all corners and load bearing surfaces for signs of cracking, water damage, de-lamination, or any other condition that may decrease the strength of the loudspeaker enclosure. Accessory suspension hardware provided with or for the JBL loudspeakers must be inspected for fatigue at least annually. The inspection shall include a visual survey of the material for signs of corrosion, bending or any other condition that may decrease the strength of the fastener. Additionally, any eyebolts shall be checked for possible spin-out of the enclosure.
For all other hardware and fittings, refer to the hardware manufacturer's inspection and maintenance guidelines for process.
JBL is not responsible for the application of its products for any purpose or the misuse of this information for any purpose. Furthermore, JBL is not responsible for the abuse of its products caused by avoiding compliance with inspection and maintenance procedures or any other abuse.
Prior to suspending the system, an expert, trained and experienced in suspending speaker systems should inspect all rigging parts and components.
Resources
Adaptive Technologies Group McMaster Carr
562.424.1100 Various Locations in the USA
1635 E. Burnett Street For a location near you, visit
Signal Hill, CA 90755 them at www.mcmaster.com
www.adapttechgroup.com
JBL Professional - Tech Note Vol. 1 No. 14
"Basic Principles for Suspending Loudspeakers"
www.jblpro.com/catalog/support/getfile.aspx?docid=296&doctype=3
Safe Rigging
JBL suspendable version loudspeakers are supplied with built-in internal brackets. The systems are designed to facilitate the suspension of the loudspeaker by a qualified person familiar with rigging hardware and industry practices. Improper installation may result in damage, injury or death.
If you are unfamiliar with Safe Rigging Practices you will need to consult with a qualified person familiar with rigging hardware and industry practices.
Working Load Limit
Working Load Limit for M10 Suspension Points
The working load limit (WLL) of any JBL suspendable loudspeaker system using the M10 attachment point will be maintained as long as no more than 470lbs/213kg from 2 points equally loaded or no more than 235lbs./106 kg from a single point maximum and as long as safe rigging practices are followed.
For permanent installation applications utilizing the M10 suspension points order JBL 229-00009-01.
This kit includes three (3) M10 x 35 mm forged shoulder steel eyebolts with washers.
WARNING
Suspension of JBL loudspeakers must employ a minimum of two (2) attachment points. When "bridling" a JBL loudspeaker system, two (2) legs of equal length must be used. The rear attachment points are pull-back points and are intended only for use in adjusting the down-angle of the speaker enclosure. Only the top and bottom attachment points are intended for use as suspension points.
Hearing Damage, Prolonged Exposure To Excessive SPL
PRX500 series loudspeakers are easily capable of generating sound pressure levels (SPL) sufficient to cause permanent hearing damage to performers, production crew and audience members. Caution should be taken to avoid prolonged exposure to SPL in excess of 90 dB.
WATCH FOR THESE SYMBOLS!

CAUTION
RISK OF ELECTRIC SHOCK DO NOT OPEN

WARNING - TO REDUCE THE RISK OF FIRE OR ELECTRIC SHOCK, DO NOT EXPOSE THIS EQUIPMENT TO RAIN OR MOISTURE.
RISQUE DE CHOC ELECTRIQUE NE PAS OUVRIR
The lightning flash with arrowhead symbol within an equilateral triangle, is intended to alert the user to the presence of uninsulated." "Dangerous Voltage" within the products enclosure that may be of sufficient magnitude to constitute a risk of electric shock to persons.
The exclamation point within an equi-lateral triangle is intended to alert the user to the presence of important operating and maintenance (Servicing) instructions in the literature accompanying the product.
Safety And EMC Compliance Specifications
EN 55103-1:1997 Electromagnetic Compatibility - Product Family Standard for Audio, Video, Audio-Visual and Entertainment Lighting Control Apparatus for Professional Use, Part 1: Emissions
EN 55103-1:1997 Magnetic Field Emissions-Annex A @ 10 cm and 20 cm
EN 55022:2003 Limits and Methods of Measurement of Radio Disturbance Characteristics of ITE: Radiated, Class B Limits; Conducted, Class A
EN 55103-2:1997 Electromagnetic Compatibility - Product Family Standard for Audio, Video, Audio-Visual and Entertainment Lighting Control Apparatus for Professional Use, Part 2: Immunity
EN 61000-4-2: A2:2001 Electrostatic Discharge Immunity (Environment E2-criteria B, 4 kV Contact, 8 kV Air discharge)
EN 61000-4-3:2003 Radiated, Radio-frequency, Electromagnetic Immunity (Environment E2, criteria A)
EN61000-4-4:2005 Electrical Fast Transient/Burst Immunity (criteria B)
EN 61000-4-5:2001 Surge Immunity (criteria B)
EN 61000-4-6:1996 Immunity to Conducted Disturbances Induced by Radio-Frequency Fields (criteria A)
EN 61000-4-11:2004 Voltage Dips, Short Interruptions and Voltage Variation
UL 6500 2nd Edition 1999 Audio/Video and Musical Instruments Apparatus for Household, Commercial, and Similar General Use
CAN/CSA-E60065-00 Audio, video and similar apparatus - Safety requirements
CSA Compliance Notice
CSA Certification Applies to Amplifier Module Only
CSA Certified to operate only at 120V\~ in Canada
FCC Compliance Notice
This device complies with part 15 of the FCC rules. Operation is subject to the following two conditions: (1) This device may not cause harmful interference, and (2) this device must accept any interference received, including interference that may cause undesired operation.
CAUTION: Changes or modifications not expressly approved by the party responsible for compliance could void the user's authority to operate the equipment.
NOTE: This equipment has been tested and found to comply with the limits for a Class A digital device, pursuant to part of the FCC Rules. These limits are designed to provide reasonable protection against harmful interference in a residential installation. This equipment generates, uses, and can radiate radio frequency energy and, if not installed and used in accordance with the instruction manual, may cause harmful interference to radio communications. However there is no guarantee that the interference will not occur in a particular installation. If this equipment does cause harmful interference to radio and television reception, which can be determined by turning the equipment off and on, the user is encouraged to try to collect the interference by one or more of the following measures.
- Reorient or relocate the receiving antenna.
- Increase the separation between the equipment and receiver.
- Connect the equipment into an outlet on a circuit different from that to which the receiver is connected.
- Consult the dealer or an experienced radio / TV technician for help.
AC Power Requirements
Standard PRX500 series speaker systems are equipped with a multi-channel Crown Class-D power amplifier and loudspeaker specific DSP electronics and require appropriate AC power. Before plugging a PRX500 speaker into an outlet ensure that it is able to provide the appropriate AC power as set on the speaker.
A robust AC supply is necessary for maximum performance. If the supply is too weak the bass performance may be affected and if it sags (drops) too much the system may self-mute to protect itself. As soon as the appropriate AC supply is restored it will continue to operate. Plugging multiple systems into the same outlet and long extension cord runs may affect the AC supply to the systems.

CAUTION
In compliance with safety agency criteria and proper system operation, it is critical that the system installer observe all electrical safety practices at all times and provide proper earth grounding for all AC Power connections.
Powering Up
The main power switch is located on the input panel on the back of the enclosure. Always ensure that the speaker system is the last thing you power up, and the first thing to turn off when operating your complete PA system. If speaker systems are daisy chained together always turn off the last system in the chain first. Power “on” is indicated by the illumination of the logo on the front of the enclosure.
Changing Voltage
Your PRX500 series speaker will typically be set at the factory to accommodate the power mains voltage in your area. Before you set up your PRX500 series speaker for the first time it is a good idea to verify that the setting of the selector is appropriate for the power in your area. In the event that you do need to change the voltage:
- Make sure that the speaker is powered off and the AC is disconnected from the speaker.
- Directly above the male IEC connector on the speaker is a voltage selector. Just slide the switch to the appropriate setting.
- Set the voltage selector switch to the 115V for (100-120V\~) or 230V for (220-240V\~) range setting as required for your area.
- After having reconfirmed that the correct voltage is selected, reconnect the AC (IEC connector) and power the unit up.
DO NOT UNDER ANY CIRCUMSTANCES OPERATE THE UNIT WITH THE WRONG VOLTAGE SELECTED. DOING SO MAY RESULT IN SERIOUS DAMAGE TO YOUR SPEAKER SYSTEM WHICH WILL NOT BE COVERED BY WARRANTY.
CLASS 2 WIRING


Class 2 output wiring.
Operating Temperature
The design of the Crown amplifier is such that it is very energy efficient and as a result does not get really hot. In the rare event that it does get too hot it will automatically shut down to protect itself. When its temperature has returned to within its operating range it will turn back on. A Condition under which this may occur is when the system is operated in very high ambient temperatures and the heat sink on the rear of the enclosure is in direct sunlight. Always ensure adequate cooling and appropriate shade.
Introduction to the PRX500series

natural_image
Technical line drawing of a speaker or speaker enclosure with front panel and circular base (no text or symbols)
natural_image
Technical line drawing of a speaker with three circular components (no text or symbols)
natural_image
Technical line drawing of a speaker grille and circular base (no text or symbols)
natural_image
Technical line drawing of a circular mechanical component with concentric rings and centerlines (no text or symbols)PRX512M
PRX512Mi
PRX518S
PRX718S

natural_image
Technical line drawing of a speaker with two circular components and a top panel (no text or symbols)PRX515 PRX525 PRX535

natural_image
Technical line drawing of a two-tiered speaker or audio device with circular and rectangular components (no text or symbols)
natural_image
Top-down line drawing of a speaker with two speakers and a front panel (no text or symbols)Thank you for choosing the JBL PRX500 series self-powered PA loudspeakers. There are seven models in the series, five full-range systems and two subwoofers. All are powered by integrated digital power amplifiers developed by Crown, the most trusted name in professional sound reinforcement power amplification. In addition to Crown power amplifiers, the systems are equipped with sophisticated DSP for EQ, crossover, system control and protection. Engineered and manufactured by JBL Professional with precision and care, your PRX500 series speaker will provide you with many years of flawless performance. To ensure you are always receiving optimum performance we encourage you to review this user's guide completely before hooking up your new system.
In addition to the high performance light weight Crown amplifier, PRX500 series utilizes the latest in JBL transducer technology. The neodymium Differential Drive® transducers not only provide high sound pressure levels with minimum distortion and power compression, but they are also incredibly light. Combined together in highly engineered enclosures, PRX500 series speaker systems deliver the highest performance to weight ratio in the class – portable PA that's actually portable.
All PRX500 systems are built road tough; covered with JBL's DuraFlex™, one of the most durable finishes ever created for a speaker and protected by heavy-duty foam backed steel grilles. The foam backing not only looks excellent but it stops direct liquid intrusion and it does not affect the acoustics. The larger systems have an extra layer of protection from the road in the form of tough polypropylene end-caps. These are independent of the acoustic enclosure so in the event of really tough knocks the speaker's performance will not suffer.
Single Box On A Pole Coverage
The PRX512M and PRX512Mi feature a dual angle pole socket providing flexibility in aiming the speaker. As a guide line, the speaker should be positioned so that the audience cannot see the top or bottom panels of the speaker. The PRX515 also features a pole mount of the 'single' socket variety. When using stands or poles, be sure to observe the precautions as stated in the "Precautions" section of the manual.
PRX512M / PRX512Mi
| System Type: | Self powered 12", two-way, bass-reflex |
| Frequency Range (-10 dB): | 46 Hz - 20 kHz (EQ in main position) / 46 Hz - 20 kHz60 Hz - 20 kHz (EQ in monitor position) / 58 Hz - 20 kHz |
| Frequency Response (±3 dB): | 76 Hz - 20 kHz (EQ in main position) / 55 Hz - 20 kHz90 Hz - 20 kHz (EQ in monitor position) / 90 Hz - 20 kHz |
| Coverage Pattern: | 70^ × 70^ nominal |
| Directivity Index (DI): | 10.2 dB |
| Directivity Factor (Q): | 10.8 |
| Crossover Modes: | DSP controlled 48 dB filter slope |
| Crossover Frequency: | 1.6 kHz |
| System Power Rating: | 500 W continuous, 1000 W peak |
| LF Power amp: | Class-D, 400 Watt (continuous) at driver impedance |
| HF Power amp: | Class-D, 100 Watt (continuous) at driver impedance |
| Distortion: | Less than 0.1% at rated power |
| Maximum Peak Output: | 133 dB |
| Signal indicators: | Overload*: Red LED indicates input overload conditionSignal: Green LED indicates signal present |
| Input sensitivity range: | Mic position: -25 dBu to 0 dBu / -26 dBu to -8 dBu **Line position: +10 dBu to +28 dBu / 0 dB to +18 dBu ** |
| Input Impedance: | 64 K Ohms (balanced), 32 K Ohms (unbalanced) |
| EQ: | Presets for use in Main and Monitor position |
| LF Driver: | 1 x JBL 262F 380 mm (12 in) Differential Drive® woofer |
| HF Driver: | 1 x JBL 2408H 37.5 mm (1.5 in) annular polymer diaphragm, neodymium compression driver |
| Enclosure: | Trapezoidal, 18 mm, plywood |
| Suspension/ Mounting: PRX512M:PRX512Mi: | Dual 36 mm pole socketDual 36 mm pole socket, 8 x M10 Suspension Points and 1 x M10 Pull-Back Point |
| Transport: | Integrated handle with backing cup |
| Finish: | Anthracite DuraFlexTM finish |
| Grille: | Powder coated, Anthracite, 18 gauge perforated steel with acoustical transparent black foam backing. |
| Input Connectors: | Balanced XLR / 1/4 inch combo jack with XLR loop through |
| Dimensions (H x W x D): | 639 mm x 384 mm x 363 mm(25.2 in x 15.1 in x 14.3 in) |
| Net Weight: | 18 kg (40 lb) |
* PRX512Mi, Limiter: Red LED indicates limiter in operation
**PRX512Mi
| System Type: | Self powered 15", two-way, bass-reflex |
| Frequency Range (-10 dB): | 45 Hz - 20 kHz (EQ in flat position) |
| Frequency Response (±3 dB): | 52 Hz - 20 kHz (EQ in flat position) |
| Coverage Pattern: | 70° x 70° nominal |
| Directivity Index (DI): | 10.3 dB |
| Directivity Factor (Q): | 10.8 |
| Crossover Modes: | DSP controlled 48 dB filter slope |
| Crossover Frequency: | 1.6 kHz |
| System Power Rating: | 500 W continuous, 1000 W peak |
| LF Power amp: | Class-D, 400 Watt (continuous) at driver impedance |
| HF Power amp: | Class-D, 100 Watt (continuous) at driver impedance |
| Distortion: | Less than 0.1% at rated power |
| Maximum Peak Output: | 133 dB |
| Signal indicators: | Overload: Red LED indicates input overload conditionSignal: Green LED indicates signal present |
| Input sensitivity range: | Mic position: -25 dBu to 0 dBuLine position: +10 dBu to +28 dBu |
| Input Impedance: | 64 K Ohms (balanced), 32 K Ohms (unbalanced) |
| EQ: | Presets for Main and Monitor position |
| LF Driver: | 1 x JBL 265F 380 mm (15 in) Differential Drive® woofer |
| HF Driver: | 1 x JBL 2408H 37.5 mm (1.5 in) annular polymer diaphragm, neodymium compression driver |
| Enclosure: | Trapezoidal, 18 mm, plywood with polypropylene end caps |
| Suspension / Mounting: | Dual 36 mm pole socket |
| Transport: | 2 x die-cast handles with backing cup |
| Finish: | Anthracite DuraFlexTM finish |
| Grille: | Powder coated, Anthracite, 18 gauge perforated steel with acoustical transparent black foam backing. |
| Input Connectors: | Balanced XLR / 1/4 inch combo jack with XLR loop through |
| Dimensions (H x W x D): | 815 mm x 440 mm x 465 mm(32 in x 17.25 in x 18.25 in) |
| Net Weight: | 26 kg (57 lb) |
| System Type: | Self powered dual 15", two-way, bass-reflex |
| Frequency Range (-10 dB): | 40 Hz - 20 kHz (EQ in flat position) |
| Frequency Response (±3 dB): | 52 Hz - 20 kHz (EQ in flat position) |
| Coverage Pattern: | 70° x 70° nominal |
| Directivity Index (DI): | 10.3 dB |
| Directivity Factor (Q): | 10.8 |
| Crossover Modes: | DSP controlled 48 dB filter slope |
| Crossover Frequency: | 1.6kHz |
| System Power Rating | 650 W continuous, 1300 W peak |
| LF Power amp: | Class-D, 275 Watt (continuous) at driver impedance |
| LF2 Power amp: | Class-D, 275 Watt (continuous) at driver impedance |
| HF Power amp: | Class-D, 100 Watt (continuous) at driver impedance |
| Distortion: | Less than 0.1% at rated power |
| Maximum Peak Output: | 135 dB |
| Signal indicators: | Overload: Red LED indicates input overload conditionSignal: Green LED indicates signal present |
| Input sensitivity range: | Mic position: -25 dBu to 0 dBuLine position: +10 dBu to +28 dBu |
| Input Impedance: | 64 K Ohms (balanced), 32 K Ohms (unbalanced) |
| EQ: | Presets for Flat or Boost |
| LF Driver: | 2 x JBL 265F 380 mm (15 in) Differential Drive® woofer |
| HF Driver: | 1 x JBL 2408H 37.5 mm (1.5 in) annular polymer diaphragm, neodymium compression driver |
| Enclosure: | Trapezoidal, 18 mm, plywood with polypropylene end caps |
| Transport: | 2 x die-cast handles with backing cup |
| Finish: | Anthracite DuraFlexTM finish |
| Grille: | Powder coated, Anthracite, 18 gauge perforated steel with acoustical transparent black foam backing |
| Input Connectors: | Balanced XLR / 1/4 inch combo jack with XLR loop through |
| Dimensions (H x W x D): | 1300 mm x 440 mm x 465mm(51 in x 17.25 in x 18.25 in) |
| Net Weight: | 38 kg (84 lb.) |
| System Type: | Self powered 15", three-way, bass-reflex |
| Frequency Range (-10 dB): | 39 Hz - 20 kHz (EQ in flat position) |
| Frequency Response (±3 dB): | 46 Hz - 20 kHz (EQ in flat position) |
| Coverage Pattern: | 90^ × 50^ nominal |
| Directivity Index (DI): | 10.6 dB |
| Directivity Factor (Q): | 11.4 |
| Crossover Modes: | DSP controlled 24 dB filter slope |
| Crossover Frequency: | 430 Hz, 2.6 kHz |
| System Power Rating: | 650 W continuous, 1300 W peak |
| LF Power amp: | Class-D, 400 Watt (continuous) at driver impedance |
| MF Power amp: | Class-D, 150 Watt (continuous) at driver impedance |
| HF Power amp: | Class-D, 100 Watt (continuous) at driver impedance |
| Distortion: | Less than 0.1% at rated power |
| Maximum Peak Output: | 134 dB |
| Signal indicators: | Overload: Red LED indicates input overload conditionSignal: Green LED indicates signal present |
| Input sensitivity range: | Mic position: -25 dBu to 0 dBuLine position: +10 dBu to +28 dBu |
| Input Impedance: | 64 K Ohms (balanced), 32 K Ohms (unbalanced) |
| EQ: | Presets for Flat or Boost |
| LF Driver: | 1 x JBL 265F, 380 mm (15 in) Differential Drive® woofer |
| MF Driver: | 1 x JBL 195H, 165 mm (6.5 in) woofer |
| HF Driver: | 1 x JBL 2414H 25 mm (1.0 in) annular polymer diaphragm, neodymium HF compression driver |
| Enclosure: | Trapezoidal, 18 mm, plywood with polypropylene end caps |
| Suspension / Mounting: | 36 mm pole socket |
| Transport: | 2 x die-cast handles with backing cup |
| Finish: | Anthracite DuraFlexTM finish |
| Grille: | Powder coated, Anthracite, 18 gauge perforated steel with acoustical transparent black foam backing. |
| Input Connectors: | Balanced XLR / 1/4 inch combo jack with XLR loop through |
| Dimensions (H x W x D): | 1070 mm x 440 mm x 465 mm(42 in x 17.25 in x 18.25 in) |
| Net Weight: | 33.5 kg (74 lb) |
| System Type: | Self powered 18", bass-reflex |
| Frequency Range (-10 dB): | 37 Hz - 140 Hz |
| Frequency Response (±3 dB): | 52 Hz – 110 Hz |
| Crossover Modes: | DSP controlled 24 dB filter slope |
| Crossover Frequency: | 120 Hz |
| System Power Rating: | 500 W continuous, 1000 W peak |
| LF Power amp: | Class-D, 500 Watt (continuous) at driver impedance |
| Distortion: | Less than 0.1% at rated power |
| Maximum Peak Output: | 129 dB |
| Signal indicators: | Overload: Red LED indicates input overload conditionSignal: Green LED indicates signal present |
| Input sensitivity range: | +6 dBu to +24 dBu |
| Input Impedance: | 34K Ohms (balanced), 18K Ohms (unbalanced) |
| Polarity: | 0° or 180° phase shift |
| LF Driver: | 1 x JBL 2044E 460 mm (18 in) woofer |
| Enclosure: | Rectangular, 18 mm, plywood |
| Suspension / Mounting: | 36 mm pole socket on top |
| Transport: | 2 x die-cast handles with backing cup |
| Finish: | Anthracite DuraFlexTM finish |
| Grille: | Powder coated, Anthracite, 18 gauge perforated steel with acoustical transparent black foam backing. |
| Input Connectors: | Balanced XLR 1/4 inch combo jack with XLR loop through. (stereo) |
| Dimensions (H x W x D): | 673 mm x 535 mm x 610 mm (26.5 in x 21 in x 24 in) |
| Net Weight: | 36 kg (79 lb.) |
| Frequency Range (-10 dB): | 33 Hz - 160 Hz |
| Frequency Response (±3 dB): | 37 Hz – 130 Hz |
| Crossover Modes: | DSP controlled 24 dB/Oct. filter slope |
| Crossover Frequency: | 120 Hz |
| System Power Rating: 700 W continuous, 1400 W peak | |
| LF Power amp: | Dual-Bridge TechnologyTM, Class-D, 700 Watts (continuous at driver impedance) |
| Distortion: | Less than 0.1% at rated power |
| Maximum Peak Output: | 133 dB |
| Signal indicators: | Limiter: Red LED indicates limiter in operationSignal: Green LED indicates signal present |
| Input sensitivity range: | +4 dBu to +22 dBu |
| Input Impedance: | 34K Ohms (balanced), 18K Ohms (unbalanced) |
| Polarity: | 0° or 180° phase shift |
| LF Driver: | 1 x JBL 2268FF 460 mm (18 in) woofer |
| Enclosure: | Rectangular, 18 mm, plywood |
| Suspension / Mounting: | 36 mm pole socket on top |
| Transport: | 2 x rugged handles with backing cup |
| Finish: | Anthracite DuraFlexTM finish |
| Grille: | Powder coated, Anthracite, 18 gauge perforated steel with acoustical transparent black foam backing. |
| Input Connectors: | Balanced XLR 1/4 inch combo jack with XLR loop through. (stereo) |
| Dimensions (H x W x D): | 668 mm x 536 mm x 713 mm (26.3 in x 21.1 in x 28 in) |
| Net Weight: | 34.5 (76 lb) |
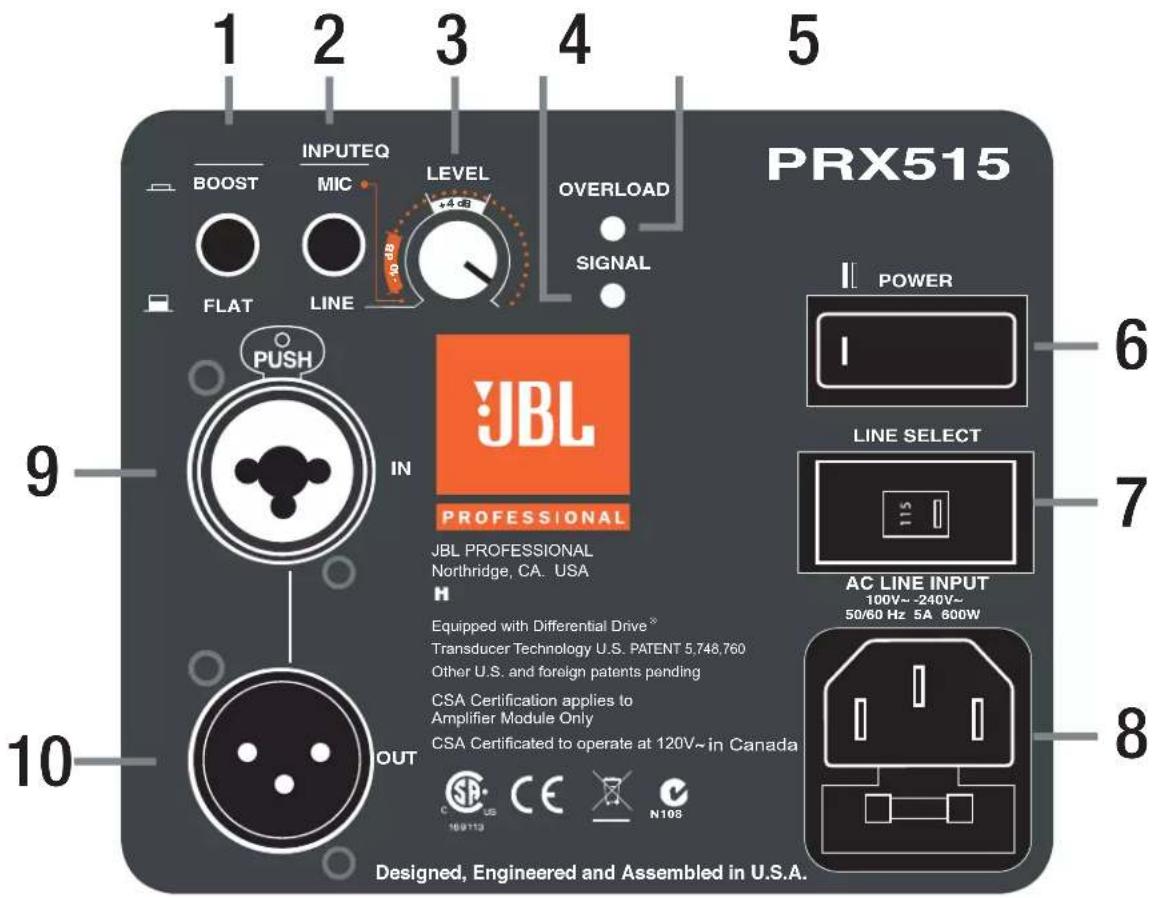
PRX500 Amplifier Input Configuration for
PRX512M, PRX512Mi, PRX515, PRX525 and PRX535 Full-Range Models:
Features
1 - EQ BOOST / FLAT: When set in the "FLAT" position, frequency response is linear and unaltered. When "Boost" is selected, internal equalization is applied to enhance low frequency and high frequency response. "FLAT" will provide greater accuracy of reproduced music, higher speech intelligibility and maximum overall level. "BOOST" is particularly useful at lower levels to enhance pre-recorded music. The feature provides flexibility without the need to use an external equalizer. The chart (at right) shows the effect of the "BOOST" setting.
MAIN/MONITOR*: Switching between "MAIN" and "MONITOR" optimizes the system for use as either a main full-range system, or a stage monitor.
* PRX512M and PRX512Mi only

line
| Frequency (Hz) | BOOST | FLAT | | -------------- | ----- | ---- | | 20 | 87 | 83 | | 100 | 101 | 96 | | 1000 | 97 | 97 | | 10000 | 100 | 98 | | 20000 | 90 | 87 |2 - INPUT MIC / LINE: Allows the selection of different input sensitivities to permit the connection of many different sources, with or without the use of a mixer or external microphone preamplifier. See "Setting Input Sensitivity" on page 23-24.
3 - LEVEL: Sound level adjustment. With the input in the "MIC" position the level can be adjusted over a large range. In the "LINE" position most typical applications will require that the level control is set at 12 o'clock. (More details are outlined in "Setting the Input Sensitivity" and "Setting the Gain").
6 - POWER SWITCH: Turns the power on. The illuminated logo in the front of the speaker serves also as a power "on" indicator.
7 - LINE SELECT: Allows the user selection for different local voltage ratings.
8 - AC LINE INPUT: Standard IEC AC mains input connector.
Indicators
4 - SIGNAL: Signal indicator. The green LED illuminates when a signal is present.
5 - OVERLOAD*: The red LED illuminates when the system overload protection is active. If the input signal is too strong or the "LEVEL" control set too high, the red LED will illuminate constantly. Illumination of the "OVERLOAD" LED can be avoided by reducing the input level or turning down the "LEVEL" control to the point at which the red LED occasionally flickers.
Connectors
9 - XLR: Female balanced XLR and 1/4 inch phone jack combo balanced input connector.
10 - XLR : Male balanced XLR output connector. This connector provides a full-range signal which can be daisy chained to another speaker.
*PRX512Mi, LIMITER: Red LED indicates limiter in operation
PRX500 Amplifier Input Configuration for
PRX518S and PRX718S Subwoofer Models:

Features
1 - XOVER IN / OUT: Pressing this button engages a high-pass filter at 120 Hz. This 4th order active filter allows a smooth transition between the subwoofer and a full range speaker connected to the output connector.
2 - POLARITY INVERT: Allows you to set the polarity of the subwoofer to either 0^ (no change) or 180^ (inverse polarity). The correct polarity setting will produce the best blend between the subwoofer and the full-range speaker and the strongest perceived bass response at the listening position. This is especially useful when the subwoofer is placed at a different distance from the listening position than the full-range speakers. If the bass response seems weak, try inverting the polarity.
3 - LEVEL: Sound level adjustment. The 12 o'clock position is a good starting point for most usages. Once the full-range system has been connected the level can be varied to match and deliver the desired balance (for details see Setting the Gain on page 21).
6 - POWER SWITCH: Turns the power on. Power "on" status is indicated with the illumination of the logo on the grille.
7 - LINE SELECT: Allows the user selection for different local voltage ratings.
8 - AC LINE INPUT: Standard IEC AC mains input connector.
Indicators
4 - SIGNAL: Signal indicator. The green LED illuminates when a signal is present at the input connector.
5 - OVERLOAD*: The red LED illuminates when the system overload protection is active. If the input signal is too strong or the "LEVEL" control set too high, the red LED will illuminate constantly. Illumination of the "OVERLOAD" LED can be avoided by reducing the input level or turning down the "LEVEL" control to the point at which the red LED occasionally flickers.
Connectors
9 & 11 - XLR: 1/4 inch phone jack balanced input connector. (see Reference section page 29 for information).
10 & 12 - XLR: Male balanced output connector. This connector provides a full-range or high-passed signal. dependent on the setting of the "XOVER" switch. In addition to connecting a full-range system to the output, it's also possible to daisy chain subwoofers together.
Note 3: A single subwoofer can be used with a stereo source. The integral differential circuits sums the low frequency information from the left and right channel to a mono signal, ready for reproduction by the subwoofer.
*PRX718S, LIMITER: Red LED indicates limiter in operation
PRX500 series systems have been designed to allow the connection of a variety of sources. This provides a great deal of versatility, especially with the PRX512M and PRX515, as a microphone or instrument can be connected directly to the input. Low level output from consumer products like MP3 and CD players, can also be accommodated.
There are two user selectable gain or input sensitivity ranges: Mic and Line. For the majority of applications, the system will be receiving a signal from a mixer, equalizer of other professional grade product. In this case “Line” should be selected and the “LEVEL” adjusted to the 12 o'clock position indicated by the +4 dB region. The “LEVEL” control can then be trimmed to optimize the performance of the system (see Setting The Gain).

LINE

When a microphone, instrument or other consumer product is connected to the system, first ensure that the "LEVEL" control is at its minimum, anti-clockwise, OFF position. Then select the "Mic" input sensitivity and slowly increase the level. If the "overload" LED illuminates you should back the level down again. If the "overload" LED illuminates and the "LEVEL" control is barely cracked open then you should try selecting the "LINE" input sensitivity range.

MIC

WARNING: SELECTING THE "MIC" POSITION WITH THE LEVEL CONTROL IN ANY POSITION OTHER THAN THE "OFF" POSITION MAY RESULT IN EXTREMELY HIGH SPLs.
The following levels should be used as a reference if you know the maximum output in dBu of the source connected to the system's input. For each position stated below there is an input signal level in dBu that is required to deliver absolute maximum output of the system.
LINE
Level Position
Full "on" +10 dBu
3 o'clock +12 dBu
12 o'clock +17 dBu
9 o'clock +28 dBu
MIC
Level Position
Full "on" -25 dBu
3 o'clock -23 dBu
12 o'clock -18 dBu
9 o'clock -7 dBu
Input Level Required To Deliver Maximum Output

(O dBu) ^ (+4 dBu) ^*
(+2 dBu) (+6 dBu)
(+6 dBu) (+10 dBu)
(+18 dBu) (+22 dBu)
Input Level Required To Deliver Maximum Output

(-26 dBu)*
(-24 dBu)
(-20 dBu)
(-8 dBu)
SETTING THE GAIN
Only a properly setup system will guarantee maximum performance with a minimum of distortion and feedback. (This is as true for self powered systems as it is for passive systems). An easy rule to follow is: "Everything should clip at once."
Following these simple steps will ensure you are getting the optimum performance out of your complete system.
- Once the source has been connected to the input of your mixer, adjust the input sensitivity (or trim) so that the highest input levels are set to just before clip (or when the input LED just starts to flicker).
- Position the channel fader for that input to 0 dB.
- Position the Master output fader to 0 dB.
- With the "Mic/Line" button set to "Line" (because the system is receiving a line level signal, or commonly called a +4 dB signal), set the "Level" control to the 12 o'clock position, and adjust until the "overload" LED just begins to flicker. In the case of PRX512Mi and PRX718S the limiter indicator flickers just as it is functioning.
For in depth articles related to gain structure please refer the website where you can find the JBL Sound System
* Input level required to engage limiter function on PRX512Mi
** Input level required to engage limiter function on PRX718S
Design Reference Manual: http://www.jblpro.com/pub/technote/ssdm_99.pdf
Basic Sound Reinforcement System
This is a very basic sound system. PRX500 series speakers allow the direct connection of sound sources, without the need for extra mixer or pre-amplifier. The XLR or 1/4 inch input jack provides versatility and cabling options and the mic/line input sensitivity selector switch optimizes the speaker gain for the input source.
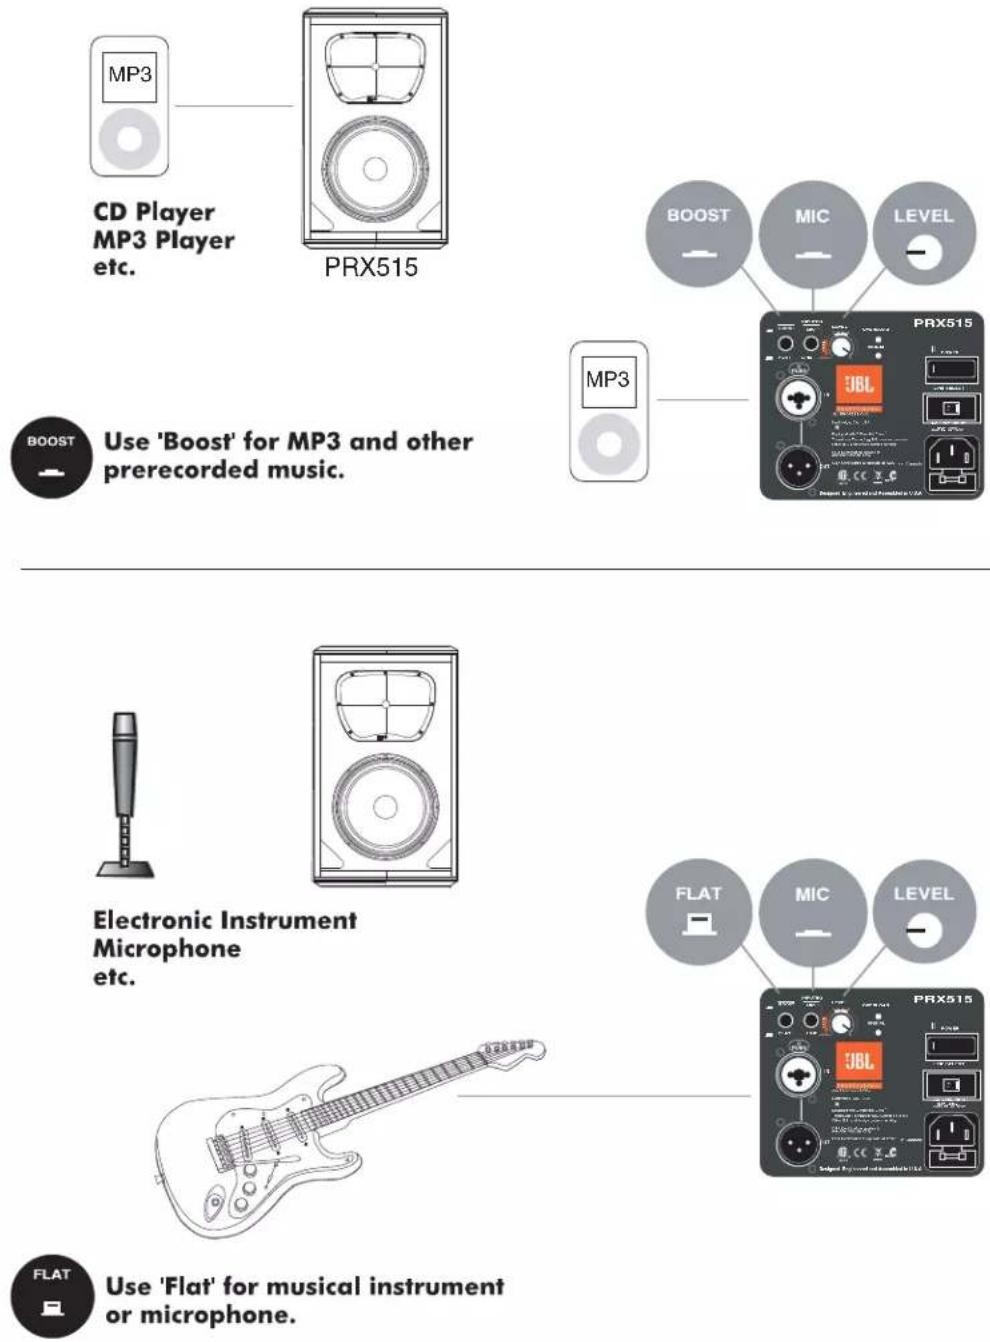
Additional speakers may be connected (daisy chained together) in mono mode.
Music Playback Reinforcement With Subwoofer (PRX512M Pole Mounted On A PRX518S)
This is a very powerful, but flexible combination. The subwoofer provides the extra low frequency extension and also serves as the base for the pole mount. The compact 12 inch satellite system, PRX512M is a perfect match to the subwoofer.
From the master outputs of your mixer route the wires to the subwoofer first and select the x-over in (high-pass) option. Route the cable form the subwoofer output connector to the top. Reduce the volume of subwoofers. Adjust the volume for the top to desired levels and match the subwoofer volume to achieve desired results.

flowchart
graph TD
    A["PRX512M"] --> B["PROX518S"]
    B --> C["PROX512M"]
    C --> D["PROX518S"]
    D --> E["PROX512M"]
    E --> F["PROX518S"]
    style A fill:#f9f,stroke:#333
    style B fill:#ccf,stroke:#333
    style C fill:#cfc,stroke:#333
    style D fill:#fcc,stroke:#333
    style E fill:#cff,stroke:#333
    note right of A: Single subwoofer application in stereo mode (see page 19)
    note right of E: Right Main Output
    note right of C: Right Main Output
    note right of E: Right Main Output
    note right of C: Right Main Output
    note right of E: Right Main Output
This will provide a well balanced LF performance for the system.
Live Performance Or Music Playback Reinforcement System With Stage Monitors (PRX535 And PRX512M)
This is an ideal system when wide coverage and good directivity is required, specifically in highly reverberant rooms. The horn loaded PRX535 3-way system will control the propagation of the sound much better than a conventional 2-way system. The more directional or controlled the sound is the more independent the system becomes from the

flowchart
graph TD
    A["PRX535"] --> B["PROX512M"]
    B --> C["Monitor Output"]
    C --> D["PRX535"]
    D --> E["PROX512M"]
    E --> F["Monitor Output"]
    F --> G["PRX535"]
    G --> H["PROX512M"]
    H --> I["Monitor Output"]
    I --> J["PRX535"]
    J --> K["PROX512M"]
    K --> L["Monitor Output"]
    L --> M["PRX535"]
    M --> N["PROX512M"]
    N --> O["Monitor Output"]
    O --> P["PRX535"]
    P --> Q["PROX512M"]
    Q --> R["Monitor Output"]
    R --> S["PRX535"]
    S --> T["PROX512M"]
    T --> U["Monitor Output"]
    U --> V["PRX535"]
    V --> W["PROX512M"]
    W --> X["Monitor Output"]
    X --> Y["PRX535"]
    Y --> Z["PROX512M"]
    Z --> AA["Monitor Output"]
    AA --> AB["PRX535"]
    AB --> AC["PROX512M"]
    AC --> AD["Monitor Output"]
    AD --> AE["PRX535"]
    AE --> AF["PROX512M"]
    AF --> AG["Monitor Output"]
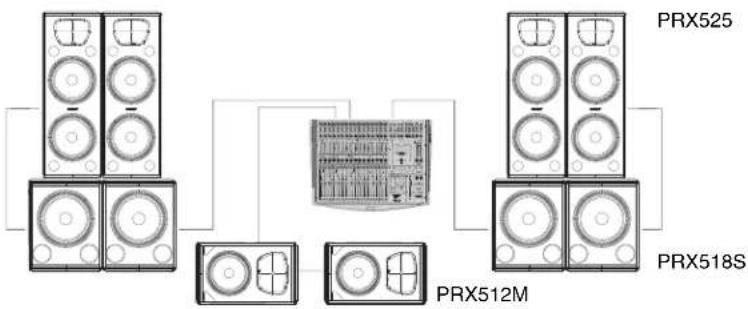
Large Live Performance Or Music Playback Reinforcement System With Stage Monitor (4 x PRX518S, 4 x PRX525 And 2 x PRX512M)
For larger crowds in and outdoors, a flexible system like this will deliver excellent results. The dual 15 inch PRX525 delivers mighty bottom end and crisp highs. The combination of extra PRX518S subwoofers gives it an even more thunderous low end. The PRX525's can be arrayed as pair of two's each side for a wider coverage and some extra SPL (extremely useful in outdoor applications).
flowchart
graph TD
    A["Speaker 1"] --> B["Audio System"]
    C["Speaker 2"] --> B
    D["Speaker 3"] --> B
    E["Speaker 4"] --> B
    F["Speaker 5"] --> B
    G["Speaker 6"] --> B
    H["Speaker 7"] --> B
    I["Speaker 8"] --> B
    J["Speaker 9"] --> B
    K["Speaker 10"] --> B
    L["Speaker 11"] --> B
    M["Speaker 12"] --> B
    N["Speaker 13"] --> B
    O["Speaker 14"] --> B
    P["Speaker 15"] --> B
    Q["Speaker 16"] --> B
    R["Speaker 17"] --> B
    S["Speaker 18"] --> B
    T["Speaker 19"] --> B
    U["Speaker 20"] --> B
    V["Speaker 21"] --> B
    W["Speaker 22"] --> B
    X["Speaker 23"] --> B
    Y["Speaker 24"] --> B
    Z["Speaker 25"] --> B
    AA["Speaker 26"] --> B
    AB["Speaker 27"] --> B
    AC["Speaker 28"] --> B
    AD["Speaker 29"] --> B
    AE["Speaker 30"] --> B
    AF["Speaker 31"] --> B
    AG["Speaker 32"] --> B
    AH["Speaker 33"] --> B
    AI["Speaker 34"] --> B
    AJ["Speaker 35"] --> B
    AK["Speaker 36"] --> B
    AL["Speaker 37"] --> B
    AM["Speaker 38"] --> B
    AN["Speaker 39"] --> B
    AO["Speaker 40"] --> B
    AP["Speaker 41"] --> B
    AQ["Speaker 42"] --> B
    AR["Speaker 43"] --> B
    AS["Speaker 44"] --> B
    AT["Speaker 45"] --> B
    AU["Speaker 46"] --> B
    AV["Speaker 47"] --> B
    AW["Speaker 48"] --> B
    AX["Speaker 49"] --> B
    AY["Speaker 50"] --> B
    AZ["Speaker 51"] --> B
    BA["Speaker 52"] --> B
    BB["Speaker 53"] --> B
    BC["Speaker 54"] --> B
    BD["Speaker 55"] --> B
    BE["Speaker 56"] --> B
    BF["Speaker 57"] --> B
    BG["Speaker 58"] --> B
    BH["Speaker 59"] --> B
    BI["Speaker 60"] --> B
    BJ["Speaker 61"] --> B
    BK["Speaker 62"] --> B
    BL["Speaker 63"] --> B
    BM["Speaker 64"] --> B
    BN["Speaker 65"] --> B
    BO["Speaker 66"] --> B
    BP["Speaker 67"] --> B
    BPB["Speaker 68"] --> B

flowchart
graph TD
    A["Monitor Output"] --> B["Right Main Output"]
    B --> C["PRX512M"]
    B --> D["PRX512M"]
    C --> E["MONITOR LINE LEVEL"]
    D --> F["MONITOR LINE LEVEL"]
    E --> G["PROX512M"]
    F --> H["PROX512M"]
    G --> I["FLAT LINE LEVEL"]
    H --> J["FLAT LINE LEVEL"]
    I --> K["PRX525"]
    J --> L["PRX525"]
    K --> M["IN 0' LEVEL"]
    L --> N["PRX518S"]
    M --> O["OUT 0' LEVEL"]
Balanced vs. Unbalanced Lines
Your PRX500 series can accept either type of input. There are two basic types of audio system interconnections for audio signals: Balanced and Unbalanced.
Balanced Lines
In audio, a balanced line is a three-conductor system in which the two signal wires carry an equal, but opposite voltage with respect to the ground wire. The ground wire acts only as a shield and does not carry any audio signal current. Outside interference (such as RFI - Radio Frequency Interference) is either shielded from the internal signal conductor, or if it gets into the cable is cancelled out by the opposite signals at the receiving end. Balanced connections are preferred for any longer cable runs.
Unbalanced Lines
Unbalanced cable is a two-wire system where the shield (ground wire) acts as one of the current carrying signal conductors. The center conductor enclosed by the shield is commonly known as the "hot" conductor. Unbalanced audio cables do not reject noise as well as balanced lines. Unbalanced lines are typical in home hi-fi type systems and on the outputs of electronic musical instruments. These work well if the distance between the components is short, the signal level is relatively high and all of the electronics used in the system are plugged into the same AC service.
CABLES AND CONNECTORS
| XLR/F to XLR/M Microphone Cable The standard cable for interconnection of microphone and line level signal in professional audio systems. • Microphone to mixer • Microphone to PRX500 direct input • Professional audio mixer to PRX500 • Daisy chaining PRX500 speakers |
| TRS (balanced) 1/4 inch phone jack to XLR/M For connecting balanced devices with 1/4 inch phone and maybe used interchangeably. |
| TRS (unbalanced) 1/4 inch phone jack to XLR/M For connections of instruments with unbalanced outputs to balanced XLR inputs. |
| TS (unbalanced) 1/4 inch phone jack to XLR/M This cable is electrically identical to “TRS (unbalanced) 1/4 inch phone and maybe used interchangeably. |
| XLR/M to RCA (phono) cable Connects consumer audio products and some DJ mixer outputs to professional audio equipment inputs |
| TRS 1/4 inch Phone jack to dual 1/4 inch Phone jack Splits a stereo output into separate left/right signals. |
| TRS 1/4 inch Phone jack to dual 1/4 inch Phone jack Change to a TRS mini-phone jack to connect to the output of a portable. MP3/CD – player and computer sound cards to a mixer or two PRX500 speakers for stereo performance. |
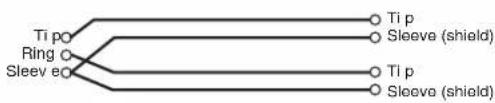
| XLR/F to XLR/M audio ground lift Used to “telescope” a ground to eliminate hum caused by ground loops. Use only with balanced in – and outputs |
XLR/F to XLR/M Microphone Cable


TRS (Balanced) 1/4" P hone to XLR/M Cable


TRS (Unbalanced) 1/4" Phone to XLR/M Cable


TS (Unbalanced) 1/4" Phone to XLR/M Cable


XLR/M to RC A (phono) Cable


TS (Unbalanced) 1/4" Phone to RCA (phono) C able


TRS 1/4" Phone to dual TS 1/4 " P hone,

flowchart
graph TD
    A["Ti p"] --> B["Sleeve (shield)"]
    C["Ring"] --> D["Sleeve e"]
    E["Ti p"] --> F["Sleeve (shield)"]
    G["Ti p"] --> H["Sleeve (shield)"]
XLR/F to XLR/M Audio Ground Lift


| Symptom | Likely Cause What To Do | |
| No sound. | Speaker not connected to active AC power. | Verify that speaker is connected and that the circuit is on. Switch on power and verify that illuminated logo is on. • Re-seat the power cable at both ends. • Substitute a known-good power cable. |
| Speaker power cable is faulty or improperly connected. | ||
| No sound, speaker is connected to working AC power but won't come on. | Blown fuse. • Replace the fuse | with the specified value. • Take your speaker to a competent servicer. |
| Signal source (mixer, instrument, etc.) is not sending. | ||
| No sound, speaker comes on. | Faulty cables and connections | • Check VU meters on the source mixer. • Verify that the CD/MP3 is playing. • Use headphones to verify that the instrument is actually sending an audio signal. |
| Faulty cables and connections | • Disconnect and re-seat signal cables. • Replace suspected cable with a known-good cable. | |
| No sound with microphone connected directly to the MIC input. | Microphone requires phantom power | The PRX500 speakers do not supply phantom power. Switch to a dynamic microphone, use a battery in the microphone (if possible), use an external phantom power supply. |
| Signal Sounds distorted and very loud, OVERLOAD light is lit most of the time. | Excessive input signal, trying to exceed the capabilities of the speakers | • Reduce the output level of the source. • Turn down the level controls on the speaker. |
| Signal sounds distorted even at moderate volumes, OVERLOAD light is not lit. | Mixer or other source is overdriven | Review the Owner's Manual for your system setup and adjust controls as needed. • Input sensitivity (gain) |
| Noise or hiss heard at output | Noisy Source Device | Disconnect the devices that are connected to your speaker one at a time. If the noise goes away, the problem is with the source or the connecting cable. |
| Hum or Buzz that increases or decreases when the mixer level controls are moved. | Improper A/C ground or faulty equipment connected to mixer input | Disconnect or mute channels one at a time to isolate the problem. Refer to the owner's manual of the faulty equipment for troubleshooting help. |
| Faulty cable between source equipment and mixer | Substitute a known-good cable for the suspected faulty cable. | |
| Hum or Buzz | Improper A/C grounding, ground loops | • “Telescope” the audio ground by using an XLR/F to XLR/M adapter on one end.• Re-route audio cable away from AC power and lighting cables. |
| Excessively long unbalanced cable run | • Use the balanced outputs (if available) of your mixer to drive your PRX speakers.• Use a “DI” (direct injection) box to convert your unbalanced equipment output to a balanced output. | |
| Improper system gain structure | Review the Owner's Manual for your system setup and adjust controls as needed.• Input sensitivity (gain) | |
| Speakers feed back and howl when the microphone volume is turned up | Microphones are pointed into the speakers | Move the speakers so they do not point to the microphone's pickup pattern. |
| Equalizer settings are incorrect | Locate the feedback frequency and reduce it using the mixer EQ or an external equalizer. | |
| Excessive gain | Reduce the gain at the mixer and move the microphone closer to the sound source. | |
| Too much low frequencies when playing back prerecorded music | Recorded music with excessive low frequencies | Switch the EQ switch to “flat.” |
Mailing Address:
JBL Professional
8500 Balboa Blvd.
Northridge, CA 91329
Shipping Address:
JBL Professional
8370 Balboa Blvd., Dock D
Northridge, CA 91329
(Do not return product to this address without
first obtaining prior authorization from JBL)
Customer Service:
Monday through Friday
8:00am - 5:00pm
Pacific Coast Time In the U.S.A.
(800)8JBLPRO (800.852.5776)
www.jblproservice.com
On The World Wide Web:
www.jblpro.com
Professional Contacts, Outside The USA:
Contact the JBL Professional Distributor in your area. A complete list of JBL Professional international distributors is provided at our U.S.A. website www.jblpro.com
Product Registration:
Register your product online at www.jblpro.com/registration
The JBL Limited Warranty on professional loudspeaker products (except for enclosures) remains in effect for five years from the date of the first consumer purchase. JBL amplifiers are warranted for three years from the date of original purchase. Enclosures and all other JBL products are warranted for two years from the date of original purchase.
Who Is Protected By This Warranty?
Your JBL Warranty protects the original owner and all subsequent owners so long as: A.) Your JBL product has been purchased in the Continental United States, Hawaii or Alaska. (This Warranty does not apply to JBL products purchased elsewhere except for purchases by military outlets. Other purchasers should contact the local JBL distributor for warranty information.); and B.) The original dated bill of sale is presented whenever warranty service is required.
What Does The JBL Warranty Cover?
Except as specified below, your JBL Warranty covers all defects in material and workmanship. The following are not covered: Damage caused by accident, misuse, abuse, product modification or neglect; damage occurring during shipment; damage resulting from failure to follow instructions contained in your Instruction Manual; damage resulting from the performance of repairs by someone not authorized by JBL; claims based upon any misrepresentations by the seller; any JBL product on which the serial number has been defaced, modified or removed.
Who Pays For What?
JBL will pay all labor and material expenses for all repairs covered by this warranty. Please be sure to save the original shipping cartons because a charge will be made if replacement cartons are requested. Payment of shipping charges is discussed in the next section of this warranty.
How To Obtain Warranty Performance
If your JBL product ever needs service, write or telephone us at JBL Incorporated (Attn: Customer Service Department), 8500 Balboa Boulevard, PO. Box 2200, Northridge, California 91329 (818/893-8411). We may direct you to an authorized JBL Service Agency or ask you to send your unit to the factory for repair. Either way, you'll need to present the original bill of sale to establish the date of purchase. Please do not ship your JBL product to the factory without prior authorization. If transportation of your JBL product presents any unusual difficulties, please advise us and we may make special arrangements with you. Otherwise, you are responsible for transporting your product for repair or arranging for its transportation and for payment of any initial shipping charges. However, we will pay the return shipping charges if repairs are covered by the warranty.
Limitation Of Implied Warranties
ALL IMPLIED WARRANTIES, INCLUDING WARRANTIES OF MERCHANTABILITY AND FITNESS FOR PARTICULAR PURPOSE, ARE LIMITED IN DURATION TO THE LENGTH OF THIS WARRANTY.
EXCLUSION OF CERTAIN DAMAGES
JBL'S LIABILITY IS LIMITED TO THE REPAIR OR REPLACEMENT, AT OUR OPTION, OF ANY DEFECTIVE PRODUCT AND SHALL NOT INCLUDE INCIDENTAL OR CONSEQUENTIAL DAMAGES OF ANY KIND. SOME STATES DO NOT ALLOW LIMITATIONS ON HOW LONG AN IMPLIED WARRANTY LASTS AND/OR DO NOT ALLOW THE EXCLUSION OF INCIDENTAL OR CONSEQUENTIAL DAMAGES, SO THE ABOVE LIMITATIONS AND EXCLUSIONS MAY NOT APPLY TO YOU. THIS WARRANTY GIVES YOU SPECIFIC LEGAL RIGHTS, AND YOU MAY ALSO HAVE OTHER RIGHTS, WHICH VARY, FROM STATE TO STATE.
PRX500
JBL
PROFESSIONAL
Part Number: 363264-003 6/2009
8500 Balboa Boulevard Northridge, CA 91329 USA Visit us online at www.jblpro.com
H Harman International
- Care And Cleaning
- Stand Mounting Safety Precautions
- Suspension of Loudspeaker System
- IMPORTANT SAFETY WARNING!
- Are You New to Rigging?
- General Hardware Information
- Attachment to Structures
- Inspection & Maintenance
- For all other hardware and fittings, refer to the hardware manufacturer's inspection and maintenance guidelines for process.
- Resources
- Safe Rigging
- Working Load Limit
- WARNING
- Hearing Damage, Prolonged Exposure To Excessive SPL
- WATCH FOR THESE SYMBOLS!
- Safety And EMC Compliance Specifications
- CSA Compliance Notice
- FCC Compliance Notice
- AC Power Requirements
- CAUTION
- Powering Up
- Changing Voltage
- Operating Temperature
- Introduction to the PRX500series
- Single Box On A Pole Coverage
- Features
- Indicators
- Connectors
- LINE
- Level Position
- MIC
- Input Level Required To Deliver Maximum Output
- SETTING THE GAIN
- Basic Sound Reinforcement System
- Music Playback Reinforcement With Subwoofer (PRX512M Pole Mounted On A PRX518S)
- Live Performance Or Music Playback Reinforcement System With Stage Monitors (PRX535 And PRX512M)
- Balanced vs. Unbalanced Lines
- Balanced Lines
- Unbalanced Lines
- CABLES AND CONNECTORS
- Who Is Protected By This Warranty?
- What Does The JBL Warranty Cover?
- Who Pays For What?
- How To Obtain Warranty Performance
- Limitation Of Implied Warranties
- EXCLUSION OF CERTAIN DAMAGES
- PRX500
Brand : JBL
Model : PRX535
Category : Speaker