
Blend Crush KBL330 - Blender Kambrook - Free user manual and instructions
Find the device manual for free Blend Crush KBL330 Kambrook in PDF.


| Product Type | Blender |
| Brand | Kambrook |
| Model | Blend Crush KBL330 |
| Motor Power | 600 watts |
| Jug Capacity | 1.5 litres (glass) |
| Speed Settings | Low, High, Pulse |
| Ice Crush Function | Yes (dedicated button) |
| Blade Material | Serrated stainless steel |
| Blade Holder | Removable with silicone seal |
| Jug Material | Glass with measurement markings |
| Lid Features | Removable inner measuring cap |
| Non-Slip Feet | Yes |
| Dishwasher Safe Parts | No (hand wash only) |
| Continuous Operation Limit | 1 minute, then 30 minutes rest |
| Voltage | 230-240V |
| Power Cord Length | Not specified (approx. 1m typical) |
| Dimensions (approx.) | Not specified (typical countertop blender size) |
| Weight | Not specified |
| Accessories Included | Blender jug, lid, inner measuring cap, removable blade holder, silicone seal |
| Cleaning Instructions | Hand wash all parts except motor base; wipe motor base with damp cloth |
| Safety Features | Blender will not operate unless properly assembled; sharp blade warning |
| Warranty | Refer to manual; contact customer service |
Frequently Asked Questions - Blend Crush KBL330 Kambrook
User questions about Blend Crush KBL330 Kambrook
0 question about this device. Answer the ones you know or ask your own.
Ask a new question about this device
Download the instructions for your Blender in PDF format for free! Find your manual Blend Crush KBL330 - Kambrook and take your electronic device back in hand. On this page are published all the documents necessary for the use of your device. Blend Crush KBL330 by Kambrook.
USER MANUAL Blend Crush KBL330 Kambrook
Kambrook - Australia
Building 2, Port Air Industrial Estate
1A Hale Street
Botany NSW 2019
Australia
Customer Service Line 1300 139 798
Customer Service Fax 1800 621 337
www.kambrook.com.au
Kambrook - New Zealand
Private Bag 94411
Botany, Manukau
Auckland 2163
New Zealand
Customer Service Line/
Spare Parts 0800 273 845
Customer Service Fax 0800 288 513
www.kambrook.co.nz
KAMBROOK
THE SMARTER CHOICE
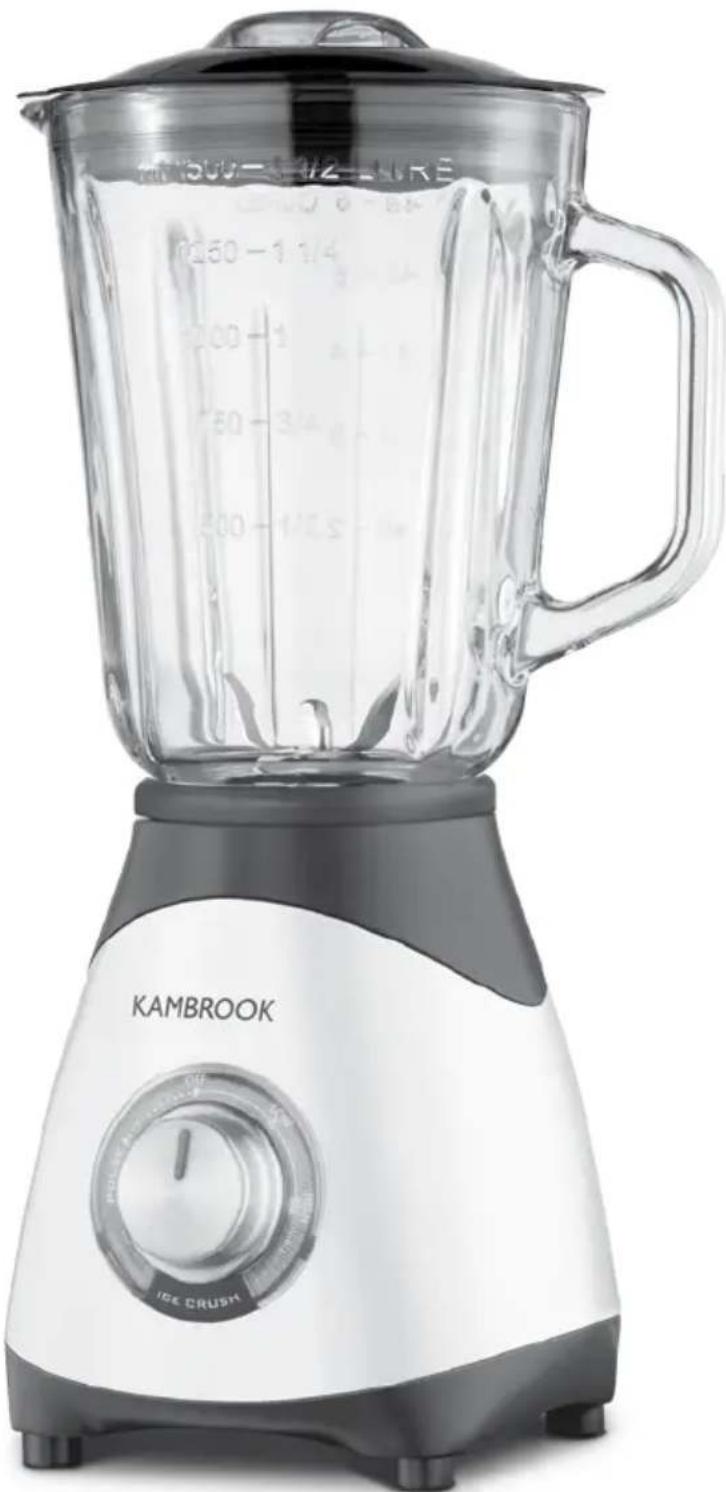
natural_image
White KAMBROOK blender with clear glass interior and black handle, no visible text or symbols on the device itself.Important
Please retain your instruction book for future use.
In the event that you need some assistance with your Kambrook appliance, please contact our Customer Service Department on 1300 139 798 (Australia) or 0800 273 845 (New Zealand). Alternatively, visit us on our website at www.kambrook.com.au or www.kambrook.co.nz
Contents
Kambrook Recommends p4
Safety First
Your Kambrook Blender p6
Operating Your Kambrook p7
Blender
Hints and Tips p11
Care, Cleaning and Storage p13
Recipes p14
IMPORTANT: Please retain your instruction book for future use.
At Kambrook, we believe that safe performance is the first priority in any consumer product, so that you, our valued customer can confidently use and trust our products. We ask that any electrical appliance that you use be operated in a sensible fashion with due care and attention placed on the following important operating instructions.
Important Safeguards For Your Kambrook Blender
- Carefully read all instructions before operating the blender for the first time and save for future reference.
- Remove and safely discard any packaging material and promotional labels before using the blender for the first time.
- To eliminate a choking hazard for young children, remove and safely discard the protective cover fitted to the power plug of this blender.
- Do not place the blender near the edge of a bench or table during operation. Ensure the surface is level, clean and free of water and other substances. Vibration during operation may cause the blender to move.
- Do not use the blender on a sink drain board.
- Do not place the blender on or near a hot gas or electric burner, or where it could touch a heated oven.
- Handle the blender and attachments with care – remember the blades are razor-sharp and should be kept out of the reach of children.
- Always ensure the blender is completely assembled before operating. The blender will not operate unless properly assembled.
-
Do not use attachments other than those provided with the blender.
-
Do not attempt to operate the blender by any method other than those described in this booklet.
- Always secure the blade assembly onto the blender jug before attaching to the motor base.
- Ensure the Speed Control Dial is in the 'OFF' position and the blender is switched off at the power outlet and the power cord is unplugged before attaching the blender jug.
• Always operate the blender with the blender jug lid in position. - Keep fingers, hands, knives and other utensils away from moving blades.
- Do not place hands or fingers into the blender jug unless the motor and blades have come to a complete stop. Ensure the Speed Control Dial is in the 'OFF' position and the blender is switched off at the power outlet and the power cord is unplugged before removing the lid from the blender.
-
Ensure the motor and the blades have completely stopped before disassembling. Ensure the Speed Control Dial is in the 'OFF' position and the blender is switched off at the power outlet and the power cord is unplugged from the power outlet before attempting to move the blender, when not in use, if left unattended and before disassembling, cleaning or storing.
-
Care should be taken when removing the food from the blender jug by ensuring the motor and the blades have completely stopped before disassembling. Ensure the Speed Control Dial is turned to the 'OFF' position, the appliance is switched off at the power outlet and unplugged, before removing the lid from the blender jug. The blender jug should then be unlocked from the motor base and the food carefully removed before attempting to remove the blade assembly.
- Do not operate the blender continuously for periods longer than 1 minute on any setting or if processing a heavy load. None of the recipes in this book are considered a heavy load. If the blender is operated continuously for too long, it should be allowed to rest for 30 minutes before recommencing.
-
Do not process hot or boiling liquids – allow liquids to cool before placing into the blender jug.
-
Always switch off the blender and disconnect from the power outlet before changing accessories or approaching parts that move in use.
- Do not move the blender whilst in operation.
- Do not leave the blender unattended when in use.
- Do not place any part of the blender in a microwave oven.
- Do not wash any parts of the blender in a dishwasher.
- Do not place anything on top of the motor base and/or blender jug when the lid is on or off, when in use and when stored.
- Do not allow children to use the blender without supervision.
- Care should be taken when handling the sharp cutting blades, emptying the blender jug and during cleaning.
- Keep the blender clean. Follow the cleaning instructions provided in this book.
Important Safeguards For All Electrical Appliances
• Fully unwind the power cord before use.
- Connect only to a 230V or 240V power outlet.
- Do not let the power cord hang over the edge of a bench or table, touch hot surfaces or become knotted.
- To protect against electric shock, do not immerse the power cord, power plug or appliance in water or any other liquid or allow moisture to come in contact with the part, unless it is recommended in the cleaning instructions.
- The appliance is not intended for use by persons (including children) with reduced physical, sensory or mental capabilities, or lack of experience and knowledge, unless they have been given supervision or instruction concerning use of the appliance by a person responsible for their safety.
• Children should be supervised to ensure that they do not play with the appliance.
- It is recommended to regularly inspect the appliance. To avoid a hazard, do not use the appliance if power cord, power plug or appliance becomes damaged in any way. Return the entire appliance to the nearest authorised Kambrook Service Centre for examination and/or repair.
- Any maintenance other than cleaning should be performed at an authorised Kambrook Service Centre.
- This appliance is for household use only. Do not use this appliance for anything other than its intended use. Do not use in moving vehicles or boats. Do not use outdoors. Misuse may cause injury.
- The installation of a residual current device (safety switch) is recommended to provide additional safety protection when using electrical appliances. It is advisable that a safety switch with a rated residual operating current not exceeding 30mA be installed in the electrical circuit supplying the appliance. See your electrician for professional advice.
- Always turn the appliance to the OFF position, switch off at the power outlet and unplug at the power outlet when the appliance is not in use.
- Before cleaning, always turn the appliance to the OFF position, switch off at the power outlet, unplug at the power outlet and remove the power cord, if detachable, from the appliance and allow all parts to cool.
- Do not place this appliance on or near a heat source, such as hot plate, oven or heaters.
- Position the appliance at a minimum distance of 20cm away from walls, curtains and other heat or steam sensitive materials and provide adequate space above and on all sides for air circulation.
Your Kambrook Blender
- Powerful 600 watt motor
- Large 1.5 litre glass jug with measurements
- 2 speed control plus Pulse function
- Ice Crush button for icy drinks
-
Removable Blade Holder with serrated blades and silicone seal located under the glass jug
-
Serrated stainless steel blades for ice crushing
-
Jug chute and inner measuring cap (Note: the inner measuring cap is also a handy tool for assisting in removing the blade holder)
-
Sturdy non-slip feet
Not Shown
- Jug collar (Note: found under the blender jug and cannot be removed)
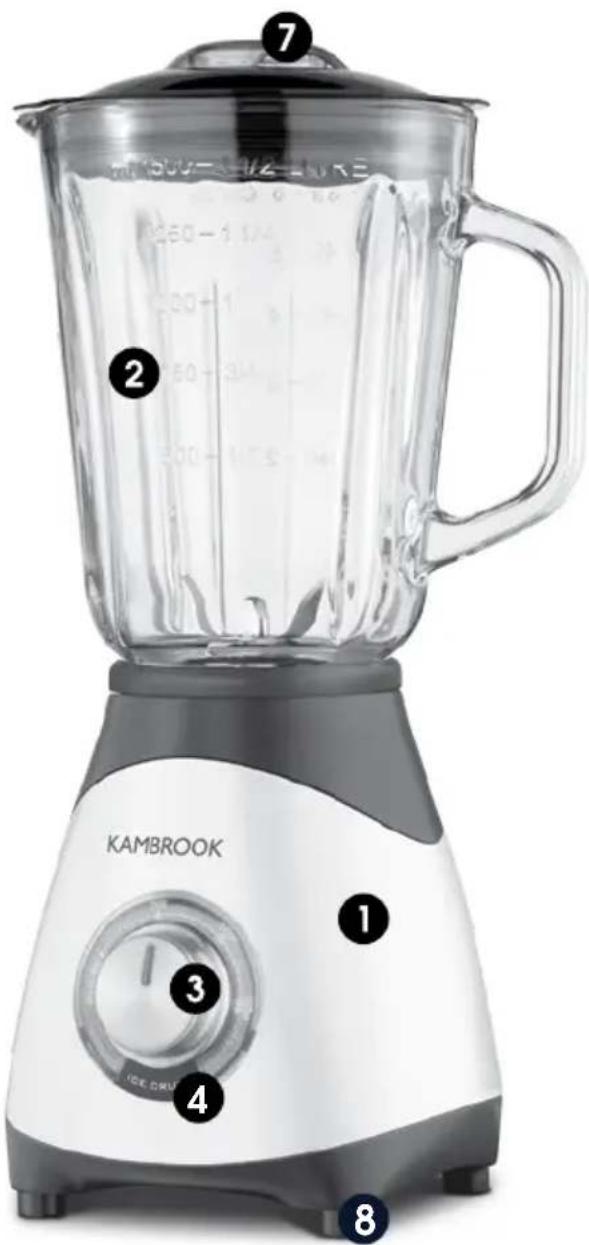
KBL330WHT Model Shown

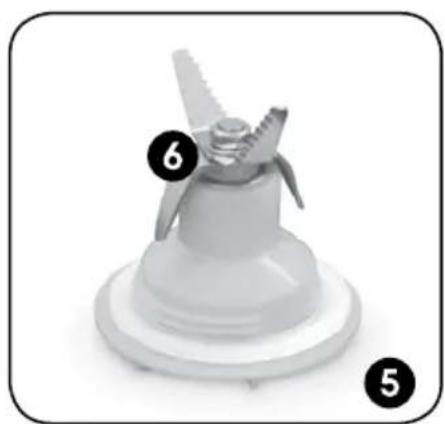
natural_image
Close-up of a kitchen knife with three blades and a central screw, labeled with numbers 5 and 6 (no text or symbols on the object itself)Operating Your Kambrook Blender
Before First Use
Remove and safely discard any packaging material and promotional labels. Disassemble the blender jug by following the steps in the 'Disassembling the Blender' section below. Wash the lid, inner measuring cap, blender jug, silicone seal and Removable Blade Holder in warm, soapy water with a soft cloth. Rinse and dry thoroughly.
Wipe the motor base with a damp cloth and dry thoroughly.
Disassembling the Blender
-
Place the motor base on a flat, dry surface such as a bench top. Ensure that the Speed Control Dial is in the 'OFF' position, the appliance is switched off at the power outlet and the power cord is unplugged.
-
Lift the blender jug out of the motor base to remove.
-
Remove the lid and inner measuring cap from the blender jug.
-
Place the jug upside down on a flat, dry surface such as a bench top.
-
Using the inner measuring cap, insert the two tabs on the inner measuring cap into the Removable Blade Holder (See Fig. 1).

natural_image
Close-up of a white plastic kitchen appliance with a lid and base, labeled 'Fig. 1' (no other text or symbols visible)- Use one hand to hold the jug handle and the other hand to turn the inner measuring cap clockwise to 'OPEN' the Removable Blade Holder (See. Fig. 2).

natural_image
Close-up of a hand pressing down on a plastic container with a black arrow indicating rotation (no text or symbols)- Once loose, tilt the Removable Blade Holder at an angle and lift it up and out of the jug body.

WARNING: Blades must be handled carefully as they are sharp!
Operating Your Kambrook Blender Continued...
- Remove the silicone seal from the Removable Blade Holder (See. Fig. 3).

natural_image
Hand holding a white plastic kitchen knife with a three-blade propeller, labeled 'Fig. 3' (no other text or symbols)NOTE: The blending blades are extremely sharp. Avoid any contact with fingers and hands.
Assembling and Attaching the Blender Jug
- Place the motor base on a flat, dry surface such as bench top. Ensure the Speed Control Dial is in the 'OFF' position, the appliance is switched off at the power outlet and the power cord is unplugged.
- Ensure the lid is off the blender jug and place the blender jug upside down on a flat, dry surface such as a bench top.
- Place the silicone seal onto the Removable Blade Holder. Make sure the silicone seal sits under the grooves (See Fig. 4).

natural_image
3D rendered image of a white plastic kitchen knife with three blades and a central screw (no text or symbols)- Tilt the Removable Blade Holder at an angle and put it inside the jug.
- Using the inner measuring cap, insert the two tabs on the Removable Blade Holder (See Fig. 1).
- Use one hand to hold the jug handle and the other to turn the inner measuring cap anti-clockwise to '▲CLOSE' and secure the Removable Blade Holder in place.
- Place the assembled blender into the motor base. The blender is designed to sit inside the motor base, it does not lock to the motor base.
- Place the lid on top of the blender jug and push down to seal. Insert the inner measuring cap into the middle opening of the blender jug lid and turn clockwise to lock.
NOTE: Ensure the lid is placed onto the blender jug firmly and the inner measuring cap is in position before operating the blender. Do not operate the blender without the lid. Additional ingredients can be added whilst blending by removing the inner measuring cap and placing or pouring ingredients through the middle opening in the lid.
Operating Your Kambrook Blender
- Place the motor base on a flat, dry surface. Ensure that the blender is switched off at power outlet and the power plug is unplugged from the power outlet.
- Place the assembled blender into the motor base. The blender is designed to sit inside the motor base, it does not lock to the motor base.
- Add food or liquid into the blender jug. Place the lid on the blender and push down to seal. Insert the inner measuring cap into the middle opening of the blender jug lid and turn clockwise to lock.
NOTE: Liquids should be placed into the blender jug before solid ingredients, unless specified differently in a recipe.
NOTE: All foods should be cut into cubes (approx. 2-3cm square) to achieve an even result.
- Plug the power cord into a 230V or 240V power outlet and switch on at the power point.
- Turn the Speed Control Dial clockwise for the LOW and HIGH speed settings. The light indicator on the Speed Control Dial will illuminate blue. The speed can be changed any time during the blending process. Ideally, start blending on 'LOW' speed and then increase to a 'HIGH' speed if necessary and blend until desired consistency.
- For ingredients that require a short burst of power, use the 'PULSE' speed setting. Starting with the Speed Control Dial in the 'OFF' position, turn the Speed Control Dial in an anti-clockwise direction and hold it in this position for the time specified in the recipes. The light indicator on the Speed Control Dial will illuminate blue. This setting is ideal for thick liquids, or nuts.
- Use the 'ICE CRUSH' button to crush ice. To crush ice, place no more than 1 cup of ice cubes into the blender jug and replace the lid tightly. Ensure the Speed Control Dial is set to the 'OFF' position. Place blender jug on the motor base and switch on at the power point. Press and hold down the 'ICE CRUSH' button for approximately 5-10 seconds, release button to stop. Repeat until ice is crushed to the desired consistency. Switch off at the power point and remove ice from the blender jug.
Operating Your Kambrook Blender Continued...

WARNING: When pressed, the 'ICE CRUSH' button overrides the setting on the Speed Control Dial and the blender will operate at high-setting, including when the dial is set at the 'OFF' position.
- After use, ensure the blender is switched off by turning the Speed Control Dial to the 'OFF' position. The indicator light on the Speed Control Dial will extinguish. Switch off at the power outlet and remove the power cord. Allow the blender to cool before storing.
NOTE: During the blending process, ingredients may stick to the sides of the blender jug. To push the food back on the blades, turn the Speed Control Dial to 'OFF' and switch off at the power outlet and remove the power cord. Remove the lid and use a plastic spatula to scrape down the sides of the jug. Replace the lid before recommencing blending.
NOTE: If the blades become stuck, immediately turn the Speed Control Dial to 'OFF' and switch the power off at the power outlet and remove the power cord. Remove the jug from the motor base and remove the lid. Use a plastic spatula to dislodge the food or liquid from the blades. Replace the lid before recommencing blending.

WARNING: Do not process boiling liquids or hot ingredients. Allow hot ingredients to cool before placing them into the blender jug.
Hints and Tips
- Ensure the maximum level of 1500ml on the blender jug is not exceeded. Ensure the lid fits securely and the inner measuring cap is locked.
- When crushing ice cubes in the blender, use 'PULSE' or 'ICE CRUSH' and ensure the blender jug is completely dry.
- Use 'LOW' speed for dressings, marinades and foods that require blending until just combined.
- Use 'HIGH' speed for pureeing, smoothie or cocktail making.
- Use 'PULSE' or 'ICE CRUSH' for mixtures that require short bursts of power such as thick liquids, ice or chopping nuts.
- Ensure all removable parts have been thoroughly washed and dried before assembly.
- Ensure the blender is correctly assembled before operating.
- Ensure the blender is used on a clean and dry surface.
- Place liquids into blender jug before solid ingredients except where specified in recipes.
- Cut all food into small cubes (approx. 2–3 cm square) to achieve an even result.
- When crushing ice do not place more than 1 cup of ice cubes into the blender jug.
- If mixing hard and soft foods together, begin with the hard foods and then add soft foods. Continue blending until you have reached the desired consistency and even texture.
- To add ingredients during blending, remove the inner measuring cap on the lid and drop solid
ingredients or pour liquids through the lid opening. Use the inner measuring cap or a container with a pouring lip, such as a measuring cup, when adding liquids.
- Place one hand on top of the blender lid and hold it down when blending large quantities of thin liquids. This will prevent the lid from popping off due to excessive pressure.
NOTE: Do not blend dry, thick or heavy mixtures for more than 1 minute without switching off the blender and stirring the ingredients with a plastic spatula, and then continue blending.
- Do not use the blender to store food.
- Do not use the blender to beat egg whites as it will not incorporate air.
- Do not use the blender to mash potatoes.
- Do not use the blender to knead dough or other heavy mixtures.
- Do not place large pieces of solid or frozen foods into the blender jug. Always break pieces before blending.
- Do not remove the blender jug or lid while the blender is operating. Always switch off at the power outlet and unplug at the power point before removing the blender jug.
- Do not overfill by exceeding the '1500ml' mark on the blender jug. Some mixtures increase in volume during blending.
- Do not overload the blender with more than specified amounts. Overloading could cause the motor to stall.
Hints and Tips Continued...
- Do not process boiling liquids or hot ingredients. Allow hot ingredients to cool before placing them into the blender jug.
- Do not expose the glass jug to sudden temperature changes (i.e. immersing the jug into hot water directly after immersing it into cold water or vice versa).
Care, Cleaning and Storage
Cleaning After Use
- Ensure the blender has stopped operation by turning the Speed Control Dial to 'OFF'.
- Switch off at the power outlet and unplug the power cord.
- Ensure all liquids have been removed from the blender jug.
- Follow the 'Disassembling the Blender' section on page 7 to remove the blade holder from the glass jug.
- Wash the blender jug, lid, inner measuring cap, silicone seal and Removable Blade Holder in warm, soapy water, rinse and dry thoroughly.

WARNING: Blades must be handled carefully as they are sharp!
NOTE: Do not place any part of the blender in the dishwasher.
NOTE: Do not immerse the motor base, power cord or power plug in water or any other liquid.
Cleaning the Motor Body
The motor body can be cleaned with a soft, damp cloth (do not use abrasive agents or cloths which can damage the surface). Dry and polish with a soft, lint free cloth.
Storage
Before storing, thoroughly wash and dry all removable parts.
Assemble the blender and store on the kitchen bench or in an easy to access cupboard.
Store out of reach of children.
Store the appliance upright.
Do not store anything on top of the appliance.
Recipes
Antioxidants Overload
Makes 4 serves
1 cup strawberries, hulled
12 cup raspberries
12 cup blueberries
150g red grapes
300ml cranberry juice
300ml pomegranate juice
12 medium ice cubes
-
Place the strawberries, raspberries, blueberries, grapes, cranberry juice, pomegranate juice and ice cubes into the blender jug; securely seal the lid onto the blender.
-
Secure the blender jug onto the motor base and turn the speed control dial to the 'PULSE' setting for 15 seconds or until smooth.
-
Remove the lid and pour into four tall glasses. Serve immediately.
Banana Breakfast Drink
Makes 1 serve
1 12 Weet-bix
375ml skim milk
12 banana
1 tsp honey
-
Place the Weet-bix, milk, banana and honey into the blender jug; securely seal the lid onto the blender.
-
Secure the blender jug onto the motor base and turn the speed control dial to the 'PULSE' setting for 15 seconds or until smooth.
-
Remove the lid and pour into a tall glass. Serve immediately.
NOTE: To make extra serves, repeat ingredients and blend for 5 seconds longer.
Raspberry Protein Booster
Makes 4 serves
3 cup frozen raspberries
400ml skim milk
250ml iced water
12 cup vanilla protein powder
2 tbsp honey
- Place the raspberries, milk, water, protein powder and honey into the blender jug; securely seal the lid onto the blender.
- Secure the blender jug onto the motor base and turn the speed control dial to the 'PULSE' setting for 15 seconds or until smooth.
- Remove the lid and pour into four tall glasses. Serve immediately.
Mango Smoothie
Makes 4 serves
3 frozen mango cheeks
750ml milk
4 scoops ice cream
2 tbsp honey
- Place the mango, milk, ice cream and honey into the blender jug; securely seal the lid onto the blender.
- Secure the blender jug onto the motor base and turn the settings control dial to the 'PULSE' setting for 15 seconds or until smooth.
- Remove the lid and pour into four tall glasses. Serve immediately.
Iced Coffee
Makes 4 serves
120ml espresso
900ml milk
4 scoops vanilla ice cream
1 tbsp vanilla syrup
-
Place the espresso, milk, ice cream and syrup into the blender jug; securely seal the lid onto the blender.
-
Secure the blender jug onto the motor base and turn the speed control dial to the 'PULSE' setting for 15 seconds or until smooth.
-
Remove the lid and pour into four tall glasses. Serve immediately.
Chocolate Milkshake
Makes 4 serves
750ml milk
4 scoops vanilla ice cream
12 cup chocolate syrup
- Place the milk, ice cream and syrup into the blender jug; securely seal the lid onto the blender.
- Secure the blender jug onto the motor base and turn the speed control dial to the 'PULSE' setting for 15 seconds or until smooth.
- Remove the lid and pour into four milkshake glasses. Serve immediately.
Pina Colada
Makes 4 serves
500ml pineapple juice
100ml coconut cream
100ml coconut water
120ml white rum
2 tbsp caster sugar
12 medium ice cubes
-
Place the pineapple juice, coconut cream, coconut water, rum, sugar and ice cubes into the blender jug; securely seal the lid onto the blender.
-
Secure the blender jug onto the motor base and press and hold the 'ICE CRUSH' button for 15 seconds or until smooth.
-
Remove the lid and pour into four tall cocktail glasses. Serve immediately.
Frozen Margaritas
Makes 6 serves
12 medium ice cubes
150ml tequila
14 cup orange liqueur
14 cup lime juice
14 cup lemon juice
12 cup sugar syrup
- Place the ice cubes, tequila, liqueur, lime juice, lemon juice and sugar syrup into the blender jug; securely seal the lid onto the blender.
- Secure the blending jug onto the motor base and press and hold the 'ICE CRUSH' button for 15 seconds or until smooth.
- Remove the lid and pour into six margarita glasses. Serve immediately.
NOTE: To make sugar syrup, dissolve 12 cup of sugar with 13 cup of boiling water. Stir until sugar has dissolved and allow to cool. Store in the refrigerator in an air tight container for up to 3 months.
Balsamic and Caramelised Garlic Dressing
Makes 1 cup
12 cup balsamic vinegar
12 cup extra virgin olive oil
8 cloves garlic, oven roasted in skin
1 tbsp brown sugar
1 tbsp flaked salt
-
Place the vinegar, oil, garlic, sugar and salt into the blender jug; securely seal the lid onto the blender.
-
Secure the blender jug onto the motor base and turn the speed control dial to the 'LOW' setting for 10 seconds or until garlic is completely blended
-
Remove the lid and pour over a garden salad. Serve immediately.
NOTE: Wrap the cloves in aluminium foil and bake them for approximately 15 minutes at 190°C.
NOTE: If not serving dressing immediately, keep in an air tight jar in the refrigerator for up to 7 days.
Dill and Garlic Aioli
Makes 1 ½ cups
1 egg yolk
60ml lemon juice
250ml light olive oil
2 tsp dill, roughly chopped
1 clove garlic, minced
-
Place the egg and lemon juice into the blender jug; securely seal the lid onto the blender.
-
Secure the blender jug onto the motor base and turn the speed control dial to the 'HIGH' setting for 10 seconds or until the mixture is fluffy.
-
Remove the lid and slowly pour the olive oil in a thin stream over 60 seconds.
-
Add the dill and garlic and turn the settings dial to the 'LOW' setting for 5 seconds to combine.
-
Spread onto sandwiches, stir through potatoes or serve with salad.
NOTE: If not serving aioli immediately, keep it in an airtight jar in the refrigerator for up to 14 days.
Beetroot and Tahini Dip
Makes 2 cups
2 baby beetroots, peeled, cooked
14 cup tahini
2 tbsp light olive oil
2 tbsp flat leaf parsley, roughly chopped
1 tbsp lime juice
2 tsp flaked salt
- Place the beetroot, tahina, oil, parsley, lime juice and salt into the blending jug; securely seal the lid onto the blender.
- Secure the blender jug onto the motor base and turn the speed control dial to the 'LOW' setting for 20 seconds or until completely blended
- Remove the lid and serve with biscuits, vegetable batons or bread.
NOTE: Tahini is a paste made from blended sesame seeds and can be found in the spreads or health foods section of your local supermarket.
NOTE: If not serving dip immediately, it can be kept in an air tight container in the refrigerator for up to 5 days.
White Bean and Lemon Olive Oil Dip
Makes 2 cups
12 cup lemon olive oil
1 tbsp lemon juice
420g can white beans, drained, rinsed
2 tbsp basil leaves, roughly chopped
1 clove garlic, minced
2 tsp flaked salt
- Place the oil, lemon juice, beans, basil, garlic and salt into the blending jug; securely seal the lid onto the blender.
- Secure the blender jug onto the motor base and turn the speed control dial to the 'LOW' setting for 20 seconds or until completely blended
- Remove the lid and serve with biscuits, vegetable batons or bread.
NOTE: If not serving dip immediately, it can be kept in an air tight container in the refrigerator for up to 5 days.
Thai Sweet Potato Soup
Makes 1 litre
2 tbsp peanut oil
1 brown onion, diced
2 cloves garlic, minced
2cm piece ginger, minced
1 tsp brown mustard seeds
1 tsp ground coriander seeds
1 tsp ground cumin seeds
1 tsp salt
600g sweet potato, roughly chopped
500ml vegetable stock
250ml water
100ml coconut milk
Bread, to serve
Fresh coriander, to serve
-
Using a 2 litre pot, heat the oil over a medium heat and sauté the onion, garlic and ginger until golden brown, approximately 5 minutes, stirring regularly.
-
Add the mustard seeds, coriander seeds, cumin seeds and salt and sauté for a further 5 minutes, stirring regularly.
-
Add the sweet potato, stock and water and allow to simmer over a medium to low heat for 40 minutes. Remove from the heat and pour over the coconut milk and allow to cool for 10 minutes.
-
Secure the blender jug onto the motor base and turn the speed control dial to the 'LOW' settings for 30 seconds or until completely blended.
-
Remove the lid and serve immediately with bread and coriander.
NOTE: If not serving soup immediately, pour into an air tight container to refrigerate for up to 5 days or freeze for up to 3 months.
Veggie Baby Food
Makes 4 serves
100g sweet potato, peeled, steamed
100g carrot, peeled, steamed
2 broccoli florets, steamed
2/3 cup water
-
Place the sweet potato, carrot, broccoli and water into the blending jug; securely seal the lid onto the blender.
-
Secure the blender jug onto the motor base and turn the speed control dial to the 'LOW' setting for 20 seconds or until completely blended.
-
Remove the lid and serve immediately or store in air tight containers and put in the refrigerator or freezer.
NOTE: Store baby food in portion sizes in air tight containers in the refrigerator for up to 5 days or in the freezer for up to 3 months.
NOTE: You can add 1 tablespoon of grated cheddar cheese if the child is old enough to consume dairy products.
Notes
Notes
Notes


- KAMBROOK
- Important
- Please retain your instruction book for future use.
- Contents
- IMPORTANT: Please retain your instruction book for future use.
- Important Safeguards For Your Kambrook Blender
- Important Safeguards For All Electrical Appliances
- Your Kambrook Blender
- Not Shown
- Operating Your Kambrook Blender
- Before First Use
- Disassembling the Blender
- Operating Your Kambrook Blender Continued...
- Assembling and Attaching the Blender Jug
- Hints and Tips
- Hints and Tips Continued...
- Care, Cleaning and Storage
- Cleaning After Use
- Cleaning the Motor Body
- Storage
- Recipes
- Antioxidants Overload
- Makes 4 serves
- Banana Breakfast Drink
- Makes 1 serve
- Raspberry Protein Booster
- Mango Smoothie
- Iced Coffee
- Chocolate Milkshake
- Pina Colada
- Frozen Margaritas
- Makes 6 serves
- Balsamic and Caramelised Garlic Dressing
- Makes 1 cup
- Dill and Garlic Aioli
- Makes 1 ½ cups
- Beetroot and Tahini Dip
- Makes 2 cups
- White Bean and Lemon Olive Oil Dip
- Thai Sweet Potato Soup
- Makes 1 litre
- Veggie Baby Food
- Notes
Brand : Kambrook
Model : Blend Crush KBL330
Category : Blender