
Mixmaster Combo Pro MXP1000WH - Hand blender SUNBEAM - Free user manual and instructions
Find the device manual for free Mixmaster Combo Pro MXP1000WH SUNBEAM in PDF.


| Type | Hand blender (immersion blender) |
| Brand | Sunbeam |
| Model | Mixmaster Combo Pro MXP1000WH |
| Power | 400 W |
| Voltage | 120 V, 60 Hz |
| Speed Settings | Variable speed control (turbo boost) |
| Blade Material | Stainless steel |
| Shaft Material | Stainless steel immersion shaft |
| Attachments Included | Blending shaft, whisk, chopper/grinder bowl |
| Bowl Capacity (Chopper) | 500 ml (approx.) |
| Dimensions (Blender Body) | 28 cm (H) x 7 cm (W) x 7 cm (D) |
| Weight (Body+Attachments) | 1.1 kg |
| Cord Length | 1.2 m |
| Housing Material | Plastic and rubberized grip |
| Dishwasher Safe Parts | Removable shaft, whisk, chopper bowl and lid |
| Safety Features | Non-slip base button, release button for attachments |
| BPA Free | Yes |
| Warranty | 1 year limited |
Frequently Asked Questions - Mixmaster Combo Pro MXP1000WH SUNBEAM
User questions about Mixmaster Combo Pro MXP1000WH SUNBEAM
0 question about this device. Answer the ones you know or ask your own.
Ask a new question about this device
Download the instructions for your Hand blender in PDF format for free! Find your manual Mixmaster Combo Pro MXP1000WH - SUNBEAM and take your electronic device back in hand. On this page are published all the documents necessary for the use of your device. Mixmaster Combo Pro MXP1000WH by SUNBEAM.
USER MANUAL Mixmaster Combo Pro MXP1000WH SUNBEAM
natural_image
White Sunbeam MixMaster blender with a metal mixing bowl, no visible text or symbols on the device itself.Contents
Sunbeam's Safety Precautions 1
Features of your Mixmaster® Combo Pro 2
Using your Mixmaster® Combo Pro 4
Swivel Control 6
Mixing Guide 7
Care and Cleaning 7
Recipes
Important Instructions - retain for future use
Sunbeam's Safety Precautions
SAFETY PRECAUTIONS FOR YOUR SUNBEAM MIXMASTER COMBO PRO.
- Never eject beaters, whisks or dough hooks when the appliance is in operation.
- Ensure fingers are kept well away from moving beaters and dough hooks.
-
Any misuse of this product may lead to potential injury.
-
Do no operate for longer than 5 minutes at a time. After 5 minutes rest for 2 minutes then continue mixing.
- Switch off the appliance and disconnect from supply before changing accessories or approaching parts that move in use.
Sunbeam is very safety conscious when designing and manufacturing consumer products, but it is essential that the product user also exercise care when using an electrical appliance. Listed below are precautions which are essential for the safe use of an electrical appliance:
- Read carefully and save all the instructions provided with an appliance.
- Always turn the power off at the power outlet before you insert or remove a plug. Remove by grasping the plug - do not pull on the cord.
- Turn the power off and remove the plug when the appliance is not in use and before cleaning.
- Do not use your appliance with an extension cord unless this cord has been checked and tested by a qualified technician or service person.
- Always use your appliance from a power outlet of the voltage (A.C. only) marked on the appliance.
- This appliance is not intended for use by persons (including children) with reduced physical, sensory or mental capabilities, or lack of experience and knowledge, unless they have been given supervision or instruction concerning use of the appliance by a person responsible for their safety.
- Children should be supervised to ensure that they do not play with the appliance.
-
The temperature of accessible surfaces may be high when the appliance is operating.
-
Never leave an appliance unattended while in use.
- Do not use an appliance for any purpose other than its intended use.
- Do not place an appliance on or near a hot gas flame, electric element or on a heated oven.
- Do not place on top of any other appliance.
- Do not let the power cord of an appliance hang over the edge of a table or bench top or touch any hot surface.
- Do not operate any electrical appliance with a damaged cord or after the appliance has been damaged in any manner. If damage is suspected, return the appliance to the nearest Sunbeam Appointed Service Centre for examination, repair or adjustment.
- For additional protection, Sunbeam recommend the use of a residual current device (RCD) with a tripping current not exceeding 30mA in the electrical circuit supplying power to your appliances.
- Do not immerse the appliance in water or any other liquid unless recommended.
- Appliances are not intended to be operated by means of an external timer or separate remote control system.
- This appliance is intended to be used in household and similar applications such as: staff kitchen areas in shops, offices and other working environments; farm houses; by clients in hotels, motels and other residential type environments; bed and breakfast type environments.
If you have any concerns regarding the performance and use of your appliance, please visit www.sunbeam.com.au or contact the Sunbeam Consumer Service Line. Ensure the above safety precautions are understood.
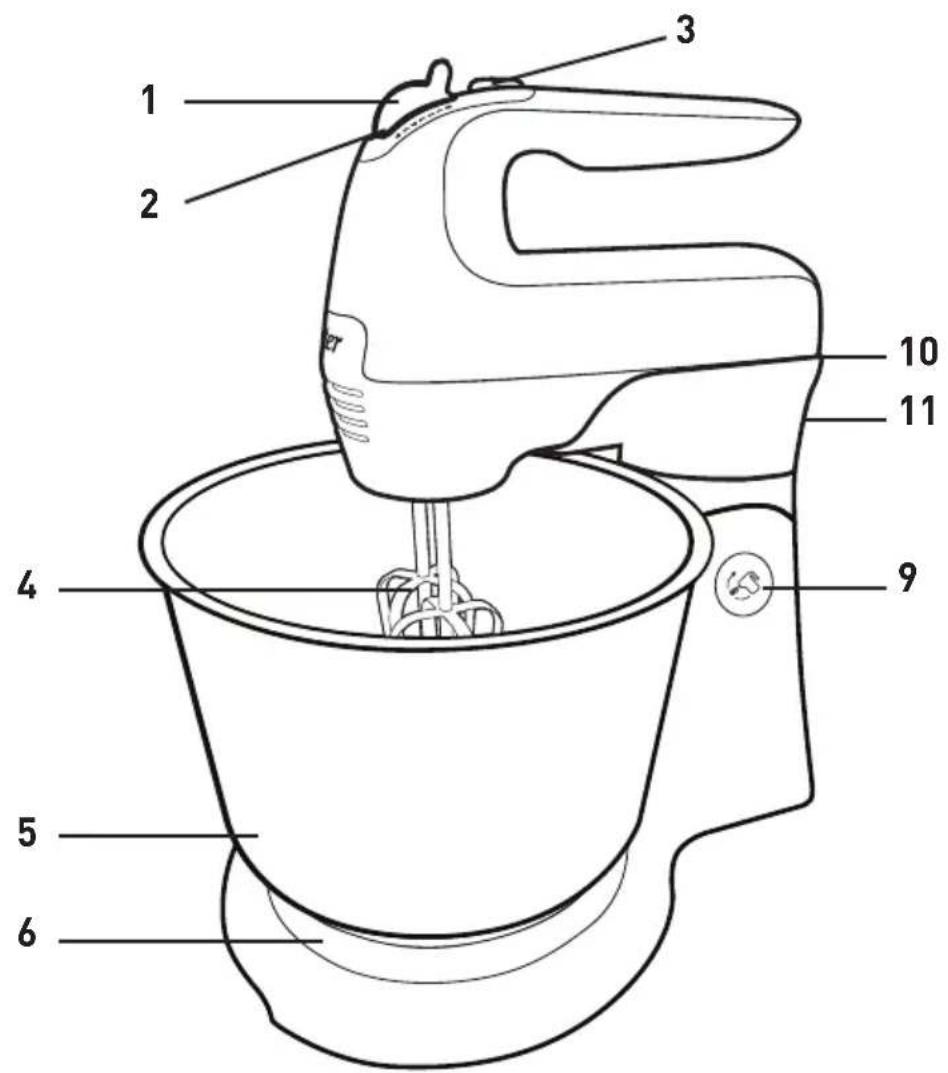
Features of your Mixmaster® Combo Pro
natural_image
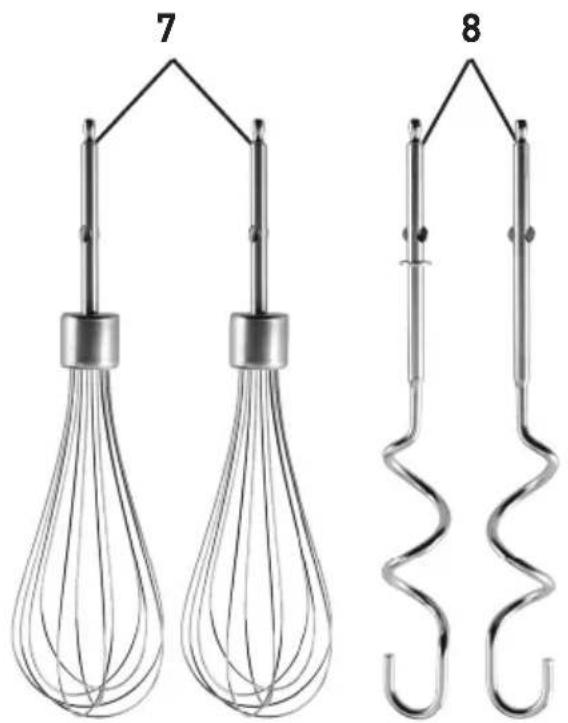
Two laboratory apparatus diagrams labeled 7 and 8: a whisker with two vessels and a coiled spring-like structure (no text or symbols present)1. 6 speed control switch
6 speeds that range from high speeds for whisking and low speeds for kneading.
2. Beater eject
To effortlessly release the beaters, whisks or dough hooks for easy cleaning. Press the speed control button downwards to eject.
3. Burst of power
Provides an extra speed boost and burst of power for those extra tough mixing tasks.
4. 'V-groove' beaters
Specially designed for optimum mixing and aeration. The beaters are positioned off-centre for easy addition of ingredients during mixing.
5. 3.8 litre stainless steel mixing bowl
Ideal for mixing delicate ingredients.
6. Turntable
The mixing bowl sits here and is rotated by the attachments during mixing to allow all areas of the bowl to be mixed.
7. Balloon whisks
Designed to add in maximum air in minimum time. Use for whipping and whisking tasks.
8. Dough hooks
The heavy-duty steel dough hooks take the hard work out of kneading dough and other heavy mixtures.
9. Tilt button
The head of the mixer tilts back and locks securely into position to allow for easy removal of the mixing bowl and attachments.
10. Hand mixer release tab
Designed for maximum use the mixer transforms into a convenient hand mixer, as the head of the mixer simply detaches from the mixing stand.
11. Swivel control
Choose between 2 different mixer head positions to ensure a thorough and even mixing action.
Using your Mixmaster® Combo Pro
Before use
Before assembling your mixer, be sure the power cord is unplugged from the power outlet and the speed control switch is in the '0' OFF position.
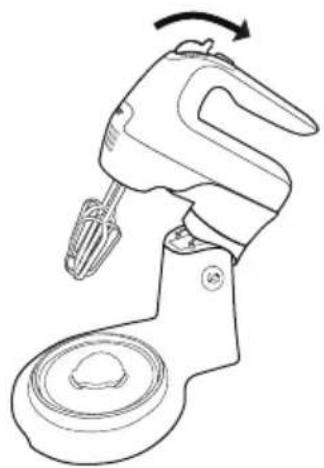
- Press the tilt button and tilt the cradle back into OPEN position. Place the hand mixer into the cradle ensuring the base of the hand locks in correctly.
Note: When fitted correctly there will be no gap between the hand mixer and the cradle.
natural_image
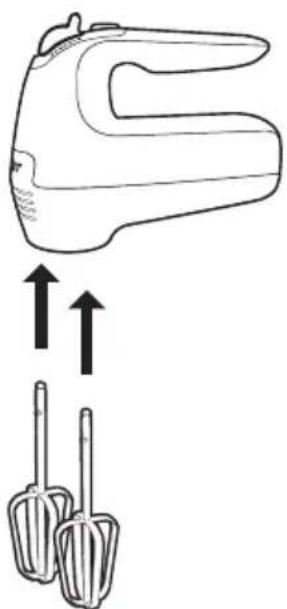
Line drawing of a hand-operated manual shaver with a rotating knob (no text or symbols)- Select the desired attachments, depending on the mixing task to be performed: beaters for mixing and beating, whisks for whisking or dough hooks for kneading.
natural_image
Line drawing of a hand mixer with two sticks, showing motion arrows (no text or symbols)Inserting the beaters or dough hooks
3a. The beater or dough hook with the collar on the stem, inserts into the larger socket on the mixer. Place one at a time and turn beater/ dough hook slightly and push in until it clicks into position. (see Figure 2).
Inserting the whisks
3b. Whisks can be inserted in either socket, as they are identical.
Note: the beaters and dough hooks are not interchangeable. If the beaters, dough hooks and whisk do not click into the sockets, reverse and try again.
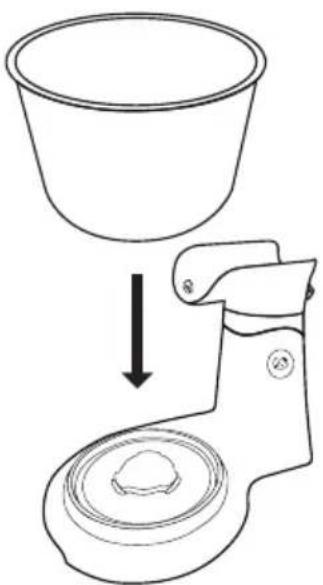
- Place the 3.8 litre mixing bowl onto the turntable.
natural_image
Diagram showing a bowl being removed from a toilet into a sink (no text or symbols present)- To lower the head of the mixer and beaters/whisks/dough hooks into the bowl, depress the 'tilt' button, hold the handle with the other hand and ease the head of the mixer down. A 'click' will indicate when the head has reached the correct position.
Using your Mixmaster® Combo Pro (continued)
Using your mixer
- With the speed control switch in the '0' OFF position, plug the power cord into a 230-240V AC power outlet.
- Use the speed control switch to turn the mixer 'ON' and 'OFF' and to control the mixing speeds. Clearly marked instructions for correct mixing speeds for each type of mixture are shown in the Mixing Guide on page 7.
Tip: Always start mixing at slow speeds and increase the speed gradually to prevent ingredients splashing out of the mixing bowl.
Tip: When adding dry ingredients use the lowest speed to prevent the 'snow storm' effect.
Tip: When kneading yeast doughs, using Low speeds 1-2 (low) to achieve best results.
- When mixing is complete, turn the speed control switch to the '0' OFF position and unplug the cord from the power outlet.
- Hold down the 'tilt' button and ease the head of the mixer back until the mixer head is in the tilt position.
- To remove the beaters/whisks/dough hooks, place fingers loosely around the spindles and press the speed control switch downwards.
Removing the hand mixer
- With the speed control switch in the '0' OFF position, unplug the power cord.
- Press the 'tilt' button with one hand and place the other hand on the hand mixer handle. Tilt the mixer head back to full position until 'click' into place.
- With one hand pull down on the Hand Mixer Release Tab, releasing the hand mixer from the mixing base.
- With the other hand, grip the hand mixer handle and pull away from the mixer base in a diagonally upwards movement.
- The hand mixer is now ready to use for mixing tasks.
Swivel Control
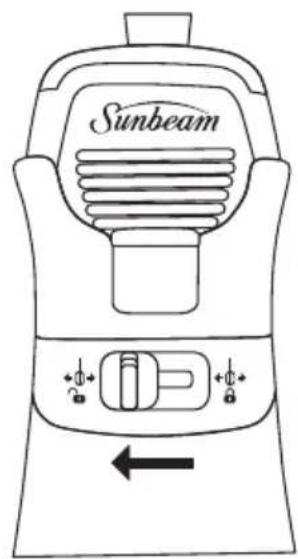
At the back of the mixer stand is the Swivel Control switch. This controls the position of the mixer head in the mixing bowl.
Lock Position (switch in far right position)
The mixer head will be locked into position with the accessories close to the edge of the bowl.
Unlock Position (switch in far left position)
The mixer head will be free to move from side to side during mixing to reach all areas of the bowl.
natural_image
Line drawing of a Sunbeam blender with control buttons and an arrow indicating left motion (no text or symbols on device body)Mixing Guide
| MIXING TASK Recommended Speed(s) | |
| Kneading, Folding & Blending 1 - 2 (low) | |
| Light Mixing 2 - 3 (low/med) | |
| Creaming & Beating 4 - 5 (med/high) | |
| Whipping & Aerating 5 - 6 (high) | |
Care and Cleaning
CAUTION: Turn off and unplug appliance and eject any accessories before cleaning.
- Before cleaning any part of the mixer, set the speed control switch to the "0 (OFF)" position to turn off. Then unplug the cord from the outlet and eject the beaters.
- The beaters, whisks, dough hooks and bowl may be washed in hot, soapy water or in a dishwasher.
CAUTION: Do not immerse mixer or stand in water while cleaning. This may cause electric shock, injury, or damage to the product.
- To remove stubborn spots on the hand mixer and base, wipe surfaces with a cloth, slightly dampened in soapy water or a mild, non-abrasive cleaner.
- Do not use any abrasive cleaner or material to clean any part of the hand mixer or stand as it can scratch the product.
Recipes
Butter Cake
Serves: 8-10
Preparation: 15 minutes
Cooking: 1 hour
175g butter, softened
1 teaspoon vanilla extract
1 cup caster sugar
3 eggs
2 14 cups self-raising flour
^3/_4 cup milk
-
Preheat oven to moderate (180°C/160°C fan-forced). Grease and line a 20cm round cake pan.
-
Place all ingredients in a large bowl. Using the beaters, beat on Low speed (1-2) until combined. Increase speed to Medium-High (4-5) and beat for about 1 minute or until smooth.
-
Pour mixture into prepared pan.
-
Bake for about 1 hour or until a skewer inserted into the centre comes out clean. Stand cake for 5 minutes then turn onto a wire rack to cool.
Serving suggestion: Ice and decorate your cake with fluffy butter frosting (recipe on page 12)
Variations:
Cupcakes
Line a 12-hole muffin pan with patty cases. Spoon 14 cup mixture into each case. Bake for about 12-15 minutes or until skewer inserted into the centre comes out clean.
Lemon or Orange Cake
Replace the vanilla extract with the finely grated rind of 1 lemon or orange.
Marble Cake
Divide batter into 2 portions, leave one plain, and add pink food colour to the second portion. Drop spoonfuls of alternate colours into prepared pan. Use a skewer or knife to swirl slightly and create a marbled effect.
Berry Cake
Fold 1 cup of fresh or frozen mixed berries through the cake batter.
Recipes
Buttermilk Pikelets
Makes: 24
Preparation: 5 minutes
Cooking: 15 minutes
1 egg
14 cup caster sugar
1 cup self-raising flour, sifted
pinch salt
12 teaspoon bicarbonate of soda
^3/_4 cup buttermilk
30g butter, melted
Cooking oil spray
Lemon juice and sugar, to serve
- Place egg and sugar in a small bowl. Using the beaters, beat on Medium/High (4-5) until light and creamy.
- Add flour, salt, bicarbonate of soda, buttermilk and butter and beat on Medium/High speed (4-5) until smooth.
- Heat a frypan over medium heat. Spray with cooking oil spray. Add tablespoons of mixture and cook for about 2-3 minutes each side or until golden.
- Serve pikelets warm or cold with lemon juice and sprinkle with sugar.
Chocolate Chip Cookies
Makes: about 30
Preparation: 15 minutes
Cooking: 10-15 minutes per batch
125g butter, softened
12 cup firmly packed brown sugar
12 cup caster sugar
1 teaspoon vanilla extract
1 egg
1 34 cup self raising flour
1 cup choc chips
- Preheat oven to moderate (180°C/160 fan-forced). Grease and line baking trays with baking paper.
- Place butter, sugars and vanilla in a bowl. Using the beaters, beat on Low speed (1-2) until combined. Increase speed to Medium/High (4-5) and beat until light and creamy.
- Add egg and beat until combined. Reduce speed to Low (1-2). Add flour and chocolate chips. Beat until combined.
- Roll tablespoons of mixture into balls and place onto prepared trays. Press lightly with the back of a fork. Ensure that the cookies are well spaced to allow for spreading.
- Bake cookies in batches for about 10 -15 minutes or until golden. Cool on trays.
Recipes
Meringue kisses
Makes: about 24
Preparation: 30 minutes
Cooking: 30 minutes
1 egg white
14 cup caster sugar
12 teaspoon white vinegar
2 teaspoons icing sugar
Whipped cream, to serve
-
Preheat oven to very slow (120°C/100°C fan-forced). Grease baking trays and dust with corn flour. Shake off excess.
-
Place egg white in a small bowl. Using the whisks, beat on High speed (5-6) until soft peaks form. Gradually add the caster sugar and vinegar. Continue beating until sugar dissolves. Fold in sifted icing sugar.
-
Spoon the mixture into a piping bag fitted with a small star shaped nozzle. Pipe small meringues (about 1.5cm) onto the prepared baking trays.
-
Bake for about 30 minutes or until crisp and dry. Cool meringues on trays.
-
Sandwich cooled meringues with chantilly cream or a basic buttercream (recipe on page 12).
Tip: If you do not have a piping bag, use two teaspoons to spoon rounds of meringue mixture onto prepared trays.
Classic Sponge Cake
Serves: 8
Preparation: 20 minutes
Cooking: 20 minutes
4 eggs
^3/_4 cup caster sugar
1 cup wheaten cornflour
1 teaspoon cream of tartar
12 teaspoon bicarbonate of soda
Whipped cream and jam, to serve
-
Preheat oven to moderate (180°C/160°C fan-forced). Grease and line two 22cm round cake pans.
-
Place eggs in a small bowl. Using the beaters, beat on High speed (5-6) until thick and creamy (about 5 minutes). Continue beating, gradually adding the sugar until dissolved.
-
Sift flour, cream of tartar and bicarbonate of soda twice onto baking paper. Sift into egg mixture and use a large metal spoon to fold until combined.
-
Divide mixture evenly among cake pans. Bake for about 20 minutes or until skewer inserted into the centre comes out clean.
-
Turn cakes immediately onto a baking paper lined wire rack.
-
Serve cool sponges sandwiched together with whipped cream and jam. Dwith icing sugar.
Recipes
White Chocolate cheesecake
Serves: 10
Preparation: 30 minutes (plus refrigeration time)
250g plain sweet biscuits
125g butter, melted
2 teaspoons gelatine
14 cup water
375g cream cheese, softened
12 cup caster sugar
1 teaspoon vanilla extract
300ml thickened cream
150g white chocolate, melted
Mixed berries and grated white chocolate, to garnish
-
Grease and line a 22cm spring form tin with baking paper.
-
Place biscuits in a food processor. Process until fine. Add melted butter. Process until combined. Press mixture onto the base of the prepared tin. Refrigerate for 30 minutes.
-
Sprinkle gelatine over water in a heatproof jug. Stand jug in a small saucepan of simmering water. Stir until gelatine dissolves. Cool slightly.
-
Place cream cheese, sugar and vanilla extract in a large bowl. Using the beaters, beat on Low speed (1-2) until just combined. Increase to Medium/High speed (4-5) and beat until smooth.
-
Add cream. Continue beating until just combined. Add chocolate and gelatine mixture. Beat until just combined. Pour mixture into prepared tin. Refrigerate overnight or until firm.
-
Serve garnished with mixed berries and grated chocolate.
Chocolate mousse
Serves: 8
Preparation: 20 minutes
300ml thickened cream
3 eggs, separated
2 tablespoons caster sugar
200g dark chocolate, chopped
30g unsalted butter, chopped
Whipped cream and extra chocolate to garnish
-
Place cream in a bowl. Using the beaters, beat on High speed (5-6) until soft peaks form.
-
Place egg whites in a clean bowl. Using the whisk, beat on High speed (5-6) until soft peaks form. Add sugar and beat until sugar dissolves.
-
Place chocolate in a heatproof bowl. Place bowl over a saucepan of simmering water. Stir with a metal spoon until melted. Remove from heat, add butter and stir until melted.
-
Add egg yolks and stir until smooth.
-
Fold cream and egg whites into chocolate mixture in two batches.
-
Spoon mixture into 8 serving glasses. Cover and refrigerate overnight.
-
Serve with extra whipped cream and garnish with shaved chocolate.
Recipes
Pavlova
Serves: 8-10
Preparation time: 25 minutes
Cooking: 90 minutes plus 4 hours cooling
4 egg whites
1 cup castor sugar
2 teaspoons vinegar
3 teaspoons cornflour
12 teaspoon vanilla extract
- Preheat oven to 120^ C. Grease and flour 20cm round tray.
- Using a clean, dry bowl whip the egg whites until stiff on 5-6 (high) speed.
- Gradually add the sugar, a teaspoon at a time to start. Beat well between each addition. As the mixture thickens add the sugar more quickly. This should take approximately 5-8 minutes mixing time.
- Reduce speed to 1 and fold through vinegar, cornflour and vanilla. Continue mixing until mixture is stiff and glossy, approximately 2-3 minutes.
- Spread half pavlova onto prepared tray. Pipe the remaining mixture to form a border.
- Bake for 114-112 hours. If able, turn oven off and allow to cool in oven overnight or for a few hours.
Serving suggestion:
Decorate as desired. Fresh cream and lots of fresh berries is a favourite. Sprinkled with icing sugar to finish off.
Fluffy Butter Frosting
13 cup butter
4 cups pure icing sugar
Pinch salt
3-4 tablespoons milk
1 12 teaspoon vanilla
- Place all ingredients into the bowl and on speed 2-3 mix until all ingredients are well combined, creamy, light and fluffy in texture.
Glaze Icing
3 tablespoons sugar
14 cup water
1 teaspoon gelatine
- Place all ingredients into a small saucepan. Stir over medium heat until sugar has dissolved, approximately 2 minutes.
- Brush warm on top of baked sweet goods.
12 Month Replacement Guarantee
This Sunbeam product is covered by a 12 month replacement or repair warranty, which is in addition to your rights under the Australian Consumer Law (if your product was purchased in Australia) or New Zealand Consumer Guarantees Act (if your product was purchased in New Zealand).
Upon receipt of your claim, Sunbeam will seek to resolve your difficulties or, if the product is defective, advise you on how to obtain a replacement or refund.
To assist us in managing warranty claims, we recommend you register your product as soon as practicable after purchase, on our Sunbeam website and uploading a copy of your original receipt. View the Support section of the Sunbeam website.
Should you experience any difficulties with your product during the warranty period, please contact our customer service line for advice on 1300 881 861 in Australia, or 0800 786 232 in New Zealand.
Australia
www.sunbeam.com.au 1300 881 861
New Zealand
www.sunbeam.co.nz 0800 786 232
In order to make a claim under our warranty, you must have the original proof of purchase documentation for the product and present it when requested (if not already uploaded to our website).
Should your product develop any defect within 12 months of purchase because of faulty materials or workmanship, we will replace or repair it, at our discretion, free of charge. A product presented for repair may be replaced by a refurbished product of the same type rather than being repaired. Refurbished parts may be used to repair the product.
Our replacement or repair warranty only applies where a defect arises as a result of faulty material or workmanship during the warranty period. Your warranty does not cover misuse or negligent handling (including damage caused by failing to use the product in accordance with this instruction booklet), accidental damage, or normal wear and tear.
Your warranty does not:
• cover freight or any other costs incurred in making a claim, consumable items, accessories that by their nature and limited lifespan require periodic renewal (such as filters and seals) or any consequential loss or damage; or
• cover damage caused by: - power surges, power dips, voltage supply problems, or use of the product on incorrect voltage;
- servicing or modification of the product other than by Sunbeam or an authorised Sunbeam service centre;
- use of the product with other accessories, attachments, product supplies, parts or devices that do not conform to Sunbeam specifications; or
- exposure of the product to abnormally corrosive conditions; or
- extend beyond 3 months if the product is used in commercial, industrial, educational or rental applications.
The benefits given to you by our warranty are in addition to other rights and remedies under law in relation to the product.
In Australia our goods come with guarantees that cannot be excluded under the Australian Consumer Law. You are entitled to a replacement or refund for a major failure and for compensation for any other foreseeable loss or damage. You are also entitled to have the goods repaired or replaced if the goods fail to be of acceptable quality and the failure does not amount to a major failure.
Our goods also come with guarantees that cannot be excluded under the New Zealand Consumer Guarantees Act.
If your warranty claim is not accepted, we will inform you and if requested to do so by you, repair the product provided you pay the usual charges for such repair. You will also be responsible for all freight and other costs.
Should your product require repair or service after the warranty period, contact your nearest Sunbeam service centre. For a complete list of Sunbeam's service centres, visit our website or call our customer service line for advice on 1300 881 861 in Australia, or 0800 786 232 in New Zealand.
Need help with your appliance?
Contact our customer service team or visit our website for information and tips on getting the most from your appliance.
Australia | visit www.sunbeam.com.au
phone 1300 881 861
New Zealand | visit www.sunbeam.co.nz
phone 0800 786 232
Newell Australia Pty Ltd | ABN 68 075 071 233
Sunbeam is a registered trade mark.
Made in China to Sunbeam's specification.
Due to minor changes in design or otherwise,
the product you buy may differ slightly from the one shown here.
Approved by the appropriate electrical regulatory authorities.
©Copyright Sunbeam 2022.
05/22
- Contents
- Important Instructions - retain for future use
- Sunbeam's Safety Precautions
- SAFETY PRECAUTIONS FOR YOUR SUNBEAM MIXMASTER COMBO PRO.
- Features of your Mixmaster® Combo Pro
- 6 speed control switch
- Beater eject
- Burst of power
- 'V-groove' beaters
- 3.8 litre stainless steel mixing bowl
- Turntable
- Balloon whisks
- Dough hooks
- Tilt button
- Hand mixer release tab
- Swivel control
- Using your Mixmaster® Combo Pro
- Before use
- Inserting the beaters or dough hooks
- Inserting the whisks
- Using your Mixmaster® Combo Pro (continued)
- Using your mixer
- Removing the hand mixer
- Swivel Control
- Mixing Guide
- Care and Cleaning
- Recipes
- Butter Cake
- Variations:
- Cupcakes
- Lemon or Orange Cake
- Marble Cake
- Berry Cake
- Buttermilk Pikelets
- Chocolate Chip Cookies
- Meringue kisses
- Classic Sponge Cake
- White Chocolate cheesecake
- Chocolate mousse
- Pavlova
- Serving suggestion:
- Fluffy Butter Frosting
- Glaze Icing
- Month Replacement Guarantee
- Australia
- New Zealand
- Your warranty does not:
- Need help with your appliance?
Brand : SUNBEAM
Model : Mixmaster Combo Pro MXP1000WH
Category : Hand blender