M1010Z - Digital photo frame Micca - Free user manual and instructions
Find the device manual for free M1010Z Micca in PDF.


| Product Type | Digital Photo Frame |
| Model | M1010Z |
| Display Size | 10.1 inches TFT |
| Display Resolution | 1024 x 600 |
| Aspect Ratio | 16:9 |
| Brightness | 200-250 cd/m² |
| Contrast Ratio | 200-300:1 |
| Response Time | 20 ms |
| Photo Format | JPG |
| Music Format | MP3 (up to 320 kbps) |
| Video Format | AVI, MP4 (MPEG-1/2/4 video, MP3 audio) |
| Storage | SD/SDHC card up to 32 GB, USB flash drive up to 32 GB, small internal memory |
| Connectivity | USB 2.0 Host, Mini USB (optional), SD/SDHC card reader, headphone output |
| Remote Control | Yes, with CR2025 battery |
| Power Supply | AC adapter input 100-240V 50/60Hz, output 5V/1.5A DC |
| Clock and Calendar | Yes, with slideshow |
| Alarm | Yes, two slots with configurable mode and repeat |
| Auto Power On/Off | Yes, programmable daily |
| Languages | English, French, Italian, German, Spanish |
| Special Features | Brushed aluminum bezel, swivel stand, slideshow with background music, adjustable transition effects |
| Cleaning | Use soft microfiber cloth; spray cleaner on cloth, never directly on screen; power off before cleaning |
| Safety Warnings | Indoor use only; avoid moisture; do not block ventilation; do not disassemble; use only supplied AC adapter |
| Spare Parts | Remote control battery CR2025, AC adapter (5V/1.5A) |
| Repairability | No user-serviceable parts; disassembly voids warranty; contact support for issues |
| Dimensions (Approx.) | 10.5 x 7.5 x 1.2 inches (estimated) |
| Weight (Approx.) | 1.5 lbs (estimated) |
Frequently Asked Questions - M1010Z Micca
User questions about M1010Z Micca
0 question about this device. Answer the ones you know or ask your own.
Ask a new question about this device
Download the instructions for your Digital photo frame in PDF format for free! Find your manual M1010Z - Micca and take your electronic device back in hand. On this page are published all the documents necessary for the use of your device. M1010Z by Micca.
USER MANUAL M1010Z Micca
Thank you for purchasing a Micca product. Should you need any assistance, please contact our technical support before returning the product to the retailer. Email support@miccastore.com
Product information, firmware updates, and common questions and answers can be found at: http://content.miccastore.com/
Copyright © 2009-2012 Micca, Ltd. All rights reserved. This manual may not be reproduced in whole or in part without permission for any purpose other than personal use.
1 Introduction
1.1 Preface
Thank you very much for purchasing this digital photo frame. We hope you will enjoy using it to view your treasured photos. This photo frame has the following features:
1.1.1 Highlights
■ M707Z: 7-Inch 800x480 high resolution wide-screen LCD screen ■ M808Z: 8-Inch 800x600 high resolution LCD screen ■ M1010Z: 10-Inch 1024x600 high resolution wide-screen LCD screen - Brushed aluminum bezel with machined highlights - Slim profile with curved back case design for modern appearance ■ Integrated swivel stand that tucks away for easy carrying
1.1.2 Features
■ Supports JPG image/photo files ■ Supports MP3 music files ■ Supports AVI and MP4 video files using MPEG1/2/4 video codecs ■ Slideshow with background music - Compact IR remote control - USB 2.0 host connector supports USB flash drives ■ Flash media card reader supports SD/SDHC cards ■ Automatic slideshow at power on and when inserting memory card or USB drive - Adjustable slideshow sequence, speed, and transition effects ■ Clock and calendar with slideshow ■ Adjustable screen brightness, contrast, and saturation ■ Multiple language support: English, French, Italian, German, Spanish
Note: All the information contained in this manual was correct at the time of publication.
However, as our engineers are always updating and improving the product, your device's software may have a slightly different appearance or modified functionality than presented in this manual.
2 Precautions
2.1 Precautions and Maintenance
- This product is intended for residential indoor use only. It is not intended for outdoors use, or use in harsh environments, or demanding commercial use.
- To avoid risk of fire or electric shock, do not expose the unit to moisture or condensation.
- To avoid overheating, do not block the ventilation holes on the digital photo frame.
- Keep the digital photo frame away from direct sunlight.
- Turn off the player and disconnect from AC power if not used for a while.
- Do not disassemble the digital photo frame. There is a risk of electric shock and there are no user-serviceable parts inside. Disassembling the digital photo frame will void its warranty.
2.2 Cleaning the LCD Screen
- Treat the screen gently and carefully. The screen of the digital photo frame has a glass component that can be damaged or broken when impacted.
- Use a soft, non-abrasive lint-free cloth such as microfiber camera lens cloth to gently wipe the LCD screen if fingerprints or dust accumulate on the LCD screen. If necessary, use a cleaning solution that's safe for coated camera photo lens cleaning. Spray the cleaning solution onto the cleaning cloth. NEVER SPRAY CLEANING SOLUTION DIRECTLY ONTO THE LCD SCREEN.
WARNING:
Please power off the unit before inserting or removing a memory card or USB drive. Do not put the unit near water or a high-moisture environment to prevent the risk of electric shock.
3 Connections and Buttons
3.1 Buttons
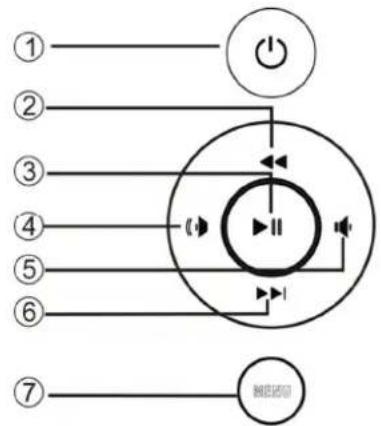
- Power
- Previous or Up
- Play/Pause or Enter
- Right (Short Press) or Volume+ (Long Press)
- Left (Short Press) or Volume- (Long Press)
- Next or Down
- Menu (Long Press) or Return (Short Press)
Note: The left and right buttons are named in accordance with their function when the user is looking at the photo frame. Thus, pressing the "Left" button will move the cursor to the left and the "Right" button will move the cursor to the right.
3.2 Connections

- SD/SDHC Card Reader
- Headphone Output
- USB 2.0 Port
- Mini USB Port (Optional)
- DC Power Input
Note: Only use the AC adapter that is provided with the digital photo frame. Using a different AC adapter may damage the unit.
3.3 Remote Control

| Key | Function | |
| 1 Power Turn the photo frame on or off | ||
| 2 | BMG | Start a slideshow with background music |
| 3 | Mute | Mutes the sound output. Press again to unmute. |
| 4 | Menu | Behavior is different depending on context, either brings up an operations menu or displays the main menu. |
| 5 Up Move cursor up | ||
| 6 Return Go back to the previous step | ||
| 7 Left Move cursor left | ||
| 8 Right Move cursor right | ||
| 9 Down Move cursor down | ||
| 10 Setup Go to the setup menu | ||
| 11 | Play/Pause | Play or pause photo slideshow, music, or video |
| 12 | OK | Play or pause photo slideshow, music, or video |
| 13 | Zoom | Zoom in when viewing a photo (slideshow must be paused) |
| 14 | Volume- | Decrease the volume for music or video playback |
| 15 | Volume+ | Increase the volume for music or video playback |
| 16 | Rotate | Rotate a photo clockwise 90 degrees. Press Play to resume slideshow. |
| 17 | Previous | Go to previous photo, music, or video file |
| 18 | Next | Go to next photo, music, or video file |
To replace the battery in the remote, place the remote control face down, press down on the ridged area of the battery cover and pull towards you to remove the tray. Place one CR2025 lithium button-cell battery on the tray with the positive “+” side facing you. Reinsert the tray.

4 Getting Started
4.1 Initial Setup
Find a flat and stable surface to place the photo frame. Swing out the built-in stand fully to prop up the photo frame – make sure the stand is fully extended or else it will collapse during use. Plug the AC adapter into a standard 110V AC or 240V AC electrical outlet and connect it to the DC Power Input on the photo frame. If the frame turns on and displays the main menu, proceed to the following steps:
- Carefully remove the protective film covering the LCD.
- Remove the plastic battery insulator from the battery compartment and make sure the remote control has a battery inside.
- Press the "Power" button on the remote control to turn the player on or off.
Your digital photo frame is now ready for use.
5 Operating Instructions
After turning on the photo frame, the main menu will display after a few seconds. If there is a flash memory card or USB flash drive inserted into the photo frame, a slideshow will automatically begin. To get back to the main menu, press the "Menu/Return" button on the back of the photo frame twice.

The main menu contains icons for Photos, Music, Videos, File Operations, Calendar, and Setup.
5.1 Flash Memory Cards and USB Flash Drives
The photo frame supports SD/SDHC flash memory cards and USB flash drives, both up to 32GB in size. While the photo frame can handle high resolution photos directly from a digital camera, it is strongly recommended to resize photos down to a lower resolution of about one megapixel in size. This allows more photos to be stored at one time and smaller files are more easily displayed by the photo frame.
The photo frame has a very small amount of built-in internal memory. It can be used to hold a few small photos.
5.2 Choosing Storage Device
When more than one storage device is detected by the digital photo frame, it is necessary to select which storage device to use. Once selected, all operations are on the selected storage device. To perform operations on another storage device, it is necessary to select it first.
To select a storage device, press the "Menu/Return" button repeatedly until the storage selection screen is shown. Highlight the desired storage device and press "Play/Pause/Enter" to select it.
5.3 Viewing Photos
When a storage device loaded with photos is inserted, the digital photo frame will automatically start displaying a photo slideshow when it is turned on. The user can also manually start a slideshow through the "Photo" icon from the main menu.
Background music will also begin playing if music files are found. To change this behavior, refer to detailed settings in Chapter 6.
When viewing photos, the following operations are available using the buttons on the back of the photo frame:
| Button | Description |
| Play/Pause Play or pause the photo slide show. | |
| Left Go to the previous photo. | |
| Right Go to the next photo. | |
| Up Rotate photo counter-clock wise. | |
| Down Rotate photo clock wise. | |
| Menu/Return Stop the slide show and return to the photo thumbnail menu. | |
5.4 Copying Photos
It is possible to copy a few small photos to the photo frame's internal memory. To copy photos follow these steps:
- Load a SD/SDHC or USB drive with photos you wish to copy and insert it into the photo frame.
- Turn on the photo frame. If slideshow automatically starts, press the "Menu/Return" button once to return to view photo thumbnails.
- Scroll to find photos you wish to copy. Highlight a photo and press the "Play/Pause/Enter" button to display it full screen.
- Long press the "Menu/Return" button to display the copy menu.
- Highlight "Save Picture" and press the "Play/Pause/Enter" button to save the photo to internal memory.
5.5 Deleting Photos
To delete a photo, such as from the internal memory of the photo frame, follow these steps:
- Remove all SD/SDHC and USB flash drives.
- Turn on the photo frame and select the "Photos" icon from the main menu.
- Highlight the photo you wish to delete.
- Long press the "Menu/Return" button to display the delete menu.
- Highlight "Delete File" and press the "Play/Pause/Enter" button to delete the photo.
5.6 Playing Music
To begin playing music, select the "Music" icon from the main menu. All music files found on the storage device will be displayed in one list. Scroll to the desired music file and press the "Play/Pause/Enter" button to begin playing the music.
While playing music, the following operations are available using the buttons on the back of the photo frame:
| Button | Description |
| Play/Pause Play or pause the music. | |
| Left Turn down the playback volume. | |
| Right Turn up the playback volume. | |
| Up Go to the previous music file. | |
| Down Go to the next music file. | |
| Menu/Return Stop the playback and return to the main menu. | |
5.7 Playing Videos
To begin playing videos, select the "Video" icon from the main menu. All video files found on the storage device will be displayed in one list. Scroll to the desired video file and press the "Play/Pause/Enter" button to begin playing the video.
While playing videos, the following operations are available using the buttons on the back of the photo frame:
| Button | Description |
| Play/Pause Play or | pause the video. |
| Left Turn down the | playback volume. |
| Right Turn up the | playback volume. |
| Up Go to the previous music file. | |
| Down Go to the next music file. | |
| Menu/Return Stop the playback and return to the video selection menu. | |
5.8 File Browsing
The "File" icon from the main menu lets users browse the contents of the selected storage device by navigating its folder directory structure. All compatible file types will be displayed while incompatible file types are not displayed. It is possible to copy or delete files using the same methods as described in previous sections.
5.9 Calendar
To view the calendar, select the "Calendar" icon from the main menu. Be sure to properly set the date and time in the settings menu so that the information displayed is correct. The photo frame will automatically begin playing a slideshow using photos found on the selected storage device.


6 Detailed Settings
To access the setup menu of the photo frame, turn it on and wait for the main menu to display. Highlight the Setup icon and press "Enter". The Setup menu has the following settings:
Language
Changes the operating language of the photo frame.
Available Values: English, French, Italian, German, Spanish
Photo Sequence
Changes the photo playback sequence when displaying slideshows.
| Setting | Description |
| Sequence | Photos will be displayed in their normal sequence alpha-numerically based on file name. |
| Random Photos will be displayed in random sequence. | |
Start Up Mode
Sets the operation mode of the photo frame when it is turned on.
| Setting | Description |
| Slideshow Play a photo slide show with background music. | |
| Music Play music files. | |
| Video Play music files. | |
| Photo Play photo files without background music. | |
| Calendar Display the calendar. | |
Slide Mode
Changes the number of photos displayed at the same time during a slideshow. The higher the setting, the more photos will be shown at the same time.
Available Values: Single Window, Two Windows, Four Windows, Triple Windows
Slide Speed
Sets the time interval between each photo in a slideshow.
Available Values: 3/5/15/30 Seconds, 1/5/15/30 Minutes, 1 Hour
Photo Effect
Applies a special effect to photos when they are displayed.
| Setting | Description |
| Color Photos will be displayed as they are without any special effects. | |
| Mono Photos will be displayed as black and white. | |
| Sepia Photos will be displayed in sepia tone. | |
Slide Show Effect
Sets the transition effect as one photo switches to the next in a slideshow.
Available Values: Random (all effects), Jalousie, Fade, Insert, Reel, Brick, 3D Float, Release, 3D Mix, Comb, 3D Circle, 3D Cube.
Photo Mode
Changes the way photos are displayed when they do not perfectly fit the screen of the photo frame.
| Setting | Description |
| Auto Fit | Black bars will be added to the top or bottom of photos that are too narrow or too wide relative to the screen. |
| Optimal | Photos that are too narrow will have the top and bottom cut to fit the screen. Photos that are too wide will have the sides cut to fit the screen. |
| Full The photo will be stretched or squeezed to fit the full screen. | |
Music Play Mode
Changes the music playback mode.
| Setting | Description |
| Single Repeat Repeat | a single music file. |
| Circular Repeat all files continuously. | |
| No Repeat Play all files one time only. | |
Video Mode
Changes the way videos are displayed when they do not perfectly fit the screen of the photo frame.
| Setting | Description |
| Original | Videos are displayed in their native resolution. If they are too small, they will appear only in the center portion of the screen. |
| Screen | Videos are enlarged to fit the screen but the original aspect ratio of the screen is retained. Black bars my appear at the sides or top of the video. |
| Full Videos are stretched or squeezed to fit the screen. | |
Display
Changes the display parameters of the LCD screen. The default values are optimal for most conditions.
| Setting | Description |
| Contrast Changes the contrast of the LCD screen. | |
| Brightness Increase or decrease the brightness of the LCD screen. | |
| Saturation | Increase to make colors more vibrant, decrease to make colors more muted. |
| Tint | Change the color cast of the LCD screen. Adjust so that skin tones in photos look natural. |
Set Time/Date
Set the current date and time. The date and time is remembered by the photo frame even when there is no power. Select "Save Time" when finished to save the setting.
Available Settings: Year, Month, Date, Hour, Minute, Second
Set Time Format
Change to display the time in either 12-hour or 24-hour time format.
Available Values: 12, 24
Alarm
Configure the alarm clock function of the photo frame. There are two alarm slots, each can be configured independently.
| Setting | Description |
| Status Turn the alarm on or off | |
| Number Switch to alarm slot #1 or #2 | |
| Hour Set the hour of the alarm | |
| Minute Set the minute of the alarm | |
| Mode | Configure how often the alarm is active: · Once: Alarm is active only once. · Each Day: Alarm is active every day. · Self Define: A 7-day box is displayed allowing the alarm to be on for specific days of the week. |
Auto Power On
Set the time at which the photo frame automatically turns on each day.
Available Settings: Hour, Minute, Status
Auto Power Off
Set the time at which the photo frame automatically turns off each day.
Available Settings: Hour, Minute, Status
Format Built-In Memory
There is a small amount of internal memory to hold a few photos. If it becomes corrupted, use this setting to reformat the internal memory.
Reset Settings
Reset all settings back to factory defaults.
7 Troubleshooting Guide
Cannot Read A SD/SDHC Card or USB Drive
Check to see if the card or drive is readable by a computer. Reformat the drive using FAT32 file system – be sure to copy files off the drive first.
Cannot Play a File
Make sure that the file is compatible with the photo frame. The photo frame supports JPG photo files. Additionally, the photo frame supports MP3 music files up to 320kbps; video files with AVI or MP4 extension encoded with MPEG1/2/4 for video and MP3 for audio.
Cannot Find a File
Make sure that the correct storage device has been selected. Press the "Menu/Return" button on the back of the photo frame repeatedly until the storage device selection screen is displayed.
Cannot Copy a Photo to Internal Memory
The internal memory is very small and can only hold about 3-4 photos at a time. It may be necessary to delete some older photos before there is enough space to hold a new photo.
8 Specifications
Adapter: Input 100-240V 50/60Hz AC, Output 5V/1.5A DC
Card Reader: SD/SDHC Up to 32GB
USB: USB flash drives up to 32GB
Photo Format: JPG
Music Format: MP3 up to 320kbps
Video Format: AVI MP4 Files, MPEG1/2/4 for video and MP3 for audio
LCD Screen:
| M707Z | M808Z | M1010Z | |
| Size | 7-Inch TFT 8-Inch TFT 10.1-Inch TFT | ||
| Resolution | 800x480 800x600 1024x600 | ||
| Aspect Ratio | 16:9 4:3 16:9 | ||
| Brightness | 200-250cd/m2 | ||
| Contrast | 200-300:1 | ||
| Response Time | 20ms | ||
Information in this manual is believed to be accurate and reliable, but Micca Ltd assumes no responsibility for its use, nor for any infringement of patents or other rights of third parties which may result from the use of this manual or the product. Micca reserves the right to change product specifications at any time without notice.
Micca, M707Z, M808Z, M1010Z, and the Micca logo are trademarks of Micca Ltd. Other trademarks referenced in this manual are the properties of their respective owners.
© 2012 Micca Ltd. All rights reserved.

- INTRODUCTION
- PREFACE
- HIGHLIGHTS
- FEATURES
- PRECAUTIONS
- PRECAUTIONS AND MAINTENANCE
- CLEANING THE LCD SCREEN
- WARNING
- CONNECTIONS AND BUTTONS
- BUTTONS
- CONNECTIONS
- REMOTE CONTROL
- GETTING STARTED
- INITIAL SETUP
- OPERATING INSTRUCTIONS
- FLASH MEMORY CARDS AND USB FLASH DRIVES
- CHOOSING STORAGE DEVICE
- VIEWING PHOTOS
- COPYING PHOTOS
- DELETING PHOTOS
- PLAYING MUSIC
- PLAYING VIDEOS
- FILE BROWSING
- CALENDAR
- DETAILED SETTINGS
- LANGUAGE
- PHOTO SEQUENCE
- START UP MODE
- SLIDE MODE
- SLIDE SPEED
- PHOTO EFFECT
- SLIDE SHOW EFFECT
- PHOTO MODE
- MUSIC PLAY MODE
- VIDEO MODE
- DISPLAY
- SET TIME/DATE
- SET TIME FORMAT
- ALARM
- AUTO POWER ON
- AUTO POWER OFF
- FORMAT BUILT-IN MEMORY
- RESET SETTINGS
- TROUBLESHOOTING GUIDE
- CANNOT READ A SD/SDHC CARD OR USB DRIVE
- CANNOT PLAY A FILE
- CANNOT FIND A FILE
- CANNOT COPY A PHOTO TO INTERNAL MEMORY
- SPECIFICATIONS
Brand : Micca
Model : M1010Z
Category : Digital photo frame