
HLS-1650A - Saw Backyard Pro - Free user manual and instructions
Find the device manual for free HLS-1650A Backyard Pro in PDF.


| Product Type | Tabletop Butcher Saw / Meat Saw |
| Brand | Backyard Pro |
| Model | HLS-1650A |
| Overall Dimensions | 21"L x 20"W x 37"H (530 x 515 x 955 mm) |
| Table Size | 18-1/4" x 17-1/4" (464 x 439 mm) |
| Motor Power | 110V / 60Hz / 1 HP (750W) |
| Blade Length | 65" (1650 mm) |
| Blade Width | 3/5" (16 mm) |
| Blade Speed | 50.1 ft/s |
| Maximum Cutting Thickness | 8-1/4" (210 mm) |
| Maximum Cutting Height | 7-1/16" (179 mm) |
| Construction Material | Stainless Steel |
| Safety Features | Grounding plug, guards, open door-cut off power switch, safety fence |
| Adjustable Cutting Thickness | Yes, via thickness adjustor |
| Blade Tension Adjustment | Yes, via tension knob |
| Scraper | Yes, to remove meat scraps from blade |
| Scrap Tray | Yes, removable for cleaning |
| Intended Use | Cutting meat, frozen meat, and bones |
| Maintenance | Clean with hot water and hard brush; dry thoroughly |
| Blade Replacement Interval | After cutting approximately 4400 lb (2000 kg) of meat or bones |
| Recommended Safety Gear | ANSI-approved safety glasses, hearing protection, heavy-duty gloves |
| Power Cord Type | 3-prong grounded plug |
| Assembly Required | No, fully assembled out of box |
| Spare Parts Availability | Yes, full exploded parts list provided |
Frequently Asked Questions - HLS-1650A Backyard Pro
User questions about HLS-1650A Backyard Pro
0 question about this device. Answer the ones you know or ask your own.
Ask a new question about this device
Download the instructions for your Saw in PDF format for free! Find your manual HLS-1650A - Backyard Pro and take your electronic device back in hand. On this page are published all the documents necessary for the use of your device. HLS-1650A by Backyard Pro.
USER MANUAL HLS-1650A Backyard Pro
natural_image
Modern stainless steel industrial cutting machine with control panel and side-mounted blade (no visible text or symbols)
Intertek

Intertek
08/2021#554

WARNING
Read carefully and understand all INSTRUCTIONS before operating. Failure to follow the safety rules and other basic safety precautions may result in serious personal injury.
Save these instructions in a safe place and keep them close at hand so they can be read when required or used to assist in future servicing.
BACKYARD
PRO
BUTCHER SERIES

WARNING
Read carefully and understand all INSTRUCTIONS before operating. Failure to follow the safety rules and other basic safety precautions may result in serious personal injury. Save these instructions in a safe place and on hand so that they can be read when required.
TECHNICAL DETAILS
| Motor 110V/60Hz/1HP (750W) |
| Blade 65”L (1650mm) x 3/5”W (16mm) |
| Blade Speed 50.1 /Second |
| Cutting Thickness 8-1/4” (210mm) |
| Max Cutting Height 7-1/16” (179mm) |
| Table Size 18-1/4” x 17-1/4” (464mmx439mm) |
| Overall Dimensions 21”L x 20”W x 37”H (530x515x955mm) |
GENERAL SAFETY WARNINGS AND PRECAUTIONS
Helpful Hints
- KEEP WORK AREA CLEAN AND DRY. Cluttered, damp or wet work areas can cause injuries.
- KEEP CHILDREN AWAY FROM WORK AREA. Do not allow children to handle this product.
- STORE IDLE EQUIPMENT. When not in use, tools and equipment should be stored in a dry location to prevent rust. Always lock up tools and equipment and keep out of reach of children.
- USE EYE AND HEARING PROTECTION. Wear ANSI- approved safety impact eyeglasses and ANSI-approved hearing protection when using this product.
- DRESS SAFELY. Non-skid footwear or safety shoes should be used when working with this product. Do not wear loose clothing or jewelry as either can become caught in moving parts. Wear a protective hair covering to prevent long hair from becoming caught in moving parts.
- DO NOT OVERREACH. Keep proper footing and balance at all times to prevent tripping, falling, back injury, etc.
- STAY ALERT. Watch what you are doing at all times. Do not use this product when you are tired or distracted from the job at hand.
- CHECK FOR DAMAGED PARTS. Before using this product, carefully check that it will operate properly and perform its intended function. Check for damaged parts and any other conditions that may affect the operation of this product. Replace or repair damaged or worn parts immediately.
- REPLACEMENT PARTS AND ACCESSORIES. When servicing, use only identical replacement parts. Only use accessories intended for use with this product.
- MAINTAIN THIS PRODUCT WITH CARE. Keep this tool clean and dry and keep saw blades clean and sharp for a better, safer performance.
- MAINTENANCE. For your safety, service and maintenance should be performed regularly by a qualified technician.
PRODUCT USE
- This tabletop saw is to be used for cutting meat, frozen meat and bones.
- The butcher saw is fitted with a machine casing, a motor, a top and belt wheel, a saw blade, and a working table.
• Under normal conditions the saw blade should be replaced after sawing 4400 lb. of meat or bones.
Warnings
SPECIFIC PRODUCT WARNINGS AND PRECAUTIONS
• GROUND THIS PRODUCT. The electrical power cord
• for this product is equipped with a grounded
- 3-prong plug. Never remove the grounding prong or modify the plug in any way. Do not use adapter plugs with this product. When in use, make sure this product is always plugged into a grounded
- 3-hole electrical receptacle with an appropriate breaker switch in-line.
- MAKE SURE THE POWER SWITCH IS IN THE "OFF" POSITION BEFORE PLUGGING IN THE POWER CORD.
- DO NOT ABUSE THE POWER CORD. Do not use the cord to pull the 3-prong plug from a power outlet. Keep the cord away from heat, oil, sharp edges, and moving parts. Replace a damaged cord immediately. Route the power cord safely. Do not route the cord where it can be walked on or tripped over.
IF YOU USE AND EXTENSION CORD, MAKE SURE TO USE ONLY UL APPROVED CORDS WITH THE CORRECT GAUGE AND LENGTH. SEE BELOW:
| Nameplate Amperes | Extension Cord Length | |||||
| 25' | 50' | 75' | 100' | 150' | 200' | |
| 0-5 16 16 | 16 14 12 12 | |||||
| 5.1-8 | 16 | 16 | 14 | 12 | 19 | - |
| 8.1-12 | 14 | 14 | 12 | 10 | - | - |
| 12.1-15 | 12 | 12 | 10 | 10 | - | - |
| 15.1-20 | 10 | 10 | 10 | - | - | - |
- MAINTAIN A SAFE WORK ENVIRONMENT. Do not use this product in or near damp or wet areas. Do not expose this product to rain. Keep work area well lit. Make sure there is adequate surrounding work space. Use this product in a well ventilated area. Do not operate this product in the presence of flammable liquids, gases, or dust. To avoid accidental electric shock, do not let your body come in contact with grounded surfaces such as pipes, radiates, ranges, and refrigerators.
- KEEP ALL GUARDS IN PLACE AND IN WORKING ORDER.
- REMOVE ALL ADJUSTING WRENCHES FROM THE MEAT SAW BEFORE TURNING IT ON.
- AVOID UNINTENTIONAL STARTING. Making sure you are prepared to begin work before turning the START switch on.
- BEFORE USING THE TABLETOP BUTCHER SAW, MAKE SURE THE SAW BLADE IS PROPERLY MOUNTED. Make sure the saw blade is balanced, its tension and tracking are properly adjusted, its teeth point downward and toward the left side of the working Table, and it is not bent or cracked.
Warnings

CAUTION
ALWAYS WEAR HEAVY-DUTY GLOVES WHEN HANDLING AND ADJUSTING THE SAW BLADE.
- ALLOW THE SAW BLADE TO REACH FULL SPEED BEFORE FEEDING MEAT INTO IT. When turning it off, allow the saw blade to spin down and stop on its own.
- DO NOT FORCE THE MATERIAL INTO THE UNIT. Apply moderate pressure, allowing the unit to cut without being forced.
- NEVER ATTEMPT TO REMOVE MATERIAL STUCK IN THE MOVING PARTS OF THE TABLETOP BUTCHER SAW WHILE THE MACHINE IS PLUGGED IN AND RUNNING.
- THE SAW BLADE WILL BECOME HOT WHILE CUTTING. Allow the saw blade to completely cool before touching.
- ALWAYS KEEP HANDS AND FINGERS AWAY FROM BLADE.

WARNING
ALWAYS DISCONNECT THE TABLETOP BUTCHER SAW FROM ITS ELECTRICAL SUPPLY SOURCE WHEN NOT IN USE AND BEFORE PERFORMING ANY SERVICES OR MAINTENANCE. Examples include moving the tool from one location to another, changing the sawing blade, cleaning debris from the unit, etc.
- ONLY LOCATE THE TABLETOP BUTCHER SAW ON A FLAT, LEVEL SURFACE THAT IS CAPABLE OF SUPPORTING THE WEIGHT OF THE SAW, AND IS CAPABLE OF WITHSTANDING THE VIBRATION OF THE SAW.
ASSEMBLY AND OPERATON INSTRUCTIONS
BEFORE USE
When unpacking, checking to make sure all parts shown are included.
INSTALLATION (See Fig 1)
- The tabletop butcher saw is fully assembled and is ready to be used right out of the box.
- The tabletop butcher saw should be put on a flat, level surface capable of withstanding vibration.
- Open the door cover (#37) of the machine and inspect if the saw blade is correctly fixed on the top and belt of the wheels (#18, #25); the teeth edge of the blade should be flush with edge of the wheels.
- Close the door cover (#37), and turn the wheel control knob (#12) counterclockwise, then plug the saw in. Turn on the white switch to start the work and turn off the black switch to stop. When the machine works, check that the blade drives in a clockwise manner.

General Information and Instructions
OPERATION INSTRUCTIONS
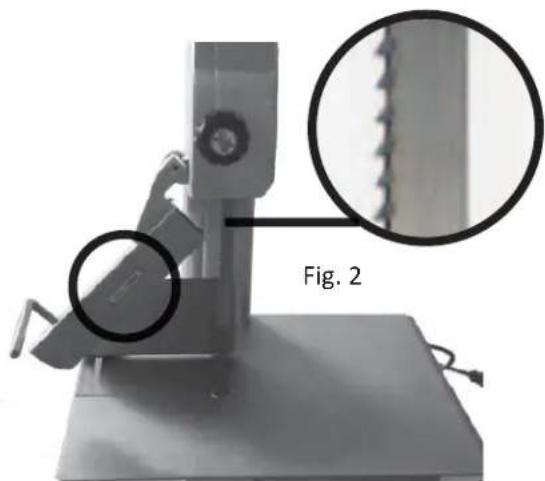
- When you stand by the machine, please put the meat between the saw blade and the safety fence (#38). Control the safety fence with your right hand and the meat with the left hand. Then use the handle of safety fence to guide the blade through the meat.
- Use the thickness adjustor (#48) to control the
- thickness of cuts.
- When using the saw, push the handle of the safety fence evenly and parallel from left to right as shown below (see FIG 2).
natural_image
Mechanical device labeled Fig. 2 showing a mechanical assembly with a close-up inset of a textured surface (no text or symbols on the device itself)
Fig. 3
NOTE:
- Before using the machine, check the Scraper (#51) to ensure that it leans against the blade, but ensure that it does not touch the teeth of blade. The scraper removes meat scraps from the blade when the machine is working. Empty the scrap tray (#30) regularly. (See below FIG 3 above).
- When the tabletop butcher saw is not in use, unscrew the tension knob (#5) counterclockwise for two revolutions to release the tension; when it is time to use the machine, tighten it by screwing it clockwise two revolutions. Following this procedure could increase the useful life of the blade.
- When the operator opens the door cover of the machine, the open door-cut off power switch will stop the operation, but the saw blade still will continue to spin for some time. Allow the blade to stop completely.
- Always use safety gloves when operating the tabletop butcher saw.
REPLACE SAW BLADE:
- Loosen the blade by turning the tension knob counterclockwise.
- Carefully remove old blade and replace with new blade. Pay special attention to the direction the sawtooth blades are going. Otherwise, the saw blade will break off from the machine.
- Make sure the saw blade and slicer are installed between the top wheel and bottom pulley/middle plate and that it passes through the guide groove.
- After installing the new blade, turn the tension knob to the point that the loosened wheel can make a slicing sound. This sound means the blade has the correct amount of tension.
- Be sure to match the right saw blade to the type of food you are cutting.
General Information and Instructions
CLEANING, INSPECTION, AND MAINTENANCE

WARNING
Always be as thorough as possible when cleaning and sanitizing components. Any parts exposed to raw meat may harbor or develop bacteria that can cause illness or death.
CLEANING:
Disconnect machine from power source before cleaning. Open the door of machine, loosen the tension, and take off the saw blade. Loosen the scraper protection knob, just enough to take off scraper. It's best to clean the machine with hot water and a hard brush.

You can also use hot water to scour and wash the main parts, belt, and protective device. Afterwards, wipe off all water from the machine with a dry cloth.
Pay attention to cleaning the dead angle, wheel, and chain wheel bottom parts.

natural_image
Close-up of a wall corner with two circular fixtures and a small object on the floor (no text or symbols visible)
natural_image
Close-up of a ceiling structure with exposed beams and a small window (no text or symbols visible)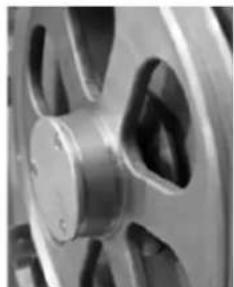
natural_image
Close-up of a mechanical component with a central hub and flanges (no visible text or symbols)
natural_image
Close-up of a mechanical component with a clockwise arrow, no visible text or symbolsGeneral Information and Instructions
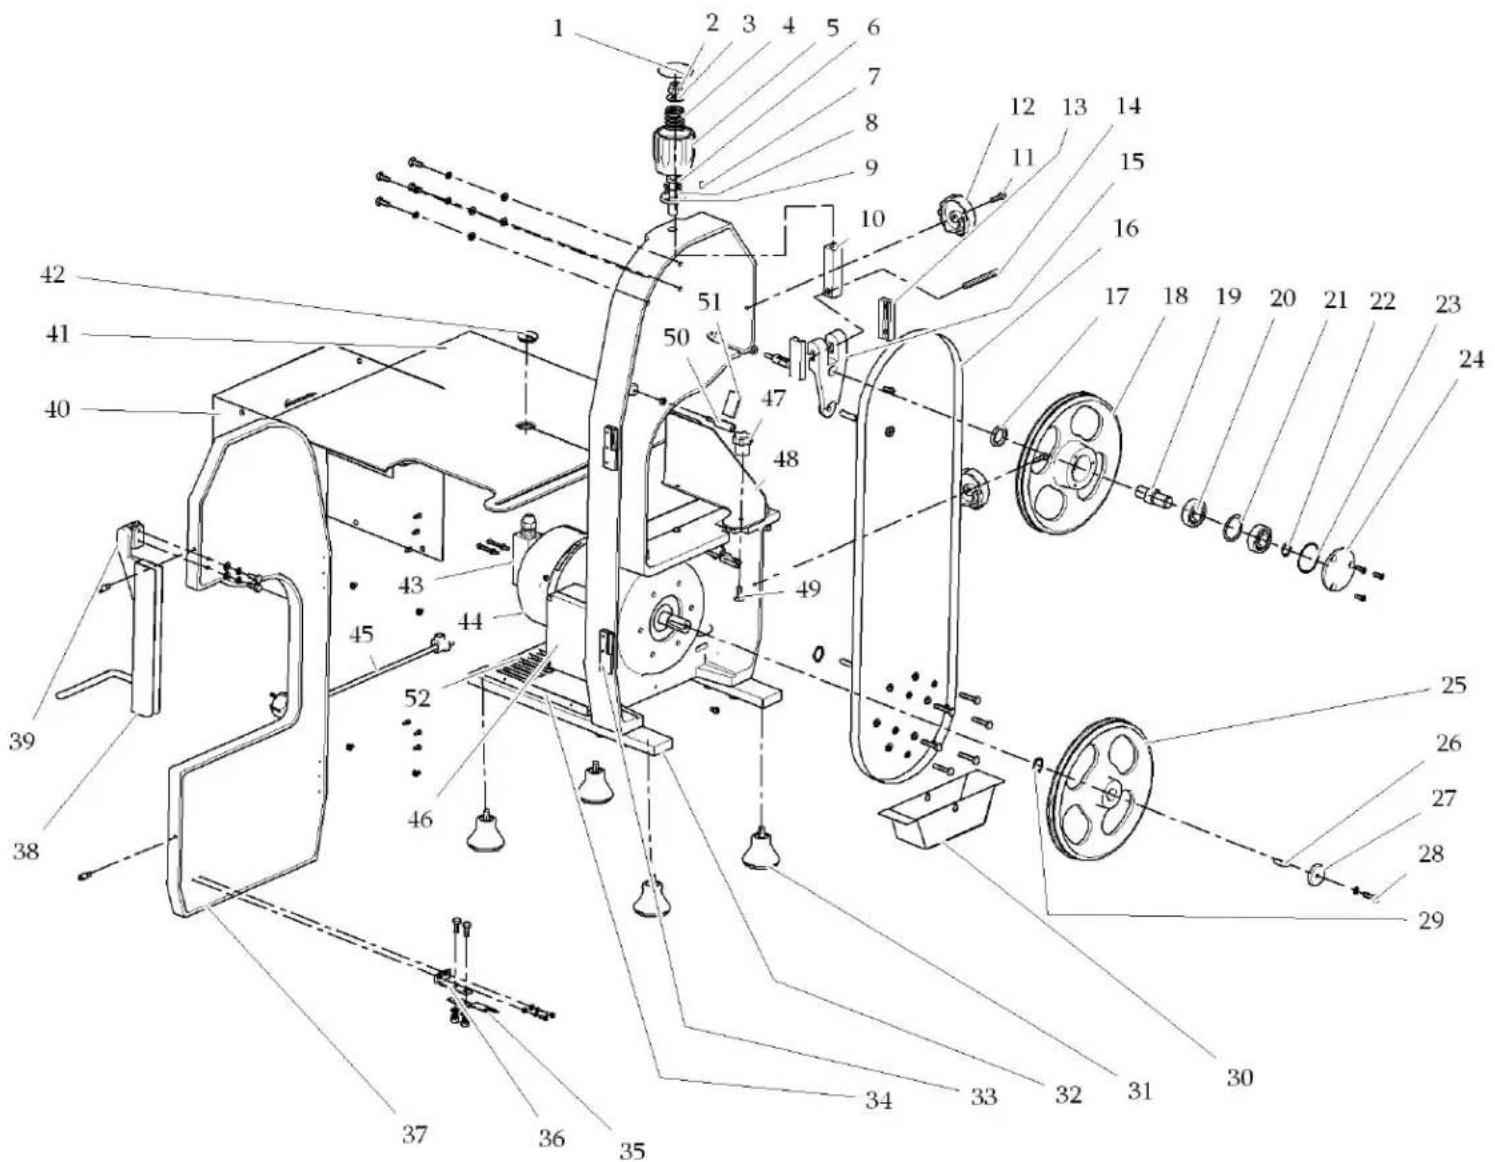
EXPLODED PARTS LIST
| PART NO. DESCRIPTION QTY. | ||
| 1 Face | Plate 1 | |
| 2 Nut 1 | ||
| 3 Flat Washer 1 | ||
| 4 Spring 1 | ||
| 5 | Tension Knob | 1 |
| 6 | Rod | 1 |
| 7 | Pin 4*9 | 1 |
| 8 Ball Bearing | 1 | |
| 9 | Cover | 1 |
| 10 | Thread Insert | 1 |
| 11 | Inner Hexagon Screw | 1 |
| 12 | Wheel Control Knobs | 2 |
| 13 | Steerage Fin | 2 |
| 14 | Small Shaft | 1 |
| 15 | Tension Sliding Block | 1 |
| 16 | Saw Blade | 1 |
| 17 | Unidirectional Rubber Seal | 1 |
| 18 Top Wheel | 1 | |
| 19 Shaft | 1 | |
| 20 | Bearing | 1 |
| 21 | Washer | 1 |
| 22 | Circlip for Shaft | 1 |
| 23 | O-Ring | 1 |
| 24 | Gland Bush | 1 |
| 25 | Bottom Wheel | 1 |
| 26 | Pin 6*25 | 1 |
| PART NO. DESCRIPTION QTY. | ||
| 27 | Circlip for Top Shaft | 1 |
| 28 | Inner Hexagon Screw | 1 |
| 29 | Circlip for Shaft | 1 |
| 30 | Scrap Tray | 1 |
| 31 | Tail Edge | 4 |
| 32 Bottom Plating 1 | ||
| 33 | Hinge | 2 |
| 34 | Angle Steel | 2 |
| 35 Turner 1 | ||
| 36 | Angle Iron | 1 |
| 37 | Door Cover | 1 |
| 38 | Safety Fence | 1 |
| 39 | Safety Fence Bracket | 1 |
| 40 | Electric Motor Enclosure | 1 |
| 41 | Working Table | 1 |
| 42 | Protecting Plug | 1 |
| 43 | Open Door-Cut Off Power Switch | 1 |
| 44 Motor 1 | ||
| 45 | Electric Line | 1 |
| 46 | E-BOX | 1 |
| 47 | Knob | 1 |
| 48 | Thickness Adjustor | 1 |
| 49 | Lock Bolt 1 | |
| 50 | Scraper Housing | 2 |
| 51 | Scraper 2 | |
| 52 | Bottom Plating | 1 |
General Information and Instructions
EXPLODED PARTS DIAGRAM
- BACKYARD
- PRO
- BUTCHER SERIES
- WARNING
- GENERAL SAFETY WARNINGS AND PRECAUTIONS
- Helpful Hints
- PRODUCT USE
- Warnings
- SPECIFIC PRODUCT WARNINGS AND PRECAUTIONS
- CAUTION
- ASSEMBLY AND OPERATON INSTRUCTIONS
- BEFORE USE
- INSTALLATION (See Fig 1)
- General Information and Instructions
- OPERATION INSTRUCTIONS
- NOTE:
- REPLACE SAW BLADE:
- CLEANING, INSPECTION, AND MAINTENANCE
- CLEANING:
- EXPLODED PARTS DIAGRAM
Brand : Backyard Pro
Model : HLS-1650A
Category : Saw