
MiVue C314 - Camcorder MIO - Free user manual and instructions
Find the device manual for free MiVue C314 MIO in PDF.


| Product Type | Dashboard Camera / Camcorder |
| Brand | Mio |
| Model | MiVue C314 |
| Dimensions | Approximately 54 x 49 x 27 mm |
| Weight | Approximately 60 g |
| Power Supply | 5V DC via vehicle charger (Mini-USB) |
| Memory Card Support | MicroSD, Class 10 or higher, up to 64 GB |
| Continuous Recording | Automatically starts after power-on; loops over oldest files |
| Event Recording | Triggered by G-sensor or manual button; locked files |
| Capture Mode | Take photos during recording |
| Playback Mode | View and manage recorded videos and photos |
| G-Sensor | Adjustable sensitivity for automatic event detection |
| LCD Screen | Display for live view and menu |
| Microphone | Records audio (can be disabled) |
| Mounting | Window mount included; attach near rearview mirror |
| Maintenance | Clean with soft, lint-free cloth; avoid moisture and extreme temperatures |
| Safety | Do not operate while driving; place to avoid obstructing view or airbags |
| Regulatory Compliance | CE, WEEE compliant |
| Warranty | Refer to product documentation; modifications void warranty |
Frequently Asked Questions - MiVue C314 MIO
User questions about MiVue C314 MIO
0 question about this device. Answer the ones you know or ask your own.
Ask a new question about this device
Download the instructions for your Camcorder in PDF format for free! Find your manual MiVue C314 - MIO and take your electronic device back in hand. On this page are published all the documents necessary for the use of your device. MiVue C314 by MIO.
USER MANUAL MiVue C314 MIO
Precautions and notices ....2
Getting to know your Mio....3
Using a memory card....4
Formatting a card ....5
Using your Mio in a vehicle....6
Turning your Mio on and off....7
Recording in driving mode....7
Continuous recording ....7
Event recording 8
Capture mode....9
Playback mode....9
Customising the settings....9
For more information ....10
Caring for your device 10
Regulatory information....12
CE 12
WEEE 12
Safety precautions....13
About the charger ....13
Precautions and notices
- Do not operate the device while driving. Using this product does not change the requirement for a driver to take full responsibility for his or her behavior. This responsibility includes observing all traffic rules and regulations in order to avoid accidents, personal injury or property damage.
- A window mount is needed when using your Mio in a car. Make sure that your Mio is placed in an appropriate place, so as not to obstruct the driver's view or deployment of airbags.
- Make sure that no object is blocking the camera lens and no reflective material appears near the lens. Please keep the lens clean.
- If the car's windscreen is tinted with a coating, it may impact the recording quality.
Getting to know your Mio
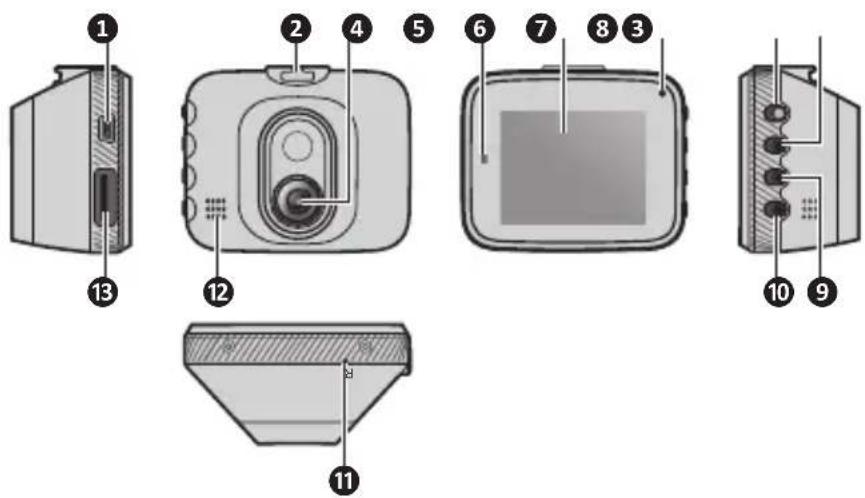
Name Description
① Mini-USB connector Connects to the charger.
② Device mount socket For the device mount.
③ Camera lens Make sure that no object is blocking the camera lens and no reflective material appears near the lens.
4 Status indicator • Glows in red when the device is powered.
- Flashes in red when recording is in progress.
⑤ LCD screen Displays the output of your device.
6 Microphone Records sounds.
⑦ Menu key • Opens the settings menu.
- Returns to the previous screen.
Name Description
8 OK key Acts as the ENTER button.
9 Up key • Takes a photo.
- Moves to the previous item.
- Changes the fast-forward speed.
10 Down key - When recording is in progress, press to lock and save it as an event recording.
- Moves to the next item.
- Changes the fast-backward speed.
- Deletes the current file.
11 Shutdown button Turns off the device.
⑫ Speaker Outputs sound alerts.
13 Memory card slot Data is recorded to a MicroSD card.
Using a memory card
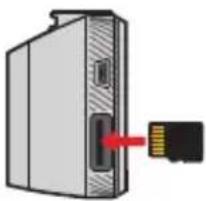
You have to insert a memory card before you can start recording. Your device supports Class 10 (or higher) memory cards with up to 64 GB capacity.
Hold the card (MicroSD) by the edges and gently insert it into the slot as shown in the illustration.
To remove a card, gently push the top edge of the card inwards to release it, and pull it out of the slot.
natural_image
Diagram of a device with a USB cable inserted into a housing (no text or symbols)Do not apply pressure to the centre of the memory card.
The memory card slot is not hot-swappable. Insert the memory card before powering on your Mio. DO NOT remove the memory card during recording. Turn the device off before removing the memory card.
You should use separate MicroSD cards for recording and for regular data storage.
MiTAC does not guarantee the product's compatibility with MicroSD cards from all manufacturers.
Formatting a card
Before you start recording, please format the MicroSD card to avoid malfunction caused by files not created by your Mio.
To format a memory card (all data will be erased):
-
Press
-
Select Format and press √.
-
Select Execute and press √.
Using your Mio in a vehicle
CAUTION: Select an appropriate location for mounting the device in a vehicle. Never place the device where the driver's field of vision is blocked.
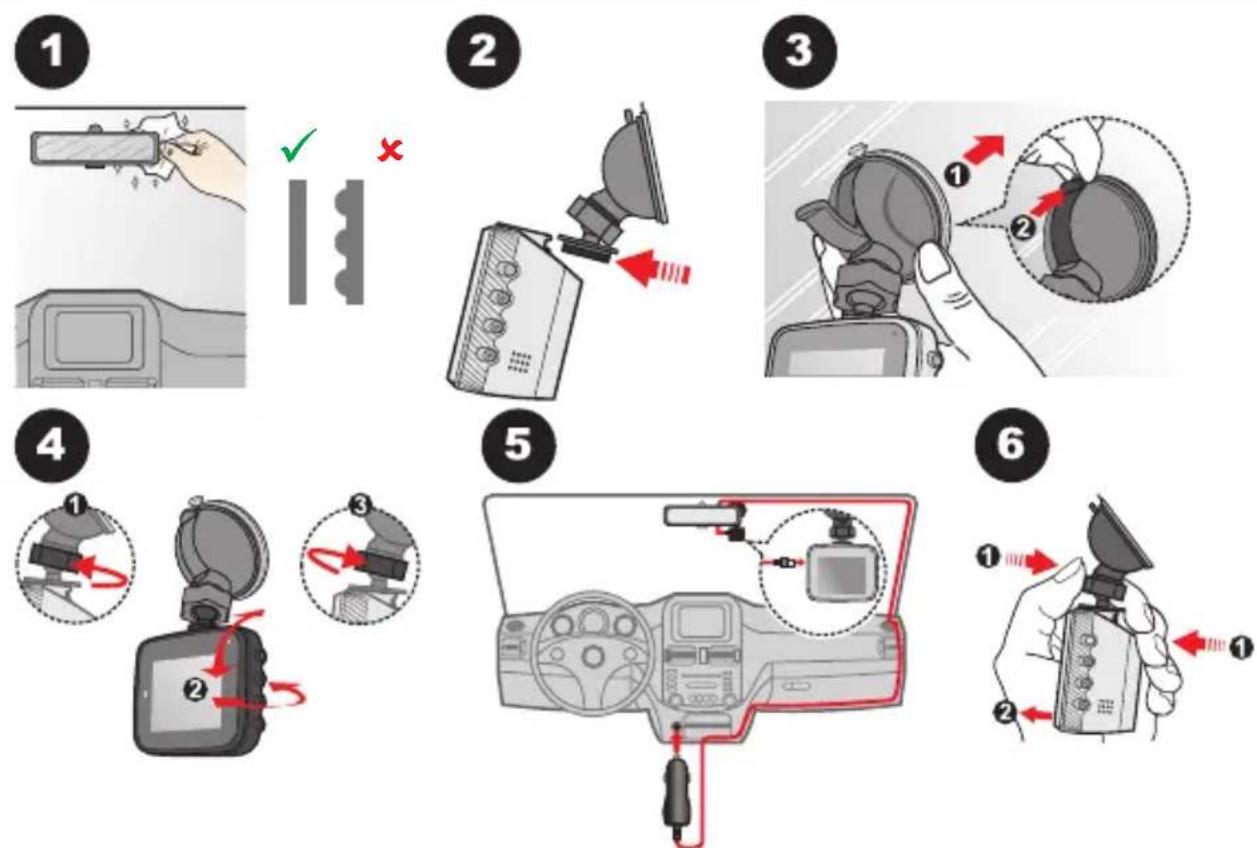
Use cable clips to secure the power cord so that it does not interfere with driving. To ensure the highest quality recordings, you are advised to place your Mio near the rear view mirror.
To ensure the optimal recording angle, pay attention to the following:
- Make sure that your car is parked on a level ground.
- When adjusting the angle of mounting, make sure that the camera's view is parallel with the level ground, and the ground/sky ratio is close to 6/4.
Turning your Mio on and off
Once the vehicle engine is started, your Mio automatically powers on.
When you power on your Mio for the first time, follow the on-screen prompts to complete the following:
- Select your preferred language.
- Set up the correct date and time for your recordings. Press ↑ / to adjust the value of the selected field, and press √ to change to the next setting field.
If the screen turns off after the enabled set timer (recording is still in progress), press any of the keys to turn on the screen again.
Occasionally, you may need to perform a hardware reset when your Mio stops responding or if it appears to be “frozen” or unresponsive. To shut down your Mio, insert a small rod (such as a straightened paperclip) into the shutdown button of your Mio.
Recording in driving mode
Continuous recording
The system will automatically begin continuous recording shortly after start-up.
When recording is in progress, you can manually stop recording by pressing
- Press to return to the recording screen; the system will start recording automatically.
The recording may be divided into several video clips; recording will not stop between video clips. When your memory card fills up with continuous recordings, it will automatically record over the oldest existing files in this category.
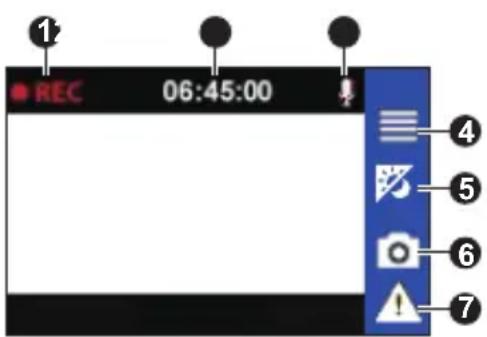
1 Recording indicator
② Time display
③ Microphone status
4 Opens the Menu screen.
5 Backlight*
6 Takes a photo.
⑦ Manually starts an event recording.
* This feature is for selected models only.
Event recording
By default, if an event happens, such as a sudden impact, high speed driving, an aggressive turn or an accidental crash during continuous recording, the G sensor will prompt your Mio to start recording the event.
If you want to manually start an event recording while continuous recording is in progress, press the Event button ( ). A lock icon will appear on the screen.
When recording is in progress, you can manually stop recording by pressing ☐. Press to return to the recording screen; the system will start recording automatically.
If there are more than 10 event recordings, the system will unlock and change the oldest event recording to a continuous recording.
Capture mode
Your Mio allows you to take a photo: press
Playback mode
To select a video or photo for playback:
- Press > File Playback.
- Press ↑ / ↓ to select the desired file from the list and then press . √
- When viewing a photo, you can press 📄 to delete the file.
-
When viewing a video, you can:
-
Press / to start / stop playback.
- Press / to change the fast-backward / fast-forward speed.
- Press to delete the file. (This is not applicable to event recordings.)
It is recommended to play the videos on your computer or media player for optimal viewing experiences.
Deleted files cannot be recovered. Make sure to back up your files before deletion.
Customising the settings
To customise the system settings, press
Item Description
File Playback Plays the recorded videos and photos.
Sound Recording Sets if you want to include sounds in the recordings.
| Item Description | |
| Video Recording | Video Clip Length: Sets the length of each video clip for a recording.Light Freq.: Sets the frequency for the camera to avoid problems caused by artificial light sources that are not constant.G-sensor: Sets the sensitivity level of the G sensor that allows automatic triggering of the event recording while continuous recording is in progress. |
| System | Date/Time: Sets the system date and time.Volume: Adjusts the volume level.Backlight:Always On: Keeps the LCD on.1 min / 3 min / 5 min: Sets the timer for the LCD to turn off automatically after recording starts.Language: Sets the language.Sys. Reset: Restores the system settings to the factory defaults.Version: Displays the software information. |
Format Formats a memory card. (All data will be erased.)
For more information
Caring for your device
Taking good care of your device will ensure trouble-free operation and reduce the risk of damage.
- Keep your device away from excessive moisture and extreme temperatures.
- Avoid exposing your device to direct sunlight or strong ultraviolet light for extended periods of time.
- Do not place anything on top of your device or drop objects on your device.
- Do not drop your device or subject it to severe shock.
- Do not subject your device to sudden and severe temperature changes. This could cause moisture condensation inside the unit, which could damage your device. In the event of moisture condensation, allow the device to dry out completely before use.
- The screen surface can easily be scratched. Avoid touching it with sharp objects. Non-adhesive generic screen protectors designed specifically for use on portable devices with LCD panels may be used to help protect the screen from minor scratches.
- Never clean your device with it powered on. Use a soft, lint-free cloth to wipe the screen and the exterior of your device.
- Do not use paper towels to clean the screen.
- Never attempt to disassemble, repair or make any modifications to your device. Disassembly, modification or any attempt at repair could cause damage to your device and even bodily injury or property damage and will void any warranty.
- Do not store or carry flammable liquids, gases or explosive materials in the same compartment as your device, its parts or accessories.
- To discourage theft, do not leave the device and accessories in plain view in an unattended vehicle.
• Overheating may damage the device.
Regulatory information
For regulatory identification purposes, MiVue C31x/C51x series is assigned a model number of N598B/N598P.
CE
CE
Products with the CE marking comply with the Radio Equipment Directive (RED) (2014/53/EU) - issued by the Commission of the European Community.
Compliance with these directives implies conformity to the following European Standards:
• EN 50498:2010
The manufacturer cannot be held responsible for modifications made by the User and the consequences thereof, which may alter the conformity of the product with the CE Marking.
Declaration of conformity
Hereby, MiTAC declares that this N598B/N598P is in compliance with the essential requirements and other relevant provisions of Directive 2014/53/EU.
WEEE
This product must not be disposed of as normal household waste, in accordance with the EU directive for waste electrical and electronic equipment (WEEE – 2012/19/EU). Instead, it should be disposed of by returning it to the point of sale, or to a municipal recycling collection point.
Safety precautions
About the charger
- Do not use the charger in a high moisture environment. Never touch the charger when your hands or feet are wet.
- Allow adequate ventilation around the charger when using it to operate the device. Do not cover the charger with paper or other objects that will reduce cooling. Do not use the charger while it is inside a carrying case.
- Connect the charger to a proper power source. The voltage requirements are found on the product case and/or packaging.
- Do not use the charger if the cord becomes damaged.
- Do not attempt to service the unit. There are no serviceable parts inside. Replace the unit if it is damaged or exposed to excess moisture.
Revision: R00
(1/2021)
Trademark
All brand and product names are trademarks or registered trademarks of their respective companies.
Disclaimer
Specifications and documents are subject to change without notice. MiTAC does not warrant this document is error-free. MiTAC assumes no liability for damage incurred directly or indirectly from errors, omissions, or discrepancies between the device and the documents.
Note
Not all models are available in all regions.
Depending on the specific model purchased, the colour and look of your device and accessories may not exactly match the graphics shown in this document.
MiTAC Europe Ltd.
Unit 27 Hortonwood 33, Telford, Shropshire, England, United Kingdom
- Precautions and notices
- Getting to know your Mio
- Name Description
- Using a memory card
- Formatting a card
- Using your Mio in a vehicle
- Turning your Mio on and off
- Recording in driving mode
- Continuous recording
- Event recording
- Capture mode
- Playback mode
- Customising the settings
- Item Description
- For more information
- Caring for your device
- Regulatory information
- CE
- Declaration of conformity
- WEEE
- Safety precautions
- About the charger
- Trademark
- Disclaimer
- Note
Brand : MIO
Model : MiVue C314
Category : Camcorder