
SM-653SS - Cooker Spring USA - Free user manual and instructions
Find the device manual for free SM-653SS Spring USA in PDF.


| Product Type | Hidden Induction Warming Range |
| Brand | Spring USA |
| Model | SM-653SS (International) |
| Power Source | 220-240V, 1 Phase, 50-60 Hz, 650W, 2.7A |
| Plug Type | CEE-7/7 Schuko (Type F) |
| Cutout Dimensions (Range) | 13.5" x 12.7" (343 mm x 323 mm) |
| Cutout Dimensions (Control Panel) | 5.7" x 2.7" (145 mm x 69 mm) |
| Max Countertop Thickness | 2" (51 mm) |
| Clearance Requirements | 4" from front and sides, 7" below |
| Temperature Settings | Low: 145-155°F (62-68°C), Low-Med: 156-165°F (69-73°C), Med-High: 166-175°F (74-79°C), High: 176-185°F (80-85°C) |
| Function | Induction warming only - maintains serving temperature, does not cook |
| Approved Surfaces | SmartStone, Silestone, Fiandre, Eiffelgres, Iris Ceramica, Fmg, Ariostea porcelain/quartz (max 2 cm thick) |
| Compatible Vessels | Induction-ready vessels, Spring USA recommended |
| SurfaceGuard Compatibility | Required for some surfaces (SES651) |
| Safety Features | Auto shut-off after 2.5 min without vessel, overheat protection, voltage overload protection |
| Error Indicators | Flashing LED patterns for no vessel, overheating, overvoltage |
| Installation Type | Hidden under countertop, flush-mount control panel |
| Warranty | Limited warranty - contact Spring USA |
| Weight (approximate) | 8 lbs (3.6 kg) based on similar models |
Frequently Asked Questions - SM-653SS Spring USA
- All 4 LEDs flash: No induction-ready vessel detected.
- Low & Low-Med flash: Overheated due to blocked ventilation.
- Low & Med-High flash: Overheating protection activated.
- Low & High flash: Temporary voltage overload.
User questions about SM-653SS Spring USA
0 question about this device. Answer the ones you know or ask your own.
Ask a new question about this device
Download the instructions for your Cooker in PDF format for free! Find your manual SM-653SS - Spring USA and take your electronic device back in hand. On this page are published all the documents necessary for the use of your device. SM-653SS by Spring USA.
USER MANUAL SM-653SS Spring USA
MultiSurface Hidden Induction Range

natural_image
Exterior view of a black rectangular electronic device with a digital display showing 'MAX. IROFUNCTION' and control buttons (no readable text beyond branding)Spring USA
The Evolution of Intelligent Design®
127 Ambassador Drive, Suite 147
Naperville, IL 60540-4079
P: 630-527-8600
F: 630-527-8677
springusa@springusa.com
www.springusa.com
Jan 2021
| Item # |
| SM-651SS (US) |
| SM-653SS (Int'l) |
| SM-653SSU (UK) |
Spring USA
The Evolution of Intelligent Design®
Before You Begin
To ensure safe operation, read the following instructions in their entirety.

WARNING
Warning is used to indicate the presence of a hazard that can cause severe personal injury, death, or substantial property damage if the warning is ignored.

CAUTION
Caution is used to indicate the presence of a hazard that will or can cause minor personal injury or property damage if the caution is ignored.
NOTICE
Notice is used to note information that is important but not hazard-related.
To reduce risk of injury or damage to the equipment:
- Plug only into grounded electrical outlets matching the nameplate rated voltage.
- Do not power the equipment with extension cords, power strips, or multipurpose sockets.
• Equipment should only be used in a flat, level position. - Do not obstruct or cover the equipment in any way when in use.
• Do not operate unattended. - Do not leave an empty vessel on the equipment when in use.
- Closely supervise equipment operating in public areas and/or around children.
- Do not operate if equipment has been damaged or is malfunctioning in any way.
- Keep equipment and power cord away from open flames, electric burners or excessive heat.
• Unplug equipment and let it cool before cleaning.
• Unplug when not in use.
This page intentionally left blank.
Service & Repair
Never attempt to service any part of The MultiSurface, Hidden Induction Range. Attempting to service the unit on your own, or through an unauthorized repair facility, automatically voids your warranty. Contact our Service Department at 630-527-8600. For service forms, visit the Spring USA website.
Warranty
For limited warranty information, visit the Spring USA website.
Function
Spring USA's MultiSurface Hidden Induction Range is a warming unit for product holding. The range has been designed specifically to keep food warm. Food must be at or above serving temperature before being placed on the range.
NOTICE: The induction range only maintains temperature – it does not cook or continue to cook food.
Electrical Requirements:
| Item # Voltage Phase Hertz Watts Amps Plug | ||||||
| SM-651SS (US) | 110-120 1 | 60 650 5.4 | NEMA 5-15P | |||
| SM-653SS (Int'l) | 220-240 | 1 | 50-60 | 650 | 2.7 | CEE-7/7 16A Schuko |
| SM-653SSU (UK) | 220-240 | 1 | 50-60 | 650 | 2.7 | BS 1363 (13A) U.K. |
Installation
Inspect all parts of the induction range prior to installation and use. If the unit is damaged, do not use. Contact a supplier for a replacement.
Ensure dedicated power is available at the installed location.
The induction range must be mounted in a heat resistant countertop (2" thick maximum) or base cabinet with the control panel mounted on the front of that enclosure.
Proper ventilation is required for the unit to operate correctly. There must be at least 4" clearance from front and sides; 7" clearance below the induction range. Cabinets housing the induction range should have intake and exhaust vents. For optimal performance, the inside temperature of the cabinet should not exceed 90°F/32°C.
Follow the below steps to mount the induction range:
-
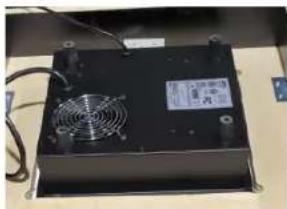
Using the provided template, make the range cutout (13.5" x 12.7") through the underlayment below the countertop.
-
Place the induction range into the cutout. Install the mounting bracket around the induction range using the provided (10) M5 x 18 mm wood screws on the underside of the countertop and underlayment.
natural_image
Exterior view of a black power supply unit with fan and cooling fan (no visible text or symbols)Figure 1. Induction Range Placed in Cutout
Maintenance
Because the induction range is hidden, it is not necessary to remove it from beneath the countertop and clean daily. Periodically check for any obstruction to airflow.
If cleaning the induction range is deemed necessary, first ensure the unit has been turned off, unplugged from the power source and has cooled before handling. Remove the screws and mounting bracket so the range is no longer mounted to the countertop.
Wipe down the unit with a sponge or cloth with a mild dishwashing liquid. Dry with a clean, soft cloth. Do not immerse the induction range directly in water for cleaning – this will damage the unit.
Troubleshooting/Error Codes
| Error Cause | Solution | |
| 4 Flashing Lights on Control Panel | The induction range does not sense an induction-ready vessel on the surface. | Place an induction ready vessel on the range. |
| Low & Low-Med Lights Flashing | The range has overheated due to blocked ventilation and has shut down. | Clear vents, let the range cool and restart the range. |
| Low & Med-High Lights Flashing | Overheating protection has been activated and the range has shut down. | Remove vessel from the range, let the range cool and restart the range. |
| Low & High Lights Flashing | The range is experiencing temporary voltage overload. | Remove vessel from the range, let the range cool and restart the range. Review dedicated power requirements under Installation in this manual. |
Keep the induction range away from other ovens or stoves. If the surrounding temperature is hot, the induction range may stop heating.
- Press the desired setting button. See the below chart for temperature ranges.
| Low Low-Med Med-High High | |
| 145-155°F 156-165°F 166-175°F 176-185°F | |
| 62-68°C 69-73°C 74-79°C 80-85°C |
NOTICE:
Actual temperatures may vary due to several variables such as ambient temperature in the immediate surrounding area, content and volume of food, and whether a cover is used.
- The LED lights will stop blinking and only the LED light above the selected setting button will remain on.
- The induction range will continue to warm until the set temperature is reached. Once the temperature is reached, the range will maintain that temperature.
- To change settings, simply press the desired setting button.
-
To turn off the unit, press the ON/OFF button. No LED lights should be illuminated.
-
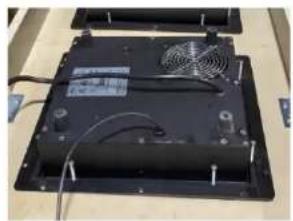
Install the (8) M5 x 4 5mm leveling screws provided.
natural_image
Black electronic device with visible fan and circuit board (no text or symbols)Figure 2. Induction Range & Mounting Bracket with Leveling Screws
- Use the leveling screws to adjust the range height so it is in direct contact with the underside of the countertop.
Follow the below steps to flush mount the control panel:
- Place the provided template on a plane or panel perpendicular to the induction.
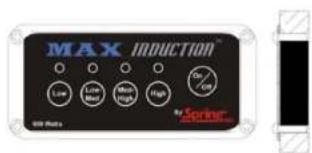
- Using the template, make the control panel cutout (5.7" x 2.7") through the plane or panel.
- Place the control panel into the cutout hole. Using the (4) M5 x 18 mm wood screws provided, secure the control panel into place.
Operation
To operate the induction range and ensure the surface material remains unaffected, approved vessels must be used with approved surfaces.
SmartStone™ is Spring USA's proprietary stone designed specifically to work together with Spring USA vessels for maximum performance and precision. SmartStone™ is the preferred surface for use with the MultiSurface Hidden Induction Range.
For other surfaces, refer to the below list for approved surfaces and vessels that can be used with the Multisurface Hidden Induction Range.
Approved Surfaces & Vessels:
| Surface Brand | Surface Material | Surface Thickness | Vessels |
| SmartStoneTM | Porcelain | 1.2 cm / 2 cm max | 1.2 cm thick:All Spring USA Induction-ready Vessels2 cm thick:Round Sauteuse Server Square ServerOatmeal/Soup ServerServella IronLiteWynwood by Skyra |
| Silestone* Quartz | 1.2 cm / 2 cm max | ||
| Fiandre Porcelain | 1.2 cm / 2 cm max | ||
| Eiffelgres Porcelain | 1.2 cm / 2 cm max | ||
| Iris Ceramica Porcelain | 1.2 cm / 2 cm max | ||
| Fmg Porcelain | 1.2 cm / 2 cm max | ||
| Ariostea Porcelain | 1.2 cm / 2 cm max | ||
| All other surfaces & vessels – inquire for testing. | |||
*Requires SurfaceGuard.
SurfaceGuard:
Spring USA's SurfaceGuard, item #SES651, helps expand the compatibility of the MultiSurface Hidden Induction Range with other approved surfaces under 2 cm thick. The SurfaceGuard prevents cracking or staining of the surface. When noted, the SurfaceGuard should always be in place between the approved vessel and approved surface for further protection.

NOTICE:
Spring USA induction servers and induction ranges are designed to work together as a system. Optimal performance is achieved by using Spring USA components in conjunction with each other. Spring USA cannot guarantee the performance of facsimile products offered by other companies.
Follow the below steps for operating the induction range:
- Plug in the unit. Press the ON/OFF button.
- Place the vessel on the countertop surface just above where the induction range is hidden.
NOTICE:
As a safety feature, if no induction ready vessel is placed on the surface after 2.5 minutes, the unit will shut off.
- The LED lights above each setting will blink until a setting is pressed.
Brand : Spring USA
Model : SM-653SS
Category : Cooker