FBT-5100U - Compressor Full Boar - Free user manual and instructions
Find the device manual for free FBT-5100U Full Boar in PDF.


| Product Type | Air Compressor |
| Model | FBT-5100U |
| Brand | Full Boar |
| Mains Voltage | 230 V ~ 50 Hz |
| Input Power | 1800 W (2.5 HP) |
| No Load Speed | 2850/min |
| Free Air Delivery (FAD) | 120 L/min |
| Tank Volume | 50 L |
| Max. Working Pressure | 10 bar (145 psi) |
| Oil Type | SAE 5W40 / L-DAB-46-A |
| Oil Capacity | 0.23 L |
| IP Rating | IP20 |
| Sound Power Level | 94 dB |
| Number of Cylinders | 1 |
| Weight | 36 kg |
| Dimensions (Approx.) | 65 x 35 x 55 cm (estimated) |
| Air Outlets | 2 (1 regulated, 1 unregulated) |
| Pressure Gauges | 2 (tank & regulated) |
| Safety Valve | Yes, on tank |
| Overload Protection | Yes, manual reset |
| Wheels | 2 included |
| Transport Handle | Included |
| Air Filter | Replaceable, clean every 300 hours |
| Oil Change Interval | First at 100 hours, then every 500 hours |
| Intended Use | DIY (domestic) |
Frequently Asked Questions - FBT-5100U Full Boar
User questions about FBT-5100U Full Boar
0 question about this device. Answer the ones you know or ask your own.
Ask a new question about this device
Download the instructions for your Compressor in PDF format for free! Find your manual FBT-5100U - Full Boar and take your electronic device back in hand. On this page are published all the documents necessary for the use of your device. FBT-5100U by Full Boar.
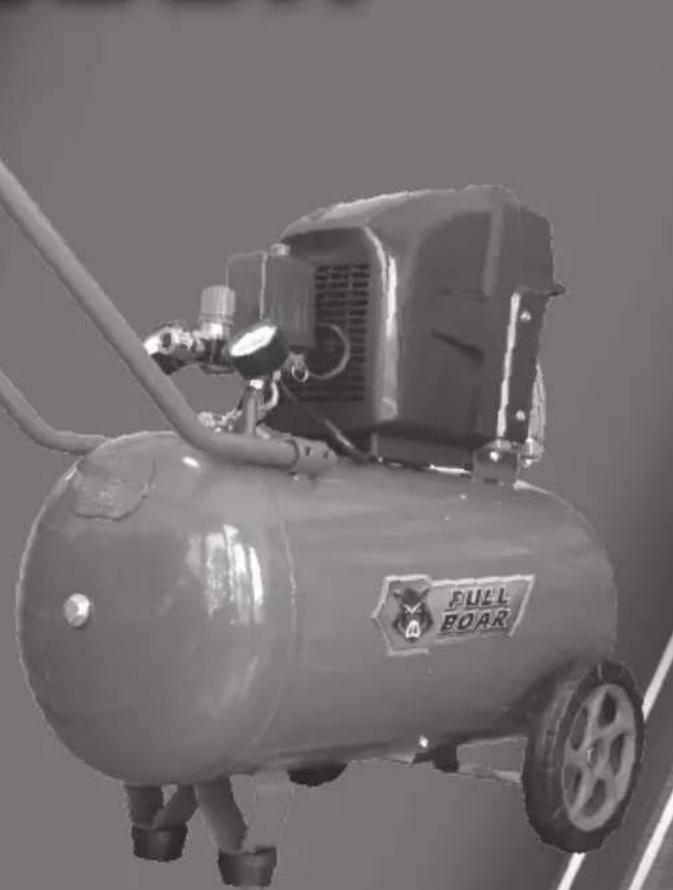
USER MANUAL FBT-5100U Full Boar
AIR COMPRESSOR
• 2.5HP, 50L TANK
• 120L/MIN FREE AIR DELIVERY
• DUAL PRESSURE GAUGES
• 10 BAR PRESSURE
• 2 AIR OUTLETS
natural_image
Black-and-white photo of a portable air compressor with visible branding and control panel (no readable text beyond label)ORIGINAL INSTRUCTIONS

WARNING: Read all safety warnings and instructions before use. Failure to follow the warnings and instructions may result in electric shock, fire and/or serious injury. Save these instructions for future reference.
SPECIFICATIONS - MODEL NO. FBT-5100U
Mains Voltage: 230\~50Hz
Input Power: 1800 W (2.5HP)
No Load Speed: 2850/min
Free Air Deliver (FAD): 120 l/min
Tank Volume: 50L
Max. Working Pressure: 10 bar (145 psi)
Oil: SAE 5W40 / L-DAB-46-A
Oil Tank: 0.23 litres
IP Rating IP20
Sound Power Level: 94dB
No. of Cylinders: 1
Weight: 36kg
Noise: The noise emission values were measured in accordance with EN ISO 2151.
Free Air Delivery: The free air delivery value was measured in accordance with Clause 4.2 of AS 4637
KNOW YOUR PRODUCT
-
Intake air filter
-
Pressure tank
-
Wheel
-
Supporting foot
-
Quick-lock coupling (regulated compressed air)
-
Locking collar
-
Pressure gauge (for reading the regulated pressure)
-
Pressure regulator
-
On/Off switch
-
Transport handle
-
Safety valve
-
Drainage screw for condensation water
-
Pressure gauge (for reading the tank pressure)
-
Quick-lock coupling (unregulated compressed air)
-
Oil sealing plug
-
Oil drainage screw
-
Overload switch
-
Oil level window
-
Wheel cap
-
Grub screw for fitting the handle
-
Transport handle fixtures
-
4mm Hex key
-
Axle bolt assembly
-
Supporting foot bolt assembly
KNOW YOUR PRODUCT (cont.)
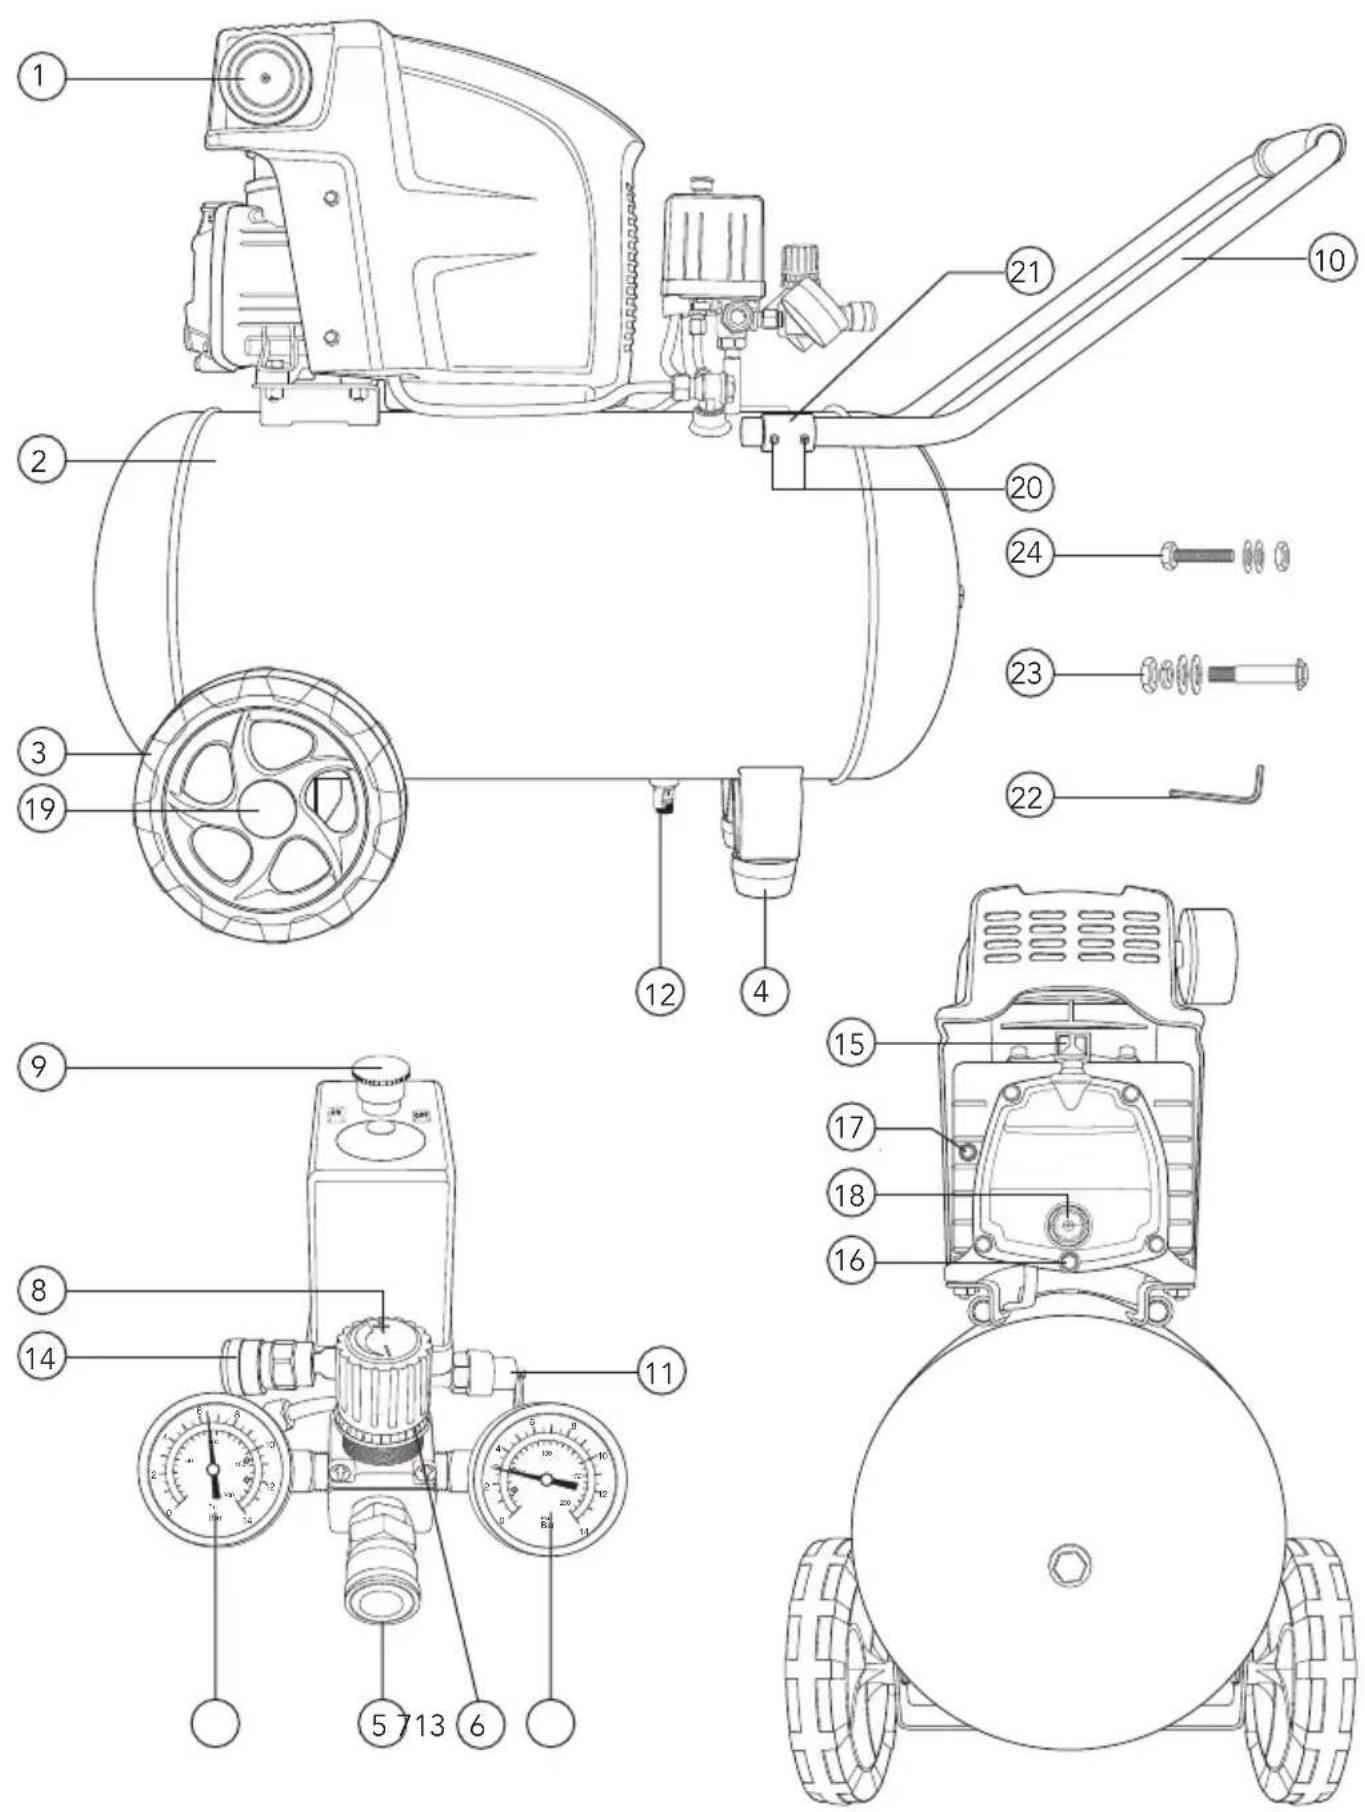
TABLE OF CONTENTS
SPECIFICATIONS...... Page 02
KNOW YOUR PRODUCT...... Page 02
INTRODUCTION...... Page 05
SAFETY INSTRUCTIONS...... Page 05
PRE-SETUP CHECKS...... Page 10
ASSEMBLY...... Page 10
PREPARATION...... Page 13
OPERATION...... Page 14
TROUBLESHOOTING......Page16
MAINTENANCE...... Page 17
DESCRIPTION OF SYMBOLS...... Page 20
CONTENTS...... Page 21
WARRANTY...... Page 24
INTRODUCTION
Congratulations on purchasing your Full Boar Air Compressor.
The Full Boar Air Compressor provides you with a wide range of options while combining solid performance output. The air compressor delivers an high efficient flow rate and is ideal for applications up to 10 bar.
SAFETY INSTRUCTIONS

WARNING! When using mains-powered equipment, basic safety precautions, including the following, should always be followed to reduce risk of fire, electric shock, personal injury and material damage.
Read and understand the manual prior to operating this tool.
Save these instructions and other documents supplied with this tool for future reference.
ELECTRICAL SAFETY
Before you connect the equipment to the mains supply make sure that the data on the rating plate are identical to the mains data.
To reduce the risk of electric shock, a residual current device (rated 30mA or less) must be used.
If the supply cord is damaged, it must be replaced by an electrician or a power tool repairer in order to avoid a hazard.
Using an Extension Lead
Always use an approved extension lead suitable for the power input of this tool. Before use, inspect the extension lead for signs of damage, wear and ageing. Replace the extension lead if damaged or defective. When using an extension lead on a reel, always unwind the lead completely. Use of an extension lead not suitable for the power input of the tool or which is damaged or defective may result in a risk of fire and electric shock.

WARNING! Read all instructions. Failure to follow all instructions listed below may result in electric shock, fire and/or serious injury. The term "Power Tool" in all of the warnings listed below refers to your mains operated (corded) power tool or battery operated (cordless) power tool.
SAVE THESE INSTRUCTIONS
1. Work area safety
a. Keep work area clean and well lit. Cluttered or dark areas invite accidents.
b. Do not operate power tools in explosive atmospheres, such as in the presence of flammable liquids, gases or dust. Power tools create sparks which may ignite the dust or fumes.
c. Keep children and bystanders away while operating a power tool. Distractions can cause you to lose control.
2. Electrical safety
a. Power tool plugs must match the outlet. Never modify the plug in any way. Do not use any adapter plugs with earthed (grounded) power tools. Unmodified plugs and matching outlets will reduce risk of electric shock.
b. Avoid body contact with earthed or grounded surfaces, such as pipes, radiators, ranges and refrigerators. There is an increased risk of electric shock if your body is earthed or grounded.
c. Do not expose power tools to rain or wet conditions. Water entering a power tool will increase the risk of electric shock.
d. Do not abuse the cord. Never use the cord for carrying, pulling or unplugging the power tool. Keep cord away from heat, oil, sharp edges or moving parts. Damaged or entangled cords increase the risk of electric shock.
e. When operating a power tool outdoors, use an extension cord suitable for outdoor use. Use of a cord suitable for outdoor use reduces the risk of electric shock.
f. If operating a power tool in a damp location is unavoidable, use a residual current device (RCD) protected supply. Use of an RCD reduces the risk of electric shock.
3. Personal safety
a. Stay alert, watch what you are doing and use common sense when operating a power tool. Do not use a power tool while you are tired or under the influence of drugs, alcohol or medication. A moment of inattention while operating power tools may result in serious personal injury.
b. Use personal protective equipment. Always wear eye protection. Protective equipment such as a dust mask, non-skid safety shoes, hard hat, or hearing protection used for appropriate conditions will reduce personal injuries.
c. Prevent unintentional starting. Ensure the switch is in the off-position before connecting to power source and/or battery pack, picking up or carrying the tool. Carrying power tools with your finger on the switch or energising power tools that have the switch on invites accidents.
GENERAL POWER TOOL SAFETY WARNINGS (cont.)
d. Remove any adjusting key or wrench before turning the power tool on. A wrench or a key left attached to a rotating part of the power tool may result in personal injury.
e. Do not overreach. Keep proper footing and balance at all times. This enables better control of the power tool in unexpected situations.
f. Dress properly. Do not wear loose clothing or jewellery. Keep your hair, clothing and gloves away from moving parts. Loose clothes, jewellery or long hair can be caught in moving parts.
g. If devices are provided for the connection of dust extraction and collection facilities, ensure these are connected and properly used. Use of dust collection can reduce dust-related hazards.
- Power tool use and care
a. Do not force the power tool. Use the correct power tool for your application. The correct power tool will do the job better and safer at the rate for which it was designed.
b. Do not use the power tool if the switch does not turn it on and off. Any power tool that cannot be controlled with the switch is dangerous and must be repaired.
c. Disconnect the plug from the power source and/or the battery pack from the power tool before making any adjustments, changing accessories, or storing power tools. Such preventive safety measures reduce the risk of starting the power tool accidentally.
d. Store idle power tools out of the reach of children and do not allow persons unfamiliar with the power tool or these instructions to operate the power tool.
Power tools are dangerous in the hands of untrained users.
e. Maintain power tools. Check for misalignment or binding of moving parts, breakage of parts and any other condition that may affect the power tool's operation. If damaged, have the power tool repaired before use. Many accidents are caused by poorly maintained power tools.
f. Keep cutting tools sharp and clean. Properly maintained cutting tools with sharp cutting edges are less likely to bind and are easier to control.
g. Use the power tool, accessories and tool bits etc. in accordance with these instructions, taking into account the working conditions and the work to be performed. Use of the power tool for operations different from those intended could result in a hazardous situation.
- Service
a. Have your power tool serviced by a qualified repair person using only identical replacement parts. This will ensure that the safety of the power tool is maintained.
b. If the supply cord is damaged, it must be replaced by the manufacturer, its service agent or similarly qualified persons in order to avoid a hazard.
AIR COMPRESSOR SAFETY WARNINGS
This appliance is not intended for use by young or infirm persons unless supervised by a responsible person to ensure that they can use the appliance safely. Young children should be supervised to ensure that they do not play with the appliance.

WARNING! Before connecting a tool to a power source (mains switch power point receptacle, outlet, etc.) be sure that the voltage supply is the same as that specified on the nameplate of the tool. A power source with a voltage greater than that specified for the tool can result in serious injury to the user, as well as damage to the tool. If in doubt, do not plug in the tool. Using a power source with a voltage less than the nameplate rating is harmful to the motor.

WARNING! Always remove the plug from the mains socket before making any adjustments or maintenance.
- To reduce the risk of fire or explosion, never spray flammable liquids in a confined area. It is normal for the compressor motor and pressure switch to produce sparks during use. If sparks come into contact with petrol vapours or solvents, they may ignite the vapours and cause a fire or explosion.
- Always operate the compressor in a well ventilated area. Do not smoke while spraying. Do not spray where sparks or flames are present. Keep the compressor as far away from the spray area as possible.
- The solvents trichloroethane and methylene chloride can chemically react with the aluminium used in some paint spray guns and form an explosion. If these solvents are used, ensure that only stainless steel spray equipment is connected. The compressor is not affected by the use of these solvents.
- Never directly inhale the compressed air produced by a compressor and do not use it for charging breathing tanks.
- Do not use welding equipment in close proximity to the compressor. Do not weld anything to the air tank of the compressor: this could dangerously weaken the tank and will void the warranty.
- Do not use the compressor outdoors when it is raining or on a wet surface; either situation could cause an electric shock.
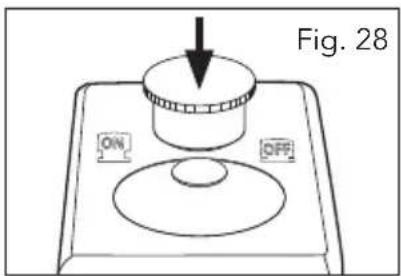
- Always shut off the compressor after use and before servicing. Push the on/off knob down, wait for the pressurised air to bleed from the tank from the release valve and then remove the electrical plug from the power supply.
- Check the maximum pressure rating of any tools or accessories that you intend using with the compressor. The output pressure of the air from the compressor must be regulated so that it never exceeds the rated pressure of the tool or accessory.
- To avoid the risk of burns and injury from moving parts, do not operate the compressor with the safety shield removed. Allow hot parts to cool before handling or servicing.
AIR COMPRESSOR SAFETY WARNINGS (cont.)
- Be certain to read all the labels on the containers of paint or other materials to be sprayed. Closely follow all safety instructions. Use a respirator mask if there is a chance that you might otherwise inhale the spray material. Carefully check the effectiveness of any respirator mask you intend using.
- Do not attempt to adjust the pressure switch or the release valve located under the pressure switch cover.
- Drain the moisture from the tank daily. It will help prevent corrosion.
- Pull the ring on the safety valve daily to ensure that it is operating properly and to clear any possible derbis.
- Keep the compressor at least 300mm from the nearest wall to ensure adequate ventilation for cooling purposes.
- Before transporting the compressor make sure that the pressurised air is bled from the tank and that the compressor is firmly secured.
- Protect the air hose and cordset from damage. Inspect for weak or worn spots regularly and replace if necessary.
- Avoid using an extension cord with this product. Use additional air hose instead of an extension cord to prevent power loss and possible damage to the motor.
• After long working periods external metal parts could be hot. - After using the compressor, switch off the on/off button, disconnect the power supply and open the outlet valve to release the pressure.
- Never attempt to remove any part of the compressor whilst the tank is under pressure.
Wear eye and ear protection
Never apply the outlet air of this compressor directly on to any part of a person's body.
Do not attempt to block the air outlet with your finger or any part of your body.
The tool must be used only for its prescribed purpose. Any use other than those mentioned in this Manual will be considered a case of misuse. The user and not the manufacturer shall be liable for any damage or injury resulting from such cases of misuse.

WARNING! In the event that an air line is cut or broken, the air supply must be turned off at the compressor. A broken air line which is not supported is extremely dangerous and can whip around very quickly, both with the capability of striking people, and blowing foreign particles into the air.
Do not attempt to catch the air line but immediately keep bystanders well clear and turn off the air supply to the hose, turn off the compressor at the On / Off button, and then remove the hose from the compressor.
PRE-SETUP CHECKS
- Examine the machine for signs of transit damage. If damaged, do not use, return to place of purchase
- The compressor should be set up near the user.
- Avoid long air lines and long supply lines (extensions).
• Make sure the intake air is dry and dust-free. - The compressor may only be used in suitable rooms (with good ventilation and an ambient temperature from +5°C to +40°C). There must be no dust, acids, vapours, explosive gases or inflammable gases in the room.
- The compressor is designed to be used in dry rooms. The compressor cannot be used in areas where work is conducted with sprayed water. Before you use the machine, make sure that the mains voltage complies with the specifications on the rating plate.
- The oil level in the compressor pump has to be checked before putting the equipment into operation.
ASSEMBLY

WARNING! During assembly, ensure the compressor is switched OFF.
Fitting the wheels
Note. You must fully assemble the compressor before using it for the first time.
-
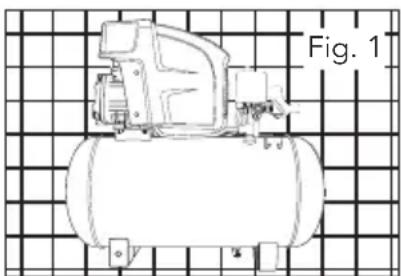
Turn the compressor onto its side (Fig. 1).
-
Insert an axle bolt (23) through one of the wheels (3) (Fig. 2).
-
Place one of the flat washers on the end of the axle bolt (23), (Fig. 3).
natural_image
Technical line drawing of a mechanical component on grid background, labeled Fig. 1 (no text or symbols on diagram)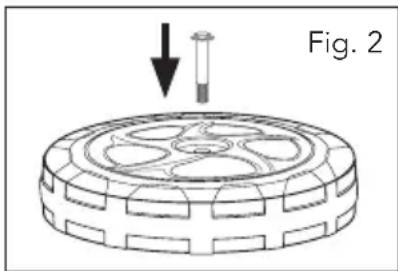
natural_image
Diagram of a mechanical component with a downward arrow and a labeled figure 'Fig. 2' (no text or symbols on the diagram itself)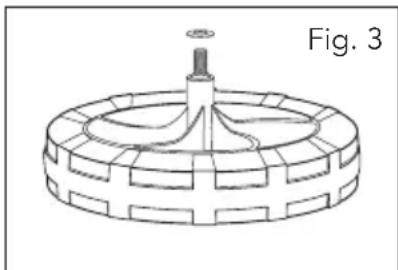
natural_image
Technical line drawing of a mechanical component with concentric rings and a central shaft (no text or symbols)ASSEMBLY (cont.)
-
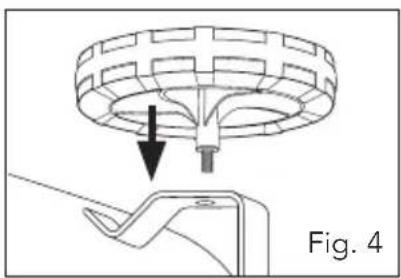
Insert the axle bolt through the hole in the wheel bracket on the underside of the tank (Fig. 4).
-
From the inside of the wheel bracket, place a flat washer, then a spring washer onto the axle bolt. Fasten the wheel bolt in position with a nut (nuts and washers supplied) (Fig. 5).
The size of both the nut and bolt head are 17mm.
-
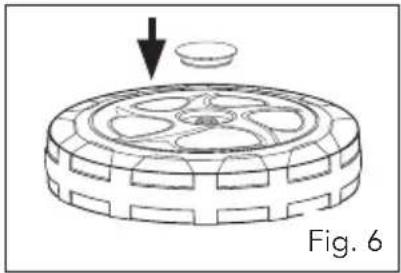
Clip the wheel cap (19) onto the outer face of the wheel (3) (Fig. 6).
-
Repeat steps 1 to 6 with the second wheel.
Fitting the supporting feet
-
Insert one of the supporting foot bolts (24) up through a supporting foot (4) (Fig. 7).
-
Place a flat washer onto the supporting foot bolt (24) (Fig. 8).
-
Insert the supporting foot bolt up through the hole in one of the front brackets, on the underside of the tank (Fig. 9).
-
From the inside of the supporting foot bracket, place the washer onto the bolt. Fasten the assembly in place with the nut (nuts, bolts and washers supplied) (Fig. 10).
The size of both the nut and bolt head are 14mm.
- Repeat steps 1 to 4 with the second supporting foot.
natural_image
Diagram showing a car tire being inserted into a clip, with an arrow indicating the direction of insertion (no text or symbols present)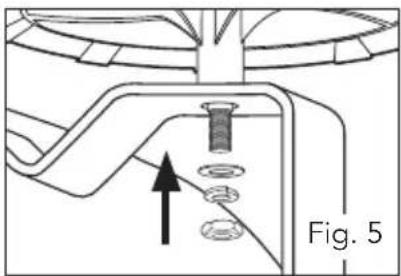
natural_image
Diagram of a mechanical component with a downward arrow and a small circular component, labeled Fig. 6 (no text or symbols on the diagram itself)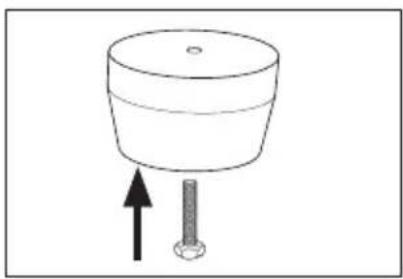
natural_image
Simple line drawing of a container with a screw and upward arrow, no text or symbols present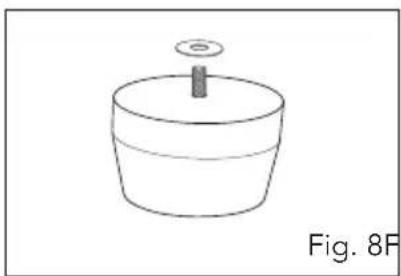
natural_image
Simple line drawing of a cylindrical container with a top and side mount, labeled Fig. 8F (no text or symbols on the diagram itself)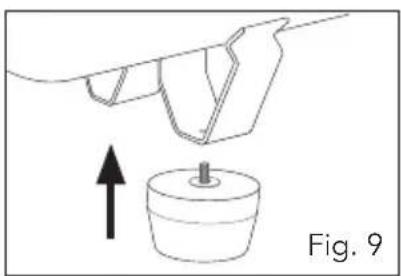
natural_image
Diagram showing a hand holding a tool above a small cylindrical object with an upward arrow, labeled Fig. 9 (no text or symbols on the diagram itself)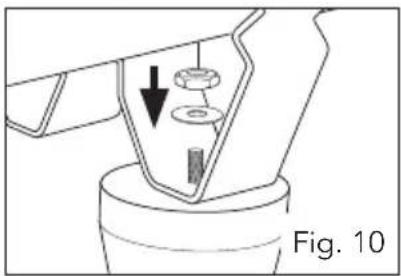
natural_image
Mechanical assembly diagram showing a component with a downward arrow and labeled Fig. 10 (no text or symbols on the diagram itself)ASSEMBLY (cont.)
Fitting the transport handle
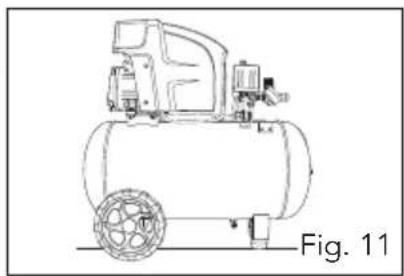
- Return the compressor to an upright position (Fig. 11).
- With the hex key supplied (22), loosen the 2 grub screws on both transport handle fixtures (20) (Fig. 12).
- Insert both arms of the transport handle (10) into the transport handle fixtures (22) at the front of the tank (Fig. 13).
- With the hex key supplied (22), tighten the 2 grub screws on both transport handle fixtures (20) (Fig. 14).
natural_image
Line drawing of a portable air compressor with wheels and a truck, labeled Fig. 11 (no text or symbols on the diagram itself)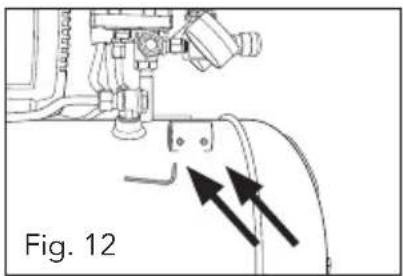
natural_image
Mechanical assembly diagram showing a component with two directional arrows indicating movement or force (no text or symbols present)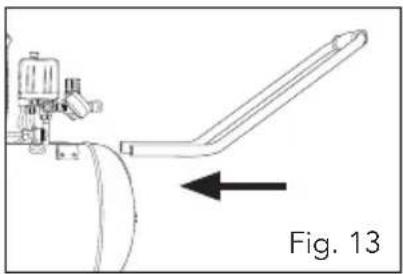
natural_image
Technical line drawing of a mechanical component with an arrow indicating direction, labeled 'Fig. 13' (no text or symbols on the diagram itself)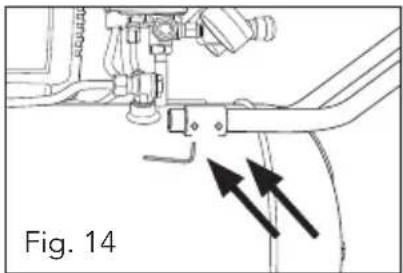
natural_image
Technical diagram showing mechanical components with arrows indicating motion or force direction (no text or symbols)Replacing the oil sealing plug
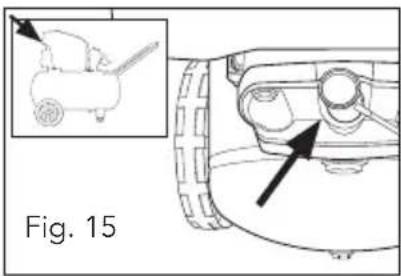
- Remove the transportation cover from the oil filler opening with a screwdriver (Fig. 15).
- Insert the supplied oil sealing plug (15) into the oil filler opening (Fig. 16).
natural_image
Technical diagram of a mechanical component with an inset showing a small vehicle and a labeled arrow, no readable text or symbols present.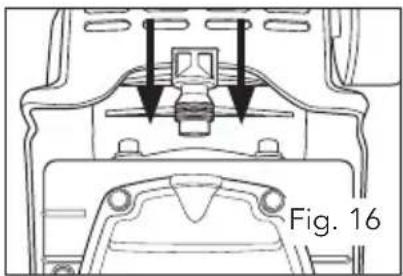
natural_image
Technical diagram of a mechanical component with arrows indicating assembly or force direction (no text or symbols)Fitting the air filter
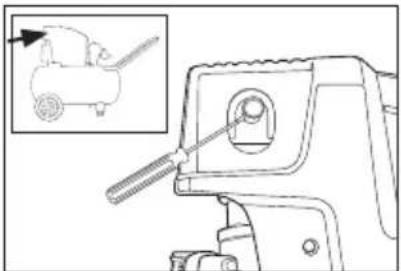
- Use a screwdriver to remove the transportation cover from the air filter connection (Fig. 17).
- Screw in the supplied intake air filter (1) (Fig. 18).
natural_image
Technical line drawing of a mechanical component with an inset showing a small mechanical part (no text or symbols present)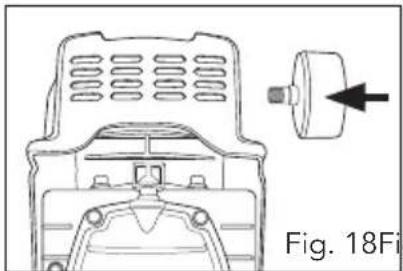
natural_image
Technical line drawing of a vehicle component with a directional arrow indicating motion (no text or symbols)PREPARATION
Filling with oil

WARNING! The air compressor must be filled with oil before first use.
Recommended lubricating oil: SAE 5W/40 or an alternative of the same quality. On the market also a special compressor oil with the oil type name: L-DAB-46-A is available. Do not mix up different oils when refilling. It should be refilled for the first time after 100 hours of operation. Thereafter the oil should be drained and refilled after every 500 hours in service.
-
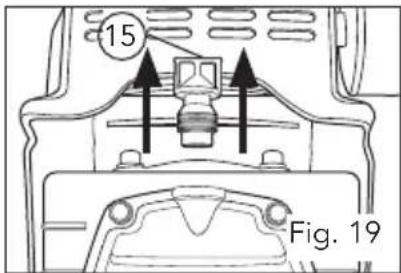
Unscrew and remove the oil sealing plug (15) (Fig. 19).
-
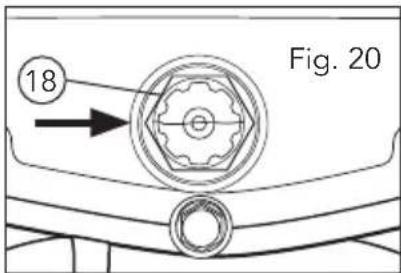
Fill the crank case until the oil level reaches the mid point of the red circle in the oil level window (18) (Fig. 20) This should be approximately 230ml of oil.
-
Screw the oil sealing plug (15) firmly in position.
OPERATION

WARNING! The air compressor must be used with a residual current device with a rated residual current of 30mA or less.
Switching on/off
-
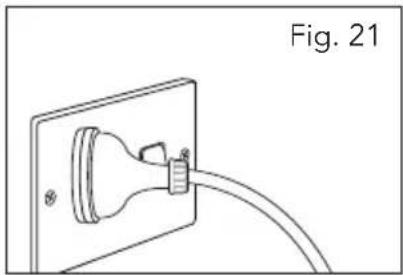
Plug the electrical cord into the power point and turn on (Fig. 21).
-
To switch ON the compressor, pull up the switch (9) (Fig. 22).
- To switch OFF the compressor, press the switch (9) down (Fig. 22).
natural_image
Line drawing of a plug inserted into a socket, labeled Fig. 21 (no text or symbols on the diagram itself)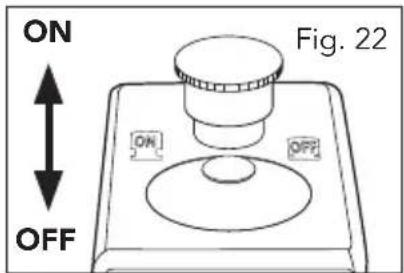
Preset pressure
The tank pressure is set at the factory and is not serviceable.
- Switch-on pressure 8 bar
- Switch-off pressure 10 bar
Note. When the maximum preset pressure is reached, the motor will automatically switch off. As the compressed air is used up by the connected air tool, the pressure will drop until it reaches the preset minimum pressure. When it does, the motor will automatically begin operating again.
Adjusting the pressure
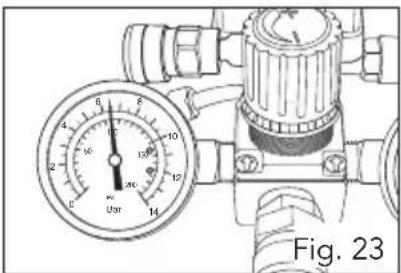
- With the desired tool attached to the quick lock regulated air outlet (5), switch on the compressor by pulling up the on/off switch (9). The tank will begin to pressurize. The level of the tank pressure can be read in the tank pressure gauge (13) (Fig. 23).
- Turn down the locking collar to allow adjustment.
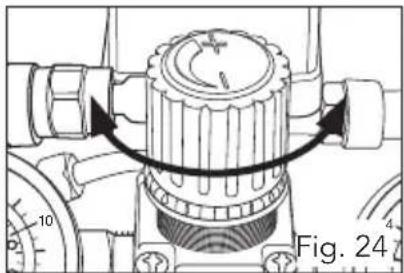
- You can adjust the level of output pressure by turning the pressure regulating knob (8). To increase the air pressure, rotate the regulating knob clockwise. To decrease the pressure, rotate the regulating knob anti-clockwise (Fig. 24).
- Turn the locking collar again hard up against regulating knob to prevent pressure drift.
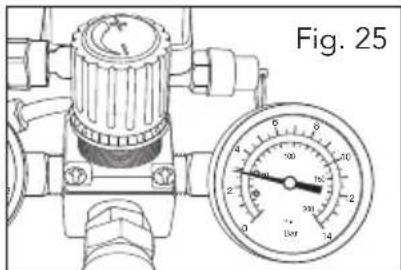
- The regulated pressure level is displayed on the adjustable pressure gauge (7) (Fig. 25).
Note. Air must be flowing through the quick lock regulated air outlet in order to obtain the correct output reading on the regulated pressure gauge.
When adjusting the pressure lower - it is best to go below the desired pressure, then adjust back up.
OPERATION
Unregulated quick lock coupling
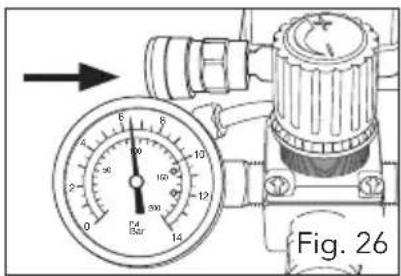
Air tools can also be attached to the unregulated quick lock coupling (14) (Fig. 26), but the output pressure level may fluctuate.
Overload switch
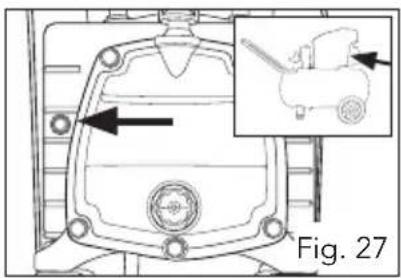
The motor is fitted with an overload switch (17). If the compressor overloads, the overload switch turns off the equipment automatically to protect the compressor. If the overload switch triggers, switch off the compressor using the ON/OFF switch (9) and wait until the compressor cools down. Then press the overload switch (17) and restart the compressor (Fig. 27).
natural_image
Technical diagram of a mechanical component with an inset showing a small mechanical component (no text or symbols present)Note. Long supply cables, extensions, cable reels etc. cause a drop in voltage and can impede motor start-up.
Turning off
-
After the task has been completed, switch off the compressor by pressing down the on/off switch (9) (Fig. 28).
-
Wait for the pressurised air to bleed from the release valve under the pressure switch cover.
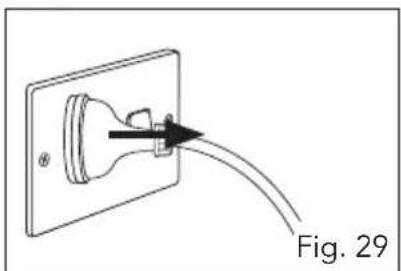
3 Switch off the power supply and remove the electrical plug (Fig. 29).
- Pull the ring on the safety valve (11) outwards, releasing the remaining compressed air in the tank. Release the ring so that the safety valve closes (Fig. 30).
natural_image
Simple line drawing of a plug inserted into a socket, labeled Fig. 29 (no text or symbols on the diagram itself)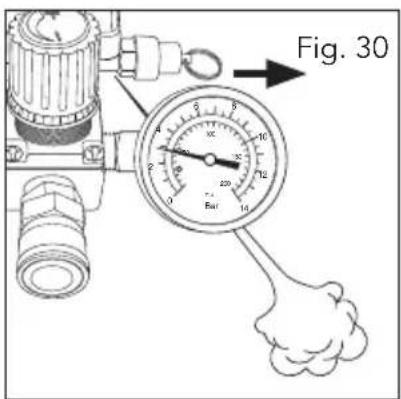
TROUBLESHOOTING
| Problem Cause Solution | ||
| The compressor does not start | 1. No supply voltage 1. Check | the supply voltage, the power plug and the socket-outlet. |
| 2. Insufficient supply voltage 2. | Make sure that the extension cable is not too long and is of suitable current capacity.. | |
| 3. Outside temperature is too low | 3. Never operate with an outside temperature of below +5°C. | |
| 4. Motor is overloaded 4. Allow down the motor to cool down. If necessary, remedy the cause of the overheating. | ||
| The compressor starts but there is no pressure in the tank | 1. Leak in the non-return valve | 1. Replace the non-return valve |
| 2. The seals are damaged. 2. | Check the seals and have any damaged seals replaced by a service centre | |
| 3. The drain cock leaks. Reseat safety valve. | 3. Tighten the screw by hand. check the seal on the screw and replace if necessary. | |
| The compressor starts, pressure is shown on the pressure gauge, but the tools do not start. | 1. Loose hose connections 1. | Check the compressed air hose and tools and replace if necessary. |
| 2. Leak in a quick-lock coupling | 2. Check the quick-lock coupling and replace if necessary. | |
| 3. Insufficient pressure set on the pressure regulator. | 3. Open the pressure regulator further. | |
MAINTENANCE

IMPORTANT! Before cleaning your air compressor or carrying out any maintenance procedure, make sure that the motor is off and the tool disconnected from the power supply to prevent accidental starting.

IMPORTANT! Wait until the compressor has completely cooled down. Risk of burns!
Checking the safety valve
-
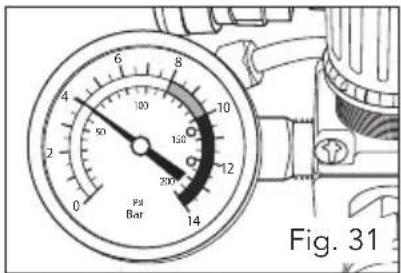
Ensure that you check that the safety valve (11) is in working order every day that the unit is in operation. To check the valve, first pressurise the tank to close to maximum pressure (Fig. 31).
-
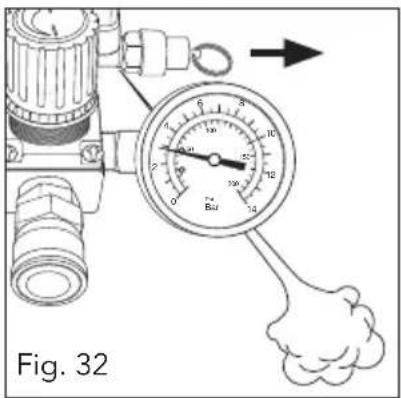
Hold the ring on the safety valve (11) and pull it outwards. Air should discharge from the valve (Fig. 32).
-
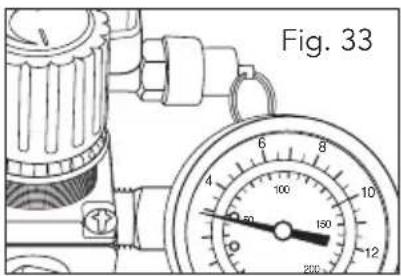
When the ring on the safety valve (11) is released the air discharge should stop (Fig. 33).

WARNING! Take care when discharging air through the safety valve, drainage screw or the air outlet. The discharged air can cause dust, stones or any other foreign particles to be blown through the air at high pressure.

WARNING! Do no use the compressor if the safety valve does not work as described.

WARNING! Wear safety glasses and keep your face away from the safety valve when carrying out this check. Air will be discharged at a high pressure.

IMPORTANT! Always depressurise the tank before carrying out any cleaning and maintenance work.
Cleaning
- Keep the devices free of dirt and dust as far as possible. Wipe the equipment with a clean cloth or blow it with compressed air at low pressure.
• We recommend that you clean the appliance immediately after you use it. - Clean the appliance regularly with a damp cloth and some soft soap. Do not use cleaning agents or solvents; these may be aggressive to the plastic parts in the appliance. Ensure that no water can get into the interior of the appliance.
- You must disconnect the hose and any spraying tools from the compressor before cleaning. Do not clean the compressor with water, solvents or the like.
Removing condensed water
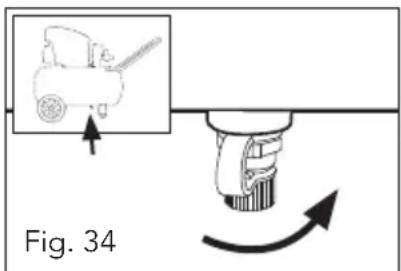
The condensed water must be drained off each day by opening the drainage screw (12), at the bottom of the tank.
The drainage screw can be opened by turning it in an anti-clockwise direction (Fig. 34). Be sure to re-tighten the drainage screw before the next use of the compressor.
Cleaning the air filter
The intake air filter (1) prevents dust and dirt being drawn in. It is essential to clean this filter after at least every 300 hours of service. A clogged air filter will decrease the compressor's performance dramatically.
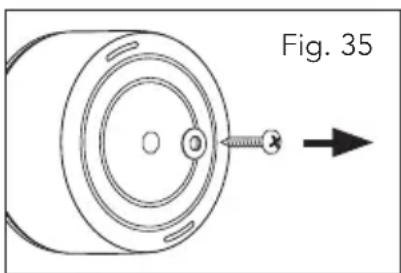
- Remove the filter from the compressor by unscrewing the screw on the plastic cover (Fig. 35).
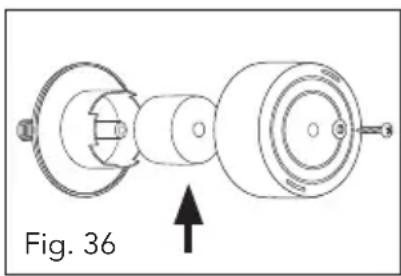
- Lift off the plastic cover and remove the intake air filter beneath (Fig. 36).
- Carefully clean the filter by tapping or blowing it with low pressure compressed air (approx. 3 bar). To assemble, proceed in reverse order.
natural_image
Mechanical assembly diagram showing a shaft and housing with an arrow indicating direction (no text or symbols)MAINTENANCE (cont.)
Changing the oil
Recommended lubricating oil: SAE 5W/40 or an alternative of the same quality.
The compressor should be refilled for the first time after 100 hours of operation. Thereafter the oil should be drained and refilled after every 500 hours in service.
-
Switch off the engine and pull the mains plug out of the socket. Depressurise the tank.
-
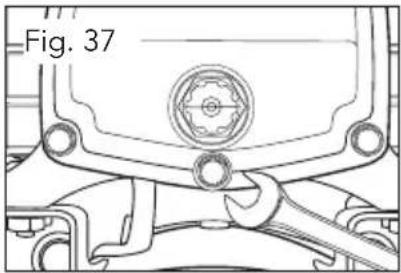
Unscrew the oil drainage screw (16) from the compressor pump (Fig. 37).
-
To prevent the oil from running out in an uncontrolled manner, hold a small metal chute under the opening and collect the oil in a vessel (Fig. 38). If the oil does not drain out completely, we recommend tilting the compressor slightly.
-
When the oil has drained out, re-fit the oil drainage screw (16).
-
Remove the oil sealing plug (15) and pour the new oil through the oil filler opening until it reaches the mid point of the red circle in the oil level window (18) (Fig. 39). The compressor should take approximately 230ml of oil.
-
Replace the oil sealing plug (15).
natural_image
Mechanical assembly diagram showing a component with a wrench and circular feature, labeled 'Fig. 37' (no readable text or symbols beyond label)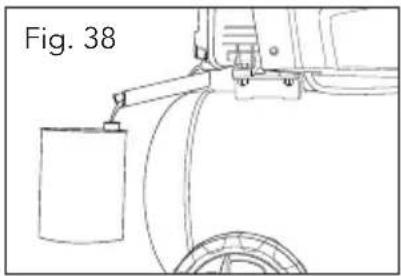
natural_image
Line drawing of a vehicle's front wheel and suspension bracket (no text or symbols)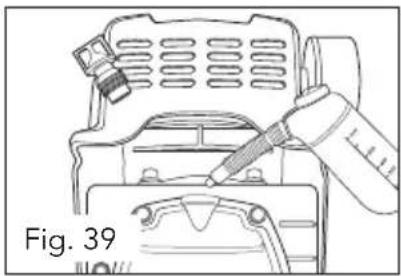
natural_image
Line drawing of a car engine component with a tool applying material to the engine compartment (no text or symbols)Note. Dispose of the old oil in an environmentally responsible way.
Storage

IMPORTANT! Pull the mains plug out of the socket and discharge unused air pressure from the appliance and all connected pneumatic tools. Switch off the compressor and make sure that it is secured in such a way that it cannot be started up again by any unauthorised person.

IMPORTANT! Store the compressor only in a dry location which is not accessible to unauthorised persons. Always store upright, never tilted!
DESCRIPTION OF SYMBOLS
| V | Volts | Hz | Hertz |
| ~ | Alternating current | W | Watts |
| min-1reciprocation per minute | Revolutions or | no | No load speed |
 | Warning | ||
 | Read instruction manual | Wear eye protection | |
 | Beware of electrical voltage | Wear hearing protection | |
 | Beware of hot parts | Sound power level | |
| IP20 | Ingress protection from water | I | Litres |
 | Before using for the first time, check the oil level and replace the oil sealing plug! | ||
CONTENTS
1 x FBT-5100U Air Compressor
1 x Intake Air Filter
2 x Wheels
2 x Feet
1 x Transport Handle
1 x Oil Sealing Plug
2 x Wheel Caps
4 x Grub Screws (for fitting the handle)
1 x Hex Key
2 x Bolts (for fitting feet)
4 x Washers (for fitting feet)
2 x Nuts (for fitting the feet)
2 x Axle Bolts
2 x Spring Washers
4 x Washers (for fitting the wheels)
2 x Nuts (for fitting the axles)
1 x Instruction Manual
Note. The manufacturer's liability shall be deemed void if the machine is modified in any way and the manufacturer shall therefore accept no liability for any damages arising as a result of modifications.
Bunnings, 489-499 Avebury Boulevard, MK9 2NW.
WARRANTY
All of our products undergo strict quality checks to ensure that they reach you in perfect condition. In the unlikely event that your device develops a fault, please contact our service department at the address shown on this guarantee card. You can also contact us by telephone using the customer service number shown. Please note the following terms under which guarantee claims can be made:
- These warranty terms regulate additional warranty services, which the manufacturer mentioned below promises to buyers of its new products in addition to their statutory guarantee claims are not affected by this guarantee. Our guarantee is free of charge to you.
- The warranty services only covers defects due to material or manufacturing faults on a product which you have bought from the manufacturer mentioned below are limited to either the rectification of said defects on the product or the replacement of the product, whichever we prefer.
Please note that our devices are not designed for use in commercial, trade or professional applications. A guarantee contract will not be created if the device has been used by commercial, trade or industrial business or has been exposed to similar stresses during the guarantee period.
-
The following are not covered by our guarantee:
-
Damage to the device caused by a failure to follow the assembly instructions or due to incorrect installation, a failure to follow the operating instructions (for example connecting it to an incorrect mains voltage or current type) or a failure to follow the maintenance and safety instructions or by exposing the device to abnormal environmental conditions or by lack of care and maintenance.
- Damage to the device caused by abuse or incorrect use (for example overloading the device or the use or unapproved tools or accessories), ingress of foreign bodies into the device (such as sand, stones or dust, transport damage), the use of force or damage caused by external forces (for example by dropping it).
- Damage to the device or parts of the device caused by normal or natural wear or tear or by normal use of the device.
- Your Product is guaranteed for a period of 12 months from the original date of purchase and is intended for DIY (Do It Yourself) use only. Warranty excludes consumable parts. Guarantee claims should be submitted before the end of the guarantee period within two weeks of the defect being noticed. No guarantee claims will be accepted after the end of the guarantee period. The original guarantee period remains applicable to the device even if repairs are carried out or parts are replaced. In such cases, the work performed or parts fitted will not result in an extension of the guarantee period, and no new guarantee will become active for the work performed or parts fitted. This also applies if an on-site service is used.
Your statutory rights remain unaffected, in particular any rights you have under the Consumer Rights Act 2015.
IN ORDER TO MAKE A CLAIM UNDER THIS WARRANTY YOU MUST RETURN THE PRODUCT TO THE PLACE OF PURCHASE WITH YOUR RECEIPT.
Please refer to the restrictions of this warranty concerning wearing parts, consumables and missing parts as set out in the service information in these operating instructions.
CUSTOMER SERVICE HELPLINE
GB: 0151 294 4488
IRL: 1850 882711
OZITO UK
Unit 9 Stadium Court, Wirral International Business Park, Plantation Road, Bromborough, Wirral, CH62 3QG
- AIR COMPRESSOR
- ORIGINAL INSTRUCTIONS
- SPECIFICATIONS - MODEL NO. FBT-5100U
- KNOW YOUR PRODUCT
- KNOW YOUR PRODUCT (cont.)
- TABLE OF CONTENTS
- INTRODUCTION
- SAFETY INSTRUCTIONS
- ELECTRICAL SAFETY
- Using an Extension Lead
- SAVE THESE INSTRUCTIONS
- Work area safety
- Electrical safety
- Personal safety
- GENERAL POWER TOOL SAFETY WARNINGS (cont.)
- AIR COMPRESSOR SAFETY WARNINGS
- AIR COMPRESSOR SAFETY WARNINGS (cont.)
- Wear eye and ear protection
- PRE-SETUP CHECKS
- ASSEMBLY
- Fitting the wheels
- ASSEMBLY (cont.)
- Fitting the supporting feet
- Fitting the transport handle
- Replacing the oil sealing plug
- Fitting the air filter
- PREPARATION
- Filling with oil
- OPERATION
- Switching on/off
- Preset pressure
- Adjusting the pressure
- Unregulated quick lock coupling
- Overload switch
- Turning off
- TROUBLESHOOTING
- MAINTENANCE
- Checking the safety valve
- Cleaning
- Removing condensed water
- Cleaning the air filter
- MAINTENANCE (cont.)
- Changing the oil
- Storage
- DESCRIPTION OF SYMBOLS
- CONTENTS
- WARRANTY
Brand : Full Boar
Model : FBT-5100U
Category : Compressor