
TFS54FC-SGW - Cooker Technika - Free user manual and instructions
Find the device manual for free TFS54FC-SGW Technika in PDF.


| Product Type | Freestanding Gas Cooker (Upright) |
| Model | TFS54FC-SGW |
| Brand | Technika Professional Series |
| Oven Capacity | 83 L |
| Number of Gas Burners (Hob) | 4 (Rapid, Semi-rapid, Auxiliary, plus separate Grill and Oven burners) |
| Burner Power (Total) | NG: 36.36 MJ/h; ULPG: 48.5 MJ/h |
| Product Dimensions (H x W x D) | 910 x 540 x 600 mm |
| Package Dimensions (H x W x D) | 960 x 590 x 712 mm |
| Gas Supply | Natural Gas @1.00 kPa or ULPG @2.75 kPa (test point pressure) |
| Electrical Supply | 220-240 V, 50/60 Hz (for ignition and light), must be earthed |
| Ignition System | Battery-powered spark ignition (AA battery required) or manual match lighting |
| Oven Features | Gas oven with thermostat, grill burner, triple-glazed removable door, interior light, anti-tilt device |
| Hob Features | Cast iron trivets, removable burner caps and crowns, flame failure safety device (thermocouple) |
| Control Type | Front panel knobs for burner and oven temperature |
| Safety Features | Anti-tilt bracket, stability bolt, child lock (supervision required), thermocouple flame failure, automatic gas shut-off if flame extinguished |
| Cleaning and Maintenance | Use warm soapy water; avoid abrasive or caustic cleaners, steam cleaners; removable oven door and inner glass panes for thorough cleaning |
| Warranty | 2 years domestic use (Australia/New Zealand) from Glen Dimplex |
| Installation Requirements | Must be installed by authorized person; clearance to range hood min 600 mm; anti-tilt plate must be secured; flexible hose max 1200 mm |
| Spare Parts Availability | Injectors, burner caps, thermocouple, door glass, knobs available through authorized service centers |
Frequently Asked Questions - TFS54FC-SGW Technika
User questions about TFS54FC-SGW Technika
0 question about this device. Answer the ones you know or ask your own.
Ask a new question about this device
Download the instructions for your Cooker in PDF format for free! Find your manual TFS54FC-SGW - Technika and take your electronic device back in hand. On this page are published all the documents necessary for the use of your device. TFS54FC-SGW by Technika.
USER MANUAL TFS54FC-SGW Technika
CONTENTS TABLE
Conditions of use....Pg 3
Safety precautions ......Pg 4
Other important safety information.....Pg 4
Warnings for use of oven and appliance hob.....Pg 5
Installation, cleaning and service ......Pg 6
Product descriptions.....Pg 7
First time use of the appliances.....Pg 8
Using the oven....Pg 11
Using the burners of your cooker....Pg 12
Getting to know your oven....Pg 13
Fitting oven accessories and cleaning ......Pg 14
Solving problems ......Pg 16
Connection to the gas supply ......Pg 17
Installing the gas cooker....Pg 19
Testing the operation of the gas cooker....Pg 20
Technical specifications....Pg 22
Warranty ...... Pg 22
We recommend that you read the instructions in this manual carefully before use for the best performance and to extend the life of your appliance, as it will provide you with all the instructions you require to ensure its safe installation, use and maintenance. Always keep this manual close to hand since you may need to refer to it in the future. Thank you.
Condition of use:
This appliance is intended to be used for domestic use, not commercial use.
SAFETY PRECAUTIONS WARNINGS FOR USE OF OVEN AND APPLIANCE HOB
- This appliance is not intended for use by persons (including children) with reduced physical, sensory or mental capabilities, or lack of experience and knowledge, unless they have been given supervision or instruction concerning use of the appliance by a person responsible for their safety.
- Warning – ensure that no downward pressure is applied to the oven door when open. In particular, DO NOT ALLOW a child to climb on to open oven door
- Warning - accessible parts can become hot during use, especially the oven door. To avoid burns, young children MUST BE KEPT AWAY.
- Young children should be supervised to ensure they do not play with this appliance.
- During use this appliance becomes hot. Care should be taken to avoid touching hot external and internal surfaces when in use. Use oven gloves.
- The cooktop area including the entire hob will become very hot when in use. Care MUST BE TAKEN when using this part of the appliance.
• Install cooker, shelving and fittings in accordance with this manual.
- Ensure all specified vents, openings and air spaces are not blocked.
- The appliance is not intended to be operated by means of external timer or separated remote-control system.
- CAUTION: The cooking process has to be supervised. A short term cooking process has to be supervised continuously.
- To ensure your safety, all electric appliances should only be installed or serviced by qualified persons. If the supply cord is damaged, it must be replaced a service agent or similarly qualified person in order to avoid a hazard.
- Important Notice - This Upright Cooker must be fitted securely using the supplied tools.
- Do not spray aerosols in the vicinity of this appliance while it is in operation.
- Do not store flammable materials in the appliance or near this appliance.
- Do not operate any gas appliance if the smell of gas persists.
- Do not modify this appliance.
- Appliance must be installed according to current laws and regulations by qualified tradesmen/ installers.
- Gas models are NOT APPROVED for installation in marine craft, caravans or mobile homes.
The Manufacturers and Importers / Distributors and Retailers shall not be liable to any legal liability, personal injury and property damage due to incorrect operation or incorrect installation.
The Manufacturers, Importers/Distributors and Retailers shall not be liable to any legal liability, personal injury and property damage due to incorrect operation or incorrect installation.
Other Important Safety Information

appliance must not be used as a space heater

of obstruct the ventilation slots on front or back of appliance.

not remove any labels or use abrasive/ corrosive cleaners on.

ording to the electrical safety regulations the appliance equipment must be properly earthed.

ot use corrosive cleaners e.g. oven cleaners that contain caustic soda.
Oven warnings
- DO NOT push down or apply any weight on open oven door.
• DO NOT place dishes on open door of oven - DO NOT line oven with foil or place anything on the bottom of the oven while baking to avoid permanent.
damage, as trapped heat will crack or craze the enamel floor of the oven cavity liner. - Use of olive oil and other poly-unsaturated oils (vegetable oils) when roasting uncovered food causes deposits inside the oven which are very difficult to remove.
- If you have an upright cooker with a gas oven that does not light within about in 5 - 8 seconds, allow 1 minute for gas to disperse clear before trying again.
Gas burner warnings
- DO NOT allow pots to boll dry, as damage to hotplate may result.
- DO NOT operate hotplates or burners without a pol. fry pan etc.
- DO NOT allow cookware to overhang hob onto adjacent bench tops, this will cause scorching to the bench top surface.
• Gas models: Ensure burner caps and crowns are in their correct position to avoid damage to these parts - Danger of fire: Do not store items on the cooking surface.
WARNING: Unattended cooking on a hob with fat or oil can be dangerous and may result in a fire.
Disposal of packaging
- Please recycle the cardboard and also any polystyrene packaging where possible.
TECHNIKA
PROFESSIONAL SERIES
PG 4
TECHNIKA
PROFESSIONAL SERIES
PG 5
INSTALLATION CLEANING AND SERVICING
- An authorised person must install this appliance. (Certificate of Compliance to be retained).
- Before using the appliance, ensure that all packing materials are removed from the appliance.
- In order to avoid any potential hazard, the installation instructions must be followed.
- In order to avoid accidental tipping of the appliance (for example, by a child climbing onto the open oven door), the and tilt bracket and stability bolt must be installed properly and securely to the floor.
• The cooker must not be placed on a base or plinth - The appliance must not be installed behind a decorative door in order to avoid overheating.
- Where the appliance is installed next to cabinets, the cabinet, material must be capable of withstanding 85%.
- Only authorised personnel should carry out servicing (Certificate of Compliance to be retained).
- WARNING Always ensure the appliance is switched off before cleaning or any maintenance is carried out such as changing of light globes.
- DO NOT use abravise type cleaner or caustic sodabased cleaners. Using warm soapy water after the appliance has cooled somewhat, followed by a dry cloth is suitable.
- DO NOT use sharp metal scrapers to clean oven door as they can scratch the surface, which may result in shattering of the glass.
- DO NOT use steam cleaners as a method to clean this appliance.
- Always clean the appliance immediately after any food spillage.
• To be serviced only by an authorized person. - Appliances requiring connection to 220-240V and must be earthed.
- Means for disconnection must be incorporated in the fixed wiring in accordance with the wiring rules
- Gas models are NOT APPROVED for installation in marine craft, caravans or mobile homes.
PRODUCT DESCRIPTIONS
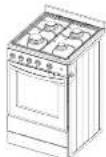
Description of Gas Cooker
-
Cast Iron Trivets
-
Gas burners
-
Control Panel
-
Oven Door
-
Front parcel
-
Apl skin foral
-
Splashpack
S. Batterugaster
- Burning baffle

Controls
Front Control Panels

-
Burner Control Knox
-
Sets the burner cooking temperature
- The oven temperature control valve
• Control the oven temperature
- Battery ignite
NOTE: The oven burner control knob has to be pressed and turned first. For the first time use the appliance
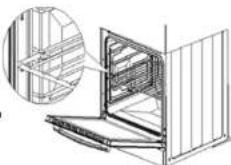
Fitting oven shelves
- Ensure shell orientation is correct (refer picture).
- Slide into oven at an angle until raised back of shelf is past the stop on side runners.
- Lower front of she1 and push in until stop is reached.
NOTE: The top ledge is not a shelf position
FIRST TIME USE OF THE APPLIANCE
USING THE OVEN
Preparing your appliance for the first time
- Please wipe out the oven interior prior to operation with warm soapy water and polish dry with a soft clean bath.
- New appliances can have an colour during first operation from components manufactured with the aid of oils.
It is recommended to run in your oven before you cook for the first time. Run the an empty oven at 180°C for approximately 1 to 2 hours. Ensure that the room is well ventilated. - Please install oven furniture as outlined in the 'Fitting Oven Accessories and Cleaning' section.
- If your appliance is fitted with solid hotplates, turn heat setting to high for 3 minutes to fully harden the coating. When cooled, apply a thin coating of cooking oil to seal the surface.
- The grill element may have cis left on the grill during manufacture. Before you cook on the grill for the first time, turn on for 15 minutes with 10mm of water in the bottom of the grill dish.
Using the gas oven
Always follow the instructions for putting the shelves and side racks into the oven, to avoid accidents.
- Do not line the oven with roll, it will damage the enamel.
- Do not touch the hot surfaces or heating elements inside the oven.
- Do not use the oven door as a shelf.
- Do not push down on the open oven door.
- Do not place shelves on top of upper most shelf runner as there are no stops for shelf withdrawal.
- After each use, always check that the control knobs are turned to 0 (off).
Using the oven of your gas cooker
Set: 1) Temperature
2) Gas Over Function
This knob lights the gas burner inside the oven. The cooking temperature is set by turning the knob anti-clockwise to the value required, between Min. and Max.
Tip: when using the grill burner can not adjust temperature.

Level 5 Level 4 Level 3 Level 2 Level 1
Installation and replacement of ignition battery
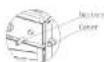
Turn the cover anti-clockwise to take the cover off. Check the “+”/“-” of the battery and make sure the “-” is on the inner side. Then insert the battery. Place the cover on and turn clockwise to complete installation.
Battery Ignition control
Completely open the oven door, turn the temperature knob and clockwise to the highest temperature setting, and press in the ignition. Once burner is ignited, hold the temperature knob in for a few seconds to allow it to heat up. If the burner is not lit after 15 seconds, stop trying; leave the oven door open, waiting one minute before trying again.
NOTE: A4 battery required
Lighting the burner by hand
Completely open the oven door and turn the temperature knob anti-clockwise. Please a lit match close to the end of the flame pipe (A) in the centre of the bottom of the oven and press the temperature knob. Once the burner has ignited, keep the knob pressed down for a few seconds to allow the thermocouple to host up and check that the burner has lit properly through the inspection hole [3]. The cooking temperature is set by turning the knob clockwise to the value required, between 50° and 231°.
If the burner accidentally goes out, turn the knob to the off position and wait at least one minute before trying to relight it.

TECHNIKA
PROFESSIONAL SERIES
PG8
Adjusting the minimum setting.
The oven thermostat has a screw for regulating the minimum setting, accessed by removing the thermostat knob. When the type of gas used changes, the minimum setting must be adjusted as follows:
- Light the oven burner and keep it operating at the highest scaling for 10/15 minutes with the door closed. Then turn the knob to the minimum temperature setting remove the knob and use a straight head screwdriver to adjust. Firstly, turn the knob in clockwise direction tightly then anticlockwise to adjust the flame. For natural gas you should turn one of a circle while 1/8 circle for LPG
- When using bottled gas, the adjuster screw must be turned fully clockwise.
- When using town or natural gas, adjust the screw so that when the thermostat knock is turned from the maximum to the minimum setting, the flame always remains stable and uniform. Close the oven door and check that the burner remains on at the minimum setting.

TECHNIKA
PROFESSIONAL SERIES
PG 9
The following is intended as a guide only. It is often required to set oven 10 20 degrees above or below this guide to get the result you want. Also adjustments are needed for the cooking time to suit personal desired results. Also you should follow the recipe guide when setting temperature and times. For best results when baking, preheat your oven 1 or 15 20 minutes.
| Food | han assisted oven | ||
| Temperature | Oven shelf position | Time in minutes | |
| Palm or full scannas | 210 | Any | 10-15 |
| Rolled biscuits | 150 (170) | Any | 10-15 |
| Sprouted biscuits | 190 | Any | 12-15 |
| Shortbrecd biscuits | 190 | Any | 30-35 |
| Hand individuals moringues | 100 | Any | 90 |
| Soft individual line-ingues | 185 | Any | 15-20 |
| Previva | 100 | Any | 75 |
| Petty cakes | 180 | Any | 15-20 |
| Sponge | 170 | Any | 20-30 |
| Plint butter cake | 170 | Any | 25-40 |
| Rich fruit cake | 190 | Any | 180 |
| Shortcrust cornish pastry | 160 (190 | Any | 40-45 (10/35) |
| Shortcrust custard tart | 170-200 | Any | 20-30 (10/25) |
| Cream puffs | 200 | Any | 25-30 |
| Yeast bread | 200 | Any | 25-30 |
| Pasta | 220 | Any | 15-25 |
| Meat/ Poultry/Fish | Recommended Temperature | Minutes per kilogram | |
| Roof | Ramp | 200 | 35-40 |
| Medium | 200 | 45-50 | |
| Well done | 200 | 55-60 | |
| Lamb | Medium | 200 | 40 |
| Well done | 60 | ||
| Veal | 180 | 80 | |
| Pork | 200 | 60 | |
| Chicken | 180-200 | 45-60 | |
| Duck | 180-200 | 60-70 | |
| Turkey | 180 | 40-45 (less than 10kg) | |
| 35-40 (more than 10kg) | |||
| Fish | 180 | 20 | |
TECHNIKA LOCKING WITH RESIN
PROFESSIONAL SERIES
PG 10
UNDERSTANDING COOKING PROBLEMS
| Problem Causes What to do | ||
| Uneven cooking income | A shelf position Select shelf that puts food in centre of oven | |
| Oven tray too large Remove oven tray. Use smaller trays or dishes | ||
| Trays not in centre Pull trays in centre | ||
| Oven fan causing uneven browning or smell cakes to lean over | Rotate food during cooking, or use Conventional Whole (i.e. no fan) | |
| Baking products too brown on top | Oven not preheated Preheat the oven | |
| Baking tins too large (diamete) for recipe Use correct size tins | ||
| Fan-forced mode with oven temperature too high Check recipe. Reduce oven temperature by 10-29 or more | ||
| Cooking lime and long Next lime short or cooking | ||
| Baking lins not evenly spaced Stagger baking lins all load 3cm between tins and the oven walls | ||
| Items to be cooked are not evenly sized or spaced in trys. Move into same size and shape and spread evenly oven in trys | ||
| Baking products too brown on bottom | Baking tins too large Use correct size tins | |
| Baking tins are dark metal or glass Change to shiny, light tins or lower the temperature by 10-20 degrees | ||
| Food to oven in oven | Cook one shelf higher | |
| Oven door opened too frequently during baking | Don't obet the oven door until at least half the cooking time has passed | |
| Cakes have a邮政 thick crust | Baking temperature too high | Lower the temperature |
| Oven tray blocking heat (below themosted) | Use higher shelf position for oven tray | |
| Baking temperature too high | Lower the temperature | |
| Food too low in oven | Cook one shelf higher | |
| Cake better oven mixed | Mix just long enough to combine the Ingredients | |
| Baking tin too deep or wrong size | Check size of tin and use recommended size | |
| Baked products are pale, flat and under cooked | Baking tins can | Change to shiny light tins |
| Baking temperature too low | Raise the temperature | |
| Food too low in oven | Cook one shelf higher | |
| Baking time too short | Increase cooking time | |
| Incorrect baking tin size | Use correct tie tin | |
| Cakes faller in centre | Baking temperature too low | Raise the temperature |
| Baking time too short | Increase cooking time | |
| Proportions of ingredients Incorrect for recipe | Check recipe | |
| Opening door too early during baking | Do not open door until the last quarter of cooking time | |
| Roast meat and potatoes not browning in fan oven | Poor hot air circulation | Elevate food onto a rack to allow air circulations |
| Oven temperature as too low | Increase temperature in 200-22 | |
| Not long enough in oven | Continue cooking far and for 15-minutes | |
NOTE: Condensation on oven door is normal, especially when kitchen is cold. Also spacing and size of food on trays and the number of baking dishes in the oven can affect air circulation.
TECHNIKA COOKING THOMSON
PROFESSIONAL SERIES
PG 11
USING THE BURNERS
Burner Safety Warnings
- Do not use pots and pans which are unsteady, as these could overbalance.
- Do not use mats, heat diffusers or wok stands. These will cause a temperature build up which can damage the cook top.
- Do not let cooking pots overhang sides or front of heb gel too close to the burner control knobs.
Ceramic burners
- Do not leave aluminium foil on the hot ceramic burners (permanent damage will occur)
Note: Stored heat in the burner can be used for the last few minutes of cooking. Simply turn off the control.
Choosing Cooking Pots
Look at this diagram below which shows you which utensils to use on the burners and whih utensils should not be used.
• Always use pots and pans with flat bottoms. Uneven or thin bottoms will waste energy and cook slowly.
• Always use pots and pans which are slightly larger than the burner. Small pans waste energy
• Always put dry pots and pens on the burners.
- Do not use pots and pans with arc too large. Pans with overhang the burner more than 50mm can damage the nub.

GOOD

BAD
(recessed base)

BAD
(convex base)

BAD
(undensize)

BAD
(overize)

BAD
besture on h

BAD
(no utensil)
Using the Burners of your gas cooker (The hob control knobs)
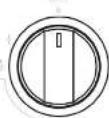
The symbols on the control knobs mean the following:
No gas flow
Maximum gas flow
Minimum gas flow
All operating positions must be set between the maximum end minimum flow settings, and never between the maximum setting and the closed position.
Introduction to the burner
- Burner cap
B-Lighting plug
C-Thermocouple
Burner Ignition
To light these burners:
1. Choose the burner you want to use
2. Turn the burner control knob to
3. Press the body release spark burner switch Burner
TECHNIKA
PROFESSIONAL SERIES

PG 12
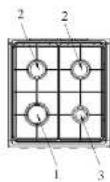
- Rapid Burner
Used for normal cooking. - Semi raplc Burner
Used with middle size pots and pans. - Auxiliary Burner
Used for slimmering.
Used with small pots and pans.
To conserve gas, place the par centrally over the burner and adjust the flame so that it does not go past the edges of the cookware.
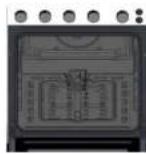
Get to know your oven
The appliance is tested with Natural gas at the pressure of 10 mbar. If it is to be used with other types of gas, the burner nozzle has to be changed and the gas valve adjusted. To replace the nozzle, proceed as described below.
Adjust the oven burner
To adjust the oven burner, open the oven door and proceed as follows:
- Remove all accessories (oans, shelves and any steel runners):
- Lift the oven bottom plate and extracell so that the inside of the oven is as shown in the picture.
Changing the nozzle
- Undo the oven burner fixing screws A.
- Move the burner B outwards until the nozzle is accessible.
- Use a 7 socket wrench to change the nozzle, fitting the
• One for the type of gas to be used.
Adjusting the oven burner primary air flow
- Undo the adjuster screw "A" of the air regulator sleeve;
- Turn the regulator sleeve "B" into the position for the type of gas to be used, consulting the table below;
- Tighten the adjuster screw and restore the seals;
- When the operation is complete, reassemble the burner correctly.
NATURAL GAS IN: ULPG
× 3mm × 8mm
When the operation is complete, replace the nameplate on the back of the oven with the one provided for the new type of gas.
In compliance with current safety standards, adapting gas from NG to LPG must be carried out by a qualified traces person.

TECHNIKA
PROFESSIONAL SERIES
PG 13
FITTING OVEN ACCESSORIES AND CLEANING
Safety warnings about cleaning
• Always make sure that the cooker is turned off before cleaning.
• Always clean cooker immediately after use.
- Do not use steam cleaners. These may cause moisture build-up.
- Do not use caustic-based cleaners. These will damage aluminum parts, and remove enamel gloss.
Cleaning the enamel
- Keep ename clean by wiping it with a soft cloth dipped in warm soapy water.
- Rub difficult stains with a nylon scourer or creamed powder cleanser.
- Do not use abrasive cleaners, dry powder cleaners, steel wool or wax polishes.
- If you use an oven cleaner, then follow the instructions on the product carefully.
Cleaning the control panel
• Make sure control knobs are in off position.
- Clean the control panel by wiping it with a soft cloth dipped in warm soapy water and squeezed dry.
- Take care when clearing around knobs to ensure printing on control panel is not removed, this can occur if abrasive cleaners are used, therefore, should not use at all.
Cleaning The Gas Hob
Removing the trivets (Refer Figure 1)
• The trivets locate in the recessed area of the hob.
• They can be removed for cleaning by carefully filling them from the hot.
- Clean by washing in warm soapy water. Dry thoroughly.
- Take care when replacing the trivets as dropping them onto the hob may damage the unamelled surface.
Removing the burners (Refer Figure 2)
• The burner caps and crowns are removable for cleaning.
- Flame port blockage should be removed by means of a match stick or brush.
- If the caps, crowns and cups are heavily soiled, use a non-abrasive cleaning compound.
- Do not clean them with abrasive or caustic type cleaners, or put in a dishwasher as they will be damaged.
Refitting the burner crowns and caps
- The burner crown must be fitted correctly into the burner cup or damage will occur during operation.
- To do this, ensure that the 2 ribs on either side of the spex plug hole are positioned into the 2 slots on the burner cup. (See figure 2).
- The burner cap is simply positioned over the top of the burner crown.
NOTE: When the burner is correctly filtered i, will sit level on the knob. If ignition is difficult or fails after cleaning, then either burner parts are not dry or parts have not been positioned correctly.

Iron burner cover
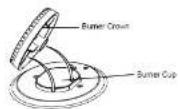
Figure 2
TECHNIKA
PROFESSIONAL SERIES
PG 14
Cleaning the oven
- Open door fully
- Remove oven shelves and side racks.
- Clean in hot soapy water.
Cleaning the oven door / How to remove the oven door
For a more thorough clean, you can remove and disassemble the oven coor. Proceed as follows:
- Open the door to the full extent [Fig. 1]
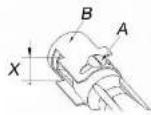
- Open the lever A completely on the left and right hinges (fig. 7)
- Hold the door as shown in (fig. 3) approximately 30 degree angle upwards
- Genly close the door (Fig. 3) until left and right hinge levers A (Fig. 2) are hooked to part B (Fig. 2) of the door
- With a few the hinge hooks from their location following arrow C. (Fig. 4)
- Rest the door on a soft surface, to reduce risk of damage to the door
• To replace the door, repeat the above steps in reverse order

Removing the Inner Pane of Glass
- Triple Glazed oven door. Remove the top frame 1G; by unscrewing the 2 screws, located on the left and right sides.
• Gently pull out the inner pane of glass (Fig. 2). Also remove the centre pane of door glass, not shown here. - Clean the glass panes with an appropriate cleaner. Dry thoroughly, and place on a soft surface.
- Now you can also clean the inside of the outer glass.

Cleaning the door glass
- Clean the glass door using non-abrasive products or sporges and dry it with a soft cloth.
- Do not use the oven without the inner door glass filled.
- Do not use harsh abrasive cleaners or sharp metal scrapers to clean the oven door glass since they can scratch the surface, which may result in shattering of the glass.
TECHNIKA
PROFESSIONAL SERIES
PG 15
SOLVING PROBLEMS
If you have a problem with your appliance, check the table below before calling service. You may be able to avoid a service call by and avoid unnecessary inconvenience and expense. For cooking problems, refer to Handling Baking Problems.
| Problem Causes Remedy | ||
| Elomona won't work | Circuit breaker tripped Check circuit breaker | |
| Household fuse blown Replace household fuse | ||
| Oven or grill not working | 120 min Timer now in Manual position Refer to 120 min timer instructions | |
| Power not turned on Switch on electricity | ||
| Control is incorrectly set Reset controls | ||
| Circuit breaker tripped Check circuit breaker | ||
| Oven light not working | Power not turned on Switch on electricity | |
| Household fuse blown Check fuses | ||
| Circuit breaker tripped Check circuit breaker | ||
| Lamp blown or loose in socket Replace or tighten globe | ||
| Oven not hot enough | Heat escaping through incorrectly sealed door | Check shelves or dishes are not preventing door closing properly. Check that door is fitted properly after door removal for cleaning |
| Door scal is worn or has moved Replace scal or re set it | ||
| Unit smoking when first used Protective oils being removed This is normal | ||
| Odour on first use of oven Manufacturing oils an elements This is normal | ||
| 120minute timer buzzer not audible | Timer not wound sufficiently | Allow 2-4 hours for odour to dissipate (open all windows) |
| Oven shelf light | Oven shelf not inserted correctly, may be upside down or back to front | Turn timer knob past 15 minute mark. Then turn to the required number of minutes. |
| Clock display off | Household fuse blown or power supply is off | Remove shelf and insert as per diagram |
| Check fuses, power supply | ||
NOTE: Only service centers should carry out servicing. Otherwise warranty may be void.
TECHNIKA
PROFESSIONAL SERIES
PG 16
INSTALLING THE GAS COOKER
Unpacking
Do not fit the burner crowns, burner caps and trivels until after the cooker has been installed.
Locating the cooker
This appliance must be installed by an authorised person in accordance with this instruction manual, AS/NZS 5601 – Gas installations (installation and pipe sizing), local gas fitting regulations, local electrical regulations, local water regulations, local health regulations, Building Code of Australia and any other government authority.
Overhead clearances—(Measurement A)
Range hoods and exhaust fans shall be installed in accordance with the manufacturer's relevant instructions. However, in no case shall the clearance between the highest part of the hob of the gas cooking appliance and a range hood be less than 600 mm or, for an overhead exhaust fan, 750 mm
Side clearances—(Measurements B, & C)
Where B, measured from the periphery of the nearest burner to any vertical combustible surface, or vertical combustible surface covered with toughened glass or sheet metal, is less than 200 mm, the surface shall be protected to a height C of not less than 150 mm above the hob for the full dimension (width or depth) of the cooking surface area. Where the gas cooking appliance is fitted with a 'splashback', protection of the rear wall is not required.
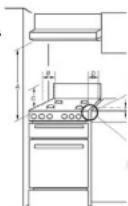
Additional requirements for freestanding and elevated gas cooking appliances—
(Measurements D & E). Where D, the distance from the periphery of the nearest bumer to a horizontal combustible surface is less than 200 mm, then E shall be 10 mm or more, or the horizontal surface shall be above the trivet.
Overheat clearances - (Measurement A): The distance between the highest part of the
hob of the gas cooking appliance should be higher than 600mm for a range hood and higher than 750mm for an overweight exhaust fan.
Installation of the anti-tilt plate
Determine position of cooker and anti-tilt plate.
Securely fix the anti-tilt plate to the floor with appropriate fasteners. Fasten the stability bolt bracket to the front grame with the 2 screws supplied.
Reposition the cooker back into the anti-lift plate and then mark the position of the stability bolt hole. Pull the cooker back out and drill the bolt location hole. Use a 10mm masonry or wood drill. When drilling into concrete ensure a minimum hole depth of 30mm. Reposition the cooker back into the anti-tilt plate, aligning the stability bolt, bracked with the 10mm drilled hole. Then slide the bolt through the bracket and into the hole. Connect Electricity supply/gas supply but do not turn on until installation is completed.
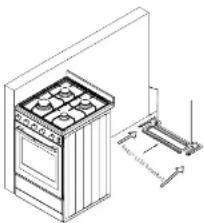
TECHNIKA
PROFESSIONAL SERIES
PG 17
The appliance is suitable for connection with rigid pipe or flexible hose. The isolating manual shut-off valve connection point must be accessible when the appliance is installed. For connection with a flexible hose assembly, the flexible one assembly must be certified to AS/N/S 1859 class II or D. 10mm internal diameter, be kept as short as possible (not exceeding 1200mm), must not be in contact with the floor or any hot or sharp surfaces. The hose assembly must not be subject to strain, abrasion, kinking or coformation. Gas leakage and operation of the appliance must be tested by the installer before leaving. Check burner flames are blue in colour, stable and completely ignore at both high and low flame settings with no appreciable yellow topping, carbon deposition, lifting, floating, lighting back or objectionable colour. Test burners individually and in combination. When satisfied with the operation of the cooker, please instruct the use on the correct method of operation.
Gas Connection
The gas intake connection of the appliance has a "melt thread". When mixing the connection, take care not to apply stresses of any kind to the appliance. Read these points before connecting to the gas supply:
- The gas connection point is a 1/2" BSP external thread located at the rear of the appliance (50mm from the edgci).
- Ensure installation allows withdrawal of appliance
Read these points about operation and look carefully at the diagram:
• The appliance regulator provided must be oriented. - The arrow showing the direction of the flow must be pointed correctly
- The regulator has a 1/2" BSP internal thread at inlet and outlet.

Natural Gas
The supplied regulator must be fitted to the appliance inlet connection. Gas pressure must be adjusted to 1.0 kPa when approximately 50% of the burners are on high flame.
Universal LPG
(The appliance test point is located at the injector) Gas pressure must be checked to confirm the appliance operation pressure is 2.75 kPa, the appliance test point is the rapid burner injector as shown below. 1. Disconnect power.
-
Light the auxiliary burner and set to high flame. Ensure all other burners are off.
-
Zero manometer, then apply flexible tubing to seal over the Rapid burner injector, hold securely in place and check the gas pressure by pressing in the corresponding burner control knob in, then turning to high flame position.
-
If the pressure is 2.75 kPa, reassemble the burner and perform the final checks as per this instruction manual.
- If the pressure is not 2.75 kPa, disconnect the appliance and check/adjust/replace the LPG cylinder regulator(s) as appropriate in accordance with AS/NZS 5601
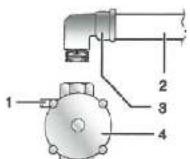
1 Test point location
2 Gas inlet pipe
3 Gas inlet connection
4 Regulator
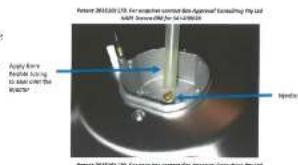
NOTE: When the installation is complete, always check that all the unions are absolutely tight using a soapy solution. Never use a flame to make this check.
TECHNIKA PROFESSIONAL SERIES
PG 18
NOTE: You must test the cooker after installation, before you hand it over to the customer. You must have a monometer and a connecting tube.
Checking Gas Supply
- Check the manometer zero point is correct.
- Connect the motorator to the cooker pressure test point. This is located on the regulator or LPG inlet fitting.
- Turn on the gas supply and the electricity (if applicable) and try to ignite the gas.
NOTE: It will take additional time to light the gas for the first time as air needs to be purged from the pipes. - Check the operating pressure for the particular gas type (see table).
For LPG cookers
Adjust the regulator necessary (this may be remote from the cooker).
For Natural Gas cookers
- Regulators are supplied pre-adjusted and configured by the component maker for use with Natural Gas. The appliance installer is not required to make an adjustment to obtain the correct outlet pressure setting.
- An arrow on the base of the regulator indicates the direction of gas flow when the inlet and outlet of the regulator are oriented correctly. When the regulator has been filled check for leaks from the connections with soapy water.
Checking the Function of the Regulator
With the appliance operating check the outlet pressure:
- When all burners of the appliance are operating at maximum,
- When the smallest owner of the appliance is operating at 1000ft.
Under these conditions the outlet pressure should not vary from the nominal outlet pressure of 1.0kPa by more than 120% of the nominal outlet pressure (10.20kPa for Natural Gas).
If the regulator appears to not be performing satisfactorily then check the following points.
- If the outlet pressure is consistently too low then the inlet pressure may be too low and adjustment of an upstream regulator may be needed, or an upstream regulator or valve with insufficient flow capacity may be present in the gas supply line. If this is suspected then it may be necessary to repeat the checks whilst measuring both the inlet and outlet pressure to determine if the inlet pressure is in the range 133 - 50Pa.
- Check that the regulator has been fitted to the gas supply line in the correct orientation, the arrow on the base of the body indicates the direction of gas flow. Once these checks have been completed, if the regulator still fails to perform in a satisfactory manner it should be replaced.
Testing the Cooker Features
Observe the fame appearance on each burner. If it is much smaller or larger than expected, then the injector size needs checking.
When maximum time appearance is correct, then check the turn down setting or each buffer. If the settings appear to be incorrect, proceed as follows:
- Adjust the bypass screw mounted on the body of each burner control box. This is accessible when the
- control knob and the control panel are removed
- Check the ignition on all burners both separately and in combination.
- Check the operation of the electrical components, if applicable.
- If you are satisfied, that the cooker is operating correctly, then turn it off and show the customer how to use it. Make sure you ask the customer to operate the clock and controls.
NOTE: If the cooker cannot be adjusted to perform correctly, then inform the customer off the problem and put a warning notice on the cooker. If the problem is dangerous, then disconnect the cooker. If there is a fault, then the customer should be advised to contact the manufacturer's local service organisation or the retailer.
TECHNIKA PROFESSIONAL SERIES
PG 19
INSTALLING YOUR NEW COOKER TECHNICAL SPECIFICATIONS
• The cooker MUST BE installed and serviced only by an authorised person.
- A certificate of compliance must be supplied by installer and is to be kept by the customer.
- The packing materials must be removed before you install the cooker.
- You must follow the installation instructions in this booklet.
- The surrounding kitchen cabinets must be able to withstand 85°C. We will not accept responsibility for damage caused by installation in to kitchen cabinets which cannot withstand 85°C.
- The appliance must not be installed in a corner, it must be installed at least 100mm from the side wall.
- The flexible pipe for gas models must have sufficient loops so the cooker can be moved for service.
- The vents, opening and all air spaces must not be blocked.
- The anti tilt plate must be installed to avoid accidental tipping.
- The 18 stabilising bolt must be installed to avoid accidental moving.
- You must not pull the cooker by the door handles.
- Power socket, if provided for gas models, and electricity isolation switch for electric models and gas models
without a 20A plug, is to be installed in an accessible position near the cooker (but not behind cooker).
- If the supply cord or cable is damaged, it must be replaced by an approved service agent, or a similarly qualified person in order to avoid a hazard.
Unpacking and installation instructions for installer
- Please check the product and make sure that there is no damage.
- Read the relevant installation sections of this manual (16,17,18,19). Ensure understanding.
- Confirm that product is compatible with available electrical/gas supply. Ensure proposed installation position does not conflict with installation sections.
- Check the attachment packing in good condition, complete accessories.
- Use screw driver to remove two fixed anti-ill plate screws and bats.
Locating the cooker
Study the diagrams below to be sure of the dimensions required to locate the cooker safely. Make sure that the top of the cooker is at least 10mm higher than the level of the bench tops. The appliance has been designed to fit in a 550mm wide gap in kitchen cabinets. The cooker may also be installed at the end of a line of benches or with a free space on either side.
NOTE: To ensure cooker stability, both the anti-tilt and anti-movement' stability bolt must be installed on all cookers (electric and gas).
The splash back installation
- To replace the splash back, align the 2 tebs of the splash back with the corresponding notes in the hob and push downwards.
- To remove the splash back, simply pull upwards.
- Clean the splash back in hot soapy water
- If required, pull the cooker back out and adjust the leveling feet as required.

TECHNIKA
PROFESSIONAL SERIES
PG 20
| Model TFS54FC-SGW | |
| Cven capacity (L) 83 | |
| Burner power (MJ/h) NG/LPG 36.36 | |
| Product dimension (mm) 540*600*910 | |
| Package size (mm) 590*712*960 | |
Gas Type: Natural Gas @ 1.00kPa Test Point Pressure
| Burner | Injector Size (mm) | N.G.C. (MJ/h) |
| Rapid | 1.55mm | 12.0 |
| Semi-rapid | 1.16mm | 8.70 |
| Auxiliary | 0.90mm | 4.00 |
| Grill Oven | 1.18mm | 7.00 |
| Oven | 1.40mm | 10.0 |
ULPG @ 2.75kPa Test Point Pressure
| Burner | Injector Size (mm) | N.G.C. (MJ/h) |
| Rapid | 0.93mm | 11.0 |
| Semi-rapid | 0.72mm | 7.50 |
| Auxiliary | 0.57mm | 4.00 |
| Grill Oven | 0.72mm | 7.00 |
| Oven | 0.85mm | 11.5 |
Total Gas Consumption:
| Natural Gas (MJ/h) | ULPG (MJ/h) |
| 45.4 | 48.5 |
TECHNIKA
PROFESSIONAL SERIES
PG 21
MANUFACTURER GUARANTEE
This warranty is provided in Australia by Glen Dimplex Australia Pty Limited ABN 69 118 275 460 (Phone number 1300 556 816) and in New Zealand by Glen Dimplex New Zealand Limited NZBN 9429000069823 (Phone number 09 274 8265) in respect of the Technika Professional product.
1. Technika Professional Express Warranty
Subject to the exclusions below, we warrant that the product will not have any electrical or mechanical breakdowns within:
a) In the case of Technika Professional products used for personal, domestic or household purposes, a period of 2 years from the date the product is purchased as a brand-new product from a retailer located in Australia / New Zealand.
b) In the case of Technika Professional products used for purposes other than personal, domestic or household purposes (including business or commercial use), a period of 90 days from the date the product is purchased as a brand-new product from a retailer located in Australia / New Zealand. Technika Professional products are designed and intended for domestic use only; and
c) All warranty repairs must be carried out by Glen Dimplex or their nominated service agent.
Note: warranty periods detailed above may vary in line with agreements with select retail and builder partners and may differ between Australia and New Zealand.
The benefits conferred by this express warranty are in addition to the Consumer Guarantees referred to in section 3 and any other statutory rights you may have under the Australian / New Zealand Consumer Law and/or other applicable laws.
2. Warranty exclusions
This express warranty does not apply where:
a) The product has been installed, used or operated otherwise than in accordance with the product manual or other similar documentation provided to you with the product;
TECHNIKA
PROFESSIONAL SERIES
PG 22
MANUFACTURER GUARANTEE
b) The product requires repairs due to damage resulting from accident, misuse, incorrect installation, insect or vermin infestation, improper liquid spillage, cleaning or maintenance, unauthorised modification, use on an incorrect voltage, power surges and dips, voltage supply problems, tampering or unauthorised repairs by any persons, use of defective or incompatible accessories or exposure to abnormally corrosive conditions, events independent of human control which occurred after the goods left the control of Glen Dimplex.
c) The repair relates to the replacement of consumable parts such as fuses and bulbs or any other parts of the product which require routine replacement;
d) You are unable to provide us with reasonable proof of purchase for the product; e) the breakdown occurs after the expiry of the express warranty period set out in section 1 or
f) the product was not purchased in Australia / New Zealand as a brand-new product.
3. Consumer guarantees
Our goods come with guarantees that cannot be excluded under the Australian / New Zealand Consumer Law. You are entitled to a replacement or refund for a major failure and for compensation for any other reasonably foreseeable loss or damage. You are also entitled to have the goods repaired or replaced if the goods fail to be of acceptable quality and the failure does not amount to a major failure.
4. How to make a claim
You may make a claim under this warranty through our website, contacting our customer care line or via email. Contact details for Glen Dimplex Australia and New Zealand can be found at the end of this document.
To make a valid claim under this warranty, you must:
a) Lodge the claim with us as soon as possible and no later than 14 days after you first become aware of the breakdown;
b) Provide us with the product serial number;
c) Provide us with reasonable proof of purchase for the product. This can take the form of a store receipt, new home handover form or other payment receipt documentation; and
d) If required by us, provide us (or any person nominated by us) with access to the premises at which the product is located at times nominated by us (so that we can inspect the product).
TECHNIKA
PROFESSIONAL SERIES
PG 23
MANUFACTURER GUARANTEE
5. Warranty claims
If you make a valid claim under this warranty and none of the exclusions set out in section 2 apply, we will, at our election, either repair the product or replace the product with a product of identical specification (or where the product is superseded or no longer in stock, with a product of as close a specification as possible).
Goods presented for repair may be replaced by refurbished goods of the same type rather than being repaired. Refurbished parts may be used to repair the goods.
Products are designed and supplied for normal domestic use. We will not be liable to you under this warranty for business loss or damage of any kind whatsoever.
Glen Dimplex Australia Pty Ltd Glen Dimplex New Zealand Ltd
www.glendimplex.com.au
www.glendimplex.co.nz
Australia
New
Zealand
Ph: 1300 556 816 Ph: 09 274 8265
customer.care.ha@glendimplex.com.au nztechserv@glendimplex.co.nz

PROFESSIONAL SERIES
PG 24
MANUFACTURER GUARANTEE
READ THE INSTRUCTION BOOKLET BEFORE INSTALLING AND USING THE APPLIANCE.
The manufacturer will not be responsible for any damage to property or to persons caused by incorrect installation or improper use of the appliance.
The manufacturer is not responsible for any inaccuracies, due to printing or transcription errors, contained in this manual. In addition, the appearance of the figures reported is also purely indicative.
The manufacturer reserves the right to make changes to its products when considered necessary and useful, without affecting the essential safety and operating characteristics.
Glen Dimplex constantly seeks ways to improve the specifications and designs of their products.
Whilst every effort is made to produce up to date literature, this document should not be regarded as an infallible guide. Actual product only should be used to derive cut out sizes.
All appliances must be installed by a qualified person/s with adherence to the relevant electrical, plumbing and building codes, with compliance being issued as required by state or national legislation.
Additionally, all upright cookers must have the anti-tilt device installed correctly in adherence to the relevant standards by a licenced installer. For maximum effectiveness and efficiency all rangehoods should be installed with the use of ductwork, by a licenced installer with adherence to the relevant state and national building codes and regulations.
All Glen Dimplex appliances are for Domestic use only, and must be installed by a licence installer into Domestic Applications only, without exception and to the required Authorities guidelines. Any installation outside of this will VOID warranty. Alresco areas are not a Domestic application.
TECHNIKA®
COOKING WITH PASSION
PROFESSIONAL SERIES
Distributed by:
Glen Dimplex Australia Pty Ltd Glen Dimplex New Zealand Ltd
For full terms and conditions, or to register your product warranty, please visit our website:
www.glendimplex.com.au
www.glendimplex.co.nz
For service advice, please contact the Customer Care Centre by phone or email below.
Australia
Ph: 1300 556 816
Ph: 09 274 8265
New Zealand
customer.care.ha@glendimplex.com.au nztechserv@glendimplex.co.nz

PROFESSIONAL SERIES
VERSION REVISION 20210514
- CONTENTS TABLE
- CONDITION OF USE
- SAFETY PRECAUTIONS WARNINGS FOR USE OF OVEN AND APPLIANCE HOB
- OTHER IMPORTANT SAFETY INFORMATION
- OVEN WARNINGS
- GAS BURNER WARNINGS
- DISPOSAL OF PACKAGING
- INSTALLATION CLEANING AND SERVICING
- PRODUCT DESCRIPTIONS
- DESCRIPTION OF GAS COOKER
- FIRST TIME USE OF THE APPLIANCE
- USING THE OVEN
- PREPARING YOUR APPLIANCE FOR THE FIRST TIME
- USING THE GAS OVEN
- USING THE OVEN OF YOUR GAS COOKER
- INSTALLATION AND REPLACEMENT OF IGNITION BATTERY
- BATTERY IGNITION CONTROL
- LIGHTING THE BURNER BY HAND
- ADJUSTING THE MINIMUM SETTING
- USING THE BURNERS
- BURNER SAFETY WARNINGS
- CERAMIC BURNERS
- CHOOSING COOKING POTS
- USING THE BURNERS OF YOUR GAS COOKER (THE HOB CONTROL KNOBS)
- INTRODUCTION TO THE BURNER
- BURNER IGNITION
- GET TO KNOW YOUR OVEN
- ADJUST THE OVEN BURNER
- CHANGING THE NOZZLE
- ADJUSTING THE OVEN BURNER PRIMARY AIR FLOW
- FITTING OVEN ACCESSORIES AND CLEANING
- SAFETY WARNINGS ABOUT CLEANING
- CLEANING THE ENAMEL
- CLEANING THE CONTROL PANEL
- CLEANING THE GAS HOB
- REMOVING THE TRIVETS (REFER FIGURE 1)
- REMOVING THE BURNERS (REFER FIGURE 2)
- REFITTING THE BURNER CROWNS AND CAPS
- CLEANING THE OVEN
- CLEANING THE OVEN DOOR / HOW TO REMOVE THE OVEN DOOR
- REMOVING THE INNER PANE OF GLASS
- CLEANING THE DOOR GLASS
- SOLVING PROBLEMS
- INSTALLING THE GAS COOKER
- UNPACKING
- LOCATING THE COOKER
- OVERHEAD CLEARANCES—(MEASUREMENT A)
- SIDE CLEARANCES—(MEASUREMENTS B, & C)
- ADDITIONAL REQUIREMENTS FOR FREESTANDING AND ELEVATED GAS COOKING APPLIANCES
- INSTALLATION OF THE ANTI-TILT PLATE
- GAS CONNECTION
- NATURAL GAS
- UNIVERSAL LPG
- CHECKING GAS SUPPLY
- FOR LPG COOKERS
- FOR NATURAL GAS COOKERS
- CHECKING THE FUNCTION OF THE REGULATOR
- TESTING THE COOKER FEATURES
- INSTALLING YOUR NEW COOKER TECHNICAL SPECIFICATIONS
- UNPACKING AND INSTALLATION INSTRUCTIONS FOR INSTALLER
- THE SPLASH BACK INSTALLATION
- MANUFACTURER GUARANTEE
- TECHNIKA PROFESSIONAL EXPRESS WARRANTY
- NOTE: WARRANTY PERIODS DETAILED ABOVE MAY VARY IN LINE WITH AGREEMENTS WITH SELECT RETAIL AND BUILDER PARTNERS AND MAY DIFFER BETWEEN AUSTRALIA AND NEW ZEALAND
- WARRANTY EXCLUSIONS
- CONSUMER GUARANTEES
- HOW TO MAKE A CLAIM
- WARRANTY CLAIMS
- GLEN DIMPLEX AUSTRALIA PTY LTD GLEN DIMPLEX NEW ZEALAND LTD
- AUSTRALIA
- READ THE INSTRUCTION BOOKLET BEFORE INSTALLING AND USING THE APPLIANCE
Brand : Technika
Model : TFS54FC-SGW
Category : Cooker