MCR-49FD - Refrigerator Maxx Cold - Free user manual and instructions
Find the device manual for free MCR-49FD Maxx Cold in PDF.


| Product Type | Refrigerator |
| Brand | Maxx Cold |
| Model | MCR-49FD |
| Energy Source | Electric (220-240V ~ 50Hz) |
| Power Consumption | 200 W (estimated) |
| Climate Class | N/ST (16°C - 38°C) |
| Total Gross Capacity | 350 L (approx.) |
| Defrost System | Automatic (frost-free) |
| Temperature Control | Mechanical thermostat |
| Shelves | Adjustable glass shelves |
| Door Storage | Multiple door bins |
| Crisper Drawers | 1 or 2 humidity-controlled drawers |
| Freezer Compartment | Yes, separate door (estimated 50 L) |
| Lighting | Interior LED light |
| Reversible Door | Yes |
| Dimensions (H x W x D) | 1800 x 700 x 700 mm (estimated) |
| Net Weight | 70 kg (estimated) |
| Noise Level | 42 dB (approx.) |
| Refrigerant | R600a |
| Cleaning Instructions | Wipe interior with warm water and mild detergent; avoid abrasive cleaners |
| Safety Feature | Child lock (optional) / grounding required |
| Spare Parts Availability | Shelves, door seals, thermostat, LED bulb via authorized service |
| Repairability Index | 8/10 (estimated) |
Frequently Asked Questions - MCR-49FD Maxx Cold
User questions about MCR-49FD Maxx Cold
0 question about this device. Answer the ones you know or ask your own.
Ask a new question about this device
Download the instructions for your Refrigerator in PDF format for free! Find your manual MCR-49FD - Maxx Cold and take your electronic device back in hand. On this page are published all the documents necessary for the use of your device. MCR-49FD by Maxx Cold.
USER MANUAL MCR-49FD Maxx Cold
Installation and Operation Guide For
MCF-49FD, MCF-23FD
MCR-49FD, MCR-23FD

natural_image
Exterior view of a modern stainless steel laboratory refrigerator with control panel and wheels (no visible text or symbols)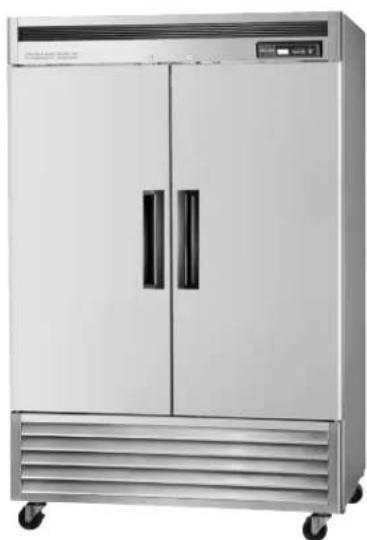
natural_image
Exterior view of a modern stainless steel multi-decker refrigerator with two doors and ventilation slots (no visible text or symbols)
CONTENTS
- SPECIFICATIONS 2
- SERIAL NUMBER 2
- INSTALLATION 3
- CLEANING 4
- CAUTION 4
- BASIC OPERATION
6-1. REFRIGERATOR 5 - 6
6-2. FREEZER 7 - 8 - REVERSIBLE DOOR ASSEMBLING METHOD 9-10
- TROUBLE SHOOTING GUIDE 11
SPECIFICATIONS
Solid Door Refrigerators
| MODEL COMP. | H.P REFRIGERANT AMPERAGE POUNDS | |||
| MCR-23FD 1/3 R- | 134a 420W 271 | |||
| MCR-49FD | 1/2 R-134a 570W | 370 | ||
Solid Door Freezers
| MODEL COMP. H.P REFRIGERANT AMPERAGE POUNDS | |||||
| MCF-23FD | 1/3 | R-134a 440W 284 | |||
| MCF-49FD | 1/2 | R-404A | 1340W | 403 | |
SERIAL NUMBER
The serial number is located on the rating label which is on the left interior wall. Please retain the unit's serial number for service purposes.
INSTALLATION
1. GOOD AIR CIRCULATION
- Be sure to avoid any object which will restrict exhausted air flow.
- Be sure that there is ample space so that air can flow through the rear of the unit.
- The back of the unit should be located no less than 5 inches from the wall.
2. PLACE ON STRONG GROUND
- Be sure the location chosen has a floor strong enough to support the total weight of the cabinet and contents.
3. DO NOT PLACE NEAR HEAT SOURCE
- Be sure to avoid hot corner or location near stove, oven, or other heat source.
- High ambient temperature will make cooling efficiency lower.
4. INDOOR USAGE ONLY
- This equipment is intended for indoor use only.
5. STABILIZING
- Make sure the unit is installed in a stable condition with the front wheels locked while in use.
6. LEVELING
- Be sure that the unit is level from front to back and side to side.
7. Unit should be on dedicated electrical circuit.
- Do not use extension cords
- Isolate the unit on an electrical circuit of proper size.
8. Place black plastic condensate pan thru back or front.
Make sure pads are installed upwards and drain hose is in pan.
CLEANING
1. CLEANING THE INTERIOR AND EXTERIOR
- The interior and exterior of the unit can be cleaned using warm water with soap.
- Do not use an abrasive cleaner because it will scratch the surface.
2. CLEANING THE CONDENSER FINS
- To maintain proper refrigeration performance, the Condenser coil must be free of dust, dirt, and grease.
It will require to clean it periodically. Condenser fins should be cleaned, at least every three months (90 days) or as needed.
3. CLEAN THE GASKET
- The door gasket should be cleaned frequently to maintain proper sealing. Use warm water and a mild soap.
4. CHECK AFTER CLEANING
- Check the unit again for safety.
- Check that the unit is operating properly.
CAUTION
1. POWER CORD
- Be sure the power cord is connected to the proper voltage.
- Compressor warranties are void if compressor burns out due to improper voltage.
- A protected circuit of the correct voltage and amperage must be run for connection of the line cord.
- Turn 'off' the power switch before disconnecting the power cord whenever performing maintenance functions or cleaning the refrigerated cabinet.
- If the power cord of Refrigerator (Freezer) is damaged, it must be replaced by the manufacturer or service agent or a similarly qualified person in order to avoid a hazard.
2. RE-STARTING
- If disconnected, wait 5 minutes before re-starting.
BASIC OPERATION
MCR-23FD MCR-49FD
REFRIGERATOR
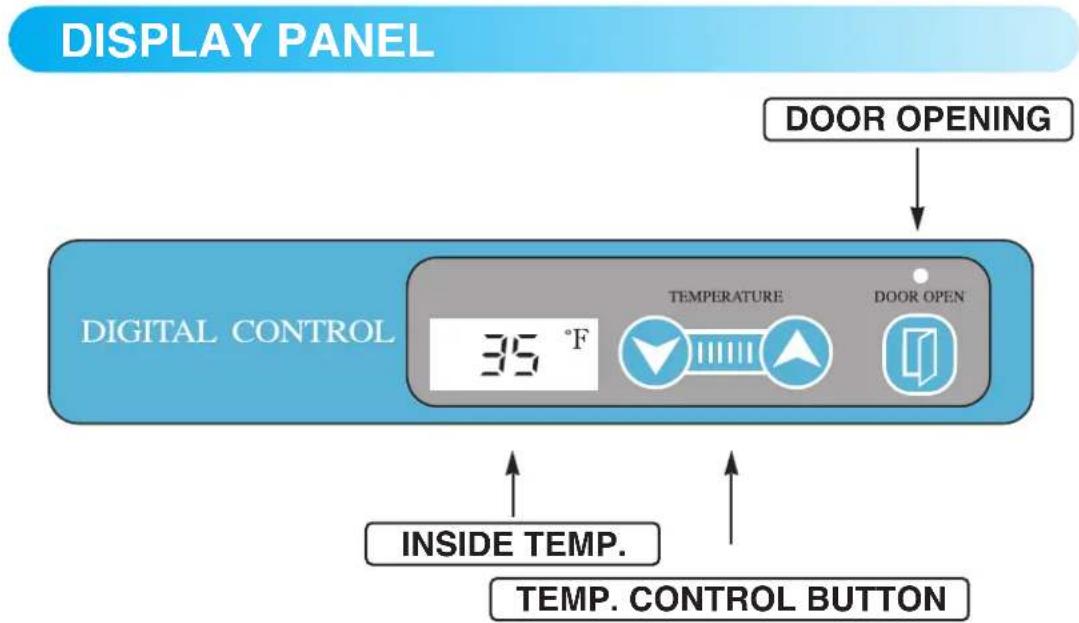
- Plug in and turn on the power switch located on the bottom of the top grill. The Display panel will be lighted. The compressor will begin to run.
- The default temperature setting is 35^ F (+1°C)
- The compressor is automatically cycled by the electronic controller (PCB).
- Temp. Control range 39°F \~ 28°F (+7°C \~ -3°C)
- The interior light is activated by the door switch when the door is opened.
- Evaporator fan motor(s) will run after all doors are completely closed.
flowchart
graph TD
    A["DISPLAY PANEL"] --> B["DIGITAL CONTROL"]
    B --> C["35 °F"]
    C --> D["TEMPERATURE"]
    D --> E["DOOR OPEN"]
    E --> F["DOOR OPENING"]
    G["INSIDE TEMP."] --> B
    H["TEMP. CONTROL BUTTON"] --> B
- UP / DOWN BUTTON (Temperature control button)
- By pushing the up/down button, you can set the inside temperature.
-
DOOR OPENING INDICATOR
-
If door is opened, door opening indicator will be turned on.
- If the door is left open for 5 minutes an alarm will sound continuously.
- The alarm will stop immediately upon closing the door.
BASIC OPERATION
MCF-23FD MCF-49FD
FREEZER
-
Plug in and turn on the power switch located on the bottom of the top grill. The Display panel will be lighted. The compressor will begin to run.
-
The default temperature setting is -2^ (-18°C)
-
The compressor is automatically cycled by the electronic controller (PCB, D-sensor).
-
The Defrost cycle is automatically controlled by the D-sensor and the PCB.
-
Temp. Control range 5^ F \~ -9^ F ( -3^ C \~ -24^ C)
-
The interior light is activated by the door switch at the bottom of the grill when the door is opened.
-
Evaporator fan motor(s) will run after all doors are completely closed.

flowchart
graph TD
    A["DISPLAY PANEL"] --> B["DOOR OPENING"]
    B --> C["DIGITAL CONTROL"]
    C --> D["TEMPERATURE"]
    C --> E["DOOR OPEN"]
    D --> F["INSIDE TEMP."]
    E --> G["TEMP. CONTROL BUTTON"]
- UP / DOWN BUTTON (Temperature control button)
- By pushing the up/down button, you can set the inside temperature.
- DEFROST
- The electronic defrost controller is set at the factory to provide a defrost cycle every 6 hours.
- Once all frost is eliminated, the defrost control is changed to the freezer mode.
- The panel displays " during the defrost.
- DOOR OPENING INDICATOR
- If door is opened, door opening indicator will be turned on.
- If the door is left open for 5 minutes an alarm will sound continuously.
- The alarm will stop immediately upon closing the door.
REVERSIBLE-DOOR ASSEMBLY METHOD
MODEL : MCF-23FD / MCR-23FD
- REMOVAL OF TOP GRILL and GRILL ASSEMBLY
1) Remove the TOP GRILL by removing securing screws.
Upper or downward located ① in the PICTURE (A)
2) Remove GRILL by removing securing screws. connected Left and right side located ② in the PICTURE (A)
# Caution : Disconnect power before reversing door, use caution with cares associated with electronic control.
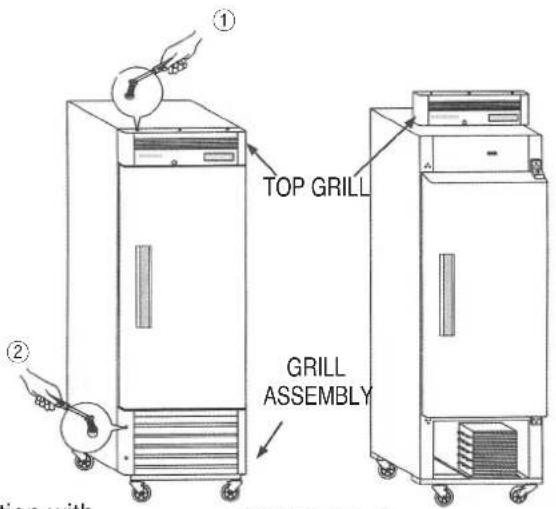
PICTURE A
- Taking apart of DOOR-ASSEMBLY
1) Follow steps ① \~ ⑩ in order at the PICTURE (B).
# Caution : Door is heavey hinges are strong loaded. Use appropriate care when removing door.
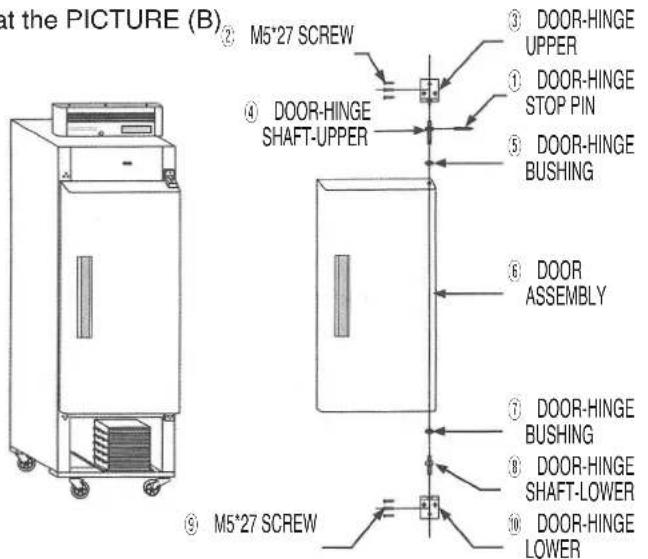
PICTURE B
3. Installation method of REVERSIBLE DOOR
1) After reversing 180 degree DOOR ASSEMBLY ⑥, locate the HANDLE in the
desired side.
2) Assemble in the following order.

PICTURE C
- After assembling ③②, assemble ④⑤
- Insert into ④ DOOR ASSEMBLY of ⑥
- After inserting ⑦⑧, secure ③⑨
- Insert reversible for suitable spring elasticity
# Attention : Securely tighten all fastners.
4. Installing TOP GRILL and GRILL ASSEMBLY
1) Install the screws at the location ① on the top and bottom of the top grill.
2) Install the screws at the location ② on the left and right side of the grill assembly.

PICTURE D
TROUBLE SHOOTING GUIDE
| SYMPTOMS CAUSES SOLUTIONS | ||
| Refrigerator/Freezer is freezing (thawing) food. | ● The Temp. is set too low (high) to maintain food freshness. | ● Push the button to a warmer (colder) position. |
| The unit does not refrigerate at all. | ● There is a power connection failure problem. | ● Check the power cord to make sure the unit is plugged in correctly. |
| The unit does not refrigerate well. | ● The unit is in sunlight or near a heating device.● The unit contains hot food or too much food.● The unit door is opened too frequently or left open too long.● The temp. Is not set on the correct position.● The condenser is clogged. | ● Check the installation place.● Check the condition of stored food.● Check the position of the temperature setted.● Clean condenser. |
| There is a loud noise. | ● The floor is too weak or the unit is not level.● The back-side of the unit is too close to the wall.● The tray is not in the correct position. | ● Check the installation and adjust the tray position. |
| There is condensation in the unit exterior. | ● High-moisture air can produce dew-drops during high condensation humidity. | ● Wipe with a dry cloth. |
| There is condensation the unit interior. | ● The door is opened too frequently or left open too long.● Damp food is stored. | ● Keep the door closed to remove condensation. |
| The door does not close tightly. | ● The door is bent.● The door gasket has come out.● The unit is not level. | ● Reposition the gasket.● Level the unit again. |
MEMO
MEMO
MEMO
MAXX COLD
3355 Enterprise Ave. Suite 160
Ft. Lauderdale, FL 33331
Tel: (954) 202-7419
Fax: (954) 202-7337
www.asburyfoodservice.com
WARRANTY AND TECHNICAL SERVICE
Warranty and Service Parts
Toll free: 1-888-464-WASP
Fax: 414-774-2410
24 hours a day, 7 days a week
- CONTENTS
- SPECIFICATIONS
- SERIAL NUMBER
- INSTALLATION
- GOOD AIR CIRCULATION
- PLACE ON STRONG GROUND
- DO NOT PLACE NEAR HEAT SOURCE
- INDOOR USAGE ONLY
- STABILIZING
- LEVELING
- Unit should be on dedicated electrical circuit.
- Place black plastic condensate pan thru back or front.
- CLEANING
- CLEANING THE INTERIOR AND EXTERIOR
- CLEANING THE CONDENSER FINS
- CLEAN THE GASKET
- CHECK AFTER CLEANING
- CAUTION
- POWER CORD
- RE-STARTING
- BASIC OPERATION
- REFRIGERATOR
- FREEZER
- REVERSIBLE-DOOR ASSEMBLY METHOD
- Installation method of REVERSIBLE DOOR
- Installing TOP GRILL and GRILL ASSEMBLY
- TROUBLE SHOOTING GUIDE
- MEMO
- MAXX COLD
Brand : Maxx Cold
Model : MCR-49FD
Category : Refrigerator