
DPO-18-DD - Pizza oven Avantco - Free user manual and instructions
Find the device manual for free DPO-18-DD Avantco in PDF.


| Product Type | Commercial Countertop Pizza Oven |
| Model Number | DPO-18-DD (177DPO18DD) |
| Brand | Avantco Equipment |
| Configuration | Double Deck |
| Oven Cavity | Two independent decks, each with 18" x 18" cordierite stone |
| Temperature Range | 150°F to over 800°F |
| Temperature Control | Dial knob with separate gauge |
| Timer | Manual timer up to 30 minutes (does not turn oven on/off) |
| Heating Elements | Top and bottom elements, individually switchable for each deck |
| Power & Light Controls | Main power/light switch per deck |
| Interior Light | Replaceable bulb with heat-proof cover |
| Door | Tempered glass with heavy-duty handle |
| Ventilation | Rear exhaust vent directing heat away from walls |
| Legs | 4 adjustable legs, packed separately |
| Power Cord | NEMA 5-15P 3-prong plug |
| Electrical Rating | 120V / 15A (typical for commercial ovens) |
| Dimensions (Approx.) | 36" wide x 30" deep x 24" high (double deck) |
| Weight (Approx.) | 150 lbs |
| Construction Material | Stainless steel exterior, cordierite baking deck |
| Available Accessories | 1" thick cordierite deck (optional) |
| Cleaning | Use damp cloth; do not use water on deck; use stainless steel cleaner for exterior |
| Safety Features | Automatic temperature limiter; cool-down before cleaning required |
| Warranty | Refer to manual for details |
| Country of Origin | Imported (specific origin not stated) |
Frequently Asked Questions - DPO-18-DD Avantco
User questions about DPO-18-DD Avantco
0 question about this device. Answer the ones you know or ask your own.
Ask a new question about this device
Download the instructions for your Pizza oven in PDF format for free! Find your manual DPO-18-DD - Avantco and take your electronic device back in hand. On this page are published all the documents necessary for the use of your device. DPO-18-DD by Avantco.
USER MANUAL DPO-18-DD Avantco
natural_image
Line drawing of a Avantco microwave oven with control knobs and a door (no text or symbols on the device itself)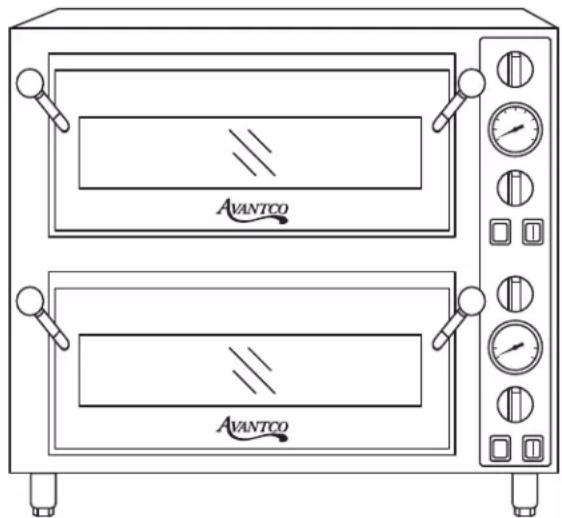
natural_image
Line drawing of a two-tiered oven with Avantco branding, no text or symbols present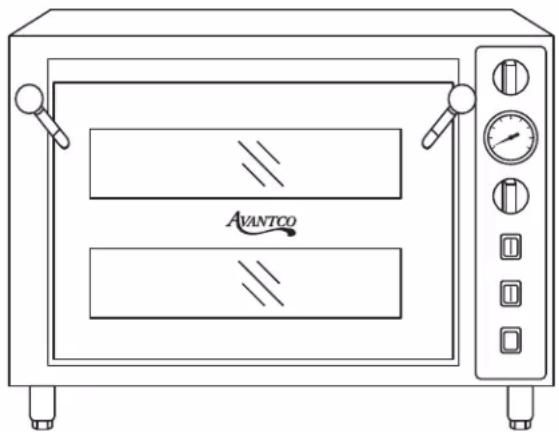
natural_image
Line drawing of a two-tiered oven with control panel and door (no text or symbols)Countertop Single & Double Deck Pizza Ovens


Intertek
40104834010483
Model: 177DPO18S, 177DPO18DS, 177DPO18DD
12/2022
Please read and keep these instructions. Indoor use only.
User Manual
AVANTCO ^EQUIPMENT
Index
Important Safety Information .... 3
Precautions for Usage.... 3
Oven Installation 4
Cordierite Deck Installation 4
Before Using Your Oven....5
Use & Care 5
Baking Instructions & Tips 6
Product Diagram (177DPO18S).... 7
Exploded Parts Diagram (177DPO18S).... 8
Product Diagram (177DPO18DD) 9
Exploded Parts Diagram (177DPO18DD) 10
Product Diagram (177DPO18DS)....11
Exploded Parts Diagram (177DPO18DS).... 12
Warranty Information 13
Introduction
The Avantco Equipment Countertop Deck Pizza Oven duplicates the ideal baking environment of traditional Italian brick pizza ovens. Cordierite pizza deck measures 18" x 18" and can accommodate large pies while maintaining consistent temperatures to ensure that pizza cooks from the bottom as well as the top. A major benefit of a pizza stone over a pizza pan is the way that the cordierite stone drives moisture away from the crust, resulting in extra crispness.
Adjustable temperature control from 150^ F to over 800^ F allows you to cook a wider variety of items, and bakes pizza fast whether using fresh, frozen, or par-baked dough. Pizza oven controls are designed for simplicity, with quick-touch switches and indicator lights for Power, Interior Oven Light, and Top and Bottom Elements. Superior heat technology ensures quick heat-up and recovery for consistent oven temperatures that guarantee great results.
IMPORTANT SAFETY INFORMATION
This manual contains important information regarding safe operation of your Avantco snack oven. Please read thoroughly before equipment setup, operation, or maintenance. Failure to comply with regular maintenance guidelines outlined in this manual may void the warranty!
NOTE: Save these instructions for future reference.
Precautions for Usage
- To protect against electrical hazards, do not immerse oven in water or other liquids.
- NEVER clean with water jets, which can result in critical bodily injury or death.
- DO NOT USE if cord or plug is damaged or if machine has malfunctioned, been dropped, or damaged. Return appliance to the nearest authorized service facility for examination, repair, or electrical or mechanical adjustment.
• DO NOT use outdoors. - DO NOT let cord hang over edge of table or counter, or touch hot surfaces.
- Improper installation or use can result in electrical shock, injury, or damage to your oven or property.
- Your pizza oven is a heavy-duty appliance designed for commercial use and intended to be operated by trained professionals only.
- To prevent risk of fire, oven should be installed in a noncombustible environment. Any combustible materials must be at least 18 inches away from the sides, front, and back of the oven and at least 40 inches from top.
- Oven must be thoroughly cleaned before first use and after all uses (see USE AND CARE).
- ALWAYS be sure to disconnect oven from power source when not in use and before cleaning or servicing.
- ALWAYS allow oven to cool before moving or servicing. Surfaces are hot during use and remain hot for a while, even after power is off.
- DO NOT allow insertion of any foreign object into any ventilation or exhaust opening; this can cause electric shock, fire, or damage to the oven.
- NEVER block air intakes or exhaust openings, or use on cushioned surfaces where blockage may occur.
- This appliance is not intended for use by persons (including children) with reduced physical sensory or mental capabilities, or lack of experience and knowledge, unless they have been given supervision or instruction concerning use of the appliance by a person responsible for their safety.
- Extreme caution should be exercised when using containers constructed of the following materials in the oven: paper, cardboard, plastic, or similar products.
Oven Installation
- After removing the outer shipping carton and packaging material, place the oven on the floor or other flat surface.
- Open oven and remove any instructions or packaging material shipped in the unit.
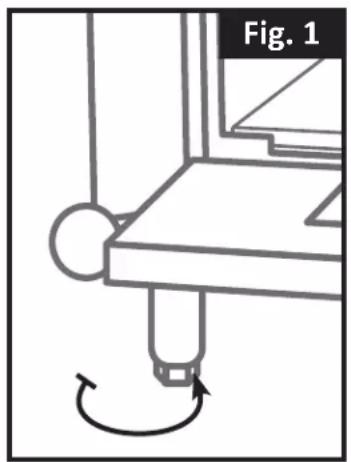
- With sufficient help, lift up the front of the oven and attach the two front legs (packed separately in styrofoam), carefully twisting each one into a corner and hand-tightening. Lift the back of the oven approximately 5 inches and block into position using a piece of wood or other solid object. Then, attach the two back legs and hand tighten.
- Move the oven to its final location. Adjust the bottom portion of the legs to level the unit. (Fig. 1)
Cordierite Deck Installation
NOTE: New deck must be conditioned (pre-dried) prior to first use.
- Handling the Cordierite Deck: If deck is struck against hard surface before, during, or after installation, it can develop a full or hairline crack which may expand over time and require you to replace it.
- Conditioning the Deck: Pre-dry cordierite deck by carefully following instructions in the following section BEFORE USING YOUR PIZZA OVEN.
NOTE: Failure to follow conditioning instructions will cause deck to crack or warp and will void warranty.
- Installing the Deck: Open the oven door and place cordierite pizza deck into the bottom with the slots on front of deck facing front of oven. Be sure the deck is firmly set in place. DO NOT force or wedge it. (Fig. 2)
natural_image
Diagram of a mechanical device with a rotating shaft and base, labeled Fig. 1 (no text or symbols on the diagram itself)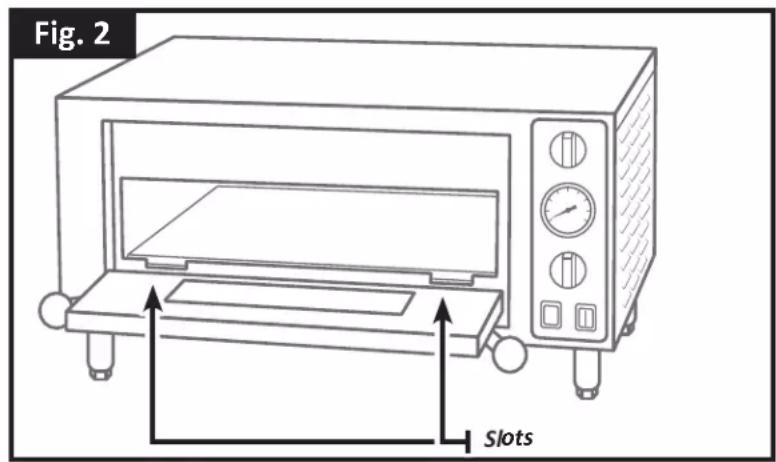
Before Using Your Pizza Oven
- Place oven in a well ventilated area to burn off any residual dust from manufacturing.
- Plug unit in, open door and set Temperature Control to 400^ F ( 205^ C). After one hour, close door and increase temperature to 500^ F ( 260^ C) for at least 112 hours.
NOTE: The oven may emit an odor during this process; this is normal and not harmful, and should quickly dissipate.
-
Turn off the oven and allow it to cool completely. Remove any smoke residue from the interior with a dry cloth.
-
Place clean, cool oven in the area where it will be used. Be sure there is at least 6 inches of clearance between sides and top of oven and any wall or cabinet.
-
Check to ensure nothing is blocking the exhaust vent on back of unit.
Use & Care
NOTE: Daily cleaning is suggested to keep oven performing its best.
CAUTION: ALLOW OVEN TO COOL COMPLETELY BEFORE CLEANING.
CAUTION: ALWAYS UNPLUG THE OVEN FROM THE POWER SOURCE.
CAUTION: DO NOT USE ANY SHARP OR HARD KITCHEN UTENSILS AS THIS COULD DAMAGE THE SURFACE OF THE OVEN.
- When opening oven door, be sure to guide the door while lowering it. Doing so will prevent possible damage to the door jamb after an extended period of time.
- Remove cordierite deck from cool oven.
- With a deck brush, scrape off hardened spillage.
- To clean heavily soiled decks, return deck to oven and run at highest temperature in a well-ventilated area for 12 hour. When oven and deck are cool, remove deck and brush off residue.
NOTE: Never use high-abrasion brushing or water to clean deck, or immerse or let any water or any other liquids come into contact with the cordierite deck. Any of these can cause deck to crack.
- Wipe interior of oven with damp cloth, avoiding heating elements.
- When cleaning exterior, use stainless steel cleaner and wipe in the direction of the grain.
- To clean the glass door, use a glass cleaner or damp cloth and dry with clean cloth.
Baking Instructions
NOTE: Only pizza and breads can be placed directly on the pizza deck. All other food items must be put onto a tray or into a container rated for high temperature use.
NOTE: The pizza oven can be used to cook fresh products. Cooking time will vary depending on the consistency and weight of the product. THIS OVEN NOT RECOMMENDED FOR THAWING OR COOKING FROZEN FOOD.
- Set the Temperature Control Knob to the desired temperature to preheat oven. Watch the Temperature Gauge; when it reaches the temperature selected, the oven is ready to use.
- The temperature range for baking fresh pizza is usually between 500^ (260°C) and 575^ (300°C), depending on the individual product.
We recommend to cook pizzas at 525^ F for 4-6 minutes each for proper leoparding on the crusts, but individual results may vary depending on a variety of factors including, but not limited to: pizza diameter, thickness, environment, etc.
- If you choose to cook frozen foods in this oven, do not place frozen foods directly on the stone. Always place on a pizza pan or sheet pan to avoid damage to the cordierite stone. Cracking or damage to the pizza stone caused by use of frozen product is not covered under warranty.
- Bake pizza until the cheese bubbles and the bottom is evenly browned, rotating it during the baking process if necessary.
- Open and close door quickly when putting pizza in oven to prevent heat from escaping, which can slow down cooking time.
Baking Tips
- Be sure cordierite pizza deck is dry. Wet spots or spills will cause food to stick.
- Never season the cordierite pizza deck with any type of baking oil.
- Scrape off burnt residue from pizza deck daily with a deck brush. Buildup can cause an "off" flavor and increase bake time.
- Frozen items cannot be placed directly on hot deck to thaw. Place food onto a screen or into a pan.
- Increase temperature during heavy production times to maintain ideal baking temperature. Be sure to decrease it when rush slows to prevent burning.
- Pizza with heavy toppings requires a lower temperature and longer baking time.
- If toppings need more time to cook, a piece of screen placed under pizza can prevent bottom from overcooking.
Product Diagram (177DPO18S)
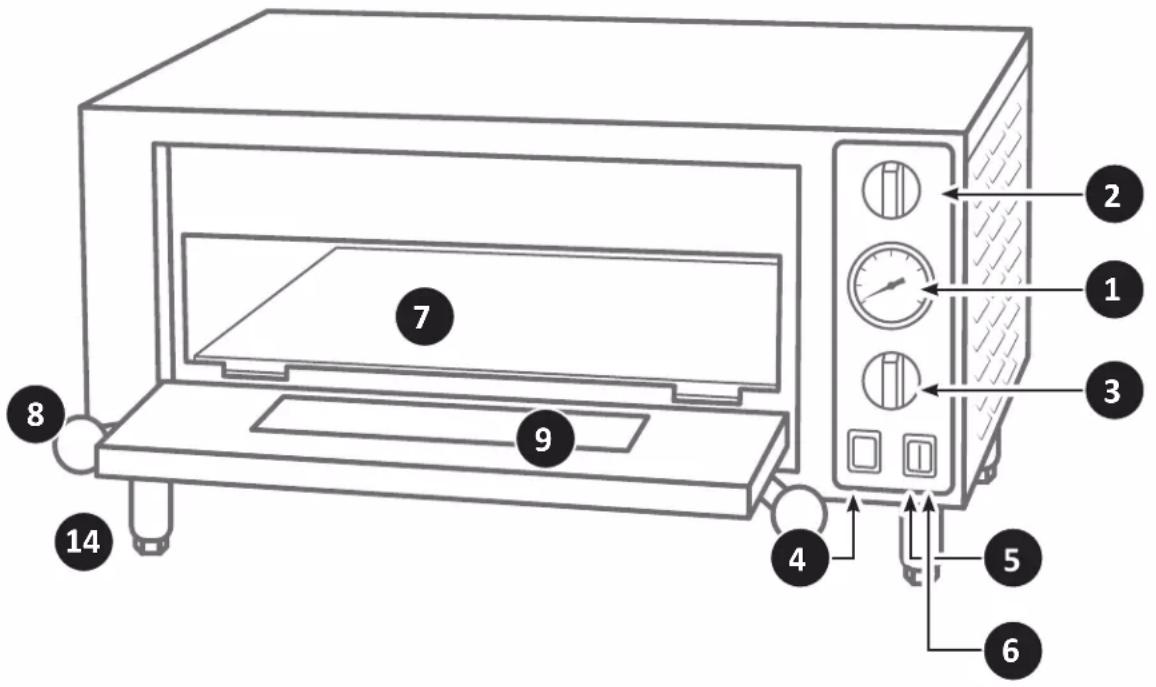
| # PART DESCRIPTION | ||
| 1 | Temperature Gauge | Visual monitor of oven temperature. |
| 2 | Manual Timer (minutes) | Timer with chime can be set up to 30 minutes.Note: Timer DOES NOT turn oven on/off. |
| 3 | Temperature Control Knob | Simple dial knob to select temperature. |
| 4 | Main Power & Light On/Off Switch | Master switch turns the unit and interior light on simultaneously. |
| 5 | Top Element On/Off Switch | Turn off for items that do not require full direct top heat. |
| 6 | Bottom Element On/Off Switch | Turn off for items that do not require full direct bottom heat. |
| 7 | 12 " Cordierite Pizza Deck (packed separately) | 18" x 18" maintains temperature and ensures even cooking.Pizza or bread can be placed directly on the deck.Optional 1" cordierite pizza deck available for even better heat retention. |
| 8 | Door Handle | Heavy-duty, easy-to-grip design. |
| 9 | Tempered Glass Door | Allows visual monitoring of cooking process. |
| 10 | Interior Light (not shown) | Replaceable bulb, removable heat-proof glass bulb cover. |
| 11 | Top Heating Element (not shown) | Ideal for top browning; turn off when top heat is not required. |
| 12 | Bottom Heating Element (not shown) | Sits directly below pizza deck; turn off when bottom heat is not required. |
| 13 | Rear Exhaust Vent (not shown) | Directs exhaust to the side of the unit and away from walls. |
| 14 | Adjustable Legs (packed separately) | 4 legs that must be attached to oven before use. |
| 15 | Power Cord (not shown) | With NEMA 5-15P 3-prong plug. |
User Manual
Exploded Parts Diagram (177DPO18S)
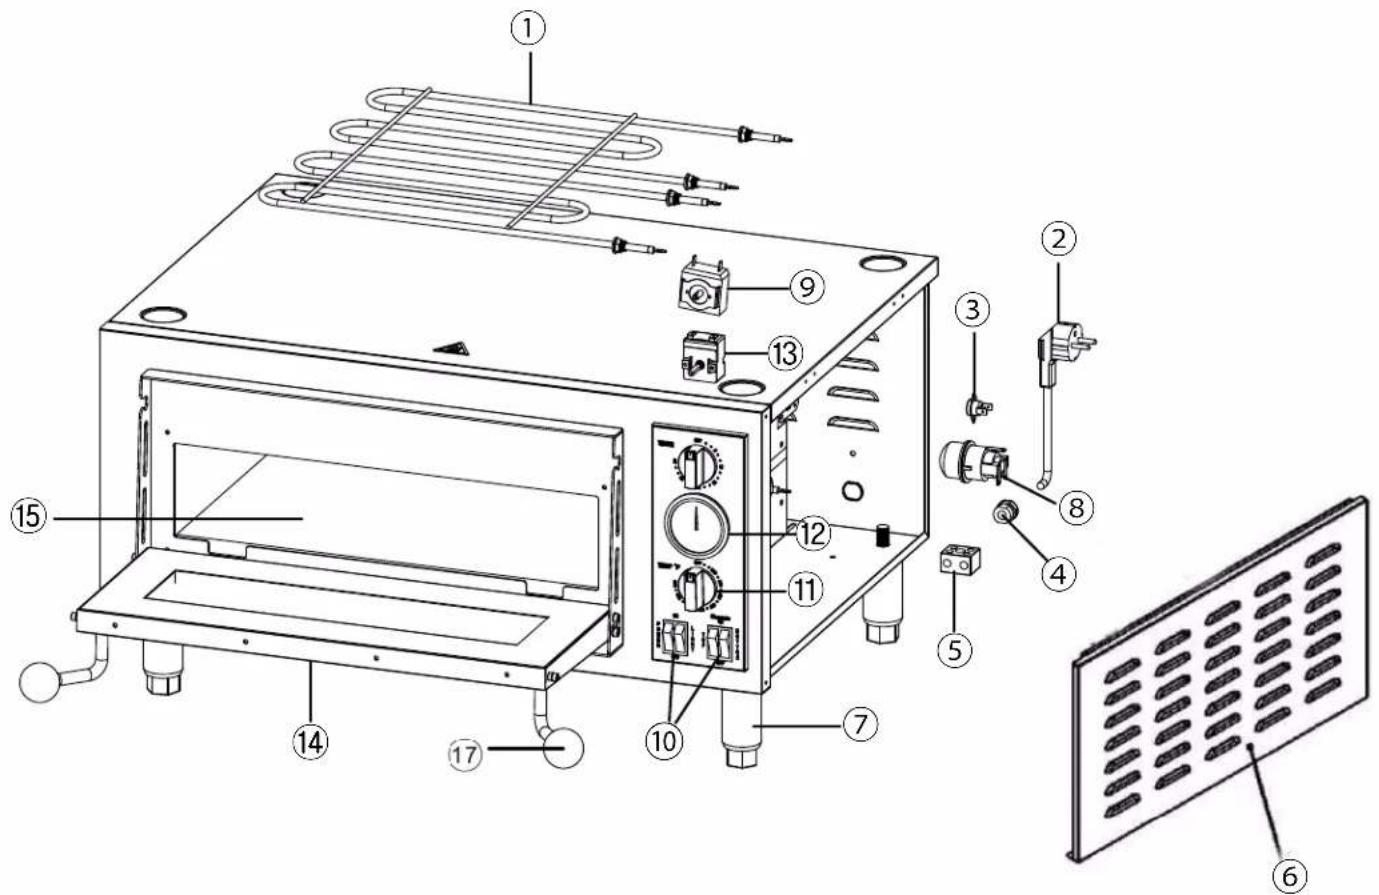
| # ITEM # DESCRIPTION | |
| 1 177DPO18S1 | Heating Element Set |
| 2 177DPO18S2 | Power cord |
| 3 177DPO18S3 | Temperature limiter |
| 4 N/S | Power Cord Buckle |
| 5 177DPO185 | Cordierite Terminal |
| 6 N/S | Side Panels |
| 7 177DPO187 | Adjustable Foot |
| 8 177DPO18S8 | Internal light |
| 9 177DPO189 | Mechanical Timer |
| # ITEM # DESCRIPTION | ||
| 10 177DPO18DS10 Dual Switch Covered | ||
| 11 177DPO1812 Knob | ||
| 12 177DPO1813 Thermometer | ||
| 13 177DPO1814 Thermostat | ||
| 14 177DPO18S15 Door Assembly | ||
| 15a | 177DPO1816 | 1/2" Pizza Stone |
| 15b | 177DPO1817 | 1" Pizza Stone |
| 17 N/S Ball Handle | ||
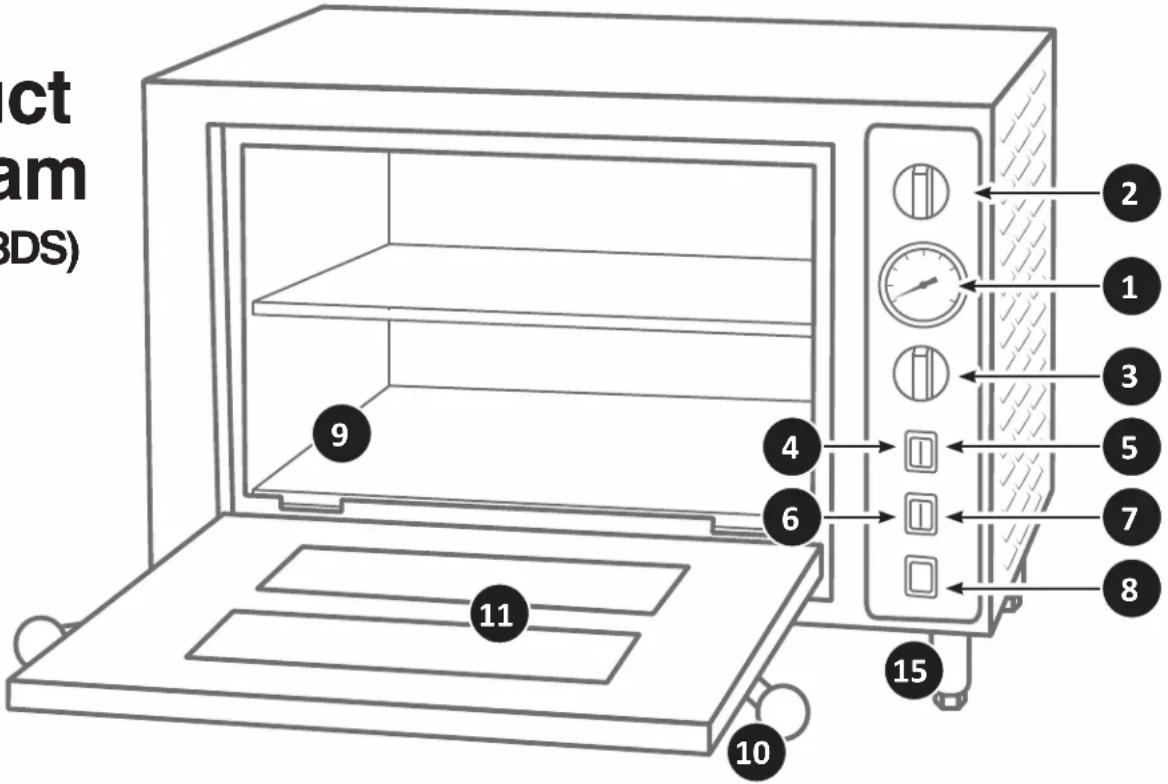
Product Diagram (177DPO18DD)
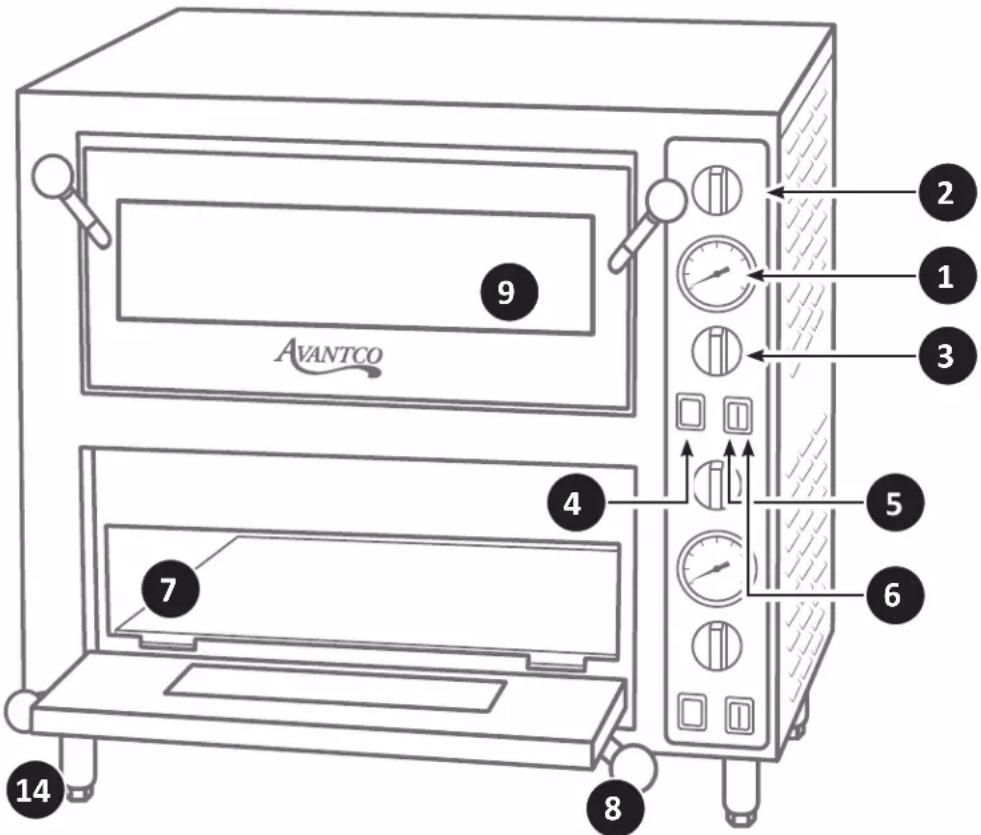
| # PART DESCRIPTION | ||
| 1 | Temperature Gauge | Visual monitor of oven temperature. |
| 2 | Manual Timer (minutes) | Timer with chime can be set up to 30 minutes.Note: Timer DOES NOT turn oven on/off. |
| 3 | Temperature Control Knob | Simple dial knob to select temperature. |
| 4 | Main Power & Light On/Off Switch | Master switch turns the unit and interior light on simultaneously. |
| 5 | Top Element On/Off Switch | Turn off for items that do not require full direct top heat. |
| 6 | Bottom Element On/Off Switch | Turn off for items that do not require full direct bottom heat. |
| 7 | 12 " Cordierite Pizza Deck (packed separately) | 18" x 18" maintains temperature and ensures even cooking.Pizza or bread can be placed directly on the deck.Optional 1" cordierite pizza deck available for even better heat retention. |
| 8 | Door Handle | Heavy-duty, easy-to-grip design. |
| 9 | Tempered Glass Door | Allows visual monitoring of cooking process. |
| 10 | Interior Light (not shown) | Replaceable bulb, removable heat-proof glass bulb cover. |
| 11 | Top Heating Element (not shown) | Ideal for top browning; turn off when top heat is not required. |
| 12 | Bottom Heating Element (not shown) | Sits directly below pizza deck; turn off when bottom heat is not required. |
| 13 | Rear Exhaust Vent (not shown) | Directs exhaust to the side of the unit and away from walls. |
| 14 | Adjustable Legs (packed separately) | 4 legs that must be attached to oven before use. |
| 15 | Power Cord (not shown) | With NEMA 5-15P 3-prong plug. |
User Manual
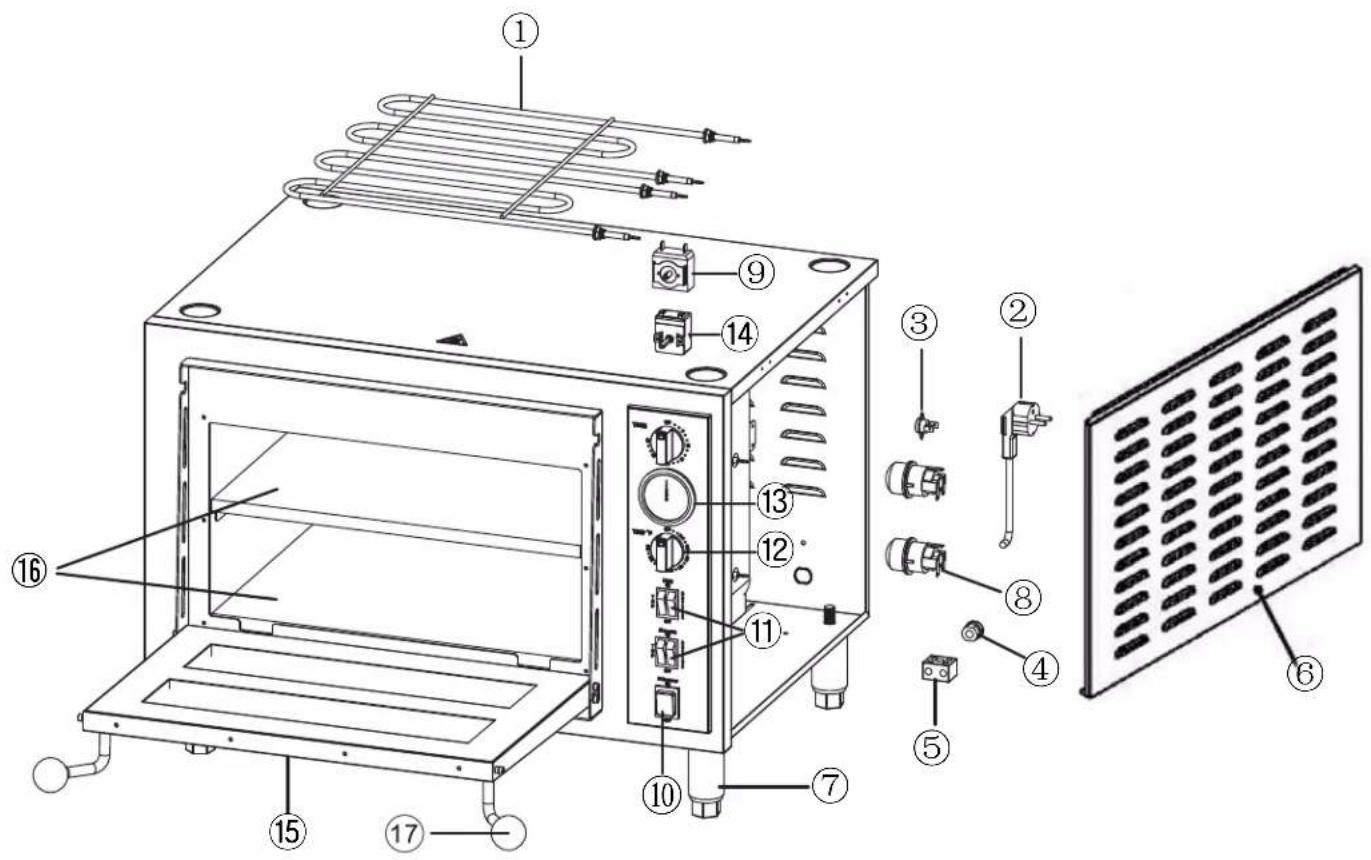
Exploded Parts Diagram (177DPO18DD)
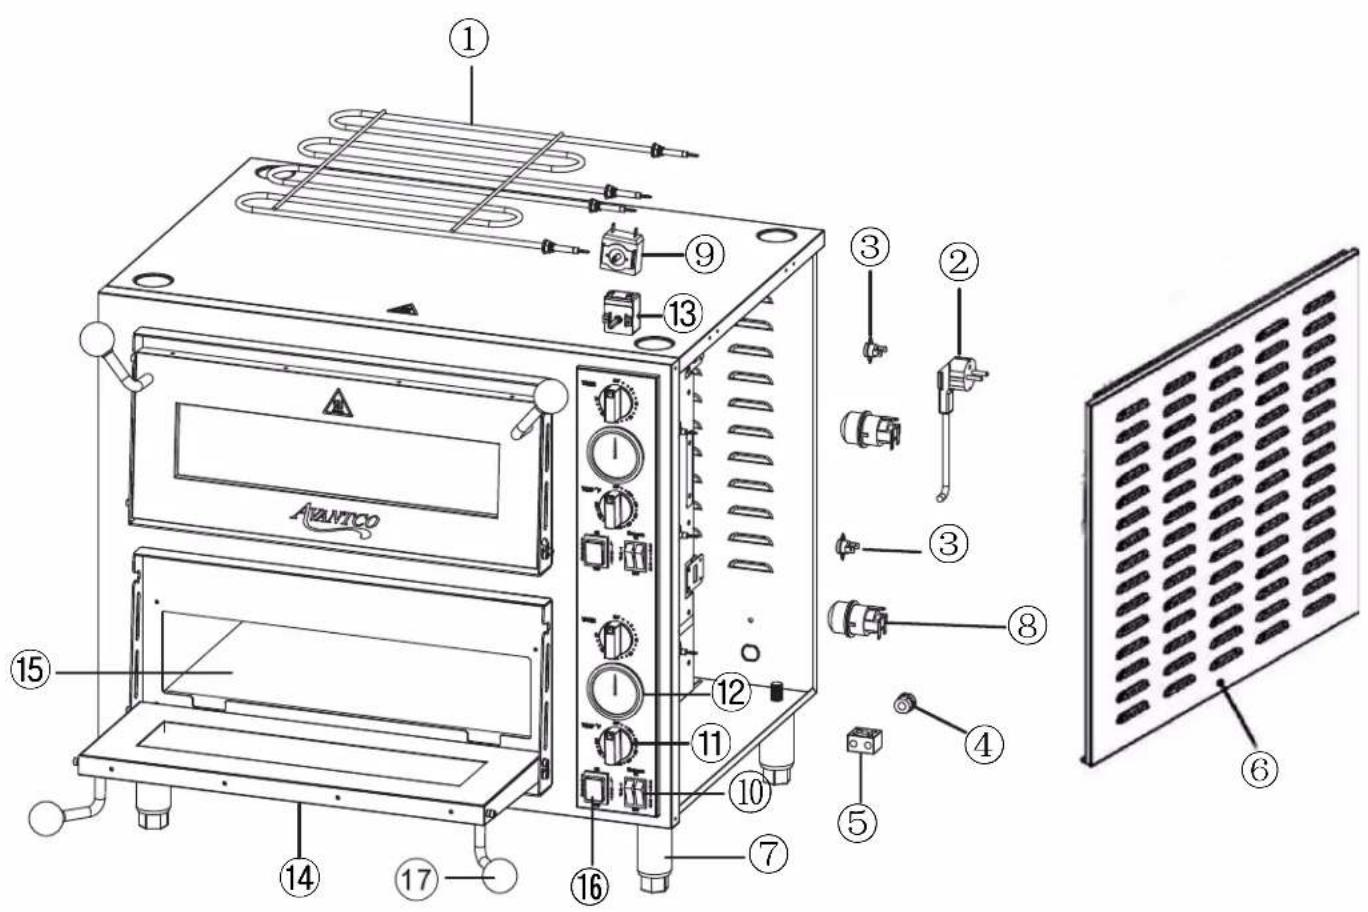
| # ITEM # DESCRIPTION |
| 1 177DPO18DD1 Heating Element Set |
| 2 177DPO18DS2 Power cord |
| 3 177DPO18DS3 Temperature limiter |
| 4 N/S Power Cord Buckle |
| 5 177DPO185 Cordiente Terminal |
| 6 N/S Side Panels |
| 7 177DPO187 Adjustable Foot |
| 8 177DPO18DS8 Internal light |
| 9 177DPO189 Mechanical Timer |
| # ITEM # DESCRIPTION | ||
| 10 177DPO18DS10 | Dual Switch Covered | |
| 11 177DPO1812 | Khob | |
| 12 177DPO1813 | Thermometer | |
| 13 177DPO1814 | Thermostat | |
| 14 177PDPOS15N | Door Assembly | |
| 15 177DPO1816 | 1/2" Pizza Stone | |
| 16 177DPO1811 | Main Power/Light Switch | |
| 17 N/S | Ball Handle | |
Product Diagram (177DPO18DS)
| # PART DESCRIPTION | ||
| 1 | Temperature Gauge | Visual monitor of oven temperature. |
| 2 | Manual Timer (minutes) | Timer with chime can be set up to 30 minutes.Note: Timer DOES NOT turn oven on/off. |
| 3 | Temperature Control Knob | Simple dial knob to select temperature. |
| 4 | Top Oven Light On/Off Switch | Turns top oven interior lights on/off. |
| 5 | Bottom Oven Light On/Off Switch | Turns top oven interior lights on/off. |
| 6 | Top Heating Element On/Off Switch | Turn off for items that do not require full direct top heat. |
| 7 | Bottom Heating Element On/Off Switch | Turn off for items that do not require full direct bottom heat. |
| 8 | Main Power On/Off Switch | Main power control for oven. |
| 9 | 12 " Cordierite Pizza Decks (packed separately) | 18" x 18" maintains temperature and ensures even cooking.Pizza or bread can be placed directly on the deck.Optional 1" cordierite pizza deck available for even better heat retention. |
| 10 | Door Handle | Heavy-duty, easy-to-grip design. |
| 11 | Tempered Glass Doors | Allows visual monitoring of cooking process. |
| 12 | Interior Light (not shown) | Replaceable bulb, removable heat-proof glass bulb cover. |
| 13 | Top Heating Element (not shown) | Ideal for top browning; turn off when top heat is not required. |
| 14 | Bottom Heating Element (not shown) | Sits directly below pizza deck; turn off when bottom heat is not required. |
| 15 | Rear Exhaust Vent (not shown) | Directs exhaust to the side of the unit and away from walls. |
| 16 | Adjustable Legs (packed separately) | 4 legs that must be attached to oven before use. |
| 17 | Power Cord (not shown) | With NEMA 5-15P 3-prong plug. |
Exploded Parts Diagram (177DPO18DS)
| # ITEM # DESCRIPTION |
| 1 177DPO18DS1 Heating Element Set |
| 2 177DPO18DS2 Power cord |
| 3 177DPO18DS3 Temperature limiter |
| 4 N/S Power Cord Buckle |
| 5 177DPO185 Cordiente Terminal |
| 6 N/S Side Panels |
| 7 177DPO187 Adjustable Foot |
| 8 177DPO18DS8 Internal light |
| 9 177DPO189 Mechanical Timer |
| # ITEM # DESCRIPTION | ||
| 10 1 | 77DPO1811 Power Switch | |
| 11 1 | 77DPO18DS10 Dual Switch Covered | |
| 12 1 | 77DPO1812 Knob | |
| 13 1 | 77DPO1813 Thermometer | |
| 14 1 | 77DPO1814 Thermostat | |
| 15 1 | 77DPO18S15 Door Assembly | |
| 16a | 177DPO1816 1/2" Pizza Stone | |
| 16b | 177DPO1817 1" Pizza Stone | |
| 17 N/S Ball Handle | ||
- Countertop Single & Double Deck Pizza Ovens
- User Manual
- AVANTCO EQUIPMENT
- Index
- Introduction
- IMPORTANT SAFETY INFORMATION
- NOTE: Save these instructions for future reference.
- Precautions for Usage
- Oven Installation
- Cordierite Deck Installation
- Before Using Your Pizza Oven
- Use & Care
- Baking Instructions
- Baking Tips
- Product Diagram (177DPO18DD)
- Product Diagram (177DPO18DS)
- Exploded Parts Diagram (177DPO18DS)
Brand : Avantco
Model : DPO-18-DD
Category : Pizza oven