
SL713A - Cutting machine Avantco - Free user manual and instructions
Find the device manual for free SL713A Avantco in PDF.


| Product Type | Commercial Meat Slicer |
| Model | SL713A |
| Brand | Avantco |
| Blade Diameter | 13 inches |
| Blade Material | Stainless Steel |
| Cutting Thickness | 0 to 1/2 inch, adjustable |
| Motor Power | 1/2 HP (approx.) |
| Voltage | 120V / 60Hz / 1PH |
| Dimensions (W x D x H) | 20 x 15 x 15 inches (approx.) |
| Net Weight | 30 lbs (approx.) |
| Carriage Travel | 11 inches |
| Food Pusher | Included |
| Sharpener | Built-in sharpener |
| Base Material | Anodized Aluminum |
| Blade Cover | Removable for cleaning |
| Safety Features | On/Off switch with safety guard |
| Cleaning | Disassemble blade and carriage for hand washing |
| Spare Parts Availability | Blades, belts, sharpeners available from Avantco |
Frequently Asked Questions - SL713A Avantco
User questions about SL713A Avantco
0 question about this device. Answer the ones you know or ask your own.
Ask a new question about this device
Download the instructions for your Cutting machine in PDF format for free! Find your manual SL713A - Avantco and take your electronic device back in hand. On this page are published all the documents necessary for the use of your device. SL713A by Avantco.
USER MANUAL SL713A Avantco
natural_image
Industrial cutting machine with mechanical arms and control panel (no visible text or symbols)
Intertek

Intertek
Meat Slicer Instruction Manual
Models: 177SL612A, 177SL713A
02/2022
Please read and keep these instructions. Indoor use only.
User Manual
Unpacking:
Unpack the product and check for any damage incurred during transit. This should be reported to the responsible carrier, railway or postal authority, and a request for a damage report should be made.

These instructions must be followed for us to guarantee our full support of your claim for protecting against loss from concealed damage. The form for filing such a claim will be provided by the carrier.
General Installation And Operation
Instructions:
The Avantco Auto/Manual slicer is a medium duty electrically driven appliance. The unit has been designed to meet the highest safety and hygiene standards. The robust aluminum construction and powerful drive motors ensure long and reliable operation and use.
- Place the unit in the desired location with the on/off switch facing the operator. DO NOT plug the unit in at this point. The supporting table should be stable and at the correct working height. The work surface should be in a dry location and preferably away from heavy traffic areas.
- Clean the unit with a DAMP cloth using a neutral P.H. dish detergent. Wipe and dry the machine. (See Cleaning instructions on page 3 of this manual.

Cut through the greasiest dishes, glassware, cutlery, pots, and pans with Sunbright pot and pan dishwashing liquid. This heavy-duty pot and pan dishwashing liquid was specially designed for the institutional environment with its super concentrated, high active, high sudsing formula. Available in 32 oz. bottles (12/case) or 5 gallon bulk supply.
- Set the thickness of slice required using the control knob adjacent to the on/off switch.
- The meat support platform should be in the start position that is close to the operator. Lift up the food pusher; place the meat to be sliced on the support platform against the raw edge. Return the food pusher to its original position now on top of the meat to be sliced.
- The unit can be operated in either MANUAL or AUTO feed modes.
5.1 MANUAL MODE
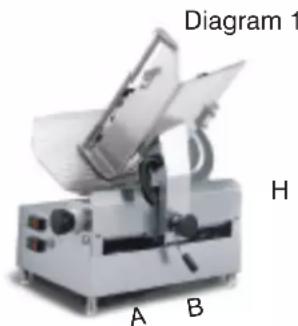
Ensure the control lever H in diagram 1 is position A. This handle disengages auto feed function.
Switch on the blade motor only and using the handle on the food pusher, push the carriage back and forth to begin cutting the food.
5.1 AUTO FEED MODE
Ensure the control lever H in diagram 1 is in position B. This handle engages the auto feed function.
Switch on the blade motor first and then the auto feed motor. The unit will now automatically cut the meat oaded.
natural_image
Diagram of a scientific instrument labeled A, B, and H, showing its screen and base components (no readable text or symbols beyond labels)- After you are finished cutting, turn off machine and collect the product slices in the exit area.
User Manual
Safety
- The units are designed to operate an alternating current (A.C) only. DO NOT CONNECT TO DIRECT CURRENT (D.C).
- Please ensure that the power supply cord does not come into contact with hot surfaces.
- If the supply cord is damaged, it must be replaced with a new cord assembly. (Available from the suppliers agent.)
- The appliance must only be used for its intended purpose.
- It is strongly suggested that the operators of this machine wear close fitting clothes. It is essential when blade maintenance or cleaning is undertaken that suitable hand protection gloves are used.
- ALWAYS unplug the slicer before undertaking cleaning or maintenance of the unit.
- These machines must be operated by trained personnel and should never be used by unskilled operators or children.
- The blade must be replaced when it has reduced in size by 5mm.

LUBRIQUIK
Silicone Lubricant
LubriQuik food grade silicone spray lubricant is ideal for use on virtually any equipment or machinery that makes contact with food, such as slicers, conveyor systems, bottling and canning machinery, bakery equipment, and dairy equipment.
Checking the Gear Box Oil Gauge
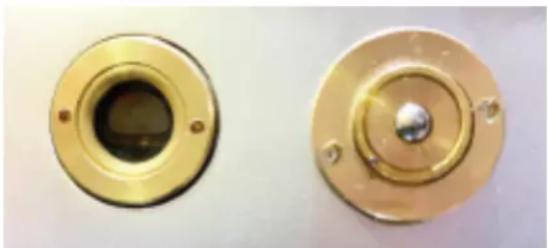
Check the glass window [A] to ensure oil levels are properly maintained. When oil levels drop below the indication line, more oil will need to be added using the oil dispenser provided. The dispenser nozzle must be inserted into the port [B].
There is also an additional port [B] on the side of the unit to lubricate the side shafts. This ports needs to be filled when the stroke is moving. Generally this port needs to be filled once a week with only two pushes of the dispenser.
Note: A new machine needs to run for 20 minutes before the oil gauge begins showing oil" – add to the section "Checking the Gear Box Oil Gauge.
natural_image
Two brass circular mechanical components with central holes and mounting holes (no text or symbols visible)A
B
User Manual
Cleaning and Sanitizing Instructions
General Information
This machine shall be cleaned and sanitized at intervals to comply with national, state and/or local health codes.
We recommend that the machines should be properly cleaned at least once a day; if necessary even more. If the machines have not been used for a while they must be cleaned before use as well.
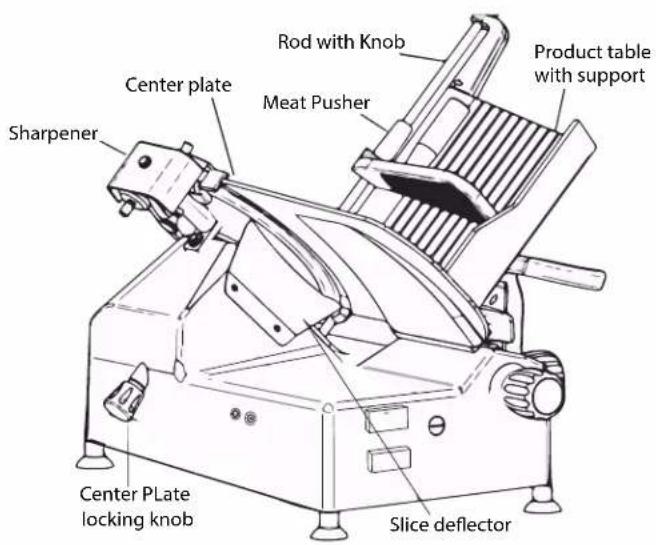
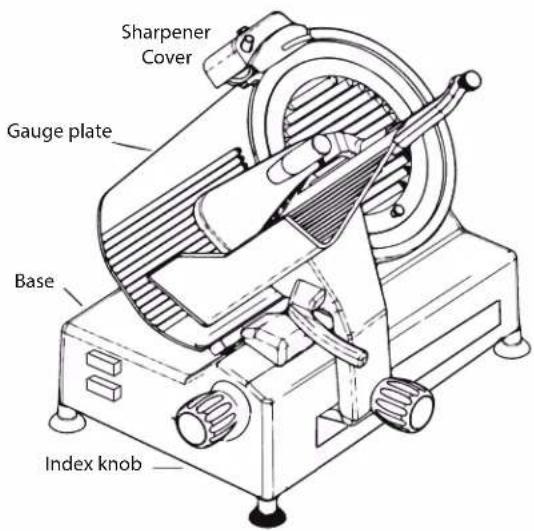
Parts that Must be Removed for Cleaning
natural_image
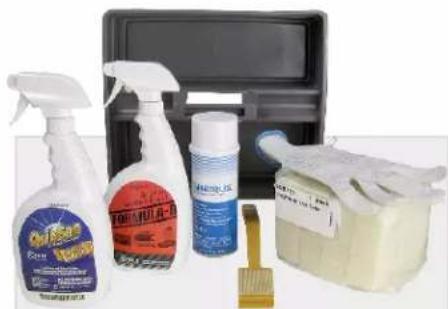
Product display featuring spray bottles, cleaning products, and a plastic container (no visible text or symbols)Get your slicer cleaned, sanitized, lubricated, and back in service in a flash with our meat slicer safety cleaning kit. The slicer cleaning kit packs all of the cleaning supplies and accessories you need into a convenient plastic carrying caddy.
8 Piece Set Includes:

Formula D Spray Degreaser

QuikSan Spray Sanitizer

LubriQuick Silicon Lubricant

Easy Slicer Cleaning Wand
60 Scrub Pads
1 Cut Resistant Glove
1 Brush
1 Plastic Carrying Case
User Manual
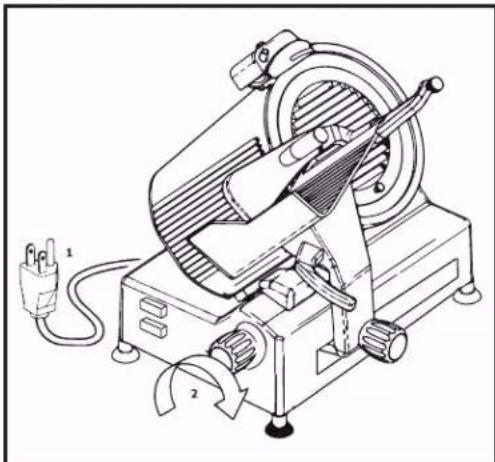
DISASSEMBLING THE MACHINE FOR CLEANING
- Disconnect the plug from the electric main supply:
- Turn the regulating knob of the thickness plate to '0';
- Remove the various components as described in the following paragraphs
natural_image
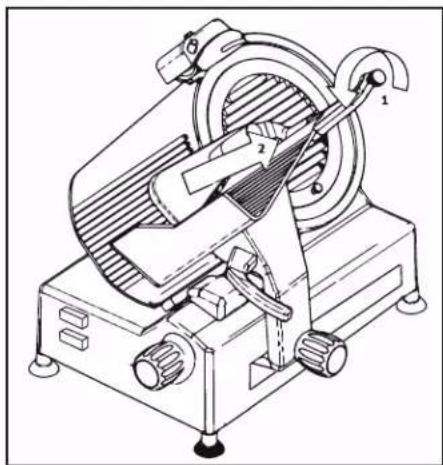
Technical line drawing of a mechanical device with labeled parts (no text or symbols present)Disassembling the Meat Pusher
- Unscrew the knob in order to extract the rod from the tray;
- Remove the meat pusher.
natural_image
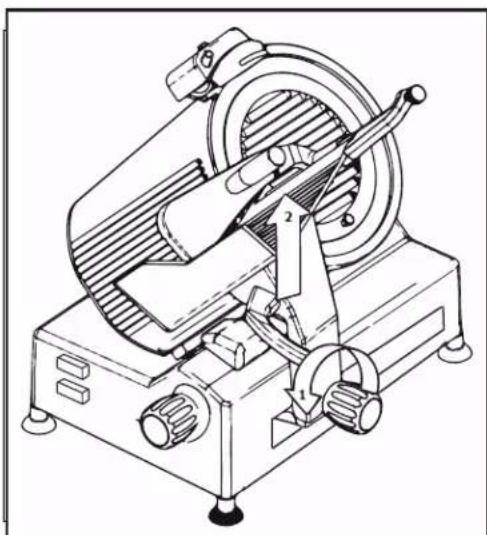
Technical line drawing of a mechanical device with labeled parts (no text or symbols present)Disassembling the product table
- Turn the locking knob counter clockwise all the way, removing the knob itself;
- Take out the whole group by pulling it upwards.
natural_image
Technical line drawing of a mechanical device with gears and a lever (no text or symbols)User Manual
Disassembling the Center Plate
- Unscrew the center plate locking knob.
- Push on the knob to move the center plate off the knife.
- Remove both the center plate and the locking knob.
natural_image
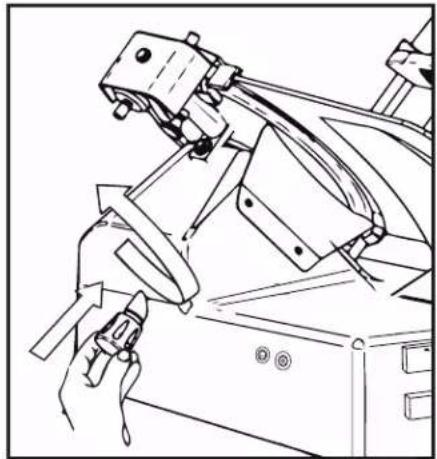
Line drawing of a robotic arm with a hand holding a tool, no text or symbols presentDisassembling the slice deflector
- Remove the slice deflector which is attached to the main slicer body, as shown in the picture.
natural_image
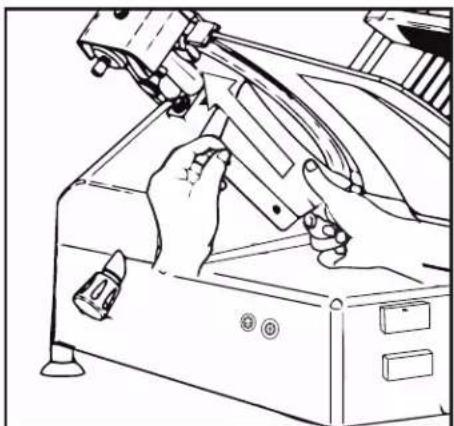
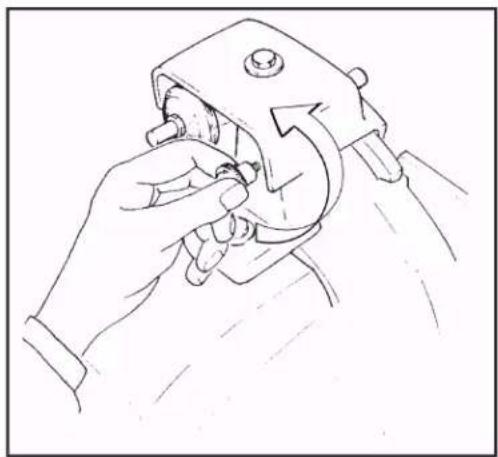
Line drawing of hands operating a mechanical device with a tool (no text or symbols visible)Disassembling the Sharpener
- Loosen the knob below the sharpener block without removing it;
- Then remove the whole sharpener by pulling upwards.
natural_image
Line drawing of a hand holding a mechanical clamp or clamp device (no text or symbols present)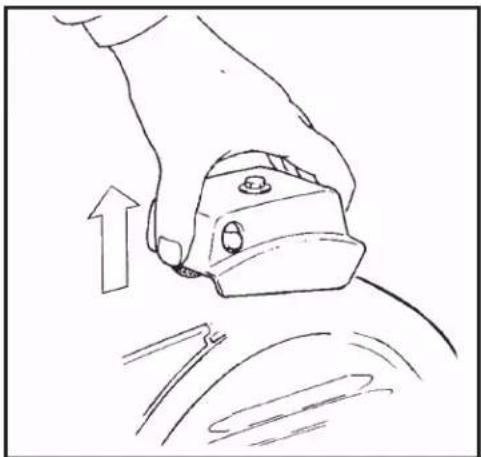
natural_image
Line drawing of a hand using a tool to press or install a component, with an upward arrow indicating motion (no text or symbols)User Manual
PRODUCTS TO BE USED
Only use hot water and a biodegradable detergent for dishes with a 7-8 PH, at a temperature of no lower than 30^ C or( 86^ F) using a soft, spongy cloth and a semi-rigid nylon brush for the plate and the sharp food press.
The sanitizer concentration shall comply with Section 4-501.114, Manual and Mechanical Warewashing Equipment, Chemical Sanitization – Temperature, pH, Concentration, and Hardness of the FDA Food Code. We recommend using USDA approved sanitizer.
If a chemical sanitizer other than chlorine, iodine or quaternary ammonium is used, it shall be applied in accordance with the EPA-registered label use instructions.
WARNING: For cleaning the sharp areas of the plates, the food press and the blade, we recommend using protective gloves.
Rinse well with a lot of hot clean water and dry with a soft cloth or a spongy material. Do not clean the slicer with water or stream jets or similar methods.
Clean all the removed parts using a cloth and a cleaning solution. Rinse with hot water. Sanitize and let air dry.
Clean the sharpener cover with water and detergent. Carefully clean the sharpener assembly and around the stones. DO NOT submerge the sharpener assembly
CLEANING SHARPENING STONES

CAUTION
Dirty Stones Cannot Sharpen!
IF THE SHARPENING STONES HAVE BECOME COATED WITH FOOD FATS OR METALLIC BUILD-UP, THEY WILL NOT SHARPEN EFFECTIVELY.
Each time the sharpener is used, the sharpening stones should be examined for cleanliness. Turn off the slicer, close the gauge plate, unplug power cord and open the sharpener cover.
If there is evidence of fatty or metallic build-up in the stones, they must be cleaned. Otherwise, they will not have the abrasive quality necessary to sharpen.
Clean as follows:
- Remove the nuts and take the stones off the shafts.
- Soak the stones in a solution of dish soap (i.e. Joy, Dawn, etc.) and water for one hour.
User Manual
- Scrub the stones with a stiff bristle brush. Rinse thoroughly at a sink.
- Shake excess water out and pat partially dry with paper toweling or a clean cloth towel. Set aside to air dry.
- Once the stones are dry (after 24 hours), oil the shafts with Food Machine Oil.
- Reassemble.
We recommend that a spare set of stones be kept available for thorough cleaning procedures, and in case of breakage, so you will not lose your sharpening capabilities.
CLEANING THE BLADE

WARNING
Use protective gloves and concentrate on the job at hand.
DANGER!
Make sure thickness control knob is fully to the right, so the gauge plate covers the knife.
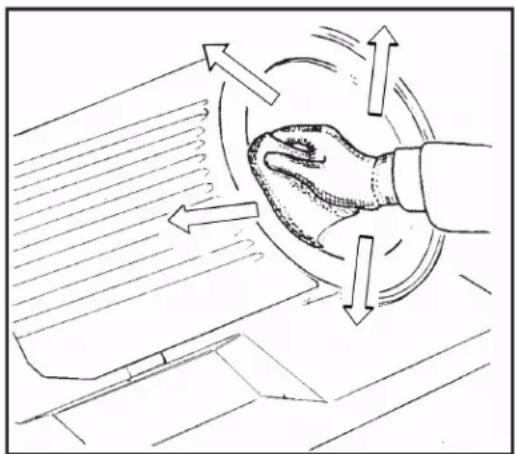
- Press a damp cloth on the surface of the blade and move it slowly from the center to the edge, as shown in the picture, on the side of the blade cover and on the other side;
- Sanitize and dry in the same way using a dry cloth.
- Repeat cleaning both front and back of knife with clear water.
- Always move from the center outward. NEVER MOVE YOUR HAND TOWARDS THE EDGE OF THE KNIFE. Sanitize and allow to dry.
natural_image
Illustration of a hand pressing down on a surface with directional arrows indicating motion (no text or symbols)User Manual
CLEANING THE RING GUARD
-
Fold a cloth wipe that has been submerged in fresh detergent solution and work it between the ring guard and the knife, starting at the base of the ring guard. Carefully work the cloth around the knife, cleaning the edge of the ring guard and edge of the gauge plate. USE EXTREME CAUTION.
-
Sanitize and allow to dry.
CLEANING THE BODY OF THE MACHINE
-
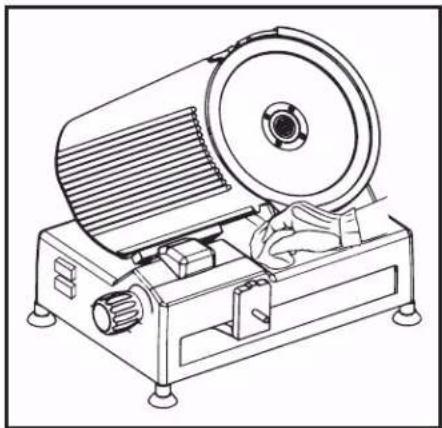
Clean the machine body with a damp cloth or a sponge rinsing frequently with hot water and cleaning solution. Rinse with hot water. Sanitize and let air dry.
-
Clean also the gauge plate and the indexing knob. While doing this operation pay attention to the knife. Don't open the gauge plate or you risk to be cut!
natural_image
Line drawing of a mechanical device with a circular component and rotating shaft (no text or symbols)CLEANING THE COMPONENTS IN THE BASE
The components contained in the base do not need any special cleaning; occasionally remove the dust that can accumulate in the end area of the carriage and of the thickness plate regulation.
REASSEMBLING THE SLICING MACHINE
Reassembling the sharpener
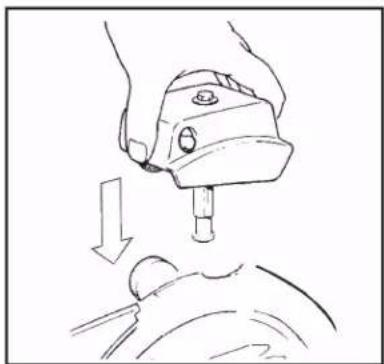
- Make sure the sharpener knob at the base of the sharpener is loose (about 10 turns).
- Insert the sharpener as shown in the picture until it stops at its correct position and screw the knob.
natural_image
Illustration of a hand using a medical or surgical instrument to lift a patient's abdomen (no text or symbols present)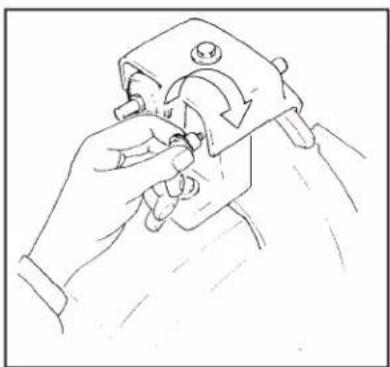
natural_image
Line drawing of a hand using a tool to adjust or install a mechanical component (no text or symbols present)User Manual
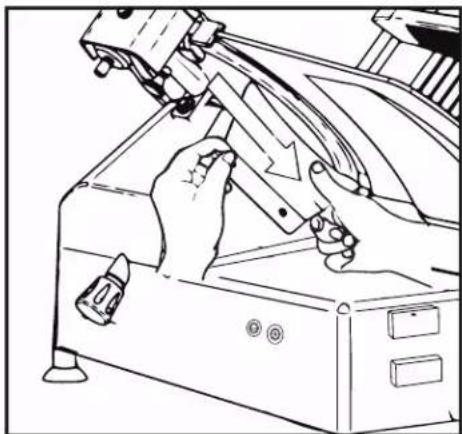
Reassembling the slice deflector
- Place the slice deflector carefully in its place as shown in the picture.
natural_image
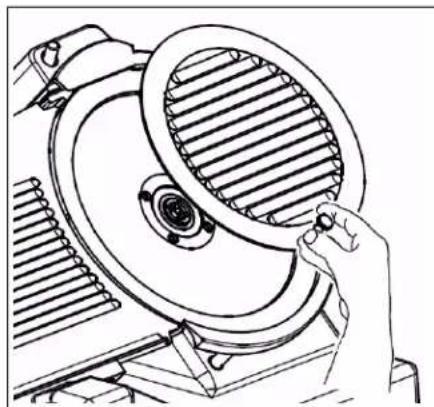
Line drawing of a hand using a tool to lift a car, with no visible text or symbolsReassembling the Center Plate
- Replace the center plate as shown in the picture making sure the section joint is in its proper place;
- Insert the tension rod for locking and screw completely.
- Reassemble carefully and do not strip the rod threads or center plate bushing threads
natural_image
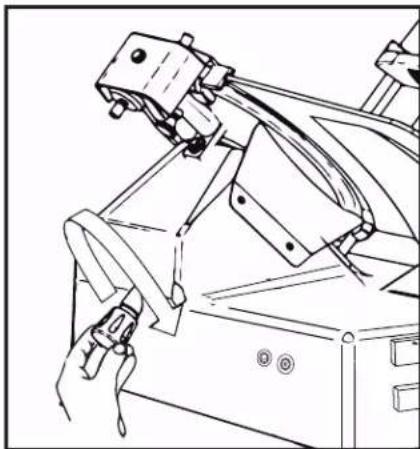
Technical line drawing of a mechanical component with a hand adjusting a circular component (no text or symbols)Reassembling the product table
- Insert the entire group on the carriage as shown in the picture;
- Tighten the locking knob.
natural_image
Line drawing of a robotic arm with sensors and control buttons (no text or symbols)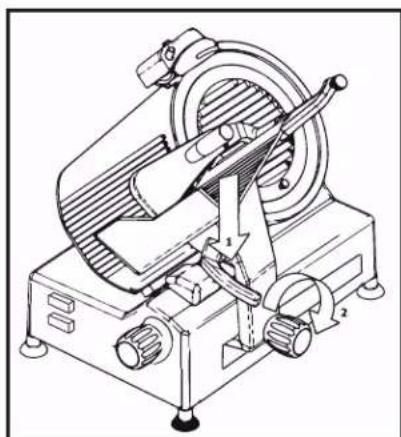
natural_image
Technical line drawing of a mechanical device with labeled parts (no readable text or symbols)www.A
User Manual
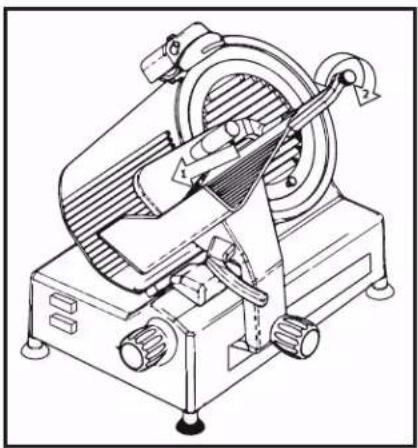
Reassembling the meat pusher
- Insert the rod in the meat pusher and in the hole of the extension;
- Tighten the locking knob.
natural_image
Technical line drawing of a mechanical device with rotating components and adjustment knobs (no text or symbols)GASKET INSPECTION
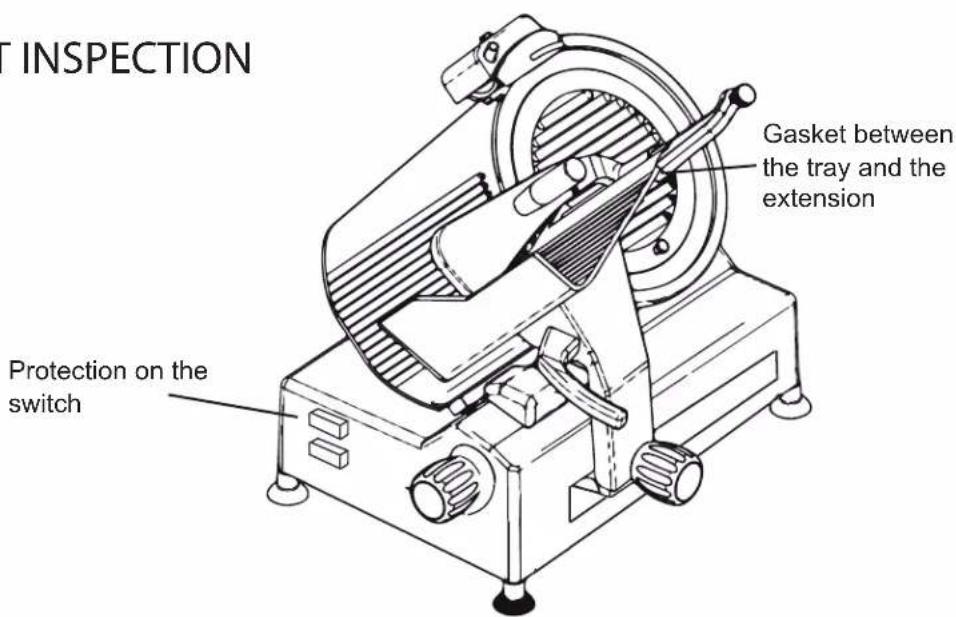
The recommended interval between inspections shall not exceed six months for components that are detached for cleaning and sanitizing the gaskets in the image.
The inspections must be made by the manufacturer or its authorized service agent.
WARNING
The slicer must be removed from service until repaired by the manufacturer or its authorized service agent if any gasket or seal is found to be damaged or missing.
User Manual
SHARPENING INSTRUCTIONS

CAUTION
THE KNIFE SHOULD BE SHARPENED WHEN THE SLICE QUALITY OF
THE PRODUCT IS NOT ACCEPTABLE
DO NOT SHARPEN A KNIFE THAT IS NOT CLEAN. YOU WILL DAMAGE
THE SHARPENING STONES AND BE UNABLE TO SHARPEN THE KNIFE ☒
- Switch OFF the power.
- Unplug the slicer.
- Turn the thickness control knob fully to the right to place the gauge plate in the fully closed position.
- Clean the knife completely. Always clean from the center towards the outside edge of the knife. Never move your hand towards the edge of the knife.
- Loosen the sharpener locking knob, raise and rotate the sharpener until the stones sit with one on each side of the knife. Retighten the knob to hold the sharpener in its sharpening position.
-
Plug in the slicer and switch on the power.
-
Press the sharpening stone push-button to bring the stone against the knife and hold it for 5 to 10 seconds and release. When the sharpener is the in the sharpening position, the sharpening stone push-button is on the left side of the knife.
-
Press the deburring stone push-button to bring the stone against the knife and hold it for 2 to 3 seconds and release. When the sharpener is the in the sharpening position, the sharpening stone push-button is on the right side of the knife.
-
Switch OFF the power.
-
Return the sharpener to its stored position and lock in place.
-
Clean slicer before slicing product. (See "Cleaning and Sanitizing instruction").
Your slicer is now sharpened, cleaned and sanitized—ready to use.
User Manual
Electrical Connection Information
Electrical Connection Information
| Model | Description | Volts /HZ | HP | Watts | Plug Type |
| 177SL612A | Avantco Auto/Manual Slicer 12” | 120 / 60 | 1/2 HP | 550 W | NEMA 5-15P |
| 177SL713A | Avantco Auto/Manual Slicer 13” | 120 / 60 | 3/4 HP | 630 W | NEMA 5-15P |
| Model | Blade Dia. | Blade Rotation Speed | Cut Thickness | Slicing Speed | Net Weight |
| 177SL612A | 12" | 530 rpm | 0 - 0.6" | 26-28 Slices per min | 150lbs |
| 177SL613A | 13" | 530 rpm | 0 - 0.6" | 26-28 Slices per min | 160lbs |
| Model | Blade Watts | HP | Drive Watts | Total Watts |
| 177SL612A | 420 | 0.56 | 630 | 26-28 Slices per min |
| 177SL613A | 630 | 0.84 | 630 | 1260 |
Wiring Diagram
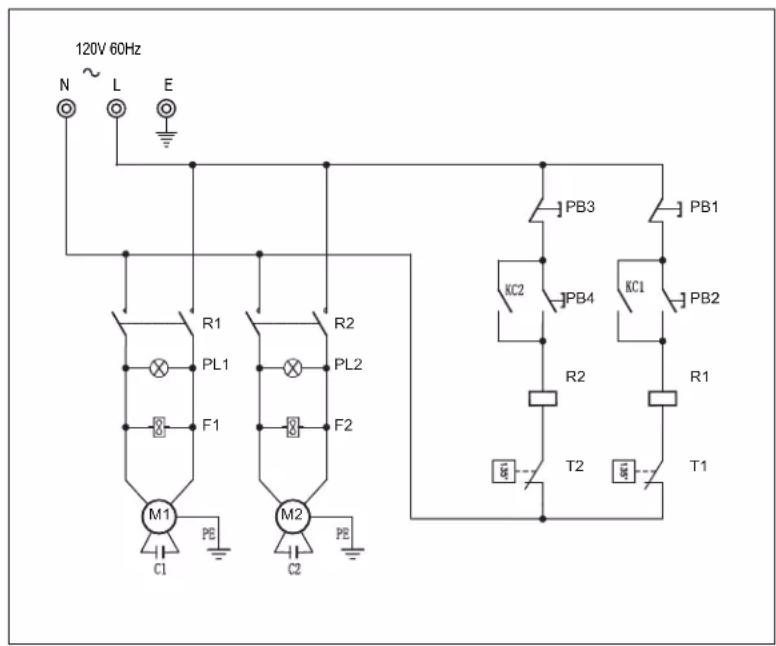
| LEGEND | Description |
| PB1/PB3 | Push Button Stop |
| PB2/PB4 | Push Button Start |
| T1/T2 | Oven Temp. Safety Motor |
| R1/R2 | Relay 120V |
| C1/C2 | Capacitor 20MF |
| M1 | Motor - 120V |
| M2 | Motor - 120V |
| F1/F2 | Cooling Fan |
User Manual
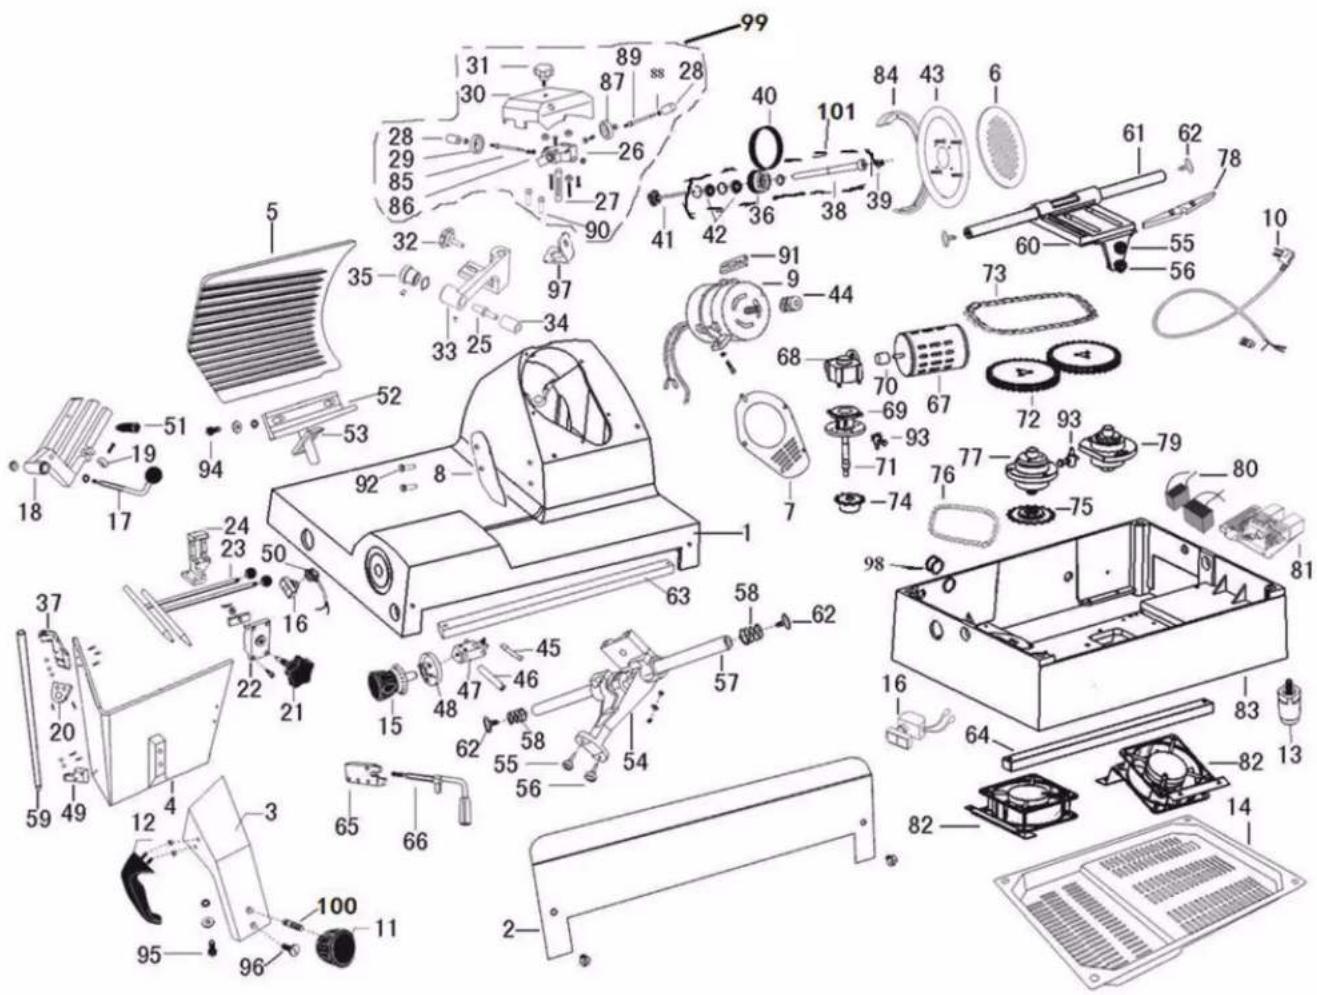
Exploded Parts Diagrams - SL612A, SL713A
User Manual
Exploded Parts Legend
| # Part Name | SL612A Replacement Part # | SL6713A Replacement Part # | Quantity Needed | |
| 5 | Movable Clapboard | 177PSLA5 | 177P7135 | 1 |
| 6 Blade Cover 177PSL A6 177P7136 1 | ||||
| 8 Director 177PSL A8 177PSL A8 1 | ||||
| 9 | Motor | 177PSLA9 | 177P7139 | 1 |
| 11 | Carriage Knob | 177PSLA11 | 177PSLA11 | 1 |
| 12 | Carriage Push Handle | 177PSLA12 | 177PSLA12 | 1 |
| 13 | Metal Feet | 177PSLA13 | 177PSLA13 | 4 |
| 15 | Thickness Adjusting Knob | 177PSLA15 | 177PSLA15 | 1 |
| 17 | Clamp Handle | 177PSLA17 | 177PSLA17 | 1 |
| 21 | Clamping Box Knob | 177PSLA21 | 177PSLA21 | 1 |
| 29 | Fine Sharpening Stone | 177PSLA29 | 177PSLA29 | 1 |
| 30 | Sharpener Cover | 177PSLA30 | 177PSLA30 | 1 |
| 31 | Sharpener Cover Knob | 177PSLA31 | 177PSLA31 | 1 |
| 25, 32, 33, 34, 35 | Ejector Assembly | 177PSLA32 | 177PSLA32 | 1 |
| 40 | Belt | 177PSLA40 | 177PSLA40 | 1 |
| 41 | Blade Guard Knob | 177PSLA41 | 177PSLA41 | 1 |
| 43 | Blade | 177PSLA43 | 177P71343 | 1 |
| 45 | Cam Pin | 177PSLA45 | 177PSLA45 | 1 |
| 46 | Sliding Axle | 177PSLA46 | 177PSLA46 | 1 |
| 47 | Gauge Carriage | 177PSLA47 | 177PSLA47 | 1 |
| 48 | Cam Regulator | 177PSLA48 | 177PSLA48 | 1 |
| 49 | Capacitor | 177PSLA49 | 177PSLA49 | 1 |
| 52, 53 | Carriage Assembly | 177PSLA52 | 177PSLA52 | 1 |
| 54 | Upper Towing Bracket | 177PSLA54 | 177PSLA54 | 1 |
| 57 | Upper Towing Bracket Axle | 177PSLA57 | 177PSLA57 | 1 |
| 58 | Upper Towing Buffer Spring | 177PSLA58 | 177PSLA58 | 2 |
| 60 | Lower Towing Bracket | 177PSLA60 | 177PSLA60 | 1 |
| 61 | Lower Towing Bracket Axle | 177PSLA61 | 177PSLA61 | 1 |
| 66 | Manual Mode Handle | 177PSLA66 | 177PSLA66 | 1 |
| 67 | Automatic Motor | 177PSLA67 | 177PSLA67 | 1 |
| 80 | Motor Capacitor | 177PSLA80 | 177PSLA80 | 1 |
| 81 | Relay Circuit Board Assembly | 177PSLA81 | 177PSLA81 | 1 |
| 82 | Radiator Fan | 177PSLA82 | 177PSLA82 | 2 |
| 84 | Blade Guarding Ring | 177PSLA84 | 177P71384 | 1 |
| 87 | Coarse Sharpening Stone | 177PSLA87 | 177PSLA87 | 1 |
| 92 | Director Screw | 177PSLA92 | 177PSLA92 | 1 |
| 97 | Support Bracket | 177PSLA97 | 177PSLA97 | 1 |
| 99 | Sharpener Assembly | 177PSLA99 | 177PSLA99 | 1 |
| 100 | Threaded Carriage Knob Stud | 177PSLA100 | 177PSLA100 | 1 |
| 101 | Blade Pulley Assembly | 177PSLA101 | 177PSLA101 | 1 |
- Meat Slicer Instruction Manual
- User Manual
- Unpacking:
- General Installation And Operation
- Instructions:
- MANUAL MODE
- AUTO FEED MODE
- Safety
- LUBRIQUIK
- Checking the Gear Box Oil Gauge
- Cleaning and Sanitizing Instructions
- Piece Set Includes:
- DISASSEMBLING THE MACHINE FOR CLEANING
- Disassembling the Meat Pusher
- Disassembling the product table
- Disassembling the Center Plate
- Disassembling the slice deflector
- Disassembling the Sharpener
- PRODUCTS TO BE USED
- CLEANING SHARPENING STONES
- CAUTION
- Dirty Stones Cannot Sharpen!
- IF THE SHARPENING STONES HAVE BECOME COATED WITH FOOD FATS OR METALLIC BUILD-UP, THEY WILL NOT SHARPEN EFFECTIVELY.
- Clean as follows:
- CLEANING THE BLADE
- WARNING
- DANGER!
- CLEANING THE RING GUARD
- CLEANING THE BODY OF THE MACHINE
- CLEANING THE COMPONENTS IN THE BASE
- REASSEMBLING THE SLICING MACHINE
- Reassembling the sharpener
- Reassembling the slice deflector
- Reassembling the Center Plate
- Reassembling the product table
- Reassembling the meat pusher
- GASKET INSPECTION
- SHARPENING INSTRUCTIONS
- Electrical Connection Information
- Wiring Diagram
Brand : Avantco
Model : SL713A
Category : Cutting machine