
PLDVRCAM74 - Rear Camera Pyle - Free user manual and instructions
Find the device manual for free PLDVRCAM74 Pyle in PDF.


| Product Type | Dual Camera DVR Kit for Vehicle Dash Cam Recording |
| Brand | Pyle |
| Model | PLDVRCAM74 |
| Recording Resolution | Full HD 1080p (1920x1080) |
| Rear Camera | Included, connects via extension cable |
| Display | Built-in LCD screen (size not specified) |
| Video Resolution Options | 1080FHD, 720P, and others |
| Loop Recording | Yes (3 min, 5 min, 10 min, or Off) |
| G-Sensor | Yes (Low, Medium, High, Off) for automatic file locking |
| Wide Dynamic Range (WDR) | Yes (On/Off) |
| Time-Lapse Recording | Yes (100ms, 200ms, 500ms, Off) |
| Audio Recording | Yes, built-in microphone (mute option) |
| Date Stamp | Yes (On/Off for video and photo) |
| License Plate Number Stamp | Yes (configurable) |
| Memory Card Support | Micro SD, up to 128GB (Class 10 recommended) |
| Power Source | 12V DC car charger (included) |
| Battery | Internal rechargeable battery for emergency file saving |
| Photo Mode | Yes, up to 12M resolution, with timer and sequence modes |
| Dimensions | Not specified in manual |
| Weight | Not specified in manual |
| Included Accessories | Front camera mount, rear camera, extension cable, car charger, USB cable |
| Maintenance | Format memory card monthly using device |
| Safety Precautions | Use only approved charger; avoid obstructing driver's view |
Frequently Asked Questions - PLDVRCAM74 Pyle
User questions about PLDVRCAM74 Pyle
0 question about this device. Answer the ones you know or ask your own.
Ask a new question about this device
Download the instructions for your Rear Camera in PDF format for free! Find your manual PLDVRCAM74 - Pyle and take your electronic device back in hand. On this page are published all the documents necessary for the use of your device. PLDVRCAM74 by Pyle.
USER MANUAL PLDVRCAM74 Pyle
PLDVRCAM74
DUAL CAMERA DVR KIT
Vehicle Dash Camera Recording
System with Full HD 1080p
USER MANUAL
GETTING STARTED
Device Layout
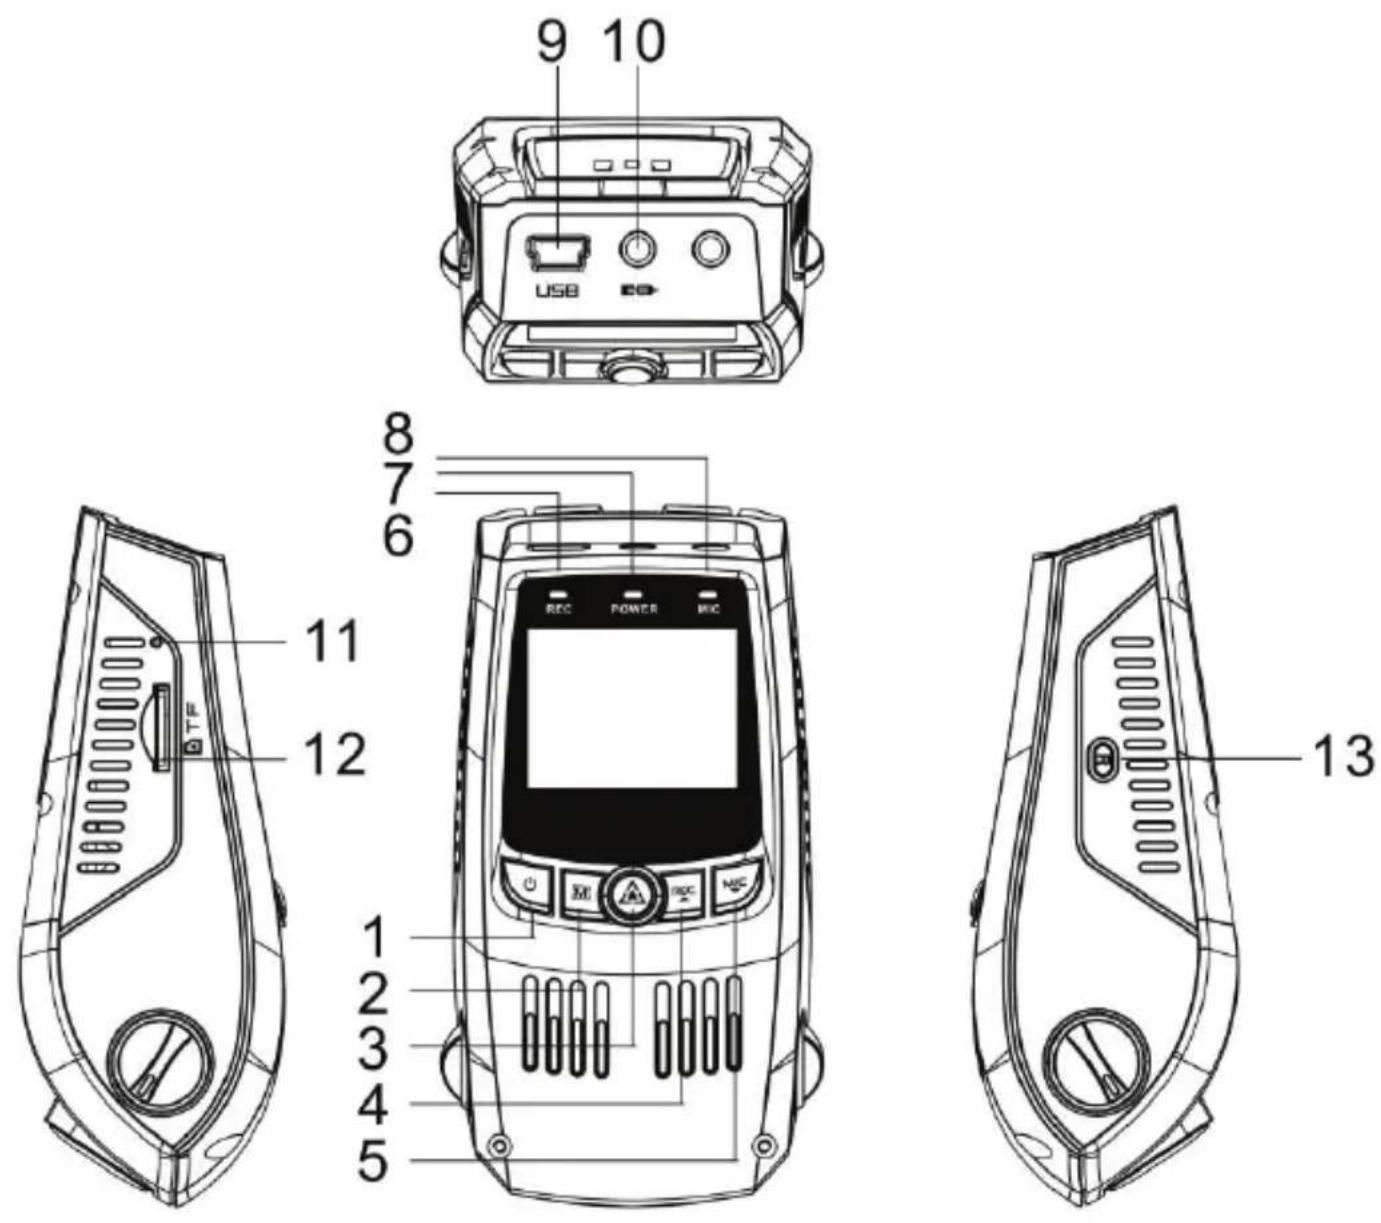
| NO Button Functions | ||
| 1 Power | Press and hold in 3 seconds to power ON/OFF | |
| Press to turn ON/OFF the Screen | ||
| 2 Menu | Press on MENU to enter menu at standby mode. Press UP and DOWN to select options and confirm with OK. After finishing, press MENU to exit | |
| 3 | Emergency Lock / OK | Press to save and lock present video in recording mode |
| It is “OK” key in the menu | ||
| 4 | REC/UP | Press to select upwards. Start or stop recording when you |
| 5 | MIC / DOWN / MODE | Press to select downwards. |
| Start or stop audio recording when you press this button in the mode of recording | ||
| Press and hold to switch between Recording/Playback | ||
| 6 REC LED The recording indication LED | ||
| 7 POWER LED The charging indication LED | ||
| 8 MIC LED The recording audio indication LED | ||
| 9 USB Slot | Charging Slot | |
| Connect to computer with USB cable as a flash drive | ||
| 10 Rear Lens Slot To connect the rear lens to host with adapter cable to get | ||
| 11 | Microphone | Record audio with microphone while recording |
| 12 | Micro SD Memory Card Slot | Supports 32G MAX |
| 13 | RESET | Press to restart in case of system crash. |
Status Icons
| Icon Meaning | ||
 | Video Resolution | |
 | Wide Dynamic Range | |
 | Charging via USB Charger | |
 | Battery Power Level | |
 | Microphone Mute | |
 | Microphone On | |
 | Video Recording Mode | |
 | Video Playback Mode | |
 | Photo Mode | |
 | Loop Recording | |
 | Memory Card Inserted | |
 | G- Sensor Sensitivity | |
 | White Balance | |
 | License plate number | |
Installation

natural_image
Line drawing of a car dashboard and steering wheel (no text or symbols)1. Attaching the front camera to the window mount
Before the device can be used in a car, it is essential to first install a properly attached window mount. Make sure that you place the recorder in a safe, appropriate location where it will not obstruct the driver's view.
Clean windshield before applying mount, do not attach camera for at least 20 minutes.
2. Mounting the rear camera
Mount the rear camera as image shown, using rear camera extension cable, connect rear camera to the main unit.

3. Inserting a memory card
Insert a memory card before recording. The recorder supports Micro SD cards with a capacity of up to 32GB. For reliable operation, use a Class 10 memory card with a capacity of at least 8GB.
4. Connecting the charger to the car's 12V DC outlet
Be sure to connect only the PLDVRCAM74 approved charger designed and supplied specifically for use with your device. Using an incompatible charger can cause serious personal injury or damage to your device.
5. Format the memory card
To ensure the memory card works on the dash cam, we recommend using the dash cam to format the memory card, (please refer to Formatting the Memory Card section on Page 9. DO NOT insert or remove memory card while the device is powered on.
CHARGING THE BATTERY
Charge the device by connecting the camera via the USB car charger port. Use only PLDVRCAM74 approved chargers. Using unapproved chargers or cables can damage the device or cause the battery to explode.
Connect the car charger's jack to the USB charging port, and then plug the charger into the car cigarette lighter or 12V DC power outlet.
- Battery is mainly used to save files in emergency. Please always connect dash cam to external power while it is in use.
- When device detects no power supply, it will automatically power off after 5 seconds. To turn on the device again, you will need to do so manually by pressing the ON / OFF button.
- If the battery is completely discharged, the device will not turn on immediately when the charger is connected.
Allow a depleted battery to charge for a few minutes before attempting to turn on the device. - The device can be used while it is charging, although it may take longer to fully charge the battery.
- If the device receives an unstable power supply while charging, the screen may not function properly. If this happens, unplug the charger from the device.
- While charging, the device may heat up. This is normal and should not affect the device's performance or lifespan.
- If the device is not charging properly, take the device and the charger to an authorized Service Center.
Connecting the charger improperly may cause serious damage to the device. Any damage caused by misuse is not covered by the warranty.
INSERTING THE MEMORY CARD
Your device accepts memory cards with a maximum capacity of 128GB. Depending on the memory card manufacturer and type, some cards may not be compatible with your device. Using an incompatible card may damage the device or the memory card, or corrupt the data stored on it.
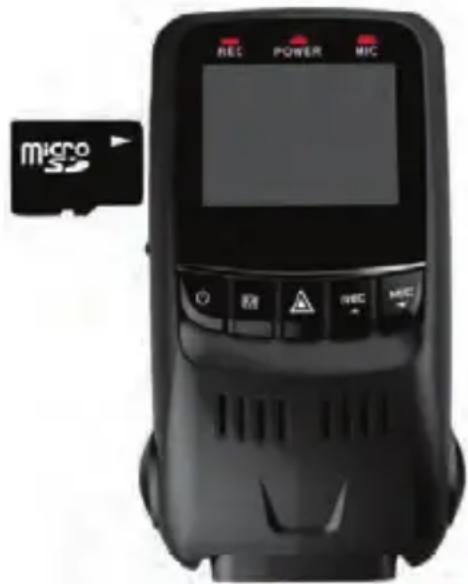
Use caution to insert the memory card right-side up as shown in the image below.
- Insert memory card with the gold-colored contacts facing downwards.
- Push the memory card into the slot until it locks in place.
- Click sound when memory card locks in place.
- Use a coin or other tools to push the memory card IN will make it easier.
It is recommended that you reformat the memory card after every time that images are transferred to a computer, or at least once a month.
Reformatting a memory card keeps important elements of data and file structure clean, helping to prevent error messages and missing images. Reformatting also restores the memory card, which can help prevent it from becoming corrupted.
REMOVING THE MEMORY CARD
Before removing memory card from your unit, you must first remove the unit from the mount.
Before removing a memory card from your device:
- Press the REC button to stop the device from recording
- Press and hold the ⏻ ON/OFF button to switch off the device
- Gently push the memory card in and let go until it unlocks
Do not remove the memory card while the device is transferring or accessing information. Doing so can result in data loss or corruption, or damage to the memory card or device. The manufacturer is not responsible for losses that result from the use of damaged memory cards, including the loss of data.
Remember to wait for the “safe to remove hardware” message before removing your memory card from your computer. Removing the memory card without properly ejecting may result in damage to the memory card or the data saved on it.
FORMATTING THE MEMORY CARD
You may choose to format your memory card with either the device or a computer.
To use the device for formatting a memory card:
- Press the REC button to stop the device from recording
- Press the MENU button twice to enter System Settings
- Press the DOWN button to navigate to the "Format" option
- Press OK to confirm your selection
- Press the UP button once
- Press OK when the word YES is highlighted in blue
Before formatting a memory card, always remember to make backup copies of all important data stored on the device. The manufacturer's warranty does not cover loss of data resulting from user actions.
TURNING THE DEVICE ON AND OFF
Press and hold the ON/OFF button for a few seconds to turn on the device. A welcome message will be displayed on screen as shown in the image below.
To turn off the device, again press and hold the ⏻ ON/OFF button for a few seconds. A goodbye message will be displayed on screen as shown in the image below.
Note:
The Dashboard Camera will switch on and off automatically if you keep it permanently connected to the car charger.
VIDEO SETTINGS
Resolution
Recommend setting: 1080FHD
Use the following procedure to set the recording resolution:
- Press MENU once to enter Video Settings
- Press the UP or DOWN button to navigate to the "Resolution" option
- Press OK to view available resolutions: 1080FD/1920x1080, 720P/1280x720, etc.
- Press the UP or DOWN button to make your selection
- Press OK to confirm your entry
- Press MENU to exit Video Settings
- Press OK to start recording
- Press OK again to stop recording
LOOP RECORDING Recommend Setting: 3 Minutes
With Loop Recording Mode enabled, the device will continuously erase older video as it records new video, keeping only the images captured over a user-selected time range. All video older than this range will be replaced with new video. (Note: any locked video files on the memory card will remain protected, and will not be automatically deleted during Loop Recording.)
It is recommended that you reformat a memory card after every time that images are transferred to a computer, or at least once a month. This keeps important elements of data and file structure clean, helping to prevent error messages and missing images.
Remember to always make backup copies of all important data stored on the device. The manufacturer's warranty does not cover loss of data resulting from user actions.
- Press MENU once to enter Video Settings
- Press the UP or DOWN button to navigate to the "Loop Recording" option
- Press OK to view the current selection:
3min/5min/10min/OFF - Press the UP or DOWN button to make your selection
- Press OK to confirm your entry
- Press MENU to exit Video Settings
TIME-LAPSE RECORD
Recommend Setting: Off
Time-lapse photography is a technique whereby the frequency at which film frames are captured (the frame rate) is much lower than that used to view the sequence. When played at normal speed, time appears to be moving faster and thus lapsing.
- Press MENU once to enter Video Settings
- Press the UP or DOWN button to navigate to the "Time-lapse Record" option
- Press OK to view the current selection: 100Ms/200Ms/500Ms/OFF
- Press the UP or DOWN button to make your selection
- Press OK to confirm your entry
- Press MENU to exit Video Settings
WDR (WIDE DYNAMIC RANGE)
Recommend Setting: On
When enabled, this feature automatically adjusts exposure settings to improve recording quality in particularly bright or dim environments, providing balanced lighting and clearer recorded video.
- Press MENU once to enter Video Settings
- Press the UP or DOWN button to navigate to the "WDR" option
- Press OK to view the current ON/OFF status for this feature
- Press the UP or DOWN button to enable or disable this feature
- Press OK to confirm your entry
- Press MENU to exit Video Settings
EXPOSURE
Recommend Setting: +0.0
Adjust the camera exposure value for brighter or darker recorded video, according to your preference.
- Press MENU once to enter Video Settings
- Press the UP or DOWN button to navigate to the "Exposure" option
- Press OK to view the current selection: +0.0, +1/3, -1/3, etc.
- Press the UP or DOWN button to make your selection
- Press OK to confirm your entry
- Press MENU to exit Video Settings
RECORDING AUDIO
You may choose to record audio with video, or turn off the microphone so that all recorded videos will be muted.
- Press MENU once to enter Video Settings
- Press the UP or DOWN button to navigate to the "Record Audio" option
- Press OK to view the current ON/OFF status for this feature
- Press the UP or DOWN button to enable or disable this feature
- Press OK to confirm your entry
- Press MENU to exit Video Settings
Alternatively, you can use a hot key shortcut for this feature. During Recording Mode, press the DOWN button to mute / unmute the microphone for video recording.
DATE STAMP
You have the option to display the date and time in your videos. Note that the date and time stamp cannot be removed from videos if this feature was enabled at the time of recording.
- Press MENU once to enter Video Settings
- Press the UP or DOWN button to navigate to the "Date Stamp" option
- Press OK to view the current ON/OFF status for this feature
- Press the UP or DOWN button to enable or disable this feature
- Press OK to confirm your entry
- Press MENU to exit Video Settings
PLATE NUMBER
Enable this feature to enter your vehicle plate number for video recording. The plate number will stamp in the video.
- Press MENU once to enter Video Settings
- Press the UP or DOWN button to navigate to the "Plate Number" option
- Press OK to view the current ON/OFF status for this feature
- Press the UP or DOWN button and OK to enable or disable this feature
- If "ON" is selected, enter the plate number on the next pop-up screen using the UP and DOWN buttons; press OK to next digit
- Press MENU to exit Video Settings
GRAVITY SENSING
Recommend Setting: Low
This feature acts as an accelerometer, measuring physical and gravitational forces acting on the camera itself. In the event that such forces are detected, the device will perform an automatic file lock. (Locked video files cannot be erased during Loop Recording; they remain on the memory card until manually deleted or the card is reformatted.)
We recommend that you use the "Low" setting for this feature.
- Press MENU once to enter Video Settings
- Press the UP or DOWN button to navigate to the "Gravity Sensing" option
- Press OK to view the current selection: Low/Medium/High/OFF
- Press the UP or DOWN button to make your selection
- Press OK to confirm your entry
- Press MENU to exit Video Settings
SYSTEM SETTINGS
Date/ Time Setup
Use the following procedure to change the device's time and date:
- Press MENU twice to enter System Settings
- Press the DOWN button to navigate to the "Date/Time" option
-
Press OK to view date/time in the format: YYYY/MM/DD HH:MM:SS
-
Press the UP or DOWN button to change the highlighted number
-
Press OK to move to the next date/time segment and repeat step 4
- Press OK again to confirm your entry
- Press MENU to exit System Settings
Note: If the battery remains fully discharged or is removed from the device, the time and date will be reset.
Auto Power Off
When enabled, this option allows the device to shut down automatically if Recording Mode is not engaged.
- Press MENU twice to enter Setup
- Press the UP or DOWN button to navigate to the "Auto Power Off" option
- Press OK to view the current selection: 3min/5min/10min/OFF
- Press the UP or DOWN button to make your selection
- Press OK to confirm your entry
Beep Sound
This setting allows you to turn the device's button sound effect on or off.
- Press MENU twice to enter Setup
- Press the UP or DOWN button to navigate to the "Beep Sound" option
- Press OK to view the current ON/OFF status for this feature
- Press the UP or DOWN button to enable or disable this feature
- Press OK to confirm your entry
LANGUAGE
Use the following procedure to change the device's time and date. Language availability may vary depending on the region.
- Press MENU twice to enter System Settings
- Press the DOWN button to navigate to the "Language" option
- Press OK to view the current language selection
- Press the UP or DOWN button to change the selection
- Press OK again to confirm your choice
TV Mode
Recommend Setting: NTSC
This feature will setup video output format.
- Press MENU twice to enter Setup
- Press the UP or DOWN button to navigate to the "TV Mode" option
- Press OK to view the current selection: NTSC/PAL
- Press the UP or DOWN button to make your selection
- Press OK to confirm your entry
Light Frequency
Recommend Setting: 60Hz
This option should be set according to the power supply specification used in your country or geographical region (U.S. users should select the "60Hz" option).
- Press MENU twice to enter System Settings
- Press the UP or DOWN button to navigate to the "LIGHT FREQ." option
- Press OK to view the current selection: 50Hz / 60Hz
-
Press the UP or DOWN button to make your selection
-
Press OK to confirm your entry
- Press MENU to exit System Settings
Format
Performing this operation will format memory card.
Note: any files in the memory card will be lost.
- Press MENU twice to enter System Settings
- Press the UP or DOWN button to navigate to the "Format" option
- Press OK to view YES / NO confirmation for this operation
- Press the UP or DOWN button to make your selection
- Press OK to confirm your entry
- Press MENU to exit System Settings
DST
Enable/Disable Daylight Saving Time
- Press MENU twice to enter System Settings
- Press the UP or DOWN button to navigate to the "DST" option
- Press OK to view the current ON/OFF status for this feature
- Press the UP or DOWN button to enable or disable this feature
- Press OK to confirm your entry
Screen Saver
Recommend Setting: 15 Seconds
Select a time duration for the screen to stay lit after recording starts.
(If you cannot find this option, please follow instructions for installing the latest firmware update.)
-
Press MENU twice to enter System Settings
-
Press the UP or DOWN button to navigate to the "Screen Saver" option
- Press OK to view the current selection:
15 Secs / 1 min / 3 min/ OFF
- Press the UP or DOWN button to make your selection
- Press OK to confirm your entry
- Press MENU to exit System Settings
Alternatively, you can use a hot key shortcut for this feature. During Recording Mode, press and hold OK to turn the LCD screen on or off.
Restore Default Factory Settings
Performing this operation will reset all of your device's settings to their original values. Note: any user-customized settings will be lost.
- Press MENU twice to enter System Settings
- Press the UP or DOWN button to navigate to the "Default Settings" option
- Press OK to view YES / NO confirmation for this operation
- Press the UP or DOWN button to make your selection
- Press OK to confirm your entry
- Press MENU to exit System Settings
Playback Mode
You can play back recorded video on your device using the following steps:
- Press REC to stop recording
- Press MODE twice to switch from Recording to Playback Mode
-
Press and hold the UP or DOWN button to navigate through the stored video files.
-
Press OK to start playback for the selected video
- Press OK again to pause playback
- Press MODE to stop playback
- FAST FORWARD: While video is playing, press the UP button one or more times to set fast playback speed (2X / 4X / 8X)
- FAST REWIND: While video is playing, press the DOWN button one or more times to set reverse playback speed (-2X / -4X / -8X)
Deleting Files
To delete one particular file:
- Press the UP or DOWN button to navigate through the stored video files
- Press MENU to view options for the highlighted file: Delete/Protect/Slide Show
- Press the DOWN button once to select "Delete"
- Press OK once to view options for "Current MOV" file or "ALL" files. Select "Current MOV"
- Press OK twice to delete file
To delete all files:
- Press on UP or DOWN button to navigate through the video files
- Press OK to enter "Video"
- Press MENU to view options for this file: Delete/Protect/Slide Show
- Press the DOWN button once to select "Delete"
- Press OK once to view delete options for "Current MOV" file or "ALL" files. Select "ALL" and press OK
- Press OK again to delete all files
PHOTO SETTINGS Resolution
This option allows you to set the pixel resolution for captured images.
- Press MODE once to enter Photo Mode
- Press MENU once to enter Photo Settings
-
Press the UP or DOWN button to navigate to the "Resolution" option
-
Press OK to view current selection: 12M 4032x3024, 10M 3648x2736, etc.
-
Press the UP or DOWN button to make your selection
-
Press OK to confirm your entry
-
Press MENU to exit Photo Settings
-
Press OK to capture an image
Capture Mode
With this feature you can set a timer for automatically capturing images.
- Press MODE once to enter Photo Mode
- Press MENU once to enter Photo Settings
- Press the UP or DOWN button to navigate to the "Capture Mode" option
- Press OK to view the current selection: 2SEC/5SEC/10SEC
- Press the UP or DOWN button to make your selection
- Press OK to confirm your entry
- Press MENU to exit Photo Settings
- Press OK to start the timer
Sequence Mode
This feature allows you to capture a sequence of 3 quick photos with one button press.
- Press MODE once to enter Photo Mode
- Press MENU once to enter Photo Settings
- Press the UP or DOWN button to navigate to the "Sequence" option
- Press OK to view the current ON/OFF status for this feature
- Press the UP or DOWN button to enable or disable this feature
- Press OK to confirm your entry
- Press MENU to exit Photo Settings
- Press OK once to capture a 3-photo sequence
Quality
This option allows you to set the quality level of captured images. (Lower quality images take up less space on the memory card.)
- Press MODE once to enter Photo Mode
- Press MENU once to enter Photo Settings
- Press the UP or DOWN button to navigate to the "Quality" option
- Press OK to view the current selection: FINE / NORMAL / ECONOMY
- Press the UP or DOWN button to make your selection
- Press OK to confirm your entry
- Press MENU to exit Photo Settings
- Press OK to capture an image
Sharpness
This feature will automatically enhance captured images for a clearer, more distinct picture.
- Press MODE once to enter Photo Mode
- Press MENU once to enter Photo Settings
-
Press the UP or DOWN button to navigate to the "Sharpness" option
-
Press OK to view the current selection:
STRONG / NORMAL / SOFT
-
Press the UP or DOWN button to make your selection
-
Press OK to confirm your entry
-
Press MENU to exit Photo Settings
-
Press OK to capture an image
White Balance
This setting allows you to adjust the lighting balance for different environments. The "AUTO" setting is recommended for most situations.
- Press MODE once to enter Photo Mode
- Press MENU once to enter Photo Settings
-
Press the UP or DOWN button to navigate to the "White Balance" option
-
Press OK to view the current selection: AUTO / DAYLIGHT / CLOUDY / TUNGSTEN / FLUORESCENT
-
Press the UP or DOWN button to make your selection
-
Press OK to confirm your entry
-
Press MENU to exit Photo Settings
-
Press OK to capture an image
Color
This feature allows you to choose color effect for captured images.
- Press MODE once to enter Photo Mode
- Press MENU once to enter Photo Settings
- Press the UP or DOWN button to navigate to the "Color" option
- Press OK to view the current selection:
- Press the UP or DOWN button to make your selection
- Press OK to confirm your entry
- Press MENU to exit Photo Settings
- Press OK to capture an image
Color / Black & White / Sepia
ISO
This setting enables you to adjust the camera's sensitivity to light when taking photos. The higher the number, the greater the light sensitivity. The "AUTO" setting is recommended.
- Press MODE once to enter Photo Mode
- Press MENU once to enter Photo Settings
- Press the UP or DOWN button to navigate to the "Color" option
- Press OK to view the current selection: 100/200/400/AUTO
- Press the UP or DOWN button to make your selection
- Press OK to confirm your entry
- Press MENU to exit Photo Settings
- Press OK to capture an image
Exposure
This setting allows you to adjust the brightness level of captured images. The "+0.0" setting is recommended.
- Press MODE once to enter Photo Mode
- Press MENU once to enter Photo Settings
- Press the UP or DOWN button to navigate to the "Color" option
- Press OK to view the current selection: +0.0, +1/3, -1/3, etc.
- Press the UP or DOWN button to make your selection
- Press OK to confirm your entry
- Press MENU to exit Photo Settings
- Press OK to capture an image
Anti-Shaking
This feature enables the image stabilizer function to reduce blurring of captured images.
- Press MODE once to enter Photo Mode
- Press MENU once to enter Photo Settings
- Press the UP or DOWN button to navigate to the "Anti-Shaking" option
- Press OK to view the current ON/OFF status for this feature
- Press the UP or DOWN button to enable or disable this feature
- Press OK to confirm your entry
- Press MENU to exit Photo Settings
- Press OK to capture an image
Quick Review
Enabling this feature will allow you to immediately view each captured image for a few seconds before taking the next photo.
- Press MODE once to enter Photo Mode
- Press MENU once to enter Photo Settings
- Press the UP or DOWN button to navigate to the "Quick Review" option
- Press OK to view the current selection: OFF/2SEC/5SEC
- Press the UP or DOWN button to make your selection
- Press OK to confirm your entry
- Press MENU to exit Photo Settings
- Press OK to capture an image
Date Stamp
This feature will automatically apply date and/or time stamp to captured images.
- Press MODE once to enter Photo Mode
- Press MENU once to enter Photo Settings
- Press the UP or DOWN button to navigate to the "Date Stamp" option
- Press OK to view the current selection:
OFF / Date / Date & Time
-
Press the UP or DOWN button to make your selection
-
Press OK to confirm your entry
-
Press MENU to exit Photo Settings
-
Press OK to capture an image
Playback Mode (Photo)
Follow these steps to view captured images as a continuous slide show.
- Press MODE twice to enter Photo View Mode
- Press the UP or DOWN button to navigate through the stored image files
- Press MENU to view options for the selected file: Delete / Protect / Slide Show
- Press the DOWN button to select "Slide Show"
- Press OK to view time options for each slide: 2Sec / 5Sec / 8Sec
- Press UP or DOWN to make your selection
- Press OK to confirm your entry and start the slide show
- Press MENU to stop the slide show
PYLE
PyleUSA.com

natural_image
Illustration of a laptop with a red checkmark on screen, next to a keyboard (no text or symbols)VISIT US ONLINE:
Have a question?
Need service or repair?
Want to leave a comment?
PyleUSA.com/ContactUs
PYLE
- PLDVRCAM74
- DUAL CAMERA DVR KIT
- GETTING STARTED
- Device Layout
- Status Icons
- Installation
- Attaching the front camera to the window mount
- Mounting the rear camera
- Inserting a memory card
- Connecting the charger to the car's 12V DC outlet
- Format the memory card
- CHARGING THE BATTERY
- INSERTING THE MEMORY CARD
- REMOVING THE MEMORY CARD
- Before removing a memory card from your device:
- FORMATTING THE MEMORY CARD
- To use the device for formatting a memory card:
- TURNING THE DEVICE ON AND OFF
- Note:
- VIDEO SETTINGS
- Resolution
- Recommend setting: 1080FHD
- LOOP RECORDING Recommend Setting: 3 Minutes
- TIME-LAPSE RECORD
- Recommend Setting: Off
- WDR (WIDE DYNAMIC RANGE)
- Recommend Setting: On
- EXPOSURE
- Recommend Setting: +0.0
- RECORDING AUDIO
- DATE STAMP
- PLATE NUMBER
- GRAVITY SENSING
- Recommend Setting: Low
- SYSTEM SETTINGS
- Date/ Time Setup
- Auto Power Off
- Beep Sound
- LANGUAGE
- TV Mode
- Recommend Setting: NTSC
- Light Frequency
- Recommend Setting: 60Hz
- Format
- DST
- Enable/Disable Daylight Saving Time
- Screen Saver
- Recommend Setting: 15 Seconds
- Secs / 1 min / 3 min/ OFF
- Restore Default Factory Settings
- Playback Mode
- Deleting Files
- To delete one particular file:
- To delete all files:
- PHOTO SETTINGS Resolution
- Capture Mode
- Sequence Mode
- Quality
- Sharpness
- STRONG / NORMAL / SOFT
- White Balance
- Color
- Color / Black & White / Sepia
- ISO
- Anti-Shaking
- Quick Review
- OFF / Date / Date & Time
- Playback Mode (Photo)
- PYLE
- PyleUSA.com
- VISIT US ONLINE:
Brand : Pyle
Model : PLDVRCAM74
Category : Rear Camera