
PT639D - Hi-Fi System Pyle - Free user manual and instructions
Find the device manual for free PT639D Pyle in PDF.


| Product Type | Dual Cassette Deck Stereo |
| Brand & Model | Pyle PT639D |
| Construction Material | Metal |
| Dimensions (W x D x H) | 16.93" x 11" x 5.1" |
| Power Input | AC 110V, 60Hz |
| Power Consumption (Working) | 10 W |
| Power Consumption (Standby) | 0.3 W |
| Tape Speed | 4.8 cm/s |
| Frequency Response (Normal Tape) | 40 - 14,000 Hz (±3 dB) |
| Frequency Response (CrO2 Tape) | 40 - 15,000 Hz (±3 dB) |
| Frequency Response (Metal Tape) | 40 - 16,000 Hz (±3 dB) |
| Signal-to-Noise Ratio | 58 dB |
| Wow & Flutter | ≤ 0.15% |
| Channel Separation | 60 dB (1 kHz) |
| Total Harmonic Distortion (THD) | 0.5% (K3), 1% (THD) |
| Track Space | 40 dB (1 kHz) |
| Audio Output Channels | 2 Ways, 4 Sound Tracks |
| Signal Input Sensitivity | 80 mV / 50 kΩ |
| Signal Output Level | 80 mV / 5 kΩ |
| Key Features | Dual cassette decks, auto backspace, digital DNR noise reduction, CrO2 tape selector, independent left/right recording level control |
| Included Accessories | Dual Cassette Deck, Audio Cable |
| Safety Certification | California Prop 65 Warning: contains Nickel carbonate |
Frequently Asked Questions - PT639D Pyle
User questions about PT639D Pyle
0 question about this device. Answer the ones you know or ask your own.
Ask a new question about this device
Download the instructions for your Hi-Fi System in PDF format for free! Find your manual PT639D - Pyle and take your electronic device back in hand. On this page are published all the documents necessary for the use of your device. PT639D by Pyle.
USER MANUAL PT639D Pyle
Need service or repair?
Want to leave a comment?
PyleUSA.com/ContactUs

Questions? Issues?
We are here to help!
Phone: (1) 718-535-1800
Email: support@pyleusa.com
PYLE
PyleUSA.com

PT639D
Dual Cassette Deck Stereo
CrO2 Tape Selector, Media Player, Music Recording Device with RCA Cables
USER GUIDE
PLEASE READ THIS USER MANUAL COMPLETELY BEFORE OPERATING THIS UNIT AND RETAIN THIS BOOKLET FOR FUTURE REFERENCE.
Read this before operation
- Choose unit installation location carefully. Avoid placing it in direct sunlight or close to a source of heat. Also avoid locations subject to vibrations and excessive dust, heat, cold or moisture. Keep away from sources that hum, such as transformers or motors.
- This unit is extremely sensitive to magnetic fields, so do not use near large speakers or other devices which generate magnetic fields.
- Do not open the cabinet as this might result in damage to the circuitry or electrical shock. If a foreign object should get into the set, contact your dealer.
- Slots and openings in the cabinet are provided for ventilation and to ensure reliable operation of the product and to protect it from overheating, and these openings must not be blocked or covered.
- The user should not attempt to service the appliance beyond that described in the operating instructions. All other servicing should be referred to qualified service personnel.
- Please do not use alcohol, ammonia or erodent, and volatile liquid to clean the unit. If it is necessary, just use some cotton cloth with warm water to clean its surface.
FRONT PANEL

- The indicator of the direction of movement of deck A
- High-speed recording indicator
- Power indicator
- LINE recording input indicator
- Cro2 tape indicator in the playing mode
- Peak value electric level display
- Cro2 tape indicator in the recording mode
- Digital noise reducing indicator
- Recording mode indicator
- Deck A
- When playing, press it down to play one side continuously; Press it up to play both sides continuously in deck A
- Press it to play the tape in deck A
- Press the REW button for rewinding in deck A
- Press FF button for fast-forward
- Press it to stop and open the deck
- Press it to choose the direction of the movement of deck A
- High-speed recording switch
- Left audio recording electric level control
- Switch for recording from LINE
- Cro2 tape function selection in the play mode
- Power switch
- Cro2 tape function selection in the record mode
- Digital noise reducing function OFF
- Right audio recording electric level control
- Digital noise reducing function ON
- Deck B RECORD button
- Deck B PLAY button
- Press the REW button for rewinding in deck B
- Press FF button for fast forward in deck B
- Deck B stop
- Deck B pause
- Deck B
REAR PANEL

flowchart
graph LR
    A["Power Supply"] --> B["Failure Detection"]
    B --> C["352-67 Bus"]
    C --> D["AC Route"]
    D --> E["AC Route"]
    E --> F["AC Route"]
    F --> G["AC Route"]
    G --> H["AC Route"]
    H --> I["AC Route"]
    I --> J["AC Route"]
    J --> K["AC Route"]
    K --> L["AC Route"]
    L --> M["AC Route"]
    M --> N["AC Route"]
    N --> O["AC Route"]
    O --> P["AC Route"]
    P --> Q["AC Route"]
    Q --> R["AC Route"]
    R --> S["AC Route"]
    S --> T["AC Route"]
    T --> U["AC Route"]
    U --> V["AC Route"]
    V --> W["AC Route"]
    W --> X["AC Route"]
    X --> Y["AC Route"]
    Y --> Z["AC Route"]
-
Record line input
-
Audio output 1
-
Audio output 2
-
Connect with ground
-
AC 110V power input
BASIC OPERATIONS
Make sure that power to both the deck and your amplifier/receiver is turned off before making any connections. If the deck is placed near an amplifier, TV or tuner, noise (induced hum) or beat interference may result. If this occurs, place the deck further away from other components or reorient its position.
C-120 cassette tapes are not recommended as they use a very thin tape base which may become tangled around the capstan or pinch roller.

- Press POWER button.

- Press STOP/EJ button to open the deck.

- Insert the cassette with the exposed tape side facing down. To close the compartment, push the section of the compartment door until it locks shut.
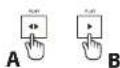
- Press the PLAY button to play.

- Press DIR button to change the direction of movement in deck A.

- Press the MODE button to choose play one-side or both sides.

- Press the REW button for rewinding.

- Press FF button for fast-forward.

- Press PAUSE button in the B deck to pause.

- Press DNR ON button to automatically enter digital noise reducing. Press OFF to stop.
HOW TO RECORD?
Before putting a tape into the deck, take up any slack with a pencil or your finger tip. This precaution prevents the tape from becoming entangled around the capstan or pinch roller.
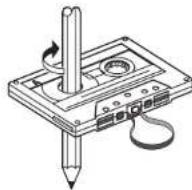
HOW TO SELECT THE RECORDING SOURCE?
- Choose deck A to be the source. Just play the tape in it for recording.
- Choose LINE to record from program source.
- Choose deck A and LINE to be the source for mix recording.
HOW TO SET THE RECORDING ELECTRIC LEVEL?

LEFT----REC LEVEL----RIGHT

Use the right and left electric level control knobs to adjust the level.
Usually turning the indicator to the middle works very well.

In the recording mode, press REC function button to select tape type.

In the playing mode, press PLAY function button to select tape type.
When the recording source and electric level are correctly set, put the record tape into deck B as the picture shows. Close the deck until it locks shut.

Press REC in deck B to start recording.


Press the STOP button in deck B to stop recording.
MAINTENANCE
Head Cleaning
After ten hours of usage, tape coating material or dust may adhere to the heads, causing deterioration of sound. Therefore, the parts depicted in the illustration should be cleaned regularly. Use a cotton swab moistened with a tape head cleaning solution (such as alcohol).
Cassett B Cassett A

Magnetic head Magnetic head

DEMAGNETIZATION
After 20-30 hours of use, enough residual magnetism will build up on the heads to cause poor high frequency reproduction. At this time you should use a commercially available cassette tape-type head demagnetizer. When cleaning the tape path or demagnetizing the heads, be sure to follow carefully the instructions of the concerning materials such as cleaning fluid or head demagnetizer.

TROUBLESHOOTING
If your cassette deck fails to operate normally, check the following table. It lists common operating errors and simple measures which you can take to correct the problem. If it cannot be corrected, or the symptom is not listed, disconnect the deck's power cord and contact your authorized dealer or authorized service center for help.
No power and no display:
Make sure that the power cord is properly plugged into the wall outlet, check if the fuse is broken. Press POWER button.
No sound:
Check if the POWER switch is turned off. No cassette is loaded. Check the connection to the stereo system. Adjust the volume of the amplifier. The stereo amplifier's input selector is set to the wrong position.
Sound is warbled or distorted:
Make sure that the inputs and outputs of all components are connected properly. Clean and demagnetize the heads.
Failure in inserting the tape:
Insert the cassette with the exposed tape side facing down. Insert the cassette tape securely.
Tapes often tangle with deck:
The heads, pinch rollers, or capstan shafts are dirty. Clean the tape head. Insert the cassette tape securely. Replace tape.
Poor Sound:
Check that Digital DNR position. Clean and demagnetize the heads. Check the connection to the stereo system.
Failure in recording:
If the safety tabs of the cassette tape have been broken off, cover the holes with adhesive tape. Check the connection to the stereo system. Clean and demagnetize the heads.
Improper display:
The unit is strongly affected by the surrounding. Unplug the power cable and plug it ten seconds later, the press the POWER button down.
FEATURES:
• Excellent Hi-Fi Sound
• Automatically Recording System with Good Recording
• High-quality Auto Backspace Movement
- First-class Hi-Fi Recording Movement
• Double-color FL Mountain-like Electric Level Indicator
• Digital DNR Professional Noise Reducing System
- Multi Styles of Tape are Optional for Both Playing and Recording (A&B Deck)
- Recording Electric Levels of the Left and Right Audio are of Independent Control
WHAT'S IN THE BOX:
- Dual Cassette Deck
- Audio Cable
TECHNICAL SPECS:
• Construction Material: Metal
• Audio Output: 2 Ways and 4 Sound Tracks
• Tape Speed: 4.8m/s
• Frequency Response: (-20dB Recording)
• 40-14000Hz (±3dB) Normal tape
• 40-15000Hz (±3dB) Cro2 tape
• 40-16000Hz (±3dB) Metal tape
• S/N Ratio: 58dB
- Wow Flutter Ratio: ≤0.15%
• Separation: 60dB(1KHz)
• THD: K3 0.5% THD 1%
• Track Space: 40dB (1KHz)
- Double 12V Motor
• Signal Input: 80mV/50K MIN
• Signal Output: 80mV/5k
• Power Input: AC110V 60Hz
• Power Consumption in Working Mode: 10 W
• Power Consumption in Ready Mode: 0.3 W
• Product Dimension: 16.93" x 11" x 5.1"-inches


California Prop 65 Warning
WARNING:
This product contains Nickel carbonate which is known to the state of California to cause cancer birth defects and other reproductive harm. Do not ingest.
For more info go to: www.P65warnings.ca.gov
- PYLE
- PyleUSA.com
- PT639D
- Dual Cassette Deck Stereo
- PLEASE READ THIS USER MANUAL COMPLETELY BEFORE OPERATING THIS UNIT AND RETAIN THIS BOOKLET FOR FUTURE REFERENCE.
- Read this before operation
- REAR PANEL
- BASIC OPERATIONS
- HOW TO RECORD?
- HOW TO SELECT THE RECORDING SOURCE?
- HOW TO SET THE RECORDING ELECTRIC LEVEL?
- MAINTENANCE
- Head Cleaning
- DEMAGNETIZATION
- TROUBLESHOOTING
- No power and no display:
- No sound:
- Sound is warbled or distorted:
- Failure in inserting the tape:
- Tapes often tangle with deck:
- Poor Sound:
- Failure in recording:
- Improper display:
- FEATURES:
- WHAT'S IN THE BOX:
- TECHNICAL SPECS:
- California Prop 65 Warning
- WARNING:
Brand : Pyle
Model : PT639D
Category : Hi-Fi System