
Vienne ION630 - Humidifier Ionmax - Free user manual and instructions
Find the device manual for free Vienne ION630 Ionmax in PDF.


| Product Type | Desiccant Dehumidifier (compressorless, zeolite rotor) |
| Model | Ionmax Vienne ION630 |
| Dimensions (W x D x H) | 379 x 239 x 520 mm |
| Weight | 7.5 kg |
| Power Supply | 220-240 V ~ 50 Hz |
| Power Consumption | 420-740 W |
| Moisture Removal Capacity | 10 L/day (at 20°C, 60% RH) |
| Water Tank Capacity | 4.2 L |
| Timer | Up to 12 hours (2, 4, 8, 12 h) |
| Humidity Setting Range | 40% - 60% RH (in 5% increments) |
| Operating Temperature Range | 1°C - 40°C |
| Ioniser | Yes (negative ions for air purification) |
| Auto Restart After Power Failure | Yes (resumes previous settings) |
| Continuous Drainage Option | Yes (hose inner diameter 12 mm) |
| Filter Type | Washable air filter |
| Maintenance | Clean filter monthly; clean exterior with damp cloth |
| Safety Features | Auto shut-off when tank full; overheat protection; child supervision advised |
| Warranty | 12 months from date of purchase (Australian Consumer Law applies) |
Frequently Asked Questions - Vienne ION630 Ionmax
User questions about Vienne ION630 Ionmax
0 question about this device. Answer the ones you know or ask your own.
Ask a new question about this device
Download the instructions for your Humidifier in PDF format for free! Find your manual Vienne ION630 - Ionmax and take your electronic device back in hand. On this page are published all the documents necessary for the use of your device. Vienne ION630 by Ionmax.
USER MANUAL Vienne ION630 Ionmax
Thank you for purchasing the Ionmax Vienne ION630 Desiccant Dehumidifier. The Ionmax Vienne can help to monitor the humidity and remove extra moisture from the air. This helps protect your home from the formation of mould, spots and corrosion.
Please read this manual carefully before use to ensure proper usage and save these instructions for future reference.
This package includes:
• Ionmax Vienne ION630 Desiccant Dehumidifier
- User Manual
Please Note: The user manual may be altered at any time to assist in quality improvement.
The design and product development may be upgraded without public notice.
CONTENTS
SAFETY INSTRUCTIONS 3
FEATURES & SPECIFICATIONS 4
PRODUCT DIAGRAM 5
CONTROL PANEL 5
UNIT SETUP 6
TO OPERATE SAFELY 6
OPERATING INSTRUCTIONS 7
EMPTYING THE WATER TANK
CONTINUOUS DRAINAGE OPTION 10
MAINTENANCE 11
TROUBLESHOOTING GUIDE 12
WARRANTY DETAILS 14
WARRANTY REGISTRATION 15

PLEASE READ ALL INSTRUCTIONS CAREFULLY BEFORE OPERATING
WARNING - This appliance is intended for use in a domestic environment only. Any other use is not recommended by the manufacturer and may cause fire, electrical shocks or other injury to person or property.
When using electrical appliances, basic safety precautions should always be followed:
- Do not operate the unit with a damaged cord or plug, after it malfunctions or has been dropped or damaged in any way. Return to an authorised service facility for examination and repair.
- This unit should always be kept in an upright position to avoid any damage. Position the unit on a flat stable surface.
- Check the household voltage to ensure it matches the unit's rated specification before operating.
- Operate this unit in an ambient temperature between 1° C and 40° C.
- Ensure that the air inlets and outlets are not blocked or covered.
- Do not place the unit too close to curtains or other objects - refer to Unit Setup instructions.
- When using the "LAUNDRY MODE" to speed up the drying of wet clothes in the room, please keep the clothing at a safe distance from the unit to prevent water from dropping onto the unit.
- Never place anything on top of the unit and do not cover with any kind of material while in use.
- This product is intended for domestic and light office use ONLY and not for commercial, industrial or outdoor use.
- To protect against electrical shocks, do not immerse unit, plug or cord in water, or spray with liquids.
- Never unplug the power cord without pressing the "ON/OFF" button to off first, as this could damage the unit.
- Always unplug the unit when not in use or moving location. To disconnect from the power supply, grip the plug and pull from the power socket. Never pull by the cord.
- Always empty the water tank before storing the unit away.
- Close supervision is necessary when any appliance is used by or near children and pets.
- Do not run power cord under carpeting, or cover with rugs or runners. Arrange the cord away from areas where it may be tripped over.
- Never operate or store the unit in direct sunlight.
- To repair the unit, take it to a qualified service engineer. Repairs carried out by unqualified people may cause damage to the unit or injury to persons or property and void the warranty.
- Where possible, avoid the use of an extension cable as they may overheat and cause a risk of fire. Only use an extension cord after ensuring it is in perfect condition.
- Do not use the unit without the air filter.
This appliance is not intended for use by persons (including children) with reduced physical, sensory or mental capabilities, or lack of experience and knowledge, unless they have been given supervision or instruction concerning use of the appliance by a person responsible for their safety. Children should be supervised to ensure that they do not play with the appliance.
SAVE AND READ THESE IMPORTANT SAFETY INSTRUCTIONS
FEATURES
Compressorless dehumidifier - uses desiccant rotor technology
Environmentally friendly - emits no harmful gases & quiet in operation
Moisture removal - 10 litres/day (20°C, 60%RH)
Water tank capacity - 4.2 litres
Automatic dehumidification - according to power level (H/L) and humidity settings
Digital humidity display - for easy viewing
Timer up to 12 hours - for added convenience
Temperature range for use - 1°C - 40°C
Auto restart after power cut - Once the power is restored after a power failure, the appliance will continue to operate at the selected settings prior to the power failure.
Light and portable with carry handle
Removable water tank with handle
Ioniser for cleaner air
SPECIFICATIONS
| Model Ionmax ION630 | |
| Voltage 220-240V ~ 50Hz | |
| Power consumption 420-740W | |
| Weight 7.5kg | |
| Dimensions 379 (W) x 239 (D) x 520 (H) mm | |
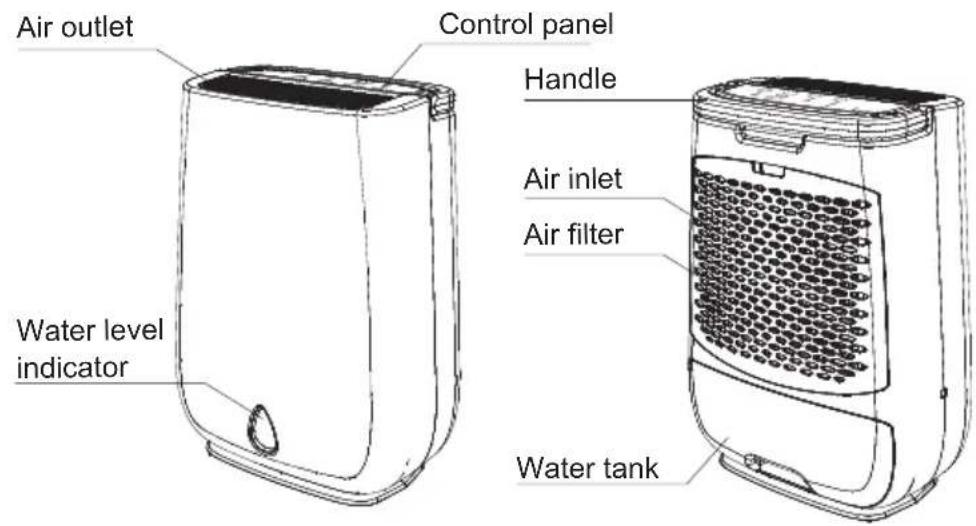
CONTROL PANEL

UNIT SETUP
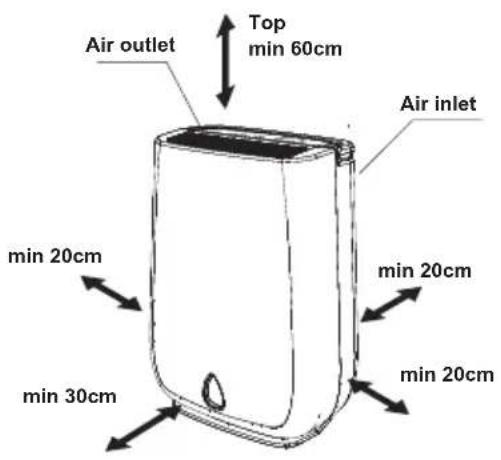
- Place the unit in an upright position on a stable, level surface. (Please ensure unit is not sitting on its own cable).
- Please ensure the unit is a safe distance away from walls and furniture (see image on the left).
- Please keep clothes at a safe distance of 30cm from air outlet of the unit to prevent water dripping into the unit.
- For best results, position the dehumidifier somewhere central like a landing or a hallway. As long as the internal doors are open, the excess moisture from all of the rooms in the house will migrate naturally towards the dehumidifier and be processed.
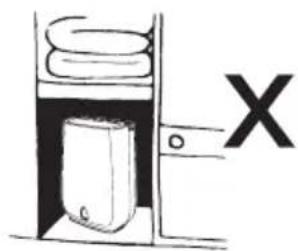
CAUTION: Do not place the dehumidifier in a broom cupboard, boiler room, small unventilated rooms etc. Avoid placing the dehumidifier in small confined areas or in close proximity to a radiator or heat source such as tumble driers and cookers to prevent the dehumidifier from overheating.
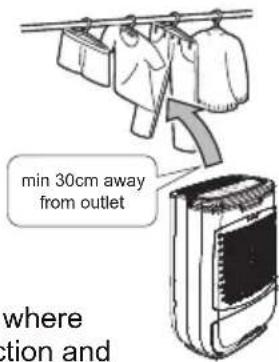

Do not use this dehumidifier in dusty or industrial environments where particles can get into the dehumidifier. This will cause a malfunction and void your warranty.
TO OPERATE SAFELY
Do not insert small objects into the unit as this will damage it and cause a hazard.
Do not attempt to remove the water tank while unit is in operation to avoid water leakage.
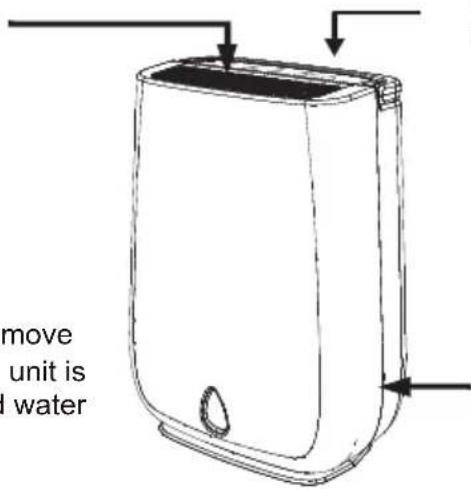
Maintain safe clearance space as shown in Unit Setup.
Ensure the water tank is fitted correctly. If the tank is full or not in place, the "FULL" indicator will light up and the machine will stop operating.

ON AND OFF
- Connect the power plug to the appropriate electrical socket outlet.
- Press the ON/OFF button to turn the appliance ON.
Note: The appliance will start to run on the previously used settings for humidity and fan.
- Press the ON/OFF button again to turn the appliance OFF.
In the event of a power failure
- Once the power is restored after a power failure, the appliance will continue to operate at the selected settings prior to the power failure.
- This includes the power level, relative humidity and time remaining in timer mode.
After turning the appliance OFF
- After turning the appliance OFF using the ON/OFF button, the fan will continue to run for a two minute period. This is a normal procedure and helps to cool and protect the internal components.
- During these two minutes, DO NOT remove the power plug from the electrical socket outlet; wait for the fan to stop running.
ION
- Press the "ION" button to turn the ioniser on and off.
- When the ioniser is on, the unit releases negative ions from the air outlet to help purify the air.
TIMER
- Press the "TIMER" button to select your desired running time (2, 4, 8, or 12 hours). The unit will automatically switch off at the end of the selected time period.
- When no “TIMER” is set (the LED is off), the unit will run continuously, or until the water tank becomes full.
![graph LR A["2H"] --> B["4H"] B --> C["8H"] C --> D["12H"] D --> E["OFF (LED OFF)"] E --> F["Ground"]](/content/2026/05/935183/images/da4fdcdc4bf3419c631d2faa2325738f3a1ca57658091d8e315ffb58d65bfb27.jpg)
RELATIVE HUMIDITY
- Press the "RELATIVE HUMIDITY" button to select your desired relative humidity (RH) level.
- The selected RH level will show up on the digital display and the corresponding LED indicators will light up.
- The RH setting will change at 5% increments with either one or two LEDs lit up. For example, when the selected RH level is 45%, both 40% and 50% LED indicators will light up.
- The set RH level will remain on the digital display for 3 seconds before returning to show the room humidity level again.
![graph LR A["40 50 60 40 50 60"] --> B["40%RH 45%RH"] C["40 50 60"] --> D["50%RH"] E["40 50 60"] --> F["60%RH"] G["40 50 60"] --> H["55%RH"]](/content/2026/05/935183/images/cc2fbd8ce61518a6b7deb025f4fabbc5246ccf89c923f08d330a9cfd4aa95322.jpg)
| MODE DESCRIPTION | |
| 60% | Maintain the room at a comfortable indoor humidity level.Note: Use this mode for maximum energy saving and quiet operation. |
| 50% | Inhibit mould and bacteria growthNote: Use this mode for daily normal household use to maintain humidity at a healthy level of 55%RH (Bacteria and mould will not breed at this level). |
| 40% | Super dry mode to prevent condensationNote: Use this to control a very damp room in the first couple of days and then switch to 50% or 60% to save energy. |
Note:
- RH indicated has a ± 10% RH tolerance and may vary depending on room temperature.
- When the unit's humidity level has been set, the heater and fan will operate at the specified power level until the room humidity level reaches the set humidity level, unless the ambient temperature becomes too high.
- Once the desired humidity level is reached, the humidity setting indicators will flash and the unit will pause dehumidification (the heater and fan will turn off) after 2 minutes of internal cooling. Every 15 minutes, the fan will run for 2 minutes to check the indoor humidity level. If the room humidity is higher than 5% of the set desired humidity level, the appliance will restart dehumidification. If not, the appliance will pause and check again after 15 minutes. During this time, the buttons can still be used to change the settings while the fan is paused.
POWER LEVEL
- Press the "POWER LEVEL" button to select the desired level for the fan and heater.
- The digital display will show "CO" temporarily when Laundry is selected.
![graph LR A["AUTO"] --> B["LOW"] B --> C["HIGH LAUNDRY"]](/content/2026/05/935183/images/2157bb43a62c0a0cf8d9a2e60ec32765aa20bb55b26ffe13358a7fb995817c96.jpg)
| POWER LEVEL DESCRIPTION | |
| Auto | Convenient automatic operationFan and heater settings will be automatically controlledFan and heater will run on high when room humidity is 10% above the desired settingFan and heater will run on low when room humidity is less than 5% above the desired setting |
| Low | Power saving, low noise and long term operation,suitable for daily useFan and heater runs on low speed |
| High | For rapid dehumidificationFan and heater runs on high speed |
| Laundry(Continuous) | Suitable in winter to dry clothes fasterProvides heated air on high speed continuously, only stopping when the water tank is full. Humidity setting will be disabled (all humidity setting indicators will switch off)It can take between 2-8 hours to dry your laundry. You may want to enable a timer setting when using Laundry mode to avoid wasting energy.You may use this mode for extreme drying of very damp rooms and then switch to Auto or Low after a few hours.To prevent excess energy consumption, avoid using Laundry mode for normal daily use. |
DIGITAL DISPLAY

- The digital display will show the room RH level when the unit is in operation.
- When the Relative Humidity button is pressed, the digital display will show the selected RH level. Once the desired RH level has been set, the digital display will show the set RH level for 3 seconds before returning to show the room RH level.
- When Laundry power level is selected, the digital display will show "CO" for 3 seconds before returning to show the room RH level.
EMPTYING THE WATER TANK
- When the water tank is full, the "FULL" LED illuminates and the unit will stop running in a few minutes.
- Do not move the unit or remove the water tank if the unit is still operating, as water may leak, damage the unit or cause an electric shock.
- To remove the water tank, pull it out gently by gripping the bottom of the water tank and lift carefully.
- Remove the cover of water tank first, then pour the water away, clean the water tank and restore the cover and the water tank to the correct position.

Pull water tank out

Lift by the handle
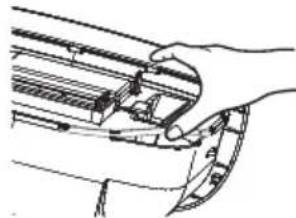
Lift open a corner of the water tank cover
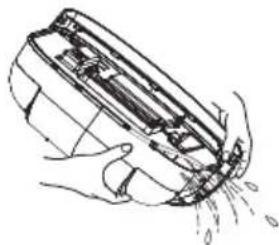
Pour the water away

Refit the cover and restore the water tank into position
CONTINUOUS DRAINAGE OPTION
You may use a hose with an inner diameter of 12mm for continuous drainage:
- Remove the plug from the drain hole at the bottom of the water tank. Keep the plug for future use.
- Fit the hose firmly on the drain connector. The hose must lead to an appropriate drain at a downward slope with no sharp bends.
NOTE:
- Ensure the water tank is fully installed in position before inserting the hose and before running the appliance.
- Before removing the water tank, ensure that the hose is disconnected.


CLEANING THE FILTER
Clean the filter at least once a month to keep your air clean and prolong the life of your dehumidifier.
- Turn off the unit and remove the filter cover and filter from the unit.
- Clean the filter gently using a vacuum cleaner with a smooth head attachment (do not use rotating brushes). Alternatively, wash the filter and wipe gently until thoroughly dry.
- Replace the filter and the cover in position.
- If the filter is covered with dust, the airflow and performance of the unit will be affected. Check the filter periodically to ensure any dust is removed.

Do not operate the unit without the air filter. Dust build-up in the unit can cause malfunction and overheating.

CLEANING THE UNIT
- Turn off the unit, wait for the fan to stop and unplug from the power socket.
- Clean the surface with a soft damp cloth.
- Dry thoroughly with a towel after cleaning.
- In order to avoid damage, do not wash the machine with water, or let water drip into the air inlet or outlet.
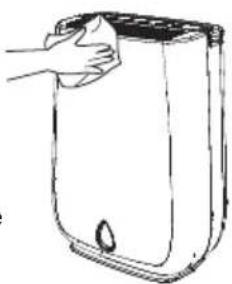

STORING THE UNIT
- Turn off the unit, wait for it to stop and unplug from the power socket.
- Clean and dry the water tank. Leave the unit to drain for approximately one day.
- Clean the filter and the unit. Cover the unit to prevent it from gathering dust. Store upright in a cool dry place.
- Do not expose to direct sunlight.
SMELL COMING FROM THE DEHUMIDIFIER
When you first use the dehumidifier and periodically afterwards you might notice a smell coming from the dehumidifier. This is caused by the Zeolite dessicant material and is not a sign that the dehumidifier is faulty, nor is it harmful to humans or pets. The smell occurs because the Zeolite absorbs odours from items like cigarettes, cosmetics, hair sprays, building materials and new furniture and then when the dessicant is heated, the smell is discharged into the room. This smell has been described as being like a burning smell or sour smell. It is normal, will not last long and is not a sign of a fault.
AMOUNT OF WATER COLLECTED
When you first use your dehumidifier, it will work harder to reduce the room humidity to its target of e.g. 60% RH humidity setting. This is the time when it will produce the most water and need emptying most frequently. As the room becomes drier the dehumidifier collects less water and runs at a lower fan speed. This is normal. When the target relative humidity has been reached, the air coming out of the dehumidifier will not be heated and it will only be running in low fan mode. This is because there is no need for dehumidication at this point and the dehumidifier is sampling the air to check the current relative humidity to see if dehumidification is required.
If you find that you still have condensation on your windows or you need to dry the air further, then try lowering the desired humidity to 40%. Avoid using Laundry mode for this purpose. Note that condensation may be more common if you have single glazed windows or if the outside air temperature drops to freezing.
VENTILATION
The dehumidifier must not be placed in a confined space. Move the dehumidifier to a well ventilated area for example in a hallway, landing or a ventilated room. Ensure that it is not in close proximity to any form of heat source, such as a radiator or appliances that generate heat (e.g. tumble dryer or cooker). The air inlet must not be obstructed.
The following conditions are normal:
- The fan is still running about 2 minutes after the unit is turned off.
- The unit works within room temperature about 1\~40°C. It may stop operation out of this range or when the air inlet or outlet is covered. (The “CHECK” LED light will illuminate)
- The unit includes a heater that could increase the room temperature while actively dehumidifying. If your dehumidifier stops working or "CHECK" LED illuminates, please check the following items first.
| Problem Possible Cause What To Do | ||
| Dehumidifier doesn’t start (no LEDs on) | The unit is not plugged in Make sure | the plug is pushed completely into the outlet. |
| The fuse is blown or circuit breaker is tripped | Check the house fuse / circuit breaker box and replace fuse or reset the breaker. | |
| The unit falls down or is not level on the floor / surface | Place the unit on a stable, level surface. | |
| Very little water is collected. | The room humidity has reached the setting | It is normal, you may choose a lower humidity setting (e.g. 40% RH) for drier air. |
| The ambient temperature is too high, such as over 40°C | Do not use it in a small and closed place where heat accumulates. Move to a cooler place, wait at least 10 minutes to resume operation. | |
| “FULL” LED on | The water tank is full or not in place | Empty the water tank, check the float is in position, and replace the water tank. |
| “CHECK” LED on | The air inlet or outlet is covered or blocked | Make sure there is nothing blocking the air inlet and air outlet of the unit. Clean the filter. Unplug and wait at least 10 minutes to resume operation. |
| Filter clogged with dust | ||
| Leaking | The unit is not level Check the unit is | placed on a level surface and not accidentally sitting on a cable etc. |
| The drainage hose is clogged or loose | Check the drainage hose and its connection. | |
| Unit is noisy | Unit is not on a horizontal flat and level surface | Move and relocate the unit on a horizontal flat and level surface. |
| Air filter is dirty Clean the filter. | ||
NOTE:
- If the “CHECK” LED illuminates, turn off the unit, unplug from the power socket, check and clean the filter. If it is dirty, remove any obstacle that covers the air inlet or outlet, and wait for at least ten minutes before plugging in and switching back on.
- Please contact your retailer if the problem continues. Do not try to repair it yourself, as this could cause an electrical shock and void your warranty.
WARRANTY DETAILS
Congratulations on your purchase! It is our aim to provide you with quality products that you can trust. Our products come with guarantees that cannot be excluded under the Australian Consumer Law. You are entitled to a replacement or a refund for a major failure and for compensation for any other reasonably foreseeable loss or damage. You are also entitled to have the goods repaired or replaced if the goods fail to be of acceptable quality and the failure does not amount to a major failure.
The Guarantee
The product is guaranteed to be free from defects in workmanship and parts for a period of 12 months from date of purchase. Defects that occur within this warranty period, under normal use and care, will be repaired, replaced or refunded at our discretion, solely at our option with no charge for parts and labour. The benefits conferred by this warranty are in addition to all rights and remedies in respect of the product that the consumer has under the Trade Practices Act and similar state laws.
Proof of Purchase
This warranty is valid for the original purchase and is not transferable. Please keep your purchase docket or receipt as proof of purchase and as proof of date on which the purchase was made. The purchase docket (or a copy) or receipt must be presented with the warranty when making a claim under this warranty.
Service during the Warranty Period
To claim for warranty, contact us on 1300 800 200 or support@andatech.com.au to get an RA# (Return Authorisation Number) or submit a support ticket on my.andatech.com.au. Ensure that the RA# is clearly stated on the outside of the packaging and that the product is properly packaged so that no damage occurs to the product during transit. Shipping of the product back to us for warranty will be at your cost. A product return without the RA# or proof of purchase will not be accepted.
Extent of Warranty
This warranty is limited to defects in workmanship or parts. All defective products or parts will be repaired or replaced. This warranty does not cover manuals and packaging.
Normal Wear and Tear
This warranty does not cover normal wear and tear to the product or parts.
Exclusions
This warranty does not cover:
- Any defect caused by an accident, misuse, abuse, improper operation, lack of reasonable care, unauthorised modification, loss of parts, tampering or attempted repair by a person not authorised by the distributor.
- Any product that has been damaged by a lightning strike either directly or indirectly or a main power surge or liquid ingress.
• The product if it is located outside of Australia. - Any damage caused by improper power input or improper cable connection.
WARRANTY REGISTRATION
Register your lonmax Vienne lon630 online at my.andatech.com.au or fill out this form and forward to the address below with a copy of your proof of purchase. Contact us on 1300 800 200 or email support@andatech.com.au for options to extend your warranty.
Andatech Pty Ltd PO Box 3038, Nunawading VIC 3131, Australia.
Date of Purchase : ____
Place of Purchase: ____
Serial No.:
Surname : ____
Given Name :
Address :
Suburb :
Postcode : ____
State :
Contact No.:
Email :


- CONTENTS
- PLEASE READ ALL INSTRUCTIONS CAREFULLY BEFORE OPERATING
- SAVE AND READ THESE IMPORTANT SAFETY INSTRUCTIONS
- FEATURES
- CONTROL PANEL
- UNIT SETUP
- TO OPERATE SAFELY
- ON AND OFF
- IN THE EVENT OF A POWER FAILURE
- AFTER TURNING THE APPLIANCE OFF
- ION
- TIMER
- RELATIVE HUMIDITY
- NOTE
- POWER LEVEL
- DIGITAL DISPLAY
- EMPTYING THE WATER TANK
- CONTINUOUS DRAINAGE OPTION
- CLEANING THE FILTER
- CLEANING THE UNIT
- STORING THE UNIT
- SMELL COMING FROM THE DEHUMIDIFIER
- AMOUNT OF WATER COLLECTED
- VENTILATION
- WARRANTY DETAILS
- THE GUARANTEE
- PROOF OF PURCHASE
- SERVICE DURING THE WARRANTY PERIOD
- EXTENT OF WARRANTY
- NORMAL WEAR AND TEAR
- EXCLUSIONS
- WARRANTY REGISTRATION
Brand : Ionmax
Model : Vienne ION630
Category : Humidifier