
ISC-H002 - Detector Dahua Technology - Free user manual and instructions
Find the device manual for free ISC-H002 Dahua Technology in PDF.


| Product Type | Handheld Metal Detector |
| Model | DHI-ISC-H002 (ISC-H002) |
| Detection Method | Magnetic and non-magnetic metal detection |
| Detection Sensitivity | Capable of detecting a No. 10 staple |
| Detection Zone | 155 mm × 80 mm |
| Alarm Modes | Sound, light, vibration (selectable) |
| Sensitivity Levels | 4 levels: Low (L), Medium (M), High (H), Ultra-high (HM) |
| Metal Intensity Indication | 4 levels with corresponding lights and tones |
| Power Source | 2 × AA batteries (alkaline, Ni-MH, or Ni-Cd) |
| Battery Life | Long battery life (exact duration not specified) |
| Standby Mode | Enters standby after 2 minutes of inactivity |
| Auto Power Off | After 10 minutes in standby |
| Low Battery Indication | Flashing LED, frequency increases as battery drains |
| Drop Resistance | 1 meter fall without damage |
| Cleaning | Damp cloth only; no chemical detergents |
| Maintenance | Do not disassemble; remove battery if not used for long periods |
| Included Accessories | Detector, 2 dry batteries, lanyard, user manual |
| Dimensions | Approximately 250 mm × 80 mm × 40 mm (estimated) |
| Weight | Approximately 300 g (estimated) |
Frequently Asked Questions - ISC-H002 Dahua Technology
User questions about ISC-H002 Dahua Technology
0 question about this device. Answer the ones you know or ask your own.
Ask a new question about this device
Download the instructions for your Detector in PDF format for free! Find your manual ISC-H002 - Dahua Technology and take your electronic device back in hand. On this page are published all the documents necessary for the use of your device. ISC-H002 by Dahua Technology.
USER MANUAL ISC-H002 Dahua Technology
Handheld Metal Detector
User's Manual

natural_image
Abstract geometric composition with gray and red shapes (no text or symbols)Foreword
General
This manual introduces the functions and operations of the handheld metal detector (hereinafter referred to as the "Detector").
Model
DHI-ISC-H002
Safety Instructions
The following signal words might appear in the manual.
| Signal Words Meaning | |
 DANGER DANGER | Indicates a high potential hazard which, if not avoided, will result in death or serious injury. |
 WARNING WARNING | Indicates a medium or low potential hazard which, if not avoided, could result in slight or moderate injury. |
 CAUTION CAUTION | Indicates a potential risk which, if not avoided, could result in property damage, data loss, reductions in performance, or unpredictable results. |
 TIPS TIPS | Provides methods to help you solve a problem or save time. |
 NOTE NOTE | Provides additional information as a supplement to the text. |
Revision History
| Version | Revision Content | Release Time |
| V1.0.0 | First release. | September 2021 |
Privacy Protection Notice
As the device user or data controller, you might collect the personal data of others such as their face, fingerprints, and car plate number. You need to be in compliance with your local privacy protection laws and regulations to protect the legitimate rights and interests of other people by implementing measures which include but are not limited: Providing clear and visible identification to inform people of the existence of the surveillance area and provide required contact information.
About the Manual
- The manual is for reference only. Slight differences might be found between the manual and the product.
- We are not liable for losses incurred due to operating the product in ways that are not in compliance with the manual.
- The manual will be updated according to the latest laws and regulations of related jurisdictions. For detailed information, see the paper user's manual, use our CD-ROM, scan the QR code or visit our official website. The manual is for reference only. Slight differences might be found between the electronic version and the paper version.
- All designs and software are subject to change without prior written notice. Product updates might result in some differences appearing between the actual product and the manual. Please contact customer service for the latest program and supplementary documentation.
- There might be errors in the print or deviations in the description of the functions, operations and technical data. If there is any doubt or dispute, we reserve the right of final explanation.
- Upgrade the reader software or try other mainstream reader software if the manual (in PDF format) cannot be opened.
- All trademarks, registered trademarks and company names in the manual are properties of their respective owners.
- Please visit our website, contact the supplier or customer service if any problems occur while using the device.
- If there is any uncertainty or controversy, we reserve the right of final explanation.
Important Safeguards and Warnings
This section describes content covering the proper handling of the Detector, hazard prevention, and prevention of property damage. Read the content carefully before using the Detector, comply with the manual when using it, and keep the manual safe for future reference.
Power Requirements

WARNING
- Use the battery according to requirements; otherwise it might result in fire or explosion.
- When replacing the battery, make sure that the same model is used.
Environment Requirements

● Transport, use and store the Detector under the allowed humidity and temperature conditions.
- Prevent any liquid from flowing into the Detector.
- Protect the Detector from heavy loads, violent vibrations, or immersion.
- Pack the Detector with packaging materials provided by its manufacturer or materials with the same quality before transporting it.
Operation and Maintenance Requirements

WARNING
Do not disassemble the Detector by yourself. Otherwise you are responsible for reduced performance or device damage.

- Remove the battery if it will not be used for a long time, and prevent the battery from short circuiting when storing it.
- Do not immerse the Detector in water to prevent the internal components from being damaged by a short circuit.
- Clean the Detector with a damp cloth instead of chemical detergent.
Table of Contents
Foreword....I
Important Safeguards and Warnings.... III
1 Overview....1
1.1 Introduction....1
1.2 Features .... 1
2 Packing List.... 3
3 Appearance and Dimensions.... 4
4 Indicators and Buttons.... 5
5 Operations 7
5.1 Installing Battery 7
5.2 Turning On/Off the Detector 7
5.3 Adjusting Sensitivity 7
5.4 Replacing Battery 8
5.5 Notes to Operations 8
6 FAQ 9
Appendix 1 Cybersecurity Recommendations.... 10
1 Overview
1.1 Introduction
The Detector is a high-sensitivity handheld device specially designed for detecting magnetic and non-magnetic metal objects. It can be used to detect metal objects such as knives that are carried in packages, as well as extremely tiny non-magnetic metal objects. The Detector combines sound, indicator light, and vibration alarms, and it can adapt to various inspection requirements. Long battery life meets your inspection needs.
1.2 Features
Detection accuracy
High sensitivity, and capable of detecting items as small as a No. 10 staple.
Detection distance
Performs stably within its detection area. The performance will not be influenced by battery consumption.
Alarm mode switch
Combines sound, light, and vibration alarms.
Sensitivity adjustment
4 sensitivity levels are available: Low, medium, high, and ultra-high.
Metal detection intensity
4 levels of metal detection intensity are available. The corresponding indicator will show different numbers according to the sizes and distances of detected metals.
Alarm tone
Different alarm tones are available when metals of different sizes or distances are detected.
Power saving
Enters standby mode and turns off its lights when idle for 2 minutes; Shuts down automatically when idle for 10 minutes while in standby mode.
Low power alarm
Low voltage indicator flashes when battery is low.
Reliable performance
The Detector can function normally after falling from a height of 1 meter.
2 Packing List
After receiving the product, check against the table below. If there are any problems, contact the after-sales service personnel.
Table 2-1 Checking list
| No. List Description | |||
| 1 | Overall packaging | Appearance | Obvious damage or not |
| Packaging | Accidental impact or not | ||
| Accessories Complete | or not | ||
| 2 Host | Appearance | Obvious damage or not | |
| Model | Whether consistent with the order contract | ||
| Labels on the equipment | Tear off or notDo not tear off or discard the label, otherwise it will affect the warranty service of the device.When contacting the company's after-sales, the serial number of the product is required. | ||
For the packing list, see the following table.
Table 2-2 Packing List
| Name Quantity | |
| Handheld Metal Detector 1 | |
| Dry Battery 2 | |
| Lanyard 1 | |
| User's Manual | 1 |
3 Appearance and Dimensions
Figure 3-1 Appearance
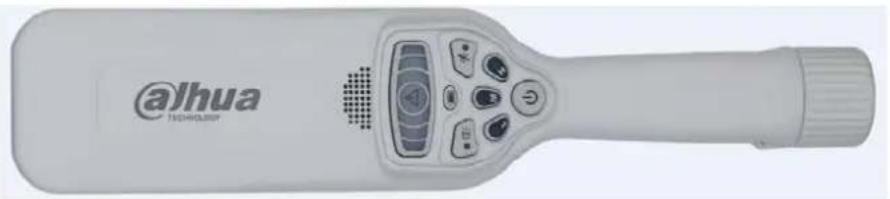
natural_image
White handheld electronic device with control panel and buttons, no visible text or symbols on bodyFigure 3-2 Dimensions
![36 [1.42] 80 [3.15] 378 [14.88]](/content/2026/05/935007/images/1bdbd9821ac811adc38f4842f65bf7736febdae6836a24d75a518a5b15ceaf85.jpg)
4 Indicators and Buttons
Figure 4-1 Indicators and buttons
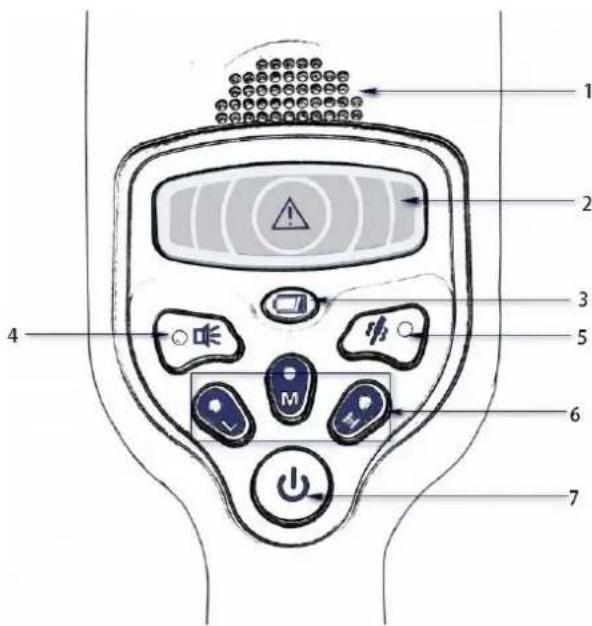
Table 4-1 Description of indicators and buttons
| No. | Name Description | |
| 1 | Metal alarm buzzer | Different alarm tones are available when metals of different sizes or distances are detected. |
| 2 | Metal alarm indicator | Shows different light levels when metals of different sizes or distances are detected. There are 4 levels in total, increasing from the center to the edge. |
| 3 | Low voltage indicator | The indicator flashes once every 2 seconds when the battery is low, and as the battery continues to decrease, the indicator flashes faster and stays on finally. |
| 4 | Sound alarm button | Press to enable the sound alarm function (the button indicator flashes). Press it again to disable the function (the button indicator is off). |
| 5 | Vibration alarm button | Press to enable the vibration alarm function (the button indicator flashes). Press it again to disable the function (the button indicator is off). |
| 6 | Buttons for adjusting sensitivity | L: Low sensitivityM: Medium sensitivityH: High sensitivityHM: Ultra-high sensitivity To enable HM, press H, and then press M+H. The M and H indicators turn on at the same time, meaning the ultra-high sensitivity function is enabled. To enable HM, press H, and then press M+H. The M and H indicators turn on at the same time, meaning the ultra-high sensitivity function is enabled. |
| 7 | Power button | Press and hold  for 1 second to turn on the Detector. Press and hold for 1 second to turn off the Detector. for 1 second to turn on the Detector. Press and hold for 1 second to turn off the Detector. |
5 Operations
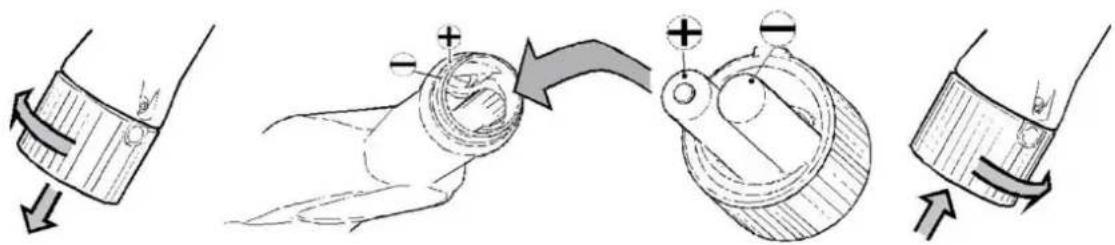
5.1 Installing Battery
Step 1 Remove screws from the bottom of the Detector.
Step 2 Loosen the battery compartment cover, and then install the battery according to the polarity instructions on the compartment opening.
Step 3 Tighten the battery compartment cover and screws to ensure good battery contact.
Figure 5-1 Replace battery
5.2 Turning On/Off the Detector
- Press and hold the power button for 1 second. If all the device lights flash once and then go out, and the lights of enabled functions flash once every 2 seconds, the Detector starts normally.

The sound and vibration functions can be enabled or disabled through corresponding buttons.
- Press and hold the power button for 1 second. If all the lights flash once and then go out, the Detector turns off. If the battery is low, the low voltage indicator flashes.
5.3 Adjusting Sensitivity
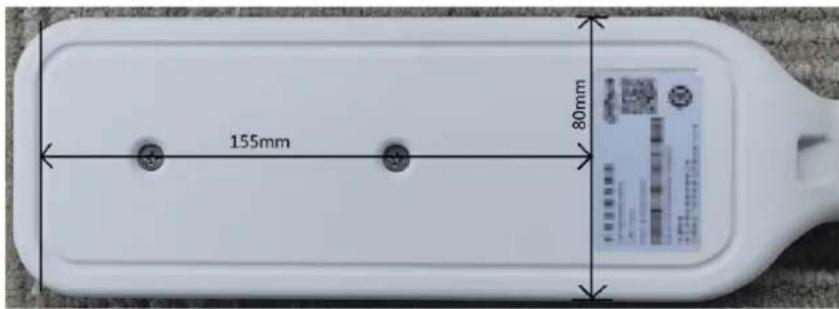
The Detector is designed with a sensitivity adjustment button with 4 levels. Generally, set the sensitivity to H (high sensitivity). Use other sensitivity levels depending on the size and the distance of the metal object to be detected. The sensitivity area is located in the middle and upper part of the Detector, and the detection zone is 155 mm × 80 mm.

HM (ultra-high sensitivity) is generally used to detect tiny metals. It cannot be set to detect the human body because false alarms are easily triggered when the human heart and thigh are detected. H (high sensitivity) can be used to detect humans.
Figure 5-2 Sensitivity area
5.4 Replacing Battery
The Detector can be powered by 2 × AA alkaline batteries or NI-MH, Ni-Cd rechargeable batteries. For rechargeable batteries, when the battery is low, take the batteries out of the Detector, and charge them with a charger. After the batteries are fully charged, put them back into the Detector. For non-rechargeable batteries, when the battery is low, you need to replace them with new ones.
5.5 Notes to Operations
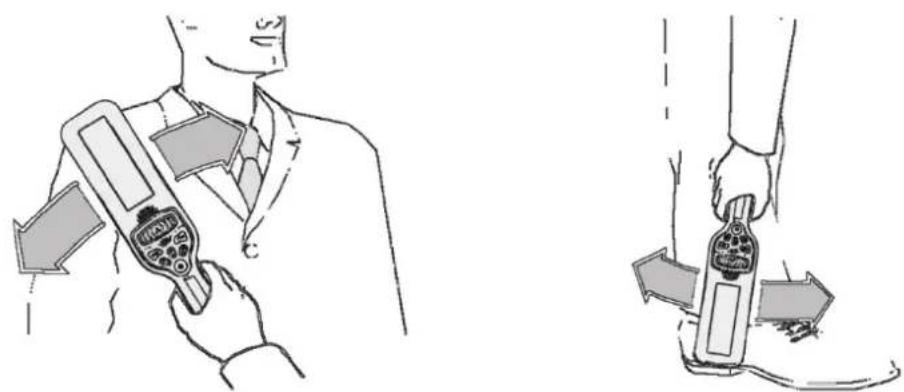
When using the Detector to scan a human body, place it close to the surface of the human body for scanning inspection. Keep the Detector in a vertical downward direction when scanning feet and ankles.

For better detection results, do not use the Detector on a metal ground.
Figure 5-3 Notes to operations
natural_image
Illustration showing a person using a handheld device to interact with another hand, both demonstrating directional arrows (no text or symbols present)
Do not disassemble the Detector by yourself. Otherwise you are responsible for reduced performance or device damage.
6 FAQ
This section provides guidance on solving some typical problems related to the Detector.
Table 6-1 FAQ
| Problem Reason Solutions | ||
| The Detector cannot be started. | The battery is not installed correctly or the battery runs out. | Install the battery correctly.If the battery is non-chargeable, replace the batteries with new ones.If the battery is rechargeable, take the batteries out from the Detector, and charge them with a charger. |
| The Detector does not work after being powered on. | The battery is low. | If the battery is non-chargeable, replace the batteries with new ones.If the battery is rechargeable, take the batteries out from the Detector, and charge them with a charger. |
Appendix 1 Cybersecurity Recommendations
Cybersecurity is more than just a buzzword: it's something that pertains to every device that is connected to the internet. IP video surveillance is not immune to cyber risks, but taking basic steps toward protecting and strengthening networks and networked appliances will make them less susceptible to attacks. Below are some tips and recommendations on how to create a more secured security system.
Mandatory actions to be taken for basic device network security:
1. Use Strong Passwords
Please refer to the following suggestions to set passwords:
- The length should not be less than 8 characters;
- Include at least two types of characters; character types include upper and lower case letters, numbers and symbols;
- Do not contain the account name or the account name in reverse order;
- Do not use continuous characters, such as 123, abc, etc.;
- Do not use overlapped characters, such as 111, aaa, etc.;
2. Update Firmware and Client Software in Time
- According to the standard procedure in Tech-industry, we recommend to keep your device (such as NVR, DVR, IP camera, etc.) firmware up-to-date to ensure the system is equipped with the latest security patches and fixes. When the device is connected to the public network, it is recommended to enable the "auto-check for updates" function to obtain timely information of firmware updates released by the manufacturer.
- We suggest that you download and use the latest version of client software.
"Nice to have" recommendations to improve your device network security:
1. Physical Protection
We suggest that you perform physical protection to device, especially storage devices. For example, place the device in a special computer room and cabinet, and implement well-done access control permission and key management to prevent unauthorized personnel from carrying out physical contacts such as damaging hardware, unauthorized connection of removable device (such as USB flash disk, serial port), etc.
2. Change Passwords Regularly
We suggest that you change passwords regularly to reduce the risk of being guessed or cracked.
3. Set and Update Passwords Reset Information Timely
The device supports password reset function. Please set up related information for password reset in time, including the end user's mailbox and password protection questions. If the information changes, please modify it in time. When setting password protection questions, it is suggested not to use those that can be easily guessed.
4. Enable Account Lock
The account lock feature is enabled by default, and we recommend you to keep it on to guarantee the account security. If an attacker attempts to log in with the wrong password several times, the corresponding account and the source IP address will be locked.
5. Change Default HTTP and Other Service Ports
We suggest you to change default HTTP and other service ports into any set of numbers between 1024\~65535, reducing the risk of outsiders being able to guess which ports you are using.
6. Enable HTTPS
We suggest you to enable HTTPS, so that you visit Web service through a secure communication channel.
7. MAC Address Binding
We recommend you to bind the IP and MAC address of the gateway to the device, thus reducing the risk of ARP spoofing.
8. Assign Accounts and Privileges Reasonably
According to business and management requirements, reasonably add users and assign a minimum set of permissions to them.
9. Disable Unnecessary Services and Choose Secure Modes
If not needed, it is recommended to turn off some services such as SNMP, SMTP, UPnP, etc., to reduce risks.
If necessary, it is highly recommended that you use safe modes, including but not limited to the following services:
- SNMP: Choose SNMP v3, and set up strong encryption passwords and authentication passwords.
- SMTP: Choose TLS to access mailbox server.
- FTP: Choose SFTP, and set up strong passwords.
- AP hotspot: Choose WPA2-PSK encryption mode, and set up strong passwords.
10. Audio and Video Encrypted Transmission
If your audio and video data contents are very important or sensitive, we recommend that you use encrypted transmission function, to reduce the risk of audio and video data being stolen during transmission.
Reminder: encrypted transmission will cause some loss in transmission efficiency.
11. Secure Auditing
- Check online users: we suggest that you check online users regularly to see if the device is logged in without authorization.
- Check device log: By viewing the logs, you can know the IP addresses that were used to log in to your devices and their key operations.
12. Network Log
Due to the limited storage capacity of the device, the stored log is limited. If you need to save the log for a long time, it is recommended that you enable the network log function to ensure that the critical logs are synchronized to the network log server for tracing.
13. Construct a Safe Network Environment
In order to better ensure the safety of device and reduce potential cyber risks, we recommend:
- Disable the port mapping function of the router to avoid direct access to the intranet devices from external network.
- The network should be partitioned and isolated according to the actual network needs. If there are no communication requirements between two sub networks, it is suggested to use VLAN, network GAP and other technologies to partition the network, so as to achieve the network isolation effect.
- Establish the 802.1x access authentication system to reduce the risk of unauthorized access to private networks.
- Enable IP/MAC address filtering function to limit the range of hosts allowed to access the device.
ENABLING A SAFER SOCIETY AND SMARTER LIVING
- Handheld Metal Detector
- User's Manual
- Foreword
- General
- Model
- Safety Instructions
- Revision History
- Privacy Protection Notice
- About the Manual
- Important Safeguards and Warnings
- Power Requirements
- WARNING
- Environment Requirements
- Operation and Maintenance Requirements
- Table of Contents
- Foreword....I
- Important Safeguards and Warnings.... III
- Overview....1
- Packing List.... 3
- Appearance and Dimensions.... 4
- Indicators and Buttons.... 5
- Operations 7
- FAQ 9
- Appendix 1 Cybersecurity Recommendations.... 10
- Overview
- Introduction
- Features
- Power saving
- Low power alarm
- Reliable performance
- Packing List
- Appearance and Dimensions
- Indicators and Buttons
- Operations
- Installing Battery
- Turning On/Off the Detector
- Adjusting Sensitivity
- Replacing Battery
- Notes to Operations
- FAQ
- Appendix 1 Cybersecurity Recommendations
- Mandatory actions to be taken for basic device network security:
- Use Strong Passwords
- Update Firmware and Client Software in Time
- "Nice to have" recommendations to improve your device network security:
- Physical Protection
- Change Passwords Regularly
- Set and Update Passwords Reset Information Timely
- Enable Account Lock
- Change Default HTTP and Other Service Ports
- Enable HTTPS
- MAC Address Binding
- Assign Accounts and Privileges Reasonably
- Disable Unnecessary Services and Choose Secure Modes
- Audio and Video Encrypted Transmission
- Secure Auditing
- Network Log
- Construct a Safe Network Environment
- ENABLING A SAFER SOCIETY AND SMARTER LIVING
Brand : Dahua Technology
Model : ISC-H002
Category : Detector