
ITALE-160BA-IR8-P - LED Lighting Dahua Technology - Free user manual and instructions
Find the device manual for free ITALE-160BA-IR8-P Dahua Technology in PDF.


| Product Type | Network IR Bullet Camera |
| Brand | Dahua Technology |
| Model | ITALE-160BA-IR8-P |
| Image Sensor | 1/2.8" Progressive Scan CMOS, 2MP (1920x1080) |
| Lens | Fixed focal length, 8mm |
| Infrared Range | Up to 30m (98ft) |
| Minimum Illumination | 0.01 Lux (color), 0 Lux (B/W with IR) |
| Video Compression | H.265+ / H.265 / H.264+ / H.264 / MJPEG |
| Day/Night | ICR auto switch with IR-cut filter |
| Network Interface | 10/100 Base-T Ethernet (RJ-45) with PoE |
| Power Supply | PoE (802.3af) or 12V DC |
| Power Consumption | Max 7.5W (with IR) |
| Dimensions (WxHxD) | 200mm x 100mm x 100mm (bracket included) |
| Weight | Approx. 1.2kg (2.65lb) |
| Ingress Protection | IP67 (weatherproof) |
| Operating Temperature | -30°C to +60°C (-22°F to +140°F) |
| Protocols | IPv4/IPv6, HTTP, HTTPS, TCP/IP, UDP, DHCP, DNS, ONVIF (Profile S/G) |
| Main Functions | Motion detection, tampering alarm, remote viewing (via browser or app), IR night vision, smart IR, 3D DNR, WDR (120dB) |
| Maintenance & Cleaning | Clean lens with soft, dry cloth; check cable seals periodically |
| Safety Precautions | Install on stable surface; disconnect power before cleaning; avoid exposure to extreme temperatures outside rated range |
| Spare Parts & Repairability | No user-serviceable parts; contact authorized service for repairs |
| General Information | Supports ONVIF, compatible with Dahua NVRs and third-party software |
Frequently Asked Questions - ITALE-160BA-IR8-P Dahua Technology
User questions about ITALE-160BA-IR8-P Dahua Technology
0 question about this device. Answer the ones you know or ask your own.
Ask a new question about this device
Download the instructions for your LED Lighting in PDF format for free! Find your manual ITALE-160BA-IR8-P - Dahua Technology and take your electronic device back in hand. On this page are published all the documents necessary for the use of your device. ITALE-160BA-IR8-P by Dahua Technology.
USER MANUAL ITALE-160BA-IR8-P Dahua Technology
LED Multifunction Illuminator
User's Manual

Foreword
General
This manual introduces the functions and operations of the LED multifunction illuminator (hereinafter referred to as "the Illuminator").
Models
DHI-ITALE-160BA
Safety Instructions
The following signal words might appear in the manual.
| Signal Words Meaning | ||
 | DANGER | Indicates a high potential hazard which, if not avoided, will result in death or serious injury. |
 | WARNING | Indicates a medium or low potential hazard which, if not avoided, could result in slight or moderate injury. |
 | CAUTION | Indicates a potential risk which, if not avoided, could result in property damage, data loss, reductions in performance, or unpredictable results. |
 | TIPS Provides methods to help you solve a problem or save time. | |
 | NOTE | Provides additional information as a supplement to the text. |
Revision History
| Version | Revision Content | Release Time |
| V1.0.3 | Updated manual format. | November 2021 |
| V1.0.2 | Updated illuminator structure and dimension pictures. | June 2021 |
| V1.0.1 | Updated manual format. | February 2021 |
| V1.0.0 | First release. | December 2020 |
Privacy Protection Notice
As the device user or data controller, you might collect the personal data of others such as their face, fingerprints, and license plate number. You need to be in compliance with your local privacy protection laws and regulations to protect the legitimate rights and interests of other people by implementing measures which include but are not limited: Providing clear and visible identification to inform people of the existence of the surveillance area and provide required contact information.
About the Manual
- The manual is for reference only. Slight differences might be found between the manual and the product.
- We are not liable for losses incurred due to operating the product in ways that are not in compliance with the manual.
- The manual will be updated according to the latest laws and regulations of related jurisdictions. For detailed information, see the paper user's manual, use our CD-ROM, scan the QR code or visit our official website. The manual is for reference only. Slight differences might be found between the electronic version and the paper version.
- All designs and software are subject to change without prior written notice. Product updates might result in some differences appearing between the actual product and the manual. Please contact customer service for the latest program and supplementary documentation.
- There might be errors in the print or deviations in the description of the functions, operations and technical data. If there is any doubt or dispute, we reserve the right of final explanation.
- Upgrade the reader software or try other mainstream reader software if the manual (in PDF format) cannot be opened.
- All trademarks, registered trademarks and company names in the manual are properties of their respective owners.
- Please visit our website, contact the supplier or customer service if any problems occur while using the device.
- If there is any uncertainty or controversy, we reserve the right of final explanation.
Important Safeguards and Warnings
This section introduces content covering the proper handling of the device, hazard prevention, and prevention of property damage. Read carefully before using the device, comply with the guidelines when using it, and keep the manual safe for future reference.
Transportation Requirements
!
- Pack the device with packaging provided by its manufacturer or packaging of the same quality before transporting it.
- Transport the device under allowed humidity and temperature conditions.
Storage Requirements
!
Store the device under allowed humidity and temperature conditions.
Installation Requirements
!
WARNING
- Do not connect the power adapter to the device while the adapter is powered on.
- Strictly comply with the local electric safety code and standards. Make sure the ambient voltage is stable and meets the power supply requirements of the device.
- Do not connect the device to two or more kinds of power supplies, to avoid damage to the device.
- When handling or installing the device, do not pull the power cord of the waterproof connector to prevent the connector from becoming loose.
- Use the accessories suggested by the manufacturer. Installation and maintenance must be performed by qualified professionals.
- A large surge of current will be generated when the device flashes. Use separate power cord and 20 Ah air switch for it.
!
- Personnel working at heights must take all necessary measures to ensure personal safety including wearing a helmet and safety belts.
- Do not place the device in a place exposed to sunlight or near heat sources.
- Keep the device away from dampness, dust, and soot.
- Put the device in a well-ventilated place, and do not block its ventilation.
- Use an adapter or cabinet power supply provided by the manufacturer.
- The power supply must conform to the requirements of ES1 in IEC 62368-1 standard and be no higher than PS2. Please note that the power supply requirements are subject to the device label.
- The device is a class I electrical appliance. Make sure that the power supply of the device is connected to a power socket with protective earthing.
- An emergency disconnect device must be installed during installation and wiring at a readily
accessible location for emergency power cut-off.
- Prevent water from flowing into the device and causing damage during on-site installation.
Operation Requirements

WARNING
- Avoid violent collisions.
- Do not constantly use flash for the device while testing it to avoid the risk of the device overheating or becoming damaged.
- If an abnormality in the operation of the device occurs, immediately cut off the power supply, and then identify and resolve the issue before attempting to use the device again.
- Do not replace the special screws with other screws. If the replacement screws are too long, then the internal components might become damaged.
- High voltage inside the device. Do not disassemble the device without a qualified professional present to avoid the risk of being exposed to danger.

- Make sure that the power supply is correct before use.
- Do not unplug the power cord on the side of the device while the adapter is powered on.
- Operate the device within the rated range of power input and output.
- Use the device under allowed humidity and temperature conditions.
- Do not drop or splash liquid onto the device, and make sure that there is no object filled with liquid on the device to prevent liquid from flowing into it.
- Do not vibrate, squeeze or immerse the device in liquid during transportation, storage or installation.
- Protect the line cord and wires from being walked on or squeezed particularly at plugs, power sockets, and the point where they exit from the device.
- We recommend you use the device with a lightning protection device for stronger protection against lightning. For outdoor scenarios, strictly comply with the lightning protection regulations.
- Ground the function earthing portion of the device to improve its reliability. The device is a class I electrical appliance. Make sure that the power supply of the device is connected to a power socket with protective earthing.
Maintenance Requirements

Use the accessories suggested by the manufacturer. Installation and maintenance must be performed by qualified professionals.
Table of Contents
Foreword ....
Important Safeguards and Warnings....III
1 Introduction .... 1
1.1 Introduction ...... 1
1.2 Features....1
2 Structure....3
2.1 Appearance....3
2.2 Dimension 3
3 Installation....4
4 Connecting Cable 6
4.1 Waterproof Operation 6
4.2 Connecting Power Cable....6
4.3 Connecting Flashlight/Strobe Cable....7
4.4 Connecting RS-485 Cable....8
4.5 Connecting Serial Port 9
5 Configuring Camera....10
5.1 Configuring External Light....10
5.2 Configuring External RS-485 (Strobe)....11
5.3 Configuring External RS-485 (Continuous Light)....12
6 Updating Program....14
7 Notes....15
7.1 Start-up Time....15
7.2 Note....15
Appendix 1 Cybersecurity Recommendations....16
1 Introduction
1.1 Introduction
ITALE-160BA is an LED illuminator, integrating strobe, continuous light and flashlight. The unique optical design makes it capable of oriented illumination at night, which greatly reduces light pollution of city road and improves traffic safety. The Illuminator supports video and image illumination, meanwhile, integrates camera maintenance. It is generally used as night illuminator for E-Police or ANPR enforcement camera to propel the modernization management of road and city traffic.
For structure and hardware, the Illuminator adopts ITC special design to greatly improve product life and work efficiency. Same as that, heat from the Illuminator dissipating through modular radiation unit is also specially designed to ensure heat dispersion, stability and safety.
1.2 Features
- Integrated Functions The Illuminator integrates imported high performance LED strobe and flashlight together. Cold light and warm light are optional.
- Oriented Illumination The Illuminator adopts special optical design. With optical grating type, it can highly polymerize light beam to illuminate single lane, which reduces light pollution in non-illumination area greatly.
- Low Cost Maintenance The Illuminator supports linking cameras (Dahua traffic cameras only) through RS-485, displaying illuminator status and more information. Covering 3 lanes of illumination (multiple lane type) can greatly reduce the needed Illuminator number, therefore reduce maintenance cost.
- Video Synchronization The LED strobe synchronizes the camera video to perform better illumination effect on plate.
- Capture Synchronization The LED flashlight synchronizes the camera capture to perform better illumination effect on human face inside car window and details.
- Adjustable Brightness You can adjust the LED strobe brightness (wide range) on camera web page.
- Adjustable Pulse Width You can configure the pulse width of the flashlight as 0 ms–3 ms and the strobe as 0 ms–5 ms on camera web page.
- Adjustable Frequency You can configure flashlight frequency on camera web page.
- Flash Interval No more than 10 ms flash interval meets the traffic camera requirement for continuous capture.
- Trigger Mode
The Illuminator supports low electrical level and pulse width triggering.
- Flashlight Duration You can calculate the device product life through the duration of the flashlight shines.
- Flash Counting You can quickly locate the signal interference on site through counting the times of the Illuminator flashes and being triggered (times of external signal input).
- Anti-interference The Illuminator filters the detected pulse width (below the configured threshold) to ensure the device works properly and improve reliability.
- False Triggering Shield To ensure that the device works properly and prolong product life, it supports shielding false triggering interference (you can configure the threshold for false triggering. When external signal input exceeds the threshold, the Illuminator enters protection mode, during which it will respond to the next triggering signal after 10 s. Default value is 3, meaning that 3 flashes are allowed during 500 ms, 4 flashes during 1 s and 8 flashes during 3 s).
- Error Display You can view the normal or abnormal status of the Illuminator on the camera web page remotely (Dahua traffic cameras only).
- Creative Structure Streamline design, simple appearance and high saturation greatly improve the protection level (waterproof and dust-free). The inside heat dissipation design prevents the Illuminator from overheating damage effectively.
2 Structure
2.1 Appearance
Figure 2-1 Product appearance

2.2 Dimension
Figure 2-2 Dimension (mm [inch])
![258.0 [10.16] 250.9 [9.88]](/content/2026/05/935003/images/2d8ccf91a767ad6f10a7a10799fd67670c9d930d52bfb935e5d55262a0e91220.jpg)
![84.0 [3.31]](/content/2026/05/935003/images/6c32c73c202716cd2b51e6d26231da97bb762df4a82e348f867a1dffa90bf189.jpg)
3 Installation
Step 1 Match the Illuminator with bracket, and then install them on the pole (only upright mount and hang mount).
Figure 3-1 Upright mount
Upright Mount
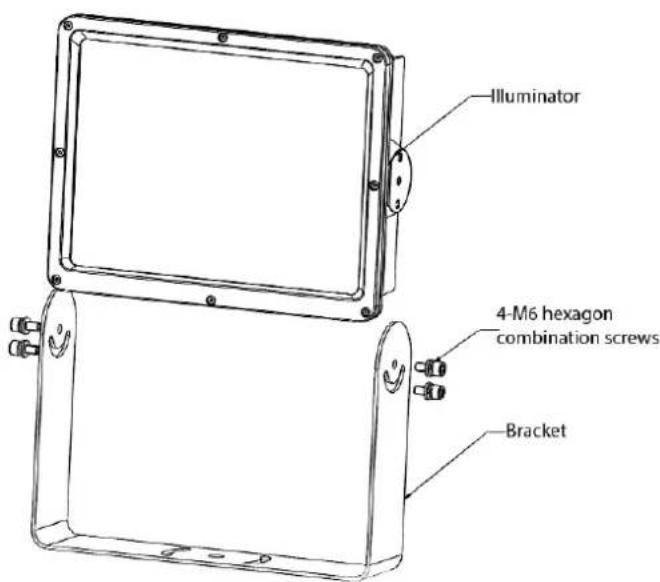
Figure 3-2 Hang mount
Hang Mount

Step 2 Connect power cable (ground). For details, see "4.2 Connecting Power Cable".
Step 3 Adjust the angle of the Illuminator as needed.
Step 4 Power on the Illuminator, and wait for about 10 s to check the device status. You can
operate on it when under normal status.

You can check the Illuminator status through directly connecting the positive with the negative signal cable of the strobe or flashlight. If it flashes, the Illuminator works.
4 Connecting Cable
4.1 Waterproof Operation
Step 1 Wrap the juncture (marked as 2 in Figure 4-1) of the cable core and insulation cover with insulation tape, and then wrap it again with waterproof insulation tape.
Step 2 Wrap the naked cable core (marked as 1 in Figure 4-1) with insulation tape, and then wrap it again with waterproof insulation tape.
Step 3 Wrap 1 and 2 together with normal and waterproof insulation tape.
Step 4 Place the cable inside the waterproof tube.
Step 5 Drill holes on the tube below the cable connector to avoid water accumulation.

- Connect cables with corresponding devices (power and signal cable included). Otherwise the device might not work properly.
- Cables need to be waterproof. If water gets inside the flashlight, the device might not work properly.
Figure 4-1 Cable connection

Table 4-1 Cable connection description
| No. Description | |
| 1 The naked cable core connector. | |
| 2 The juncture of the cable core and insulation cover. | |
4.2 Connecting Power Cable
Connect the power cable of the Illuminator.
Figure 4-2 Power cable
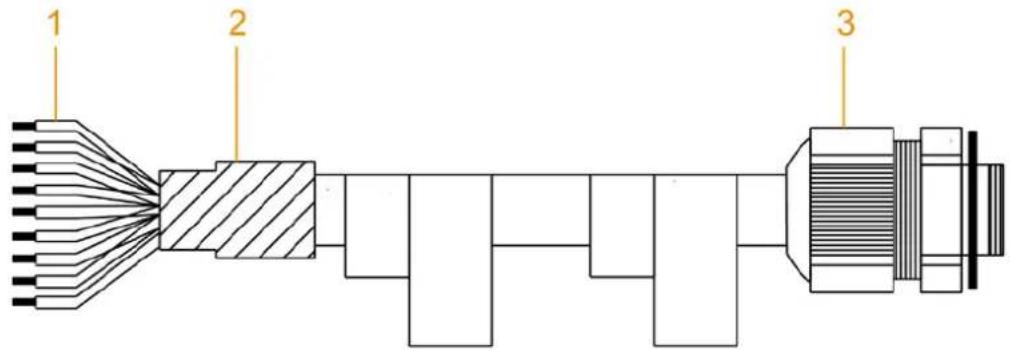
Table 4-2 Description of power cable
| No. Function Description | ||
| 1 Power cable | Blue: Neutral line. 220 VACBrown: Live line. 220 VACYellow and green: Ground lineYellow: Flashlight +Blue: Flashlight -Green: Strobe +Gray: Strobe-/GNDRed: RS-485AWhite: RS-485B | |
| 2 | Bulk heat shrink tubing | 20 mm bulk heat shrink tubing. |
| 3 Waterproof connector | PG 13.5 waterproof connector with circular flat gasket | |

- Cables must be connected right. Do not mix power cable and signal cable.
- Signal cable can only sustain low voltage, while power cable connects with 220V power supply. The device will be damaged if they are mixed up.
- The yellow and green cable is ground cable. It must be grounded to improve device reliability. Otherwise, the device will lose lightning protection.
4.3 Connecting Flashlight/Strobe Cable
Connect the power cable of the flashlight/strobe.
Figure 4-3 Flashlight/strobe cable connection

Step 1 Plug the flashlight + (yellow) and flashlight - (blue) of the Illuminator into the flashlight triggering port F1+/F2+ and F1-/F2- of the camera.
Step 2 Plug the strobe + (green) and strobe - (gray) into the strobe triggering port F7+ and F7- of the camera.

There are 7 ports on the camera, among which F1 to F6 are flashlight ports and F7 is strobe port by default. You can change them on the Light Config page on web. For details, see "5.1 Configuring External Light".
4.4 Connecting RS-485 Cable
Connect the RS-485 signal cable.
Figure 4-4 RS-485 cable connection
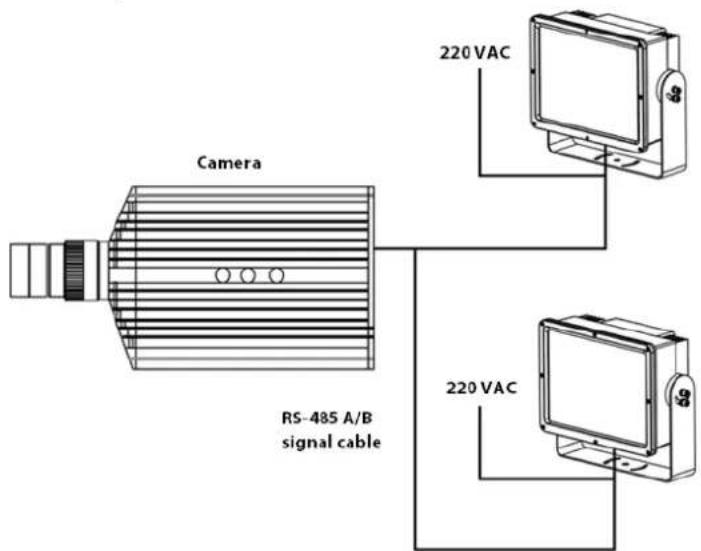
Step 1 Connect the RS-485 A (red) cable of two illuminators in parallel circuit, and then connect the 485-A port of the camera.
Step 2 Connect the RS-485 B (white) cable of two illuminators in parallel circuit, and then connect the 485-B port of the camera.
Step 3 Obtain the address of each illuminator.
Step 4 Select Setup > ITC > Extra Device > Light (485) Config, and then click Auto Address on the continuous light area.

- One camera can connect up to 5 illuminators.
- You can independently control the work mode and brightness of each illuminator on the camera web page. For details, see "5 Configuring Camera".
4.5 Connecting Serial Port
You can convert the PC serial port to RS-485 to connect the Illuminator, and then perform certain operations on web.

- Read and configure the parameters of the Illuminator and switch mode on camera web page. For details, see "5 Configuring Camera".
- Update the program of the Illuminator. For details, see "6 Updating Program".
Figure 4-5 Convert serial port to RS-485
![graph TD A["Computer"] -->|Serial| B["Converter"] C[" Laptop"] -->|Serial| B B -->|Serial| D["220 VAC"] D -->|RS-485| B](/content/2026/05/935003/images/15440996bce41834a7c276e0a95e923367d3c0c8dc0005a96fc11e12b6ef5a11.jpg)
5 Configuring Camera
You can configure the parameters of the strobe, flashlight and continuous light on the camera web page.

The configuration page might vary with different web baseline. Select the corresponding configuration.
5.1 Configuring External Light
Step 1 Log in to the camera web page and select Setup > ITC > Extra Device > Light Config. Step 2 Configure the parameters of the flashlight or strobe.
Figure 5-1 Flashlight/strobe configuration

Table 5-1 Description of the flashlight/strobe parameters
| Parameter Description | ||
| Port | Select the external light type for each port between flashlight and strobe. | |
| Flashing Light | Work Mode | Forbidden: Flashlight stays off.Always: Flashlight stays on.Default: Configure the prevalue of brightness. When the environment brightness is lower than the prevalue, the flashlight lights up automatically. |
| Pulse Width | Set the pulse width value of the flashlight. When the flashlight is configured as pulse width triggering, the pulse width here needs to be inside the range of detection to prevent false triggering. | |
| Delay Time | Set the delay time of the flashlight to make sure that the camera captures and the flashlight flashes at the same time. | |
| Burst Mode | The triggering electrical level (high level and low level) of the flashlight. Only low electrical level triggering is supported at present. | |
| Strobe | Output Mode | Forbidden: Strobe stays off.Always: Strobe stays on.Default: Configure the preset value of brightness. When the environment brightness is lower than the prevalue, the strobe lights up automatically. |
| Delay Time | Set the delay time of the strobe to make sure that the camera captures and the strobe flashes at the same time. | |
| Pulse Width | Set the pulse width value of the strobe. The bigger the value, the brighter the strobe. When the pulse width is bigger than the camera shutter, the actual image will not become brighter. | |
| Frequency | Set the frequency of the strobe flashes. | |
Step 3 Click Confirm.

If the pulse width of the camera is configured as 0, the Illuminator is off.
5.2 Configuring External RS-485 (Strobe)
Plug the RS-485 signal cable of the Illuminator into the A1, B1 port of the camera.
Step 1 Select Setup > ITC > Extra Device > Light (485) Config.
Step 2 Select Strobe from COM1.
Step 3 Configure parameters.
Figure 5-2 Configure strobe parameters

Table 5-2 Description of strobe parameters
| Parameter Description | |
| Strobe No. Select strobe number as needed. | |
| Enable Select | Enable to turn on the selected strobe. |
| Check Status | Select Yes or No as needed to check the strobe status. |
| Light Brightness | Set the brightness of the strobe under normal working status. |
| Address The address of the strobe is automatically obtained. | |
| Device Number | Enter the number of the strobe. |
| Auto Address Click | Auto Address to assign address for the strobe. |
Step 4 Click Confirm.
5.3 Configuring External RS-485 (Continuous Light)
Plug the RS-485 signal cable of the Illuminator into the A1, B1 port of the camera.
Step 1 Select Setup > ITC > Extra Device > Light (485) Config.
Step 2 Select Continuous Light from COM 1.
Step 3 Configure parameters.
Figure 5-3 Configure parameters of the continuous light

Table 5-3 Description of parameters of the continuous light
| Parameter Description | |
| Continuous Light No. | Select the continuous light No. as needed. |
| Enable | Select the enable checkbox to turn on the selected continuous light. |
| Address | Automatically obtain the address of the continuous light. |
| Check Status | Select yes or no as needed to check the continuous light status. |
| Work Mode | Close: The continuous light stays off.Enable: The continuous light stays on.Auto (recommend): System turns on the continuous light according to time or environment brightness. |
| Light Brightness | Set the brightness of the continuous light under normal working status. |
| Auto Mode | You need to configure this when setting Work Mode to Auto.Time: Set the time period for turning on the continuous light. You can configure 6 periods every day.Brightness: Set the brightness prevalue. When the environment brightness is lower or higher than the prevalue, system turns on or off the continuous light respectively. |
| Device Number | Enter the number of the continuous light. |
| Auto Address Click | Auto Address to assign address for the continuous light. |
Step 4 Click Confirm.
6 Updating Program
You can update the program on the web page of the camera.

- If error happens during updating, you can restart the Illuminator and update again.
- Do not cut off the power supply during update.
Plug the RS-485 signal cable of the Illuminator into the A1, B1 port of the camera.
Step 1 Log in to the camera web page and select Setup > System > System Upgrade.
Step 2 Import the update file in File Upgrade > Select Firmware File, and then click Upgrade.
Figure 6-1 Program update

7 Notes
7.1 Start-up Time
- When powering up the Illuminator, you need to wait for about 13 s for the program to start. System turns on or off the Illuminator based on the environment brightness as configured.
- You can view the Illuminator status and other information on the camera web.
7.2 Note
- Avoid violent collision.
- If exception happens, cut off the power first.
- Do not change the screws that come with the Illuminator. Unstandardized screws might damage internal components.
Appendix 1 Cybersecurity Recommendations
Cybersecurity is more than just a buzzword: it's something that pertains to every device that is connected to the internet. IP video surveillance is not immune to cyber risks, but taking basic steps toward protecting and strengthening networks and networked appliances will make them less susceptible to attacks. Below are some tips and recommendations from Dahua on how to create a more secured security system.
Mandatory actions to be taken for basic equipment network security:
1. Use Strong Passwords
Please refer to the following suggestions to set passwords:
- The length should not be less than 8 characters.
- Include at least two types of characters; character types include upper and lower case letters, numbers and symbols.
- Do not contain the account name or the account name in reverse order.
- Do not use continuous characters, such as 123, abc, etc.
- Do not use overlapped characters, such as 111, aaa, etc.
2. Update Firmware and Client Software in Time
- According to the standard procedure in Tech-industry, we recommend to keep your equipment (such as NVR, DVR, IP camera, etc.) firmware up-to-date to ensure the system is equipped with the latest security patches and fixes. When the equipment is connected to the public network, it is recommended to enable the "auto-check for updates" function to obtain timely information of firmware updates released by the manufacturer.
- We suggest that you download and use the latest version of client software.
"Nice to have" recommendations to improve your equipment network security:
1. Physical Protection
We suggest that you perform physical protection to equipment, especially storage devices. For example, place the equipment in a special computer room and cabinet, and implement well-done access control permission and key management to prevent unauthorized personnel from carrying out physical contacts such as damaging hardware, unauthorized connection of removable equipment (such as USB flash disk, serial port), etc.
2. Change Passwords Regularly
We suggest that you change passwords regularly to reduce the risk of being guessed or cracked.
3. Set and Update Passwords Reset Information Timely
The equipment supports password reset function. Please set up related information for password reset in time, including the end user's mailbox and password protection questions. If the information changes, please modify it in time. When setting password protection questions, it is suggested not to use those that can be easily guessed.
4. Enable Account Lock
The account lock feature is enabled by default, and we recommend you to keep it on to guarantee the account security. If an attacker attempts to log in with the wrong password several times, the corresponding account and the source IP address will be locked.
5. Change Default HTTP and Other Service Ports
We suggest you to change default HTTP and other service ports into any set of numbers between
1024–65535, reducing the risk of outsiders being able to guess which ports you are using.
6. Enable HTTPS
We suggest you to enable HTTPS, so that you visit Web service through a secure communication channel.
7. MAC Address Binding
We recommend you to bind the IP and MAC address of the gateway to the equipment, thus reducing the risk of ARP spoofing.
8. Assign Accounts and Privileges Reasonably
According to business and management requirements, reasonably add users and assign a minimum set of permissions to them.
9. Disable Unnecessary Services and Choose Secure Modes
If not needed, it is recommended to turn off some services such as SNMP, SMTP, UPnP, etc., to reduce risks.
If necessary, it is highly recommended that you use safe modes, including but not limited to the following services:
- SNMP: Choose SNMP v3, and set up strong encryption passwords and authentication passwords.
- SMTP: Choose TLS to access mailbox server.
- FTP: Choose SFTP, and set up strong passwords.
- AP hotspot: Choose WPA2-PSK encryption mode, and set up strong passwords.
10. Audio and Video Encrypted Transmission
If your audio and video data contents are very important or sensitive, we recommend that you use encrypted transmission function, to reduce the risk of audio and video data being stolen during transmission.
Reminder: encrypted transmission will cause some loss in transmission efficiency.
11. Secure Auditing
- Check online users: we suggest that you check online users regularly to see if the device is logged in without authorization.
- Check equipment log: By viewing the logs, you can know the IP addresses that were used to log in to your devices and their key operations.
12. Network Log
Due to the limited storage capacity of the equipment, the stored log is limited. If you need to save the log for a long time, it is recommended that you enable the network log function to ensure that the critical logs are synchronized to the network log server for tracing.
13. Construct a Safe Network Environment
In order to better ensure the safety of equipment and reduce potential cyber risks, we recommend:
- Disable the port mapping function of the router to avoid direct access to the intranet devices from external network.
- The network should be partitioned and isolated according to the actual network needs. If there are no communication requirements between two sub networks, it is suggested to use VLAN, network GAP and other technologies to partition the network, so as to achieve the network isolation effect.
- Establish the 802.1x access authentication system to reduce the risk of unauthorized access to private networks.
- Enable IP/MAC address filtering function to limit the range of hosts allowed to access the device.
More information
Please visit Dahua official website security emergency response center for security announcements and the latest security recommendations.
ENABLING A SAFER SOCIETY AND SMARTER LIVING

- LED MULTIFUNCTION ILLUMINATOR
- USER'S MANUAL
- FOREWORD
- GENERAL
- MODELS
- SAFETY INSTRUCTIONS
- REVISION HISTORY
- PRIVACY PROTECTION NOTICE
- ABOUT THE MANUAL
- IMPORTANT SAFEGUARDS AND WARNINGS
- TRANSPORTATION REQUIREMENTS
- STORAGE REQUIREMENTS
- INSTALLATION REQUIREMENTS
- WARNING
- OPERATION REQUIREMENTS
- MAINTENANCE REQUIREMENTS
- TABLE OF CONTENTS
- IMPORTANT SAFEGUARDS AND WARNINGS....III
- 1 INTRODUCTION .... 1
- 2 STRUCTURE....3
- 3 INSTALLATION....4
- 4 CONNECTING CABLE 6
- 5 CONFIGURING CAMERA....10
- 6 UPDATING PROGRAM....14
- 7 NOTES....15
- APPENDIX 1 CYBERSECURITY RECOMMENDATIONS....16
- 1 INTRODUCTION
- 1.1 INTRODUCTION
- 1.2 FEATURES
- 2 STRUCTURE
- 2.1 APPEARANCE
- 2.2 DIMENSION
- 3 INSTALLATION
- 4 CONNECTING CABLE
- 4.1 WATERPROOF OPERATION
- 4.2 CONNECTING POWER CABLE
- 4.3 CONNECTING FLASHLIGHT/STROBE CABLE
- 4.4 CONNECTING RS-485 CABLE
- 4.5 CONNECTING SERIAL PORT
- 5 CONFIGURING CAMERA
- 5.1 CONFIGURING EXTERNAL LIGHT
- 5.2 CONFIGURING EXTERNAL RS-485 (STROBE)
- 5.3 CONFIGURING EXTERNAL RS-485 (CONTINUOUS LIGHT)
- 6 UPDATING PROGRAM
- 7 NOTES
- 7.1 START-UP TIME
- 7.2 NOTE
- APPENDIX 1 CYBERSECURITY RECOMMENDATIONS
- MANDATORY ACTIONS TO BE TAKEN FOR BASIC EQUIPMENT NETWORK SECURITY
- USE STRONG PASSWORDS
- UPDATE FIRMWARE AND CLIENT SOFTWARE IN TIME
- NICE TO HAVE" RECOMMENDATIONS TO IMPROVE YOUR EQUIPMENT NETWORK SECURITY
- PHYSICAL PROTECTION
- CHANGE PASSWORDS REGULARLY
- SET AND UPDATE PASSWORDS RESET INFORMATION TIMELY
- ENABLE ACCOUNT LOCK
- CHANGE DEFAULT HTTP AND OTHER SERVICE PORTS
- ENABLE HTTPS
- MAC ADDRESS BINDING
- ASSIGN ACCOUNTS AND PRIVILEGES REASONABLY
- DISABLE UNNECESSARY SERVICES AND CHOOSE SECURE MODES
- AUDIO AND VIDEO ENCRYPTED TRANSMISSION
- SECURE AUDITING
- NETWORK LOG
- CONSTRUCT A SAFE NETWORK ENVIRONMENT
- MORE INFORMATION
Brand : Dahua Technology
Model : ITALE-160BA-IR8-P
Category : LED Lighting