
LPH65-MT440-C - Whiteboard Dahua Technology - Free user manual and instructions
Find the device manual for free LPH65-MT440-C Dahua Technology in PDF.


| Product Type | Smart Interactive Whiteboard |
| Brand | Dahua Technology |
| Model | LPH65-MT440-C (65-inch) |
| Display Size | 65 inches (16:9 aspect ratio) |
| Resolution | 3840 x 2160 (4K UHD) |
| Touch Technology | Infrared touch, supports stylus and fingers |
| Dimensions (with camera) | 1436.9 x 952.5 x 86.1 mm (W x H x D) |
| Dimensions (without camera) | 1436.9 x 926.7 x 86.1 mm (W x H x D) |
| Weight | Approx. 45 kg (estimated) |
| Power Supply | 100 VAC, 50/60 Hz |
| Power Consumption | ≤ 250 W (typical) |
| Operating System | Android 8.0 (built-in), supports Windows via OPS |
| Processor | Quad-core, 1.8 GHz (estimated) |
| RAM | 4 GB |
| Storage | 32 GB (expandable via USB) |
| Connectivity | Wi-Fi 802.11 b/g/n/ac, Bluetooth (optional), Ethernet RJ-45 |
| Input Ports | HDMI (x3), DP, VGA, AV, YPbPr, USB 3.0 (x2), USB 2.0, Mic In, Line In |
| Output Ports | HDMI Out, Line Out, Earphone, SPDIF |
| Speakers | Built-in stereo speakers, 10W x 2 (estimated) |
| Camera | Built-in HD camera (optional on some models) |
| Microphone Array | 8 microphones, far-field pickup up to 8 m |
| Security | Fingerprint sensor, password, pattern lock |
| Included Accessories | Power cord, remote control, stylus pens (x2), wall mount kit, battery, warranty card |
| Cleaning | Use soft dry cloth; avoid liquid cleaners |
| Operating Temperature | 0°C to 40°C |
Frequently Asked Questions - LPH65-MT440-C Dahua Technology
User questions about LPH65-MT440-C Dahua Technology
0 question about this device. Answer the ones you know or ask your own.
Ask a new question about this device
Download the instructions for your Whiteboard in PDF format for free! Find your manual LPH65-MT440-C - Dahua Technology and take your electronic device back in hand. On this page are published all the documents necessary for the use of your device. LPH65-MT440-C by Dahua Technology.
USER MANUAL LPH65-MT440-C Dahua Technology
Smart Interactive Whiteboard
User's Manual

natural_image
Abstract geometric composition with gray and blue color blocks (no text or symbols)V1.0.2
Foreword
General
This manual introduces the packing list, structure, basic operations and settings of the smart interactive whiteboard (hereinafter referred to as "the device").
Model
| Dimension | Description |
| 65" | 65-inch classic version, 65-inch classic & Pro version (with camera) |
| 75" | 75-inch classic version, 75-inch classic & Pro version (with camera) |
| 86" | 86-inch classic version, 86-inch classic & Pro version (with camera) |
Safety Instructions
The following signal words might appear in the manual.
| Signal Words | Meaning |
 DANGER DANGER | Indicates a high potential hazard which, if not avoided, will result in death or serious injury. |
 WARNING WARNING | Indicates a medium or low potential hazard which, if not avoided, could result in slight or moderate injury. |
 CAUTION CAUTION | Indicates a potential risk which, if not avoided, could result in property damage, data loss, reductions in performance, or unpredictable results. |
 IPS IPS | Provides methods to help you solve a problem or save time. |
 ITE ITE | Provides additional information as a supplement to the text. |
Revision History
| Version | Revision Content | Release Time |
| V1.0.2 | Updated packing list and model description. | September 2021 |
| V1.0.1 | Updated model description. | August 2021 |
| V1.0.0 | First release. | March 2021 |
Privacy Protection Notice
As the device user or data controller, you might collect the personal data of others such as their face, fingerprints, and license plate number. You need to be in compliance with your local privacy protection laws and regulations to protect the legitimate rights and interests of other people by implementing measures which include but are not limited: Providing clear and visible identification to inform people of the existence of the surveillance area and provide required contact information.
About the Manual
- The manual is for reference only. Slight differences might be found between the manual and the product.
- We are not liable for losses incurred due to operating the product in ways that are not in compliance with the manual.
- The manual will be updated according to the latest laws and regulations of related jurisdictions. For detailed information, see the paper user's manual, use our CD-ROM, scan the QR code or visit our official website. The manual is for reference only. Slight differences might be found between the electronic version and the paper version.
- All designs and software are subject to change without prior written notice. Product updates might result in some differences appearing between the actual product and the manual. Please contact customer service for the latest program and supplementary documentation.
- There might be errors in the print or deviations in the description of the functions, operations and technical data. If there is any doubt or dispute, we reserve the right of final explanation.
- Upgrade the reader software or try other mainstream reader software if the manual (in PDF format) cannot be opened.
- All trademarks, registered trademarks and company names in the manual are properties of their respective owners.
- Please visit our website, contact the supplier or customer service if any problems occur while using the device.
- If there is any uncertainty or controversy, we reserve the right of final explanation.
Important Safeguards and Warnings
This section introduces content covering the proper handling of the device, hazard prevention, and prevention of property damage. Read carefully before using the device, comply with the guidelines when using it, and keep the manual safe for future reference.
Operating Requirements
- The device is with high voltage. Do not open the rear cover to prevent electric shock.
- Do not place or install the device in a place exposed to sunlight or near the heat source.
- Keep the device away from dampness, dust, or soot.
• Install the device in a well-ventilated place, and do not block the ventilation of the device.
- Stably put the device onto a support platform that is strong enough to prevent the device falling.
- Do not drop or splash liquid onto the device, and make sure that there is no object filled with liquid on the device to prevent liquid from flowing into the device.
- Operate the device within the rated range of power input and output.
- Do not dissemble the device without professional instruction.
● Transport, use and store the device under the allowed humidity and temperature conditions.
- Unplug the power cord before cleaning the device. Do not use the liquid cleaner or spray cleaner when cleaning the device.
- Use the clean and soft cloth or use the special lens wiping cloth when cleaning the surface of display screen. Do not use the wet cloth to clean the display screen. Otherwise, it might damage the screen.
Electrical Safety
- Use the battery according to requirements; otherwise it might result in fire, explosion or inflammation.
- Replace the battery with that of the same type.
- Use the standard power adapter. We will assume no responsibility for any problems caused by nonstandard power adapter.
- Use locally recommended power cord in the limit of rated specifications.
- Make sure that all cables are connected correctly before plugging the device into the power. Do not overload the power socket or pull the power code. Otherwise, it might cause fire or electric shock.
- For devices with type-I structure, use a grounded power socket.
● The appliance coupler is a disconnection device. Keep a convenient angle when using it.
Table of Contents
Foreword....I
Important Safeguards and Warnings....III
1 Introduction....1
2 Packing List....2
3 Structure....3
3.1 Appearance 3
3.2 Dimensions....4
3.2.1 Dimension (65-inch) 5
3.2.2 Dimension (75-inch) 7
3.2.3 Dimension (86-inch) 9
3.3 Button....10
3.4 Port....11
4 Starting Device and Turning off Screen....14
4.1 Starting Device....14
4.2 Turning off Screen....15
5 Basic Operations....16
5.1 Navigation Bar....16
5.2 Common Tools 17
5.3 Signal Source 20
5.4 Whiteboard....21
5.5 Managing File 23
5.6 Screen Sharing 24
5.6.1 Screen Sharing through PC 24
5.6.2 Screen Sharing through Mobile Phone 25
5.7 Managing Fingerprint....27
6 Settings....29
6.1 Network Settings....29
6.2 General Settings....30
6.3 Advanced Settings....32
6.4 System Settings....33
7 Shutdown....36
8 System Update ....37
9 FAQ 38
Appendix 1 Touch Operation Note ....39
Appendix 2 Cybersecurity Recommendations ....40
1 Introduction
Smart interactive whiteboard is an integrated multimedia device, which integrates large-screen HD display, PC, TV, electronic whiteboard, audio amplifier, application, and central control system. It can be widely used in various scenarios such as education, business conference, and thematic presentation. The device has the following characteristics:
• Supports 4K HD LCD display.
- Supports one-tap quick switch between Android and Windows systems (you need to install an OPS computer or connect to a computer).
● Supports one-tap projection of devices such as mobile phones and pads.
• Supports electronic whiteboard.
● Supports office software such as Microsoft Office and audio and video files.
- With built-in fingerprint sensor, you can unlock the device with fingerprint.
2 Packing List
Check whether there is any obvious damage on the packing box. Unpack the box and check whether the components are complete according to the packing list.
Table 2-1 Packing list
| Items | Quantity |
| Smart interactive whiteboard | 1 |
| Power cord 3 | |
| Remote control 1 | |
| Wall mounting accessory package 1 | |
| Stylus pen 2 | |
| Wall Mount Installation Instructions 1 | |
| Battery 2 | |
| Warranty Card and Certificate (with RoHS mark) | 1 |
3 Structure
This chapter introduces the appearance, dimensions, buttons, and ports of the device.
3.1 Appearance
Figure 3-1 Device appearance (with camera)
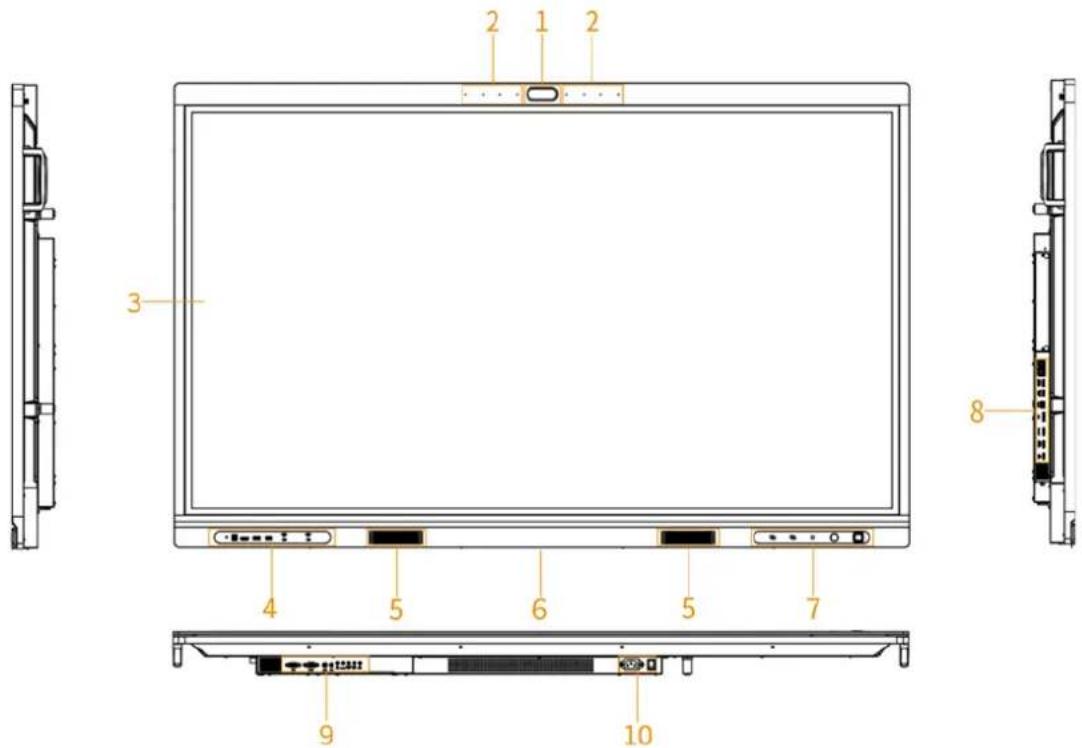
Figure 3-2 Device appearance (without camera)
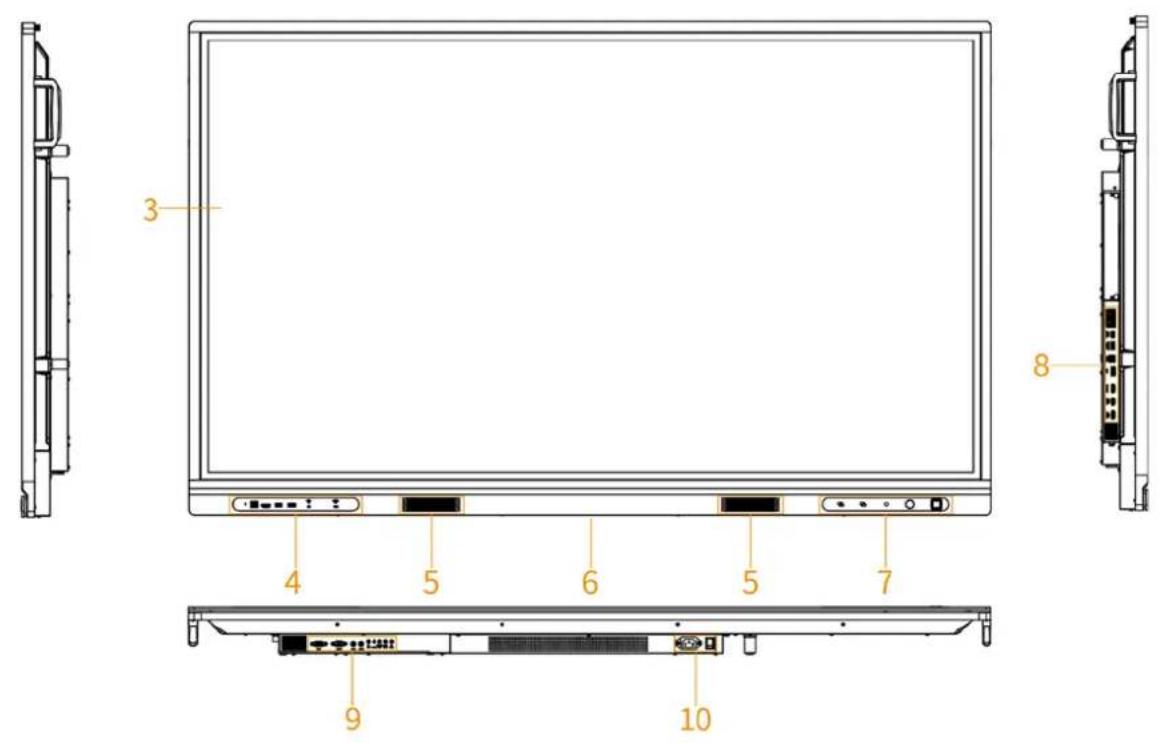
Table 3-1 Appearance description
| No. | Description |
| 1 Built-in HD camera. | |
| 2 | 8 microphones, used to pick up live audio, and support 6 m–8 m far-field pickup. |
| 3 4K HD LED LCD with 3 mm tempered glass. | |
| 4 | Front panel ports. For details, see "3.4 Port". |
| 5 Speaker. | Plays multi-media sound. |
| 6 Logo (reserved). | |
| 7 | Front panel buttons. For details, see "3.3 Button". |
| 8 | Left panel ports. For details, see "3.4 Port". |
| 9 | Bottom panel ports. For details, see "3.4 Port". |
| 10 | |
3.2 Dimensions
This section introduces the dimensions of different models, including that of the front panel, left panel and bottom panel.
3.2.1 Dimension (65-inch)
Figure 3-3 Dimensions (with camera) (mm [inch])
![1436.9 [56.57] 811.7 [31.96] 952.5 [37.50] 1504.5 [59.23]](/content/2026/05/934900/images/1a8aef93d926001bcf7218d3ac7f1bbedeac591ae0a7be17acfc9896b28da007.jpg)
![22.8 [0.90] 86.1 [3.39]](/content/2026/05/934900/images/2046a606446fdb82f59d7345167626a35b2fe532db0db2c3be6fe7ea41d68a38.jpg)
![600.0 [23.62] 400.0 [15.75] 283.9 [11.18]](/content/2026/05/934900/images/1144dbdfc4ae08fa09e05c0992b7dcf6957e17dbec57fe66834590e8e10c33ee.jpg)
Figure 3-4 Dimensions (without camera) (mm [inch])
1436.9 [56.57]
![1436.9 [56.57] 811.7 [31.96] 926.7 [36.48] 1504.5 [59.23]](/content/2026/05/934900/images/9dab94ffcb6c04a08862bf2028bba5c8713e2d4d04a56c258a2513ce5686444f.jpg)
![22.8 [0.90] 86.1 [3.39]](/content/2026/05/934900/images/3334dbed927ff4728c7a7ad7d6698f1deb619687de50198b5bba1401e8f69576.jpg)
![600.0 [23.62] 400.0 [15.75] 283.9 [11.18]](/content/2026/05/934900/images/53ae77caaf375e31f0b78828b851f8da60274a05c5a9fb067d6d9bfa17924afa.jpg)
3.2.2 Dimension (75-inch)
Figure 3-5 Dimensions (with camera) (mm [inch])
![1652.9 [65.07] 927.5 [36.51] 1066.7 [42.00] 1715.5 [67.54] 22.8 [0.90] 85.4 [3.36]](/content/2026/05/934900/images/d4f4eba02f5b7491b291c0b3a9d842902212c83f6f67d055d01081c5b4ef55a9.jpg)
![800.0 [31.50] 400.0 [15.75] 340.8 [13.42]](/content/2026/05/934900/images/51f383a708495eea0afc76906972acf19b128574a872b39b9345367f75c86867.jpg)
Figure 3-6 Dimensions (without camera) (mm [inch])
![1652.9 [65.07] 927.5 [36.51] 1040.9 [39.80] 1715.5 [67.54] 22.8 [0.90] 85.4 [3.36]](/content/2026/05/934900/images/fdc387ef0c60ff1606288577ddc46d472664f61331adc132a0b104867e5a155c.jpg)
![800.0 [31.50] 400.0 [15.75] 340.8 [13.42]](/content/2026/05/934900/images/277f1daf511a8c3df562c423d246af08ab5d10b09fd721e42343fcb4d44af30d.jpg)
3.2.3 Dimension (86-inch)
Figure 3-7 Dimensions (with camera) (mm [inch])
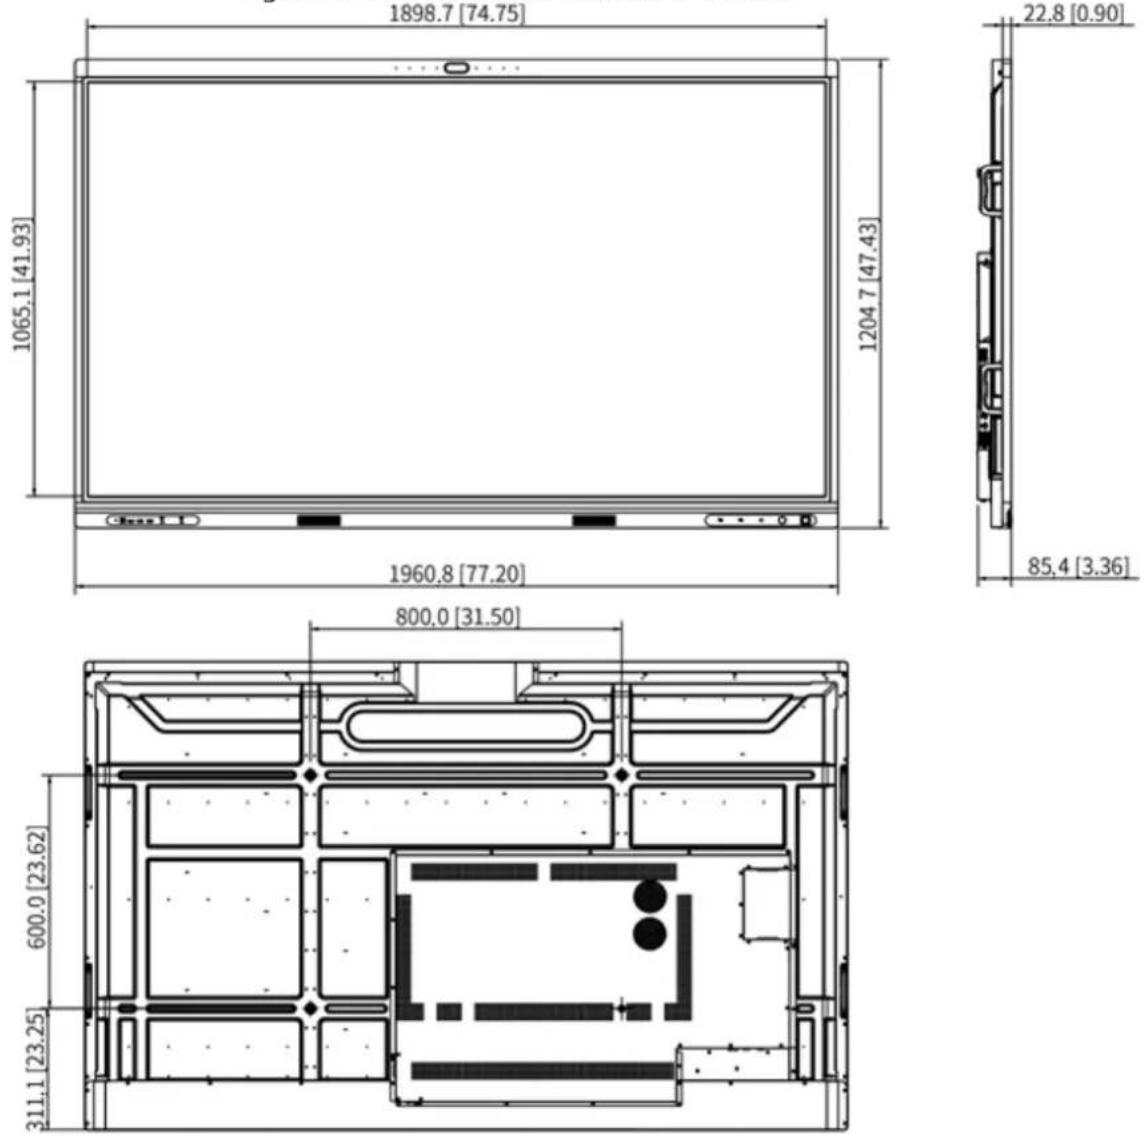
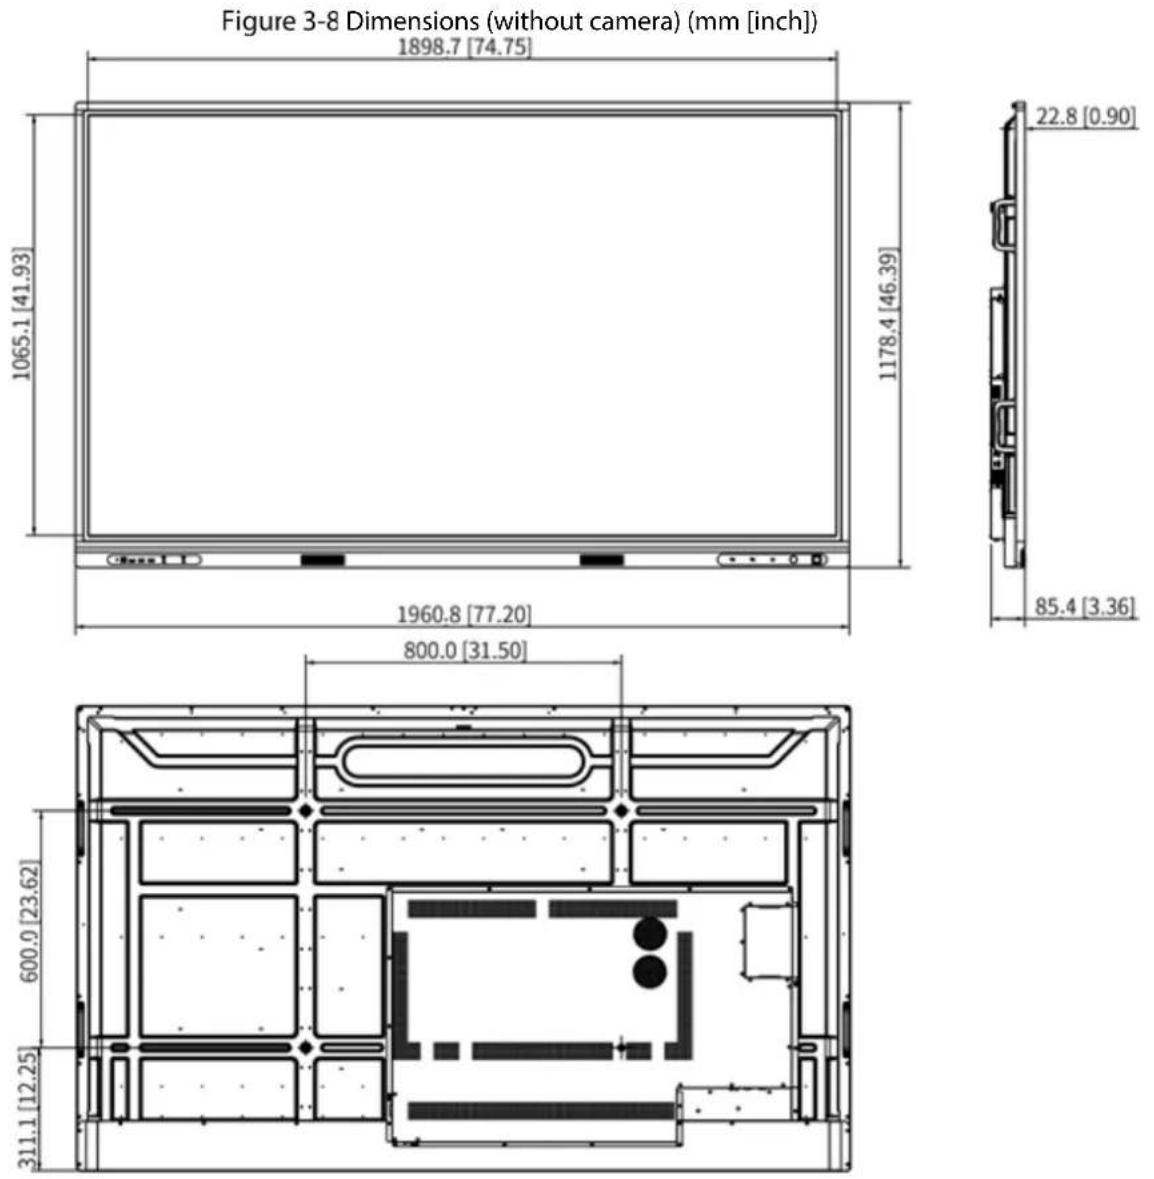
3.3 Button
Figure 3-9 Front panel buttons
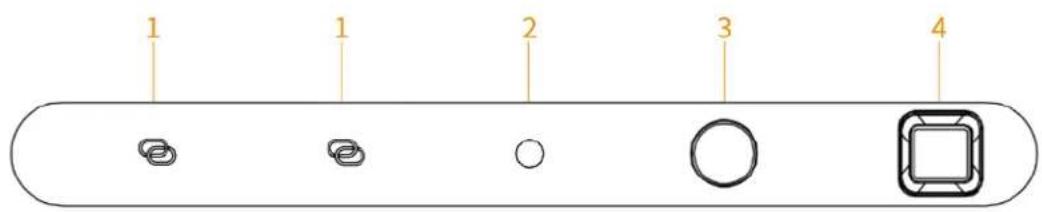
Table 3-2 Button description
| No. | Name | Description |
| 1 Wireless antenna | Enhances device hotspot transmission signal to make it easier for other devices to connect to the device. | |
| 2 | IR sensor | Receives signals from remote control. |
| 3 Power button | When the device is off, press the button to turn on the device.When the screen is on, press the button to turn off the screen.When the screen is off, press the button to wake up the device.When the device is on, press and hold the button to turn off the device. | |
| 4 Fingerprint sensor | Add your fingerprint to the device, and then you can unlock the device through fingerprint recognition. | |
3.4 Port
Front panel ports
Figure 3-10 Front panel ports

Table 3-3 Description of front panel ports
| No. | Name | Description |
| 1 Light sensor | The device recognizes the ambient brightness through the light sensor and automatically adjusts the backlight brightness according to the ambient brightness. | |
| 2 | TOUCH | Transmits HDMI-F touch signal. |
| 3 HDMI-F | HD audio and video signal input port. Through the port, external HDMI signal source transmits the uncompressed HD video and multi-channel audio data to the device. | |
| 4 USB | 3.0 port | Connects to USB devices such as mobile hard disk, USB drive, USB keyboard and USB mouse. It is applicable to OPS computers and Android systems. |
| 5 Wi-Fi antenna | Enhances Wi-Fi signal reception to facilitate device connection to Wi-Fi.We recommend you choose a secure authentication method to connect to Wi-Fi. | |
Left Panel Ports
Figure 3-11 Left panel ports
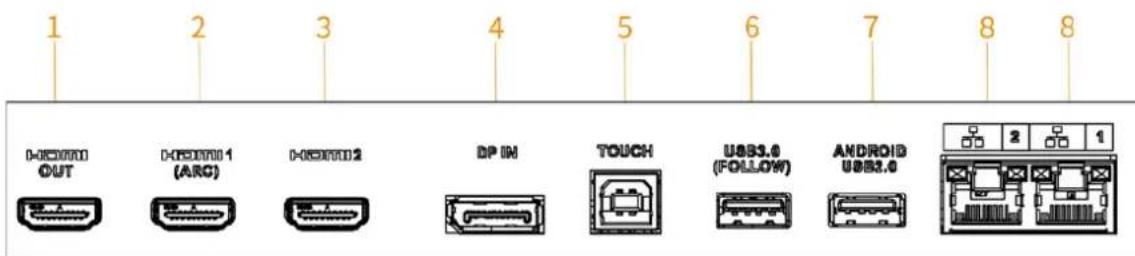
Table 3-4 Description of left panel ports
| No. | Name | Description |
| 1 HDMI OUT | HD audio and video signal output port. Transmits uncompressed HD video and multi-channel audio data. | |
| 2 | HDMI1 (ARC) | HD audio and video signal input port. Through the port, external HDMI signal source transmits the uncompressed HD video and multi-channel audio data to the device. |
| 3 HDMI2 | ||
| 4 DP IN | HD digital signal input port, which can be connected to computer and family theater. | |
| 5 | TOUCH | Transmits touch signal of HDMI1, HDMI2, DP, and VGA. |
| 6 USB | 3.0 (FOLLOW) | Connects to USB devices such as mobile hard disk, USB drive, USB keyboard and USB mouse. It is applicable to OPS computers and Android systems. |
| 7 ANDROID USB 2.0 | Connects to USB devices such as mobile hard disk, USB drive, USB keyboard and USB mouse. It is only applicable to Android system. | |
| 8 RJ-45 | Ethernet ports, which are used to connect the device to network through network cable. | |
Bottom Panel Ports
Figure 3-12 Bottom panel ports
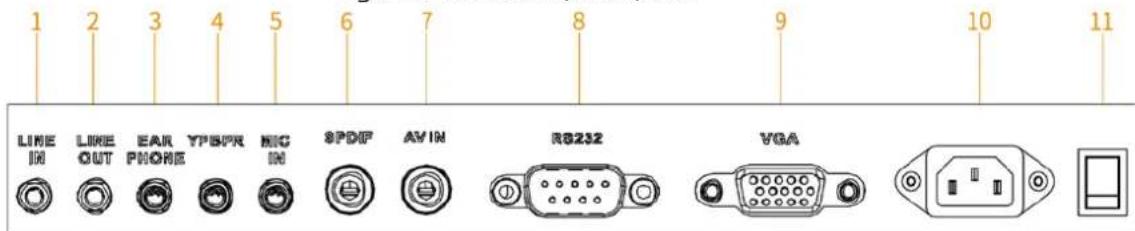
Table 3-5 Description of bottom panel ports
| No. | Name | Description |
| 1 | LINE IN | Audio signal input port of VGA and YPBPR ports. |
| 2 LINE | OUT | Audio signal output port, which connects to the earphone or speaker. |
| 3 EAR | PHONE | |
| 4 | YPBPR | Component port, which connects to component signal source. |
| 5 | MIC IN | Audio input port, which connects to microphone. |
| 6 | SPDIF | Audio output port, which mainly connects to speaker. |
| 7 AV IN | Analog video signal input port, which connects to video signal source. | |
| 8 RS232 | Transparent debugging serial port, which is used for data transmission between devices. | |
| 9 VGA | Analog video signal input port, which connects to VGA signal source. | |
| 10 | Power input port | Connects to 100 VAC power supply. |
| 11 Power switch — |
4 Starting Device and Turning off Screen
4.1 Starting Device
Prerequisites
- Before connecting the device to power supply, check whether the input voltage is correct against the device power requirement.
- To ensure the stable work of the device and the external devices connected to the device and to prolong the service life, we recommend that you should refer to the national related standard to use the power source that provides stable voltage with less interference from ripples.
Procedure
Step 1 Plug the power cord into the power port on the bottom panel, and then press the power switch on the bottom panel of the device.
Step 2 Press the power button on the front panel to start the device. After starting the device, you are going to the Android home by default.
Figure 4-1 Android home
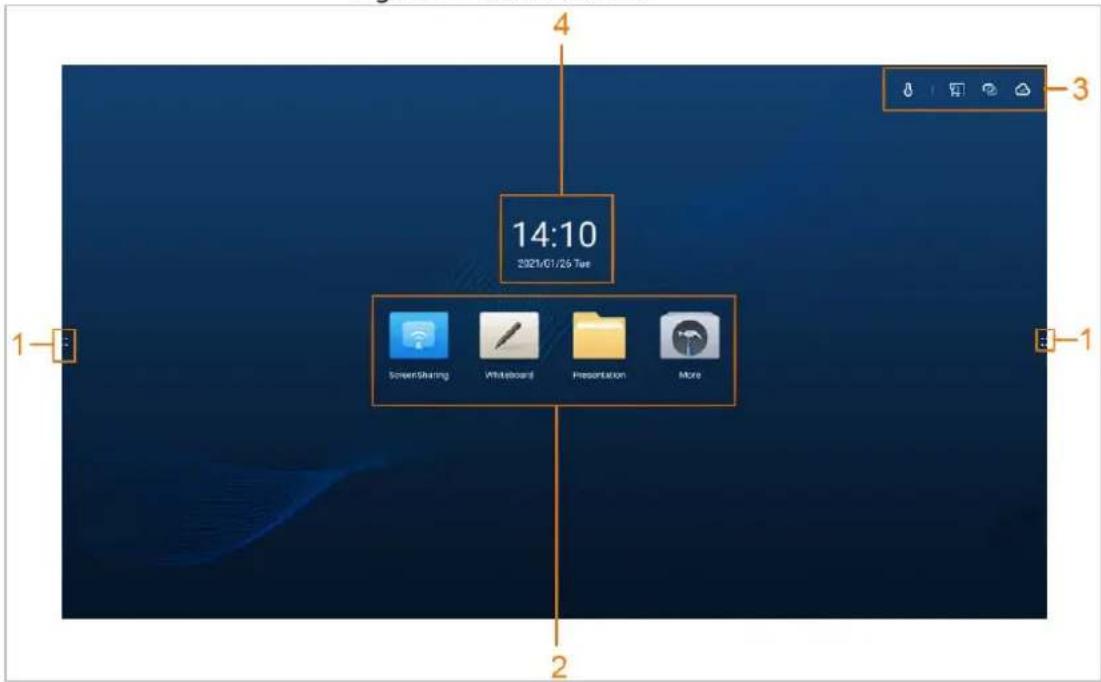
Table 4-1 Home screen description
| No. | Description |
| 1 | Tap : or : to display the navigation bar. For details, see "5.1 Navigation Bar". |
| 2 | Function area. Tap a function icon, and then you can go to the corresponding operation screen.● Tap ScreenSharing to enable wireless screen sharing. For details, see "5.6 Screen Sharing".● Tap Whiteboard to open the electronic whiteboard. For details, see "5.4 Whiteboard".● Tap Presentation, and then the File Management screen is displayed. For details, see "5.5 Managing File".● Tap More, and then the application screen is displayed on which you can carry out the following operations:◇ Tap Calendar to view the date.◇ Tap Chrome to scan news and look for information you need through browser.◇ Tap Settings to view the setting information. For details, see "6 Settings".◇ Tap WPS Office to edit the document information.◇ Tap Calculator for calculations.◇ Tap CloudSettings, register to the cloud management platform, and then you can manage the registered device status on the platform, and upload the meeting files on the device to the platform.Tap and hold either app icon to uninstall the app or clear the data. |
| 3 | Status bar, which displays the temperature and status information of the device. |
| 4 Displays date, time and weekday. | |
4.2 Turning off Screen
When the screen is on, press power button to turn off the screen.
You can wake up the device by the following two ways.
- Press power button.
- Touch the screen slightly.
If the password lock or pattern lock is set and screen lock configuration is enabled, there are two ways to unlock the device when the screen is off:
- Enter the correct password or pattern.
● After recording the fingerprint, tap the fingerprint sensor on the front panel.
5 Basic Operations
This chapter introduces the basic operation of the device, including navigation bar, common tools, signal source, whiteboard, and screen sharing.

We recommend you use the stylus pen to operate directly on the device screen. For details, see "Appendix 1 Touch Operation Note".
5.1 Navigation Bar
You can use the navigation bar or compass to quickly go to the corresponding function screen.
On Android home, tap or to display the navigation bar.
Figure 5-1 Navigation bar

Table 5-1 Navigation bar description
| Icon | Description |
 Tap Tap | the icon to hide the navigation bar. |
 | Tap the icon, and then you will return to the previous page or the Android home.Tap the icon on the signal source screen, and then you will return to Android home.Tapping the icon on Android home is invalid.On the other screens of the Android system (except Android home), tap the icon and you will return to the previous page. |
 | Tap the icon, and then the Android home is displayed. If the current screen is the Android home, then tapping the icon is invalid. |
 | Tap the icon, and then the common tools and the notification bar are displayed. |
 | Tap the icon to go to the Annotation screen.Tap  to select the type of pen and the size and color of the brush.Tap to select the type of pen and the size and color of the brush.Tap  to clear content.[Y60S][STX4]to erase unwanted content.[XX78] to clear content.[Y60S][STX4]to erase unwanted content.[XX78] to track erase the content.[ST8C]h [AWB9]n in , tap and slide [=] to clear up all content on the screen.[SBV6]You can recall the eraser in any mode by tapping the screen with your palm by default.Save: Save the current notification screen.◇ Tap Save, and then select the path to save the annotation screen.◇ Tap Scan to Download, and then you can download the annotation file to mobile phone. For details, see Table 5-3.Tap Quit to exit the annotation screen. to track erase the content.[ST8C]h [AWB9]n in , tap and slide [=] to clear up all content on the screen.[SBV6]You can recall the eraser in any mode by tapping the screen with your palm by default.Save: Save the current notification screen.◇ Tap Save, and then select the path to save the annotation screen.◇ Tap Scan to Download, and then you can download the annotation file to mobile phone. For details, see Table 5-3.Tap Quit to exit the annotation screen. |
| [H40A] | Tap the icon, and then the Signal Source screen is displayed. For details, see "5.3 Signal Source". |
 | Tap the icon, and the power option screen is displayed, where you can shut down the device, shut down OPS, and restart the device. |
After enabling the compass, you can add function icon to the compass. For details, see Table 6-2.
Table 5-2 Compass description
| Icon | Description |
| [zxxc] | Tap the icon, and then you can view and close background program. |
 | Tap the icon and the whiteboard screen is displayed. |
 | After connecting to the OPS device, tap the icon to switch to the Windows system. |
5.2 Common Tools
After invoking the Common Tools screen, you can quickly open the functions as needed.
Step 1 On Android home, tap or to display the navigation bar.
Step 2 Tap, and the notification and common tools screens are displayed.
- On Notification screen, you can view system notification and application notification.
- On Common Tools screen, you can view the tool status.
Figure 5-2 Common tools
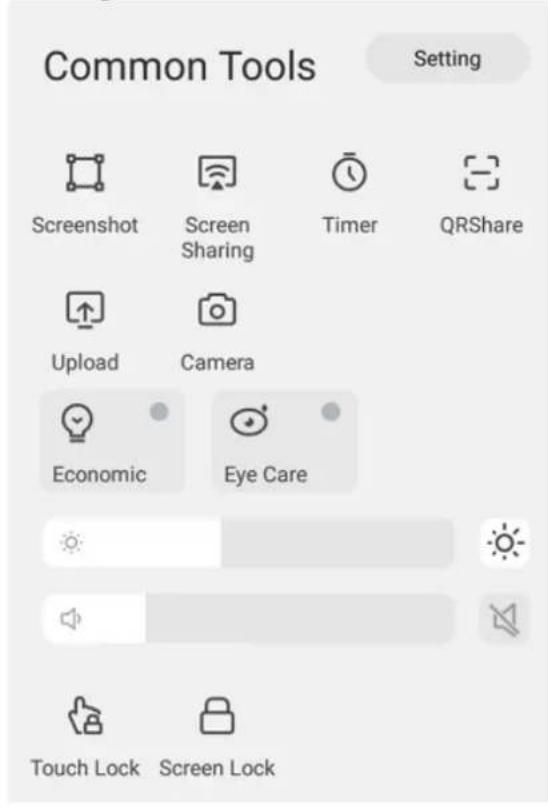
Table 5-3 Description of common tools
| Items | Description |
| Screenshot | Tap the icon, and the middle area is selected by default. You can drag the four corners of the square to customize the area size.Tap ,and then you can import the screenshot to whiteboard with one tap.Tap to capture the full screen.Tap to cancel the screenshot.Tap , and the screenshot named year-month-day-hour-minute - second. png (4K)will be saved in the screenshot folder. |
| Screen Sharing | Tap the icon to go to Screen Sharing screen. You can transfer content to the device through PC or mobile phone. For details, see "5.6 Screen Sharing". |
| Timer | Tap the icon, and then Timer screen is displayed. You can start and pause timing, set full-screen display of timing information, and reset the timer (resetting only supported when the timing is paused, and it will reset to the initial state 00:00:00). |
| QRShare | Tap the icon, and then Select file screen is displayed. You can select all file types, but cannot select a folder. Single file size cannot exceed 200 MB. Two or more files need to be compressed into a zip file for transmission. After tappingOK, a QR code is generated. Tap  to enlarge the QR code. You can scan the QR code to download the file, and tap Continue to Select under the QR code to return to theSelect File screen, and then you can continue to select files.Supports QR code encryption. If the device is connected to extranet, the QR sharing function will automatically use extranet. If the device is not connected to the extranet, it will automatically switch to the intranet.Intranet: Displays device hotspot name and password. After connecting to the hotspot, use camera or browser of mobile phone to scan the code. If encryption function is enabled, you need to enter the verification password after scanning the code, and the download screen will be displayed after successful verification.Extranet: Does not display device hotspot name and password. If encryption function is enabled, you need to enter the verification password after scanning the code with camera or browser of mobile phone, and the download screen will be displayed after successful verification.File sharing is risky. Please keep the QR code properly.When the files selected have the same name, the QR code cannot be generated. to enlarge the QR code. You can scan the QR code to download the file, and tap Continue to Select under the QR code to return to theSelect File screen, and then you can continue to select files.Supports QR code encryption. If the device is connected to extranet, the QR sharing function will automatically use extranet. If the device is not connected to the extranet, it will automatically switch to the intranet.Intranet: Displays device hotspot name and password. After connecting to the hotspot, use camera or browser of mobile phone to scan the code. If encryption function is enabled, you need to enter the verification password after scanning the code, and the download screen will be displayed after successful verification.Extranet: Does not display device hotspot name and password. If encryption function is enabled, you need to enter the verification password after scanning the code with camera or browser of mobile phone, and the download screen will be displayed after successful verification.File sharing is risky. Please keep the QR code properly.When the files selected have the same name, the QR code cannot be generated. |
| Upload | After tapping the icon, tap Platform Registration, enable Cloud Management Platform Registration, enter the server IP address or domain name, and then tap REGISTER to register to the cloud management platform.After registering on the cloud management platform, you can upload the files on the device to the cloud platform for management and saving. All file types can be selected (folder selection is not supported), and the files can be compressed into ZIP files for transmission. TapUpload, and then the meeting list of the day and the previous two days is displayed. The default is the upload time point meeting. If there is no meeting at this time point, the default is the nearest meeting before that time point. |
| Camera | Tap the icon to take a picture.The built-in camera supports beautifying and mirroring.Supports delay picture taking, including: Off, 3 s, 5 s, 10 s. It is 3 s by default.After taking a picture, tap Import Whiteboard, and then you can import the picture to whiteboard with one-tap.Tap to save the picture to the local default folder, and the picture is named year-month-day-hour-minute-second .png by default.Supports QR sharing. |
| Economic | With this function enabled, the backlight is fixed to a lower value, and the backlight brightness can be adjusted manually or automatically. |
| Eye Care | With this function enabled, it will reduce the blue light of the channel layer and change the screen to yellow light mode to protect your eyes. |
| Drag the slider to adjust the backlight brightness. You can tap to enable auto adjustment function. With the function enabled, the device can automatically adjust the brightness according to the environment. For details, see Table 6-2 Description of general settings".Do not set the backlight brightness to a quite low value, otherwise it might cause display exception. | |
| Drag the slider to adjust the volume. Tap to enable muting. | |
| Touch Lock | Tap the icon, and then screen touch is invalid.If there is no lock screen password, press the power button three times to restore the touch function.If there is a lock screen password, after pressing the power button three times, you need to enter the digit password, pattern password, or fingerprint to unlock and restore touch function. |
| Screen Lock | Tap the icon to lock up the screen. |
5.3 Signal Source
Add the signal source and preview images of signal source.

Make sure that he device has been connected to signal source correctly.
Step 1 On Android home screen, tap or to display the navigation bar.
Step 2 Tap, and then the signal source screen is displayed.
Figure 5-3 Signal source
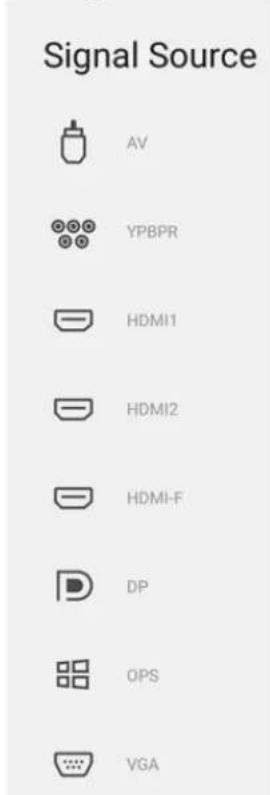
Step 3 Select the kind of signal sources that have been connected to the device.
- The connected signal source is displayed normally, and the unconnected signal source is grayed out.
- Preview images of corresponding source are displayed on the signal preview window of the device. Tap the corresponding signal preview window and you can enter the signal source.
Table 5-4 Description of signal source
| Signal Source | Description |
| AV | Connects to video signal source to play video signal source images. |
| YPBPR | Connects to YPBPR to play YPBPR signal source images. |
| HDMI1 | HDMI signal source can transmit uncompressed HD video and multichannel audio data. |
| HDMI2 | |
| HDMI-F | HDMI is the signal input port of HD audio and video. Through the port, external HDMI signal source transmits the uncompressed HD video and multichannel audio data to the device. |
| DP | Connects to DP signal source to play DP signal source images. |
| OPS | OPS computer is an open, pluggable microcomputer. After installing the OPS computer to the device, you can switch the system to Windows with one tap and carry out operations such as using teaching application. |
| VGA | Connects to VGA signal source and can play analog video images. |
5.4 Whiteboard
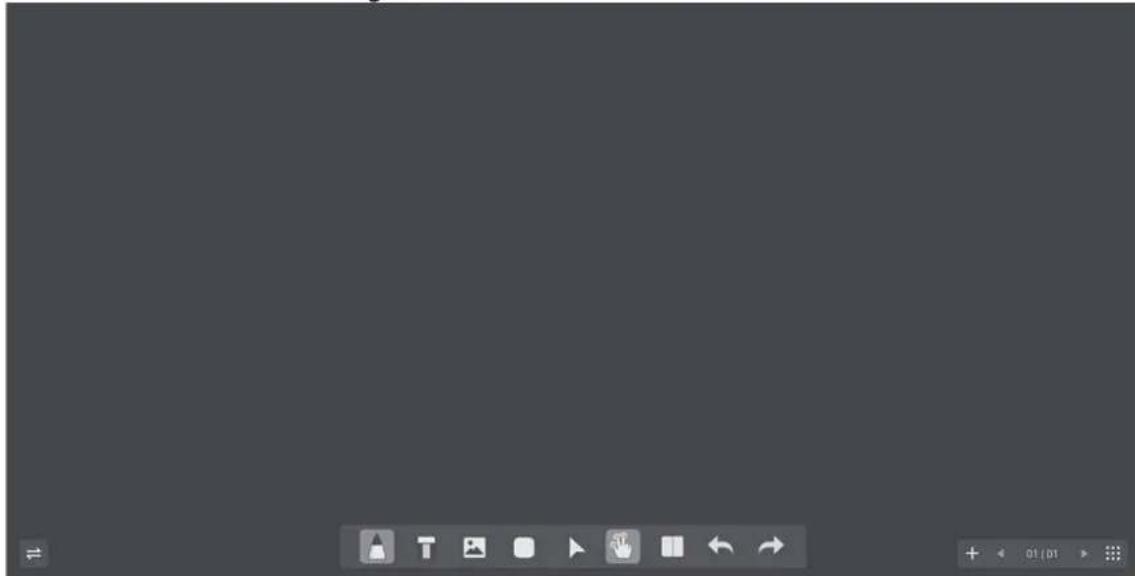
Whiteboard supports various operations, including writing, inserting pictures, sharing through QR code and email.
On Android home, tap Whiteboard.
Figure 5-4 Whiteboard screen
natural_image
Blank gray canvas with no visible content, text, or symbolsTable 5-5 Description of whiteboard icon
| Icon | Description |
| [SH82]Switch the location of the whiteboard tool bar. | |
| Tap the icon to select the type, thickness, color and transparency of the pen. | |
 | Tap the icon to erase or clear the content.Tap [D23X] to erase unwanted content.Tap [D23X] to track erase the content.As shown in [XX26] tap and slide = to clear up all content on the screen.Eraser will be displayed in any mode if you press your hand on the screen. |
| [X73W] | Tap the icon, and then you can insert image with bmp, png, jpg, or jpeg format. Up to 30 images can be inserted. |
| [S2XH] | Tap the icon to select the shape of the draw graph. |
| [ZXTC] | Tap the icon to select content on the screen, and then you can zoom or move the selected content. |
| [XXW2] | Tap the icon to change the system to single point.Single point: Supports one-point writing, side erasing (anti error touching), double-finger zooming, and multi-finger roaming.Multiple point: Supports multiple-point writing. |
| [SCXS] | Tap the icon to undo the last action or redo the undone action. Supports undoing or redoing 100 steps. |
[K4A0] | Tap the icon to add whiteboard page.Up to 100 pages can be added.Tap 01/01 to preview the saved file list. Tap the file, and then you can edit the file.When you have created several files, tap or to switch to the previous file and the next file. You can browse the thumbnail of the switch page. |
| [4539V] | Tap the icon, and then you can perform the following operations.New: Create a new whiteboard file. Save the currently written content first, or the changes will be lost.Open: Open the saved writing file. Only the whiteboard file format can be opened. After tapping, it will jump to the whiteboard file screen on file management screen by default.Change wallpaper: You can use local background template or custom template.Background template: Solid color (all black, all blue, all green), and small grid (white and beige).Custom template: Only images in bmp, png, jpg, and jpeg formats are supported. The image size is limited to 20 MB. We recommend you select the image whose ratio is 16:9.Save: Save the written file, and the default name of the file is year-month-day-hour-minute-second. You can select the file format as source file (whiteboard), pdf, and png. It is whiteboard format by default.Save as: Save the written file, and the default name of the file is year-month-day-hour-minute-second. You can select the file format as source file format (whiteboard), pdf, and png. It is whiteboard format by default.QR share: Download the written whiteboard file. For details, see Table 5-3.Email share: After configuring the email information, add the email subject and recipients (up to 10 recipients can be added).Quit: Quit the whiteboard application. Save the modified file first, or the changed content will be lost. |
5.5 Managing File
You can manage local files in Android system and files in USB.
On Android home, tap Presentation.
The screen shows different file types.
Figure 5-5 Managing files
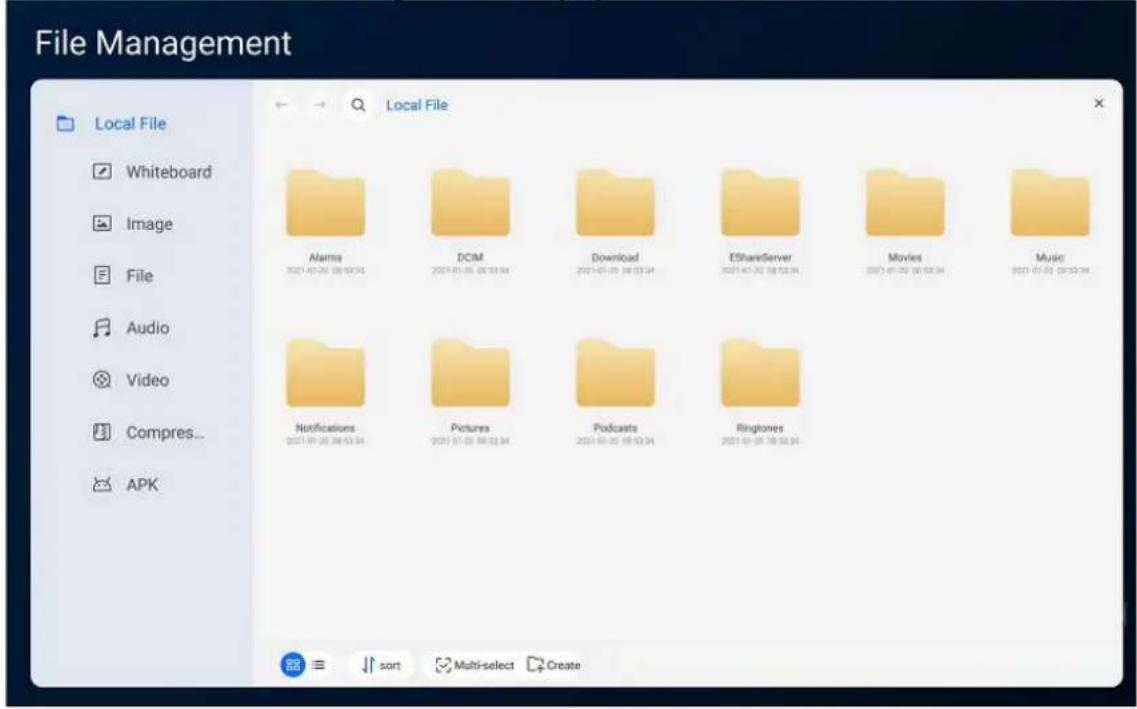
Table 5-6 Icon description
| Icon | Description |
| ← or → | View local file on the previous page or next page. |
| Enter file names to search for file. | |
| Files are displayed as icons/lists. | |
| Files can be sorted in ascending or descending order by name, size and time. | |
| Select multiple files. | |
| new folder. |
5.6 Screen Sharing
You can remotely operate the device on mobile phone or PC, and cast the content on mobile phone or PC to the device screen.
5.6.1 Screen Sharing through PC
PC content can be casted onto the device screen for display and operation.
Prerequisites
- The device and PC have been connected to the same LAN, and the device hotspot has been enabled. For details, see "6.1 Network Settings".
- Wireless transmitter corresponding to the device has been obtained. Wireless transmitter does not come with the device by default. Purchase it separately as needed.
Procedure
Step 1 Pair the wireless transmitter with device. 1) Tap ScreenSharing on Android home.
2) Plug the wireless transmitter into the USB port of Android system on the front panel of the device.
The system starts to pair. After the pairing is successful, the system prompts that the wireless transmitter is paired successfully.
3) Tap OK.
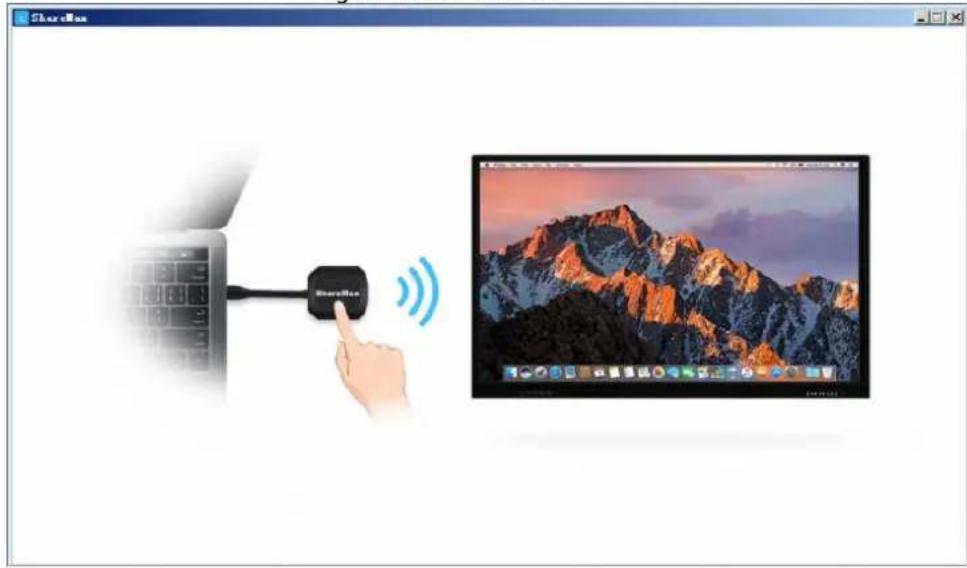
Step 2 Cast the content on PC screen onto the device screen.
1) Plug the wireless transmitter into the USB port of the PC.

For first time use, you might need to install driver program of the wireless transmitter. If the installation fails, please manually download the driver.
2) Tap the ShareMax on the wireless transmitter.
Cast the PC content to the device screen for display and operation.
Figure 5-6 ShareMax
5.6.2 Screen Sharing through Mobile Phone
After casting the screen through the mobile phone, the device can be operated on the mobile phone or the content of the mobile phone can be casted onto the device screen for display.
Prerequisites
The device and your phone have been connected to the same LAN.
Procedure
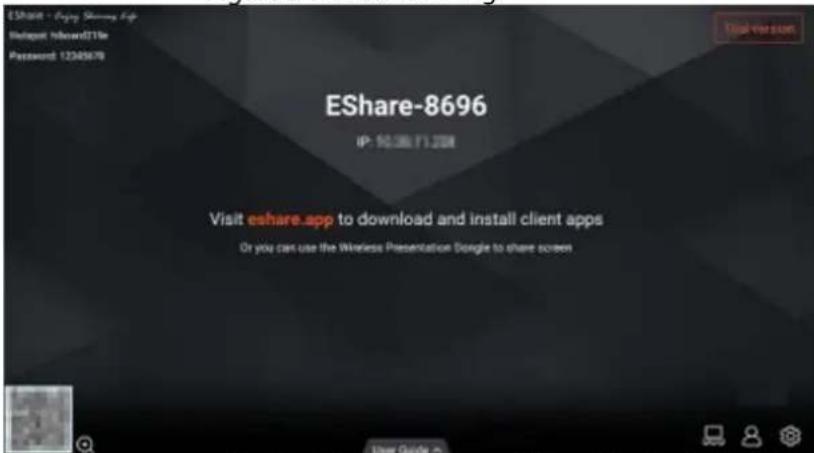
Step 1 Tap ScreenSharing on the Android home.
Step 2 Use your mobile phone to scan the QR code at the lower-left corner of the screen to download and install the client, or you can access "http://IP address:port" on the mobile phone.

- If the device connects to different network, then the IP address you are going to access vary accordingly.
- Tap + to enlarge the QR Code.
Figure 5-7 Screen Sharing
Step 3 Download the corresponding installation package (EShare for Android, for example) of your phone system and install EShare software.
Step 4 Open EShare and select the corresponding device name to link your phone, for example, EShare-6750.
After successful connection to the device, you can manage the device with your phone or you can cast the content in your phone onto the device screen to display.
Table 5-7 Icon description
| Icon | Description |
| [26c5] | View display group settings.● Duplicate displays.◇ Enable: Synchronize the screen to all devices in the group.◇ Only valid in client screen sharing: When the mobile phone or other device shares the screen to the client, it synchronizes the screen to the group.◇ Disable: The shared screen will not be synchronized to the group.● Invitation for joining display group.◇ Auto-accept: Join the group automatically.◇ Notify me: Select whether to authorize to join the group on the prompted window.◇ Disable: Refuse to join the group. |
 | View moderator control center.● Share Screen or File.◇ All allowed: Automatically connect and share the screen.◇ Need authorization: Select whether to authorize to share the screen on the prompted window.◇ Disable: Disable screen sharing.● View, Control and Wireless Annotation.◇ All allowed: You can view, control, and annotate the shared screen.◇ View only: You can view the screen through mobile phone or other devices, but cannot operate.◇ Need authorization: Select whether to authorize the operation on the prompted window.◇ Disable: You cannot view, control, or annotate the shared screen.● Floating Moderator Button.◇ Always display: Displays the floating icon on any screen.◇ Only on the Home screen : Only displays the floating icon on the homepage.◇ Disable: Do not display the floating icon.◇ Auto: Displays the floating icon and the number of connections when connected to mobile phone or other devices. |
 | Device Name: You can change the device name.Connection ModeDevice name: When using a mobile phone or other devices to share screen, the screen displays the device name, and you can connect the device directly by tapping the displayed device name.PIN code (4 digits): When using a mobile phone or other device to share the screen to the device, you need to enter the 4 digits to connect the device.PIN code (6 digits): When using a mobile phone or other devices to share the screen to the device, you need to enter the 6 digits to connect device.Multiple Screens: You can selectDisable, 2 Screens, 4 Screens, 6 Screens, and 9 Screens.Show Device Name on Screen: Enable the function to display the name of the mobile phone or other devices connected to the device.Auto Fullscreen: Full screen display the shared screen.AirPlay visible: Enable to cast the content on Apple devices when in the same network environment. |
| User Guide ^ | View user guide. |
5.7 Managing Fingerprint
Add your fingerprint to the device, and then you can unlock the device through fingerprint recognition.
Procedure
Step 1 On Android home, select More > Settings.
Step 2 On the left side of the screen, tap System Security to enable fingerprint password, and then tap Fingerprint Database.
- No fingerprints added: Record fingerprints first. Tap Add Fingerprint, and then put your finger on the fingerprint sensor on the front panel to collect your fingerprint.

You need to repeat 3 times to complete fingerprint recording.
Figure 5-8 Adding fingerprint
Set Fingerprint

First Registration
Please put your finger on the scanner.

natural_image
Fingerprint pattern (no text or symbols)- Fingerprint added: Fingerprint database is displayed.

After deleting the fingerprint, the device cannot be unlocked by this fingerprint. Please operate with caution.
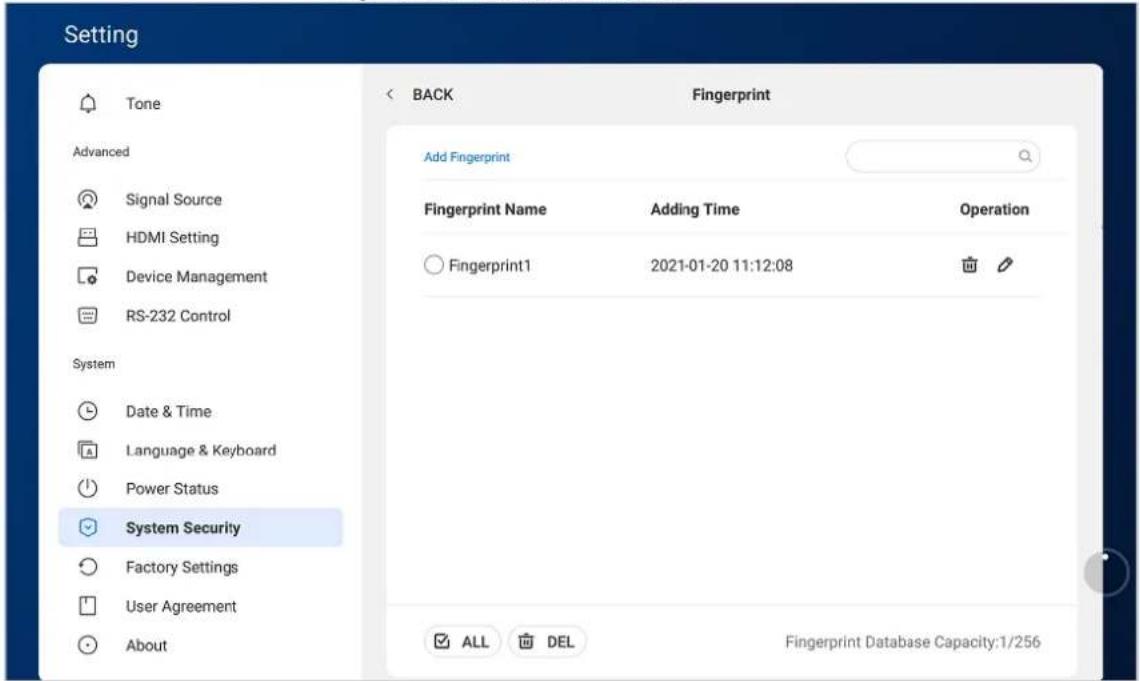
Figure 5-9 Fingerprint database
Related Operation
• In , enter the fingerprint name to search for fingerprint information.
- Tap 📊 to delete a single fingerprint.
- Tap to change the fingerprint name.
- Select multiple fingerprints, and then tap to delete the selected fingerprints.
- Tap ☑ ALL to select all the fingerprint, and then tap ☑ DEL to delete all fingerprints.
6 Settings
This chapter introduces network settings, general settings, and advanced settings of the device.
6.1 Network Settings
On Android home, tap More > Settings.

You can enable wireless network or wired network as needed. Wireless network and wired network cannot be enabled at the same time. The device itself can also act as a hot spot to share flows with other terminals.
Figure 6-1 Network settings
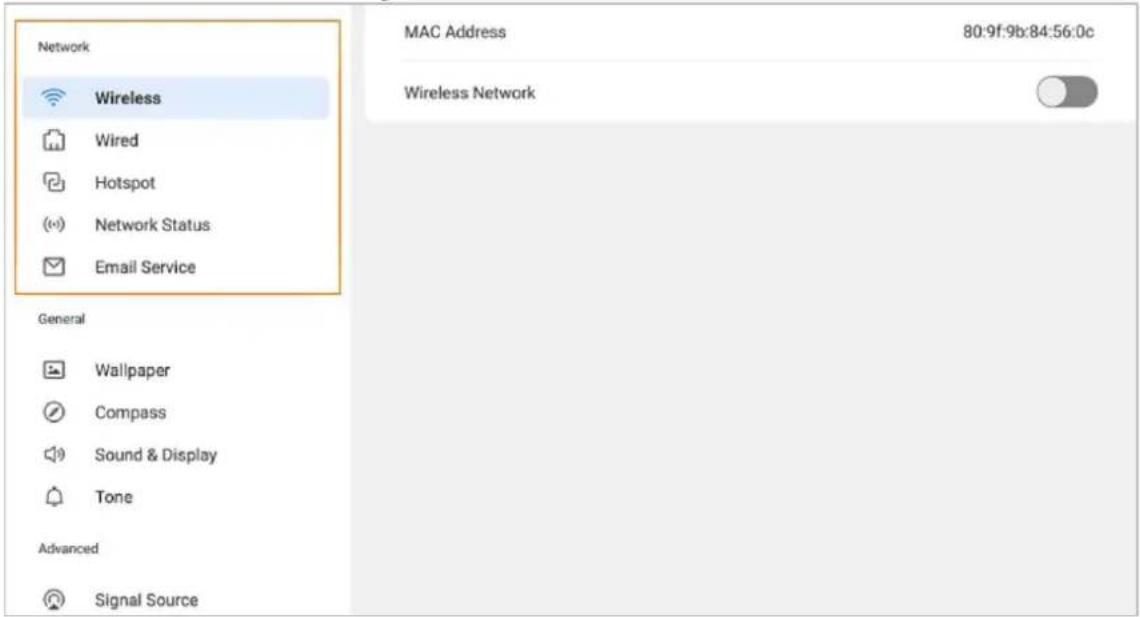
Table 6-1 Description of network settings
| Items | Description |
| Wireless | Enable Wireless Network, and then the device can connect to available Wi-Fi in your surroundings. You can add wireless network: Tap Add Network, and then enter network SSID. You can select Display Advanced Settings as needed.Select the encryption method (security level from low to high).None: No encryption.WEP: Static encryption to prevent illegal users from eavesdropping or intruding into the wireless network.WAP/WPA 2PSK: Unable to calculate the general key to prevent data from being tampered during transmission.We recommend you select a secure authentication method to connect to wireless network. |
| Wired | Set the dual-port wired network connection parameters. Network port 2 does not support the DHCP function and can only be configured manually. It is generally used in intranet environment.DHCP: When there is a DHCP server in Internet, you can enable Wired, and the device gets a dynamic IP address automatically.Static: According to the actual networking, manually configure IP address, subnet mask, default gateway and DNS for the device. |
| Hotspot | You can enable or disable Hotspot, and view hotspot name, password, encryption method, frequency band and other information on hotspot screen.Tap Move to Blocklist, and then the device will not be able to connect to the hotspot.Tap to remove the hotspot from the blocklist. |
| Network Status | Displays information such as the device current connection mode, IP address, default gateway, subnet mask, and DNS1. |
| Email Service | Enter sender email address, SMTP server address, port number, and select attachment size (a single attachment supports 200 M at most. When the attachment is larger than the set attachment threshold, the attachment will be sent in packets).Before configuring email service, enable SMTP of your email account. (SMTP: Mainly used for the transmission of mail messages between systems).After enabling Verify Username and Password, you need to enter the username, and password/authorization code. With Recipient Restriction enabled, you can enter the email suffix, and then only recipient addresses that comply with this email suffix will receive the email. |
6.2 General Settings
On Android home, tap More > Settings, and then you can view general settings on the General module.
Figure 6-2 General settings
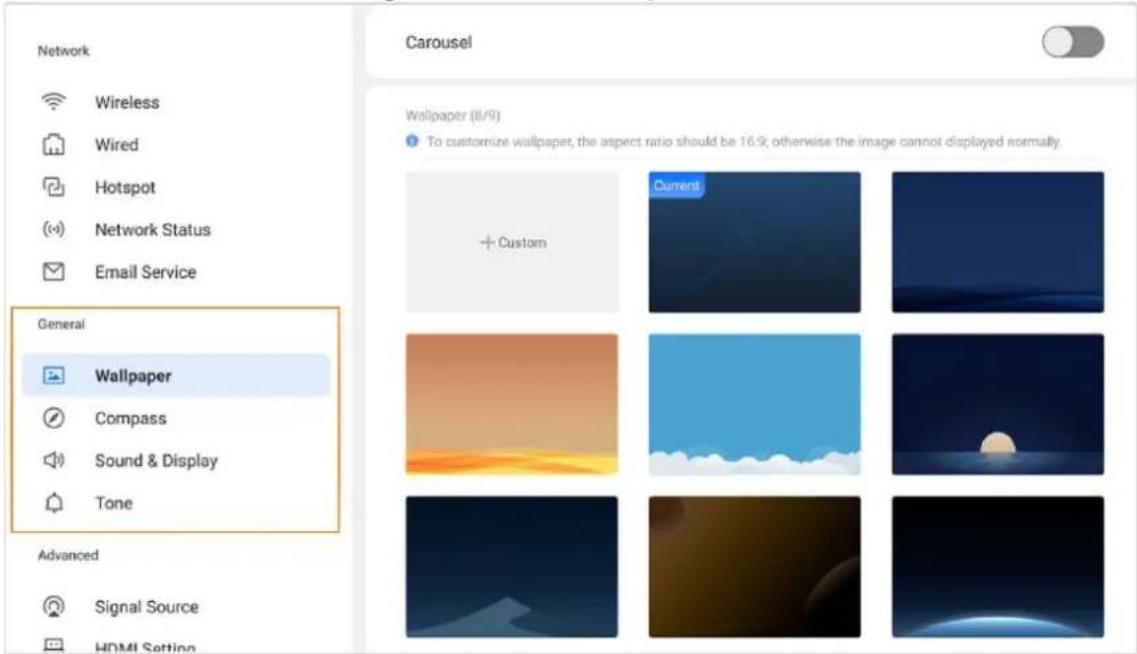
Table 6-2 Description of general settings
| Item | Description |
| Wallpaper | Set the background image, and you can enable Carousel to play the selected background images in turn.There are 8 wallpapers by default.You can customize and upload wallpapers. |
| Compass | Select or customize the automatic hide time of the compass and the hidden status, including small circle or disappearing.[IMAGE]After enabling the compass, double-tap with more than two fingers to call it out, and the number of fingers must be the same for the two taps. |
| Sound & Display | Adjust the volume level: Supports local volume adjustment from 0 to 100, and the default is 25. If the volume is 0, a mute sign will be displayed in the lower-left corner of the screen.Sound effect: Displays specific value, and the grayed-out item cannot be modified.Standard: Bass 50, treble 50, balance 50.Meeting: Bass 90, treble 75, balance 50.Theater: Bass 35, treble 35, balance 50.Classroom: Bass 75, treble 75, balance 50.Custom: Custom high and low volume.Backlight brightness can be adjusted manually or automatically.Manual: Supports screen brightness adjustment from 0 to 100.Auto: After enabling Adjust Brightness Automatically, the device will adjust brightness according to the environment brightness. |
| Tone | There are 10 kinds of tone by default.Tap Add Audio to add external audio. The maximum number of added audio is 10, and the size of each audio is less than 500K. Tap 📄 to delete the added audio. |
6.3 Advanced Settings
On Android home, tap More > Settings, and then you can view advanced settings on the Advanced module.
Figure 6-3 Advanced settings
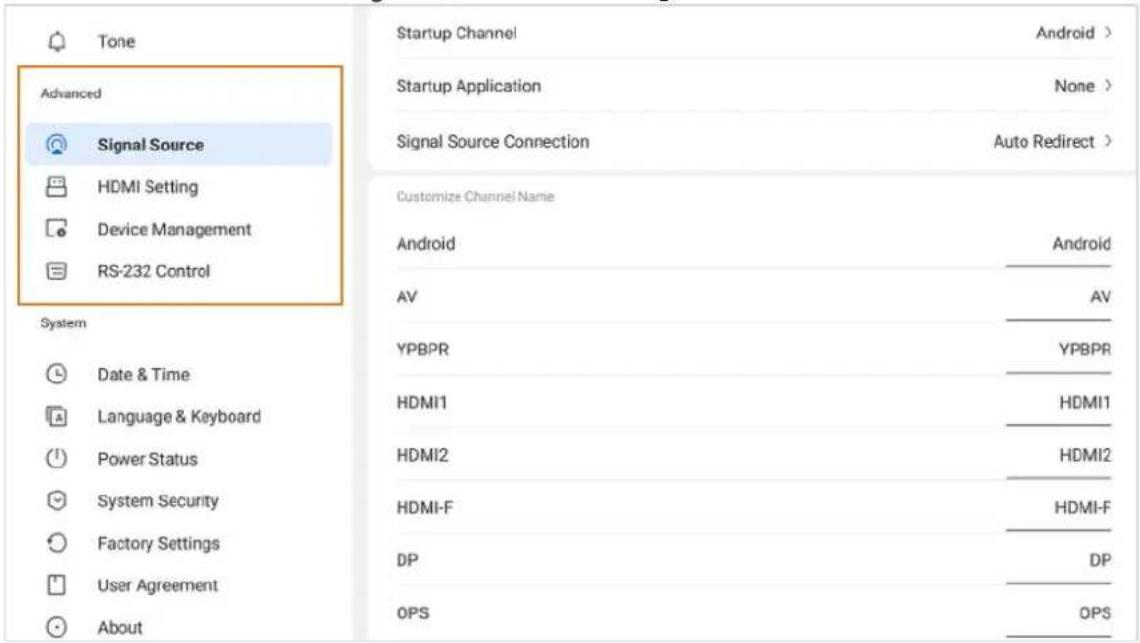
Table 6-3 Description of Advanced settings
| Item | Description |
| Signal Source | Startup channelFixed channel: Access to a fixed channel after startup.Memory channel: Enter the channel of the last startup.Startup application: Customize the selection of the applications installed on the device. After selecting, it will jump directly to the set applications after startup.Signal source connectionAuto Redirect: Access source and automatically jump to the corresponding channel.Pop-up Window: Access to source, and a pop-up window appears asking whether to jump to the connected source channel.Channel name: Customize the channel name. After the name is modified, the corresponding channel name of the whole system will be modified synchronously.Auto wake: Enable Auto Wake to wake the device if it is connected to HDMI or VGA signal source when the device is in the sleep status. |
| HDMI Setting | HDCP: High-Definition Content Protection Technology. After enabling HDCP, you need to connect a device that supports the HDCP protocol.HDMI OUT: Displays the content according to the resolution supported by the monitor.Supports setting the output resolution according to the display resolution.When the HDMI cable is longer than 5 m, you need to enable the long-distance output mode, otherwise 4K signals might not be transmitted.When the monitor is not connected, the display is gray; after the monitor is connected, the HDCP function is enabled by default. Disabled by default. |
| Device Management | View information of camera, microphone, and speaker. |
| R232 Control | With R232 Control enabled, connect the device to the RS-232 transparent debugging serial port to support mutual data transmission among devices.The attributes of RS-232 control serial port are 115200 baud rate, 8 data bit, NONE parity bit, 1 stop bit 1. |
6.4 System Settings
On Android home, tap More > Settings, and then you can view system settings on the System module.
Figure 6-4 System settings
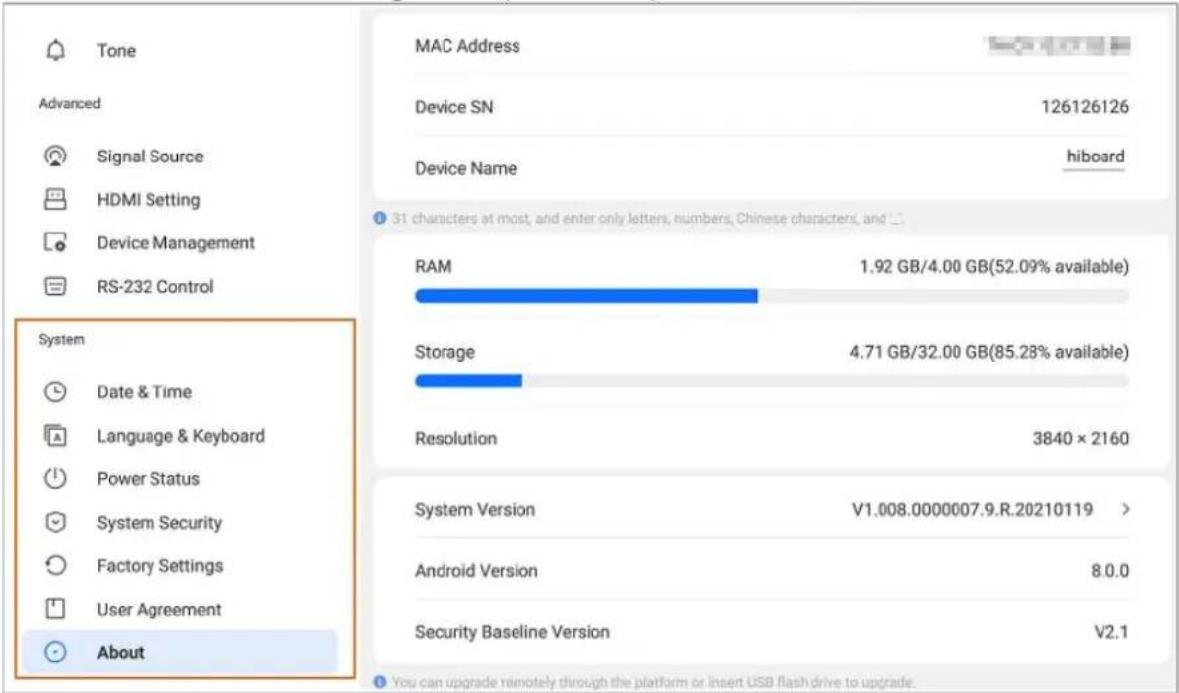
Table 6-4 Description of system settings
| Item | Description |
| Date & time | Set the date and time automatically or manually. With Auto Sync enabled, the device time is synchronized with the server time; when it is disabled, you need to manually set the date and time, If the cloud management platform is successfully registered, the device synchronizes time from the platform (the time cannot be configured manually).If the platform is disconnected, the device automatically synchronizes time from server. If the cloud management platform is successfully registered, the device synchronizes time from the platform (the time cannot be configured manually).If the platform is disconnected, the device automatically synchronizes time from server. |
| Language & keyboard | Select the system language and the input method. |
| Power Status | Startup Options: Standby with power on; Startup with power on.Screen Turns Off: Always on; No operation after 1 min; no operation after 5 min; no operation after 10 min; custom configuration from 1 min to 60 min.Temperature Detection:When the device temperature is between 80°C and 90°C, a warning prompts, reminding you to shut down and cool down the device before use. Tap Remind later, a warning prompt will appear after a few minute, tap Shut down now to shut down the device.If the device temperature is higher than 90 °C, the device will shut down after 10 seconds.Scheduled Power On/Off (Max. 10 plans): Tap Add Plan to set the power on and power off time and week. Tap 📄 to delete the plan. |
| System Security | ● Fingerprint: After enabling Fingerprint, and recording fingerprint, you can use fingerprint to unlock the device. For details, see "5.7 Managing Fingerprint".● Passcode: After enabling Passcode, you can unlock the device with 4–8 digits passcode.● Pattern: After enabling Pattern, you can unlock the device by drawing a pattern.● Lock screen: Enable Lock screen, and then you can select screen lock configuration, including lock when turning off the screen, no operation after 1 min, no operation after 5 min, no operation after 10 min, and custom configuration.The system does not support simultaneous use of pattern and passcode. |
| Factory Settings | Tap FACTORT SETTINGS , all your operation records and saved content will be deleted, and your device will be restored to the factory status. Make sure that you have backed up the data before the operation. |
| User Agreement | View Privacy Policy , Software License Agreement, and Open Source Notice. |
| About | View MAC address, device serial number, device name (can be edited), running memory, storage space, resolution, system version, Android version, and security baseline version.The maximum allowed length of the device name is 31 characters. The available characters include only alphanumeric characters, "-", "@", and "" |
7 Shutdown
Under the booting up condition, you can shut down the device through the following methods.

The device can provide power-off protection to the OPS computer. After you shut down the device, the OPS will wait for some time to shut down.
- Press and hold the power button for 5 s, and then tap OK on the prompted window to shut down the device.
- Press the power switch on the left panel to shut down the device.
8 System Update
You can update the device through USB flash drive or platform. For update through USB drive, contact our technical support to obtain the update package (update.zip).

Degrading to a lower version will make the device vulnerable to security vulnerabilities. Please operate with caution.
- Update through USB
Verify the update.zip upgrade package in the root directory of the USB flash drive. After the verification is successful, it will automatically prompt "Update package XX/XXX/update.zip detected, whether to upgrade or not". USB drive needs to be verified every time it is inserted into the USB port. - Update through platform
Smart Interactive Multimedia System will send update package to update the device.
9 FAQ
- The device cannot start after connecting power supply and quickly pressing the power button on the front panel.
After the device is powered on, it needs a few seconds to initialize. Therefore, press and hold the power button for a few seconds after the device is powered on. The same operation is required when updating.
- Cannot use USB to update the device.
- Check whether the USB is inserted into the USB port of the Android mainboard. If not, insert the USB into the USB port of the Android mainboard.
- Check whether the USB format is FAT32. If not, format the USB.
- Update the device
- OPS computer does not start after the device is powered on.
The OPS computer will not start automatically. You need to press the power button on your OPS computer.
- The OPS computer does not shut down when there is file unsaved.
To prevent data loss caused by shutdown, when there is a file not saved, the device does not shut down.
Appendix 1 Touch Operation Note
You can use the stylus pen or directly use your fingers to operate on the device screen.

Operation with stylus pen is taken for an example.
Appendix Table 1-1 Touch operation introduction
| Operation | Description |
| Tap | Tap the screen once with the stylus pen. |
| Double-tap | Tap the screen twice with the stylus pen (the time gap of the taps is around 0.5 s). |
| Right-hand button menu | Slightly touch the screen 1 s-2 s with the stylus pen. Lift the stylus pen when there is a circle on the screen. Then, the right-hand button menu is displayed. |
| Dragging | Hold the icon that need to be dragged with the stylus pen and move the stylus pen to the target place. Lift the stylus pen to finish the dragging operation. |
| Sliding | Hold the screen (such as slider used for web browsing) that needs to be slid with the stylus pen, and slide the stylus pen towards the direction you want. Lift the stylus pen to finish the sliding operation. |
| Extracting | Hold the screen that can be extracted (such as webpages or images) with a stylus pen. Use another stylus pen to do the dragging operation. Then, the extracting operation is finished. |
Appendix 2 Cybersecurity Recommendations
Mandatory actions to be taken for basic device network security:
1. Use Strong Passwords
Please refer to the following suggestions to set passwords:
• The length should not be less than 8 characters.
- Include at least two types of characters; character types include upper and lower case letters, numbers and symbols.
- Do not contain the account name or the account name in reverse order.
- Do not use continuous characters, such as 123, abc, etc.
- Do not use overlapped characters, such as 111, aaa, etc.
2. Update Firmware and Client Software in Time
- According to the standard procedure in Tech-industry, we recommend to keep your device (such as NVR, DVR, IP camera, etc.) firmware up-to-date to ensure the system is equipped with the latest security patches and fixes. When the device is connected to the public network, it is recommended to enable the "auto-check for updates" function to obtain timely information of firmware updates released by the manufacturer.
• We suggest that you download and use the latest version of client software.
"Nice to have" recommendations to improve your device network security:
1. Physical Protection
We suggest that you perform physical protection to device, especially storage devices. For example, place the device in a special computer room and cabinet, and implement well-done access control permission and key management to prevent unauthorized personnel from carrying out physical contacts such as damaging hardware, unauthorized connection of removable device (such as USB flash disk, serial port), etc.
2. Change Passwords Regularly
We suggest that you change passwords regularly to reduce the risk of being guessed or cracked.
3. Set and Update Passwords Reset Information Timely
The device supports password reset function. Please set up related information for password reset in time, including the end user's mailbox and password protection questions. If the information changes, please modify it in time. When setting password protection questions, it is suggested not to use those that can be easily guessed.
4. Enable Account Lock
The account lock feature is enabled by default, and we recommend you keep it on to guarantee the account security. If an attacker attempts to log in with the wrong password several times, the corresponding account and the source IP address will be locked.
5. Change Default HTTP and Other Service Ports
We suggest you to change default HTTP and other service ports into any set of numbers between 1024–65535, reducing the risk of outsiders being able to guess which ports you are using.
6. Enable HTTPS
We suggest you to enable HTTPS, so that you visit Web service through a secure communication channel.
7. MAC Address Binding
We recommend you bind the IP and MAC address of the gateway to the device, thus reducing the risk of ARP spoofing.
8. Assign Accounts and Privileges Reasonably
According to business and management requirements, reasonably add users and assign a minimum set of permissions to them.
9. Disable Unnecessary Services and Choose Secure Modes
If not needed, it is recommended to turn off some services such as SNMP, SMTP, UPnP, etc., to reduce risks.
If necessary, it is highly recommended that you use safe modes, including but not limited to the following services:
- SNMP: Choose SNMP v3, and set up strong encryption passwords and authentication passwords.
- SMTP: Choose TLS to access mailbox server.
- FTP: Choose SFTP, and set up strong passwords.
● AP hotspot: Choose WPA2-PSK encryption mode, and set up strong passwords.
10. Audio and Video Encrypted Transmission
If your audio and video data contents are very important or sensitive, we recommend that you use encrypted transmission function, to reduce the risk of audio and video data being stolen during transmission.
Reminder: encrypted transmission will cause some loss in transmission efficiency.
11. Secure Auditing
- Check online users: we suggest that you check online users regularly to see if the device is logged in without authorization.
- Check device log: By viewing the logs, you can know the IP addresses that were used to log in to your devices and their key operations.
12. Network Log
Due to the limited storage capacity of the device, the stored log is limited. If you need to save the log for a long time, it is recommended that you enable the network log function to ensure that the critical logs are synchronized to the network log server for tracing.
13. Construct a Safe Network Environment
In order to better ensure the safety of device and reduce potential cyber risks, we recommend:
- Disable the port mapping function of the router to avoid direct access to the intranet devices from external network.
- The network should be partitioned and isolated according to the actual network needs. If there are no communication requirements between two sub networks, it is suggested to use VLAN, network GAP and other technologies to partition the network, so as to achieve the network isolation effect.
- Establish the 802.1x access authentication system to reduce the risk of unauthorized access to private networks.
- Enable IP/MAC address filtering function to limit the range of hosts allowed to access the device.
- Smart Interactive Whiteboard
- Foreword
- General
- Model
- Safety Instructions
- Revision History
- Privacy Protection Notice
- About the Manual
- Important Safeguards and Warnings
- Operating Requirements
- Electrical Safety
- Table of Contents
- Introduction
- Packing List
- Structure
- Appearance
- Dimensions
- Dimension (65-inch)
- Dimension (75-inch)
- Dimension (86-inch)
- Button
- Port
- Left Panel Ports
- Bottom Panel Ports
- Starting Device and Turning off Screen
- Starting Device
- Prerequisites
- Procedure
- Turning off Screen
- Basic Operations
- Navigation Bar
- Common Tools
- Signal Source
- Whiteboard
- Managing File
- Screen Sharing
- Screen Sharing through PC
- Screen Sharing through Mobile Phone
- Managing Fingerprint
- Set Fingerprint
- Related Operation
- Settings
- Network Settings
- General Settings
- Advanced Settings
- System Settings
- Shutdown
- System Update
- FAQ
- Appendix 1 Touch Operation Note
- Appendix 2 Cybersecurity Recommendations
- Use Strong Passwords
- Update Firmware and Client Software in Time
- Physical Protection
- Change Passwords Regularly
- Set and Update Passwords Reset Information Timely
- Enable Account Lock
- Change Default HTTP and Other Service Ports
- Enable HTTPS
- MAC Address Binding
- Assign Accounts and Privileges Reasonably
- Disable Unnecessary Services and Choose Secure Modes
- Audio and Video Encrypted Transmission
- Secure Auditing
- Network Log
- Construct a Safe Network Environment
Brand : Dahua Technology
Model : LPH65-MT440-C
Category : Whiteboard