
MiniJet - Pool pump Jandy - Free user manual and instructions
Find the device manual for free MiniJet Jandy in PDF.


| Brand | JANDY |
| Model | MiniJet (FFMJ-VL for Vinyl Liner) |
| Product Type | Pool Circulation Jet |
| Application | Vinyl Liner Pools (also standard for deck) |
| Material | PVC housing, brass jets, stainless steel mounting hardware |
| Mounting Type | Through-wall installation at mean water level |
| Water Connection | 1/2" PVC pipe |
| Flow Rate (GPM) | 2.1 to 4.4 GPM per nozzle |
| Jet Spray Height | 3.3 ft to 13.1 ft |
| Head Loss (Feet) | 3.9 ft to 16.0 ft |
| Maximum MiniJets per Pipe | 26 with 3" return pipe |
| Cutout Size | 3-5/16" x 3-5/16" square |
| Included Components | Housing, rear mounting plate, front plate, gasket, brass jets, cover, screws, 3/8" plug |
| Installation Template | Included (layout template) |
| Winterizing | Drain water and install 3/8" plug in nozzle inlet |
| Pressure Testing | Required before liner installation |
| Weight (approx.) | 1.5 lbs (0.7 kg) |
Frequently Asked Questions - MiniJet Jandy
User questions about MiniJet Jandy
0 question about this device. Answer the ones you know or ask your own.
Ask a new question about this device
Download the instructions for your Pool pump in PDF format for free! Find your manual MiniJet - Jandy and take your electronic device back in hand. On this page are published all the documents necessary for the use of your device. MiniJet by Jandy.
USER MANUAL MiniJet Jandy
MiniJet® for Vinyl Liner Pool Installation
The Polaris MiniJet for vinyl liner pools (FFMJ-VL) is designed to mount in a vinyl pool wall slightly above water level. It can be mounted in wall panels with a thickness of .1094" (12Ga. Steel) to 3/8" (polymer wall). For deck installations, use the standard Polaris MiniJet (FFMJ).
Preparing For Installation
Determine the mean water level of the pool and the vertical center line of each MiniJet. If water covers the nozzle, the performance will be affected. Mounting it too high may interfere with the coping and liner installation.
Pressure testing is required. Screw the 3/8" plug provided into the nozzle inlet of the MiniJet housing. This plug is also used for winterizing, so do not discard.
Store the brass jets, the MiniJet housing cover, the 3/8" plug and the four screws for pool start-up.
Prevent dirt and debris from entering the plumbing lines during construction.
Installing The MiniJet
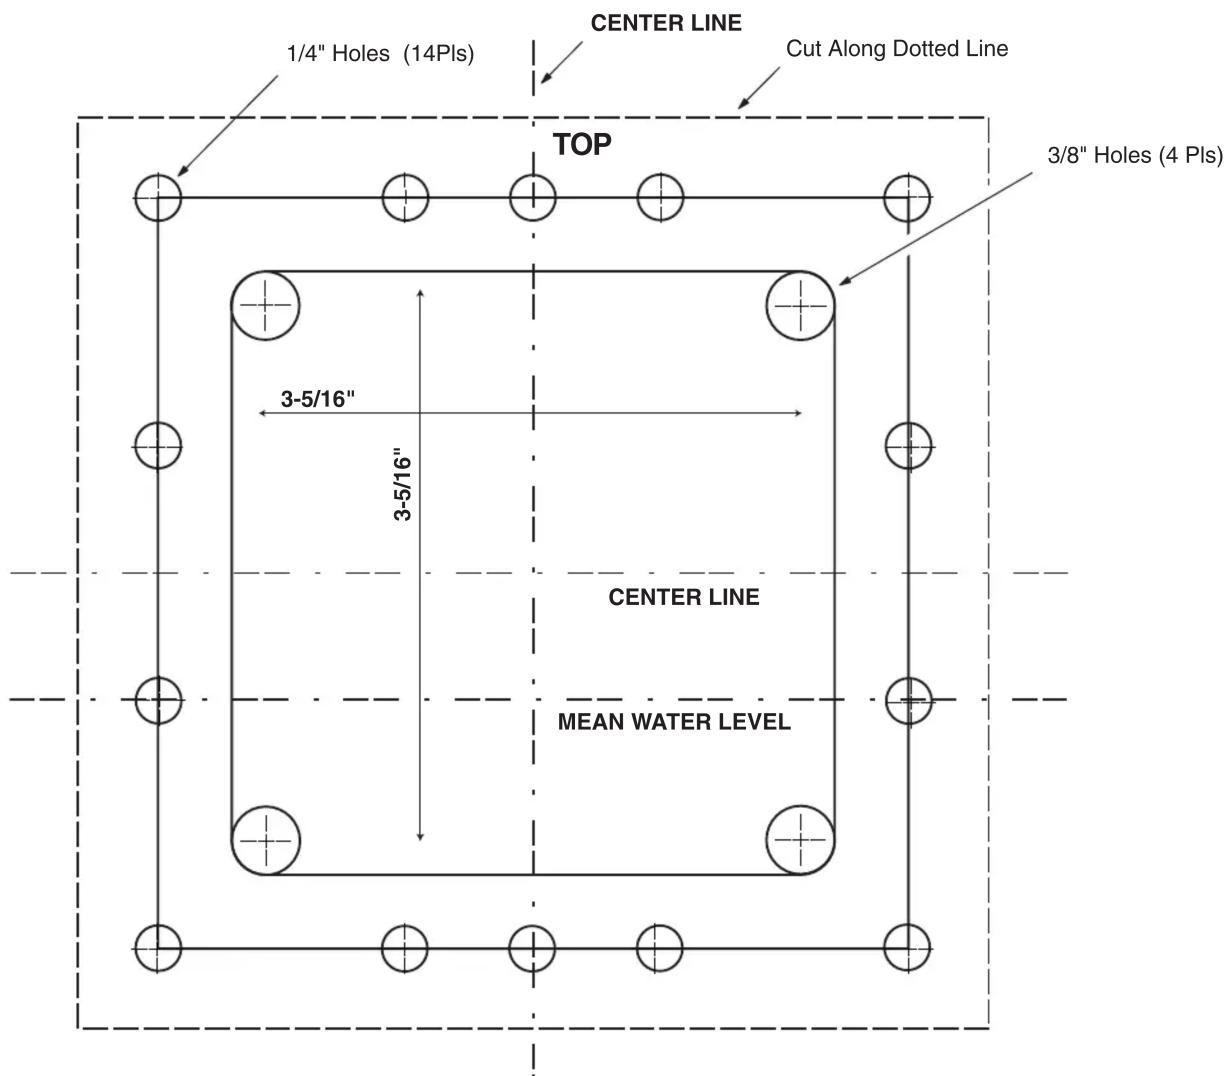
- Position the Layout Template to line up with the vertical center line and mean water level. Tape it to the pool wall.
- Use a 1/4" bit to drill fourteen (14) mounting holes.
- Use a 3/8" bit to drill the four (4) corner holes used as guides for cutting out the center square.
- Use a jigsaw and blade compatible with the material of the pool wall to cut out the center square, cutting around the outer edges of the four (4) holes.
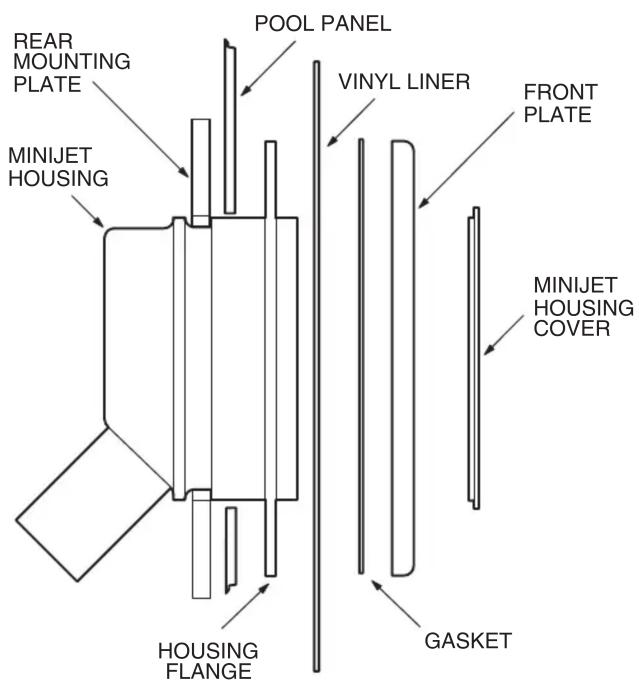
- Insert the MiniJet housing through the wall from the water side. Rest the back of the housing flange against the inside of the pool wall.
- Position the rear mounting plate over the back of the MiniJet housing on the outside of the pool wall. Insert the two (2) pan-head screws in the center holes (top and bottom) of the flange, through the pool wall and into the rear mounting plate. Secure housing to pool wall.
Plumbing The MiniJet
Water flow and pressure control the projection of the water. As a rule, 4.4 GPM per nozzle will provide adequate water flow. Refer to data below.
| MiniJet Performance Data Chart | ||||
| Height of Jet Spray | 3.3'6.6' | 9.8'13.1' | ||
| Feet of Head | 3.9'7.9' | 11.9'16.0' | ||
| GPM 2.13.0 | 3.74.4 | |||
- Determine the size of the manifold or plumbing loop and return pipe required.
| MiniJet Pipe Sizing | ||
| Max. MiniJets | Return Pipe Sizing | Suction Pipe Size |
| 81-1/2"1-1/2" | ||
| 122" | 2" | |
| 162-1/2"2-1/2" | ||
| 263" | 3" | |
- Use 1/2" PVC pipe to connect the MiniJet to the manifold or plumbing loop. See plumbing diagram below.
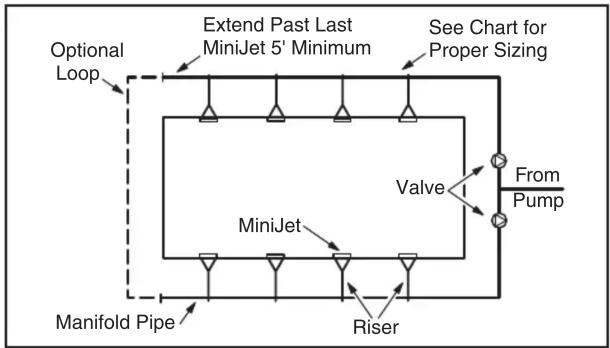
flowchart
graph TD
    A["Manifold Pipe"] --> B["MiniJet"]
    B --> C["Valve"]
    C --> D["From Pump"]
    D --> E["Riser"]
    E --> F["See Chart for Proper Sizing"]
    F --> G["Extend Past Last MiniJet 5' Minimum"]
    G --> H["Optional Loop"]
-
When the MiniJets are lined up to project water streams of equal distance, cut the riser to equal lengths. When the MiniJets are not set in lines parallel to the pool ledge, valve each MiniJet separately.
-
Keep the 1/2" feed pipe short, and the manifold or plumbing loop as close to the beam as possible. Avoid undue stress on plumbing lines.
- The manifold pipe should extend 5 ft. past the last MiniJet®.
- Pressure test the MiniJet.
- After the liner is installed, place the gasket between the front plate and the liner. Attach the front plate, tightening each screw a little at a time to seat the liner and gasket.
- With a sharp knife, cut out the center 3" square of the vinyl liner.
Pool Startup
- Clean the pool water.
- Remove threaded plug from the MiniJet housing. Save plug for winterizing. Run water through the MiniJet plumbing to clear lines.
- Screw the brass jets into the threaded fittings. Adjust nozzle alignment and plumbing valves until the desired projection is reached.
- Install MiniJet housing cover.
Winterizing
- Drain all water from the MiniJet plumbing.
- Screw the 3/8" plug provided into the nozzle inlet of the MiniJet housing to protect the unit.
natural_image
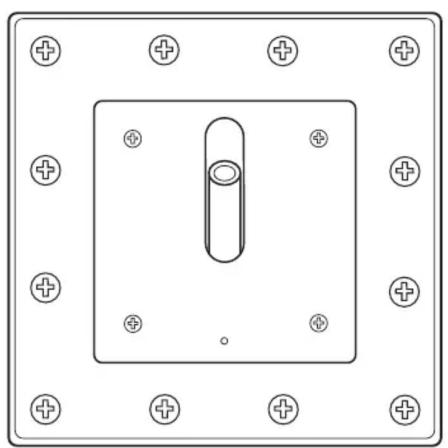
Pure electrical circuit lines without any symbolsFRONT VIEW AFTER INSTALLATION
MiniJet® for Vinyl Liner Pools (FFMJ-VL)
LAYOUT TEMPLATE
Brand : Jandy
Model : MiniJet
Category : Pool pump