T51 - Loudspeaker Feelworld - Free user manual and instructions
Find the device manual for free T51 Feelworld in PDF.


| Product Type | Portable Bluetooth Speaker |
| Brand | Feelworld |
| Model | T51 |
| Dimensions (W x H x D) | 200 x 100 x 80 mm (7.9 x 3.9 x 3.1 inches) |
| Weight | 500 g (1.1 lbs) |
| Power Output | 5 W (RMS) |
| Frequency Response | 80 Hz – 20 kHz |
| Bluetooth Version | 5.0 |
| Bluetooth Range | 10 m (33 ft) |
| Battery Capacity | 2000 mAh, 3.7 V Li-ion |
| Playback Time | Up to 8 hours (at 50% volume) |
| Charging Time | 3 hours via Micro USB |
| Audio Input | Bluetooth, 3.5 mm AUX, Micro SD, USB |
| Water Resistance | IPX5 (splash proof) |
| Hands-free Calling | Yes (built-in microphone) |
| Controls | Power, Volume +/-, Play/Pause, Next/Previous, Bluetooth pair, AUX |
| Included Accessories | USB charging cable, 3.5 mm AUX cable, user manual |
| Material | ABS plastic with metal mesh |
| Color | Black (or as available) |
| Cleaning | Wipe with a soft, dry cloth. Avoid liquids and abrasives. |
| Safety | Do not expose to extreme heat or moisture. Disconnect when not in use. |
| Repairability | Spare parts available from official retailer; refer to manual for disassembly. |
Frequently Asked Questions - T51 Feelworld
User questions about T51 Feelworld
0 question about this device. Answer the ones you know or ask your own.
Ask a new question about this device
Download the instructions for your Loudspeaker in PDF format for free! Find your manual T51 - Feelworld and take your electronic device back in hand. On this page are published all the documents necessary for the use of your device. T51 by Feelworld.
USER MANUAL T51 Feelworld
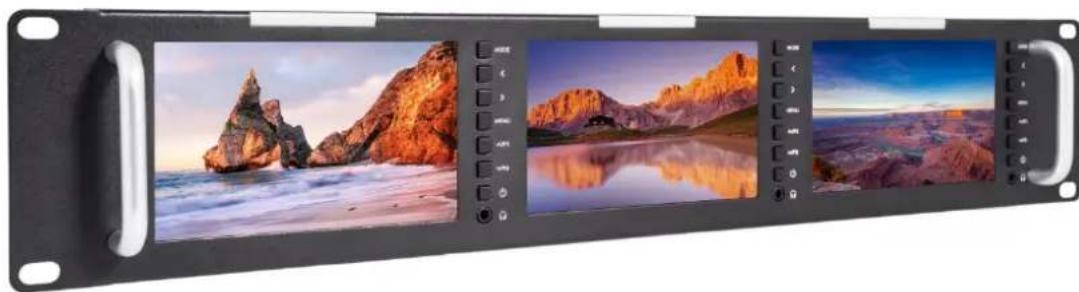
Triple 2RU Rack Mount
HD LCD Monitor
natural_image
Black rectangular device with three scenic mountain peaks on a beach at sunset, displayed side by side (no text or symbols visible)User Manual
Product introduction:
Thank you for using our Triple Rack Mount Color LCD Monitor. This monitor adopts advanced integrated circuits and special TFT LED panel, which makes it low power consumption, stable performance, no radiation etc. This monitor is with HDMI, 3G-SDI, CVBS and AUDIO input, HDMI, 3G-SDI, CVBS output, Stereo headphone etc. It has a wide range of application, casing compact, simple operation, and strong compatibility. The advanced features contain Screen Marker, Pixel to Pixel, Image Flip, and Color Temp.etc

To insure best use of the unit, please read the
user's manual carefully.
CAUTION
- Please use the qualified power adapter to charge.
- Do not expose this product to direct sunlight, heat or humid Conditions
- Keep away from strong light while using this product so as to obtain the clearest and the most colorful picture.
- Please avoid heavy impact or drop on the ground.
- Do not use chemical solutions to clean this unit. Please simply wipe with a clean soft cloth to keep the brightness of the surface.
- In order to avoid damaging the product, please do not take apart or repair the unit by yourself without adjustable component in the unit by professional staff.
Features
- Triple rack mount LCD monitor, compact thin and lightweight design, which make it suitable for installing where the space is limited and also could be installed in the standard 19-inch rack.
- Three-color Tally indicator.
- With VIDEO, AUDIO, HDMI, 3G-SDI input, suitable for a variety of signals.
- Custom buttons, could set the custom F button function as customers operating habit.
- With advanced functions like Center Marker, Safe Frames, Check Field, Focus Assist, Aspect Ratio, Image Flip, P2P, Image Freeze, etc.
Contents
- Product description ---- 3
- Monitor operation instruction ---- 6
- Technical Parameters 13
- Trouble shooting 14
1. Product description
1.1 Front panel description (One of the them)

natural_image
Front view of a rectangular electronic device with three rectangular panels and labeled ports (no text or symbols visible)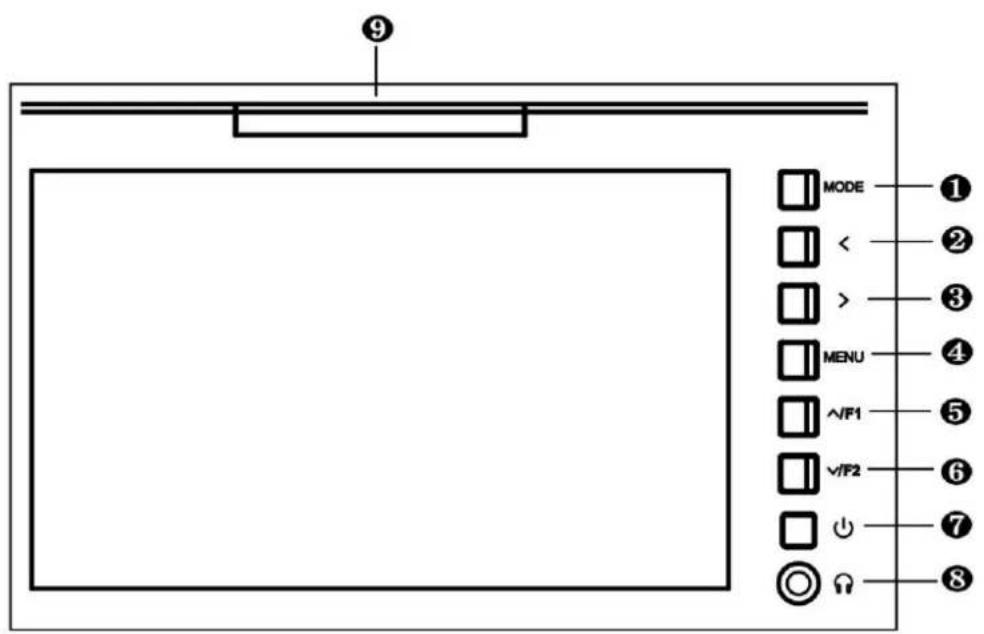
-
MODE: Signal input selection.
-
<: Volume down. In menu operation, it is for the adjustment of the set item.
-
: Volume up. In menu operation, it is for the adjustment of the set item.
-
MENU: Menu button
-
∧/F1: No menu display, it is F1 button, when enters into menu bar, it is for the up item selection.
-
∨/F2: No menu display, it is F2 button, when enters into menu bar, it is for the down item selection.
-
⏻ On/Standby button
- 🙏: Earphone jack
- TALLY indicator.
1.2 Rear panel description

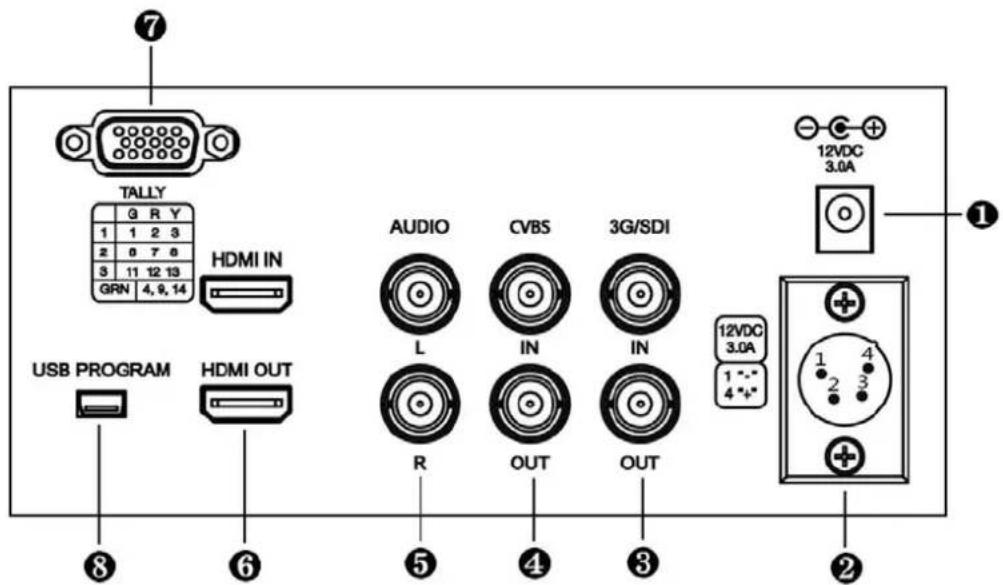
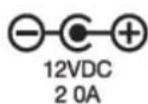
1.DC power input port.
- 4-pin XLR DC12V power input.
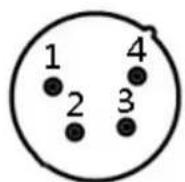
| Pin number | Signal |
| 1 | GND |
| 2 | No connection |
| 3 | No connection |
| 4 | +12V |
- 3G/SDI: input & output
- CVBS: input & output
- AUDIO: Audio input L / R
-
HDMI: input & output
-
TALLY indicator input
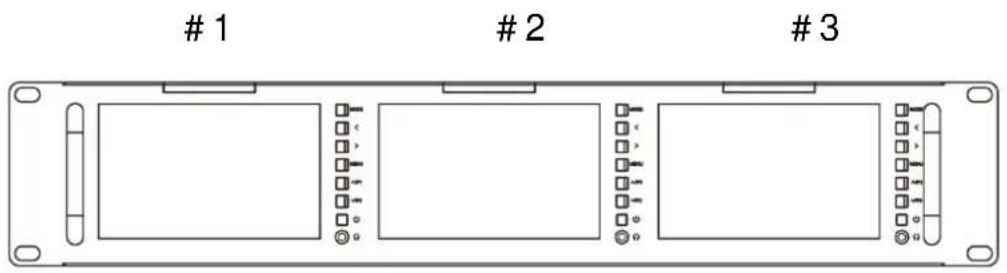
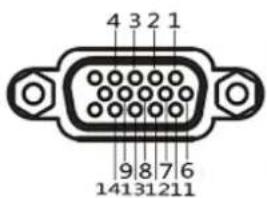
| Screen #1 | Screen #2 | Screen #3 | Tally |
| 1 | 6 | 11 | Green Light |
| 2 | 7 | 12 | Red Light |
| 3 | 8 | 13 | Yellow Light |
| 4 | 9 | 14 | Ground |
- USB program upgrade port
2. Monitor operation instruction
Connect DC12V power to our monitor, the three displays light, and then customers could operate the corresponding display screen button on the panel.
2.1 Monitor button instruction


Corresponding display screen On/Standby button
MODE
Signal input selection
MENU

Menu button


Earphone volume up.
In Menu operation, it is for menu bar

selection.
In secondary menu, it is as function selection or increase the value of the analog.

Earphone volume down.
In menu operation, it is for menu bar
selection.
In secondary menu, it is as function selection or decrease the value of the analog.
∧/F1
No menu display, it is F1 custom button.
After enter into secondary menu operation, it is for the up item selection.
VIF2
No menu display, it is F2 custom button.
In menu operation, press<,>button to select
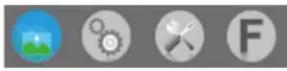
then press ∨/F2 button to enter
into the secondary menu.
In secondary menu operation, it is for the down item selection.
F1/F2
Custom button, select F1/ F2 in F menu, then press>or<button to pop-up F button function and select (Center Marker, Safe Frames, Check Field, Focus Assist, Aspect Ratio, Image Flip, P2P, Image Freeze), then use ∧/F1 or ∨/F2 button to set one of them as F1 button function, press "MENU" button to confirm, and then press ∨/F2 button to enter F2 button custom operation.
2.2 Menu instruction
Press MENU button to pop-up menu, and press
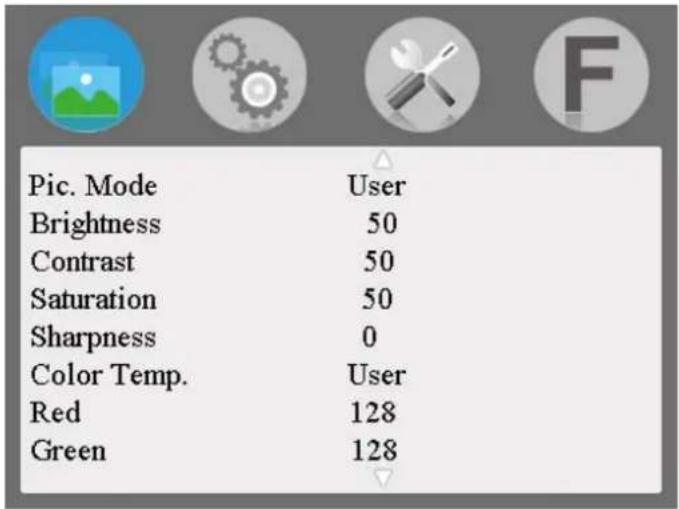
※ Pic. Mode: Standard, Dynamic, Mild, User.
Select "User" to adjust Brightness, Contrast, Saturation Sharpness according to the site situation.
※ Brightness: To adjust image's brightness.
※ Contrast: To adjust the brightest and the darkest ratio of the image, please note the sense of picture will make the picture lose the color when adjust proportion too high or low.
※ Saturation: To adjust color concentration.
※ Sharpness: Also called 'Resolution', is an indicator for the image plane definition and image edge sharpness. If sharpness is higher, then the details contrast on the image is higher, the image is more clearly.
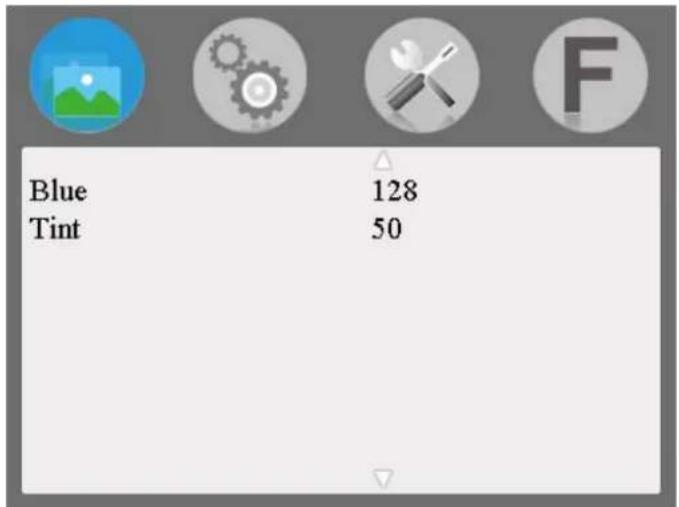
※ Color Temp.: 6500, 9300, User. When select "User", adjust the R/G/B to meet the different user's requirement for the different Color Temp.
※ Tint: On NTSC video mode, color tint is adjusted by Tint.

Setting
- Menu of Page One
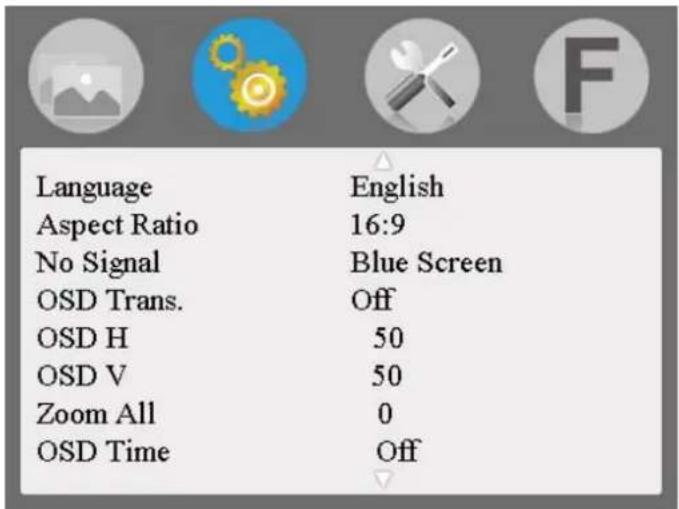
※ Language: Language for OSD:
English, 中文, Español, Português,
Français, Nederlands, Deutsch, 日本語
※ Aspect Ratio: To change the aspect ratio
Panorama, Just Scan, Zoom 1, Zoom 2, 16:9, 4:3, Autom
※ No Signal: Color options of screen background when no signal: Blue Screen, Red Screen, Green Screen, Black Screen, White Screen
※ OSD Trans.: To adjust the level of transparent.
※ OSD H: To adjust the OSD position in horizontal.
※ OSD V: To adjust the OSD position in vertical.
※ Zoom All: Select this function and use “<” or “>” button to adjust the image to Zoom In or Zoom Out separately.
※ OSD Time: Menu display time selection:
30s, 20s, 10s, Off.
- Menu of Page two
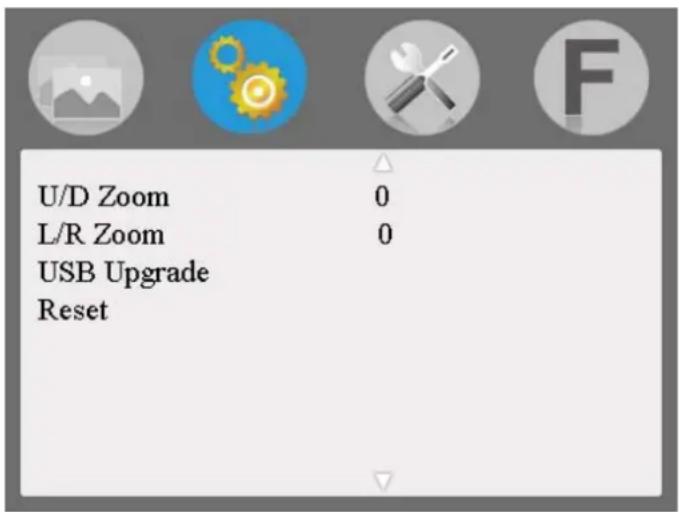
※ U/D Zoom: Press “<” or “>” button, to adjust the proportion of the image Up and Down to Zoom In or Zoom Out.
※ L/R Zoom Press “<” or “>” button, to adjust the proportion of the image Left and Right to Zoom In or
Zoom Out.
※ USB Upgrade: When need to upgrade the native data application software, copy the file to the U disk, then through the USB cable to connect with upgrade USB port, press “>”key to confirm. After the upgrade, monitor will automatically restart. Do NOT plug a USB cable into this connector without contacting the factory.
※ Reset: Press “>” button, back to original setting.

Function
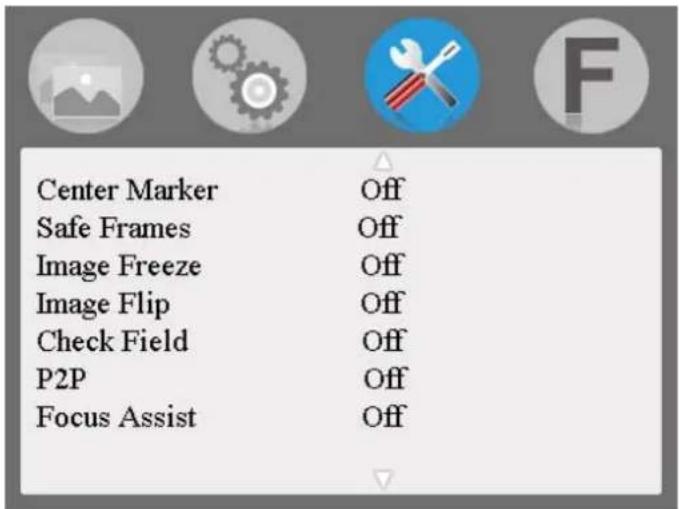
※ Center Marker: To set center mark (cross mark) display.
※ Safe Frames: To adjust screen marker (off, 96%, 93%, 90%, 85%, 80%, 2.35:1)
※ Image Freeze: The current picture still (capture function)
※ Image Flip: The H_V Flip, H Flip, V Flip of the image around flip.
※ Check field: To switch among Color, Mono, Red, Green, Blue.
※ P2P: The display mode makes the resolution of the image consistent with display of the physical resolution.
※ Focus Assist: Under HDMI input, select this function, Peaking (Superimpose red highlight over parts of the monochrome image in focus), could be used as focus auxiliary function in camera viewfinder.

Shortcut button setting
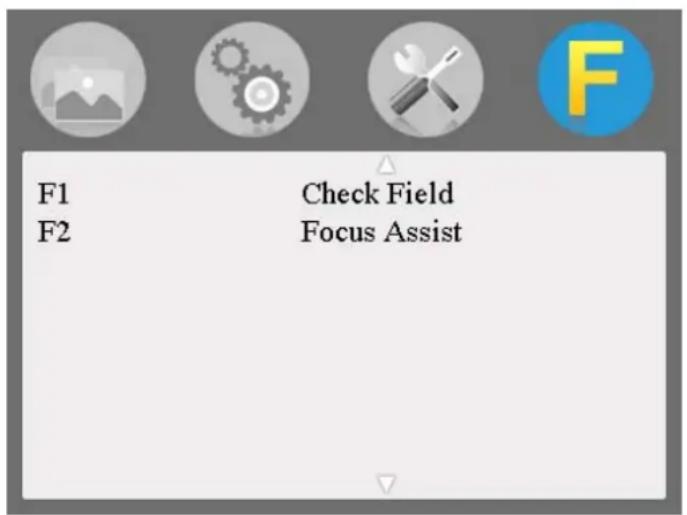
※ F1: Custom button, Choose F1, press“<” or “>”button to pop-up (Center Marker, Safe Frames, Check Field, Focus Assist, Image Freeze, Aspect Ratio, Image Flip, P2P, Image Freeze) and use “^/F1”or “∨/F2” to set one of them as definition function. Press “MENU” to confirm.
※ F2: Custom button, see F1
- Technical parameters
| Panel Size | 5.0inch |
| Panel Type TFT LCD | |
| Resolution | 800×480×3(RGB) |
| Backlight | LED |
| Dot Pitch 0.045(W) x 0.135 (H) mm | |
| Aspect Ratio 16:9 | |
| Brightness | 500cd/m2 |
| Contrast | 500:1 |
| Response Time | TON=10ms; Toff=15ms |
| Viewing Angle 70°/70°(L/R) 50°/70°(U/D) | |
| Input Signal HDMI/ 3G-SDI/ Video/ Audio(L/R) | |
| Output signal HDMI/ 3G-SDI/ Video | |
| Color Video Format PAL-4.43 / NTSC-3.58 | |
| HDMI Support Format | 480i /480p /576i /576p720p (60/59.94/50/30/29/25/24/23.98)1080i (60/59.94/50)1080p(60/59.94/50/30/29.97/25/24/24fps/23.98/23.98fps) |
| SDI Support Format | 480i/576i720p(60/59.94/50/30/29/25/24/23.98)1080i(60/59.94/50)1080p(60/59.94/50/30/29.97/25/24/24fps/23.98/23.98fps) |
| Headphone Output Stereo headphone output 3.5 mm interface | |
| Input Voltage | DC: 9.0~24.0V |
| Power Consumption ≤25W | |
| Unit Size (mm) | 482.6Lx88Hx34D mm |
| Unit Weight ≈1570g | |
| Working Temperature | -20~55°C |
| Storage Temperature | -30~65°C |
4. Trouble Shooting
4.1 Only Mono or Single color picture:
① Please check Saturation, Brightness & Contrast adjustment.
② Please check monitor color from the menu "Check Field" is in Mono image or in other single color state.
4.2 NO image after put on the power
① Check if signal cable connection is in good condition, also need to check if the monitor is synchronized with the input signal, press “MODE” button to have a try.
② Make sure to use the standard adapter to connect the monitor.
4.3 No Sound
① Volume control did not open, can press the volume button and try increasing the volume.
② Check the AUDIO input and ensure there is AUDIO signal.
■ Remark:
★If there are still other problems, please contact with our related technical persons.
★If there are changes without prior notice.
- Triple 2RU Rack Mount
- User Manual
- Product introduction:
- To insure best use of the unit, please read the
- CAUTION
- Features
- Contents
- Product description
- Front panel description (One of the them)
- 1
- 2
- 3
- Monitor operation instruction
- Monitor button instruction
- F1/F2
- Menu instruction
- Setting
- - Menu of Page two
- Function
- Shortcut button setting
- Trouble Shooting
- Only Mono or Single color picture:
- NO image after put on the power
- No Sound
- ■ Remark:
Brand : Feelworld
Model : T51
Category : Loudspeaker