
RPC41NC - Air Conditioning Rinnai - Free user manual and instructions
Find the device manual for free RPC41NC Rinnai in PDF.


| Product Type | Portable Room Air Conditioner |
| Brand | Rinnai |
| Model | RPC41NC |
| Power Supply | 220-240 V ~ 50 Hz |
| Input Power | 1520 W |
| Net Dimensions (H x W x D) | 745 x 450 x 396 mm |
| Weight | 34 kg |
| Nominal Cooling Capacity | 4.1 kW |
| Rated Input Current | 8.5 A |
| Refrigerant Type | R290 (Flammable) |
| Refrigerant Volume | 270 g |
| Sound Power Level | 65 dB(A) |
| Operating Modes | Cool, Dry, Fan, Auto (Smart) |
| Timer | Delay On/Off (0.5-24 hours) |
| Remote Control | Included (range up to 7 m) |
| Air Filters | Two removable, washable filters |
| Condensate Drainage | Internal tank or optional hose connection |
| Minimum Room Area | 13 m² (for R290 refrigerant) |
| Warranty (Portable) | 2 years parts (labour not included on-site) |
| Included Accessories | Exhaust duct, window slider kit, remote control, condensate hose |
Frequently Asked Questions - RPC41NC Rinnai
User questions about RPC41NC Rinnai
0 question about this device. Answer the ones you know or ask your own.
Ask a new question about this device
Download the instructions for your Air Conditioning in PDF format for free! Find your manual RPC41NC - Rinnai and take your electronic device back in hand. On this page are published all the documents necessary for the use of your device. RPC41NC by Rinnai.
USER MANUAL RPC41NC Rinnai
natural_image
Line drawing of a portable air conditioner unit with control panel and side buttons (no text or symbols)Portable Room Air Conditioner
Operation & Installation Manual
Rinnai
For continued safety of this appliance it must be installed and maintained in accordance with the manufacturer's instructions.
Before proceeding with the operation of your new Rinnai Portable Room Air Conditioner, please read this manual thoroughly and gain a full understanding of the requirements, features and operation of your new appliance.

REFRIGERANT
R290
TABLE OF CONTENTS
Safety & Important Information 4
Specifications 10
Introduction 10
Specifications 10
Air Conditioner Basics 11
Appliance Components 11
Operation 12
Control Panel 12
Basic Operation 12
Basic Operation Control Panel 12
Cool 12
Dry 13
Fan 13
Other Operation 13
Timer 13
Remote Control 14
Remote Control Overview 14
Basic Operation Remote Controller 14
Button Descriptions & Operation ....14
Remote Control Batteries 15
Care & Maintenance 16
General Maintenance 16
Cleaning the Air Filter 16
Save a Service Call 17
When to Call for Service 17
Installation 18
Location 18
Duct Assembly 18
Window Installations 19
Condensate Drainage 20
Internal Condensate Tank 20
Fixed Condensate Drainage Hose 20
Warranty 21
Contacts 28

READ ALL INSTRUCTIONS BEFORE USING THE APPLIANCE.
Always comply with the following precautions to avoid dangerous situations and to ensure optimum performance.
Failure to carefully read and follow all instructions in this manual can malfunction, property damage, personal injury and/or death.
result in
DANGER: Indicates an imminently hazardous situation which, if not avoided, will result in personal injury or death.
WARNINGS: Indicates a potentially hazardous situation which, if not avoided, could result in personal injury or death.
CAUTIONS: Indicates a potentially hazardous situation which, if not avoided, could result in minor or moderate injury or damage to the appliance. It may also be used to alert against unsafe practices.

The appliance is fitted with an Australian flexible cord and plug intended for connection to an Australian 10 Amp socket outlet. It is not suitable for connection in other countries or alternative power supplies. Ensure that the voltage and frequency of the power supply correspond to the ratings on the dataplate of the appliance.
This appliance is not intended for use by persons (including children) with reduced physical, sensory or mental capabilities, or lack of experience and knowledge, unless they have been given supervision or instruction concerning use of the appliance by a person responsible for their safety.
Young children should be supervised to ensure they do not play with the appliance.
DO NOT allow children or persons with reduced physical, sensory or mental capabilities to sleep directly in front of this appliance.
DO NOT allow children to 'post articles' into the louvres of the appliance.
DO NOT use power boards or double adaptors with this appliance.
DO NOT coil or bundle the electric cord to reduce it's length as overheating of the cord may occur which could result in a fire hazard.
The flexible cord and plug must not be modified. If the cord or plug are damaged, they must be replaced by Rinnai or a Rinnai appointed service agent.
DO NOT cover or place articles on or against any parts of this appliance, to avoid overheating.
DO NOT sit on this appliance
DO NOT use this appliance in the immediate surroundings of a bath, a shower or a swimming pool.
DO NOT move this appliance whilst it is turned on.
DO NOT unplug the appliance by pulling on the flexible cord.
DO NOT handle any parts of this appliance, including the plug and flexible cord, with wet or damp hands.
DO NOT immerse the appliance, flexible cord and plug in water or any other liquid.
DO NOT place containers of any liquid or wax on top of this appliance.
Turn off the appliance and unplug from the power socket outlet when not in use.
DO NOT use in areas where flammable liquids are stored.
This appliance is suitable for indoor use only.
Never dismantle the appliance. Tampering with electrical connections and components is highly dangerous and may cause appliance malfunction, property damage, personal injury and/or death.

WARNING INFORMATION REGARDING APPLIANCES WITH R290 REFRIGERANT GAS
Thoroughly read all of the warnings.
This appliance contains up to 270g of R290 refrigerant gas.
This appliance uses R290 refrigerant, which is class 3 flammability and must be handled by a refrigeration mechanic with appropriate Australian refrigerant handling licence.
The appliance must be installed, used and stored in a ventilated area that is greater than 13 m^2 .
When cleaning the appliance, do not use any tools other than those recommended by the manufacturing company.
DO NOT use means to accelerate the defrosting process or to clean, other than those recommended by the manufacturer.
The appliance must be placed in an area without any continuous sources of ignition (for example: open flames, gas or electrical appliances in operation).
DO NOT puncture and DO NOT burn.
Refrigerant gases can be odourless.
If the appliance is installed, operated or stored in a non-ventilated area, the room must be designed to prevent the accumulation of refrigerant leaks resulting in a risk of fire or explosion due to ignition of the refrigerant caused by electric heaters, stoves, or other sources of ignition.
Compliance with national gas regulations shall be observed. Keep ventilation openings clear of obstruction.
A warning that the appliance shall be stored in a well-ventilated area where the room size corresponds to the room area as specified for operation.
Any person who is involved with working on or breaking into a refrigerant circuit should hold a current valid certificate from an industry-accredited assessment authority, which authorises their competence to handle refrigerants safely in accordance with an industry recognised assessment specification.
Servicing shall only be performed as recommended by the equipment manufacturer. Maintenance and repair requiring the assistance of other skilled personnel shall be carried out under the supervision of the person competent in the use of flammable refrigerants.
The appliance MUST BE stored in such a way as to prevent mechanical failure.
Repairs must be performed based on the recommendations from the manufacturing company. Maintenance and repairs that require the assistance of other qualified personnel must be performed under the supervision of an individual specified in the use of flammable refrigerants.

MANDATORY INSPECTION PRIOR TO INSTALLATION
Immediately report any damage or discrepancies to the Supplier of the appliance. This appliance was inspected and tested at the time of manufacture and packaging, and released for transportation without known damage. Upon receipt, inspect the exterior for evidence of rough handling in shipment. Ensure that the appliance is labelled correctly for the gas and electrical supply, and/or other services it is intended to be connected to.
For safety and warranty purposes, appliances that may be damaged or incorrect MUST NOT be installed or operated under any circumstances. Installation of damaged or incorrect appliances may contravene local government regulations. Rinnai disclaims any liability or responsibility whatsoever in relation to the installation or operation of damaged or incorrect appliances.

A NOTE ON ILLUSTRATIONS
The illustrations used in this manual are for explanatory purposes only and the shape of your indoor unit may vary slightly from that which is shown in this manual.

EXPLANATION OF SYMBOLS DISPLAYED ON THE UNIT

WARNING Risk of fire / flammable material. If the refrigerant is leaked, together with an external ignition source, there is a possibility of ignition.

Read the OPERATING INSTRUCTIONS carefully before operation.

Service personnel are required to carefully read the OPERATING INSTRUCTION INSTALLATION MANUAL before operation.

Further information is available in the OPERATING INSTRUCTIONS, INSTALLATION MANUAL, and the like.
1. Transport of equipment containing flammable refrigerants
See transport regulations.
2. Marking of equipment using signs
See local regulations.
3. Disposal of equipment using flammable refrigerants
See national regulations.
4. Storage of equipment/appliances
The storage of equipment should be in accordance with the manufacturer's instructions.
5. Storage of packed (unsold) equipment
Storage package protection should be constructed such that mechanical damage to the equipment inside the package will not cause a leak of the refrigerant charge. The maximum number of pieces of equipment permitted to be stored together will be determined by local regulations.
- General work area
All maintenance staff and others working in the local area shall be instructed on the nature of work being carried out. Work in confined spaces shall be avoided. The area around the workspace shall be sectioned off. Ensure that the conditions within the area have been made safe by control of flammable material.
6. Information on servicing
1) Checks to the area Prior to beginning work on systems containing flammable refrigerants, safety checks are necessary to ensure that the risk of ignition is minimised. For repair to the refrigerating system, the following precautions shall be complied with prior to conducting work on the system.
2) Work procedure
Work shall be undertaken under a controlled procedure so as to minimise the risk of a flammable gas or vapour being present while the work is being performed.
3) General work area
All maintenance staff and others working in the local area shall be instructed on the nature of work being carried out. Work in confined spaces shall be avoided. The area around the workspace shall be sectioned off. Ensure that the conditions within the area have been made safe by control of flammable material.
4) Checking for presence of refrigerant
The area shall be checked with an appropriate refrigerant detector prior to and during work, to ensure the technician is aware of potentially flammable atmospheres. Ensure that the leak detection equipment being used is suitable for use with flammable refrigerants, i.e. non-sparking, adequately sealed or intrinsically safe.
5) Presence of fire extinguisher
If any hot work is to be conducted on the refrigeration equipment or any associated parts, appropriate fire extinguishing equipment shall be available to hand. Have a dry powder or CO ^2 fire extinguisher adjacent to the charging area.
6) No ignition sources
No person carrying out work in relation to a refrigeration system which involves exposing any pipe work that contains or has contained flammable refrigerant shall use any sources of ignition in such a manner that it may lead to the risk of fire or explosion. All possible ignition sources, including cigarette smoking, should be kept sufficiently far away from the site of installation, repairing, removing and disposal, during which flammable refrigerant can possibly be released to the surrounding space. Prior to work taking place, the area around the equipment is to be surveyed to make sure that there are no flammable hazards or ignition risks. No Smoking signs shall be displayed.
7) Ventilated area
Ensure that the area is in the open or that it is adequately ventilated before breaking into the system or conducting any hot work. A degree of ventilation shall continue during the period that the work is carried out. The ventilation should safely disperse any released refrigerant and preferably expel it externally into the atmosphere.
8) Checks to the refrigeration equipment
Where electrical components are being changed, they shall be fit for the purpose and to the correct specification. At all times the manufacturer's maintenance and service guidelines shall be followed. If in doubt consult the manufacturer's technical department for assistance. The following checks shall be applied to installations using flammable refrigerants:
The charge size is in accordance with the room size within which the refrigerant containing parts are installed;
The ventilation machinery and outlets are operating adequately and are not obstructed;
If an indirect refrigerating circuit is being used, the secondary circuit shall be checked for the presence of refrigerant; Marking to the equipment continues to be visible and legible. Markings and signs that are illegible shall be corrected;
Refrigeration pipe or components are installed in a position where they are unlikely to be exposed to any substance which may corrode refrigerant containing components, unless the components are constructed of materials which are inherently resistant to being corroded or are suitably protected against being so corroded.
9) Checks to electrical devices
Repair and maintenance to electrical components shall include initial safety checks and component inspection procedures. If a fault exists that could compromise safety, then no electrical supply shall be connected to the circuit until it is satisfactorily dealt with. If the fault cannot be corrected immediately but it is necessary to continue operation, an adequate temporary solution shall be used. This shall be reported to the owner of the equipment so all parties are advised.
Initial safety checks shall include:
That capacitors are discharged: this shall be done in a safe manner to avoid possibility of sparking;
That there no live electrical components and wiring are exposed while charging, recovering or purging the system; That there is continuity of earth bonding.
7. Repairs to sealed components
1) During repairs to sealed components, all electrical supplies shall be disconnected from the equipment being worked upon prior to any removal of sealed covers, etc. If it is absolutely necessary to have an electrical supply to equipment during servicing, then a permanently operating form of leak detection shall be located at the most critical point to warn of a potentially hazardous situation.
2) Particular attention shall be paid to the following to ensure that by working on electrical components, the casing is not altered in such a way that the level of protection is affected. This shall include damage to cables, excessive number of connections, terminals not made to original specification, damage to seals, incorrect fitting of glands, etc. Ensure that apparatus is mounted securely. Ensure that seals or sealing materials have not degraded such that they no longer serve the purpose of preventing the ingress of flammable atmospheres. Replacement parts shall be in accordance with the manufacturer's specifications.
NOTE: The use of silicon sealant may inhibit the effectiveness of some types of leak detection equipment. Intrinsically safe components do not have to be isolated prior to working on them.
8. Repair to intrinsically safe components
Do not apply any permanent inductive or capacitance loads to the circuit without ensuring that this will not exceed the permissible voltage and current permitted for the equipment in use. Intrinsically safe components are the only types that can be worked on while live in the presence of a flammable atmosphere. The test apparatus shall be at the correct rating. Replace components only with parts specified by the manufacturer. Other parts may result in the ignition of refrigerant in the atmosphere from a leak.
9. Cabling
Check that cabling will not be subject to wear, corrosion, excessive pressure, vibration, sharp edges or any other adverse environmental effects. The check shall also take into account the effects of aging or continual vibration from sources such as compressors or fans.
10. Detection of flammable refrigerants
Under no circumstances shall potential sources of ignition be used in the searching for or detection of refrigerant leaks. A halide torch (or any other detector using a naked flame) shall not be used.
11. Leak detection methods
The following leak detection methods are deemed acceptable for systems containing flammable refrigerants. Electronic leak detectors shall be used to detect flammable refrigerants, but the sensitivity may not be adequate, or may need re-calibration. (Detection equipment shall be calibrated in a refrigerant-free area.) Ensure that the detector is not a potential source of ignition and is suitable for the refrigerant used. Leak detection equipment shall be set at a percentage of the LFL of the refrigerant and shall be calibrated to the refrigerant employed and the appropriate percentage of gas (25 % maximum) is confirmed. Leak detection fluids are suitable for use with most refrigerants but the use of detergents containing chlorine shall be avoided as the chlorine may react with the refrigerant and corrode the copper pipe-work. If a leak is suspected, all naked flames shall be removed/extinguished.
If a leakage of refrigerant is found which requires brazing, all of the refrigerant shall be recovered from the system, or isolated (by means of shut off valves) in a part of the system remote from the leak. Oxygen free nitrogen (OFN) shall then be purged through the system both before and during the brazing process.
12. Removal and evacuation
When breaking into the refrigerant circuit to make repairs or for any other purpose conventional procedures shall be used. However, it is important that best practice is followed since flammability is a consideration. The following procedure shall be adhered to:
Remove refrigerant; Purge the circuit with inert gas; Evacuate; Purge again with inert gas; Open the circuit by cutting or brazing.
The refrigerant charge shall be recovered into the correct recovery cylinders. The system shall be flushed with OFN to render the unit safe. This process may need to be repeated several times. Compressed air or oxygen shall not be used for this task. Flushing shall be achieved by breaking the vacuum in the system with OFN and continuing to fill until the working pressure is achieved, then venting to atmosphere, and finally pulling down to a vacuum. This process shall be repeated until no refrigerant is within the system.
When the final OFN charge is used, the system shall be vented down to atmospheric pressure to enable work to take place. This operation is absolutely vital if brazing operations on the pipe-work are to take place. Ensure that the outlet for the vacuum pump is not close to any ignition sources and there is ventilation available.
13. Charging procedures
In addition to conventional charging procedures, the following requirements shall be followed. Ensure that contamination of different refrigerants does not occur when using charging equipment. Hoses or lines shall be as short as possible to minimise the amount of refrigerant contained in them.
Cylinders shall be kept upright.
Ensure that the refrigeration system is earthed prior to charging the system with refrigerant.
Label the system when charging is complete (if not already).
Extreme care shall be taken not to overfill the refrigeration system. Prior to recharging the system it shall be pressure tested with OFN. The system shall be leak tested on completion of charging but prior to commissioning. A follow up leak test shall be carried out prior to leaving the site.
14. Decommissioning
Before carrying out this procedure, it is essential that the technician is completely familiar with the equipment and all its detail. It is recommended good practice that all refrigerants are recovered safely.
Prior to the task being carried out, an oil and refrigerant sample shall be taken in case analysis is required prior to re-use of reclaimed refrigerant. It is essential that electrical power is available before the task is commenced.
a) Become familiar with the equipment and its operation.
b) Isolate system electrically.
c) Before attempting the procedure ensure that: Mechanical handling equipment is available, if required, for handling refrigerant cylinders; All personal protective equipment is available and being used correctly;
The recovery process is supervised at all times by a competent person; Recovery equipment and cylinders conform to the appropriate standards.
d) Pump down refrigerant system, if possible.
e) If a vacuum is not possible, make a manifold so that refrigerant can be removed from various parts of the system.
f) Make sure that cylinder is situated on the scales before recovery takes place.
g) Start the recovery machine and operate in accordance with manufacturer's instructions.
h) Do not overfill cylinders. (No more than 80% volume liquid charge).
i) Do not exceed the maximum working pressure of the cylinder, even temporarily.
j) When the cylinders have been filled correctly and the process completed, make sure that the cylinders and the equipment are removed from site promptly and all isolation valves on the equipment are closed off.
k) Recovered refrigerant shall not be charged into another refrigeration system unless it has been cleaned and checked.
15. Labelling
Equipment shall be labelled stating that it has been de-commissioned and emptied of refrigerant. The label shall be dated and signed. Ensure that there are labels on the equipment stating the equipment contains flammable refrigerant.
16. Recovery
When removing refrigerant from a system, either for servicing or decommissioning, it is recommended good practice that all refrigerants are removed safely. When transferring refrigerant into cylinders, ensure that only appropriate refrigerant recovery cylinders are employed. Ensure that the correct number of cylinders for holding the total system charge is available. All cylinders to be used are designated for the recovered refrigerant and labelled for that refrigerant (i.e. special cylinders for the recovery of refrigerant). Cylinders shall be complete with pressure relief valve and associated shut-off valves in good working order. Empty recovery cylinders are evacuated and, if possible, cooled before recovery occurs. The recovery equipment shall be in good working order with a set of instructions concerning the equipment that is at hand and shall be suitable for the recovery of flammable refrigerants.
In addition, a set of calibrated weighing scales shall be available and in good working order. Hoses shall be complete with leak-free disconnect couplings and in good condition. Before using the recovery machine, check that it is in satisfactory working order, has been properly maintained and that any associated electrical components are sealed to prevent ignition in the event of a refrigerant release.
Consult manufacturer if in doubt. The recovered refrigerant shall be returned to the refrigerant supplier in the correct recovery cylinder, and the relevant Waste Transfer Note arranged. Do not mix refrigerants in recovery units and especially not in cylinders. If compressors or compressor oils are to be removed, ensure that they have been evacuated to an acceptable level to make certain that flammable refrigerant does not remain within the lubricant. The evacuation process shall be carried out prior to returning the compressor to the suppliers. Only electric heating to the compressor body shall be employed to accelerate this process. When oil is drained from a system, it shall be carried out safely.
SPECIFICATIONS
INTRODUCTION
This portable air conditioner can alter the room temperature and humidity. It has multiple functions of cooling dehumidifying (drying) and fan ventilation and can be moved from room to room and transported from building to building easily.
The air conditioner can maintain set room indoor air temperatures between 18^ C and 32^ C. The set room temperature is displayed on the remote control and in the control panel on the unit. This does not mean that the air conditioner will necessarily reduce the actual room temperature to the set room temperature.
- Do not place the air conditioner or plastic window slider in direct sunlight. Close all curtains in the room being cooled.
- For maximum cooling (COOLING MODE), set the temperature at 18°C and the fan at HIGH. After approximately 3 minutes, the compressor will turn on and cooled air will come out of the front air outlet.
- Warm air will also come out of the rear outlet and into the exhaust hose.
- In COOLING MODE the air conditioner will not cool unless the set temperature is below the existing room temperature.
- In COOLING MODE once the existing room temperature reaches the set temperature, the fan continues operating and the compressor switches on and off to maintain the set temperature within the room.
- For maximum cooling output keep the exhaust hose as short and as straight as possible. Minimise bends which can reduce the maximum cooling capacity of the air conditioner. Elevate the air conditioner if necessary.
• Make sure the air intake and outlet grills are unobstructed. - Clean the filters at least once every two weeks.
SPECIFICATIONS
| MODEL RPC41NC | ||
| Power Supply V/Hz 220- | 240~ / 50 | |
| Input Power W 1520 | ||
| Dimensions - Net (H x W x D) | mm | 745 x 450 x 396 |
| Dimensions - Packing (H x W x D) | 880 x 499 x 459 | |
| Weight | kg | 34 |
| Nominal Cooling Capacity | kW | 4.1 |
| Rated Input Current | A | 8.5 |
| Rated Input Power | kW | 1.65 |
| Refrigerant | Type | R290 |
| Refrigerant Volume | g | 270 |
| Sound Power Level | dB(A) | 65 |
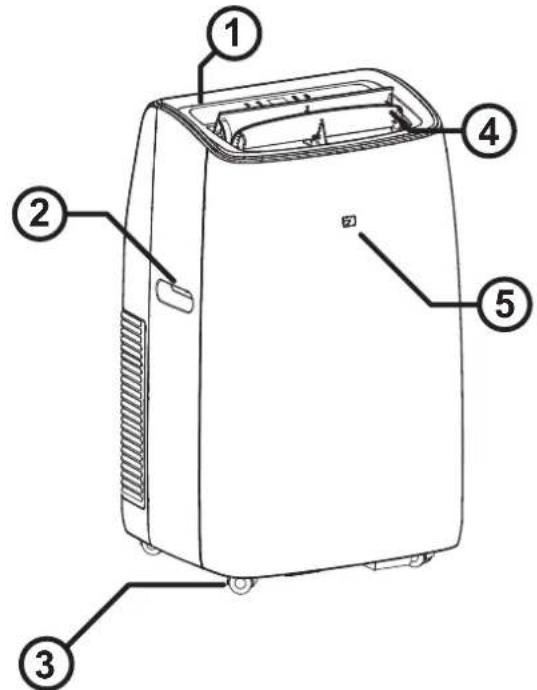
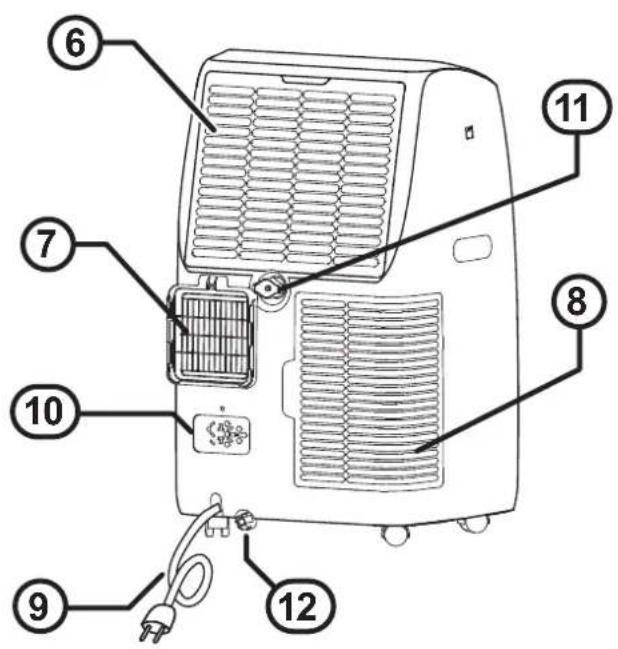
APPLIANCE COMPONENTS
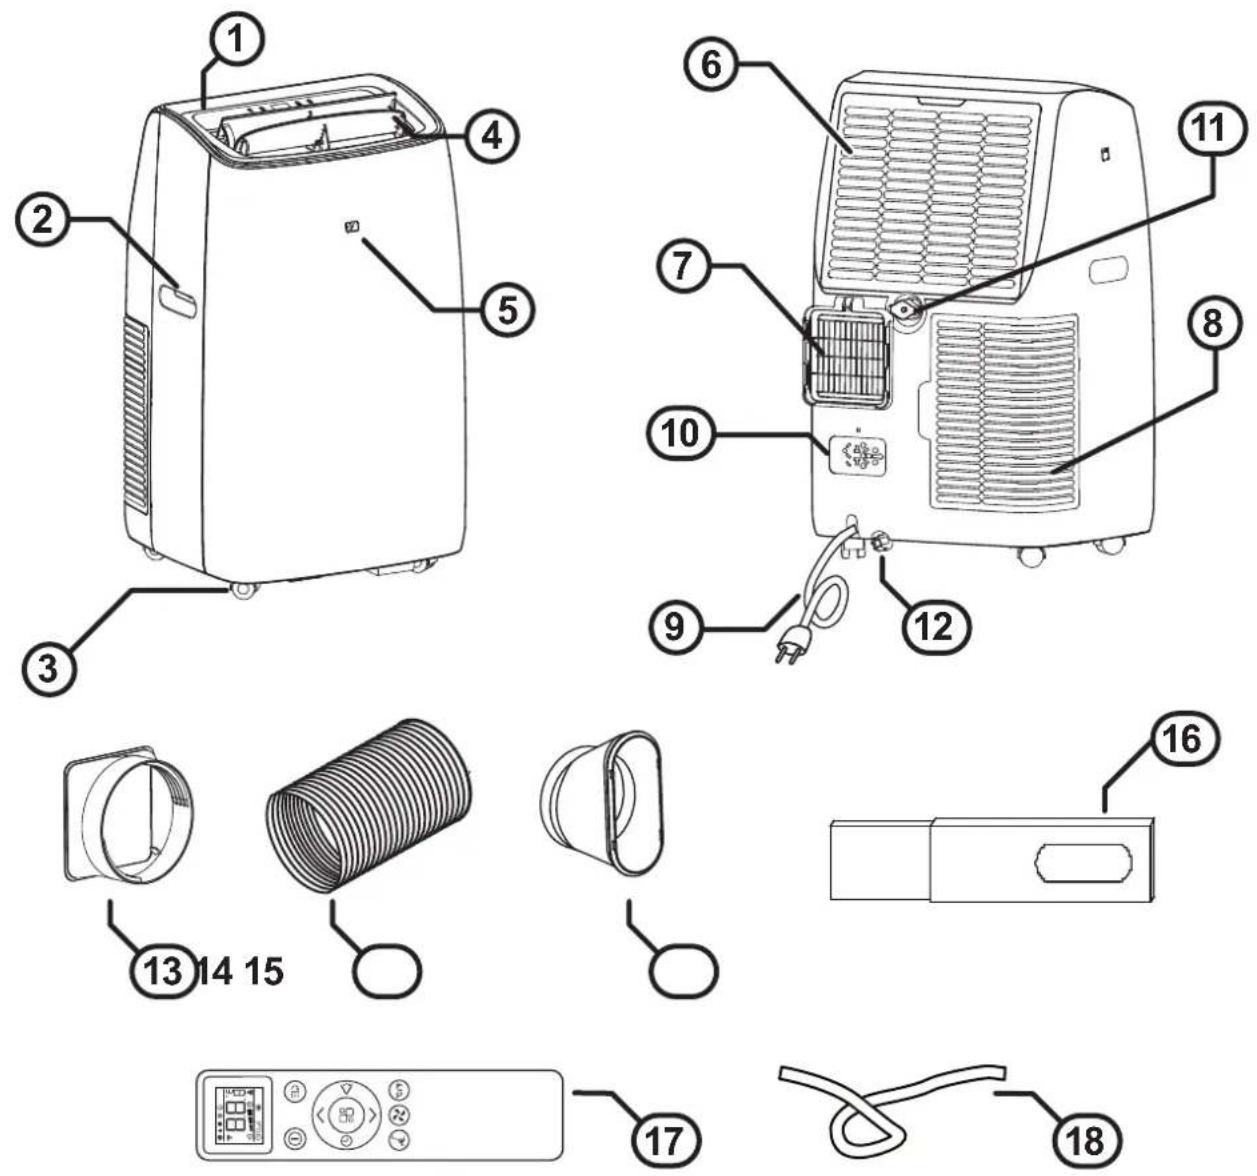
| 1. Control panel 2. Carry handles | |
| 3. Swivel casters (x4) 4. Cool air outlet | |
| 5. Remote control receiver 6. Room air intake (filter located behind grill) | |
| 7. Exhaust outlet 8. Lower air intake (filter located behind grill) | |
| 9. Power cable 10. Plug fixer | |
| 11. Drain outlet 1 12. Drain tray outlet | |
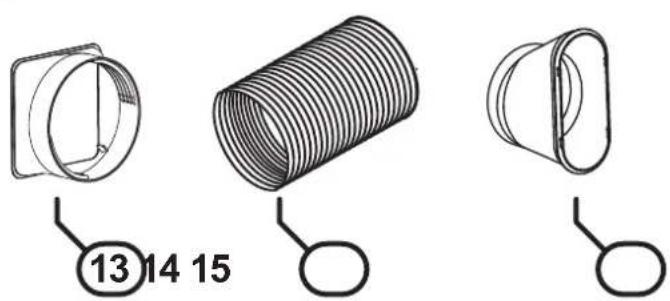
| 13. Duct to appliance adaptor 14. Exhaust duct | |
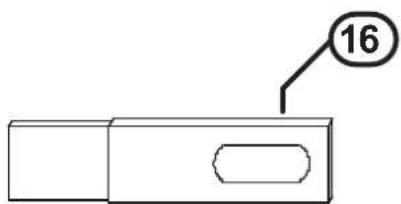
| 15. Window exhaust duct window adaptor 16. Window slider kit | |
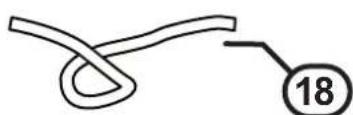
| 17. Remote Control 18. Condensate drain hose |
OPERATION
CONTROL PANEL
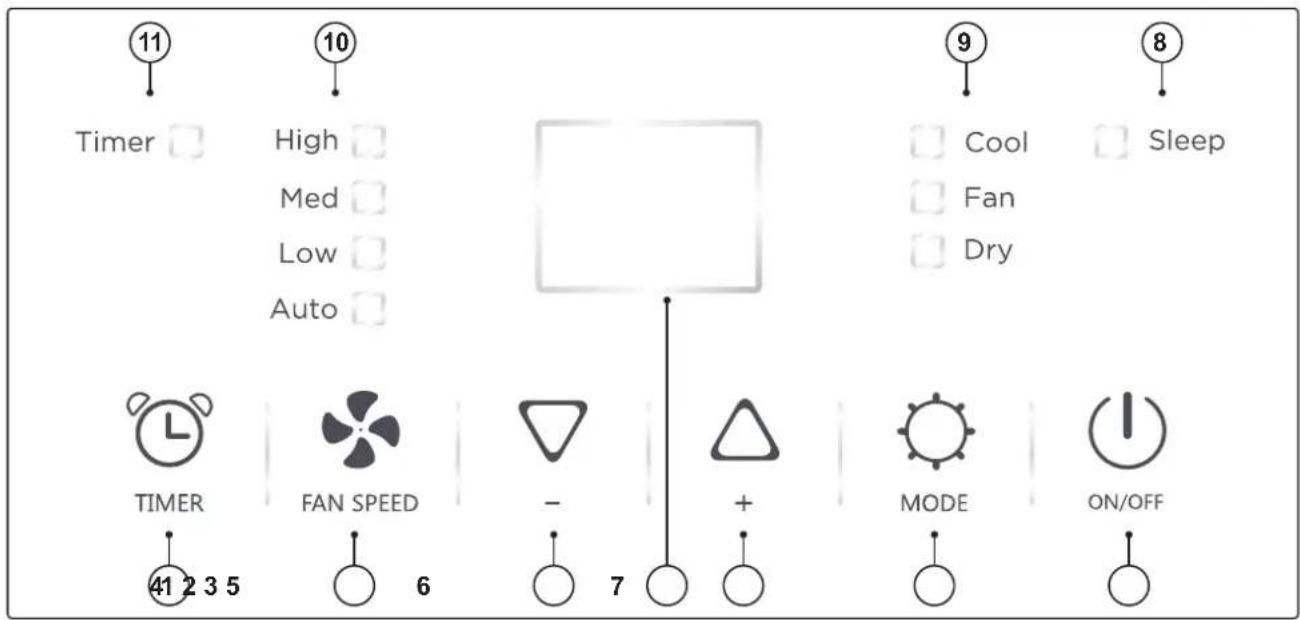
| 1. Timer Button 2. Fan Speed Button | |
| 3. Decrease Button 4. Display Screen | |
| 5. Increase Button 6. MODE Button | |
| 7. ON/OFF Button 8. Sleep Indicator | |
| 9. Mode Indicator 10. Fan Speed Indicator | |
| 11. Timer Indicator |

Before operating this appliance ensure that the location, installation and condensation requirements have been met, refer to installation instructions starting on page 19 for details.
For the best cooling results ensure that the filters are clean, refer page 17 for details.
BASIC OPERATION
When the appliance is plugged and the power point is turned on, the appliance is on standby mode.
There are three basic operational modes available, these are COOL (chilled air operation), FAN (fan only operation) and DRY (chilled and dehumidified operation).
- Press the ON/OFF (7) button.
- Press the Mode Selection button (6) until the COOL mode indicator is illuminated.
- Use Decrease/Increaser buttons (3/5) to select the desired temperature (18°C to 32°C)
- Use fan speed button (2) to select the desired fan speed (HIGH, MED, LOW or AUTO).
- Press the ON/OFF button (7) to stop operation.
DRY
- Press the ON/OFF (7) button.
- Press the Mode Selection button (6) until the DRY mode indicator is illuminated.
- Press the ON/OFF button (7).

Fan speed is on Auto when DRY mode.
FAN
- Press the ON/OFF button (7).
- Press the Mode Selection button (6) until the FAN mode indicator is illuminated.
- Use fan speed buttons (2) to select the desired fan speed (HIGH, MED or LOW). The screen display “==” as high speed, “==” as medium speed, “_as low speed.

AUTO fan speed is not available on FAN mode.
- Press the ON/OFF button (7)

The most recent basic operational settings are stored in the appliance's memory.
If the appliance is not disconnected from the mains power supply, then these s available the next time the appliance is turned on via the ON/OFF button.
OTHER OPERATION
TIMER
With the appliance "OFF", press the "TIMER" button (1) once to active Delay On Timer.
Press "TIMER" button (1) to set the desired time period (1-24 hours).
Wait until the timer indicator is light.
With the appliance "ON", press the "TIMER" button (1) once to active Delay Off Timer.
Press "TIMER" button (1) to set the desired time period.
Wait until the timer indicator is light.
When a timer is set, pressing the "TIMER" button (7) will cancel any timer settings.

Only one mode of operation is available at any time.

Before proceeding with the operation of your new Rinnai Portable Room Air Conditioner Remote Controller, please read these instructions thoroughly and gain a full understanding requirements features and operation of your new Remote Controller.
REMOTE CONTROL OVERVIEW
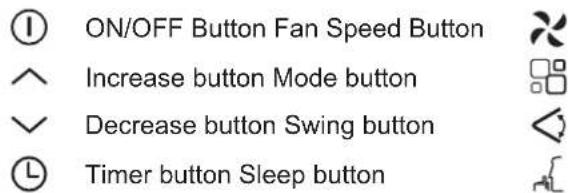
°C/F Unit switch button Turbo button (Not Applicable)
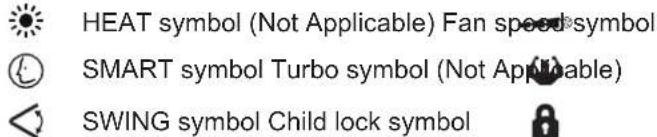
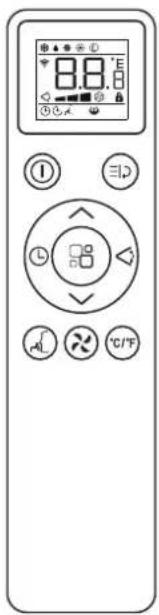
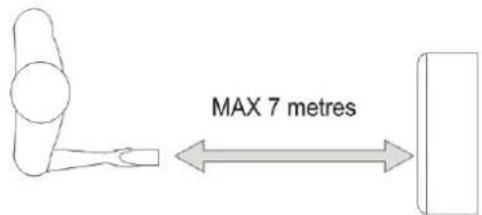
The Rinnai Remote Controller allows for convenient operation of the appliance within a 7 metre range.

A confirmation beep sounds to confirm that a successful controller input has been received by the appliance.
BUTTON DESCRIPTIONS & OPERATION
-
"ON/OFF" Button Press "ON/OFF" button to turn "ON" or "OFF" the Air Conditioner.
-
"FAN SPEED" Button Press "FAN SPEED" to set the fan speed (LOW, MEDIUM, HIGH or AUTO).
-
"^" and "∨" Button to adjust temperature or time Press "^" and "∨" to regulate the temperature (the unit is 1°C) and set the time (the unit is 0.5h). The temperature ranges from 18° to 32°, and the time ranges from 0.5h to 24h.
-
"MODE" selection button Selects the operation mode: COOL, FAN, DRY and SMART (Auto).

SMART (Auto)
This mode operates on Fan mode when the room temperature is below 23^ C; and operates on Cool mode when the room temperature is above 23^ C.
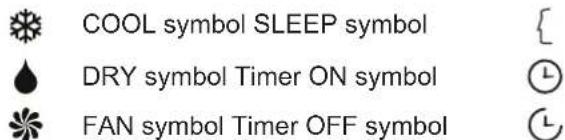
Display on the control panel:

flowchart
graph LR
    A["Step 1: Square with dashed arrow"] --> B["Step 2: Square with solid arrow"]
    B --> C["Step 3: Square with dashed arrow"]
    C --> D["Step 4: Square with solid arrow"]
5. "SWING" Button
Press "SWING" button to turn "ON" or "OFF" the swing function.
6. "TIMER" Button
Delay on Timer
- With the appliance "OFF", press the "TIMER" button twice, digits and a blinking "L" and "h" are shown on the LCD screen.
- Press ∧ or ∨ to set the desired time period (the available time range is in 1/2 hour increments from 0.5 to 24 hours).
- Press the "TIMER" button again to lock in the setting.
Delay off Timer
- With the appliance "ON", press the "TIMER" button once, digits and a blinking "L" and "h" are shown on the LCD screen.
- Press or set the desired time period (the available time range is in 1/2 hour increments from 0.5 to 24 hours).
- Press the "TIMER" button again to lock in the setting. When a timer is set, pressing the "TIMER" button (7) will cancel any timer settings.
7. "SLEEP" Button
The SLEEP function allows the set temperature to increase and decrease over an 8 hour period at pre-set time intervals to maintain your comfort while saving energy.
(a) In operating mode, press "SLEEP" to enter the 8-hour intelligent sleep mode. After 8 hours, the air conditioner will be off.
(b) the fan speed is low when sleep mode.
(c) In sleep mode, press "SLEEP" again to exit the sleep mode.

Sleep mode is not available in DRY and FAN only mode.
8. ℃/°F button
Press this button to switch temperature unit.
9. Turbo button
Not applicable for this mode.
10. Child lock
Press ^ or √ button simultaneously for 3 seconds to active he child-lock function.
REMOTE CONTROL BATTERIES
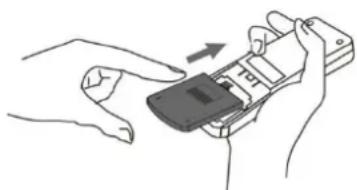
Insert batteries before using the remote control. The battery type used is AAA (1.5 V).
- Remove the battery cover at the rear of the remote control.
- Insert the new batteries and make sure that the + and - terminals of the batteries are installed correctly.
- Reattach the battery cover.
natural_image
Illustration of hands holding a smartphone with an arrow indicating the process (no text or symbols present)
If the LCD screen of the remote control starts to fade or fails to transmit, replace the batteries.
CARE & MAINTENANCE
GENERAL MAINTENANCE
It is recommended that after each cooling season the exterior panels and display of the appliance are cleaned with a soft damp cloth.
Air filters should be checked and cleaned every week during periods of heavy use. For intermittent use this can be extended to 2 to 3 weeks.

ALWAYS turn off the power before you perform any maintenance.
DO NOT use solvents, alcohol or harsh cleaners on this appliance or the filters.
NEVER use water that is hotter than 40^ C when you clean the filters. It may cause deformation or discolouration.
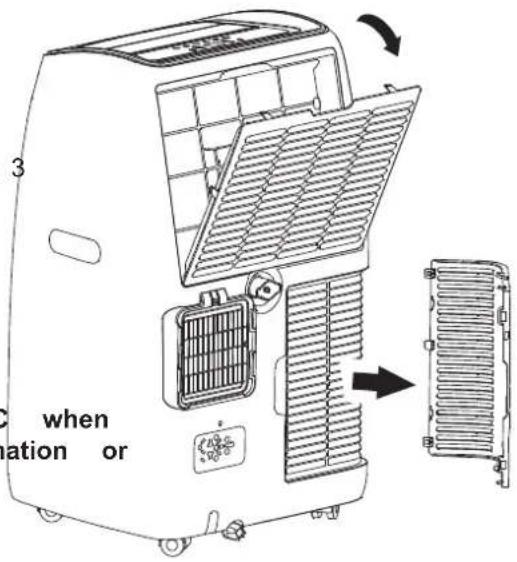
CLEANING THE AIR FILTER
There are two air filters in this appliance as shown in the figure on the right.
Before removing the grills, ensure the power cord is disconnected from the power supply.
- Remove the grills:
To remove the Room Air Intake Grill pull down on the top tab and unfasten the grill.
To remove the Lower Air Intake Grill unfasten the grill.
-
Unfasten the filters from each of the grills. Clean the filters with a vacuum cleaner or with warm water. If dirt is difficult to remove, wash the filter in lukewarm water with a mild detergent.
-
Ensuring that the filters are dry before replacing, then clip the filters back into the grill covers.
-
Reattach the grills:
To reattach the Room Air Intake Grill ensure that all the tabs are properly seated and that the grill is securely clipped back into place.
To reattach the Lower Air Intake Grill ensure that all the tabs are properly seated and that the grill is securely clipped back into place.
The power may now be reconnected.

Failure to clean the filters regularly can cause excessive condensation to form and reduce the appliances efficiency.
If you need replacement filters, please contact Rinnai.
SAVE A SERVICE CALL
| SYMPTOM POSSIBLE CAUSES | POSSIBLE SOLUTIONS | |
| Appliance will not operate. | Not plugged into power. Plug into power. | Power. |
| Power switch OFF. Switch power ON. | N. | |
| Timer Function set. Wait or reset timer function. | er function. | |
| Power to appliance but it will not start. | After switching off the appliance there may be a 3 minute delay before it may be re-started. | Wait 3 minutes. |
| Room temperature is lower than the set temperature. | Adjust the set temperature to be lower than the room temperature. | |
| FT appears on the display. Drain the water from the drain outlets. | water from the drain outlets. | |
| Error code PF | Sensor issue Contact Rinnai | |
| Error code FT | Safety tank full | Follow the instructions for Condensate drainage below. |
| The air conditioner does not generate enough cool air. | The air intake filters are blocked | Clean air filters. |
| The set temperature is too high. | Adjust the set temperature to a lower temperature. | |
| Drafts from open windows and doors. | Close windows and doors in the area you want to be cooled. | |
| Other heat sources in the room. | Remove or turn off heat sources. | |
| Cooling space too big. | Operate the appliance within the required cooling capacity. | |
| Too noisy or vibrating. | Operating surface not level | Move the appliance to level a operating surface. |
| Splashing sound. | High level of condensate being generated. | This is normal. This appliance has a pump that evaporates some condensate through the exhaust duct. |
WHEN TO CALL FOR SERVICE
| SYMPTOM | CAUSE |
| There is a burning smell and a strange sound coming from the unit.When operated if a circuit breaker (safety, ground) is thrown or a fuse is blown. | Turn off the air conditioner, and contact Rinnai. |
INSTALLATION
LOCATION
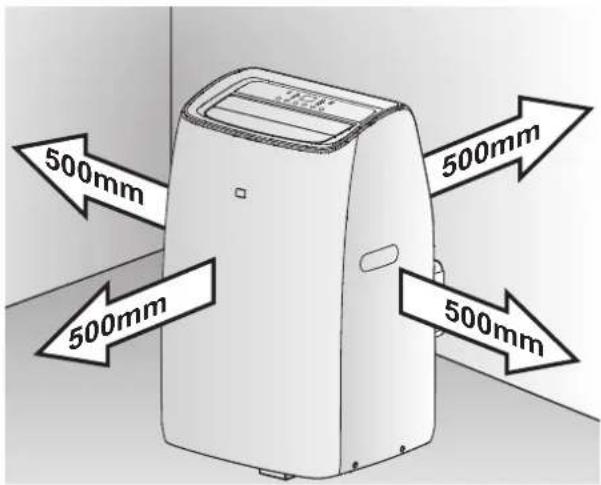
This portable air conditioner must be installed on a flat and dry surface. A minimum clearance of 500mm from walls or other appliances is required as well as easy access to a power point (GPO).
The air outlets and the ducting system must not be obstructed.

The appliance is fitted with a flexible cord 220-240V 50Hz 10A.
The maximum duct extension is 1.5m in total.
Both factors are to be taken into account when determining the location that the appliance will be operated in.
DUCT ASSEMBLY
natural_image
Simple line drawing of a rectangular object with an oval cutout and a numbered label '16' pointing to the top-right corner (no text or symbols on the object itself)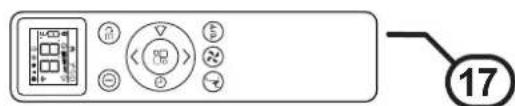
natural_image
Simple line drawing of a rope knot with a numbered circle (18) on the right side (no text or symbols beyond the number)- Place the Duct to Unit Adaptor (13) over the Exhaust Outlet (7), push it downwards to ensure it engages the Exhaust Outlet tabs.
- Screw one end of the Exhaust Duct (14) into the Duct to Unit Adaptor (13).
- On the other end of the Exhaust Duct (15) fix the Window Exhaust Duct Adaptor (16).
WINDOW INSTALLATIONS

DO NOT over extend the exhaust duct.
Over extension of the exhaust duct can lead to kinking.
Kinked ducting causes air flow restrictions and lowers the efficiency of the appliance.
Keeping the exhaust duct as short as possible avoids this issue.
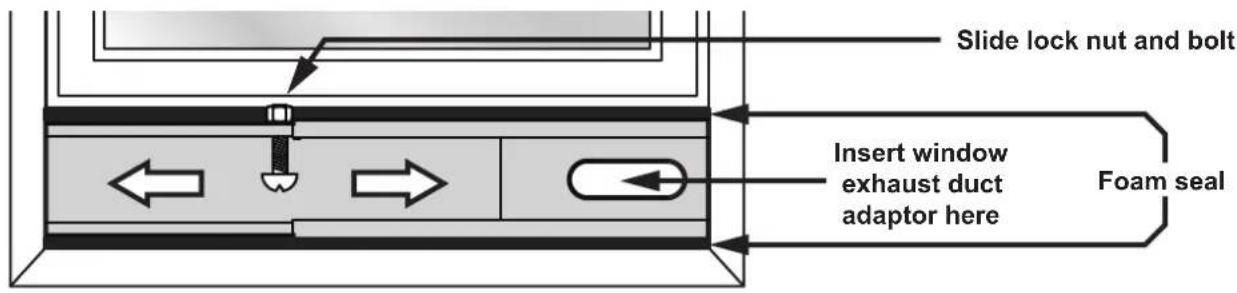
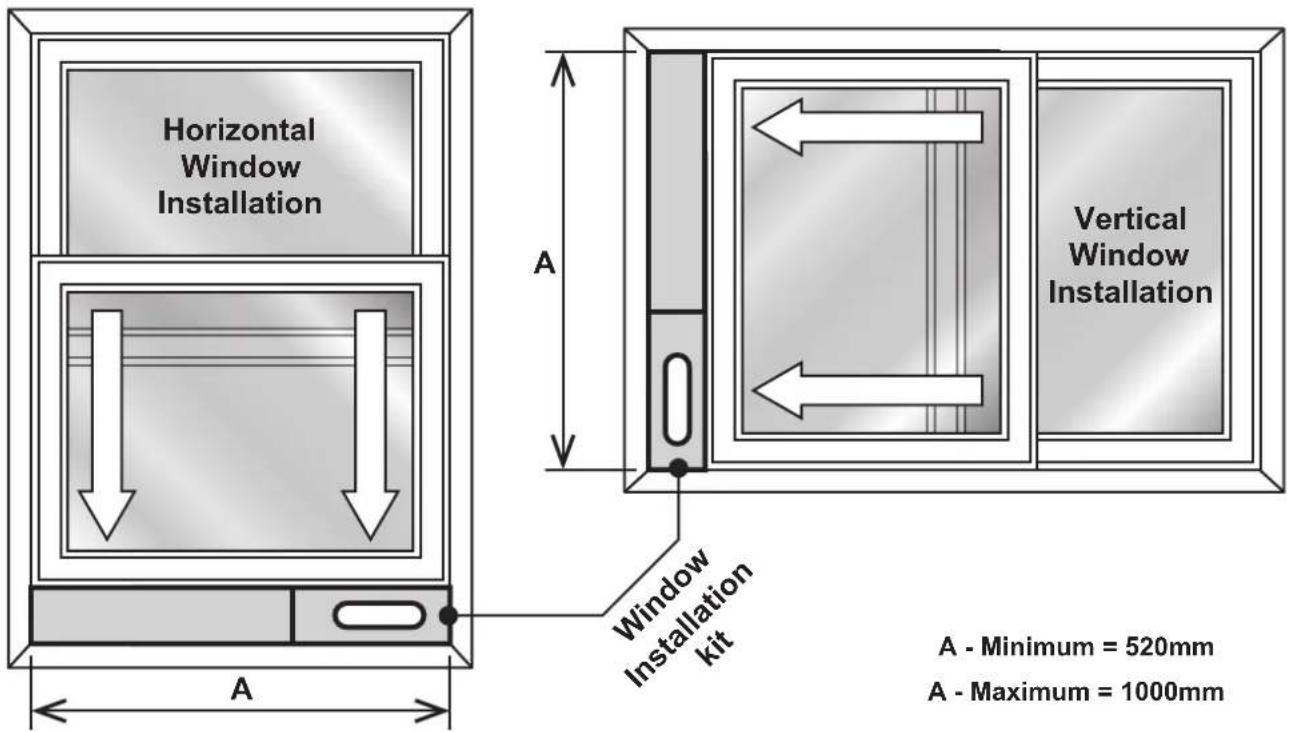
The window kit has been designed to fit most standard vertical and horizontal window applications. There may be some cases where you may need to modify some aspects of this installation procedure for certain window types.
Minimum and maximum horizontal / vertical window opening dimensions:
- Once a suitable window has been chosen, fit the Adjustable Slider Kit (16) into the window areas and fix the length of the kit using the supplied slide lock nut and bolt.
CONDENSATE DRAINAGE

Condensate produced by this appliance is NOT potable, dispose of via waste outlet or allow to evaporate.
INTERNAL CONDENSATE TANK
During operation the appliance may produce small amounts of condensate. The appliance has an inbuilt condensate tank. If both drain outlets (11) and (12) are plugged, then this tank may reach capacity. If this happens, the appliance will stop operation and the condensate full code "FLT" will be shown on the control panel display and the condensate tank will need to be drained before operation can be resumed. To do this:
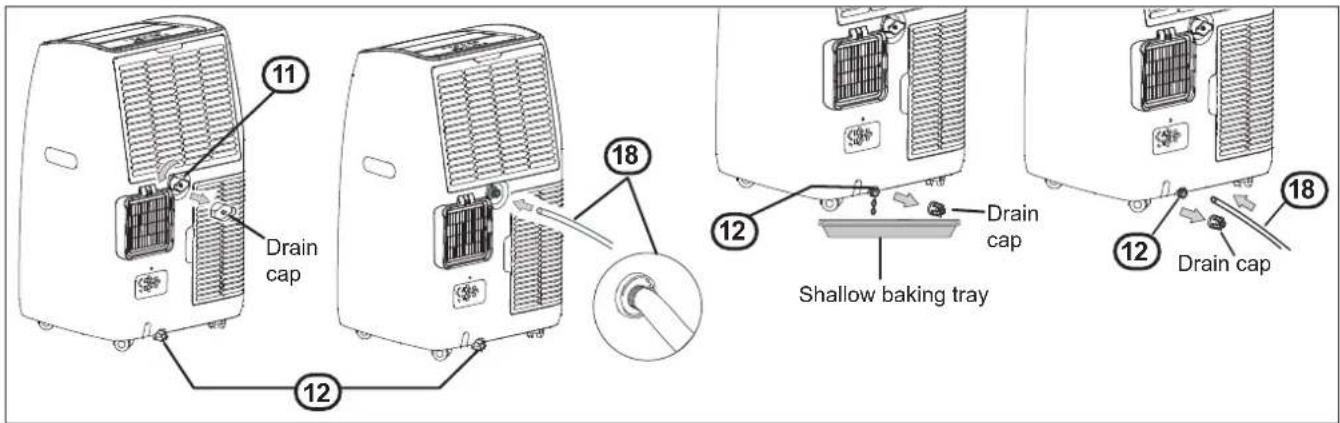
- Place shallow tray such as an oven baking tray or similar (with at least a 1 litre volume) under Drain Tray Outlet (12).
- Remove the plug from Drain Tray Outlet (12) and drain out the condensate water, once the condensate is drained replace the plug, the appliance will now be able to then resume operation.
FIXED CONDENSATE DRAINAGE HOSE
As an alternative to using the appliances internal condensate tank, a condensate drain hose (18) may be fitted. Option 1 - External Drain Tray: with drain outlet (11) plugged, fit the condensate drain hose (18) to drain outlet (12) and drain the condensate into a drain tray.
Option 2 - Existing Waste Outlet: with drain outlets (12) plugged, fit the condensate drain hose (18) to drain outlet (11) and drain the condensate into a drain tray or waste outlet.

The point to which the condensate is to be drained MUST BE lower than the drainage outlet point. When using a drain tray option, ensure that the capacity of the tray is greater than that of the condensate being produced.

TERMS OF WARRANTY - AUSTRALIA
Rinnai Australia Pty. Ltd. ABN 74 005 138 769, 100 Atlantic Drive, Keysborough VIC 3173.
NOTICE TO CONSUMERS UNDER AUSTRALIAN CONSUMER LAW
Our goods and services come with guarantees that cannot be excluded under the Australian Consumer Law.
For a major failure with a good, you are entitled to a replacement or refund and compensation for any other reasonable foreseeable loss or damage. If the failure does not amount to a major failure and if the goods fail to be of acceptable quality, you are also entitled to have the goods repaired or replaced.
For a major failure with the service, you are entitled to cancel your service contract with us and obtain a refund for the unused portion, or to compensation for its reduced value. You are also entitled to be compensated for any other reasonably foreseeable loss or damage. If the failure does not amount to a major failure you are entitled to have problems with the service rectified in a reasonable time and, if this is not done, to cancel your contract and obtain a refund for the unused portion of the contract.
The benefits provided by this Warranty are in addition to any other rights and remedies available to a consumer under the Australian Consumer Law and any other law which may apply to the goods and or services.
1 DEFINITIONS
The terms listed below shall have the following meanings:
1 "Authorised Service Representative" means an independent service contractor authorised by Rinnai or Rinnai service personnel.
2 “Rinnai” means Rinnai Australia Pty Ltd (ABN 74 005 138 769) and any related company.
3 “Certificate(s) of Compliance” means certificate(s) issued by licensed personnel (including plumbers, refrigeration mechanics, electricians or other relevant tradespeople) to certify that any prescribed works comply with applicable regulatory requirements.
4 “Certificate(s) of Occupancy” means certificate(s) issued by the local government authority (or similar organisation) which certifies that a home can be occupied.
5 "Installation Site" means the site at which the Product is originally installed.
6 “Normal Business Hours” means 8:30am to 5:00pm Monday to Friday, excluding public holidays.
7 “Operating/Installation Instructions” means the user manual or other documentation which provides detailed instructions on the proper operation and maintenance of the Product.
8 “Other Applications” means any Product used for purposes other than Residential & Light Commercial Applications. Other Applications may include but are not limited to factory, IT/Server room, telephone exchange, processing area (e.g. bakery, kitchen, warehouse, swimming pool, agricultural facilities such as a nursery). Any Product which has been installed, for whatever purpose, as a retrofit component to an existing system, will also be classed as being part of an “Other Application” regardless of the purpose of use of the existing system into which such product has been installed.
9 "Purchaser" means the end user of the Product, the person named as owner in the Warranty certificate, the holder of the Proof of Purchase or the holder of a property transfer document where the Product is included as part of the chattels.
10 "Product" means the equipment purchased by the Purchaser and described in Section 2 of this document.
11 "Proof of Purchase" means a Tax Invoice or Receipt in respect of the Product. In the case of new constructions, a Certificate of Occupancy or a Certificate of Compliance that details the date of installation or commissioning will suffice.
12 “Qualified Installer” means the qualified installation contractor who is responsible for performing the installation work in the manner prescribed by local and statutory regulations, including compliance with any relevant and to Rinnai specifications, including Australian Standards.
13 “Residential & Light Commercial Applications” means any Product for use in residential or light commercial applications where
a) the Product is solely used for the purpose of human comfort; and
b) the ambient temperature of the space the Product is intended to heat or cool is influenced solely or primarily by natural exterior weather conditions rather than by man-made or mechanical heat sources.
Examples of Residential & Light Commercial Applications include, homes, offices, hotels, apartments, nursing homes, hospitals, health care premises, shopping centres, and retail stores.
2 TERMS OF WARRANTY
2.1 Subject to the Terms of Warranty set out in this document, effective from the date of purchase by the Purchaser, the Product is warranted to be free from defects in materials & factory workmanship for the period set out in table below:
| Residential and Light Commercial | PRODUCT GROUPS PARTS LABOUR | ||
| Evaporative Coolers & Ducted Gas Heaters (excluding Compact Classic Series) | 5 Years*Extended 4Years Option | 5 Years*Extended 4Years Option | |
| Ducted Gas Heaters - Compact Classic Series 3 Years 3 | Years | ||
| Refrigerated Airconditioning Products 5 Years 5 Years | |||
| Ducted Gas Heaters - Heat Exchangers and Burners Evaporative Coolers - Structural components only | 10 Years N/A | ||
| Portable Air conditioning 2 Years N/A | |||
| Wi-Fi Devices 1 Year 1 Year | |||
| Other Applications | All Product Groups | 2 Years | 1 Year |
| After Market | Spare Parts | 1 Year | N/A |
| *Extended Warranty Option | Up to 4 year extended warranty (in addition to the standard warranty period listed above) applies on selected products when you opt in to the Rinnai Service Advantage program. This program has terms and conditions, including the requirement for scheduled servicing of the product by Rinnai.To participate in the program you must register your product online at: www.rinnai.com.au/support-resources/ warranty-registration/ within the first 12 months of the product being installed. | ||
2.2 Rinnai will determine in its sole discretion, which classification the Product fits into and the corresponding Warranty that shall apply.
2.3 An Authorised Service Representative will repair or replace, at its option, the Product or any part of the Product that its examination shows to be defective. The repair or replacement shall be performed during Normal Business Hours by an Authorised Service Representative. Repair by persons other than an Authorised Service Representatives may void the Warranty.
2.4 Alternatively to clause 2.3 above, Rinnai can at its discretion elect to pay you an amount equivalent to the cost of repairing or replacing the Product.
2.5 If Rinnai provides you with either the replacement costs or replacement product, ownership of the original Product shall immediately transfer to Rinnai.
2.6 Rinnai is responsible for reasonable costs associated with legitimate warranty claims, including call-out of an Authorised Service Representative to inspect the Product. Rinnai is not responsible for:
a) costs for tradespeople engaged by you that are not Rinnai Authorised Service Representatives.
b) any costs, including call out costs for a Rinnai Authorised Service Representatives, associated with a Product which is determined upon inspection not to be covered by this warranty.
2.7 Rinnai will reimburse any reasonable costs associated with making a legitimate warranty claim against Rinnai which are not otherwise specified above.
2.8 The Warranty of the Product requires that, in addition to all other conditions, the Purchaser conducts regular and/or preventative maintenance as may be specified by the Operating/Installation Instructions or otherwise directed by Rinnai and required by the level of usage and the usage environment, including the use of correct and uncontaminated refrigerants and lubricants. Refrigeration, plumbing and electrical works must be undertaken by licensed personnel.
2.9 Where a Product or failed component is replaced under warranty, the time remaining on the original Product warranty period will continue to apply and the replacement product or part will be subject to the original warranty period only.
3 CONDITIONS OF WARRANTY
3.1 The Purchaser may only obtain the benefit of the Warranty if the Purchaser:
a) maintains and has the Product serviced in accordance with the instructions set out in the service section of the relevant Service or Owner's Manual;
b) complies with clause "7 Purchaser's Responsibilities" on page 24;
c) notifies Rinnai within 30 days of a defect occurring or, in the case of a latent defect, becoming apparent, that a claim is being made under this Warranty; and
d) provides, in support of the claim made under this Warranty, a Proof of Purchase.
3.2 This document (and any statutory consumer guarantees) represents the only Warranty given by Rinnai in respect of the Product. No other person or organisation is authorised to offer any alternative warranty on behalf of Rinnai.
3.3 If the date of purchase cannot be established to Rinnai's satisfaction, the date shall be deemed to be 2 months after the date of manufacture or the date of sale by Rinnai, whichever is the latter.
3.4 This warranty applies to Products which are manufactured on or after the date of publication of this warranty but before the next date of publication of this warranty.
4 EXCLUSIONS
4.1 This Warranty does NOT cover:
a) damage, problems or failure resulting from improper operation and/or inadequate maintenance by the Purchaser (refer Purchaser's Responsibilities section below);
b) damage, problems or failure resulting from improper or faulty installation. The Product must be installed by a Qualified Installer in accordance with applicable regulations. Where applicable, Certificate(s) of Compliance must be obtained by the purchaser from the Qualified Installer and presented to the Authorised Service Representative;
c) damage, problems or failure caused by factors external to the Product including, but not limited to, faulty or poor external electrical wiring, incorrect or faulty power supply, voltage fluctuations, over voltage transients or electromagnetic interference, inadequate or faulty gas, drainage services, or water services, including water pressure, and non-potable water;
d) damage, problems or failure caused by acts of God, fire, wind, lightning, flood, storm, hail storm fallout, vandalism, earthquake, war, civil insurrection, misuse, abuse, negligence, accident, pests, animals, pets, vermin, insects, spiders/bugs or entry of foreign objects or matter into the Product such as dirt, debris, soot or moisture;
e) damage, problems or failure caused by environmental conditions including, but not limited to, excessive moisture, salt or other corrosive substances or atmospheric conditions;
f) Product which has been installed in a portable or mobile building, structure or application including, but not limited to, a caravan, boat or trailer;
g) Product which has been re-installed at a location other than the original site;
h) any consumable item supplied with the Product including, but not limited to, an air filter, battery, fan belt, igniter or cooler pad;
i) installation of third-party components that may be attached to the Product. These include, but are not limited to, control wiring, ducting, return air filter(s) grille, register, diffuser, zone motors, controls/thermostats, pipe work and fabricated or added components. These items remain solely the responsibility of the Qualified Installer;
j) installations where electrics/electronics may be subjected to moisture/chemicals (e.g. swimming pools or nurseries);
k) any repair, which is needed as a result of an accident, misuse, abuse or negligence;
I) Product that is utilised in an environment (indoor and outdoor) outside its specified operating range; and
m) fair wear and tear to the Product.
n) On-site labour warranty on portable (non-fixed installation) Products – In respect of such Products the Purchaser must return the Product to the supplier for repair or replacement).
5 LIMITATIONS
5.1 Third parties are often involved in providing advice to consumers about the climate control solutions best suited to the consumer's needs. Any advice or recommendations given by such parties, including advice about Product fitness for purpose and overall system design, sizing and application are not the responsibility of Rinnai. This includes but is not limited to the heat load calculations, airflow and system balancing.
5.2 This Warranty does not apply to any Product installed at an Installation Site which is outside Australia.
5.3 Except where inconsistent with the purchaser's statutory rights and the rights given by this Warranty, all liabilities of Rinnai for any direct, special, indirect or consequential loss or damage, any damage or expense for personal injury or any loss or destruction of property, arising directly or indirectly from the use or inability to use the Product or any of its parts and/or servicing the Product, are expressly excluded.
6 TRAVEL, TRANSPORT & ACCESS COSTS
6.1 The Purchaser must pay freight charges, in-transit insurance expenses and travelling costs for repairs/replacements under this Warranty, that are required to be performed 50km from the nearest Rinnai branch or Authorised Service Representative.
6.2 Subject to clause 6.3, Rinnai will pay freight charges, in-transit insurance expenses and travelling costs for repairs/replacements that are required to be performed less than 50km from the nearest Rinnai branch or Authorised Service Representative, subject to the following:
a) Rinnai will arrange for such repairs/replacements and make any payment directly to the third party to provide the freight, in-transit insurance or travel services; or
b) if Rinnai considers appropriate, it will authorise the Purchaser in writing to pay for the relevant freight charges, in-transit insurance expenses or travelling costs and then, upon provision by the Purchaser to Rinnai of a tax invoice showing those costs have been incurred, reimburse the Purchaser for such costs which are within the terms of the authorisation. If the Purchaser pays for the relevant freight charges, in-transit insurance expenses or travelling costs without written authorisation from Rinnai, Rinnai will not reimburse the Purchaser for such costs.
6.3 The Purchaser must pay all costs and expenses in respect of:
a) any service call out fee if the Product is not accessible for service
b) making the Product accessible for service, for example, restricted access or working at heights, or the labour cost for an additional person due to OHS requirements.
c) providing a safe working environment for installation, service, maintenance or repair of the Product;
d) any surcharge applicable in respect of supplying replacement parts outside Normal Business Hours; and
e) any other costs and expenses in relation to claiming the Warranty that is not covered by clause 6.2.
7 PURCHASER'S RESPONSIBILITIES
7.1 The Purchaser must operate and maintain the Product in accordance with the Operating Instructions and service maintenance schedule, including conducting an appropriate number of services to the unit during the Warranty period, based on usage and the usage environment including but not limited to;
a) regularly cleaning the air filter(s) and replacing them where necessary;
b) replacing expired batteries or other consumables as required;
c) ensuring that the condensate drain is kept clean and clear of obstructions.
HOW TO MAKE A WARRANTY CLAIM:
If you wish to make a warranty claim in respect of any Portable Product, please return it to the place of purchase, or if that is not possible, contact Rinnai to enquire about alternative arrangements.
If you wish to make a warranty claim in respect of any fixed Product, please contact Rinnai on the details set out below to make arrangements for an Authorised Service Representative to inspect the product.
As per clause 2.6 of the Terms and Conditions of Warranty, purchasers are responsible for the costs of any repair and/or call out fee where, on inspection, the alleged defect is found by Rinnai's Authorised Service Representative not to be covered by this warranty or any statutory consumer guarantee applicable to the Product.
The Terms and Conditions of Warranty contain important information about your rights and obligations under this warranty. Please read them fully and carefully before making a claim.
NOTES
Rinnai Australia Pty Ltd
ABN74005138769 | AU45204
100 Atlantic Drive, Keysborough, Victoria 3173
P.O. Box 460, Braeside, Victoria 3195
Tel: (03) 92716625
Fax: (03) 92716622
National Help Line
Tel: 1300 555 545* Fax: 1300 555 655
Monday to Friday, 8.00 am to 5.00 pm EST.
*Cost of a local call higher from mobile or public phones.
For further information visit www.rinnai.com.au or email enquiry@rinnai.com.au
Rinnai has a Service and Spare Parts network with personnel who are fully trained and equipped to give the best service on your Rinnai appliance. If your appliance requires service, please call our National Help Line. Rinnai recommends that this appliance be serviced every 2 years.
With our policy of continuous improvement, we reserve the right to change, or discontinue at any time, specifications or designs without notice.
- Portable Room Air Conditioner
- Operation & Installation Manual
- TABLE OF CONTENTS
- Safety & Important Information 4
- Specifications 10
- Air Conditioner Basics 11
- Operation 12
- Remote Control 14
- Care & Maintenance 16
- Installation 18
- Warranty 21
- Contacts 28
- READ ALL INSTRUCTIONS BEFORE USING THE APPLIANCE.
- WARNING INFORMATION REGARDING APPLIANCES WITH R290 REFRIGERANT GAS
- MANDATORY INSPECTION PRIOR TO INSTALLATION
- A NOTE ON ILLUSTRATIONS
- EXPLANATION OF SYMBOLS DISPLAYED ON THE UNIT
- Transport of equipment containing flammable refrigerants
- Marking of equipment using signs
- Disposal of equipment using flammable refrigerants
- Storage of equipment/appliances
- Storage of packed (unsold) equipment
- Information on servicing
- 6) No ignition sources
- 7) Ventilated area
- 8) Checks to the refrigeration equipment
- 9) Checks to electrical devices
- Repairs to sealed components
- Repair to intrinsically safe components
- Cabling
- Detection of flammable refrigerants
- Leak detection methods
- Removal and evacuation
- Charging procedures
- Decommissioning
- Labelling
- Recovery
- SPECIFICATIONS
- INTRODUCTION
- OPERATION
- BASIC OPERATION
- DRY
- FAN
- OTHER OPERATION
- TIMER
- REMOTE CONTROL OVERVIEW
- BUTTON DESCRIPTIONS & OPERATION
- SMART (Auto)
- "SWING" Button
- "TIMER" Button
- Delay on Timer
- Delay off Timer
- "SLEEP" Button
- Sleep mode is not available in DRY and FAN only mode.
- ℃/°F button
- Turbo button
- Child lock
- REMOTE CONTROL BATTERIES
- CARE & MAINTENANCE
- GENERAL MAINTENANCE
- CLEANING THE AIR FILTER
- INSTALLATION
- LOCATION
- WINDOW INSTALLATIONS
- CONDENSATE DRAINAGE
- INTERNAL CONDENSATE TANK
- FIXED CONDENSATE DRAINAGE HOSE
- TERMS OF WARRANTY - AUSTRALIA
- NOTICE TO CONSUMERS UNDER AUSTRALIAN CONSUMER LAW
- DEFINITIONS
- TERMS OF WARRANTY
- CONDITIONS OF WARRANTY
- EXCLUSIONS
- LIMITATIONS
- TRAVEL, TRANSPORT & ACCESS COSTS
- PURCHASER'S RESPONSIBILITIES
- HOW TO MAKE A WARRANTY CLAIM:
- NOTES
- Rinnai Australia Pty Ltd
- National Help Line
Brand : Rinnai
Model : RPC41NC
Category : Air Conditioning