
Elite SLIM10 - Subwoofer BOSS - Free user manual and instructions
Find the device manual for free Elite SLIM10 BOSS in PDF.


| Product Type | Amplified subwoofer for car audio |
| Brand | Boss Audio Systems |
| Model | Elite SLIM10 |
| Driver Size | 10 inches |
| Output Power | 1000W peak |
| Speaker Impedance | 2.6 ohms |
| Frequency Response | 20 Hz - 150 Hz |
| Low Pass Filter (LPF) | 50 Hz - 150 Hz |
| Bass Boost | 0 to +12 dB |
| Phase Control | Switchable 0° or 180° |
| Input Sensitivity (Low Level) | 50 mV |
| Input Sensitivity (High Level) | 0.3 V |
| Signal-to-Noise Ratio | 68 dB |
| Total Harmonic Distortion | < 4% |
| Power Supply | 12V DC (10-16V) |
| Current Consumption | Max 12A |
| Fuse Rating | 25A ATO blade type |
| Dimensions (W x H x D) | 13.58 x 3.15 x 10.43 inches (345 x 80 x 265 mm) |
| Weight | 10.36 lbs (4.7 kg) |
| Protection Circuits | Overload, short circuit, thermal |
| Auto Power On | Yes (with high-level input) |
| Input Gain Control | Yes, variable |
| Remote Level Control | Included |
| Mounting | Under seat with included brackets |
| Wiring Options | Low-level RCA or high-level speaker input |
| Package Contents | Subwoofer, high-level harness, remote control, mounting kit, spare fuse, manual |
| Cleaning | Dry fiber-free cloth only |
| Safety | Professional installation recommended; do not open; keep dry |
Frequently Asked Questions - Elite SLIM10 BOSS
User questions about Elite SLIM10 BOSS
0 question about this device. Answer the ones you know or ask your own.
Ask a new question about this device
Download the instructions for your Subwoofer in PDF format for free! Find your manual Elite SLIM10 - BOSS and take your electronic device back in hand. On this page are published all the documents necessary for the use of your device. Elite SLIM10 by BOSS.
USER MANUAL Elite SLIM10 BOSS
natural_image
Black BSX ELITE speaker with mesh grille and ventilation grille (no visible text or symbols on device body)BOSS® AUDIO SYSTEMS
Thank you for choosing our product!
Please read the instructions carefully so you will know how to operate your product properly.
If there are any technical questions, please contact:
Customer care: (805) 751-4853 & Live chat
Online support: www.bossaudio.com/support
IMPORTANT
Please enter below the Serial No. which is located on the exterior of the product. Retain this information for future reference.
Model No.
Serial No.
Purchase Date
Table of Contents
Introduction....2
Package Contents....2
Important ....3
Panel Controls and Features....4
Subwoofer Setup Procedure ....5
Protection Mode 6
Mounting....6
Wiring 7
Low-Level Input Wiring ....7
High-Level Input Wiring ....7
Power Connection 8
Subwoofer Level Control Connection....9
Troubleshooting....9
Specifications 11
Introduction
This product is designed as a car subwoofer with an integrated amplifier. The product is low enough to easily fit below the seat of your car, and serves as an addition to your car audio system.
This product has a low pass filter (LPF), bass boost control, phase control and input gain control. These allow you to adjust sound effects to suit personal need.
This product offers you two wiring alternatives for audio input (RCA and speaker level inputs). It can also auto-sense high level input to power on automatically, without a need to connect the remote wire at the remote terminal of the subwoofer.
Package Contents
When first unpacking your new amplified subwoofer, please check first the package contains all of the items listed below. If something is missing, contact the store where you purchased the product.
- 1 x SLIM10 amplified subwoofer
• 1 x High level input wire harness
• 1 x Remote subwoofer level control
- 4 x mounting brackets, 8 x screws
• 1 x spare ATO fuse (25A)
- User manual and warranty card
Important
Read and understand all instructions before you use your product. If you do not follow the instructions in this manual, we are not responsible for injury or damage resulting from improper handling. This will also void the warranty.
Important safety precautions
- Do not open or attempt to repair this product yourself. Dangerous high voltages are present which may result in electric shock.
- To avoid risk of electronic shock or damage to the product, do not permit the product to become damp or wet from water or drinks. If this does occur, immediately unplug the power wires and send the product to your local dealer or service center as soon as possible.
- Be sure to observe the following guidelines:
- Do not increase speaker volume so high that you cannot hear what is around you.
- Use caution or temporarily discontinue use in potentially hazardous situations.
- Do not make any adjustment on the product when driving or in other situations where distractions can be hazardous. Responsible and safe driving is your primary responsibility when operating a vehicle.
- Start volume at a low setting then gradually increase the volume until you can hear it comfortably, without sound distortion or ear discomfort.
- In the event of smoke, strange noise or odor emitted from the product or any other abnormal operational signs appearing on the product, disconnect the product from the power supply. Discontinue use and contact your dealer or our technical support. Using the product in this condition may result in permanent damage to the system.
- Servicing must only be carried out by a technician. Contact our technical support for any service question.
Installation precautions
- WARNING: Always consult a professional installer.
• Installation must be performed by a professional. Contact our technical support for any installation question.
• Use only installation parts provided with the product. Using other mounting methods may void the warranty. - Before installation, disconnect the negative terminal of the vehicle battery to prevent damage to the product, fire, and/or possible injury.
- Never operate the product when it is not mounted. Make sure the product is securely mounted and all the cables are securely connected to prevent damage, especially in an accident.
• Always connect the product to the vehicle battery through a fuse. - Observe the safety and operating instructions of the devices which are connected to the product.
- Important! Replace the faulty fuse with the same type and rating. Using a different type or rating of use may result in damage to the product or vehicle, or cause a fire.
- Do not use any aggressive cleaning agents. Clean the product with a dry, fiber-free cloth.
Care of the environment
Please inform yourself about the local separate collection system for electrical and electronic products. Do not throw away the product with the normal household waste at the end of its life, but hand it in at an official collection point or recycling. By doing this, you help to preserve the environment.
Panel Controls and Features
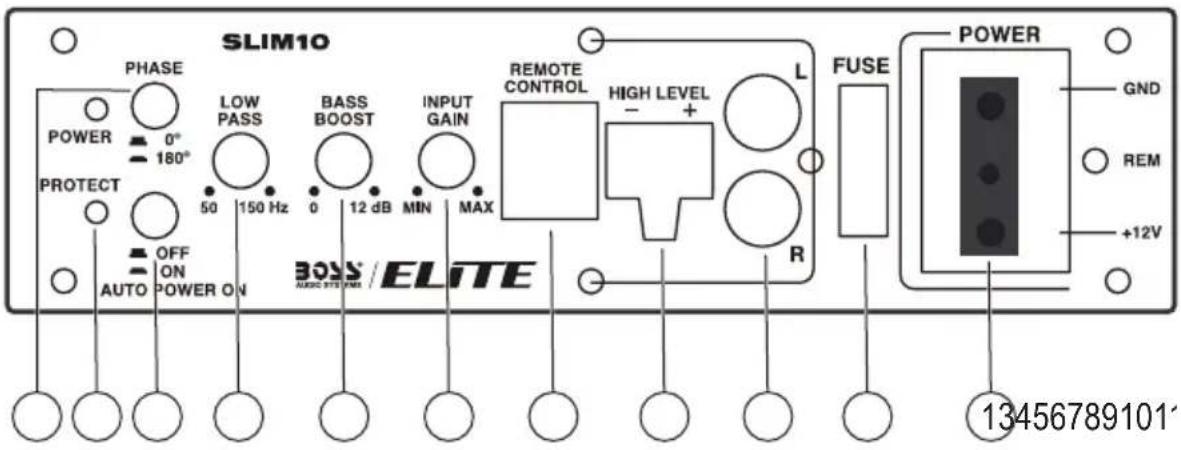
1. Power terminals
GND: Connect to the closest point on the chassis of your vehicle.
REM: Connect to the remote output wire of your head unit. No need to make the remote connection if you use high-level input connection and auto power on function is activated.
+12V: Connect to the positive terminal of the 12V vehicle battery.
2. Fuse holder
Insert a 25A blade type fuse (ATO) to provide protection of the circuitry. Do not use a fuse with a different rating. Never replace the fuse with a wire or coin.
3. Low-level input (RCA input)
Connect to the RCA outputs on your head unit. Low level input is recommended to input audio signal to the subwoofer if RCA outputs are present on your head unit or signal processor.
4. High-level input (speaker level input)
Connect to the speaker wires on your head unit. If your head unit does not have RCA outputs, use the speaker wires on the head unit for high-level input connection.
5. Remote level control port
Connect to the supplied remote subwoofer level control. Use the control to adjust volume level of the subwoofer independently.
6. Input gain control
Adjust the input level of the subwoofer in order to match the output level from your head unit.
Important! Do not adjust the input level to maximum unless your input level requires it.
Follow the steps below to set your input level correctly.
a. On the subwoofer, turn the input gain control to minimum.
b. On the head unit, turn the volume to about 3/4 full level.
c. Slowly turn up the input gain control until you hear a small amount of distortion. Then turn down the gain control until the distortion is completely gone. Leave the gain control at this setting.
7. Bass boost control
Use this control to increase sound output level in bass frequencies.
8. Low pass filter (LPF)
Use this control to define the frequency range you want the subwoofer to receive. The subwoofer will only receive the frequencies below the one you set to reproduce sound.
Tip: If the other speakers of your audio systems are weak on the mid frequencies, set the LPF control relatively high. If the midrange is well covered by the other speakers of your audio system, set the LPF control relatively low only to receive lower frequency signal.
9. Auto power on
This function works only with high level input connection, and you do not need to make the wire connection to the remote terminal on the subwoofer.
Press ON or OFF switch to activate or deactivate the function. If activated, the subwoofer will automatically power on or off whenever your head unit is turned on or off.
10. Status indicators
Green LED: the subwoofer is powered on and operational.
Red LED: the subwoofer is in protection mode and not operational. This problem is caused by input overload, short circuit or high temperature.
11. Phase control
Press to adjust bass response (no or little bass sound) caused by time alignment in your audio system. This problem usually results from having this subwoofer at a different distance from the listener than the other speakers in the audio system.
Subwoofer Setup Procedure
- Secure the subwoofer in your vehicle. See the section "Mounting" on page 6).
- Disconnect the negative terminal on the vehicle battery to prevent a short circuit.
- Connect audio input (low-level or high-level inputs). See the section "Low Level Input Wiring" or "High Level Input Wiring" on page 7.
- Make power connection on the subwoofer. See the section "Power Connection" on page 8.
- Recheck all connections to ensure correct and secure power/signal inputs.
- Set the input gain control (INPUT GAIN) to the minimum position.
- Reconnect the negative terminal on the vehicle battery.
- Turn on the head unit, then the subwoofer automatically turns on.
- Set the head unit volume to about 3/4 full level, then adjust the subwoofer's input gain control (INPUT GAIN) to just below the level of distortion.
- Fine tune the various controls on the subwoofer to obtain best results.
Important notes on input level control
- The input gain control (INPUT GAIN) is designed only to adjust the input level of the subwoofer in order to match the output level of your head unit. It is not a volume control!
- Never adjust the input level to maximum unless your input level requires it.
- Failure to notice these instructions will result in an input overload to the subwoofer and excessive audio distortion. It can also trigger protection mode, or may cause damage to the subwoofer or your speakers.
Protection Mode
When protection mode triggers, the red LED on the subwoofer turns on and the subwoofer shuts down.
One of the following reasons can trigger protection mode: input overload, short circuit and extremely high temperature.
When the red LED turns on, take the following measures.
- Check the system carefully to determine what has caused the protection mode to trigger.
- Reset the subwoofer. Turn off the subwoofer (by turning off the head unit or other audio source which feeds the subwoofer) and turn it on again.
- If the shut down was due to either an input overload or a short circuit, correct the conditions which cause the overload or short circuit then turn on the subwoofer again.
Mounting
See the section "Installation precautions" on page 3.
Before you drill or cut any holes, investigate your car's layout very carefully. Take special care when you work near the gas tank, fuel lines, hydraulic lines and electrical wiring.
Make sure there is sufficient air circulation around the intended mounting location.
Mount the subwoofer in the location away from moisture, and where connection cables are not pinched or damaged by sharp objects.
- Find a suitable location in the vehicle to mount the subwoofer. A typical location is under the front or rear seat of the vehicle, as shown below.
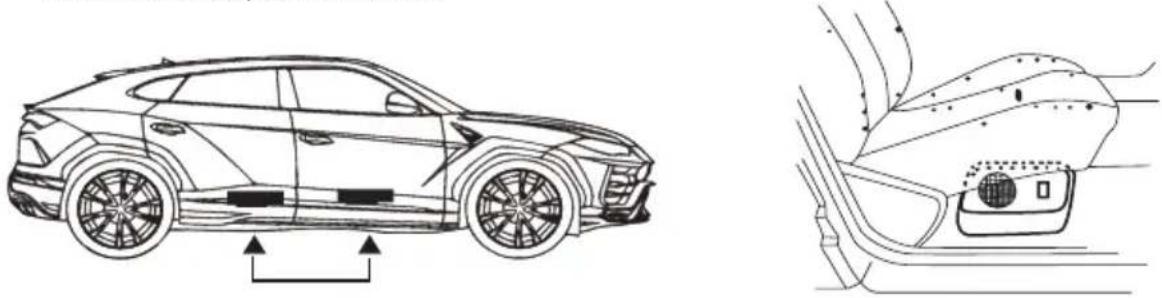
- Locate four screw holes on the bottom of the subwoofer. Then fix the correct end of a supplied bracket to the bottom of the subwoofer, using a supplied screw with flat point. Repeat the step to fix the other three supplied brackets to the bottom of the subwoofer.
- Ensure the subwoofer is correctly oriented and placed on the mounting surface. Secure the other end of a fixed bracket on the mounting surface, using a supplied screw with tapered point. Repeat the step to secure the other fixed brackets on the mounting surface. The mounting completes.
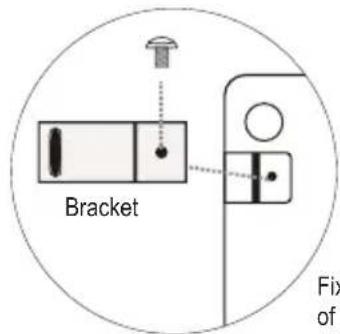
Fixed to the bottom of the subwoofer
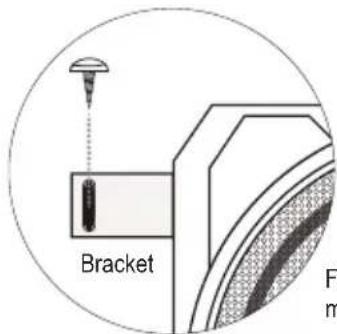
Fixed to the mounting surface
Wiring

See the section "Installation precautions" on page 3.
fety, disconnect the negative terminal of the vehicle battery prior to wiring.
Use only high quality wires for reliable installation to minimize signal or power loss.
Make sure wires are not squeezed or damaged by sharp edges. Use rubber bushings for penetrations.
Make sure all the cables are securely connected and bare wires are insulated with electric tape.
Reconnect the negative terminal of the vehicle only when all wire connections are correctly and securely made.
Low-Level Input Wiring
The subwoofer offers you two wiring alternatives for audio input from your head unit. Low-level input wiring is preferred for audio input. It provides an exceptional clean sound from the source unit.
Important! Do not connect both the high-level and low-level inputs from your head unit to the subwoofer at the same time.
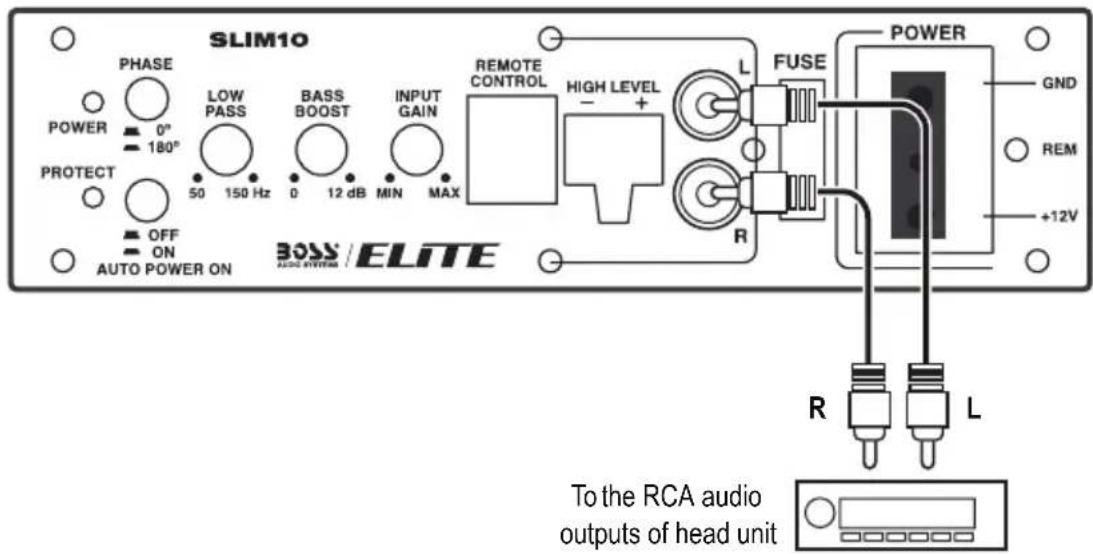
- Using RCA cables, connect two RCA jacks (L/R) on the subwoofer to the RCA audio outputs on your head unit. Make sure the left and right channels are correctly matched.
- To reduce the possibility of noise entering signal chain, use high-quality RCA cables for better insulation and run the RCA cables away from large wire loops, electric fan and power wires.
High-Level Input Wiring
The subwoofer offers you two wiring alternatives for audio input from your head unit. Use high-level input wiring for audio output only when your head unit does not have the RCA audio outputs for connection.
Important! Do not connect both the high-level and low-level inputs from your head unit to the subwoofer at the same time.
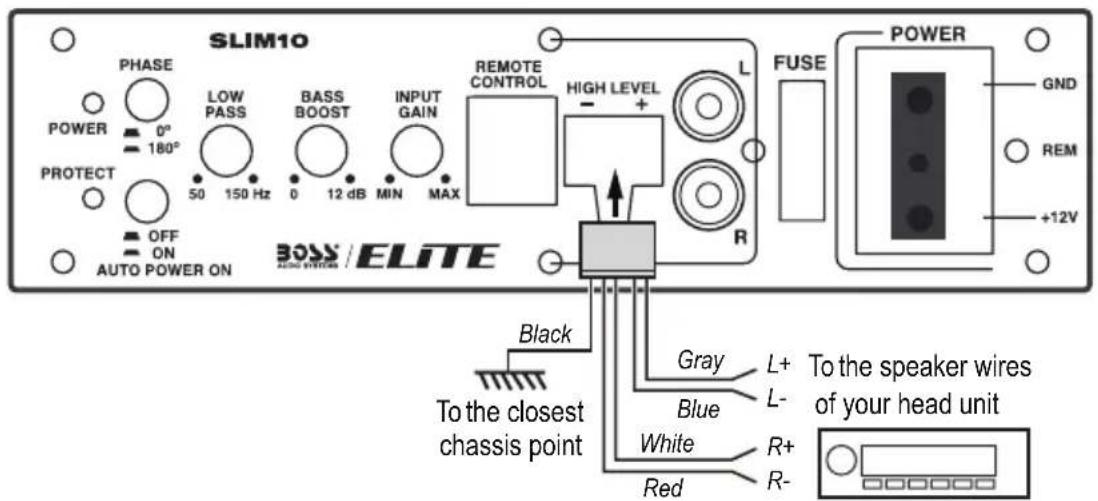
- Using the supplied high-level input wire harness, connect the black wire to the closest point on the metal frame (chassis) of your vehicle, and connect the other four colored wires to speaker output wires of your head unit. Make sure to observe speaker polarity.
- Make sure the speaker wires are securely connected and insulated with electric tape. Run the wires under the car mats for wire protection.
Power Connection
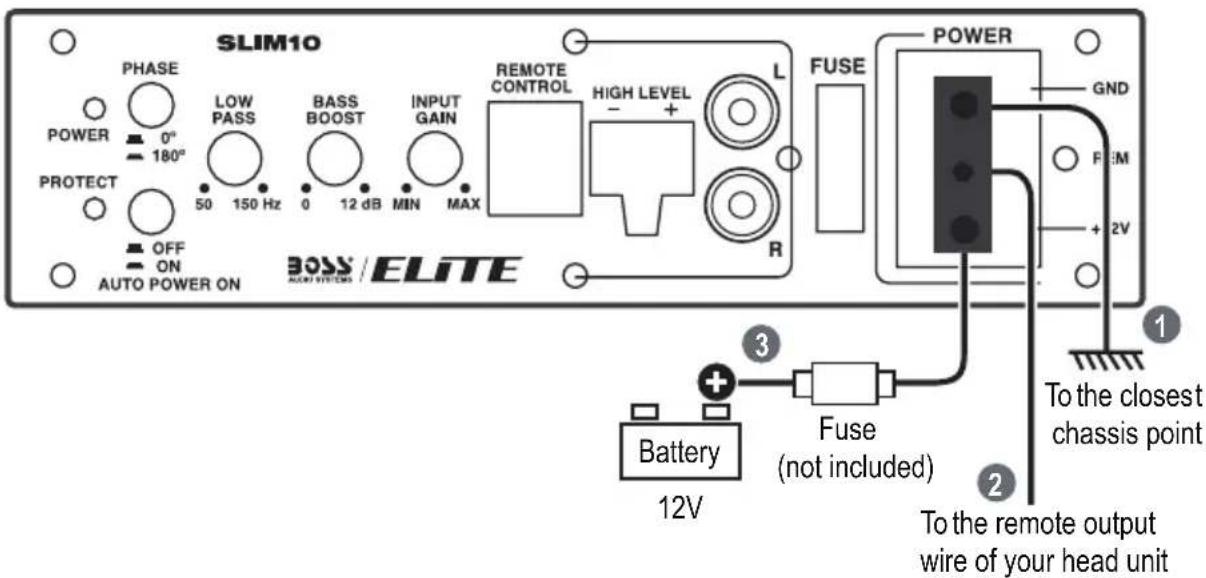
- Using an 8 gauge (or heavier) wire, connect the GND terminal on the subwoofer to the closest point on the metal frame (chassis) of your vehicle. Keep the ground wire less than 39" (100 cm) in length.
Make sure the chassis contact point of the ground wire is clean and secured on the chassis with a screw.
- Using a 16 gauge (or heavier) wire, connect the REM terminal on the subwoofer to the remote output wire of your head unit.
If high-level input connection is used, you do not need to connect the remote connection. With high-level input connection and auto power on feature is activated (using the AUTO POWER ON switch on the subwoofer), the subwoofer can be turned on or off automatically whenever the connected head unit is turned on or off.
Remote connection is used to automatically turn on or off the subwoofer every time the connected head unit is turned on or off.
If your head unit does not have the remote output wire, connect the REM terminal on the subwoofer to the ignition switch wire of your vehicle. In this case, make sure your head unit is also turned on or off with the operation of the ignition switch to avoid noise occurrence
- Using an 8 gauge (or heavier) wire, connect the +12V terminal on the subwoofer to the positive terminal of the 12V vehicle battery through a fuse (not included). Keep the fuse within 18" (45 cm) of the vehicle battery. It is important to connect the power supply through a fuse.
Subwoofer Level Control Connection
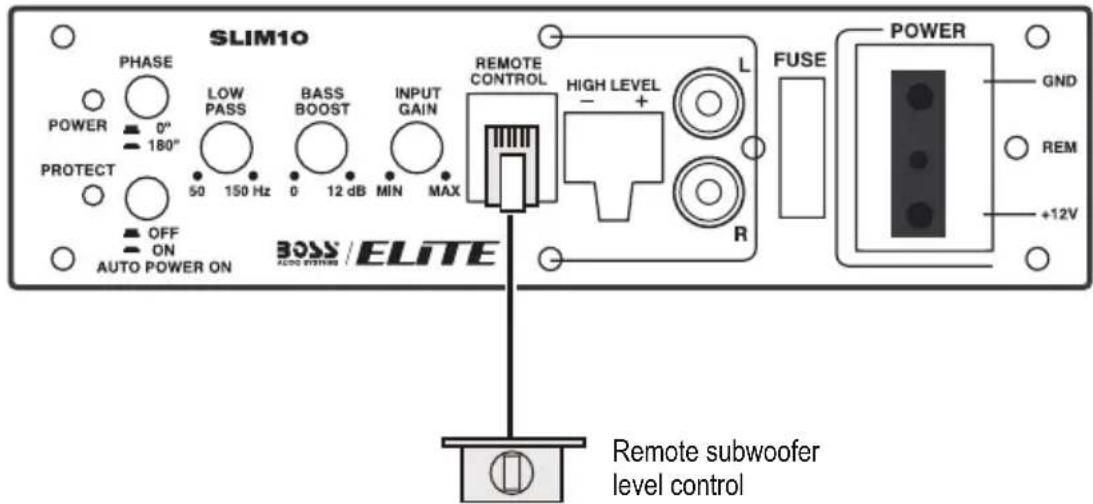
- Connect the supplied remote subwoofer level control to the REMOTE CONTROL on the subwoofer. Use this remote control to independently adjust sound level output of the subwoofer.
• Install the remote control securely under the dash or in a similar location where using it will not distract the driver.
Troubleshooting
If you have problems using this product, check the following points before you request service. If you still have a problem, contact our technical support.
| Problem Solution | |
| No power Check that the subwoofer is properly grounded (e.g. clean contact point on the chassis and secure ground connection). | |
| Protection/Red LED lights up | Turn down volume on your head unit to prevent overdriving. |
| Reset the subwoofer by turning it off and on again. If the protection still lights up, the subwoofer is faulty and needs servicing. | |
| No sound Check that audio input | input connection is correctly and securely made.If using low-level input connection, check the RCA cables are correctly and securely plugged.If using high-level input connection, check connection with the speaker wires of your head unit. |
| Low output Adjust the remote | subwoofer level control to increase sound level. |
| Input gain level is too low. Reset the input level control. | |
| Check the frequency pass filter settings. | |
| Hissing sound Disconnect audio | bio inputs (e.g. RCA cables) from the subwoofer and power on the subwoofer to find out the faulty/noisy component. |
| Try to set the head unit volume as high as possible (without distortion) and set the input gain level of the subwoofer as low as possible. | |
| Squealing noise Check for improperly grounded RCA interconnects. | |
| Distorted sound Check that the input gain control is set to match the output level of your head unit. Always try to set the input gain level as low as possible. | |
| Engine noise (static type) This is usually caused by poor quality RCA cables, which can pick up radiated noise. Use only the high quality RCA cables and route them away from the power cables, large wire loops and electric fan. | |
| Engine noise (alternator whine) | Check that the RCA grounds are not shorted to the vehicle chassis. |
| Check that your head unit is properly grounded. | |
| Subwoofer gets very hot Check | the minimum speaker impedance for the subwoofer is correct. |
| Check that there is good air circulation around the subwofoer. In some applications, it may be necessary to add an external cooling fan. | |
Specifications
Audio
Output power....1000 high output
Driver size.....10"
Speaker impedance....2.6Ω
Total harmonic distortion (THD)....<4%
Frequency response....20Hz - 150Hz
Signal-to-noise ratio......68dB
Input sensitivity.... 50mV (low level/RCA); 0.3V (high level)
Low pass filter (LPF).... 50Hz - 150Hz
Bass boost....0 to +12dB
Phase control....switchable between 0° and 180°
General
Power supply....12V DC (allowable 10-16V DC)
Current consumption .... max. 12A
Fuse....ATO type, 25A
PWM MOSFET power supply......yes
Protection circuitry.... yes (overload, short circuit, and thermal protection)
High-level inputs with auto power on.....yes (no need to have remote wire connection)
Remote turn-on/turn-off .... yes
Input gain control.....yes, variable
LED indicators .... green - power on; red - protection
Weight 10.36 lbs/ 4.7 kg
Dimensions.... 13.58" x 10.43" x 3.15" / 345 x 265 x 80 mm
Specifications are subject to change without notice.
BOSS Audio Systems
3451 Lunar Court - Oxnard, CA 93030
www.bossaudio.com
805-751-4853 Customer Service
Tech Support: www.bossaudio.com/support



- BOSS® AUDIO SYSTEMS
- IMPORTANT
- Table of Contents
- Introduction
- Package Contents
- Important safety precautions
- Installation precautions
- Care of the environment
- Panel Controls and Features
- Power terminals
- Fuse holder
- Low-level input (RCA input)
- High-level input (speaker level input)
- Remote level control port
- Input gain control
- Bass boost control
- Low pass filter (LPF)
- Auto power on
- Status indicators
- Phase control
- Subwoofer Setup Procedure
- Important notes on input level control
- Protection Mode
- Mounting
- Wiring
- Low-Level Input Wiring
- High-Level Input Wiring
- Subwoofer Level Control Connection
- Troubleshooting
- Specifications
- Audio
- General
Brand : BOSS
Model : Elite SLIM10
Category : Subwoofer