MP120 - Piano Kurzweil - Free user manual and instructions
Find the device manual for free MP120 Kurzweil in PDF.


| Product Type | Digital Piano |
| Keyboard | 88 weighted keys with touch sensitivity |
| Polyphony | Up to 64 voices |
| Sound Engine | Kurzweil Triple Strike Grand Piano samples |
| Number of Sounds | Over 300 including pianos, strings, organs, synths |
| Effects | Reverb, chorus, modulation, EQ |
| Song Recorder | 2-track MIDI recorder with playback |
| Metronome | Built-in with adjustable tempo and time signature |
| Connectivity | USB to host, MIDI in/out, audio in, headphone output |
| Speakers | 2 x 10W built-in stereo speakers |
| Pedals | 1 x sustain pedal input (optional triple pedal unit compatible) |
| Power Supply | AC adapter (12V DC, included) |
| Power Consumption | Approx. 15W |
| Dimensions (W x D x H) | Approx. 1310 x 300 x 130 mm |
| Weight | Approx. 12.5 kg |
| Maintenance | Clean with a soft, dry cloth; avoid liquids and direct sunlight |
| Safety | Use only supplied adapter; keep away from water |
| Spare Parts & Repairability | Contact authorized Kurzweil service center for parts and repairs |
| Included Accessories | AC adapter, sustain pedal, user manual |
| Compatible Stand | Optional KS-Series stand |
Frequently Asked Questions - MP120 Kurzweil
User questions about MP120 Kurzweil
0 question about this device. Answer the ones you know or ask your own.
Ask a new question about this device
Download the instructions for your Piano in PDF format for free! Find your manual MP120 - Kurzweil and take your electronic device back in hand. On this page are published all the documents necessary for the use of your device. MP120 by Kurzweil.
USER MANUAL MP120 Kurzweil
The lightning flash with the arrowhead symbol, within an equilateral triangle is intended to alert the user to the presence of uninsulated "dangerous voltage" within the product's enclosure that may be of sufficient magnitude to constitute a risk of electric shock to persons.

The exclamation point within an equilateral triangle is intended to alert the user to the presence of important operating and maintenance (servicing) instructions in the literature accompanying the product.
IMPORTANT SAFETY & INSTALLATION INSTRUCTIONS
INSTRUCTIONS PERTAINING TO THE RISK OF FIRE ELECTRIC SHOCK, OR INJURY TO PERSONS
WARNING: When using electric products, basic precautions should always be followed, including the following:
- Read all the Safety and Installation Instructions and Explanation of Graphic Symbols before using the product.
- This product must be grounded. If it should malfunction or break down, grounding provides a path of least resistance for electric current to reduce the risk of electric shock. This product is equipped with a power supply cord having an equipment-grounding conductor and a grounding plug. The plug must be plugged into an appropriate outlet which is properly installed and grounded in accordance with all local codes and ordinances.
DANGER: Improper connection of the equipment-grounding conductor can result in a risk of electric shock. Do not modify the plug provided with the product – if it will not fit the outlet, have a proper outlet installed by a qualified electrician. Do not use an adaptor which defeats the function of the equipment-grounding conductor. If you are in doubt as to whether the product is properly grounded, check with a qualified serviceman or electrician. - Do not use this product near water D for example, near a bathtub, washbowl, kitchen sink, in a wet basement, or near a swimming pool, or the like.
- This product should only be used with a stand or cart that is recommended by the manufacturer.
- This product, either alone or in combination with an amplifier and speakers or headphones, may be capable of producing sound levels that could cause permanent hearing loss. Do not operate for a long period of time at a high volume level or a level that is uncomfortable. If you experience any hearing loss or ringing in the ears, you should consult an audiologist.
- This product should be located so that its location or position does not interfere with its proper ventilation.
-
The product should be located away from heat sources such as radiators, heat registers, or other products that produce heat.
-
The product should be connected to a power supply only of the type described in the operating instructions or as marked on the product.
- This product may be equipped with a polarized line plug (one blade wider than the other). This is a safety feature. If you are unable to insert the plug into the outlet, contact an electrician to replace your obsolete outlet. Do not defeat the safety purpose of the plug.
- The power supply cord of the product should be unplugged from the outlet when left unused for a long period of time. When unplugging the power supply cord, do not pull on the cord, but grasp it by the plug.
- Care should be taken so that objects do not fall and liquids are not spilled into the enclosure through openings.
-
The product should be serviced by qualified service personnel when:
A. The power supply cord or the plug has been damaged;
B. Objects have fallen, or liquid has been spilled into the product;
C. The product has been exposed to rain;
D. The product does not appear to be operating normally or exhibits a marked change in performance;
E. The product has been dropped, or the enclosure damaged. -
Do not attempt to service the product beyond that described in the user maintenance instructions. All other servicing should be referred to qualified service personnel.
-
WARNING: Do not place objects on the product's power supply cord, or place the product in a position where anyone could trip over, walk on, or roll anything over cords of any type. Do not allow the product to rest on or be installed over cords of any type. Improper installations of this type create the possibility of a fire hazard and/or personal injury.
RADIO AND TELEVISION INTERFERENCE
WARNING: Changes or modifications to the instrument not expressly approved by Young Chang could void your authority to operate the instrument.
IMPORTANT: When connecting this product to accessories and/or other equipment use only high quality shielded cables.
NOTE: This instrument has been tested and found to comply with the limits for a Class B digital device, pursuant to Part 15 of the FCC Rules. These limits are designed to provide reasonable protection against harmful interference in a residential installation. This instrument generates, uses, and can radiate radio frequency energy and, if not installed and used in accordance with the instructions, may cause harmful interference to radio communications. However, there is no guarantee that interference will not occur in a particular installation. If this instrument does cause harmful interference to radio or television reception, which can be determined by turning the instrument off and on, the user is encouraged to try to correct the interference by one or more of the following measures:
- Reorient or relocate the receiving antenna.
- Increase the separation between the instrument and the receiver.
- Connect the instrument into an outlet on a circuit other than the one to which the receiver is connected.
- If necessary consult your dealer or an experienced radio/television technician for additional suggestions.
The normal function of this product may be disturbed by strong electro magnetic interference. If so, simply reset the product to resume normal operation by following the instruction manual. In case the function could not resume, please use the product in another location.
NOTICE
This apparatus does not exceed the Class B limits for radio noise emissions from digital apparatus set out in the Radio Interference Regulations of the Canadian Department of Communications.
AVIS
SAVE THESE INSTRUCTIONS
IMPORTANT SAFETY INSTRUCTIONS
1) Read these instructions.
2) Keep these instructions.
3) Heed all warnings.
4) Follow all instructions.
5) Do not use this apparatus near water.
6) Clean only with dry cloth.
7) Do not block any of the ventilation openings. Install in accordance with the manufacturer's instructions.
8) Do not install near any heat sources such as radiators, heat registers, stoves, or other apparatus (including amplifiers) that produce heat. Allow adequate ventilation for the power adapter. Do not hide it under a carpet or behind a curtain or place it in an enclosed space where heat buildup can occur. Do not defeat the safety purpose of the polarized or grounding-type plug. A polarized plug has two blades with one wider than the other. A grounding type plug has two blades and a third grounding prong. The wide blade or the third prong are provided for your safety. If the provided plug does not fit into your outlet, consult an electrician for replacement of the obsolete outlet.
9) Protect the power cord from being walked on or pinched, particularly at plugs, convenience receptacles, and the point where they exit from the apparatus.
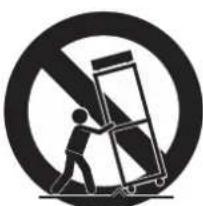
natural_image
Symbolic icon of a person pushing a cart with a diagonal line (no text or symbols)10) Only use attachments/accessories specified by the manufacturer.
11) Use only with a cart, stand, tripod, bracket, or table specified by the manufacturer, or sold with the apparatus. When a cart is used, use caution when moving the cart/ apparatus combination to avoid injury from tip-over.
12) Unplug this apparatus during lightning storms or when unused for long periods of time.
13) Refer all servicing to qualified service personnel. Servicing is required when the apparatus has been damaged in any way, such as power-supply cord or plug is damaged, liquid has been spilled or objects have fallen into the apparatus, the apparatus has been exposed to rain or moisture, does not operate normally, or has been dropped.
Warning: To reduce the risk of fire or electric shock, do not expose this apparatus to rain or moisture. Do not expose this equipment to dripping or splashing and ensure that no objects filled with liquids, such as vases, are placed on the equipment.
To completely disconnect this equipment from the AC Mains, disconnect the power supply cord plug from the AC receptacle.
Kurzweil International Contacts
Contact the appropriate Kurzweil office listed below to locate your local Kurzweil representative.
US Customers:
American Music & Sound
925 Broadbeck Dr #220 Newbury Park, CA 91320
Tel: 800-431-2609
Fax: 818-597-0411
Email: info@americanmusicandsound.com
Customers outside the US:
Young Chang Co., LTD.
196, Bongsu-daero, Seo-gu, Incheon, Korea
South Korea Tel: +82 32 570 1000
www.ycpiano.co.kr
www.youngchang.com

WWW
www.kurzweil.com

support@kurzweil.com

www.facebook.com/kurzweilmusicsystems/

www.twitter.com/KurzweilMusic

www.youtube.com/user/KurzweilTutorials
Contents
Chapter 1 Primary Features 7
Chapter 2 Assembly Instructions 8
Chapter 3 Left Panel 13
Chapter 4 Selecting a Voice ....14
Chapter 5 Using Layer Mode ......15
Chapter 6 Using Split/Dual Mode ......16
Chapter 7 X-Pose/Setting ....17
Chapter 8 Recording 21
Chapter 9 EDU/DEMO/USB Function 22
Chapter 10 Metronome/Rhythm Mode....23
Chapter 11 Pedal ......24
Chapter 12 MIDI....25
Chapter 13 Connectors....27
Chapter 14 Demo List ....28
Chapter 15 Sonatine/Rhythm List ......29
Chapter 16 Specifications ....30
Chapter 17 Product Warranty ....31
Installation Site and Precautions
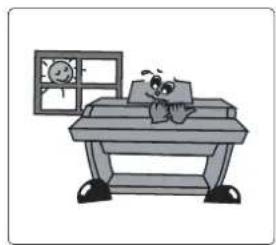
natural_image
Cartoon illustration of a person sleeping at a desk with a window and clock in the background (no text or symbols)- Avoid direct sunlight.
- Avoid excessive dusty or dirty location.
- Do not place near any heat sources such as radiators, heat registers, stoves, or other apparatus (including amplifiers) that produce heat.
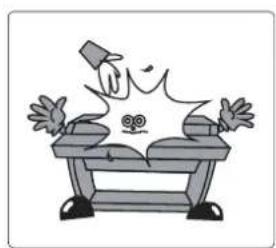
natural_image
Illustration of a person in a top hat using a steaming cup to smoke or smoke from a table, with no visible text or symbols.- Do not place objects, such as vases, glasses, and coffee cups, on the product.
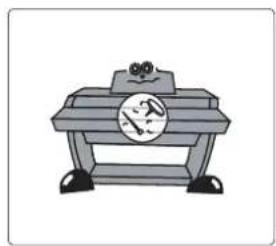
natural_image
Simple line drawing of a bench with a circular emblem on the side (no text or symbols)- Do not let paper, metallic, or other objects into the instrument.
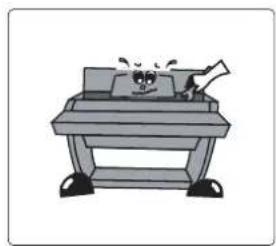
natural_image
Cartoon illustration of a smiling computer with legs and a stick, no text or symbols present- Do not open inside personally.
- When repair is needed, please contact the Kurzweil A/S center.
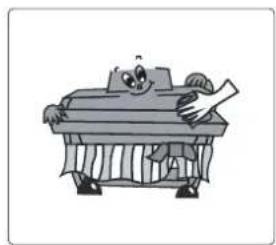
natural_image
Cartoon illustration of a character with a document, sitting at a desk (no text or symbols present)- Clean only with a soft, dry cloth. Do not use paint thinners, solvents, cleaning fluids, or chemical-impregnated wiping cloths.
Congratulations on your purchase of the MP120. You are certain to enjoy many hours exploring the variety of features as well as the 128 beautiful preset voices.
1. Primary Features
- 88-NOTE, Fully-Weighted, Graded Hammer-Action, 3-Point Sensor Keyboard
• 128 GM Voices - 5 x 7 Dot Matrix LCD Display
- Dual Mode
- Layer/Split Mode
- Transpose Function
• 256 Voice Polyphony - Favorite Button for Piano Voice
- Recording & Smart Recording Function
• 50 Built-in Demo Songs
• Built-in Learning Songs (Beyer, Czerny, Sonatina) - Built-in Sustain Pedal, Sostenuto Pedal and Soft Pedal (Half Pedal, String/Damper Resonance)
- Stereo Audio Input and Output
- Two Headphone Jacks
- "Plug & Play" USB MIDI, USB Audio
Instrument Description
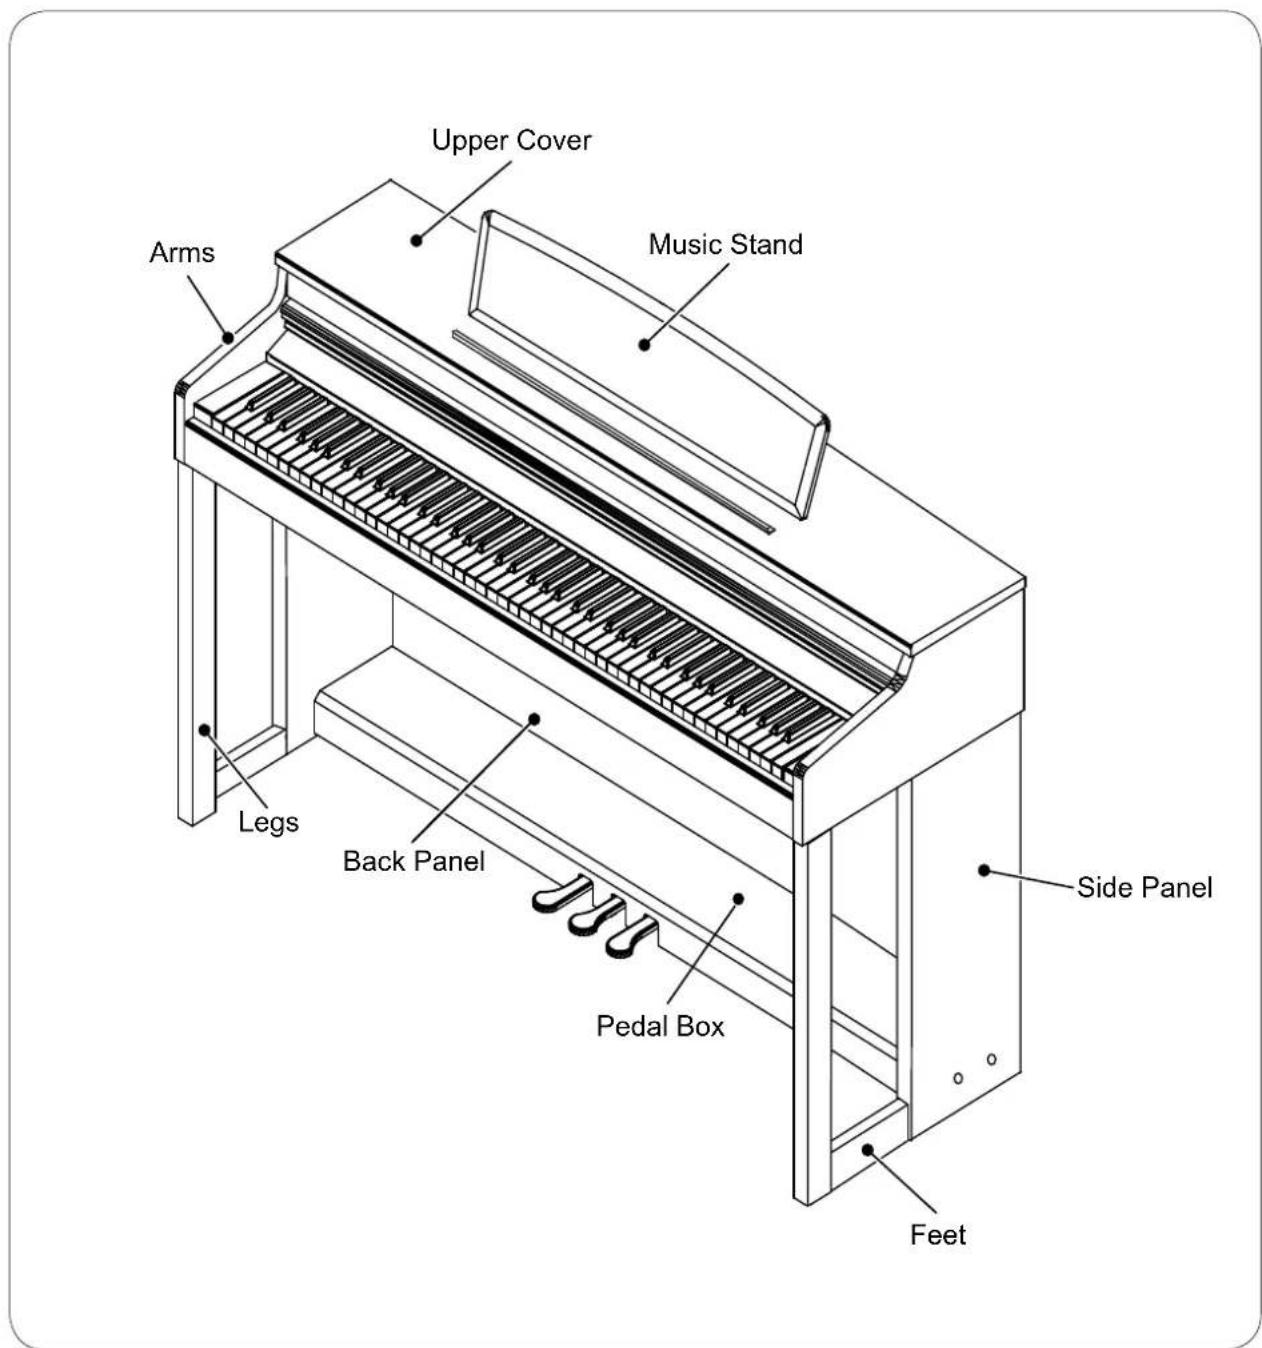
Components
① Piano Body x1
② Side Panel(Left) Stand x1
③ Side Panel(Right) Stand x1
④ Pedal Box x1
⑤ Back Panel x1
⑥ Side Panel(Left/Right) Stand & Piano Body Set Bolts x 4
⑦ Side Panel(Left/Right) Stand & Pedal Box Set Bolts x 4
⑧ Back Panel Set Bolts x 2
⑨ Side Panel & Back Panel Set Screws x6
⑩ Cable Clamps x 2
⑪ Pedal Box Supports x2
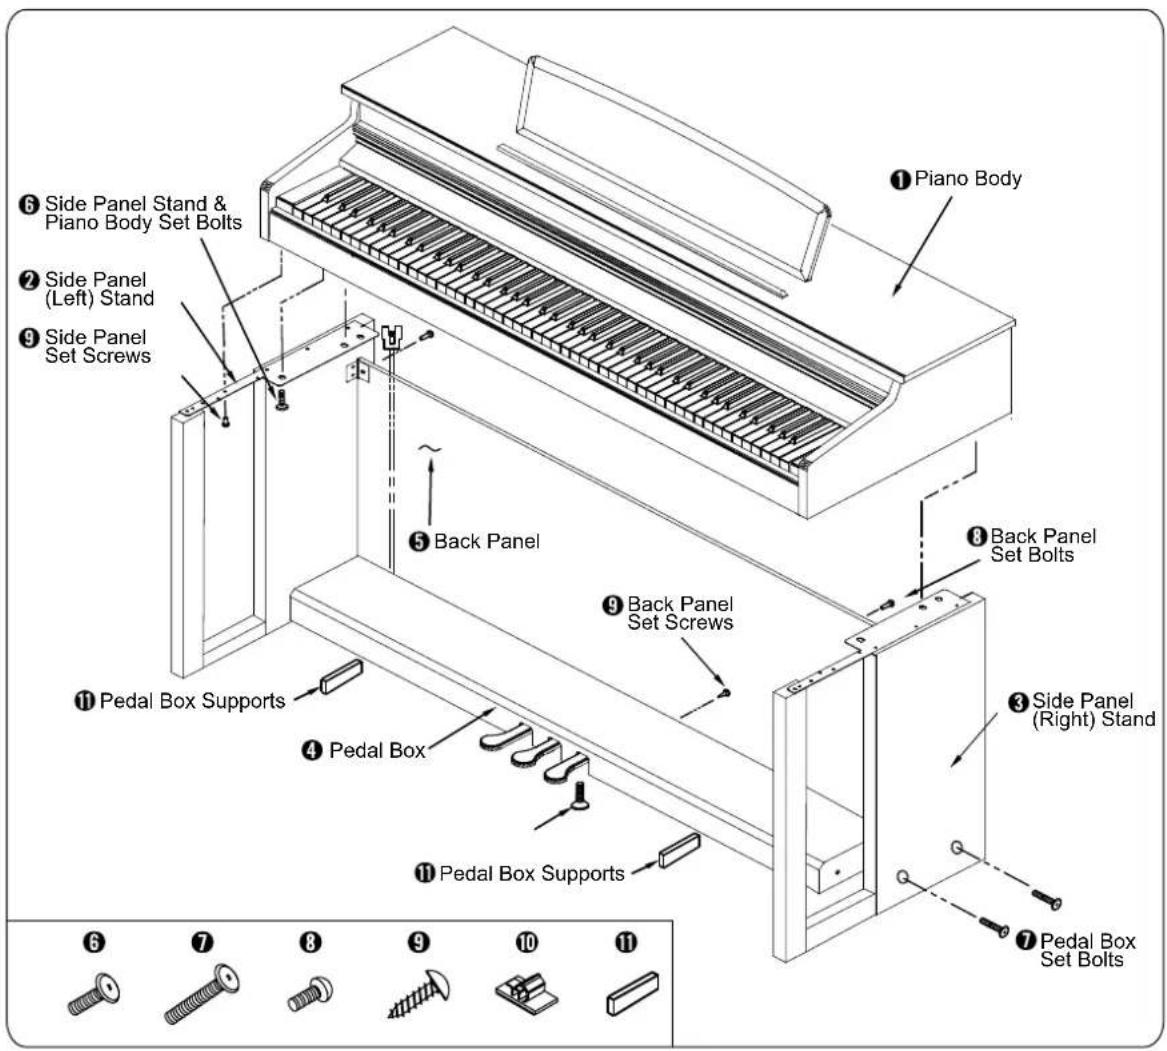
Carton Contents
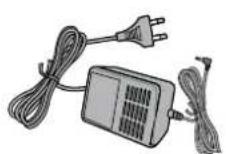
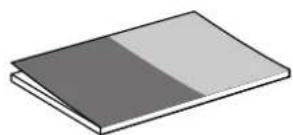
natural_image
Illustration of a closed book with two shades of gray pages (no text or symbols visible)
Assembling Left/Right Side Panel Stand
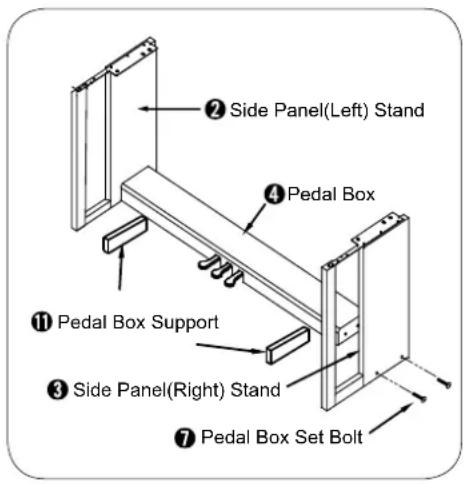
- Put the cable in the Pedal Box④ out.
- Starting with the left stand leg ^2 , place the Pedal Box ^4 on the Pedal Box Supports ^11 , align the holes in the Pedal Box ^4 with the holes in the Stand Leg, then thread the Pedal Box Set Bolts ^7 into the holes.
- Repeat with the right stand③ and tighten all bolts fully.
Assembling Back Panel
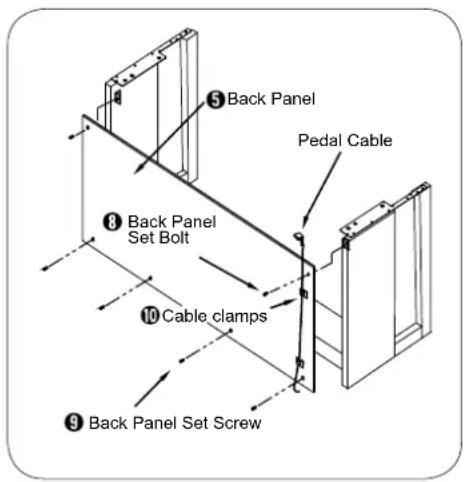
- Place the Back Pane ^5 on the assembled stand legs. Align the holes in the Back Panel ^5 with the bracket in the stand legs, then fasten them by using the Back Panel Set Bolts ^8 as shown.
- Attach the Pedal Bo④ to the bottom of the Back Panel⑤ and thread the Back Panel Set Screws⑨ into the 4 holes.
- After placing the Cable Clamp ^③ over the pedal cable, stick the clamps on the back panel to arrange the cable behind the Back Panel ^⑤
Caution!
Please arrange the pedal cable after completely assembling the back panel with the side panel and pedal box.
Assembly Instructions
Assembling Piano Body
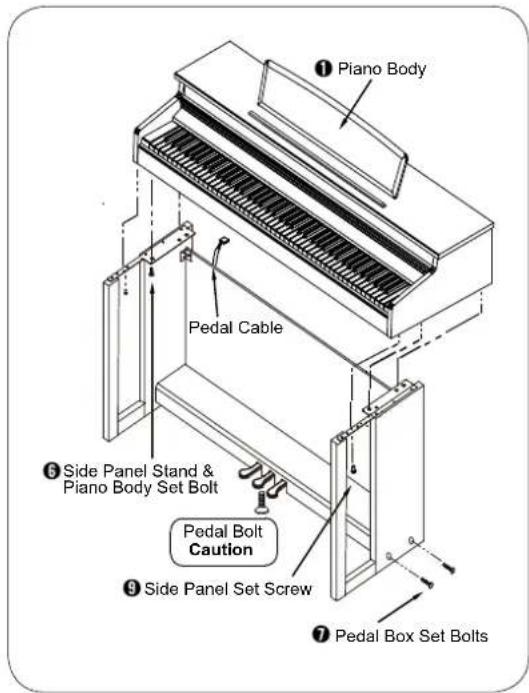
- After putting the Piano Body on each side of the stand, align the 4 holes in the stands with the holes in the bottom of the Piano Body.
Before tightening up the bolts, do not press down on the Piano Body or keys, as the body may fall forward.
-
Secure the Piano Body to the stand by tightening the Side Panel Stand & Piano Body Set Bolts⑥.
-
Thread the Side Panel Set Screw ^9 into the hole in the connecting bracket (front Stand).
How to connect Pedal Cable
natural_image
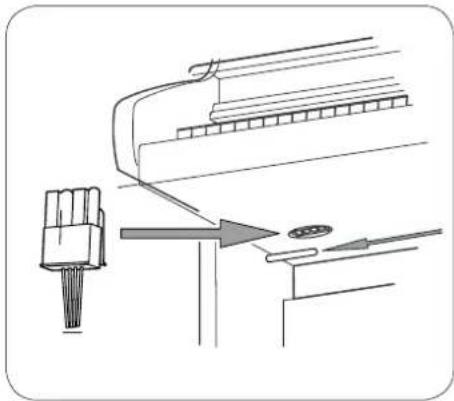
Technical line drawing of a mechanical assembly with a connector and directional arrow (no text or symbols)When the assembly is complete, connect the pedal cable to the port in the bottom of the piano body. Insert the connector until it makes a "tick" sound. If the connector is bent or is not completely connected, the Pedals will not work.
Caution!
Unless you loose the Pedal Bolt, it can be damaged.
After decide the place for the piano, loose the pedal bolt when it goes to the ground to avoid damaging the pedal box with playing the piano.
Caution!
Before moving the piano, make sure the pedal bolt below the pedals is not extended, otherwise the piano may be damaged when moved. Position the piano in the desired spot, then turn the pedal bolt until it touches the ground.
1. Power Connection
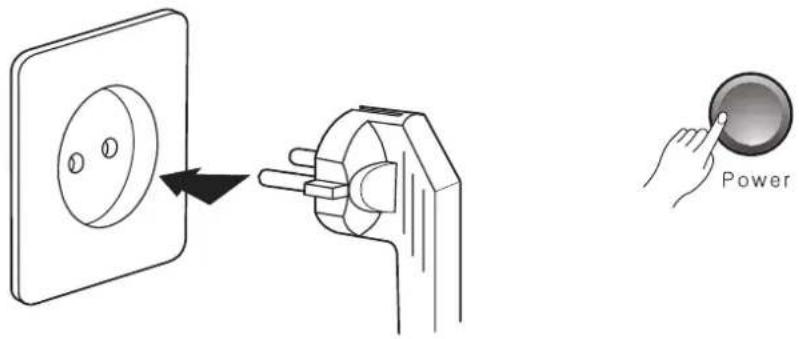
The AC plug shape will vary depending on location of use.
MP120 uses a free voltage(110V\~240V) power adaptor.
When the MP120 is set up, turn the power on. After a couple of seconds, the LCD screen will show the current state and the [Piano] button will light up. The MP120 is now ready to play.
2. Master Volume
natural_image
Simple diagram showing a large circle with a smaller inner circle, surrounded by dots and curved arrows (no text or symbols)VOLUME
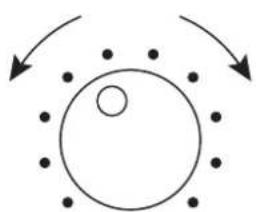
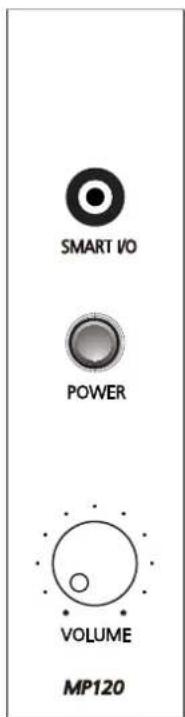
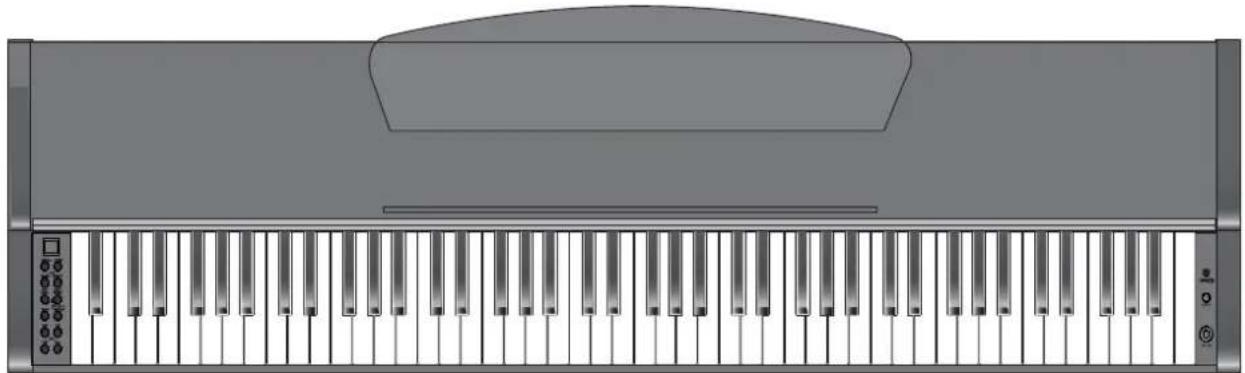
Volume Control is located on the right end of the keyboard. Turn this knob from left to right (clockwise) to increase the volume, or from right to left (counter-clockwise) to decrease the volume.
1. Main Button
natural_image
Top-down view of a piano keyboard with control buttons and keys (no text or symbols visible)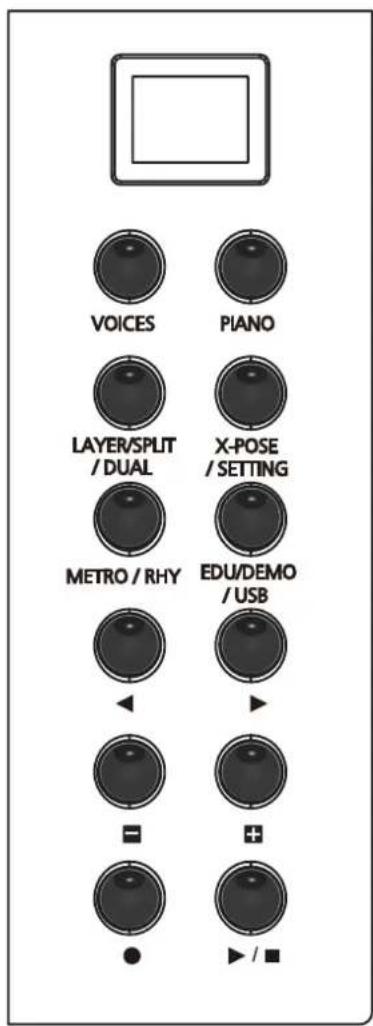
(1) [Voices] Button
This instrument features 128 exceptionally realistic voices in 16 instrument categories. When Voice mode is selected, a category can be selected by pressing the [◀] or [▶] buttons. Use the [-] or [+] buttons to select a voice within an instrument category.
(2) [Piano] Button
Press this button to select a piano voice at any time.
(3) [LAYER/SPLIT/DUAL] Button
Press the [LAYER/SPLIT/DUAL] button repeatedly to select each Mode. To return to Voices Mode, press the Voices Button.
(4) [X-POSE/SETTINGS] Button
You can use this button when you want to change the pitch of your instrument or to change the overall behavior of the entire instrument.
(5) [METRO/RHY] Button
Press the [MET/RHY] button to enter Metronome/Rhythm Mode. This mode allows you to select whether a Metronome and/or Rhythm will be played. You can select a rhythm or metronome pattern, and set the rhythm and Metronome tempo.
(6) [EDU/DEMO/USB] Button
Press this button to play educational songs, demo songs and MP3 songs saved in USB memory.
(7) [◀], [▶] button
These buttons allow you to select a category or a song by group.
(8) [-], [+] button
These buttons allow you to select a voice within a category. They can also be used to select other values within each mode.
(9) [●] RECORD Button
Press this button to record your performance in real time.
User songs are automatically stored.
(10) [▶/■] PLAY/STOP Button
Press this button to start or stop user songs, educational songs, demo songs and songs in the USB memory.
1. Selecting a Voice
Use of the [Voices] and [PIANO] buttons to select a Voice.
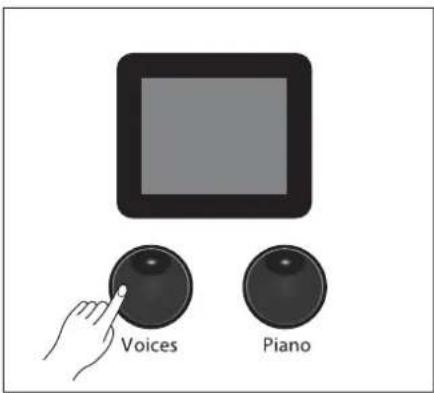
- Press the [Voices] button.
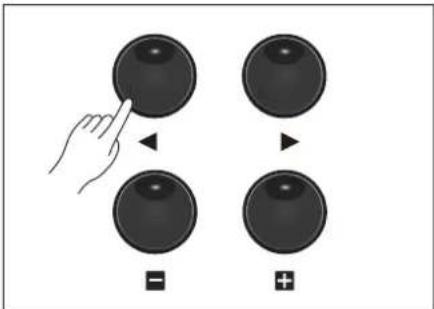
- Select a category of 16 instrument categories by using the [◀] or [▶] button. 8 voices are assigned for one category.
- After selecting a category, you can use the [-], [+] buttons to select a voice you desire to play in the current category.
If you want to play with a piano voice, press the [PIANO] Button. You can immediately select the "GRAND PIANO" sound (first voice) at any time.
The name of the selected voice will be displayed in the LCD screen.
2. GM Voice List
| NO | VOICES | Category | NO | VOICES | Category | NO | VOICES | Category | NO | VOICES | Category |
| 1 | Grand Piano | Piano | 33 | AC Bass | Bass | 65 | Soprano Sax | Reed | 97 | Rain | Synth Effects |
| 2 | Dynamic Piano | 34 | E. Bass 1 | 66 | Alto Sax | 98 | Soundtrack | ||||
| 3 | Electric Grand | 35 | E. Bass 2 | 67 | Tenor Sax | 99 | Crystal | ||||
| 4 | Honky-tonk | 36 | Fretless Bass | 68 | Baritone Sax | 100 | Atmosphere | ||||
| 5 | Electric Piano1 | 37 | Slap Bass 1 | 69 | Oboe | 101 | Brightness | ||||
| 6 | Electric Piano2 | 38 | Slap Bass 2 | 70 | English Horn | 102 | Goblins | ||||
| 7 | Harpsichord | 39 | Synth Bass 1 | 71 | Bassoon | 103 | Echoes | ||||
| 8 | Clavi | 40 | Synth Bass 2 | 72 | Clarinet | 104 | Sci-fi | ||||
| 9 | Celesta | Chromatic Percussion | 41 | Violin | Strings | 73 | Piccolo | Pipe | 105 | Sitar | Ethnic |
| 10 | Glockenspiel | 42 | Viola | 74 | Flute | 106 | Banjo | ||||
| 11 | Music Box | 43 | Cello | 75 | Recorder | 107 | Shamisen | ||||
| 12 | Vibraphone | 44 | Contrabass | 76 | Pan Flute | 108 | Koto | ||||
| 13 | Marimba | 45 | Tremolo Strings | 77 | Blown Bottle | 109 | Kalimba | ||||
| 14 | Xylophone | 46 | Pizzicato Strings | 78 | Shakuhachi | 110 | Bag pipe | ||||
| 15 | Tubular Bells | 47 | Orchestral Harp | 79 | Whistle | 111 | Fiddle | ||||
| 16 | Dulcimer | 48 | Timpani | 80 | Ocarina | 112 | Shanai | ||||
| 17 | Drawbar Organ | Organ | 49 | String Ensemble 1 | Ensemble | 81 | Square Lead | Synth Lead | 113 | Tinkle Bell | Percussive |
| 18 | Perc Organ | 50 | String Ensemble 2 | 82 | Sawtooth Lead | 114 | Agogo | ||||
| 19 | Rock Organ | 51 | SynthStrings 1 | 83 | Calliope | 115 | Steel Drums | ||||
| 20 | Church Organ | 52 | SynthStrings 2 | 84 | Chiff | 116 | Woodblock | ||||
| 21 | Reed Organ | 53 | Choir Aahs | 85 | Charang | 117 | Taiko Drum | ||||
| 22 | Accordion | 54 | Voice Oohs | 86 | Voice Lead | 118 | Melodic Tom | ||||
| 23 | Harmonica | 55 | Synth Voice | 87 | Fifths Lead | 119 | Synth Drum | ||||
| 24 | Tango Accordion | 56 | Orchestra Hit | 88 | Bass&Lead | 120 | Reverse Cymbal | ||||
| 25 | Nylon Guitar | Guitar | 57 | Trumpet | Brass | 89 | New age Pad | Synth Pad | 121 | Guitar Fret Noise | Sound Effects |
| 26 | Steel Guitar | 58 | Trombone | 90 | Warm Pad | 122 | Breath Noise | ||||
| 27 | Jazz Guitar | 59 | Tuba | 91 | Polysynth Pad | 123 | Seashore | ||||
| 28 | Electric Guitar | 60 | Muted Trumpet | 92 | Choir Pad | 124 | Bird Tweet | ||||
| 29 | Muted Guitar | 61 | French Horn | 93 | Bowed Pad | 125 | Telephone Ring | ||||
| 30 | Ovd Guitar | 62 | Brass Section | 94 | Metalic Pad | 126 | Helicopter | ||||
| 31 | Dist Guitar | 63 | SynthBrass 1 | 95 | Halo Pad | 127 | Applause | ||||
| 32 | Guitar harmonics | 64 | SynthBrass 2 | 96 | Sweep Pad | 128 | Gunshot |
Using Layer Mode
Layer Mode allows you to layer two different voice sounds on the keyboard.
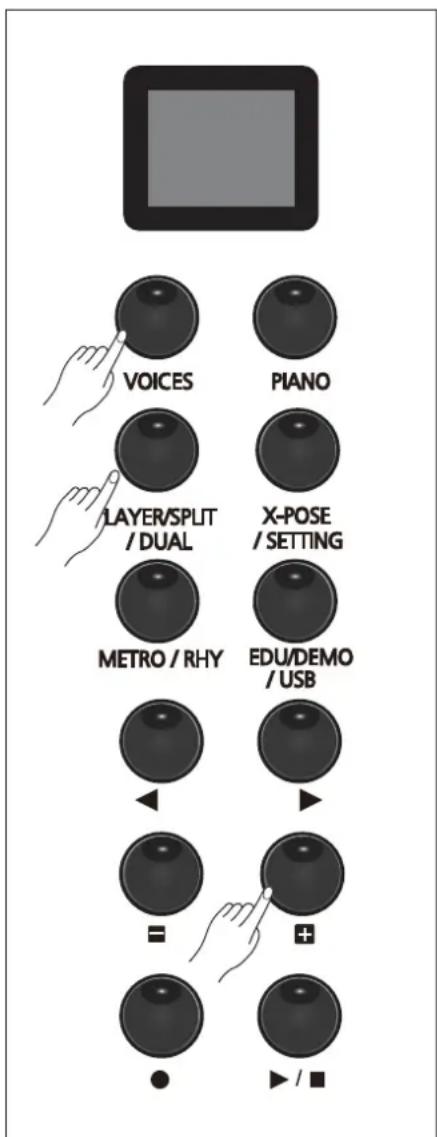
Select a basic voice you want to use by pressing the [Voices] or [PIANO] button, then use the [◀], [▶] or [-], [+] buttons to select a category and voice.
Press the [LAYER/SPLIT/DUAL] button, then select another voice by using the [◀], [▶] or [-], [+] buttons to layer with the basic voice.
The LCD display will show the second voice's name.
Layer Volume
Press and hold the [LAYER/SPLIT/DUAL] button for 3 seconds. LCD display will show the Layer Volume value.
You can adjust the value by using the [-] and [+] buttons. When you finish the adjustment, press the [LAYER/SPLIT/DUAL] button again. You don't need to press and hold it.
Default Layer Volume: 80
Adjustable Volume Range: 10\~120
Using Split Mode
Split Mode allows you to split the keyboard into two regions containing two different voice sounds, with adjustable split point.
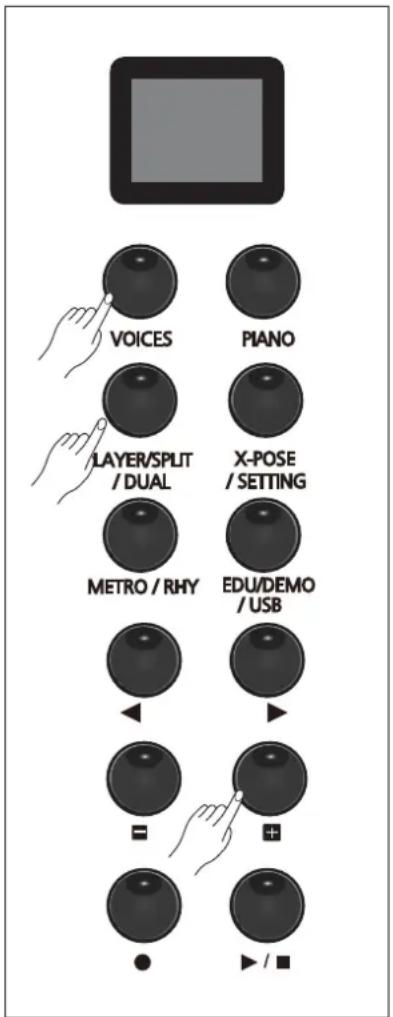
Select a basic voice you want to use for the right hand region of the keyboard by pressing the [Voices] or [PIANO] button, then use the [◀], [▶] or [-], [+] buttons to select a category and voice.
Press the [LAYER/SPLIT/DUAL] button twice to select Split mode, then select another voice for the left region by using the [◀], [▶] or [-], [+] buttons.
The default Split Point is F#3. The Split Point will be the highest note of the left region of the keyboard.
Split Volume
To control the volume, press and hold the [LAYER/SPLIT/DUAL] button for 3 seconds after splitting the keyboard. LCD display will show the Split Volume value.
You can adjust the value by using the [-] and [+] buttons.
When you finish the adjustment, press the [LAYER/SPLIT/DUAL] button again. You don't need to press and hold it.
Default Split Volume: 90
Adjustable Volume Range: 10\~120
Split Point
To set the Split Point, press and hold the [LAYER/SPLIT/DUAL] button for 3 seconds. LCD display will show the Split Point. Use the [◀], [▶] buttons to select a Split Point setting. When you finish the setting, press the [LAYER/SPLIT/DUAL] button again. You don't need to press and hold it.
Using DUAL Mode
Dual Mode allows you to split the keyboard into two regions, each transposed to the same range for 4-hand use (ideal for duets or instructors and students).
Press the [LAYER/SPLIT/DUAL] button 3 times. LCD display will show "DUAL".
The keyboard regions in Dual Mode are split at the E4 key.
In Dual Mode, the left pedal functions as sustain for the left region, the right pedal functions as sustain for the right region.
X-Pose/Setting Button
Transpose
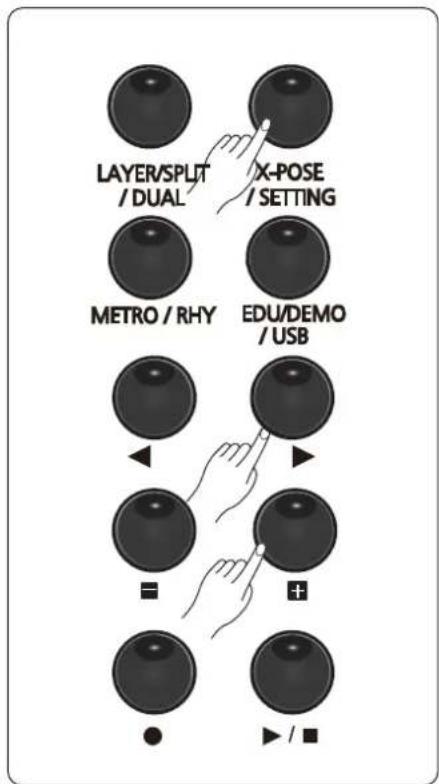
If you want to change the pitch of the instrument, press the [X-POSE/SETTING] button once. LCD display will show the current Transposition value.
To transpose up and down by octave intervals, press the[◀], [▶] buttons. Press the [-] or [+] buttons to transpose the MP120 keyboard down or up by one semitone.
Transposition Value Range: -24 \~ 0 \~ +24
| 1 Style Volume |
| 2 Accompaniment |
| 3 Chord Mode |
| 4 Reverb |
| 5 Chorus |
| 6 Effect Level |
| 7 Mic Effect Level |
| 8 Touch |
| 9 | Demo Repeat |
| 10 | String Resonance |
| 11 | Damper Resonance |
| 12 | Temperaments |
| 13 | Tune |
| 14 | Auto Power Off |
| 15 | Reset & Version |
| 16 | MP3 Playback Setting |
Using Setting Mode
Press the [X-POSE/SETTING] button twice to enter Setting mode.
The parameters in the table above are available in numeric order in Setting mode.
Use the [◀] , [▶] buttons to select each parameter. When you find the parameter you desire, press the [-] or [+] buttons to adjust the setting of the parameter.
If you want to adjust another parameter, use the [◀] , [▶] buttons.
To exit Setting mode, press the [X-POSE/SETTING] button again.
All settings are remembered across power cycles.
1. Style Volume
This function will adjust the accompaniment volume, so as to keep an appropriate balance between the accompaniment volume and the voice volume.
In Setting mode, select "RHYTHE VOL" by pressing the [◀] , [▶] buttons, then control the volume by pressing the [-] or [+] buttons.
The volume range is from 0 (minimum) to 100 (maximum). The default volume setting is 70.
2. Accompaniment
You can turn on/off the automatic accompaniment.
In Setting mode, select "ACCOMP" by pressing the [◀] , [▶] buttons, then turn on/off the accompaniment by pressing the [-] or [+] buttons.
The default setting is “Acc On”, which means you are ready to start the automatic accompaniment. If the LCD display shows “Acc Off”, the accompaniment is turned off and only rhythm pattern will be played.
3. Chord Mode
While playing your keyboard with a rhythm accompaniment, you can select the way to recognise the chords.
You can use one of the three options: One Finger/ 3 Finger/ Full range
In Setting mode, select "CHORD MODE" by pressing the [◀], [▶] buttons, then select one by pressing the [-] or [+] buttons.
4. Reverb
You can control the level of the Reverb.
In Setting mode, select "REVERB TYPE" by pressing the [◀], [▶] buttons, then select a Reverb Type by pressing the [-] or [+] buttons.
The default value is 1.
You can adjust the Reverb Type to the following settings: 0, 1, 2, 3, 4, 5
5. Chorus
In this operation, piano sound can be played in three-dimensions as if it sings in chorus.
In Setting mode, select "Chorus TYPE" by pressing the [◀], [▶] buttons, then select a Chorus Type by pressing the [-] or [+] buttons.
The default value is 0.
You can adjust the Chorus Type to the following settings: 0, 1, 2, 3, 4.
6. Effect Level
You can adjust the Effect Level.
In Setting mode, select "Effect Level" by pressing the [◀], [▶] buttons, then control the Effect Level by pressing the [-] or [+] buttons.
You can adjust the effect level from 0 to 127. The default value is 15.
7. MicEffect Level
MicEffect feature will give you a reverb effect when singing with a microphone.
In Setting mode, select "Mic Reverb" by pressing the [◀], [▶] buttons, then control the Mic Reverb by pressing the [-] or [+] buttons.
You can adjust the effect level from 0 to 127. The default setting is 0.
8. Touch
You can adjust the keyboard touch sensitivity to your playing technique.
In Setting mode, select "TOUCH" by pressing the [◀], [▶] buttons, then select a Touch setting by pressing the [-] or [+] buttons.
The default setting is N3.
You can adjust the Touch setting to the following settings:
S1(Soft1), S2(Soft2), S2(Soft3)
N1(Normal1), N2(Normal2), N3(Normal3)
H1(Hard1), H2(Hard2), H3(Hard3)
9. Demo Loop
You can set the repeat options for demo songs.
In Setting mode, select "DEMO MODE" by pressing the [◀], [▶] buttons, then select a DEMO PLAY setting by pressing the [-] or [+] buttons.
The default setting is "ALL Repeat".
Demo Loop Setting
1) No: Demo song will automatically be stopped after the current song is finished.
2) One: Repeat only a selected demo song.
3) All: Repeat all demo songs continuously in order.
10. String Resonance
You can simulate sympathetic string resonance in an acoustic piano.
In Setting mode, select "STR,RESO" by pressing the [◀] , [▶] buttons, then control the String Resonance level by pressing the [-] or [+] buttons.
You can adjust the resonance level from 0 (no effect) to 50. The default setting is 0 String Resonance.
11. Damper Resonance
This pedal function performs the same function as the damper pedal on an acoustic piano, letting you sustain the sound of voices even after releasing the keys.
In Setting mode, select "DAM, RESO" by pressing the [◀] , [▶] buttons, then control the Damper Resonance level by pressing the [-] or [+] buttons.
You can adjust the resonance level from 0 (no effect) to 120. The default setting is 0 Damper Resonance.
12. Temperament
You can change Temperament.
In Setting mode, select "TEMPERATE" by pressing the [◀] , [▶] buttons, then select a Temperament type by pressing the [-] or [+] buttons.
You can adjust the Temperament from 1 to 7. The default setting is 1.
Temperament Type
- Equal 2. Pythagorean 3. Pure Major 4. Pure Minor
- Meantone 6. Werckmeister 7. Kimberger
13. Tune
You can tune the pitch of your instrument to match other instruments.
In Setting mode, select "Tuning" by pressing the [◀] , [▶] buttons, then select a Tuning value by pressing the [-] or [+] buttons.
The tuning setting range is "427 - 440 - 453". The default setting is 440.
14. Auto Power Off
"Auto Power Off" is an energy-saving feature that will automatically shut off power to the unit after a period of inactivity. When the Auto Power Off is set to On, the MP120 will automatically power off after the Power Off time(4 hours) has expired.
In Setting mode, select "Auto Power" by pressing the [◀], [▶] buttons, then select "On" or "Off" by pressing the [-] or [+] buttons.
The default setting is "On".
15. Reset & Version
In Setting mode, select "RESET&VER" by pressing the [◀], [▶] buttons, then the LCD displays the currently installed S/W(Software) version.
In this state, if you press the [-] or [+] buttons, you will see "Do You Want To Reset?" on the screen.
To perform the Reset function, press the [-], [+] buttons again. If you want to cancel the Reset, press the [Setting] Button.
16. MP3 Playback Setting
The MP3 USB playback function uses some of the MP120's 256 voices of polyphony. To gain more voices of polyphony for instrument sounds, the MP3 function can be disabled.
This setting is not restored by the 'Reset' operation.
In Setting mode, select "MP3 MODE" by pressing the [◀], [▶] buttons, then the LCD screen will show "On" or "Off", depending on the current setting.
In this state, if you press the [-] or [+] buttons, you will see "MP3 MODE=ON" or "MP3 MODE=OFF" on the screen.
Then, if you press the [-] or [+] buttons, you will see "MP3 ON Please Reboot" or "MP3 Off Please Reboot(If you need to reset DSP). If you do not need to reset, you will see On/Off state.
Note
If Reset is needed, when "Please Reboot" is shown, the actual operation works after turning off and on the keyboard again.
With the easy-to-use song recording features, you can record your own keyboard performances as a user song.
By recording your performance with various voices, you can improve your playing skill or composing and arranging skills.
Furthermore, you can enjoy playing with a previously recorded song.
1. Recording a Song
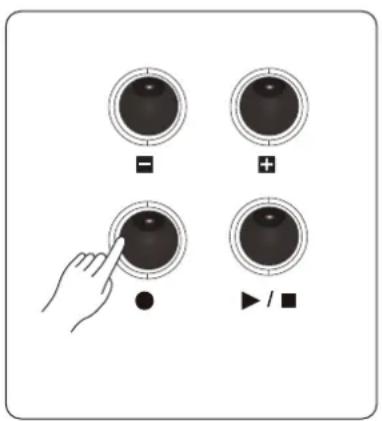
1) If you press the [Record] button, one bar of the Metronome will play before recording begins. Then, Recording will start.
2) Press the [Record] button again to stop recording.
3) To play the recording, press the [PLAY/STOP] button.
4) Press the [PLAY/STOP] button again to stop the playback.
2. Erasing a User Song
1) Press the [Record] button for 2-3 seconds. The LCD display will show "Clear", then the user song will be erased.
2) If you restart recording, recording a new song will replace the previously recorded user song.
Playing a Learning Song
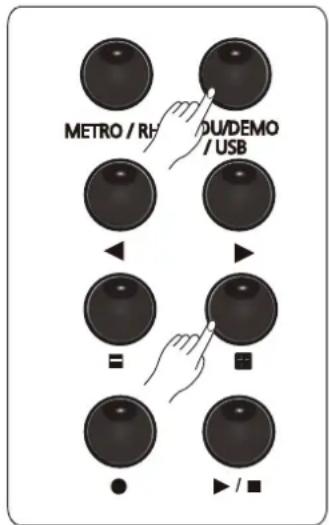
1) Press the [EDU/DEMO/USB] Button once.
2) Select a teaching material by pressing the [◀] , [▶] buttons.
3) You have a choice among Beyer or Czerny 100/30/40, Sonatina.
4) Select a song you want to play by pressing the [-], [+] buttons or specific keyboard keys.
The [PLAY/STOP] Button will blink when the playback is ready to start.
5) Press the [PLAY/STOP] Button to play the learning song you choose.
6) Press the [PLAY/STOP] Button again to stop the song.
■ Left/Right Part Learning
1) Press the [EDU/DEMO/USB] Button for 2\~3 seconds to enter the Left/Right selection mode.
2) Use the[◀] , [▶] buttons to select a part you want to play.
ALL PLAY: Play all parts(Left and Right parts).
RIGHT PLAY: Play only right-hand part.
LEFT PLAY: Play only left-hand part.
■ To Practice Left/Right Part
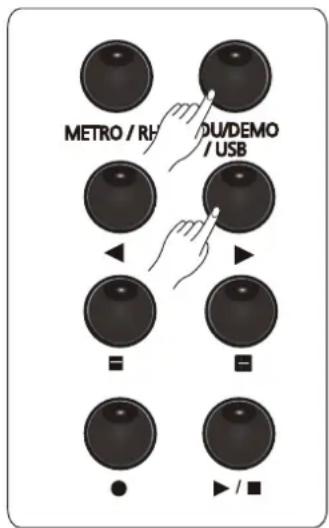
In Education mode, if you press the [EDU/DEMO/USB] Button for 2\~3 seconds, you can enter the Left/Right selection mode. You can also change the tempo by pressing the [-], [+] buttons. To return to the default tempo, press the [-], [+] buttons simultaneously.
Playing a Demo Song
1) Press the [EDU/DEMO/USB] Button twice. The first Demo Song name is displayed in the LCD screen.
2) The [PLAY/STOP] Button will blink. (While playing, it goes off. But when stop the playing, it blinks again.)
3) Select a demo song you desire by using the [◀], [▶] buttons or [-], [+] buttons.
4) To skip forward/backward 10 songs, use the[◀], [▶] buttons.
5) To select the previous or next song, use the [-], [+] buttons.
See the Setting Button chapter for more details on Demo Loop.
Demo Loop Setting
No: Demo song will automatically be stopped after the current song isished.
One: Repeat only a selected demo song.
All: Repeat all demo songs continuously in order.
Playing an MP3 song in USB
Connect USB memory(The files should be MP3 or MIDI format.) to your keyboard.
(MP120 works only on FAT32 file systems.)
1) Press the [EDU/DEMO/USB] Button three times.
2) Select a song you desire by using the [◀], [▶] buttons or [-], [+] buttons.
3) The selected song name is displayed in the LCD screen.
4) To skip forward/backward 10 songs, use the◀, [▶] buttons.
To select the previous or next song, use the[-], [+] buttons. (Press the [PLAY/STOP] Button to play or stop.)
Metronome/Rhythm Mode
Metronome or Rhythm
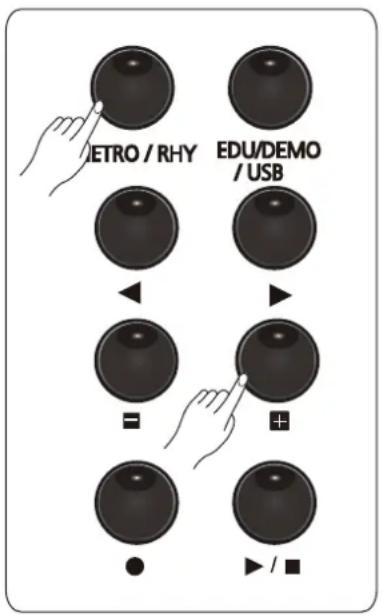
To select Metronome or Rhythm, press the [METRO/RHY] Button once or twice respectively.
The [PLAY/STOP] Button will blink when Metronome or Rhythm is ready to start.
Now you can play Metronome or Rhythm by pressing the [PLAY/STOP] Button.
■ Selecting Metronome or Rhythm
Use the [◀], [▶] buttons to select Time Signature for Metronome or Rhythm Pattern.
The LCD will display the name of rhythm pattern for Rhythm mode or of time signature for Metronome mode.
Selecting the Tempo
You can change the Metronome or Rhythm tempo by pressing the [-], [+] buttons.
The LCD will display the Tempo value.
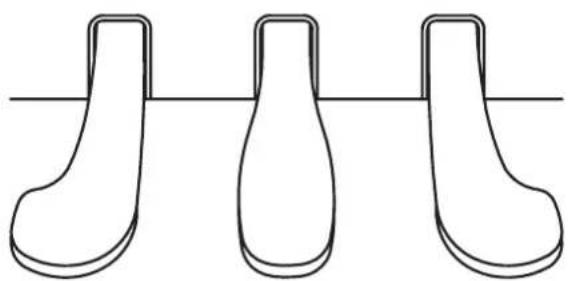
The three pedals of the MP120 function like the pedals of a Grand Piano.
Pedal Type
natural_image
Three identical stylized shoe-shaped objects aligned horizontally on a horizontal line (no text or symbols)Soft Pedal Sostenuto Pedal Sustain Pedal
-
Soft Pedal - When the soft pedal is pressed, all notes played on the keyboard will have a softer effect.
-
Sostenuto Pedal - When the sostenuto pedal is pressed, keys held before you step on the pedal will sustain after they are released, until the pedal is released.
-
Sustain Pedal - When the sustain pedal is pressed, notes sustain longer. Releasing the pedal immediately stops any sustained notes.
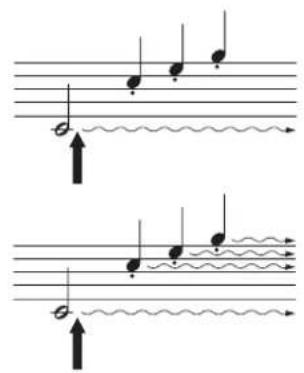
■ Half Pedal
The half pedal function of the sustain pedal emulates the behavior of an acoustic piano's sustain pedal by gradually increasing the sustain time of each note as the pedal is pressed down, before becoming fully sustained when the pedal is fully pressed down.
Note
If you are having problems with using your pedal, please check the connection between the Piano body and Pedal box. (see Page 11 for more details.)
MIDI is the acronym for Musical Instrument Digital Interface. It is the industry standard protocol which allows the exchange of musical data between electronic musical instruments, devices (such as a sequencer), and computers.
MIDI Channels
MIDI protocol transmits multiple channels of MIDI performance data. Typical MIDI instruments can play up to 16 channels at the same time. Each channel can be assigned its own Program.
MIDI Connection
In addition to the conventional MIDI In and Out ports, MP120 has a USB port. You can connect the MP120 directly to a computer with a USB cable.
To use the MP120 as a MIDI device with a computer, use the MP120's USB Type-B USB port.
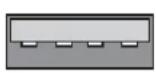
Type A

Type B
MIDI Implementation Chart
Manufacturer:
YOUNG CHANG Co, LTD.
Date : 2015.2.15
Version 1.0
| Function | Transmitted | Recognized | Remarks | |
| Basic Channel | DefaultChanged | 1ch1-16ch | ALL1-16ch | |
| Mode | DefaultMessagesAltered | ××********** | 33× | |
| NoteNumber | Note:True voice | 0—127********** | 0—1270—127 | |
| Velocity | Note onNote off | ○9nH,V=1-127×(9nH,V=0) | ○9nH,V=1-127○(9nH,V=0;8nH,V=0-127) | |
| AfterTouch | key'sCh's | ×× | ×× | |
| Pitch Bend | × | ○ | ||
| Control Change | 0156710116465666780819193120121123 | ○××○○×○○××○○×○○×○○×○○○○○○○○○○○○○○○○○○○○○○○○○○○○○○○○○○○○○○○○○○○○○○○○○○○○○○○○○○○○○○○○○○○○○○○○○○○○○○○○○○○○○○○○○○○○○○○○○○○○ ○○○○○○○○○○○○○○○○○○○○○○○○○○○○○○○○○○○○○○○○○○○○○○○○○○○○○○○○○○○○○○○○○○○○○○○○○○○○○○○○○○○○○○○○○○○○○○○○○○○○-127 | ||
| ProgramChange | :true | ○********** | ○0—127 | |
| System Exclusive | × | ○ | ||
| System Common | :SongPosition:Song Select:Tune | ××× | ××× | |
| System Real Time | :Clock:Commands | ○×*1 | ××*1 | |
| Aux Messages | :LOCAL ON/OFF:Active sense:Reset | ×○× | ×○○ | |
| Notes: | ||||
• Mode 1: OMNI ON, POLY
• Mode 3: OMNI OFF, POLY
○: YES
• Mode 2: OMNI ON, MONO
• Mode 4: OMNI OFF, MONO
×: NO
1. Headphone
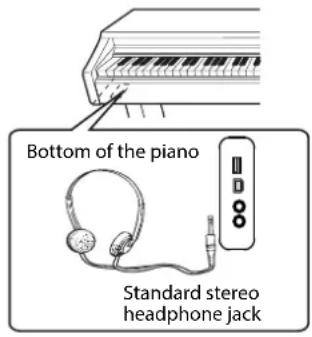
The headphone jacks are located on the bottom left of keyboard. The headphone jacks are compatible with 1/8-inch stereo plugs. Two pairs of headphones can be used simultaneously.
To avoid the risk of hearing loss when using headphones, please do not play the piano with a high volume level for a long time.
2. Audio In
Connect the audio output of an MP3/CD player or other audio Source to the stereo RCA IN jacks on the rear panel. (To connect an MP3 player with a 1/8-inch cable, use the Smart I/O port on the front right panel.)
The INPUT Jack accepts a 1/4-inch plug for connecting a microphone. Use the GAIN control to adjust the level of the INPUT signal.
3. Audio Out
Audio Out ports can be used to transmit the audio signal of the piano to a keyboard amplifier, stereo sound system, mixing console or tape recorder.
When you connect an audio speaker, please ensure that the volume has been set to the
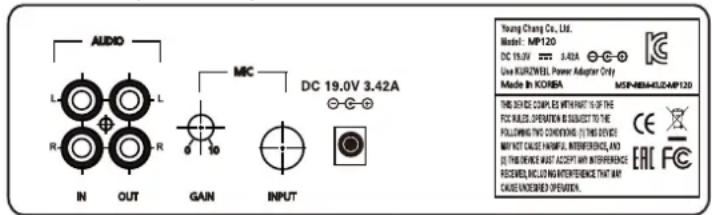
minimum level.
4. Smart Recording(I/O)
Connect the Smart Recording cable to the Smart I/O port on the right panel of your keyboard, then connect the cable with your smartphone. Now you can record the piano sound on your smartphone with the recording function.
When you play the contents of your smartphone, you can hear them through the amp of MP120.
- Depending on the smartphone manufacturers, Smart Recording function cannot be supported for every device. The Smart Recording cable has a 4-Pole plug.
Note
When you connect the Smart Recording cable, please ensure that the volume is set to the minimum level or is turned off because noise can suddenly be produced.
| 1 | Prelude I BWV 846 | J.S Bach | |
| 2 | Invention No.4 | J.S Bach | |
| 3 | Invention No.8 | J.S Bach | |
| 4 | BMV 847 | Prelude II BWV 847 | J.S Bach |
| 5 | ARIA Goldenberg - Variationen BMW 988 | J.S Bach | |
| 6 | BMV 848 | Fuga II (A3 VOCI) | J.S Bach |
| 7 | Op36, No4 | Sonatine Op.36 No.4 | M.Clementi |
| 8 | K15v | Klavierstuck K. 15v | W.A.Mozart |
| 9 | K333 | Piano Sonate K.333 1st mov. | W.A.Mozart |
| 10 | K485 | Rondo in D-dur K.485 | W.A.Mozart |
| 11 | Piano Sonate K.331 Rondo Turkish March | W.A.Mozart | |
| 12 | K545 | Piano Sonate K.545 1st mov. | W.A.Mozart |
| 13 | Minuette in G | L.v. Beethoven | |
| 14 | Bagatelle No.25 Fur Elise | L.v. Beethoven | |
| 15 | Op55,No. 1 | Sonatine Op.55 No.1 | Fr.Kuhlau |
| 16 | March Militaire Op.51 No.1 | F.P Schubert | |
| 17 | Op94 - 3 | Momentts Musicaux 3. | F.P Schubert |
| 18 | Op90 - 2 | Impromptu Op.90 No.2 | F.P Schubert |
| 19 | Op90 - 4 | Impromptu Op.90 No.4 | F.P Schubert |
| 20 | La chevaleresque | J.F Buramu ler | |
| 21 | Op38,No. 2 | Without words song Op.38 No.2 | J.L.F. Mendelssohn |
| 22 | Op30,No. 6 | Venetianisches Zgondellied | J.L.F. Mendelssohn |
| 23 | KK lvb-10 | Sostenuto | F.F Chopin |
| 24 | KK lvb-11 | Valse KK IVB - 11 | F.F Chopin |
| 25 | Op.7. No.1 | 5 Mazurkas | Op.7 No.1 | F.F Chopin |
| 26 | Op.69 - 2 | Valse Op.69 No.2 | F.F Chopin |
| 27 | Op18 | Grande Valse Brillante Op.18 | F.F Chopin |
| 28 | Valse Op.64. No.2 | F.F Chopin | |
| 29 | Op9. No.2 | Noctutne Op.9 No.2 | F.F Chopin |
| 30 | Op64. No.1 | Valse Op.64. No.1 | F.F Chopin |
| 31 | Op64. No.15 | Preludes in Db Maior Op.28 No.15 | F.F Chopin |
| 32 | Op66 | Fantaisie-Impromptu Op.66 | F.F Chopin |
| 33 | Op15-7 | Traumerei | R. Schumann |
| 34 | Frolicher Landmann Op.68 - 10 | R. Schumann | |
| 35 | Op15 | Von fremden Landern und Menschen Op.1 | R. Schumann |
| 36 | Liebestraume Nr.3 | F. Liszt | |
| 37 | Dolly's Dreaming And Awakening | T. Oesten | |
| 38 | Op410 | Fryhlings stimmen Op.410 | J. Strauss |
| 39 | The Swan | Saint-Saens | |
| 40 | Blumenlied | G. lange | |
| 41 | Valsette | F. Borowski | |
| 42 | Op39, No.16 | Old French Air | P.I.Tchaikovsky |
| 43 | Op39, No.10 | Mazurka | P.I.Tchaikovsky |
| 44 | Polka | P.I.Tchaikovsky | |
| 45 | Barcarolle | P.I.Tchaikovsky | |
| 46 | Op101 - 7 | Humoreska | A. Dvor A k |
| 47 | Op46 - 3 | Suite Peer Gynt Op.46-3 Anitras Tanz | E. Grieg |
| 48 | L75 | Suite Bergamasque Prelude | C.A. Debussy |
| 49 | Reverie | C.A. Debussy | |
| 50 | Arabesque | C.A. Debussy |
Sonatine/Rhythm List
Sonatine List
| F. KUHLAU Number W. A. MOZART | |
| OP.20 NO.1-1 | 1 |
| OP.20 NO.1-2 | 2 |
| OP.20 NO.1-3 | 3 |
| OP.20 NO.2-1 | 4 |
| OP.20 NO.2-2 | 5 |
| OP.20 NO.2-3 | 6 |
| OP.20 NO.3-1 | 7 |
| OP.20 NO.3-2 | 8 |
| OP.20 NO.3-3 | 9 |
| OP.55 NO.1-1 | 10 |
| OP.55 NO.1-2 | 11 |
| OP.55 NO.2-1 | 12 |
| OP.55 NO.2-2 | 13 |
| OP.55 NO.2-3 | 14 |
| OP.55 NO.3-1 | 15 |
| OP.55 NO.3-2 | 16 |
| M. CLEMENTI Number | |
| OP.36 NO.1-1 | 17 |
| OP.36 NO.1-2 | 18 |
| OP.36 NO.1-3 | 19 |
| OP.36 NO.2-1 | 20 |
| OP.36 NO.2-2 | 21 |
| OP.36 NO.2-3 | 22 |
| OP.36 NO.3-1 | 23 |
| OP.36 NO.3-2 | 24 |
| OP.36 NO.3-3 | 25 |
| OP.36 NO.4-1 | 26 |
| OP.36 NO.4-2 | 27 |
| OP.36 NO.4-3 | 28 |
| OP.36 NO.5-1 | 29 |
| OP.36 NO.5-2 | 30 |
| OP.36 NO.5-3 | 31 |
| OP.36 NO.6-1 | 32 |
| OP.36 NO.6-2 | 33 |
| J. HAYDN Number | |
| HOB.16-35-1 | 34 |
| HOB.16-35-2 | 35 |
| HOB.16-35-3 | 36 |
| Number | |
| K.545-1 | 37 |
| K.545-2 | 38 |
| K.545-3 | 39 |
| L. V. BEETHOVEN Number | |
| OP.49 NO.2-1 | 40 |
| OP.49 NO.2-2 | 41 |
| OP.49 NO.1-1 | 42 |
| OP.49 NO.1-2 | 43 |
| J. L. DUSSEK Number | |
| OP.20 NO.1-1 | 44 |
| OP.20 NO.1-2 | 45 |
Rhythm List
Rhythm List
Press the [METRO/RHY] Button for 2\~3 seconds.
Use the [◀], [▶] buttons to select the rhythm pattern you want.
| No | Rhythm |
| 1 | Pop euro |
| 2 | 90s Dance |
| 3 | Kick dance |
| 4 | 80s Pop |
| 5 | Techno Rock |
| 6 | Country |
| 7 | Beguine |
| No | Rhythm |
| 8 | Bossa nova |
| 9 | Blues |
| 10 | Jazztet |
| 11 | Rock & Roll |
| 12 | Soca |
| 13 | Lounge |
| 14 | Waltz |
| Keyboard 88-NOTE, Fully-Weight, Graded Hammer-Action, 3-Point Sensor Keyboard | |
| Exterior Color Rosewood, White, Mahogany | |
| Appearance Pattern | |
| Voice Type Stereo PCM | |
| Polyphony 256 Polyphony | |
| Voice 128 GM | |
| Rhythm 14 Styles (Auto Accompaniment), 6 Metronome Rhythms | |
| Function SPLIT, LAYER, DUAL | |
| Learning Songs Beyer, Czerny 100/30/40, Sonatine | |
| Demo 50 Demo Songs | |
| Recording Record, Start/Stop (20,000 Notes) | |
| Pedal | Soft Pedal, Sostenuto Pedal, Sustain Pedal (Half-Pedal, String/Damper Resonance) |
| Display 5 x 7 Dot Matrix | |
| Additional Functions | Mater Volume, Transpose, Metronome, Tune |
| Connection Terminal | Headphone x2, SMART I/O, Aux Input, Aux Out, USB Audio, USB MIDI, MIC In, MIC Vol. |
| Generating Capacity | 25W X 25W |
| Power Consumption | 50W |
| Speaker | 4 WAY SYSTEM (5 x 7" WOOFER X 2, 1" TWEETER X 2) |
| Dimensions | 1400 x 432 x 850 (W x D x H) |
| Weight | 52Kg (114lb) |
NOTE
KURZWEIL
- IMPORTANT SAFETY & INSTALLATION INSTRUCTIONS
- RADIO AND TELEVISION INTERFERENCE
- NOTICE
- AVIS
- SAVE THESE INSTRUCTIONS
- IMPORTANT SAFETY INSTRUCTIONS
- Kurzweil International Contacts
- US Customers:
- Customers outside the US:
- Contents
- Installation Site and Precautions
- Primary Features
- Instrument Description
- Components
- Carton Contents
- Assembling Left/Right Side Panel Stand
- Assembling Back Panel
- Caution!
- Assembly Instructions
- Assembling Piano Body
- How to connect Pedal Cable
- Power Connection
- Master Volume
- Main Button
- Selecting a Voice
- GM Voice List
- Using Layer Mode
- Layer Volume
- Using Split Mode
- Split Volume
- Split Point
- Using DUAL Mode
- X-Pose/Setting Button
- Transpose
- Using Setting Mode
- Style Volume
- Accompaniment
- Chord Mode
- Reverb
- Chorus
- Effect Level
- MicEffect Level
- Touch
- Demo Loop
- Demo Loop Setting
- String Resonance
- Damper Resonance
- Temperament
- Temperament Type
- Tune
- Auto Power Off
- Reset & Version
- MP3 Playback Setting
- Note
- Recording a Song
- Erasing a User Song
- Playing a Learning Song
- Playing a Demo Song
- Playing an MP3 song in USB
- Metronome/Rhythm Mode
- Metronome or Rhythm
- ■ Selecting Metronome or Rhythm
- Pedal Type
- ■ Half Pedal
- MIDI Channels
- MIDI Connection
- MIDI Implementation Chart
- Headphone
- Audio In
- Audio Out
- Smart Recording(I/O)
- Sonatine/Rhythm List
- Rhythm List
- KURZWEIL
Brand : Kurzweil
Model : MP120
Category : Piano