R-5T - Loudspeaker TVLogic - Free user manual and instructions
Find the device manual for free R-5T TVLogic in PDF.


| Product Type | Professional LCD Rack-Mountable Monitor |
| Model | TVLogic R-5T |
| Display Size | 5.5 inches |
| Resolution | 1920 x 1080 (Full HD) |
| Pixel Pitch | 0.0213 (W) x 0.0639 (H) mm |
| Color Depth | 16.7 million colors (8-bit) |
| Viewing Angle | 160° horizontal / 160° vertical (typical) |
| Luminance | 500 cd/m² (center typical) |
| Contrast Ratio | 1000:1 |
| Inputs | 1 x HDMI, 2 x BNC SDI (12G-SDI x1, 3G-SDI x1) |
| Outputs | 2 x BNC SDI (12G-SDI x1, 3G-SDI x1), HDMI to SDI conversion |
| Supported SDI Formats | 12G/6G/3G/HD/SD-SDI up to 2160p60 |
| Audio | Embedded audio, stereo audio out via phone jack |
| Power Supply | DC 12V, 2.9A (adapter supplied) |
| Power Consumption | Approximately 35W |
| Operating Temperature | 0°C to 45°C (32°F to 113°F) |
| Storage Temperature | -20°C to 60°C (-4°F to 140°F) |
| Dimensions (main body) | 439 x 87.5 x 118.7 mm (17.28 x 3.44 x 4.67 in) |
| Weight (main body) | 2.9 kg (6.4 lbs) |
| Mounting | Rack-mountable (kit included) |
| Key Features | Waveform/Vectorscope, Focus Assist, Marker overlays, 3D LUT support, UMD, Tally |
| Accessories Included | DC power adapter, rack-mountable kit |
| Warranty | Refer to manufacturer's warranty policy |
Frequently Asked Questions - R-5T TVLogic
User questions about R-5T TVLogic
0 question about this device. Answer the ones you know or ask your own.
Ask a new question about this device
Download the instructions for your Loudspeaker in PDF format for free! Find your manual R-5T - TVLogic and take your electronic device back in hand. On this page are published all the documents necessary for the use of your device. R-5T by TVLogic.
USER MANUAL R-5T TVLogic
LCD RACK MOUNTABLE MONITOR
# Operation manual_V1.7_200428

natural_image
Front view of a rectangular electronic device with three panels and control buttons (no text or symbols)| R-5T
| R-7D
CONTENTS
01 CAUTION 04p
02 MAIN FEATURES 06p
03 CONTROLS & FUNCTIONS 07p
04 MENU TREE & ADJUSTMENT 10p
05 MENU OPERATIONS 11p
[1] PICTURE 12p
[2] COLOR 13p
[3] MARKER 16p
[4] VIDEO 18p
[5] WAVEFORM 21p
[6] AUDIO 23p
[7] SYSTEM/GPI/UMD 24p
06 BUTTON FUNCTIONS 30p
07 OTHER FUNCTIONS 31p
08 VIDEO SUPPORT RESOLUTION 42p
09 PRODUCT SPECIFICATION 43p
01 CAUTION
- Always use set voltage. (DC 12V MAX 6A)
- When using a DC Adapter other than the one supplied by the manufacturer, please be advised that the adapter with DC 12V/3A \~ 6A can be compatible with the monitor.
- All operating instructions must be read and understood before the product is operated.
• These safety and operating instructions must be kept in safe place for future reference. - All warnings on the product and in the instructions must be observed closely.
- All operating instructions must be followed.
- Do not use attachments not recommended by the manufacturer. Use of inadequate attachments can result in accidents.
- This product must be operated on a power source specified on the specification label.
- If you are not sure of the type of power supply used in your home, consult your dealer or local power company. For units designed to operate on batteries or another power source, refer to the operating instructions.
- The power cords must be routed properly to prevent people from stepping on them or objects from resting on them. Check the cords at the plugs and product.
- In case of using other 12V DC adapters instead of the standard adapter provided by the manufacturer, please check the proper load capacity (or current capacity) and use an adapter with stable voltage.
- Do not overload DC outlets or extension cords. Overloading can cause or electric shock.
-
Never insert an object into the product through vents or openings. High voltage in the product, and inserting an object can cause electric shock and/or short internal parts. For the same reason, do not spill water or liquid on the product.
-
Do not attempt to service the product yourself. Removing covers can expose you to high voltage and other dangerous conditions. Request a qualified service person to perform servicing.
- If any of the following conditions occurs, unplug the power cord from the DC outlet, and request a qualified service person to perform repairs.
a. When the power cord or plug is damaged.
b. When a liquid was spilled on the product or when objects have fallen into the product.
c. When the product has been exposed to rain or water.
d. When the product does not operate properly as described in the operating instructions. Do not touch the controls other than those described in the operating instructions.
Improper adjustment of controls not described in the instructions can cause damage, which often requires extensive adjustment work by a qualified technician.
e. When the product has been dropped or damaged.
f. When the product displays an abnormal condition.
Any noticeable abnormality in the product indicates that the product needs servicing.
- In case the product needs replacement parts, make sure that the service person uses replacement parts specified by the manufacturer, or those with the same characteristics and performance as the original parts. Use of unauthorized parts can result in fire, electric shock and/or other danger.
- Upon completion of service or repair work, request the service technician to perform safety checks to ensure that the product is in proper operating condition.
- When mounting the product on a wall or ceiling, be sure to install the product according to the method recommended by the manufacturer.
- Unplug the power cord from the DC outlet before cleaning the product. Use a damp cloth to clean the product. Do not use liquid cleaners or aerosol cleaners.
- Unplug the power cord from the AC outlet if you do not use the product for considerably long time.
01 CAUTION
- Do not use the product near water, such as bathtub, washbasin, kitchen sink and laundry tub, swimming pool and in a wet basement.
- Keep the product away from direct rays of the Sun-light.
- Do not place the product on an unstable cart, stand, tripod or table. Placing the product on an unstable base can cause the product to fall, resulting in serious personal injuries as well as damage to the product. Use only a cart, stand, tripod, bracket or table recommended by the manufacturer or sold with the product. When mounting the product on a wall, be sure to follow the manufacturer's instruction. Use only the mounting hardware recommended by the manufacturer.
- When relocating the product placed on a cart, it must be moved with the utmost care.
- The power cord plug shall be connected to a MAINS socket outlet with a protective earthing connection.
-
Infrared devices can cause noise or malfunction under condition as below.
-
parts of the body come into contact with the infrared transmitter or acoustic device.
- Obstacles can cause electrical changes if there is a partition in the middle or in the wall.
-
Exposure to radio interference from medical equipment, microwave ovens, wireless LAN devices, etc. with the same frequency band.
-
Unplug the power cord from the AC outlet when happening any problem in the product.
- Sudden stops, excessive force and uneven floor surface can cause the product to fall from the cart.
- The vents and other openings in the cabinet are designed for ventilation. Do not cover or block these vents and openings since insufficient ventilation can cause overheating and/or shorten the life of the product. Do not place the product on a bed, sofa, rug or other similar surface, since they can block ventilation openings. This product is not designed for built-in installation; do not place the product in an enclosed place such as a bookcase or rack, unless proper ventilation is provided or the manufacturer's instructions are followed.
- In case of installation the product on the rack, the inside of the product would be overheated due to heat from other devices near by and the decrease of air circulation, which could damage to the monitor. To prevent the damage, please have enough space for the monitors and use fan to avoid heat and maintain the operating temperature. (Refer to the specification of the product).
- The LCD panel used in this product is made of glass. Therefore, it can break when the product is dropped or applied with impact. Be careful not to be injured by broken glass pieces in case the LCD panel breaks.
- Keep the product away from heat sources such as radiators, heaters, stoves and other heat generating products (including amplifiers).
WARNING

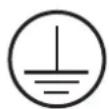
To identify any terminal which is intended for connection to an external conductor for protection against electric shock in case of a fault, or the terminal of a protective earth (ground) electrode.
This mark indicates the possibility of injury or damage to property.
02 MAIN FEATURES
R-Series Monitors contain the following features :
- Compatible with various SDI signals formats (SD/HD/3G)
- This product is compatible with various SDI signals - 480i, 576i, 720p, 1080i, 1080p, 1080psf
• HDMI(with HDCP) Signal
- This product is compatible with various HDMI signals.
• HDMI To SDI / SDI To HDMI Conversion Output
- This product features an HDMI To SDI conversion output so that video source from HDMI In terminal can be output through SDI Out terminal.
- The SDI To HDMI conversion output is also supported. The video source from SDI In terminal can be output through HDMI Out terminal.
- All-in-one type system
- Slim and all-in-one type monitor that requires no additional accessories, for optimized space utilization.
- Waveform/Vectorscope/Audio Level Meter Function
- Waveform & Vector Scope
- Embedded Audio Level Meter
- Audio Out
- Stereo Audio Out through phone Jack.
- Knob Control
- Easy to adjust user configuration using the control knob on the top of the monitor.
- BLUE ONLY / MONO / Focus Assist/ H/V Delay Function
- Range Error/Luma(Y') Zone Check(Color/Zebra Type) Function
- Internal Pattern Generator (0\~100% Gray/ColorBar+Pluge)
• Various Markers & Safety Areas
- Center Marker, Safety Area Marker, Marker Mat, Marker Size, Fit Marker, Thickness Adjustment function
• 1:1 Scan/Zoom Function
- Used to display the original image resolution without scaling to match a certain resolution or an aspect ratio.
- Select 'Pixel to pixel' to display unscaled images, and select 'Zoom' to enlarge the original image.
- Zoom Scroll Function (Left/Right, Top/Bottom)
• RS422 / D-UMD feature support
- This product supports TSL3.1 protocol using the RS-422 communication.
- Power
- Basically, the product is powered by a normal DC source.
- The product can be battery-powered.
* DC 12 (Typical)
• Additional features
- OSD user interface and Rack-Mountable Design.
03 CONTROLS & FUNCTIONS
R-5T : FRONT
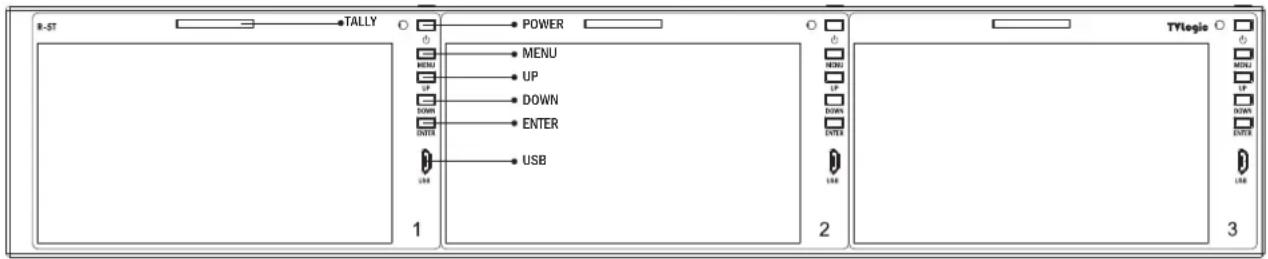
• [TALLY]
- Tally lamp that can be toggled in green or red using the REMOTE(RS-422) port or TVLogic's control program(Observer).
• [POWER]
- Used to turn the power on and off.
• [MENU]
- Used to activate the OSD menu.
- When the OSD menu is activated, press the MENU button to exit from the menu.
- Press the MENU button more than 2 seconds, input select menu will activated.(SDI, HDMI)
• [UP]
- Used to move within the menu when the OSD menu is activated and is also used to increase the value of selected feature.
• [DOWN]
- Used to move within the menu when the OSD menu is activated and is also used to decrease the value of selected feature.
• [ENTER]
- Used to select the feature of main menu and the sub menus.
- When the OSD menu is deactivated, press the ENTER button longer to activate the menus in order of : [BRIGHTNESS]-
[CONTRAST]-[CHROMA]-[SHAPNESS] -
[PEAKING BOOST] After the function is activated, press the [DOWN]/[UP] button to adjust the values.
•[USB] (Micro B USB)
- Use the Micro B Type USB. The OTG gender is required when using a USB Memory Stick.
- Used to upgrade the firmware using a USB Memory Stick or calibrate the monitor's color temperature using the TVLogic's color calibration tool.
03 CONTROLS & FUNCTIONS
R-5T : FRONT
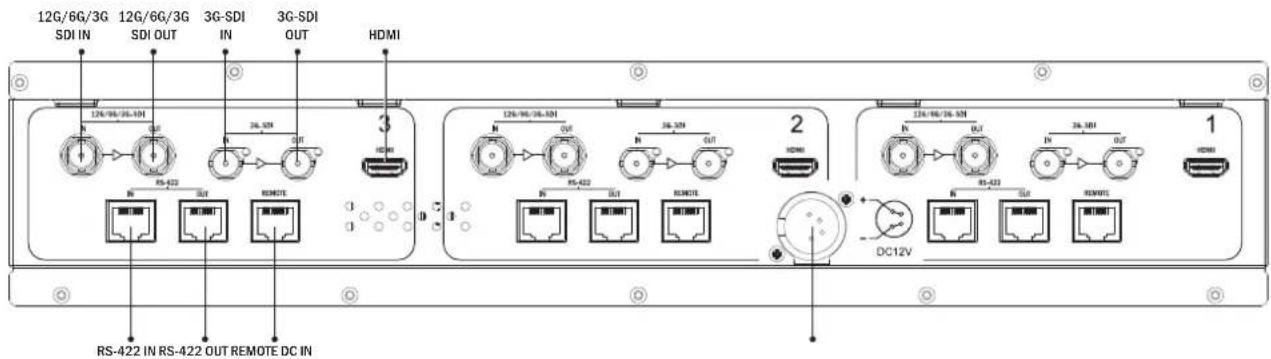
• 12G/6G/3G [SDI IN/OUT] (BNC)
- Signal input/output terminals for 12G/6G/3G/HD/SD SDI signal.
- Outputs the SDI signal input from the [SDI IN] terminal to [SDI OUT] terminal.
• 3G [SDI IN/OUT] (BNC)
- Signal input/output terminals for 3G/HD/SD SDI signal.
- Outputs the SDI signal input from the [SDI IN] terminal to [SDI OUT] terminal.
• [HDMI IN] (HDMI)
- Signal input terminals for HDMI signal.
• [REMOTE] (RS-422)
- Provides connection to control equipment (parallel switch) for external monitor control.
- Features of the each pin can be changed in the [MARKER] section of the OSD menu.
• [RS-422 IN/OUT] (RS-422)
- Used to control the Dynamic UMD function with the TSL3.1 protocol.
• DC IN
-12V DC
When using the product make sure to ground, whenever possible, before connecting the input signal cable in order to prevent any possible damage to the product or connected devices. The damage may include signal noise, malfunction of main board or display panel. And the connected devices such as camera or video source player may also be influenced through signal cable. Please check if the AC power source and the power extender or power distributor is grounded.
03 CONTROLS & FUNCTIONS
R-7D : FRONT
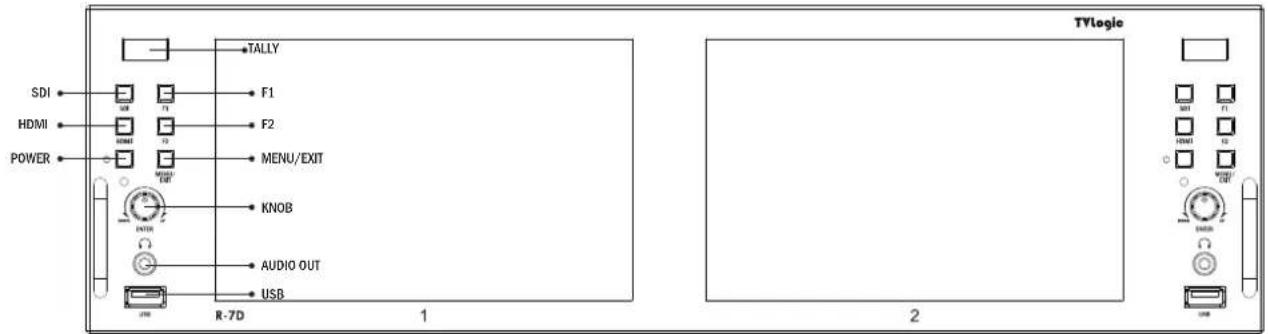
• [TALLY]
- Tally lamp that can be toggled in green or red using the REMOTE(RS-422) port or TVLogic's control program(Observer).
• [SDI]
- Select the SDI A / B input signal.
• [HDMI]
- Select the HDMI input signal.
• [F1/F2]
- Press the button for less than 2 seconds to activate the function.
- Press the button for more than 2 seconds to activate Function Select menu.
• [POWER]
- Used to turn the power on and off.
• [MENU/EXIT] Button
- Used to activate the OSD menu.
- When the OSD menu is activated, press this button to exit from the menu.
- Press the button for more than 2 seconds to activate Input Select menu. (SDI, HDMI)
- Use the [ENCODER] Knob to change the Input Signal.
•[UP/DOWN/ENTER] Knob
- Used to move within the menu when OSD menu is activated, and is also used to decrease or increase the value of the selected feature.
- Press the knob to select the main menu and the sub menus.
- Press the button for more than 2 seconds to activate the HOT Key menu. (BRIGHT / CONTRAST / CHROMA / SHAPRNESS / PEAKING BOOST)
- Press the button for less than 2 seconds to activate the PRESET function.
•[USB] (USB-A)
- Use the Micro B Type USB. The OTG gender is required when using a USB Memory Stick.
- Used to upgrade the firmware using a USB Memory Stick or calibrate the monitor's color temperature using the TVLogic's color calibration tool.
•[AUDIO OUT] (Phonejack)
- Used for Stereo Audio Output through Phone Jack. (video signals with embedded audio only)
03 CONTROLS & FUNCTIONS
R-7D : REAR
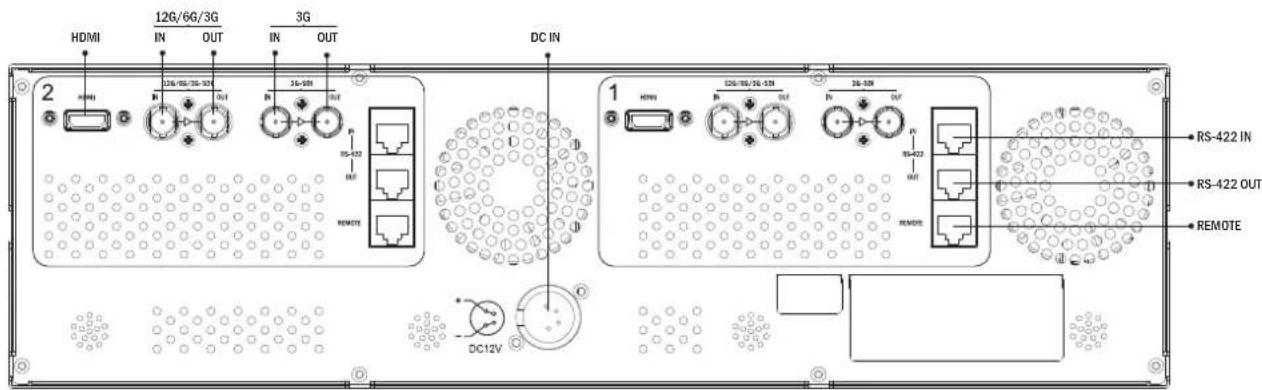
• 12G/6G/3G [SDI IN/OUT] (BNC)
- Signal input/output terminals for 12G/6G/3G/HD/SD SDI signal.
- Outputs the SDI signal input from the [SDI IN] terminal to [SDI OUT] terminal.
• 3G [SDI IN/OUT] (BNC)
- Signal input/output terminals for 3G/HD/SD SDI signal.
- Outputs the SDI signal input from the [SDI IN] terminal to [SDI OUT] terminal.
• [HDMI IN] (HDMI)
- Signal input terminals for HDMI signal.
• [REMOTE] (RS-422)
- Provides connection to control equipment (parallel switch) for external monitor control.
- Features of the each pin can be changed in the [MARKER] section of the OSD menu.
• [RS-422 IN/OUT] (RS-422)
- Used to control the Dynamic UMD function with the TSL3.1 protocol.
• DC IN
-12V DC
When using the product make sure to ground, whenever possible, before connecting the input signal cable in order to prevent any possible damage to the product or connected devices. The damage may include signal noise, malfunction of main board or display panel. And the connected devices such as camera or video source player may also be influenced through signal cable. Please check if the AC power source and the power extender or power distributor is grounded.
04 MENU TREE & ADJUSTMENT
- OSD(On-Screen Display) Menu helps to use various different functions.
• This Picture is the menu structure for R-Series
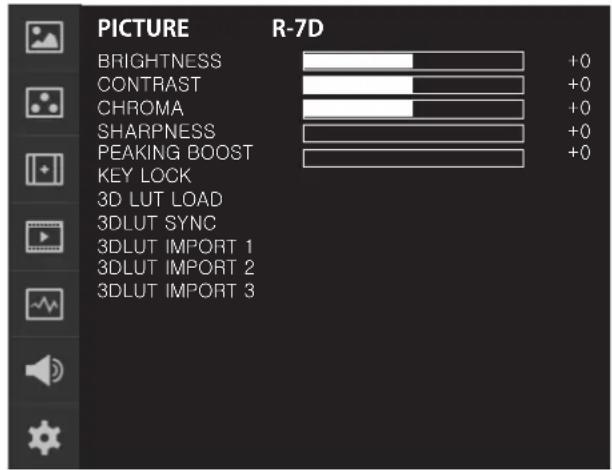
[2] MENU CONTROL
- User may control various functions using the MENU button and the Knob on the top of the monitor.
* In the case of the R-7D, use the KNOB instead of the UP/DOWN/ENTER button.
- Menu control sequence follows the order below.
- Press MENU button to activate the OSD menu.
- Move to a desired menu using the Knob.
- Press the Knob to select a menu and move to select a sub-menu by scrolling the Knob.
- Press the Knob to select the desired sub menu. (The selected sub-menu will be highlighted)
- Press the ENTER button or the MENU button to save the new value after adjusting the value by scrolling the Knob.
- Press MENU button to return to previous menu and if there is no previous menu, the OSD menu will be removed from the screen.
05 MENU OPERATIONS
[1] PICTURE
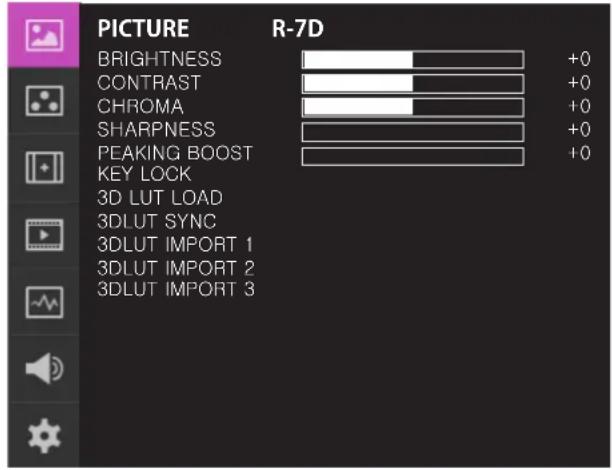
• BRIGHT
- Used to set the brightness(=offset) level from -100 to 100.
• CONTRAST
- Used to set the contrast(gain) level from -100 to 100.
• CHROMA
- Used to set the saturation level from -50 to 50.
• SHARPNESS
- Used to set the Sharpness level from 0 to 24.
- PEAKING BOOST
- Used to set the Peaking Boost level from 0 to 24.
- KNOB LOCK
- Locks the Knob control.
• 3DLUT LOAD
- Used to apply the internally stored 3DLUT.
- Maximum 3 x 3DLUT files can be stored.
- The file name can be set up to 20 characters including the extension.
• 3DLUT SYNC
- Used to load a list of available 3DLUT files currently stored in the FLASH MEMORY.
- Available 3DLUT formats are Cube, GV Lut, Quantel, Davinci and Assimilate Scratch.
- Available sizes of the 3DLUT are 17 or 33.
• 3DLUT IMPORT 1/2/3
- Used to save the 3DLUT stored in the external memory to the internal memory 1/2/3 area.
- Once saved, the 3DLUT can be maintained even when the power is turned ON/OFF.
- The file name can be set up to 20 characters including the extension.
05 MENU OPERATIONS
[2] COLOR
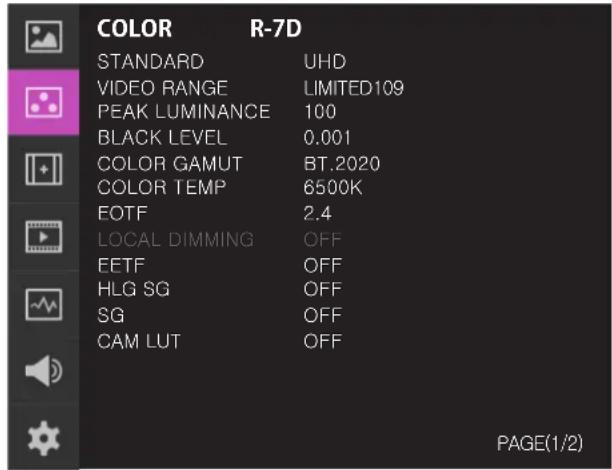
• STANDARD
- Used to select the color and dynamic rage of the screen.
- Available options are HD, UHD, DCI-P3, PQ, HLG, SLog3 and User1/2/3.
Activates only in the User1/2/3 mode.
•VIDEO RANGE
- Used to select the range of digital video signal.
* FULL : Input signal 0\~255 (8bit), 0\~1023 (10bit) (When connecting the PC)
* LIMITED109 : Input signal Y': 16\~235, CbCr: 16\~240 (8bit)/ Y': 64\~940, CbCr: 64-960 (10bit)
- PEAK LUMINANCE
- Used to select the Peak Luminance of the monitor.
- Available options are 100, 200, 300, 400, 500, 600, 700, 800, 900, 1000, 2000, 4000 and 10000.
- Activates only in the User1/2/3 mode.
- BLACK LEVEL
- The minimum black level of the video signal can be set differently depending on the performance of the monitor or the lighting environment. For example, the lowest luminance that the R-Series can display is 0.002, but it is necessary to adjust the offset level to about 0.2nit when using under bright light.
- At this time, when the black level is set to 0.2, dark gradations below 0.2 nit are expressed without crushing.
- Activates only in the User1/2/3 mode.
• COLOR GAMUT
- Used to select the standard color gamut.
- Available options are BT.709, DCI-P3, BT.2020 and Native.
The submenus may be activated in the User1/2/3 mode only.
• COLOR TEMP (Color Temperature)
- Controls the color temperature.
- Available options are 6500K, 9300K and User.
The submenus may be activated in the User1/2/3 mode only.
•EOTF (Electro-Optical Transfer Function)
- Electrophotic conversion Functions(ex: Gamma or HDR curve).
- Available modes are 2.2, 2.4, 2.6, PQ, HLG and SLOG3.
The submenus may be activated in the User1/2/3 mode only.
- LOCAL DIMMING
- Used to set the Local Dimming Backlight mode.
- This mode is supported by the local dimming backlight model (LUM-310R) and does not support R-Series.
05 MENU OPERATIONS
[2] COLOR
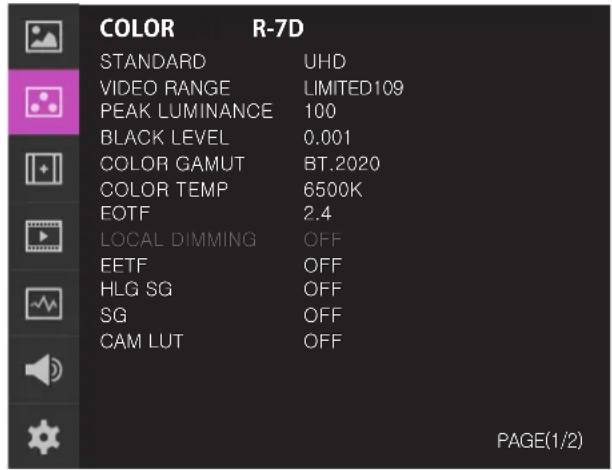
• EETF (Electrical-Electrical Transfer Function)
- Used to display the HDR image(without clipping) within the actual luminance range (black level and peak luminance) that the monitor can express. In the Auto mode, the HDR image is converted within the range of set peak luminance and black level. In the OFF mode, the video signal outside of the set range is clipped.
- Available modes are OFF and AUTO.
- Available only when the EOTF is set to PQ or SLOG3.
The submenus may be activated in the User1/2/3 mode only.
• HLG SG (HLG System Gamma)
- Used to set the System Gamma of HLG mode.
- In the Auto mode, the value of the System Gamma changes automatically according to the previously set peak luminance. When it is OFF, the value is set to default value of 1.2.
- Activates only when the EOTF is set to HLG.
The submenus may be activated in the User1/2/3 mode only.
• SG (System Gamma)
- The System Gamma of HLG is automatically calculated and displayed according to the set peak luminance.
- Activates only when the EOTF is set to HLG and the HLG SG is Auto.
• CAM LUT (Camera LUT)
- Used to change the Camera LUT.
- Available LUTs are OFF, LOG-C, C-LOG, S-LOG 1,2,3 and RED Gamma 3,4.
05 MENU OPERATIONS
[2] COLOR
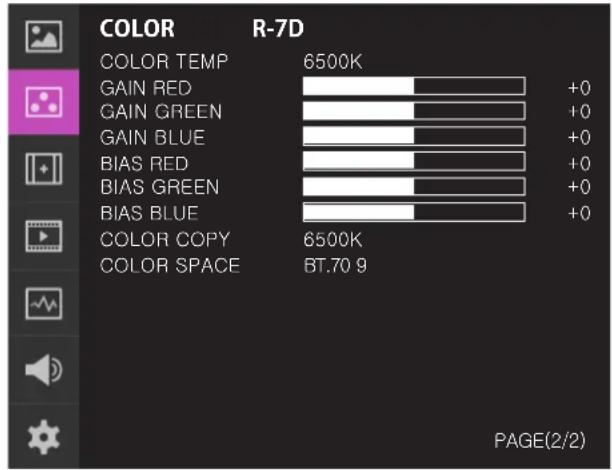
• TEMP COLOR (Color Temperature)
- Controls the color temperature and allows instant access to preset the color temperature settings.
- Available color temperatures are 6500K, 9300K and User1/2/3.
In User 1/2/3 modes, user can define custom RGB GAIN, BIAS (=Offset) and Color Copy values.
- Used to set Red/Green/Blue Gain(or Picture, Contrast) level from -256 to 255.
Only available in User 1/2/3 mode.
• BIAS RED / GREEN / BLUE
- Used to set Red/Green/Blue Bias(or Offset, mainly affects on Black level) from -100 to 100.
Only available in User 1/2/3 mode.
• COLOR COPY
- Used to copy the R/G/B Gain value of pre-stored color temperature settings.
- In User mode, find and select the color temperature and press the Knob to copy and apply the Gain value to GAIN RED, GAIN GREEN, GAIN BLUE.
Only available in User 1/2/3 mode.
• COLOR SPACE
- Used to select the standard color space.
- Available options are BT.709, DCI-P3, BT.2020 and Native.
05 MENU OPERATIONS
[3] MARKER
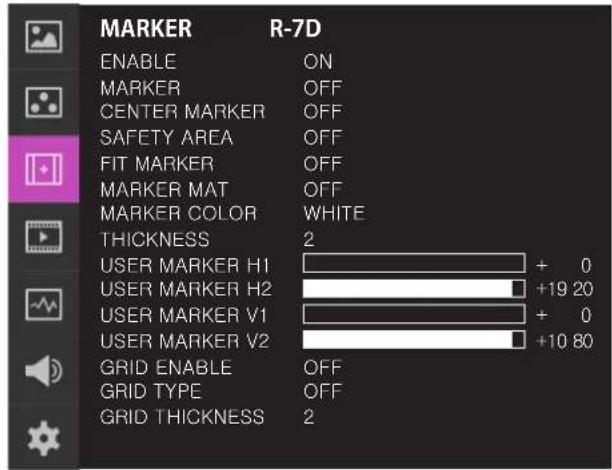
- ENABLE
- Used to activate the Marker function.
- MARKER
- Available Marker types are OFF, 16:9, 4:3, 4:3 ON AIR, 15:9, 14:9, 13:9, 1.85:1, 2.35:1, 1.85:1& 4:3 and USER.
• CENTER MARKER
- Displays the Center Marker on the screen.
• SAFETY AREA
- Used to select to display and controls the size and availability of the Safety Area.
- Available sizes are 80%, 85%, 88%, 90%, 93%, 100%, EBU ACTION 16:9, EBU GRAPHIC 16:9, EBU ACTION 14:9, EBU GRAPHIC 14:9, EBU ACTION 4:3 and EBU GRAPHIC 4:3.
• FIT MARKER
- Used to activate or inactivate the Fit Marker function.
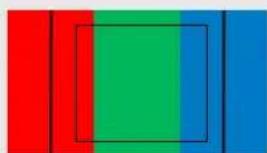
- When the Marker type is selected in the Marker menu, a border line of the Safety Area will be displayed inside the Marker. Images below show the difference between Fit Marker ON and OFF.
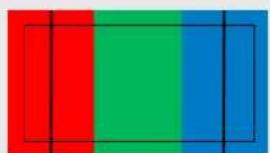
natural_image
Abstract color block composition with red, green, and blue vertical stripes (no text or symbols)MARKER : 4:3 SAFETY AREA : 90% FIT MARKER : OFF
natural_image
Abstract color block composition with red, green, and blue vertical stripes (no text or symbols)MARKER : 4:3 SAFETY AREA : 90% FIT MARKER : ON
• MARKER MAT
- Used to set the darkness level outside of the MARKER area from OFF(transparent) to 7(Black).
- The bigger the value, the darker the color.
• MARKER COLOR
- Used to set the color of the MARKER lines.
- Available colors are white, gray, black, red, green and blue.
• THICKNESS
- Used to set the thickness of the MARKER lines.
- Thickness level is from 1 to 7 by the pixel unit.
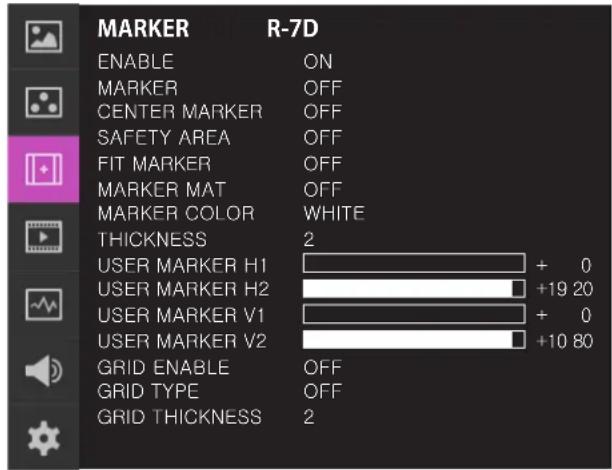
- USER MARKER H1
- Used to set the position of the first horizontal marker line.
- Displayed when the MARKER menu is set to USER.
- USER MARKER H2
- Used to set the position of the second horizontal marker line.
- Displayed when the MARKER menu is set to USER.
- USER MARKER V1
- Used to set the position of the first vertical marker line.
- Displayed when the MARKER menu is set to USER.
- USER MARKER V2
- Used to set the position of the second vertical marker line.
- Displayed when the MARKER menu is set to USER.
05 MENU OPERATIONS
[3] MARKER
- USER MARKER H1
- Used to set the position of the first horizontal marker line.
- Displayed when the MARKER menu is set to USER.
- USER MARKER H2
- Used to set the position of the second horizontal marker line.
- Displayed when the MARKER menu is set to USER.
- USER MARKER V1
- Used to set the position of the first vertical marker line.
- Displayed when the MARKER menu is set to USER.
- USER MARKER V2
- Used to set the position of the second vertical marker line.
- Displayed when the MARKER menu is set to USER.
- GRID ENABLE
- Used to activate the GRID display function.
* This function is not supported in R-7D.
• GRID TYPE
- Used to select the GRID type.
- Available GRID types are 3x3, 4x4, 5x5 and 6x6.
* This function is not supported in R-7D.
• GRID THICKNESS
- Used to set the thickness of the GRID.
- Thickness level is from 1 to 5.
* This function is not supported in R-7D.
05 MENU OPERATIONS
[4] DISPLAY / VIDEO
• SCAN
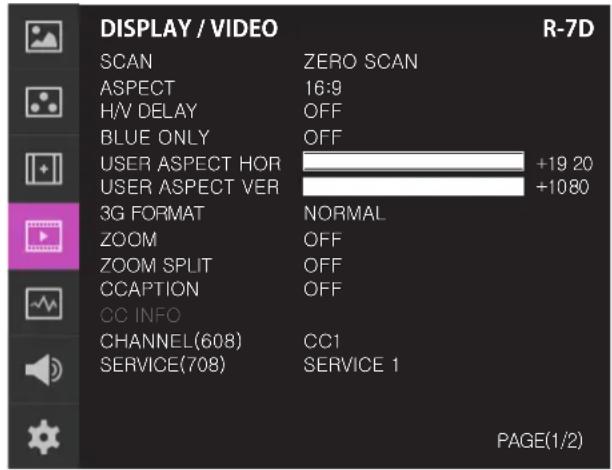
- Used to change the Scan mode. Scroll up and down using the Knob and the mode will change as the following sequence. [Zero Scan] -> [Over Scan] -> [Pixel-To-Pixel] -> [User Aspect]
* [USER ASPECT]: User can control the aspect ratio by adjusting width and height of the display.
* See section "7. Other Functions [1] User Aspect" for more information.
• ASPECT
- Used to change the Aspect Ratio.
- Regardless of the original Aspect ratio of the input signal, the Aspect Modes are changed as follow sequence. : [16:9][4:3][2.35:1][1.85:1][15:9][16:10][Anamorphic1.3x][Anamorphic1.5x][Anamorphic2.0x][Auto]
* [Auto] mode enables the Aspect Ratio of the output signal to be synchronized to the original Aspect Ratio of the input signal.
• H/V DELAY
- Used to monitor the Blanking area of H sync and V sync.
- BLUE ONLY
- Used to switch in the order of [Off]-[Blue Only]-[Mono]-[Off].
- Press the button to remove red and green components from the input signal and display blue component only.
- Press the button again to switch to monochrome mode which has no chroma signal.
- USER ASPECT HORIZONTAL/USER ASPECT VERTICAL
- Activated only when the [SCAN] mode is set to [User Aspect].
- User can adjust the Horizontal and Vertical size of the screen.
- See section "7. Other Functions [1] User Aspect" for more information.
• 3G FORMAT
- Used to select 3G-SDI A/B input format among NORMAL MODE(AUTO - A 422 10BIT_YCbCr 50/60P), A 444 10/12BIT_YCbCr, A 444 10/12BIT_RGB, A 422 12BIT_YCbCr, B 444 10/12BIT_YCbCr, B 444 10/12BIT_RGB, B 422 12BIT_YCbCr, B 422 10BIT_YCbCr 50/60P.
- In NORMAL MODE, automatically detected when Payload signal is contained.
•ZOOM
- Used to magnify the image up to 90% on a pixel basis and display on full screen.
* (e.g., 10% Zoom : If the input signal's resolution is 1920 x 1080, only 90% (1728(H) x 972(V)) of the image would be shown on full screen without the remaining 10% (192(H) x 108(V)) of the image.)
* See section "7. Other Functions -> [4] Zoom" for more information.
•ZOOM SPLIT
- Used to magnify the image.
- Used to zoom the specified area sequentially.
- Designable areas are Left-Top, Right-Top, Left-Bottom, Right-Bottom and Center.
05 MENU OPERATIONS
[4] DISPLAY / VIDEO
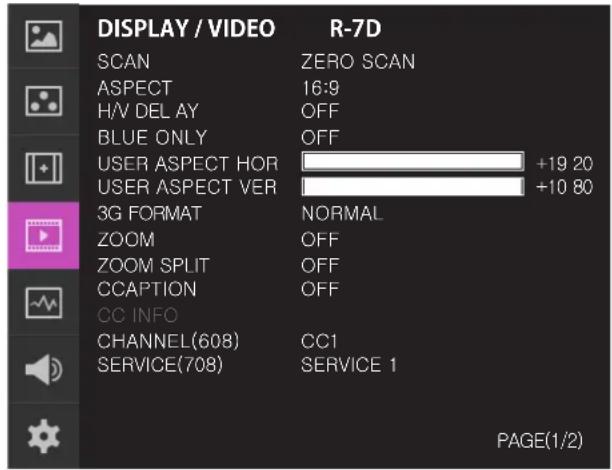
• CLOSED CAPTION
- This item controls the Closed Caption.
- Available modes are OFF, 708, 608(LINE21) and 608(ANC).
* This fuction is not supported in R-5T.
• CC INFO
- Displays the current setting closed cation information.
* This fuction is not supported in R-5T.
• CHANNEL (608)
- Sets the Channel of Closed Caption 608
- Available modes are CC1 \~ CC4.
* This fuction is not supported in R-5T.
• SERVICE (708)
- Sets the service of Closed Caption 708.
- Available modes are Service 1 \~ Service 6.
* This fuction is not supported in R-5T.
05 MENU OPERATIONS
[4] DISPLAY / VIDEO
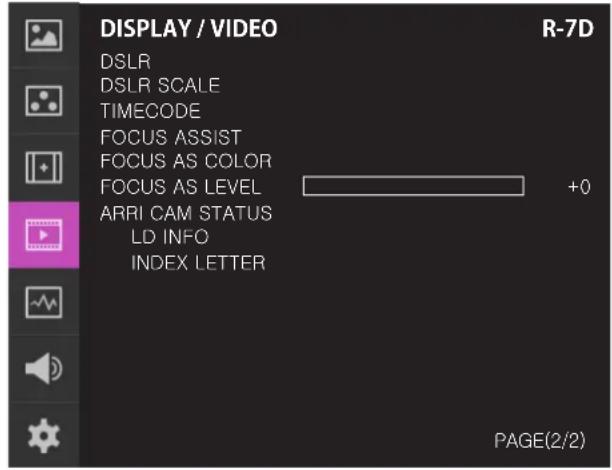
• DSLR
- Select the DSLR camera to be used with the monitor. Available mode is [CANON 7D].
* DSLR cameras' screen size and aspect ratio of Live / Record / Playback modes vary depending to their manufacturer.
• DSLR SCALE
- This is a special function for CANON/NIKON DSLR cameras.
- Used to scale the image with different resolution as to the operation mode(Live View/ Record/ PlayBack) of the camera to fulfill the screen.
* See section "7. Other Functions [08] DSLR SCALE" for more information.
• TIMECODE
- Used to set the Time Code.
- Available modes are [Off], [VITC], and [LTC].
• FOCUS ASSIST
- Focus Assist helps the shooters to easily find out the exact area in the picture with good focus, simply by adding colors on the shape or boundaries of the object in the picture.
- Activates in order of [Mono On]-[Color On]-[Off]
* [Color On] : Only the boundary of the area with good focus is displayed with the designated color.
*[Mono On] : The boundary of the area with good focus is colored with the designated color, while the rest of the areas(pixels) have only Y'(Luma) signals to be black & white image.
* See section "7. Other Functions [06] Focus Assist" for more information.
• FOCUS AS COLOR (Focus Assist Color)
- Used to select a color for Focus Assist among red, green and blue.
- This feature is available only when the Focus Assist mode is activated.
• FOCUS AS LEVEL (Focus Assist Level)
- Used to set the edge difference value between the edges in an image.
- Available values are from 0 to 100. Larger the value the more sophisticated the detail detection.
- Designated color is displayed when the difference of the edges exceeds the previously set value.
- This feature is available only when the FOCUS ASSIST mode is activated.
•ARRI CAM STATUS (Arri Cameara Status)
- Used to set the Status Information provided by the ARRI ALEXA Camera.
- The screen is squeezed when this setting is enabled. (1742x980)
•LDS INFO (Lens Data System Information)
- Used to set the information display of the Lens Data System.
- Activates in the order of [Lens name]–[Focal length]–[Iris]–[DOF Min]–[Focus distance]–[DOF max].
• INDEX LETTER
- Used to set the monitor identification character notation in the upper right corner of the screen.
05 MENU OPERATIONS
[5] WAVEFORM
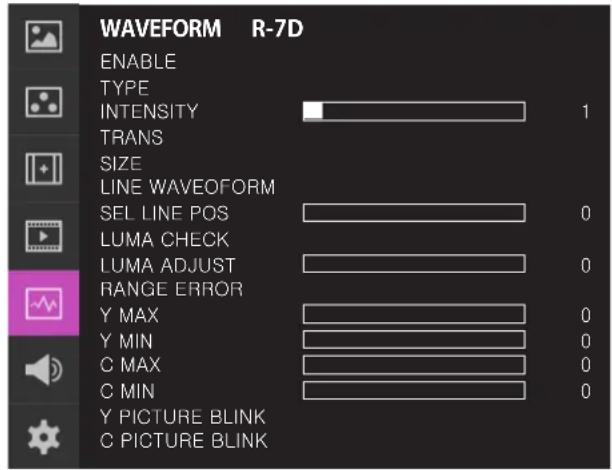
- ENABLE
- Used to activate/ deactivate the Waveform which is selected in the Waveform/Vectorscope Type menu.
• TYPE
- This function sets the Waveform and Vectorscope.
- Available options are different according to the Input signal.
- Activates in the order: YCbCr: Off - Waveform
- Vectorscope - Waveform Wide - Waveform YCbCr - RGB(Conv.) - Wave_Vector - Vector_YCbCr
- Full Waveform(Y) - Full Vectorscope.
• INTENSITY
- Used to set the brightness level of the Waveform/Vectorscope display from 1 to 63.
- The higher the number the brighter the waveform will be.
• TRANS (Transparency)
- Used to select the transparency option of the Waveform/ Vectorscope between Opaque and Blend.
- Even if the option is set to [Opaque], it will automatically turn to [Blend] when the main OSD overlaps the waveform/vectorscope. And turns back to [Opaque] when the main OSD disappears.
• SIZE
- Adjust the size of the Waveform or Vectorscope.
- Can select among [NORMAL] and [LARGE].
•LINE WAVEFORM
- This item is utilized to display the entire data or one line data on the Waveform.
• SEL LIN POS (Select Line Position)
- Used to select specific Vertical Line for Waveform/Vectorscope.
- This is available when LINE Waveform is activated.
- Use the Knob to select a desired vertical line.
- Control range varies according to the resolution of the input SDI signal.
* PAL : Min. 1, Max. 625
* NTSC : Min. 1, Max. 525
* 720p : Min. 1, Max. 750
* 1080i : Min. 1, Max. 1125
* 1080p : Min. 1, Max. 1125
• LUMA CHECK
- Displays the Luma(Y') level of the input image in colors.
- Can select between [Color Pattern] or [Zebra Pattern].
- Each pixel's Y' analyzed and changed to a certain color or zebra pattern according to the Index on the right side of the screen.
- When a pixel's Y' level is under 0%(16), the color / diagonal line will be colored Green.
- When the pixel's Y' level is over 100%(235), the color / diagonal line will be colored Red.
- When the Y' level of a pixel is between 0\~100%, the pixel is displayed with Gray, except for selected Luma Zone.
- In the [Color Pattern] mode, a 5% zone of the selected Y' level will be colored Pink(5%) and ±10% will be colored Yellow(-10% from Pink) and Cyan(+10% from Pink).
- In the [Zebra Pattern] mode, ± 5% of the selected Y' Level will be displayed with diagonal lines.
05 MENU OPERATIONS
[5] WAVEFORM
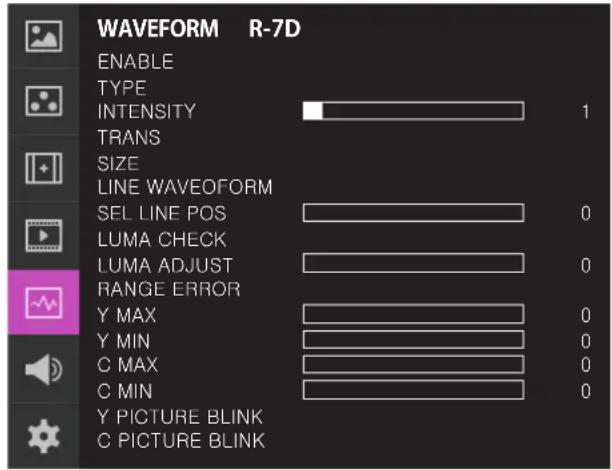
• LUMA ADJUST
- Used to set the Y' level to be colored Yellow, Pink and Cyan in [Color Pattern] mode, or to set Y' level zone to be displayed with diagonal lines in [Zebra Pattern] mode simply by scrolling the Knob.
- Available values are 0w \~ 100%.
* See section "7. Other Function [5] Luma(Y') Zone Check" for more information.
• RANGE ERROR
- Used to set whether or not to activate Y MAX, Y MIN, C MAX, C MIN, Y PICTURE BLINK and C PICTURE BLINK functions.
- The values of Y MAX, Y MIN, C MAX, C MIN are indicated in Waveform/Vectorscope.
- If [Y PICTURE BLINK] or [C PICTURE BLINK] is enabled, the section of image that exceeds the selected values of Y MAX, Y MIN, C MAX and C MIN shall blink.
* In the case of RGB input, Range Error is not supported.
* See section "7. Other Function [7] Range Error" for more information.
• Y MAX
- Used to set the maximum Luma(Y') level from 0 to 255.
- Pixels with values exceeding the max Y' level will blink on the screen, and be displayed in red on the Waveform.
•Y MIN
- Used to set the minimum Luma(Y') level from 0 to 255.
- Pixels with values exceeding the max Y' level will blink on the screen, and be displayed in red on the Waveform.
•C MAX
- Used to set the maximum chroma(C') level from 0 to 255.
- Pixels with values exceeding the max Y' level will blink on the screen, and be displayed in red on the Waveform.
• C MIN
- Used to set the minimum chroma(C') level from 0 to 255.
- Pixels with values exceeding the max Y' level will blink on the screen, and be displayed in red on the Waveform.
•Y PICTURE BLINK
- Used to set whether or not to blink pixels with values exceeding Y MAX and Y MIN.
•C PICTURE BLINK
- Used to set whether or not to blink pixels with values exceeding C MAX and C MIN.
05 MENU OPERATIONS
[6] AUDIO
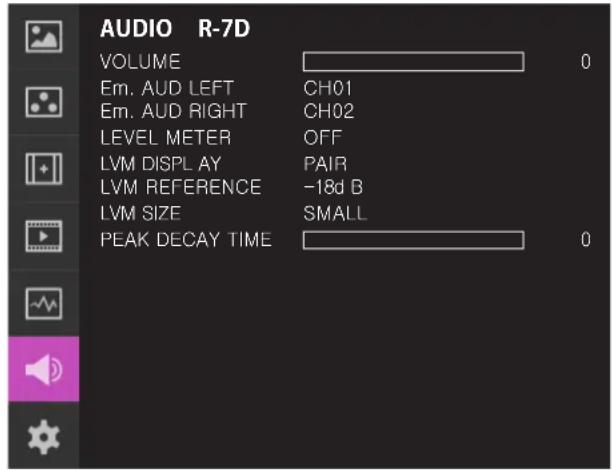
• VOLUME
- Used to control the output volume for the [AUDIO OUT] on the back of the monitor.
- Control range is from 0 to 30.
• Em. AUD LEFT (Embedded Audio Left)
- Used to set embedded audio channel for left audio out of [AUDIO OUT] terminal on the back of the monitor.
- Available values are between CH1\~CH16 and Ext..
* In the HDMI mode, Left is set to CH1.
• Em. AUD RIGHT(Embedded Audio Right)
- Used to set embedded audio channel for right audio out of [AUDIO OUT] terminal on the back of the monitor.
- Available values are between CH1\~CH16 and Ext..
* In the HDMI mode, Right is set to CH2.
- LEVEL METER
- Used to set the Level Meter for the embedded audio.
- Available options are :
SDI Input : [Off]-[16CH(Hor.)]-[16CH(Ver).]
HDMI Input: [Off]-[2CH(Hor.)]-[2CH(Ver).]
* 16 CH(HOR.) : Displays 8 channels on top left and 8 channels on top right of the screen horizontally.
* 16 CH(VER.) : Displays 8 channels on center left and 8 channels on top right of the screen vertically.
• LVM DISPLAY (Level Meter Display)
- Used to set the display method for audio level meter.
- Available modes are Group and Pair.
* In the HDMI mode, the mode is set to Pair.
• LVM REFERENCE (Level Meter Reference)
- Display the default audio level meter value,
- Available options are -18dB and -20dB.
- Audio level meter within selected value turns to green and exceeded audio level is displayed in yellow.
- Audio level exceeding -4dB is displayed in red.
• LVM SIZE (Level Meter Size)
- Used to control the size of the audio level meters.
- Available options are NORMAL and LAGRE.
• PEAK DECAY TIME
- Sets the reduction time for max value indication of audio signals.
- Control range is from MIN 0 to MAX 100. Bigger number means a longer display time for max value.
05 MENU OPERATIONS
[7] SYSTEM / GPI / UMD
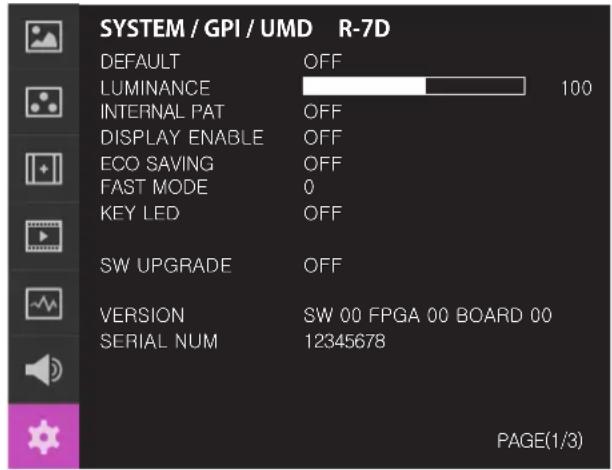
- DEFAULT
- Used to initialize OSD values to factory default.
- Available modes are DEFALUT and FACTORY.
- In the DEFALUT mode, except for the stored 3D LUT, all values are initialized.
- In the FACTORY mode, all values are initialized to factory default.
• LUMINANCE
- Used to indicate the current Luminance value.
- In the case of System Default, the value returns to factory default(after color calibration).
- Available values are from 0 to 50.
• INTERNAL PAT (INTERNAL PATTERN)
- Generates ColorBar, Pludge and Grayscale Pattern internally.
- Selectable range for Gray Pattern is from 0% to 100% with 5% increment.
* See section "7. Other Function -> [09] Internal Pattern" for more information.
• DISPLAY ENABLE
- Used to set the LUMINANCE to the minimum value when the time set in the still image output is exceeded.
- When video is output or the MENU button is pressed, the LUMINANCE is reset to the original value.
- Settable options are ON, 5MIN, 10MIN, 20MIN and 30MIN.
- In the Function Key, the screen can be turned ON/OFF immediately by user's choice.
• ECO SAVING
- Used to save power consumption automatically when there is no monitor signal.
- When the signal is supplied, the brightness of the monitor will be changed to the set value.
- FAST MODE
- Used to minimize the de-interlacing processing time delay and improve the quality of fast moving and fine details under the interlaced format.
- Since the function of this feature is to minimize the de-interlacing delays, it will not be effective under the progressive format.
- Feature bypasses deinterlacer, playing back 2 full fields per frame. Also reduces signal processing delay for reduced audio/video delay.
* This function is not supported in R-7D.
- KEY LED
- Locks the Function Key functions except the MENU and UP/DOWN button.
* For the R-7D, the KNOB LOCK menu supports the same function.
• S/W UPGRADE
- Used to upgrade the firmware using USB (Thumb drive).
* See section "7. Other Functions -> [11] Firmware Upgrade" for more information.
- VERSION
- Displays current firmware version.
• SERIAL NUM (Serial Number)
- Displays the serial number of the monitor.
05 MENU OPERATIONS
[7] SYSTEM / GPI / UMD
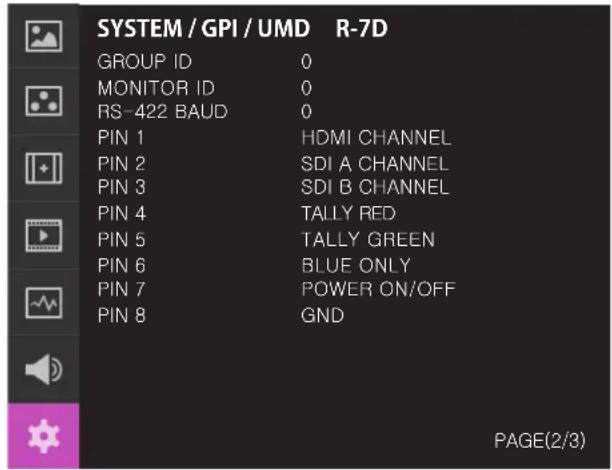
• GROUP ID
- Used to group the monitors to control the monitors by group when the monitors are controlled by using RS-422 communication.
• MONITOR ID
- Used to set the ID of each monitor for using RS-422 communication.
- Available values are between 0,2,4 \~ 98.
• RS-422 BAUD
- Used to set the Baud Rate for the RS-422 communication.
- Available values are 9600, 14400, 19200, 38400, and 115200.
- PIN1\~PIN8
- This item activates/ inactivates the REMOTE function.
- The user may designate a function for each pin and each pin's default setting is as follows.
- The default settings are as follows:
PIN 1 : HDMI CHANNEL
PIN 2 : SDI-A CHANNEL
PIN 3 : SDI-B CHANNEL
PIN 4 : TALLY RED
PIN 5 : TALLY GREEN
PIN 6 : BLUE ONLY
PIN 7 is POWER ON/OFF use only, PIN 8 is GND
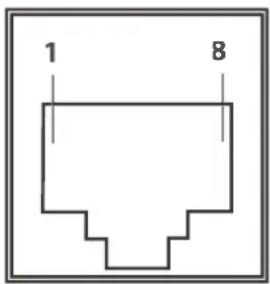
REMOTE ( RJ-45)
1: Pin1
2: Pin2
3: Pin3
4: Pin4
5: Pin5
6: Pin6
7: Pin7
8: GND
| Menu Classification | Settable Values |
| PIN 1~6 | NONEHDMI CHANNELSDI-A/B CHANNELTALLY REDTALLY GREENBLUE ONLYMONO, ASPECTHVDELAY16:9 MARKER15:9 MARKER14:9 MARKER13:9 MARKER4:3 MARKER4:3 ON AIR MARKER1.85:1 MARKER2.35:1 MARKER1.85:1 & 4:3 MARKERCENTER MARKERSAFETY AREA 80%SAFETY AREA 88%SAFETY AREA 90%SAFETY AREA 93%SAFETY AREA 100% |
05 MENU OPERATIONS
[7] SYSTEM / GPI / UMD
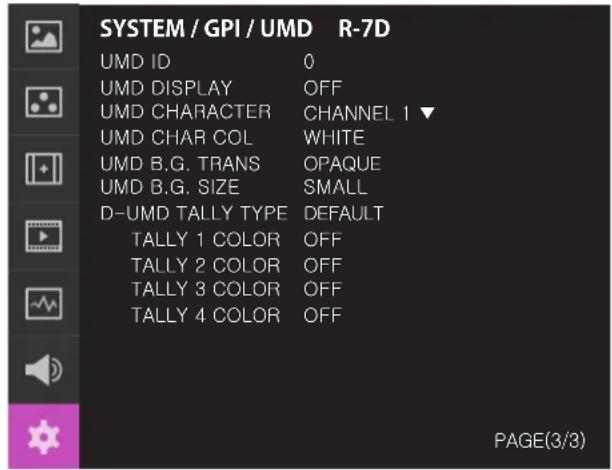
• UMD ID
- Used to set the ID of each monitor for the DYNAMIC UMD setting of the UMD DISPLAY using the RS-422 communication.
• UMD DISPLAY
- Used to set the UMD, ANC and Dynamic UMD.
- Available modes are OFF, UMD, ANC, D-UMD(S-8C), D-UMD(S-16C) and D-UMD(D-8C).
* UMD : Displays user customized 8 characters on screen.
* ANC : Displays characters embedded in SDI signal.
* D-UMD(S-8C) : Displays the incoming data of 8 characters and tally signal from the TSL protocol (V3.1).
* D-UMD(S-16C) : Displays the incoming data of 16 characters and tally signal from the TSL protocol (V3.1).
* D-UMD(D-8C) : Displays the incoming data of two pairs of 8 character strings and tally signals from the TSL protocol(V3.1). - When setting the D-UMD(S-8C), D-UMD(S-16C) and D-UMD(D-8C) mode, the RS-422 Baud setting in the System menu is automatically changed to [38400].
• UMD CHARACTER
- Used to customize the characters for Under Monitor Display.
- Press the [ENTER] button to activate the Virtual Key Board. Alphabets, numbers and special symbols are available. - There is a special buttons at the bottom right of the Virtual Key Board.
- Left Cursor / Space / Right Cursor / Clear Current Cursor / Clear All (from left to right)
![<[__]>](/content/2026/05/934169/images/1d254a49209ae0b31fc92a14f768c0e49d36118aee7c5583f45b34f15841b629.jpg)
- Up to 8 characters can be set.
• UMD CHAR COL (UMD Character Color)
- Used to set the character color of UMD.(White/Red/Green/Yellow/Cyan/Magenta)
- Activates only when the [D-UMD tally type] is set to [Default], [User color], [BG. Color], [User tally] or [User BG].
• UMD B.G TRANS - Used to set the transparency of the UMD character's background box.
- Available modes are [Opaque], [50%], [85%] and [100%].
- UMD B.G SIZE
- Used to adjust the size of UMD font and character's background box.
- Available modes are [Small] and [Large].
• UMD B.G TRANS (UMD Background Transparency)
- Used to set the transparency of the UMD character's background box.
- Available modes are [Opaque], [50%], [85%] and [100%].
• UMD B.G SIZE (UMD Background Size)
- Used to adjust the size of UMD font and character's background box.
- Available modes are [Small] and [Large].
05 MENU OPERATIONS
[7] SYSTEM / GPI / UMD
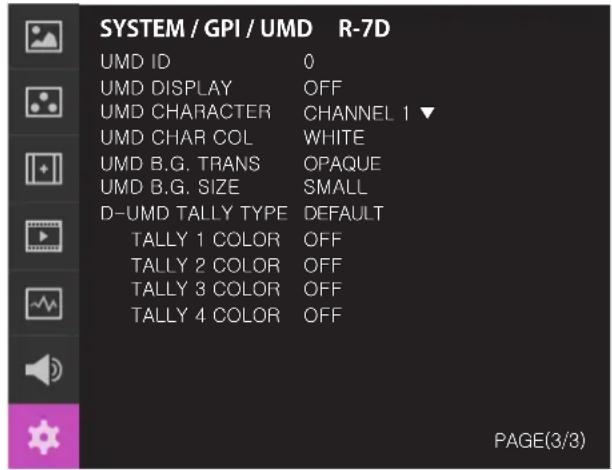
• D-UMD TALLY TYPE
- Used to set the Tally type in the D-UMD(D-8C).
- Available values are DEFAULT and USER COLOR.
* Default : Existing TV Logic operating system(VRT)
* User color : User configuration settings on each Tally color type. - Tally1 Color \~ Tally4 Color are activated when USER COLOR is selected.
* Character : Tally is displayed with the character color. Activates the same as [Default] mode.
* B.G. color : Tally is displayed as the background of character. Activates the same as [Default] mode.
* User tally: The bit 0 & bit 1 of TSL Protocol Control Byte receives the input signal and displays Tally by user's set (Off, White, Red, Green, Blue, Yellow Cyan, Magenta)
* User char.: Activates in the same way as the User Tally and the Tally is displayed by the Character color.
* User B.G.: Activates in the same way as the User Tally and the Tally is displayed in the background of the character.
• TALLY COLOR
- Used to set the color of each Tally 1, Tally 2, Tally 3 and Tally 4.
- Available colors are Red, Green and Yellow.
• B0:0 B1:0 \~ B0:1 B0:1
- Used to set the color of the Byte0 and Byte1 of Control Byte based on TSL Protocol V3.1.
- Available colors are Off, White, Red, Green, Blue, Yellow, Cyan and Magenta.
05 MENU OPERATIONS
[7] SYSTEM / GPI / UMD
* Transmission (18 Byte) (PC or Device -> Monitor)
| HEADER(1 BYTE) | CONTROLBYTE(1 BYTE) | DISPLAY DATA(16 BYTE) |
* [HEADER] : Display address (0\~126) + 80 hex.
* [CONTROL BYTE]
bit 0 : Tally 1 (1=on, 0=off)
bit 1 : Tally 2 (1=on, 0=off)
bit 2 : Tally 3 (1=on, 0=off)
bit 3 : Tally 4 (1=on, 0=off)
bit 4 : bright data (Not used)
bit 5 : bright data (Not used)
bit 6 : reserved (Not used)
bit 7 : cleared to 0 (Not used)
* [DISPLAY DATA] : 16 displayable ASCII characters.
Tally1
CHANNEL1
Tally2 Tally3
CHANNEL1
Tally4
05 MENU OPERATIONS
[7] SYSTEM / GPI / UMD
• Tally Type - Default
- S-8C(Single 8 Character) & S-16C(Single 16 Character)
| Bit 1 (Tally2) | Bit 1 (Tally1) | Operation |
| 0 | 0 | CHANNEL1 |
| 0 | 1 | CHANNEL1 |
| 1 | 0 | CHANNEL1 |
| 1 | 1 | CHANNEL1 |
- D-8C(Dual 8 Character)
| Bit 1(Tally4) | Bit 1(Tally3) | Operation |
| 0 | 0 | CHANNEL1 |
| 0 | 1 | CHANNEL1 |
| 1 | 0 | CHANNEL1 |
| 1 | 1 | CHANNEL1 |
• D-UMD TALLY TPYE - USER COLOR
- Used to set the color of the TALLY1 \~ TALLY4.
Activates as follows when the UMD DISPLAY is set to D-UMD(D-8C) and the D-UMD TALLY TYPE and the TALLY1 \~ TALLY4 COLOR is set to as below.
D-UMDTALLYTYPE
TALLY1 COLOR
TALLY2 COLOR
TALLY3 COLOR
TALLY4 COLOR
USER COLOR
RED
GREEN
RED
YELLOW
CHANNEL1 CHANNEL1
CHANNEL1
06 BUTTON FUNCTIONS
INPUT BUTTON & FUNCTION KEY SET BUTTON
[1] INPUT BUTTON [2] FUNCTION KEY SET BUTTON
SDI A
SDI B
HDMI
NO VIDEO
- R-Series unit is capable of processing SDI/HDMI Input signal.
- Press the[MENU<EXIT]button on the front of the monitor for more than 2 seconds and activate the OSD menu as shown on the below.
- Input resolution displays on the bottom of the OSD screen.
- Press the [MENU<EXIT] button again to remove the OSD menu from display.
* If no image displays after selecting the desired input mode, check and make sure that your connection is not lost or disconnected.
F1 FUNC SEL
SCAN
ASPECT
MARKER
H/V DELAY
BLUE ONLY
ZOOM
ZOOM SPLIT
FREEZE
DSLR SCALE
AUDIO LVM
TIME CODE
FOCUS ASSIST
WAVEFORM
LUMA(Y') ZONE
RANGE ERROR
MAX BRIGHTNESS
CAMERA LUT
DISPLAY ENABLE
INPUT SELECT
ARRI METADATA
- Used to make a quick setting of the Function Key.
- Press the function button(F1\~F2) on the front of the monitor for more than 2 seconds and activate the OSD menu as follows.
- Move to a desired function with the Knob and press the Knob to select.
- Once the function is set, press the Function button(F1\~F6) to activate the function.
07 OTHER FUNCTIONS
[01] USER ASPECT
• Used to adjust the Width /Height display ratio.
- Select [Aspect] mode in the OSD menu by pressing the function button on the right top of the monitor to activate the [USER ASPECT] mode.
- After the activation, press the Knob to begin controlling. Adjust the ratio using the knob.
USER ASPECT
WIDTH +1920
HEIGHT +1080
![TVLogic R-5T - [01] USER ASPECT - 1](/content/2026/05/934169/images/fc6cbe9fa748155558c8d0de568d8bd95cb644a2dac78390185fd9df6545fc29.jpg)
natural_image
Two-panel color swatch image showing solid and striped bars in yellow, cyan, green, magenta, red, blue, and black (no text or symbols)![TVLogic R-5T - [01] USER ASPECT - 2](/content/2026/05/934169/images/a2e6c0d88a8edee19b93f84fc9dd8513cc9a0f41823cfeacd6381b31efda9145.jpg)
natural_image
Two-panel color calibration image showing CMYK and grayscale color mapping (no text or symbols)- Adjust the ratio using the Knob.
- Control range for width: 0\~1920.
- Control range for height : 0\~1080.
- The size-adjusted picture always stays in the center of the screen.
- The size can be adjustable with 2 increment and decrement.
# To adjust the 16:9 aspect ratio of 1920X1080 resolution into 2.35:1 aspect ratio, adjust the width and height as 1280 x 544.
07 OTHER FUNCTIONS
[02] WAVEFORM / VECTORSCOPE
- WAVEFORM Y
- Displays the Luma(Y') component of the input signal into waveform.
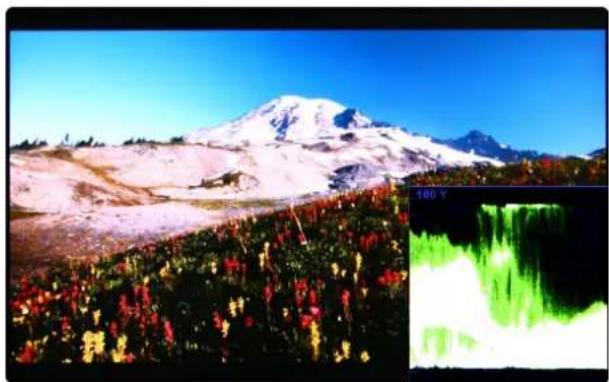
natural_image
Scenic mountain landscape with snow-capped peaks and colorful flowers, inset shows a waterfall display (no text or symbols)- The Waveform/ Vectorscope function can be used only when the input signal is YUV.
-
In the case of RGB input, Waveform RGB is supported.
• Available modes in the YUV signal: -
Waveform Y
- Vectorscope
- Waveform Wide
- Waveform Y Cb Cr
- RGB(Conv.)
- Wave Vector
- Vector_YCbCr
- Full Waveform(Y)
- Full Vectorscope
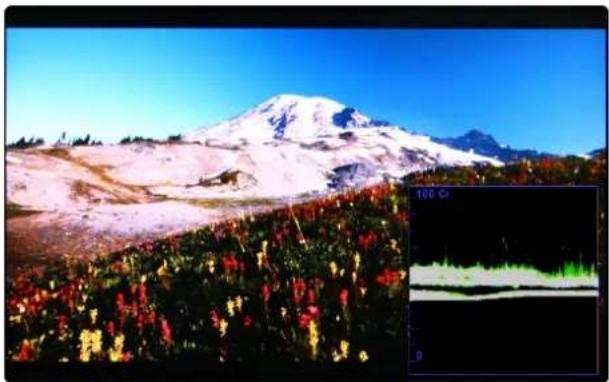
- WAVEFORM Cb, Cr
- Displays the Cb, Cr components of the input signal into waveform.
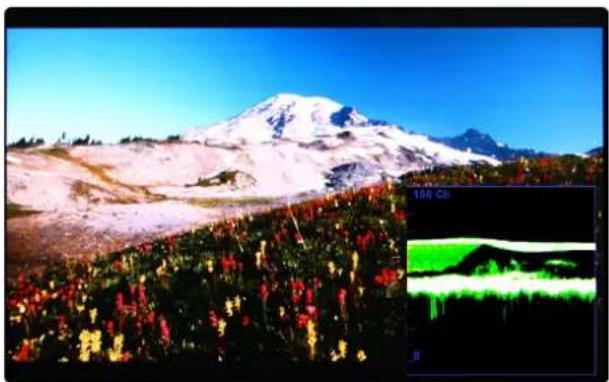
natural_image
Snow-capped mountain landscape with colorful foliage under a clear blue sky, inset shows a 100 CB signal (no text or symbols on main scene)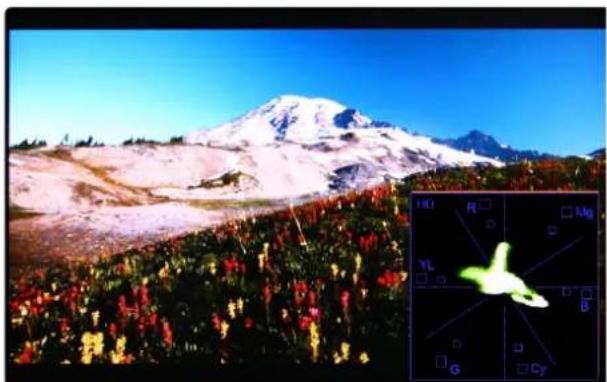
natural_image
Mountain landscape with snow-capped peaks and colorful flowers, inset shows a 3D coordinate system (H0, R, Mg, YL, B, G, Cy) with a stylized airplane in flight.- VECTORSCOPE
- Displays the color components 'B-Y' and 'R-Y' of the input signals onto the X-Y axis.
- Two different types of Vetorscopes are displayed according to SD or HD input signals.
- 100% and 75% scales are indicated on the Vetorscope.rm.
natural_image
Snow-capped mountain landscape with colorful foliage under a clear blue sky, inset shows a 100 Cr spectral line (no text or symbols on main scene)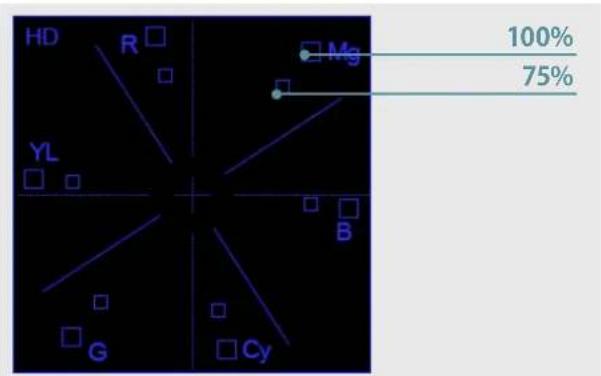
radar
| Element | Value (%) | |---|---| | Mg | 100 | | YL | 75 |07 OTHER FUNCTIONS
[03] LINE SELECT (WAVEFORM/VECTORSCOPE)
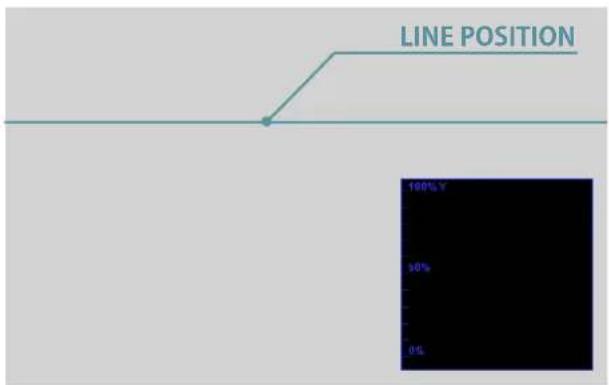
- Used to select specific Vertical Line for WaveForm/VectorScope.
- This is available when LINE WaveForm is activated.
- To activate this feature, go to [Waveform]-[Waveform/Vector]-[Line Waveform]-[Select Line Position] and use the Knob to select a vertical line.
- Selected line is indicated in White on the screen.
- Control range varies according to the resolution of the input SDI signal.
* PAL: 0\~625
* NTSC: 0\~525
* 720p : 0\~750
* 1080 i/p : 0\~1125
* Selected line is indicated on the screen.
07 OTHER FUNCTIONS
[04] ZOOM
• Used to magnify the input signal from 0% to 90%.
- Supports Zoom Width Scroll / Zoom Height Scroll function.
- Zooms IN/OUT focused on the scrolled area.
![TVLogic R-5T - [04] ZOOM - 1](/content/2026/05/934169/images/bdf126241e96a12e4fde90a82b200c74148dc0ccfb168c662607877c91e93a2c.jpg)
natural_image
Mountain landscape with snow-capped peaks and colorful wildflowers under a clear blue sky (no text or symbols)![TVLogic R-5T - [04] ZOOM - 2](/content/2026/05/934169/images/0283ddc81e129644b3cfcbf7dc562427a03ab3ee8b5a8b25326c6848ecaac0bd.jpg)
natural_image
Mountain landscape with snow-capped peaks and surrounding flowers under a clear blue sky (no text or symbols)![TVLogic R-5T - [04] ZOOM - 3](/content/2026/05/934169/images/f7f1c5b44852db8bf39b9472b8ca2ea2999eb7ca47af64fd7d1291aa174e085d.jpg)
natural_image
Snow-capped mountain peak under clear blue sky, with colorful flowers in foreground (no text or symbols)07 OTHER FUNCTIONS
[05] LUMA (Y') ZONE CHECK
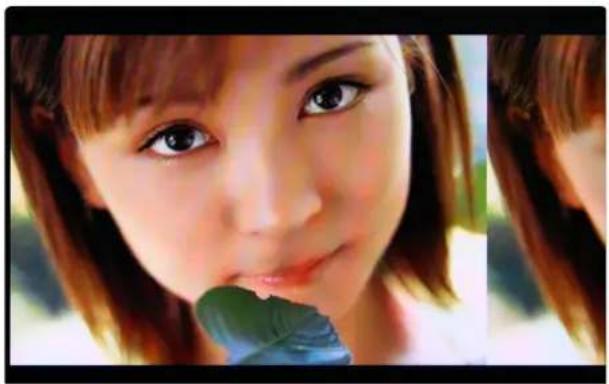
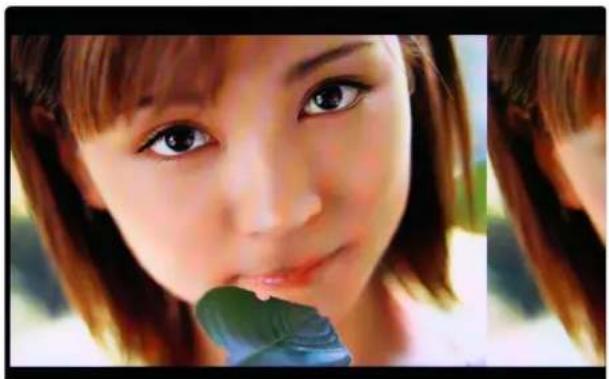
• COLOR PATTERN TYPE
- Displays the Luma(Y') level of the input image in colors.
- Y' ≥ 100% : Pixels with higher Y' level than 100 turn to red.
- Y' ≤ 0% : Pixels with lower Y' level than 0 turn to green.
- Pixels with Y' levels designated by the user are displayed in following colors - yellow, pink, cyan.
- Factory Default Y' (Border line between pink and yellow) level is 75% and the pink color is assigned to pixels with Y' level from 70% to 75%.
- Yellow color is assigned to pixels with Y' level from 75% to 85%, and Cyan from 60% to 70%.
- This function is designed for a better performance in setting the exposure when shooting with DSLR cameras.
natural_image
Close-up portrait of a young woman with brown hair holding a green leaf (no text or symbols visible)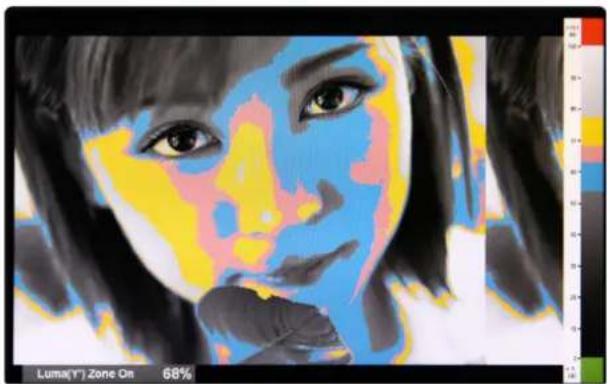
natural_image
Portrait of a person with facial features colored by color (no text or symbols visible)• ZEBRA PATTERN TYPE
- Displays the pixels with designated Luma(Y') levels with zebra pattern.
- Y' ≥ 100%: Pixels with Y' level over 100% turn to red diagonal stripes.
- Y' ≤ 0% : Pixels with Y' level under 0% turn to green diagonal stripes.
- User defined Y' levels are displayed as black diagonal stripes.
- Factory Default Y' level is 70% and the pixels with Y' level from 65% to 75% is displayed with zebra pattern.
- Pixels with 10% of Y' level is displayed as black diagonal stripes.
- This function is designed for a better performance in setting the exposure when shooting with vDSLR cameras.
natural_image
Close-up portrait of a young girl with dark eyes and green leaf, no visible text or symbols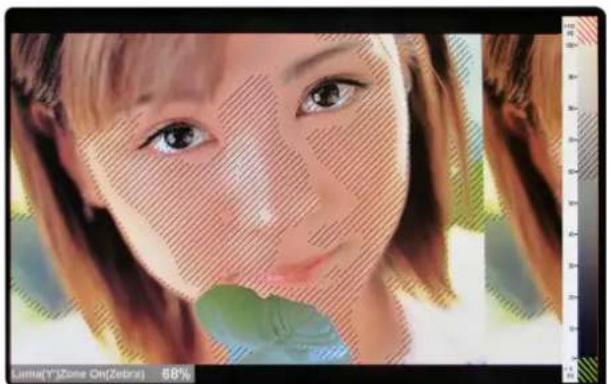
natural_image
Close-up portrait of a person with visible facial features and green foliage, no text or symbols present.07 OTHER FUNCTIONS
[06] FOCUS ASSIST
- Focus Assist function assigns a color to the pixels in the shape or the boundary of the image to inform the user to achieve the best focus.
- With this function, user can easily differentiate the focused area from the out-focused area especially when shooting with a shallow depth of field.
- Available types are [Mono] and [Color] types.
* [Mono] : Background image is mono type.
* [Color]: Background image is original color type.
![TVLogic R-5T - [06] FOCUS ASSIST - 1](/content/2026/05/934169/images/93a162cf5702ed5d0e1712997fe75fbd776eb85f76773f54e9106ce439855dea.jpg)
natural_image
Two women gently holding flowers, one looking at the camera (no visible text or symbols)![TVLogic R-5T - [06] FOCUS ASSIST - 2](/content/2026/05/934169/images/5e163d67fdc5ff44a56ff61827857a5b9c69323b1de5e705463a930f83fe3f3e.jpg)
natural_image
Black-and-white photo of two women in close proximity, one holding a rose, with red lighting effects (no text or symbols visible)07 OTHER FUNCTIONS
[07] RANGE ERROR
- Pixels with Y' or C' levels exceeding the designated levels of Y MAX, Y MIN, C MAX and C MIN shall blink.
- Analyzes the input signal's Luma(Y') and chroma information(C') and if the input signal exceeds the designated minimum value and maximum value, the pixel shall blink. This function is to help the user to easily find out any unwanted level of signals and for a better exposure setting.
* In the case of RGB input, Range Error is not supported.
![TVLogic R-5T - [07] RANGE ERROR - 1](/content/2026/05/934169/images/ea856db9fc77fdeb31bd6e083d0cdf0f537654fde58726c12a37874d3eb8806c.jpg)
natural_image
Scenic mountain ridge with forested slopes and a distant lake under a cloudy sky (no text or symbols visible)![TVLogic R-5T - [07] RANGE ERROR - 2](/content/2026/05/934169/images/709f011ff3bfd51eaf041c7b7e87b01d22493d68c841480f892a2796d972739c.jpg)
natural_image
Scenic landscape with snow-covered trees on a hillside overlooking a calm lake, distant forested hills under a clear sky (no text or symbols visible)07 OTHER FUNCTIONS
[08] DSLR SCALE
- This function is designed for some DSLR cameras of Canon(7D) that output different resolution from the operation mode (StandBy, Record, Play Back)
- Select the Camera model in the [Display/Vide]- [DSLR Camera Sel.] menu.
• CANON (5D/550D)
- In StandBy mode of Canon 5D Mark II, 1080i of HD resolution is indicated. However, real output resolution is 1620x1080 so blank area is displayed on the screen because the 16:9 aspect ratio is not realized.
- In this case, use DSLR SCALE function to enlarge the 1920x1080 image and display full screen.
- In Recording mode of CANON 5D Mark II, the output resolution is SD(480p).
- Although it is SD, the real output resolution is 640x390 not 720x480.
- DSLR SCALE function scales the 640×390 image to 1280×800(panel resolution) and display full screen.
*Note
-
When you compare the circle chart or the camera shooting chart with DSLR connected monitor(HDMI) and HDMI to SDI Conversion connected monitor, The function of Live/Rec 16:9 mode should be selected to compare circle and it is equal to its actual. If the circle is compared in Live/Rec Full mode, the output of the circle is deformed.
-
Both the DSLR Camera connected monitor and HDMI to SDI Conversion connected monitor should be compared to circle in Zeroscan mode. It is deformed if user selects in Overscan and Underscan mode.
![TVLogic R-5T - [08] DSLR SCALE - 1](/content/2026/05/934169/images/cf50935549be8f6acae418b72f2f2feeb0613b3ee7e9edcb6e8e14321f24745f.jpg)
natural_image
Scenic lake view with sky and clouds, framed by decorative orange arrows on black background (no text or symbols)![TVLogic R-5T - [08] DSLR SCALE - 2](/content/2026/05/934169/images/3ac243a14fea0f87151ec27eb4206e067681a690d7513100934ae886c96267e1.jpg)
natural_image
Scenic lakeside view with a small building and rocky shoreline, reflecting in calm water under a partly cloudy sky (no text or symbols visible)07 OTHER FUNCTIONS
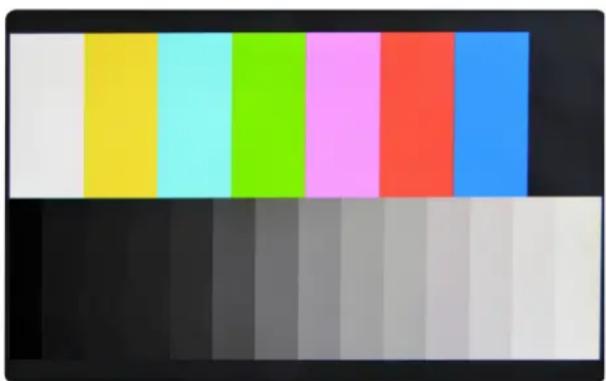
[09] INTERNAL PATTERN
- Displays internally generated test patterns.
- The pattern consists of ColorBar and Pluge+ Grayscale Patterns. Full screen colors of various gray levels (0\~100%) are also embedded.
natural_image
Color swatch bar with eight solid color blocks (yellow, cyan, lime, pink, red, blue) on black background, no text or symbols
natural_image
Blank white image with no visible content, text, or symbols07 OTHER FUNCTIONS
[10] ARRI CAM STATUS
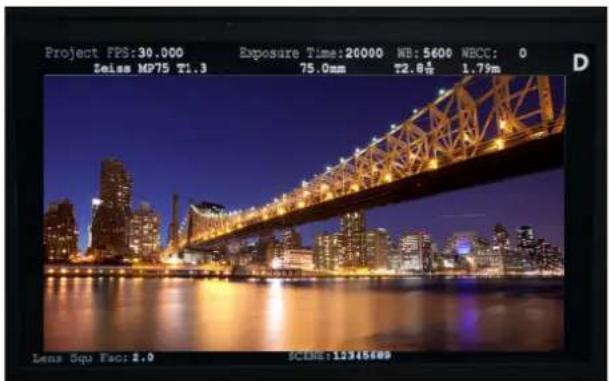
• Used to display the camera status information provided by ARRI ALEXA camera on the OSD.
- Displays the information in the order: [Project FPS]-[Exposure Time]-[White Balance]-[White Balance CC]-[Camera Index Letter] / [Lens Name]-[Focal Length]-[Iris]-[Focus Distance] / [Lens Squeeze Factor]-[Scene] - When the Arri Cam Status is activated, the screen will be scaled to 1742 x 980.
07 OTHER FUNCTIONS
[11] FIRMWARE UPGRADE
- The USB(Thumb drive) which contains the F/W file is needed for Firmware Upgrade.
-
Select the SW UPGRADE in the SYSTEM menu.
-
Connect the USB to the USB Slot on the front of the monitor.
- Select what to update among CPU / FPGA / ALL in [S/W UPGRADE].
- When the USB connection is completed, the S/W upgrade starts and the progress displays on the bottom left side of the screen.
- If the USB doesn't connect properly or there is no file in the specified location, the error message will be displayed on the bottom left side of the screen and the upgrade won't start.
- In that case, check the USB or the file location and try again.
• After USB connection, turn off and then on the monitor.
08 VIDEO SUPPORT RESOLUTION
INPUT SIGNAL INTERFACES SIGNAL FORMAT (SD SDI)
| SD SDI | 720x487 (59.94i) | YCbCr 4:2:2 10bit |
| single link | 720x576 (50i) |
INPUT SIGNAL INTERFACES SIGNAL FORMAT (HD SDI)
| HD SDI single link | 1280x720 (23.98/24/25/30/50/59.94/60P) 1920x1080 (23.98/24/25/29.97/30p)(50/59.94/60I) YCbCr 4:2:2 10bit (24/25/29.97/30psf) |
INPUT SIGNAL INTERFACES SIGNAL FORMAT (3G SDI)
| 1920x1080 (60p/59.94p/50p) | YCbCr 4:2:2 10bit | |
| 3G-SDI (A/B) | 1920x1080 (30/29.97/25/24/23.98/30sF/29.97sF/25sF/24sF/23.98sF) | YCbCr 4:2:2 12bit |
| single link | 1920x1080i (60/59.94/50) | RGB 4:4:4 10bit / 12bit |
| 1280x720((23.98/24/25/29.97/30/50/59.94/60P) | YCbCr 4:4:4 10bit | |
| RGB 4:4:4 10bit | ||
| YCbCr 4:4:4 10bit |
INPUT SIGNAL INTERFACES SIGNAL FORMAT (12G SDI)
| 12G-SDI (A) | 12G-SDI 4096/3840x2160 (60/59.94/50p) | YCbCr 4:2:2 12bit |
| Single link | 6G-SDI 4096/3840x2160 (30/29.97/25/24/23.98p) |
INPUT SIGNAL INTERFACES SIGNAL FORMAT (12G SDI)
| 1080p (60/59.94/50/30/29.97/25/24/23.98) | ||
| HD-SDI | 1080i/60/59.94/50) | RGB 4:4:4 8bit / 10bit / 12bit |
| 720p (50/59.94/60p) | YCbCr 4:4:4 8bit / 10bit / 12bit | |
| Single link | 480i(60) / 576i(50) | YCbCr 4:2:2 8bit / 10bit / 12bit |
| 480p(60) / 576p(50) |
09 PRODUCT SPECIFICATIONS
| R-5T | ||
| LCD | Size 5.5" | |
| Resolution 1920x1080 | (16:9) | |
| Pixel Pitch 0.0213(W) x | 0.0639(H) mm | |
| Color Depth 16.7M (True) | ||
| Viewing Angle (Typ.) 160°(H)/160°(V) | ||
| Luminance of white | 500 cd/ m2 (Center) | |
| Contrast Ratio 1,000 : 1 | ||
| Display Area 122.7(H)x69.0(V) mm | ||
| Input | 1 X HDMI HDMI Input | |
| 2 X BNC SDI Input (12G-SDI x 1 / 3G-SDI x 1) | ||
| Output 2 X BNC SDI | Output (12G-SDI x 1 / 3G-SDI x 1), HDMI to SDI conversion output | |
| Input Signal | 12G-SDI | 11.88Gb/s |
| 6G-SDI | 5.94Gb/s | |
| 3G-SDI | 2.970Gbps | |
| HD-SDI | 1.485Gbps | |
| SD-SDI | 270 Mbps | |
| HDMI | 1080p(60/59.94/50/30/25/24/23.98)/1080i(60/59.94/50)/720p(60/50)/480i(60)/480p(60)/576i(50)/576p(50) | |
| SDI Input Signal Formats | SMPTE ST 2082 | 3840x2160(60/50/59.94p) |
| SMPTE ST 2081 | 3840x2160(30/29.97/25/24/23.98p) | |
| SMPTE-425M-A/B | 1080p(60/59.94/50/30/29.97/25/24/23.98/30sF/29.97sF/25sF/24sF/23.98sF) | |
| SMPTE-274M | 1080i (60/59.94/50) | |
| 1080p (30/29.97/25/24/24sF/23.98/23.98sF) | ||
| SMPTE-296M | 720p(60/59.94.50/30/29.97/25/24/23.98) | |
| SMPTE-125M | 480i (59.94) | |
| ITU-R BT.656 576i (50) | ||
| Audio In | Embedded Audio | |
| Audio Out | Speaker | |
| Power | DC 12V / 2.9A | |
| Power Consumption (Approx.) | 35W | |
| Tally Signal In/Out Level | DC5V ±2V | |
| Operating Temperature | 0°C to 45°C (32°F to 113°F) | |
| Storage Temperature | -20°C to 60°C (-4°F to 140°F) | |
| Main Body Dimensions (mm/inch) | 439 X 87.5 X 118.7 (17.28 X 3.44 X 4.67) | |
| Main Body Dimensions with RMK (mm/inch) | 480.2 X 87.5 X 141.7 (18.9 X 3.44 X 5.58) | |
| Box Dimensions (mm/inch) | 555 X 180 X 250 (21.85 X 7.08 X 9.84) | |
| Weight | 2.9Kg/6.4lbs | |
| Basic Accessories | DC Power adapter, Rack Mountable Kit | |
| Optional Accessories | - | |
* The specification above may be changed without notice.
* When using a DC Adapter other than the one supplied by the manufacturer, please be advised that the adapter with DC 12V/3A \~ 6A can be compatible with the monitor.
09 PRODUCT SPECIFICATIONS
| R-7D | ||
| LCD | Size 7.02" | |
| Resolution 1920x1200 | ||
| Pixel Pitch 0.07875(W) x 0.07875(H) mm | ||
| Color Depth 16.7M (True) | ||
| Viewing Angle (Typ.) 160°(H)/160°(V) | ||
| Luminance of white | 500 cd/ m2 (Center) | |
| Contrast Ratio 1,200 : 1 | ||
| Display Area 151.2(H)x94.5(V) mm | ||
| Input | 1 X HDMI HDMI Input | |
| 1 X BNC 3G-SDI | ||
| 1 X BNC 12G-SDI | ||
| 2 X RJ45 RS-422, REMOTE | ||
| Output | 1 X BNC | 12G-SDI OUT (Passive Through Out) |
| 1 X BNC | 3G-SDI OUT (Passive Through Out) | |
| 1 X RJ45 | RS-422 | |
| Input Signal | 12G-SDI | 11.88Gb/s |
| 6G-SDI | 5.94Gb/s | |
| 3G-SDI | 2.970Gbps | |
| HD-SDI | 1.485Gbps | |
| SD-SDI | 270 Mbps | |
| HDMI | 1080p(60/59.94/50/30/25/24/23.98)/1080i(60/59.94/50)/720p(60/50)/480i(60)/480p(60)/576i(50)/576p(50) | |
| SDI Input Signal Formats | SMPTE ST 2082 | 2160p (60/59.94/50/30/29.97/25/24/23.98/30sF/29.97sF/25sF/24sF/23.98sF)2160i (60/59.94/50) |
| SMPTE-425M-A/B | 1080p (60/59.94/50/30/29.97/25/24/23.98/30sF/29.97sF/25sF/24sF/23.98sF)1080i (60/59.94/50) | |
| SMPTE-274M | 1080i (60/59.94/50) | |
| 1080p (30/29.97/25/24/24sF/23.98/23.98sF) | ||
| SMPTE-296M | 720p(60/59.94.50/30/29.97/25/24/23.98) | |
| SMPTE-125M | 480i (59.94) | |
| ITU-R BT.656 576i (50) | ||
| Audio In | Embedded Audio | |
| Audio Out | Speaker | |
| Power | DC 12V / 1.85A | |
| Power Consumption (Approx.) | 22W | |
| Tally Signal In/Out Level | DC5V ±2V | |
| Operating Temperature | 0°C to 45°C (32°F to 113°F) | |
| Storage Temperature | -20°C to 60°C (-4°F to 140°F) | |
| Main Body Dimensions (mm/inch) | 430 X 120 X 50.5 (16.93 X 4.72 X 1.99) | |
| Main Body Dimensions with RMK (mm/inch) | 480.8 X 132 X 73 (18.92 X 5.19 X 2.87) | |
| Box Dimensions (mm/inch) | 555 X 165 X 230 (21.85 X 6.50 X 9.06) | |
| Weight | 2.46Kg / 5.42lbs | |
| Basic Accessories | DC Power adapter, Rack Mountable Kit | |
| Optional Accessories | - | |
MEMO
MEMO
- LCD RACK MOUNTABLE MONITOR
- CONTENTS
- CAUTION
- WARNING
- MAIN FEATURES
- R-Series Monitors contain the following features :
- CONTROLS & FUNCTIONS
- R-5T : FRONT
- • [TALLY]
- • [POWER]
- • [MENU]
- • [UP]
- • [DOWN]
- • [ENTER]
- •[USB] (Micro B USB)
- • 12G/6G/3G [SDI IN/OUT] (BNC)
- • 3G [SDI IN/OUT] (BNC)
- • [HDMI IN] (HDMI)
- • [REMOTE] (RS-422)
- • [RS-422 IN/OUT] (RS-422)
- • DC IN
- R-7D : FRONT
- • [SDI]
- • [HDMI]
- • [F1/F2]
- • [MENU/EXIT] Button
- •[UP/DOWN/ENTER] Knob
- •[USB] (USB-A)
- •[AUDIO OUT] (Phonejack)
- R-7D : REAR
- MENU TREE & ADJUSTMENT
- [2] MENU CONTROL
- MENU OPERATIONS
- [1] PICTURE
- • BRIGHT
- • CONTRAST
- • CHROMA
- • SHARPNESS
- - PEAKING BOOST
- - KNOB LOCK
- • 3DLUT LOAD
- • 3DLUT SYNC
- • 3DLUT IMPORT 1/2/3
- [2] COLOR
- • STANDARD
- Activates only in the User1/2/3 mode.
- •VIDEO RANGE
- - PEAK LUMINANCE
- - BLACK LEVEL
- • COLOR GAMUT
- The submenus may be activated in the User1/2/3 mode only.
- • COLOR TEMP (Color Temperature)
- •EOTF (Electro-Optical Transfer Function)
- - LOCAL DIMMING
- • EETF (Electrical-Electrical Transfer Function)
- • HLG SG (HLG System Gamma)
- • SG (System Gamma)
- • CAM LUT (Camera LUT)
- • TEMP COLOR (Color Temperature)
- In User 1/2/3 modes, user can define custom RGB GAIN, BIAS (=Offset) and Color Copy values.
- Only available in User 1/2/3 mode.
- • BIAS RED / GREEN / BLUE
- • COLOR COPY
- • COLOR SPACE
- [3] MARKER
- - ENABLE
- - MARKER
- • CENTER MARKER
- • SAFETY AREA
- • FIT MARKER
- • MARKER MAT
- • MARKER COLOR
- • THICKNESS
- - USER MARKER H1
- - USER MARKER H2
- - USER MARKER V1
- - USER MARKER V2
- - GRID ENABLE
- • GRID TYPE
- • GRID THICKNESS
- [4] DISPLAY / VIDEO
- • SCAN
- • ASPECT
- • H/V DELAY
- - BLUE ONLY
- - USER ASPECT HORIZONTAL/USER ASPECT VERTICAL
- • 3G FORMAT
- •ZOOM
- •ZOOM SPLIT
- • CLOSED CAPTION
- • CC INFO
- • CHANNEL (608)
- • SERVICE (708)
- • DSLR
- • DSLR SCALE
- • TIMECODE
- • FOCUS ASSIST
- • FOCUS AS COLOR (Focus Assist Color)
- • FOCUS AS LEVEL (Focus Assist Level)
- •ARRI CAM STATUS (Arri Cameara Status)
- •LDS INFO (Lens Data System Information)
- • INDEX LETTER
- [5] WAVEFORM
- • TYPE
- • INTENSITY
- • TRANS (Transparency)
- • SIZE
- •LINE WAVEFORM
- • SEL LIN POS (Select Line Position)
- • LUMA CHECK
- • LUMA ADJUST
- • RANGE ERROR
- • Y MAX
- •Y MIN
- •C MAX
- • C MIN
- •Y PICTURE BLINK
- •C PICTURE BLINK
- [6] AUDIO
- • VOLUME
- • Em. AUD LEFT (Embedded Audio Left)
- • Em. AUD RIGHT(Embedded Audio Right)
- - LEVEL METER
- • LVM DISPLAY (Level Meter Display)
- • LVM REFERENCE (Level Meter Reference)
- • LVM SIZE (Level Meter Size)
- • PEAK DECAY TIME
- [7] SYSTEM / GPI / UMD
- - DEFAULT
- • LUMINANCE
- • INTERNAL PAT (INTERNAL PATTERN)
- • DISPLAY ENABLE
- • ECO SAVING
- - FAST MODE
- - KEY LED
- • S/W UPGRADE
- - VERSION
- • SERIAL NUM (Serial Number)
- • GROUP ID
- • MONITOR ID
- • RS-422 BAUD
- - PIN1\~PIN8
- • UMD ID
- • UMD DISPLAY
- • UMD CHARACTER
- • UMD CHAR COL (UMD Character Color)
- • UMD B.G TRANS (UMD Background Transparency)
- • UMD B.G SIZE (UMD Background Size)
- • D-UMD TALLY TYPE
- • TALLY COLOR
- • B0:0 B1:0 \~ B0:1 B0:1
- • Tally Type - Default
- • D-UMD TALLY TPYE - USER COLOR
- BUTTON FUNCTIONS
- INPUT BUTTON & FUNCTION KEY SET BUTTON
- [1] INPUT BUTTON [2] FUNCTION KEY SET BUTTON
- OTHER FUNCTIONS
- [01] USER ASPECT
- [02] WAVEFORM / VECTORSCOPE
- - WAVEFORM Y
- - WAVEFORM Cb, Cr
- - VECTORSCOPE
- [03] LINE SELECT (WAVEFORM/VECTORSCOPE)
- [04] ZOOM
- [05] LUMA (Y') ZONE CHECK
- • COLOR PATTERN TYPE
- • ZEBRA PATTERN TYPE
- [06] FOCUS ASSIST
- [07] RANGE ERROR
- [08] DSLR SCALE
- [09] INTERNAL PATTERN
- - Displays internally generated test patterns.
- [10] ARRI CAM STATUS
- [11] FIRMWARE UPGRADE
- VIDEO SUPPORT RESOLUTION
- PRODUCT SPECIFICATIONS
- MEMO
Brand : TVLogic
Model : R-5T
Category : Loudspeaker