SC-5500AU7TL - Washing machine Seiki - Free user manual and instructions
Find the device manual for free SC-5500AU7TL Seiki in PDF.


| Product Type | Top Load Washing Machine |
| Brand | Seiki |
| Model | SC-5500AU7TL |
| Washing Capacity | 5.5 kg |
| Power Supply | 240V ~ 50Hz |
| Rated Input Power | 400W |
| Standard Water Pressure | 0.03 - 0.8 MPa |
| Dimensions (W x D x H) | 515 x 525 x 910 mm (1223 mm with door open) |
| Net Weight | 31 kg |
| Gross Weight | 35 kg |
| Wash Programs | Normal, Soft, Mix, Strong, Jeans, Quick 15', Heavy, FCR |
| Child Lock | Yes (press and hold RINSE and PROGRAM buttons) |
| Delay Function | Yes (adjustable delay time) |
| Lint Filter | Built-in, clean every 10 cycles |
| Water Inlet Filter | Cleanable mesh filter |
| Drain Pump Filter | Cleanable |
| Bottom Cover | Included for stability |
| Levelling Feet | Adjustable |
| Drain Hose Height | 86 - 100 cm |
| Safety Feature | Automatic unbalance correction |
| Installation Clearance | 20 mm on all sides |
| Operating Temperature | 0 - 40°C |
| Usage | Indoor household use only |
| Maximum Dry Load | 5.5 kg |
Frequently Asked Questions - SC-5500AU7TL Seiki
If the Start/Pause button hasn't been pressed, press it to begin the cycle.
Soft: gentle wash with slow spin for delicate items.
Mix: for mixed fabrics like cotton, linen, and flax.
Strong: for large loads like curtains and bedding.
Jeans: for heavy stained jeans and sturdy clothes.
Quick 15': for lightly soiled clothes (15 minutes).
Heavy: for heavily stained items.
FCR: Fast Clean Reduce – saves up to 40% washing time by intensifying wash action.
User questions about SC-5500AU7TL Seiki
0 question about this device. Answer the ones you know or ask your own.
Ask a new question about this device
Download the instructions for your Washing machine in PDF format for free! Find your manual SC-5500AU7TL - Seiki and take your electronic device back in hand. On this page are published all the documents necessary for the use of your device. SC-5500AU7TL by Seiki.
USER MANUAL SC-5500AU7TL Seiki
natural_image
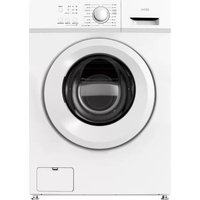
White washing machine with control panel and buttons, no visible text or symbols on the device bodyINSTRUCTION MANUAL
Please read this manual carefully before using, and keep it for future reference.
CONTENTS
| General | Safety | |||
| Product | Overview | |||
| Getting | Started | |||
| Levelling | the | appliance | ||
| Connecting the water inlet hose | 12 | |||
| Connecting | the | Drain | Hose | |
| Instructions | 14 | |||
| Operations | 17 | |||
| Cleaning | and | Maintenance | ||
| FAQs | 21 | |||
| Specifications | 22 | |||
| Customer | Helpline | 24 | ||
4
10
GENERAL SAFETY
IMPORTANT INFORMATION
Read this manual thoroughly before you start using the Top Load Washing Machine. The safety precautions instructions reduces the risk of fire, electric shock and injury when correctly complied to. Please follow all instructions and take notice of all warnings.
Pay close attention to messages that follow this safety alert symbol or the words DANGER, WARNING or CAUTION. These words will be used to alert you of potential hazards that and injure you and others. Following these instruction will tell you how to reduce the chance of injury and the possible dangers if instructions aren't followed.

WARNING
This symbol indicates when there is a serious risk of injury if you do not pay attention to the warnings.

CAUTION
This symbol indicates when to be careful to avoid a serious risk of injury to oneself or damage to property.
GENERAL SAFETY INSTRUCTIONS (Cont.)
ELECTRICAL SAFETY
- Voltage: Plug the appliance to a 240V \~ 50Hz, properly earthed power outlet, it must be in good working order.
- Power connection: Do not use an adaptor or an extension cord. Plug the power plug directly into a separate power point that cannot be accidentally turned off, and that is easily accessible so you can switch it off if needed.
- Power cord: Do not kink or damage the power supply cord. Make sure it is behind the appliance so no one can step on or place anything on the power supply cord or against it. A damaged power plug may overheat and cause a fire.
- Damaged cord: Do not use a cord that shows cracks or damage. Any damage to the cord may cause a short circuit, fire and/or electric shock. Contact our support centre on 1300 296 699 for advice
If the supply cord is damaged, it must be replaced by the manufacturer, its service agent or similarly qualified persons in order to avoid a hazard - Disconnection: Never pull the power cord to unplug appliance. Grip the plug and pull straight out from the power point.
- Electrical work: If the installation of this appliance requires any electrical work, make sure it is carried out by an electrician.
To reduce risk of fire, electric shock or injury, always follow these basic precautions and accident prevention measures when using this appliance, including the below:
NOTE: This appliance should be installed by an authorised technician else warranty will be void.
INSTALLATION
- The product is heavy, be careful when moving it. To avoid back or other injury, have 2 people lift or mechanical aid when installing.
- When unboxing, thoroughly inspect the appliance carefully for any damage. If there is any damage, do not install the appliance. Contact our support centre on 1300 296 699 for advice.
- While installing the appliance make sure that the power cord is not bent or flattened.
- Make sure to remove all packaging materials such as foams and tapes before installing the appliance.
- Make sure if the machine is to be placed on carpet that the ventilation openings in the base are not obstructed
• Install the washing machine on a flat level and stable ground. - Allow for 20mm of space on all sides of the washing machine.
- The openings shall not obstructed by carpet.
- This appliance is intended to be used in household and similar applications such as
- Staff kitchen areas in shops, offices and other working environments;
- Farm houses
- By clients in hotels, motels and other residential type environments;
- Bed and breakfast type environments;
- Areas for communal use in blocks of flats or in launderettes.
GENERAL SAFETY INSTRUCTIONS (Cont.)
USAGE CONDITIONS AND RESTRICTIONS
- Supervision over children is to ensure that they do not play with the appliance. Never allow them to use, play with or crawl inside the appliance. Cleaning and maintenance must not be done by children.
- This appliance is not to be used by persons (including children) with reduced physical, sensory or mental capabilities, or lack of experience and knowledge, unless they are being supervised or been given instructions on how to use of the appliance in a safe way and understand the hazards with using this appliance incorrectly.
- Only for indoor domestic use only. It is not to be used for industrial or commercial use.
- Do not use this product for anything other than its intended purpose, and only use it as described in this manual. Do not attempt to alter or modify this appliance.
- In the process of a hot wash, the door window can become hot. Make sure not to touch it or that no children or pets come into contact with the door window.
- Ensure that emptying all pockets of every item to make sure that there is no hard, sharp objects such as coins, safety pins, bra wires, nails or screws can cause damage to the appliance and has a chance to block the pump.
- Damage or malfunction caused from foreign objects is not covered by your warranty to the appliance.
- Do not operate this appliance outdoors.
- Incorrect use can result in property damage, injury or death. We assume no liability for misuse of the appliance or noncompliance with these instructions.
GENERAL SAFETY INSTRUCTIONS (Cont.)
CLEANING AND MAINTENANCE
- Before cleaning or maintenance, always unplug the appliance from the power socket. Make sure you pull by the plug, not the cord as this can damage the power cord and cause a hazard.
- Only the filter requires regular cleaning, everything else is non user-serviceable parts. Do not try to repair, disassemble or modify the appliance.
- Check and clean the lint filter on a regular basis
- Service: Never try to repair, modify or replace any part of the appliance, unless this manual says you can do so. All other servicing is to be done by a qualified technician, or contact our support centre on 1300 296 699 for advice.
PRODUCT OVERVIEW
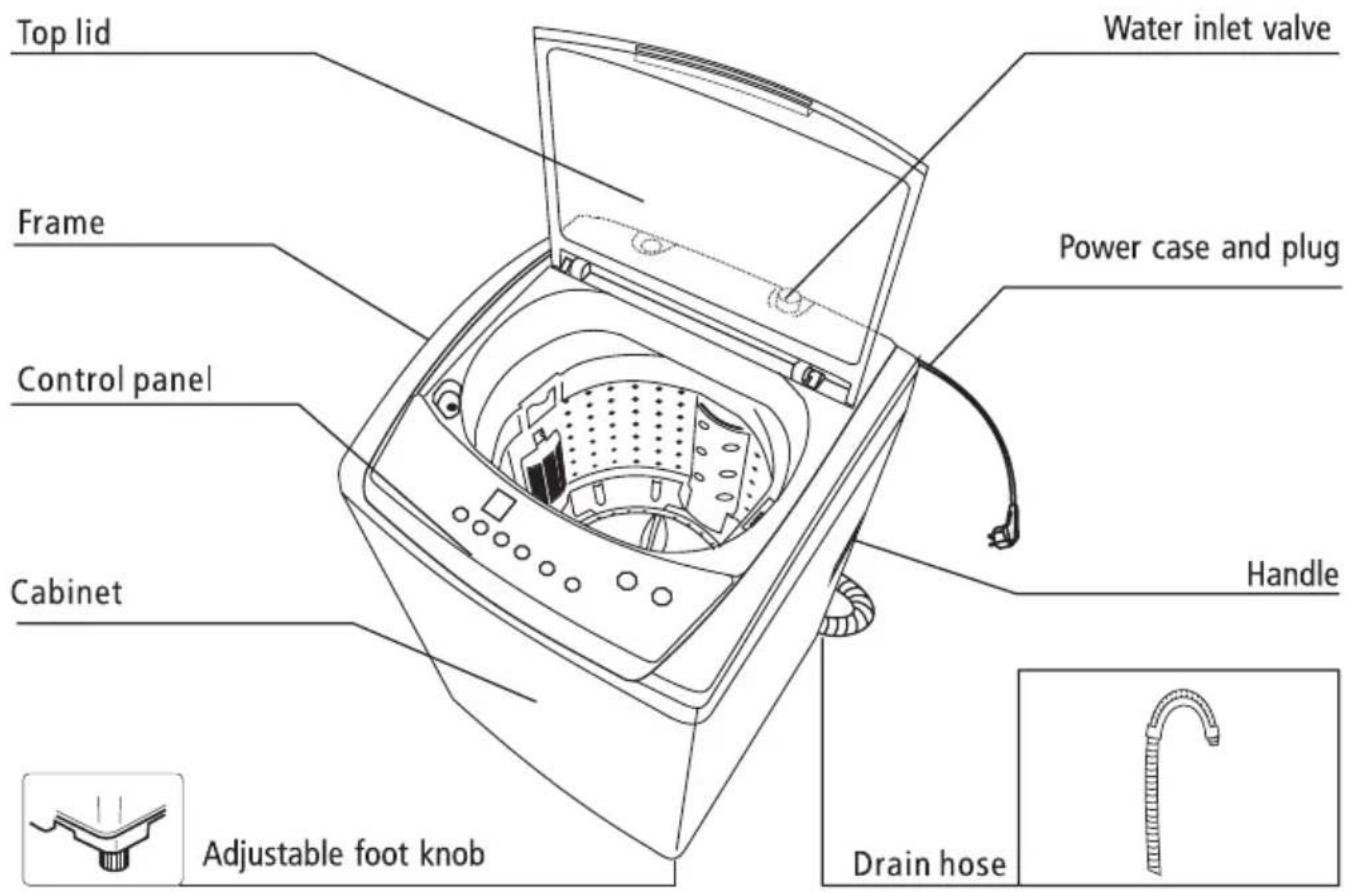
Accessories

PRODUCT OVERVIEW (Cont.)
CONTROL PANEL

flowchart
graph TD
    A["Light/Flash"] --> B["7 8 Delay (M)"]
    A --> C["5 6"]
    A --> D["3 4 FCS"]
    A --> E["1 2"]
    F["Light/Flash"] --> G["Soak Watercycle"]
    F --> H["Wash 3times"]
    F --> I["Rinse 2times"]
    F --> J["Spin 1time"]
    K["Start/Pause ONE TOUCH Smart Wash Auto Control Technology"] --> L["2 ON/OFF"]
    M["Water Level"] --> N["Delay"]
    O["Function"] --> P["Function"]
    Q["Program"] --> R["Program"]
    S["Temp."] --> T["Temp."]
-
ON/OFF: ON/OFF button allows you to turn the appliance off or on.
-
START/PAUSE: Press this button to start or pause the washing cycle.
-
PROGRAM: Before starting the washing machine, continuously press the "PROGRAM" button to select your desired program. (REFER TO PAGE 17 FOR PROGRAMS).
-
OPTIONS: Select either of the 4 functions shown,
-
DISPLAY: Displays the settings, estimated time remaining, options and status messages for your washer. The display will remain on while in use.
NOTE: When LED is flashing, it means the remaining time for "Delay" function. When LED stays lit, its the remaining time of the program wash.
CHILD LOCK: When you commence a washing cycle, Press and hold - (4) RINSE and (3) PROGRAM to lock the washing machine control panel. Press and hold the same buttons to unlock.
FCR: Press and hold - (3) PROGRAM and (4) TEMP. to activate or de-activate Refer to page 17 in this Instruction manual for more informatino.
Step 1 - Power on and select a washing between 5 of the 7 washing programs: Normal / Soft / Mix / Strong / Jeans.
Step 2 - Then Press and hold (3) PROGRAM and (4) TEMP. to turn on FCS.
Step 3 - Then Press (2) START/PAUSE to commence wash.
GETTING STARTED
Before installing your appliance, read all safety instructions in this manual, especially the sections on electrical safety and installation.
UNPACKING
- When unpacking the appliance, be sure to keep all the packaging materials until you have made sure your new appliance is undamaged and in good working order. Plastic can be a suffocation hazard for babies and young children, make sure the materials are out of their reach.
TRANSPORTATION
- CAUTION: VERY HEAVY! Be sure to team lift the appliance with someone or mechanical aid is required when moving the appliance. Keep the appliance upright as possible when moving the appliance.
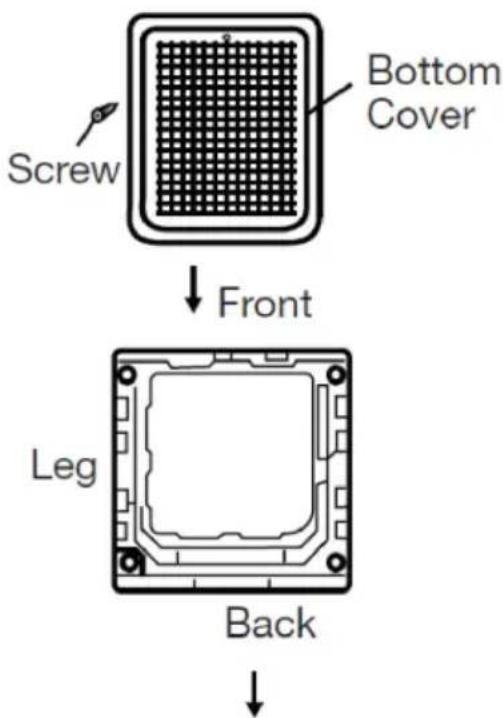
IMPORTANT! Installing the bottom cover
- Make sure the power cord is unplugged from the mains supply.
- Place some padding (such as a soft mat, blanket or thick towel) on the floor and gently lay the washing machine on the padding, back side down. Take care not to dent the housing.
- Insert the bottom cover into the hooks of the leg, pushing it straight until it reaches into the front hooks.
- Ensure to fasten the bottom cover with the supplied screws.
- Carefully set the washer upright.

natural_image
Exterior view of a mechanical component with grid pattern and mounting holes (no text or symbols visible)GETTING STARTED (Cont.)
LEVELLING THE APPLIANCE
IMPORTANT! Make sure to level the appliance carefully with a spirit level to ensure the most accurate levelling of the appliance. This is a must if your floor in unbalanced to level the washing machine.
- Make sure to position the appliance on a level and stable ground. If the floor is uneven you can adjust the feet by twisting the feet. Make sure to slightly incline the appliance first then adjust the leveling feet by twisting it clockwise or counter clockwise depending if you are raising or lowering the feet.

- By placing a spirit level on top of the appliance you can check correctly to aid you in adjusting the feet levelling nuts to adjust the appliance to be completely level.
Note: Make sure to avoid direct sunlight onto the appliance.
GETTING STARTED (Cont.)
CONNECTING THE WATER INLET HOSE
IMPORTANT! To prevent leakage or water damage please follow the below instructions. Do not kink, crush, modify or sever the water inlet hose.
- Connect the inlet pipe as indicated, there are two ways of connecting the inlet pipe.
• Minimum Inlet Water Pressure: 0.03MPa Maximum Inlet Water Pressure: 0.8MPa
INSTALL INLET PIPE
- Connect the elbow to tap and fasten it clockwise.
- Connect the other end of inlet pipe to the inlet valve at the backside of washing machine and fasten the pipe tightly clockwise.
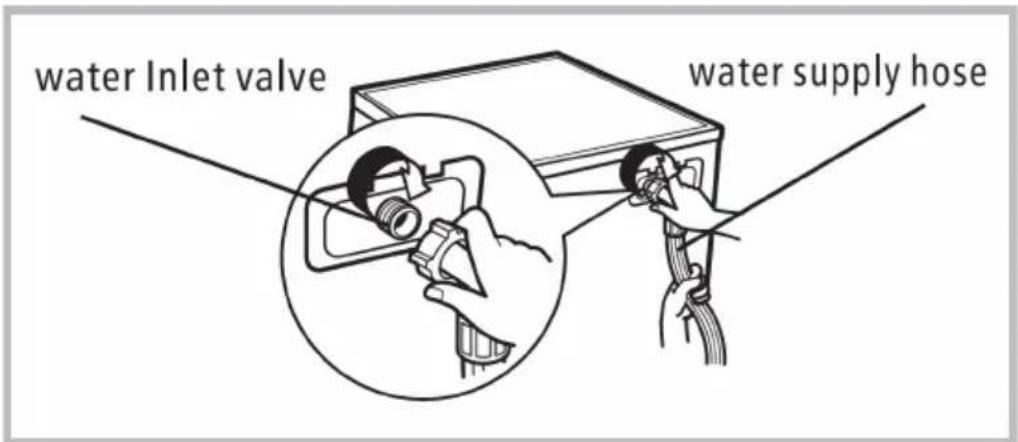
Notes: If there is any leakage with hose after connecting, then repeat the steps to connect inlet pipe. The most common type of tap shall be used to supply water. If the tap is square or too big, then the tap should be changed to a standard one.
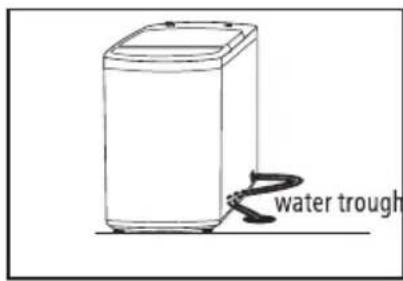
PLACE OUTLET HOSE
There is 1 way to place the end of outlet hose:
- Put it beside the water trough.
Connect the other end of the inlet pipe to the inlet valve on the back of the appliance and fasten the pipe tightly clockwise.

natural_image
Line drawing of a bathtub with a curved tube inserted into the sink, no text or symbols presentGETTING STARTED (Cont.)
CONNECTING THE DRAIN HOSE
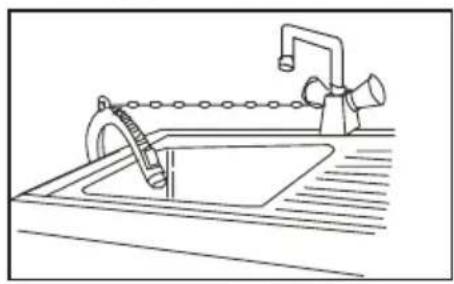
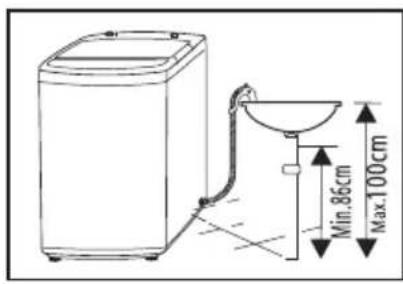
- Do not kink or protract the drain hose. Position the drain hose correctly other wise damage will result in water leakage.
- The height of the water drain hose can be from 86 to 100cm .
- Do not bend the drain hose or place it under the washing machine.
- Be sure to only use new hose sets when connecting the Washing Machine. Do not re-use old hoses.
There are two ways to place the end of drain hose:
1. For lower drain system


2. For upper drain system
natural_image
Line drawing of a kitchen sink with faucet and chain-link rings (no text or symbols)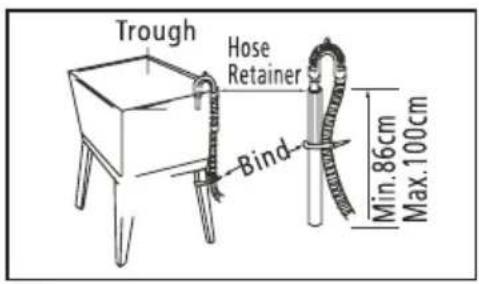
INSTRUCTIONS
BEFORE FIRST USE
• Make sure the washing machine is completely level as to previous instructions on how to level your washing machine.
• Make sure the water inlet hose is installed correctly.
• Make sure that the washing machine is plugged into the power socket.
- When the water inlet hose is installed, turn on the water supply on the tap.
- Properly install and set up the upper drain hose at no less then the height of 860mm, the water will overflow if it is below the recommended height of 860mm.

natural_image
Line drawing of a washing machine with a wall-mounted hose and height dimension labeled >860mm (no text or symbols on the device itself)After the above steps have been completed, In a few simple steps you can select the type of wash you want and get started.
INSTRUCTIONS (Cont.)
- Make sure that the appliance is in a correct working temperature (0-40°C). If the appliance is used under 0°C the inlet valve and draining system may be damaged.
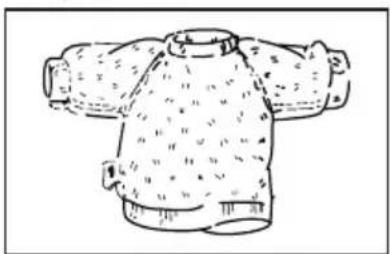
• Make sure that all labels are checked on items if they can be washed. - Use non-foaming or less-foaming detergents which are more suitable for washing machines to wash correctly.

natural_image
Simple line drawing of a sweater with a tag (no text or symbols)Check the label

Take out the items out of the pockets

natural_image
Line drawing of two fabric bags with circular designs and ribbon handles (no text or symbols)Knot the long strips,zip or button

natural_image
Line drawing of a bag with internal mesh pattern and small animal cutouts (no text or symbols)Put small clothes into the pillow slip
natural_image
Line drawing of a T-shirt with pleated collar and shoulder strap (no text or symbols)Turn easy-pilling and long-pile fabric inside out

natural_image
Simple line drawing of a bag being folded into a basket (no text or symbols)Separate clothes with different textures
WARNING
- Never use the washing machine to wash a single item at any given time, if you need to urgently wash an item, we suggest placing a few clothing items in there.
• Make sure that all labels are checked on items if they can be washed. - Use non-foaming or less-foaming detergents which are more suitable for washing machines to wash correctly.
• Maximum mass of dry clothes is 5.5kg
INSTRUCTIONS (Cont.)
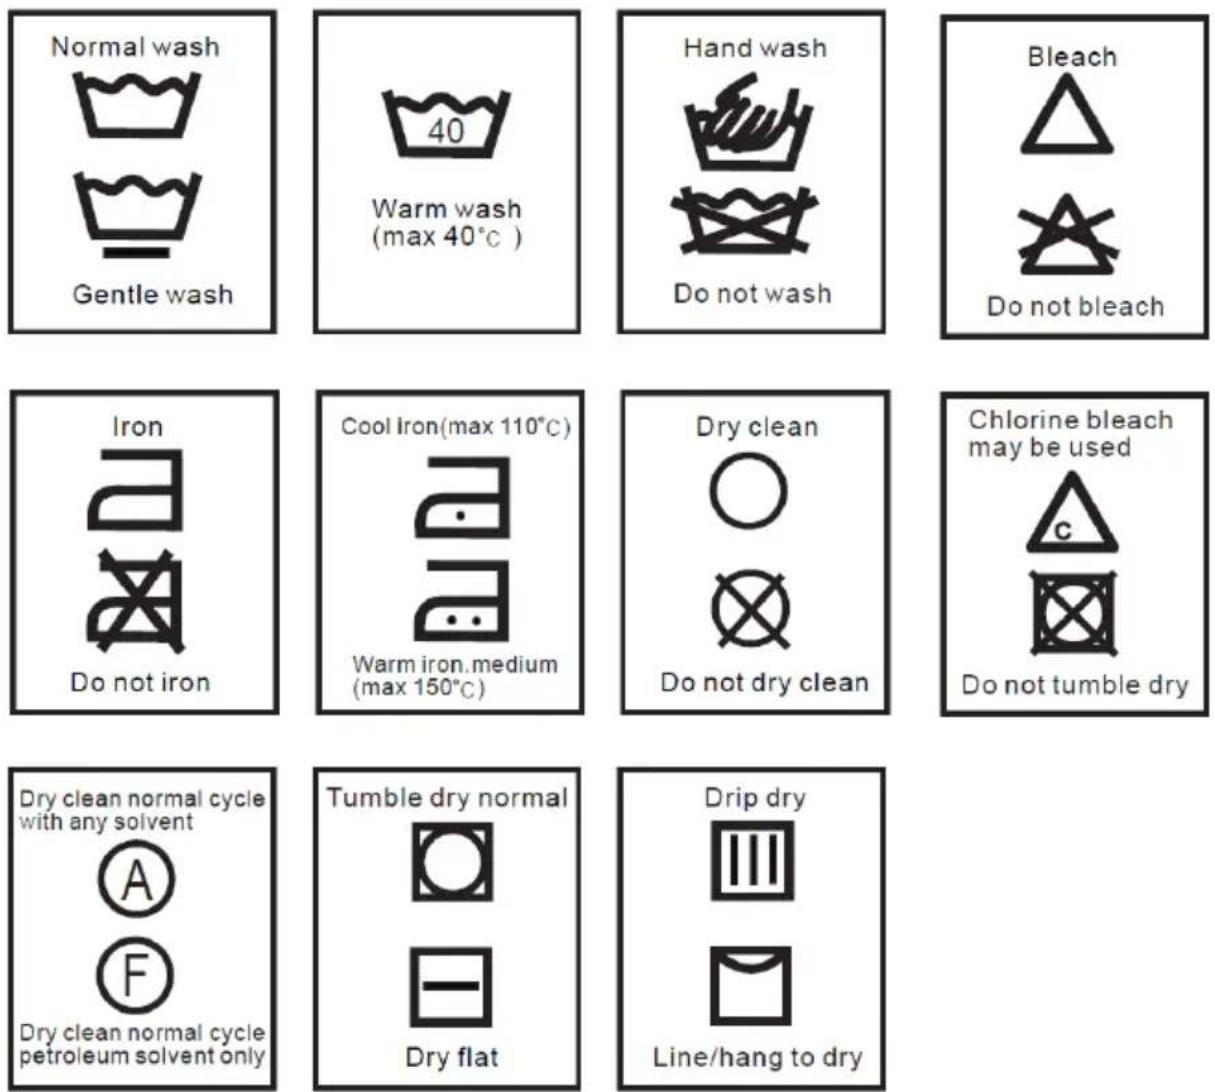
WASH CARE SYMBOLS
When choosing a wash program, check for any labels on your clothes and follow the instructions. below are some commonly used symbols.
OPERATIONS
PROGRAMS
Select the desired programs according to the clothes that are being washed.
| PROGRAMS | |
| Jeans Suitable for washing | heavy stained clothes and jeans. |
| Quick 15' Suitable to wash | lightly stained clothes. |
| Soft Washing tempo is soft | and spinning speed is slow, to make the lightest wear clean. |
| Mix Suitable to wash cotton | , linen, flax clothes |
| Normal Normal fabric washing | ing program suitable to wash cotton fabrics. |
| Strong Suitable for washing | large load size such as curtains and bed sheets. Extra Washing Time |
| Heavy Suitable for washing | heavily stained clothes. |
| FCR Can save up to 40% w | washing time by strengthening the washing beats while keeping the same washing effect simultaneously. |
*Normal- is the normal washing programs to which the information in the energy efficiency label relates, and they are suitable to clean normal soiled cotton laundry and they are the most efficient programs in terms of energy and water consumption for washing that type of cotton laundry, the actual water temperature may differ from the declared cycle temperature.
CLEANING AND MAINTENANCE
WARNING:
- Before starting maintenance, ensure that the appliance is unplugged and close the tap.
CLEANING THE CABINET
Proper maintenance on the washing machine can extend its working life. The surface can be cleaned with diluted non-abrasive neutral detergents when necessary. If there is any water overflow, use a wet cloth to wipe it off immediately. Make sure no sharp items are used to clean the appliance.
- Use a gentle cloth to wipe off the water and dirt on the surface of the washing machine after every use. Detergent, properllant and other chemicals are not allowed to be used to clean the washing machine surface as it can damage the plastic accessories.
CLEANING THE WATER INLET
1 Switch on the power, followed by shutting off the tap
2 Let the washer work for 5 seconds so that the water flows into the tub through the hose, then turn off the power.
3 Unload the water inlet hose and clean the mesh bag, then re-install everything.

natural_image
Diagram showing two cable fastening setups with coiled connectors and connecting wires (no text or symbols)
natural_image
Line drawing of a hand holding a tennis racket, with a mesh ball nearby (no text or symbols)CLEANING AND MAINTENANCE (Cont.)
CLEANING THE INLET FILTER
- Screw off the inlet pipe from the backside of the machine.
- Pull out the filter with long noise pliers and reinstall it back after being washed.
- Use the brush to clean the filter.
- Reconnect the inlet pipe.
CLEANING LINT FILTER
- There is a built-in Lint filter in your washing machine. It can help to collect lint during a washing cycle.
- It is suggested to clean the lint filter every 10 cycles.
- Take out and clean the filter with water. Then place it back into the washer.

CLEANING AND MAINTENANCE (Cont.)
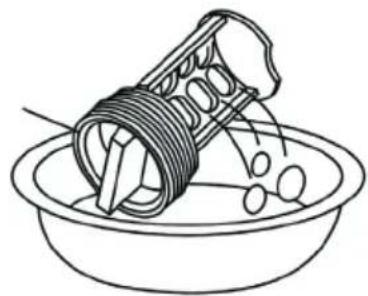
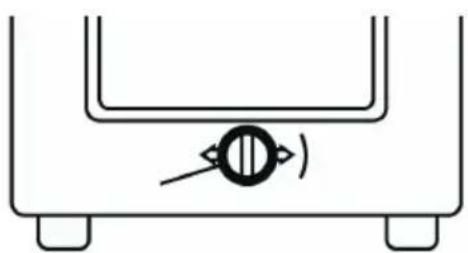
CLEANING THE DRAIN PUMP FILTER
1 Drain the water out of the pump under which you use a container to collect the water.

natural_image
Simple line drawing of a kitchen sink with a bowl and a circular valve (no text or symbols)3 Take out the lint filter.

natural_image
Line drawing of a mechanical component inserted into a basin (no text or symbols)5 Restore it and adjust the convex place to align at the pump hole.

natural_image
Technical line drawing of a mechanical component with threaded end and flanged ends (no text or symbols)2 Loosen the pump cover. (anti-clockwise)

natural_image
Simple line drawing of a kitchen sink with a bowl and a circular valve (no text or symbols)4 Clean the filter.
natural_image
Line drawing of a mechanical component in a bowl, showing a threaded shaft and balls inside (no text or symbols)6 Tighten the pump cover (clockwise)
natural_image
Simple line drawing of a mechanical component with a circular feature and directional arrow (no text or symbols)FAQs
Please be sure to contact our call centre on 1300 296 699 if you cannot identify the issue with the below information.
| Problem Solution | |
| No water is flowing in | ·Check to see if the power is on·The water supply is cut off or the water pressure is too low.·The inlet hose is properly connected and the water tap is opened.·The filtering screen of inlet valve is blocked by dirt.·The coil of the inlet valve is damaged.·Make sure the Start/Pause button hasn't been pressed. |
| No washing | ·If the power is off or fuse has burned out·The power supply voltage is too low·The water amount reaches to the requiredwater level. (The washer will not work if the water amount does not reach the required water level)·If it is set on “delay” then the washer will not start until time is reached. |
| Abnormal draining | ·The water drain hose is placed to high.·The internal rubber ring of drain valve is blocked. |
| Abnormal Spin | ·Make sure the door lid is closed.·If all clothing piled largely at one side of the barrel.·The appliance must be placed completely level for it to work correctly. |
NOTE: During the de spin process of a washing cycle. If the washing is piled at one side it will cause an unbalance of the barrel. The washing machine computer will feel this unbalance and will automatically try to correct it, if its unable to correct in in three tries, then you will have to manually open, pause the cycle and evenly place the clothing inside the barrel to solve the problem.
SPECIFICATIONS
| Power Supply 240V~50Hz | |
| Standard Water Pressure 0.03MPa~0.8MPa | |
| Washing Capacity 5.5 KG | |
| Rated Input Power 400W | |
| Dimensions 515 (w) x 525 (d) x 910 (h) mm - (1223mm door open) | |
| Weight Net: 31 kg / Gross: 35 kg | |
SEIKI | S HOME
CUSTOMER HELPLINE:
info@ayonz.com
DISTRIBUTED BY:
Ayonz Pty Ltd
- INSTRUCTION MANUAL
- CONTENTS
- GENERAL SAFETY
- IMPORTANT INFORMATION
- WARNING
- CAUTION
- GENERAL SAFETY INSTRUCTIONS (Cont.)
- ELECTRICAL SAFETY
- INSTALLATION
- USAGE CONDITIONS AND RESTRICTIONS
- CLEANING AND MAINTENANCE
- PRODUCT OVERVIEW
- Accessories
- PRODUCT OVERVIEW (Cont.)
- CONTROL PANEL
- GETTING STARTED
- UNPACKING
- TRANSPORTATION
- IMPORTANT! Installing the bottom cover
- GETTING STARTED (Cont.)
- LEVELLING THE APPLIANCE
- CONNECTING THE WATER INLET HOSE
- INSTALL INLET PIPE
- PLACE OUTLET HOSE
- CONNECTING THE DRAIN HOSE
- There are two ways to place the end of drain hose:
- For lower drain system
- For upper drain system
- INSTRUCTIONS
- BEFORE FIRST USE
- INSTRUCTIONS (Cont.)
- WASH CARE SYMBOLS
- OPERATIONS
- PROGRAMS
- WARNING:
- CLEANING THE CABINET
- CLEANING THE WATER INLET
- CLEANING AND MAINTENANCE (Cont.)
- CLEANING THE INLET FILTER
- CLEANING LINT FILTER
- CLEANING THE DRAIN PUMP FILTER
- FAQs
- SPECIFICATIONS
- SEIKI | S HOME
Brand : Seiki
Model : SC-5500AU7TL
Category : Washing machine