Vlink 2 - Microphone Saramonic - Free user manual and instructions
Find the device manual for free Vlink 2 Saramonic in PDF.


| Product Type | 2.4 GHz Wireless Microphone System |
| Brand | Saramonic |
| Model | Vlink 2 |
| Components | Receiver (Vlink2 RX), Body-pack Transmitter (Vlink2 TX), Handheld Transmitter (Vlink2 HU) optional |
| Frequency Band | 2.4 GHz (2404-2476 MHz) |
| Operating Range | Up to 100 m (328 ft) for TX/RX; up to 50 m (164 ft) for HU |
| Audio Output | 3.5 mm LINE OUT jack (locking), 3.5 mm headphone jack |
| Audio Input (TX) | 3.5 mm MIC IN/LINE IN jack (locking) |
| Display | OLED display on RX and TX |
| Output Modes | Mono or Stereo |
| Battery Capacity (RX) | 3000 mAh Li-ion |
| Battery Capacity (TX) | 2000 mAh Li-ion |
| Battery Capacity (HU) | 1600 mAh Li-ion or 2x AA batteries |
| Battery Life (RX) | 19 hours |
| Battery Life (TX) | 20 hours |
| Battery Life (HU) | 22 hours (Li-ion) / 20 hours (AA) |
| Charging | USB-C (DC 5V) |
| Weight (RX) | 189 g (6.6 oz) |
| Weight (TX) | 121 g (4.3 oz) |
| Weight (HU) | 225 g (7.9 oz) |
| Dimensions (RX) | 88 x 69 x 23 mm |
| Dimensions (TX) | 70 x 52 x 23 mm |
| Dimensions (HU) | 49.2 x 263.1 x 49.2 mm |
| Frequency Response | 35 Hz – 18 kHz |
| Signal-to-Noise Ratio | ≥ 75 dB |
| RF Output Power | < 10 mW |
| Special Features | Talkback, mute, adjustable gain (0-19), detachable antennas, cold shoe mount |
| Included Accessories (Kit1) | 1 TX, 1 RX, lavalier mic, headphone, USB-C cables, 3.5mm TRS/TRRS cables, shoe mount, antennas, belt clips, hard case |
| Compatibility | Cameras, smartphones (with TRRS cable), mixers, amplifiers |
| Construction | Aluminum alloy (HU), plastic with metal connectors |
| Operating Temperature | -10°C to 50°C |
| Storage Temperature | -20°C to 55°C |
Frequently Asked Questions - Vlink 2 Saramonic
User questions about Vlink 2 Saramonic
0 question about this device. Answer the ones you know or ask your own.
Ask a new question about this device
Download the instructions for your Microphone in PDF format for free! Find your manual Vlink 2 - Saramonic and take your electronic device back in hand. On this page are published all the documents necessary for the use of your device. Vlink 2 by Saramonic.
USER MANUAL Vlink 2 Saramonic
2.4 GHz Wireless Microphone System
2.4 GHz 无线麦克风系统
Vlink2
User Manual
用户手册

Statement
Please read this manual carefully before use and operate and store in strict accordance with the instructions provided. Please retain for future reference.
For any issues that cannot be resolved with the user manual, please refer to your retailer for help or contact us at: info@saramonic.com.
Cautions
- Take care not to use the unit underwater or unprotected in rainy conditions. Store in a cool, dry place.
- Designed for use and storage at normal temperatures. Do not move the unit from overheated to cold conditions frequently, and keep away from heat sources such as heaters and ovens.
- When in use, or when storing, avoid contact with dust and moisture.
- Do not subject to device to violent collisions, as this can damage the device.
- In order to avoid acoustic feedback, do not hold the microphone close to loudspeakers.
- For optimal sound detection, do not hold your hand against the microphone head.
General Introduction
The Saramonic Vlink2 wireless microphone system provides a premium 2-person wireless audio solution for vloggers, mobile journalists and content creators. It is an easy-to-use, high-quality and flexible 2.4 GHz system. The external microphone input allows the receiver to be connected to a mic device. The system can be powered through its USB-C ports, allowing it to run for numerous hours on a USB-C 5V power bank.
Portable Receiver Vlink2 RX
Introduction
The Saramonic Vlink2 RX is a camera-mountable dual-channel 2.4GHz wireless receiver. It features a high-contrast OLED display and talkback function to transmitter. The two detachable antennas can be rotated 360° for better reception. The receiver's output can be toggled between mono and stereo modes. The talkback and monitor function on the receiver allows camera operators to select individually if desired, and communication can be controlled by a mute button.
Product Structure


① Antennas
② LINE OUT Jack
Connect the Vlink2 RX to a DLSR camera, smartphone with a 3.5mm headphone jack, mixer or amplifier with the supplied output cable.
③ 3.5mm Talkback and Headphone Jack
Using the talkback function with the supplied headphone, the receiver can monitor the real-time feedback and deliver talkback communication with transmitter.
④ USB-C Charging Port (DC 5V)
⑤ Cold Shoe Mount Adapter
⑥ SET Button
Long press the SET button to enter the displayed menu. Then, short press the SET button to confirm your setting change, or long press again to exit without saving.
⑦ Power / Mute Button
| Status Operation | |
| Power ON Long | press for at least three seconds |
| Power OFF Long | press until it turns off |
| Mute ON | Short press |
| Mute OFF |
⑧ RF Indicator
| Status Indicators | |
| Disconnected Lights off | |
| Pairing Quickly flashing blue light | |
| Paired Successfully Solid blue light | |
| Mute ON (Paired Successfully) Slowly flashing blue light | |
⑨ OLED Display
⑩ POWER Indicator
| Status Indicators | |
| Power On / Fully charged Solid | blue light |
| Low battery / Charging Solid | red light |
| Low battery warning | Flashing red light(the unit shutdowns whitin 10 mins) |
⑪ +/- button (Pair button)
Press the buttons "+" and "-" for 3 seconds at the same time, entering pairing mode.
Attaching Accessories


Connect the supplied cable to the output jack.
① Plug the supplied cable into the LINE OUT jack.
② For a secure connection, turn to lock the connector.
Attach the shoe mount adapter
③ Please attach the belt clip as shown before attaching the shoe mount adapter.
④ Press the bottom of the belt clip to make some space between the belt clip and the receiver.
⑤ Align the belt clip with the two vertical grooves on the shoe mount adapter and insert the adapter in the direction of the arrow.
⑥ Push the shoe mount adapter in fully until the belt clip fits into the horizontal groove on the adapter holds.
OLED Display Operation Guide
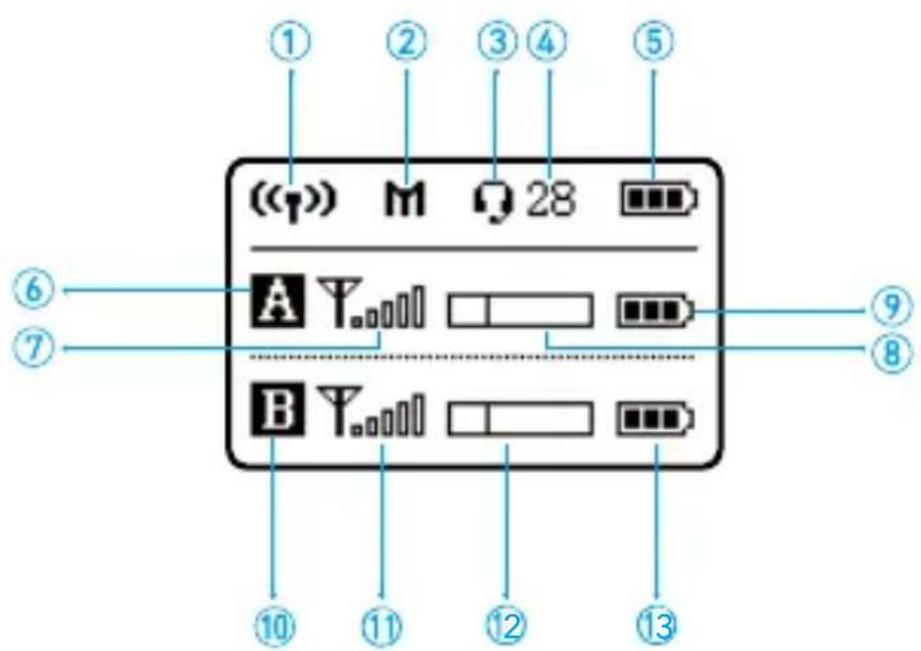
Home screen: If no operation is performed for 20 seconds on the other screens, the display will automatically return to the home screen.
① Pairing Indicator
(<<) Paired Successfully
1 Disconnected
② Output Mode Indicator
M: Mono S: Stereo
③ Mic & Audio Monitoring Icon

Mute Off

Mute On
④ Headphone Volume
⑤ RX's Battery Level Indicator
Displays the RX battery level. Please recharge the device immediately when the indicator starts flashing.
⑥ Channel A Icon
⑦ RF Level Indicator (Channel A)
Indicates the current reception level.
⑧ Audio Input Level Meter (Channel A)
Displays the audio input level.
⑨ TX's Battery Level Indicator (Channel A)
Displays the TX battery level. Please recharge the device immediately when the indicator starts flashing.
⑩ Channel B Icon
⑪ RF Level Indicator (Channel B)
Indicates the current reception level.
⑫ Audio Input Level Meter (Channel B)
Displays the audio input level.
⑬ TX's Battery Level Indicator (Channel B)
Displays the TX battery level. Please recharge the device immediately when the indicator starts flashing.
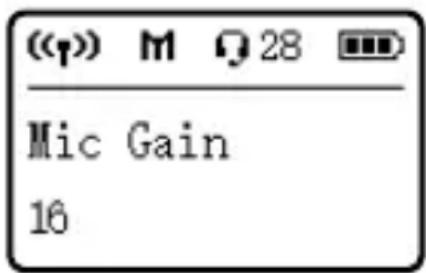
Mic Gain
Adjust the external microphone's gain level (0-19). Default is "16".

Set Output Volume
Set the volume of output audio within the range of 0 to 31. The setting is retained even after the power is turned off. Default volume is 28.

Output Mode
The output mode can be set to mono or stereo. When the output mode is in mono, the audio from the left and right channel will be mixed.
When in stereo, receiver A's and receiver B's audio output will be separated to the left and right of the stereo output.
System default is mono.
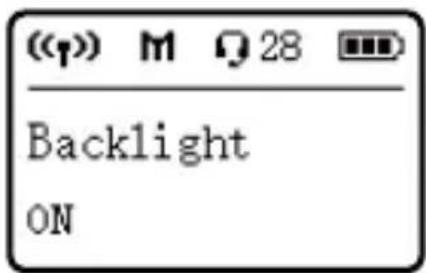
Set Backlight
Set backlight to Always On or On for 10, 30, or 60 seconds. Default is "On".

Set Mute Key
Enable or Disable Mute key button function. Default is "Enable".

Language
English or 简体中文 (Chinese) are available. Default is English.

Version of the Vlink2 RX's firmware
Body-pack Transmitter Vlink2 TX
Introduction
The Saramonic Vlink2 TX is a compact body-pack transmitter. It features an easy-to-read OLED display, a detachable antenna and built-in rechargeable battery. With the 3.5mm headphone and mic input jacks, it can accept audio from the included 3.5mm locking mic, and supports efficient two-way communication with the receiver. A short press of the power button mutes the mic between takes.
Product Structure


① Antennas
② c'v
Connect headphones for monitoring communication from the receiver.
The transmitter can be connected to a 3.5mm microphone or other line-level devices.
③ MIC IN/LINE IN Jack
④ USB-C Charging Port (DC 5V)
⑤ Power / Mute Button
| Status Operation | |
| Power ON Long | press for at least three seconds |
| Power OFF Long | press until it turns off |
| Mute ON | Short press |
| Mute OFF |
⑥ SET Button
⑦ RF Indicator
| Status Indicators | |
| Disconnected Lights off | |
| Pairing Quickly flashing blue light | |
| Paired Successfully Solid blue light | |
| Mute ON (Paired Successfully) Slowly flashing blue light | |
⑧ OLED display
Display menus, please refer to "OLED Display Operation Guide" for more details.
⑨ POWER indicator
| Status Indicators | |
| Power On / Fully charged Solid blue light | |
| Low battery / Charging Solid red light | |
| Low battery warning | Flashing red light(the unit shutdowns whitin 10 mins) |
⑩ +/- button (Pair button)
Press the buttons "+" and "-" for 3 seconds at the same time, entering pairing mode.
OLED Display Operation Guide

Home screen: If no operation is performed for 20 seconds on the other screens, the display will automatically return to the home screen.
① Pairing Indicator

Paired Successfully

Disconnected
② RF Level Indicator
③ Battery Level Indicator
Displays the TX battery level. Please recharge the device immediately when the indicator starts flashing.
④ Mute Indicator

Mute Off

Mute On
⑤ Mic Gain
⑥ Audio Input Level Meter
Displays the audio input level.
Mic Gain 06
MIC GAIN
Adjust the external microphone's gain level (0-9). Default is "06".
Volume 28
Set Output Volume
Set the volume of output audio within the range of 0 to 31. The setting is retained even after the power is turned off.
Default volume is 28.
Input Mic In
Input Setting
The input mode can be set to Mic In or Line In.
Mic In: for connecting a 3.5mm microphone to the transmitter.
Line In: for connecting a line level device to the transmitter.
B-Light ON
Set Backlight
Set backlight to Always On or On for 10, 30, or 60 seconds. Default is "On".
Mute Key Enable
Set Mute Key
Enable or Disable Mute key button function. Default is "Enable".
Language English
Language Setting.
English or 简体中文 (Chinese) are available. Default is "English".
Restore Default
Version of the Vlink2 TX's firmware.
Handheld Transmitter Vlink2 HU
The Vlink2 HU is a 2.4GHz wireless handheld microphone transmitter that features a lightweight and durable aluminum alloy body, built-in antenna and easy operation. It can be powered by a rechargeable Li-ion battery or two AA batteries. The Vlink2 HU works with the Vlink2 RX on various audio capturing occasions.
Product Structure

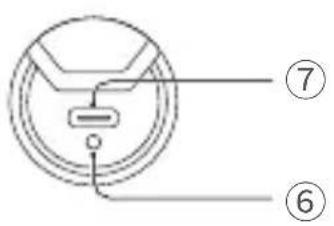

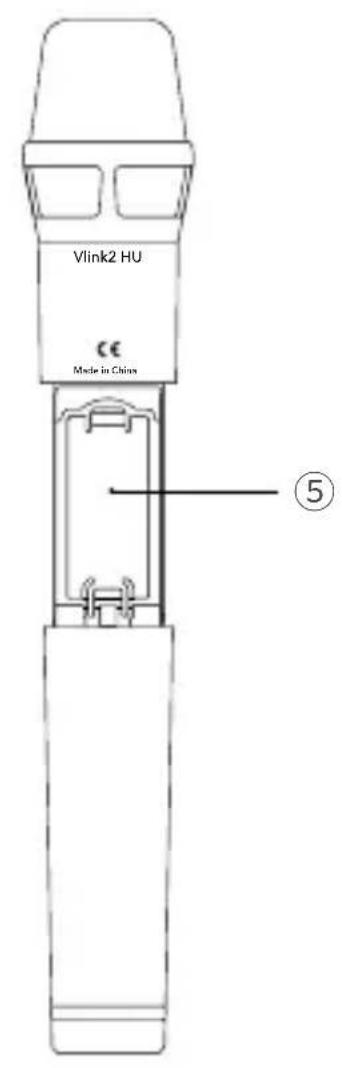
① Power Indicator
| Status Indicators | |
| Disconnected Slowly flashing blue light | light |
| Pairing Quickly flashing blue light | |
| Paired Successfully Solid blue light | |
| Mute ON (Paired Successfully) Flashing red light | |
| Low Battery Solid red light |
② Power/Mute Button
| Status Operation | |
| Power ON Long press | for at least three seconds |
| Power OFF Long press | until it turns off |
| Mute ON | Short press |
| Mute OFF |
③ Antenna
For optimal sound detection, please do not hold the antenna.
④ Pair Button
⑤ Battery Compartment
Accepts two AA batteries or an customized rechargeable Li-ion battery.
⑥ Charging Indicator
| Status Indicators | |
| Fully charged Solid blue light | |
| Charging Solid red light | |
| Error occurs Flashing red light |
⑦ USB-C Charging Port (DC 5V)
Battery Installation
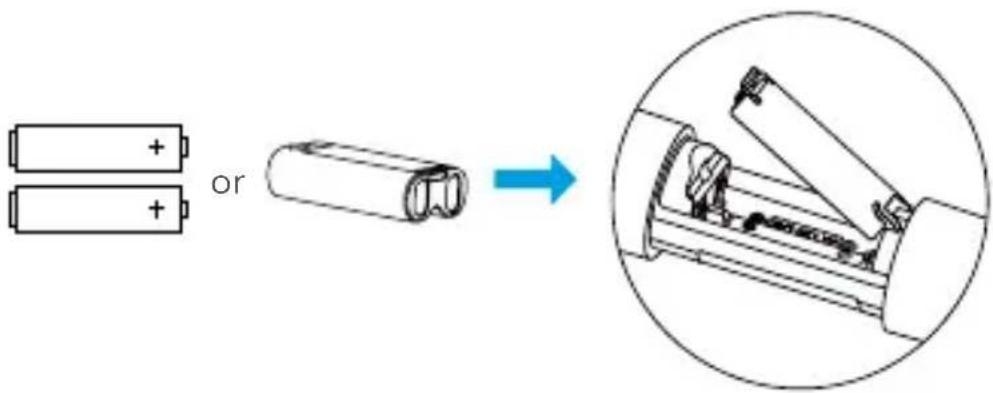
The transmitter is powered by a rechargeable Li-ion battery or two AA batteries. To install batteries, please follow these steps:
- Turn the grip anti-clockwise, and pull the grip down until the battery compartment is visible.

natural_image
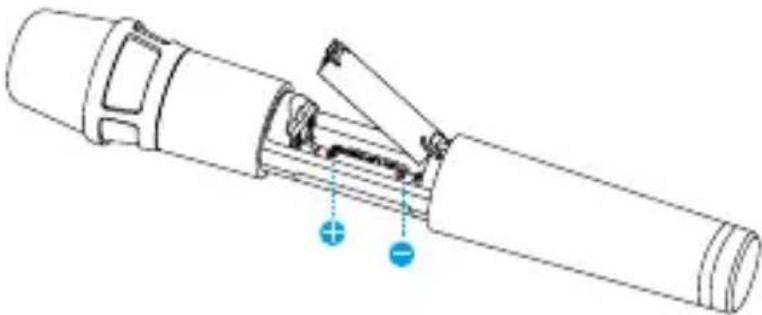
Diagram of a cylindrical device with blue circular arrows indicating rotational or mechanical motion (no text or symbols)- Open the battery cover as shown.
natural_image
Technical line drawing of a cylindrical device with internal components and blue indicator lights (no text or symbols)- Insert two two AA batteries or the supplied Li-ion battery into the battery compartment, respecting the polarity indicated inside the compartment.
4.Close the battery cover, and turn the grip clockwise to tighten it.
Note:
- Replacing the batteries during operation may generate a large noise. Be sure to turn off the unit before replacing the batteries.
- When not using the device for a long period of time, remove the batteries.
- AA batteries can not be charged with this unit. Please do not charge the unit when two AA batteries are inserted. The charging indicator will blink red light when this error occurs.
Operation Guide
How to connect the Vlink2 TX with the Vlink2 RX
Before leaving factory, the transmitter and the receiver of a set are pre-paired. Therefore, the connection will be established once they are powered on. If transmitters and receiver are disconnected, please follow below steps:
- Turn on the receiver and the transmitter.
- Press the buttons "+" and "-" for 3 seconds at the same time to enter pairing mode. The RF lights of receiver and transmitter flash quickly.
- The system is paired successfully when the RF lights of the TX and RX turn solid blue.
How to connect the Vlink2 HU with the Vlink2 RX
- Long press the Power button to turn on the Vlink2 RX and the Vlink2 HU.
- Long press the Pair button of the Vlink2 RX (press the buttons "+" and "-" at the same time) to enter pairing mode. The RF indicator will flash rapidly in blue.
- Unscrew the grip and press the Pair button of the Vlink2 HU to enter pairing mode. The indicator will flash rapidly in blue.

- The system is paired successfully when the indicators of the RX and HU turn solid blue.
Connection Example
TX+RX

flowchart
graph TD
    A["User"] --> B["Saramonic Vlink2 System"]
    B --> C["Wireless Microphone Vlink2 TX"]
    C --> D["Saramonic Vlink2 System"]
    D --> E["Wireless Microphone Vlink2 RX"]
    E --> F["Image"]
    F --> G["Photo"]
    H["Compatible with TRS/TRRS headphones (not included)"] --> B
    H --> D
TX+TX+RX

flowchart
graph TD
    A["User with Headphones"] --> B["Saramonic Vlink2 System"]
    B --> C["Wireless Microphone Vlink3 TX"]
    C --> D["Saramonic Vlink2 System"]
    D --> E["Wireless Microphone Vlink3 RX"]
    E --> F["Camera"]
    G["User with Headphones"] --> H["Saramonic Vlink2 System"]
    H --> I["Wireless Microphone Vlink3 TX"]
    I --> J["Saramonic Vlink2 System"]
    J --> K["Wireless Microphone Vlink3 RX"]
    K --> L["Camera"]
    M["User with Headphones"] --> N["Saramonic Vlink2 System"]
    N --> O["Wireless Microphone Vlink3 TX"]
    O --> P["Saramonic Vlink2 System"]
    P --> Q["Wireless Microphone Vlink3 RX"]
    Q --> R["Camera"]
    S["User with Headphones"] --> T["Saramonic Vlink2 System"]
    T --> U["Wireless Microphone Vlink3 TX"]
    U --> V["Saramonic Vlink2 System"]
    V --> W["Wireless Microphone Vlink3 RX"]
    W --> X["Camera"]
    Y["User with Headphones"] --> Z["Saramonic Vlink2 System"]
    Z --> AA["Wireless Microphone Vlink3 TX"]
    AA --> AB["Saramonic Vlink2 System"]
    AB --> AC["Wireless Microphone Vlink3 RX"]
    AC --> AD["Camera"]
Packing Lists
Vlink2 Kit1 (TX+RX)
- Transmitter (1)
- Receiver (1)
• DK3 Omnidirectional Lavalier Microphone Kit (1)
• Headphone (talkback and monitoring function) (1)
• USB-C Charging Cable (2)
• 3.5mm TRS Locking-type Plug Audio Cable for Cameras (1)
• 3.5mm TRRS Locking-type Plug Audio Cable for Smartphone (1)
• Cold Shoe Mount Adapter (1) - Detachable Antenna (3)
- Belt clip (2)
• Hard Protective Case (1)
Vlink2 Kit2 (TX+TX+RX)
- Transmitter (2)
- Receiver (1)
• DK3 Omnidirectional Lavalier Microphone Kit (2)
• Headphone (talkback and monitoring function) (1)
• USB-C Charging Cable (3)
• 3.5mm TRS Locking-type Plug Audio Cable for Cameras (1)
• 3.5mm TRRS Locking-type Plug Audio Cable for Smartphone (1)
• Cold Shoe Mount Adapter (1) - Detachable Antenna (4)
- Belt clip (3)
• Hard Protective Case (1)
Vlink2 HU
• Vlink2 HU Handheld Microphone Transmitter (1)
• Type-C Charging Cable (1)
• Rechargeable Li-ion Battery (1)
Specifications
Vlink2 RX
| Oscillator type GFSK | |
| Carrier frequencies 2.4GHz (2404-2476MHz) | |
| Operating range Up to 328'(100m) | |
| Audio connector | 3.5 mm LINE OUT jack3.5mm MIC IN & 3.5mm headphone output jack |
| Built-in battery capacity 3000mAh | |
| Continuous use time 19 hrs | |
| Power requirements Built-In Li-ion Battery or USB-C DC 5V | |
| Signal-to-noise ratio 75 dB or more | |
| Headphone output level 30mW (32 Ω) | |
| RF output power | < 10mW |
| Frequency response 35Hz-18KHz | |
| Dimensions 88x69x23mm | |
| Weight 189g(6.6oz) | |
| Operating temperature -10 °C to 50 °C | |
| Storage temperature -20 °C to +55°C | |
Vlink2 TX
Oscillator type GFSK
Carrier frequencies 2.4GHz (2404-2476MHz)
Operating range Up to 328'(100m)
Audio output connector 3.5mm headphone output
Audio input connector 3.5mm MIC IN/LINE IN jack
Built-in battery capacity 2000mAh
Continuous use time 20 hrs
Power requirements Built-In Li-ion Battery or USB-C DC 5V
Signal-to-noise ratio 75 dB or more
Sensitivity Lavalier microphone: -40dB.
Headphone output level 30mW (32 Ω)
RF output power < 10mW
Frequency response 35Hz-18KHz
Dimensions 70x52x23mm
Weight 121g(4.3oz)
Operating temperature -10 °C to 50 °C
Storage temperature -20 °C to +55°C
Vlink2 HU
| Oscillator type GFSK | |
| Carrier frequencies 2.4GHz (2404-2476MHz) | |
| Operating range Up to 164'(50m) | |
| Battery capacity 1600mAh Li-ion battery or 2*AA battery | |
| Continuous use time | With the supplied Li-ion battery: 22 hrsWith 2 AA batteries: 20 hrs |
| Power requirements | Li-ion battery or 2*AA batteries or USB-DC 5V |
| Signal-to-noise ratio 75 dB or more | |
| Microphone type Condenser microphone | |
| Sensitivity -35dB | |
| RF output power | < 10mW |
| Frequency response 35Hz-18KHz | |
| Dimensions 49.2x263.1x49.2mm | |
| Weight 225g(7.9oz) | |
| Operating temperature -10 °C to 50 °C | |
| Storage temperature -20 °C to +55°C | |

SmartRecorder
For better recording experience, the application SmartRecorder is recommended.
Scan the QR code and follow us! 扫描微信关注枫笛公众号
Shenzhen Jiayz Photo Industrial., Ltd
深圳市长丰影像器材有限公司
A16 Building, Intelligent Terminal Industrial Park of Silicon Valley
Power, Guanlan, Longhua District, Shenzhen, China


- Statement
- Cautions
- General Introduction
- Portable Receiver Vlink2 RX
- Introduction
- Product Structure
- ⑥ SET Button
- ⑦ Power / Mute Button
- ⑧ RF Indicator
- ⑨ OLED Display
- ⑩ POWER Indicator
- Attach the shoe mount adapter
- OLED Display Operation Guide
- Mic Gain
- Set Output Volume
- Output Mode
- Set Backlight
- Set Mute Key
- Language
- Body-pack Transmitter Vlink2 TX
- ⑧ OLED display
- ⑨ POWER indicator
- ⑩ +/- button (Pair button)
- Mic Gain 06
- Volume 28
- Input Mic In
- Input Setting
- B-Light ON
- Mute Key Enable
- Language English
- Language Setting.
- Restore Default
- Handheld Transmitter Vlink2 HU
- ③ Antenna
- ④ Pair Button
- ⑤ Battery Compartment
- ⑦ USB-C Charging Port (DC 5V)
- Battery Installation
- Note:
- Operation Guide
- How to connect the Vlink2 TX with the Vlink2 RX
- How to connect the Vlink2 HU with the Vlink2 RX
- Connection Example
- Packing Lists
- Vlink2 Kit1 (TX+RX)
- Vlink2 Kit2 (TX+TX+RX)
- Vlink2 HU
- Specifications
- Vlink2 TX
Brand : Saramonic
Model : Vlink 2
Category : Microphone