BT-889 - Tiller Baumr-AG - Free user manual and instructions
Find the device manual for free BT-889 Baumr-AG in PDF.


| Product Type | Rototiller / Cultivator |
| Brand | Baumr-AG |
| Model | BT-889 |
| Engine Type | 4-stroke petrol engine |
| Engine Displacement | 196 cc |
| Power Output | 6.5 HP (4.8 kW) |
| Fuel Tank Capacity | 3.6 L (0.95 US gal) |
| Tilling Width | 40 cm (15.7 in) |
| Tilling Depth | Adjustable up to 25 cm (9.8 in) |
| Number of Tines | 4 pairs (8 tines) |
| Transmission | Chain drive with forward gear |
| Wheel Size | 10 inches (25.4 cm) |
| Overall Dimensions (L x W x H) | 142 x 60 x 105 cm |
| Net Weight | 49 kg (108 lb) |
| Fuel Type | Unleaded gasoline (87 octane or higher) |
| Oil Capacity | 0.6 L (SAE 10W-30) |
| Starting System | Recoil start |
| Handle Type | Adjustable handles with rubber grips |
| Warranty | 2 years limited warranty |
| Maintenance Required | Regular oil change, air filter cleaning, spark plug check |
| Safety Features | Engine kill switch, safety shield, throttle lock |
| Included Accessories | Operator's manual, tool kit, spark plug wrench |
Frequently Asked Questions - BT-889 Baumr-AG
User questions about BT-889 Baumr-AG
0 question about this device. Answer the ones you know or ask your own.
Ask a new question about this device
Download the instructions for your Tiller in PDF format for free! Find your manual BT-889 - Baumr-AG and take your electronic device back in hand. On this page are published all the documents necessary for the use of your device. BT-889 by Baumr-AG.
USER MANUAL BT-889 Baumr-AG
Actual product may vary due to product enhancement. Pictures shown are for illustration purpose only.

User Manual
[Revision 3.0 July 2022]
Safety
Safety messages are designed to alert you to possible dangers or hazards that could cause death, injury or equipment or property damage if not understood or followed. Safety messages have the following symbols:

You WILL be KILLED or SERIOUSLY INJURED if you do not follow instructions.
It is vital that you read and understand this user manual before using the product, including safety warnings, and any assembly and operating instructions. Keep the manual for future reference.
Safety precautions and recommendations detailed here must be fully understood and followed to reduce the risk of injury, fire, explosion, electrical hazard, and/or property damage.
Safety information presented here is generic in nature – some advice may not be applicable to every product. The term "equipment" refers to the product, be it electrical mains powered, battery powered or combustion engine powered.
- Before Use - If you are not familiar with the safe operation/handling of the equipment or are in any way unsure of any aspect of suitability or correct use for your application, you should complete training conducted by a person or organization qualified in safe use and operation of this equipment, including fuel/electrical handling and safety.
- Do NOT operate the equipment in flammable or explosive environments, such as in the presence of flammable liquids, gases, or dust. The equipment may create sparks or heat that may ignite flammable substances.
- Keep clear of moving parts.
- Equipment may be a potential source of electric shock or injury if misused.
- Do NOT operate the equipment if it is damaged, malfunctioning or is in an excessively worn state.
- Do NOT allow others to use the equipment unless they have read this manual and are adequately trained.
- Keep packaging away from children - risk of suffocation! Operators must use the equipment correctly. When using the equipment, consider conditions and pay due care to persons and property.
General Work Area Safety
• Work areas should be clean and well it.
- Do not operate the equipment if bystanders, animals etc are within operating range of the equipment or the general work area.
- If devices are provided for connecting dust extraction / collection facilities, ensure these are connected and used properly. Dust collection can reduce dust-related hazards.

You CAN be KILLED or SERIOUSLY INJURED if you do not follow instructions.
General Personal Safety
- Wear appropriate protective equipment when operating, servicing, or when in the operating area of the equipment to help protect from eye and ear injury, poisoning, burns, cutting and crush injuries. Protective equipment such as safety goggles, respirators, non-slip safety footwear, hard hat, hearing protection etc should be used for appropriate equipment / conditions. Other people nearby should also wear appropriate personal protective equipment. Do not wear loose clothing or jewellery, which can be caught in moving parts. Keep hair and clothing away from the equipment.
- Stay alert and use common sense when operating the equipment. Do not overreach. Always maintain secure footing and balance.
- Do not use the equipment if tired or under the influence of drugs, alcohol, or medication.
- This equipment is not intended for use by persons with reduced physical, sensory, or mental capabilities.
General Fuel Safety
- Petrol/fuel/gasoline is extremely flammable – keep clear of naked flames or other ignition sources.
- Do not spill fuel. If you spill fuel, wipe it off the equipment immediately – if fuel gets on your clothing, change clothing.
- Do NOT smoke near fuel or when refuelling.
• Always shut off the engine before refuelling. - Do NOT refuel a hot engine.
- Open the fuel cap carefully to allow any pressure build-up in the tank to release slowly.
• Always refuel in well ventilated areas. - Always check for fuel leakage. If fuel leakage is found, do not start, or run the engine until all leaks are fixed.
General Carbon-Monoxide Safety
- Using a combustion engine indoors CAN KILL IN MINUTES. Engine exhaust contains carbon-monoxide – a poison you cannot smell or see.
- Use combustion engines OUTSIDE only, and far away from windows, doors, and vents.

You CAN be INJURED if you do not follow instructions or equipment damage may occur.
General Equipment Use and Care
- The equipment is designed for domestic use only.
- Handle the equipment safely and carefully.
- Before use, inspect the equipment for misalignment or binding of moving parts, loose components, damage, or any other condition that may affect its operation. If damaged, have the equipment repaired by an authorised service centre or technician before use.
- Prevent unintentional starting of the equipment - ensure equipment and power switches are in the OFF position before connecting or moving equipment. Do not carry equipment with hands or fingers touching any controls. Remove any tools or other items that are not a part of the equipment from it before starting or switching on.
- Do not force the equipment. Use the correct equipment for your application. Equipment will perform better and be safer when used within its design and usage parameters.
- Use the equipment and accessories etc. in accordance with these instructions, considering working conditions and the work to be performed. Using the equipment for operations different from those intended could result in hazardous situations.
- Always keep equipment components (engines, hoses, handles, controls, frames, housings, guards etc) and accessories (cutting tools, nozzles, bits etc) properly maintained. Keep the equipment clean and, where applicable, properly lubricated.
- Store the equipment out of reach of children or untrained persons. To avoid burns or fire hazards, let the equipment cool completely before transporting or storing. Never place or store the equipment near flammable materials, combustible gases, or liquids etc.
- The equipment is not weather-proof, and should not be stored in direct sunlight, at high ambient temperatures or locations that are damp or humid.
- Do not clean equipment with solvents, flammable liquids, or harsh abrasives.
- For specific equipment safety use and care, see Equipment Safety.
General Electrical Safety
- Inspect electrical equipment, extension cords, power bars, and electrical fittings for damage or wear before each use. Repair or replace damaged equipment immediately.
- Ensure all power sources conform to equipment voltage requirements and are disconnected before connecting or disconnecting equipment.
- When wiring electrically powered equipment, follow all electrical and safety codes.
- Wherever possible, use a residual current device (RCD).
- High voltage / high current power lines may be present. Use extreme caution to avoid contact or interference with power lines. Electrical shock can be fatal.
General Electrical Safety
- Electrically grounded equipment must have an approved cord and plug and be connected to a grounded electrical outlet.
- Do NOT bypass the ON/OFF switch and operate equipment by connecting and disconnecting the electrical cord.
- Do NOT use equipment that has exposed wiring, damaged switches, covers or guards.
- Do NOT use electrical equipment in wet conditions or in damp locations.
- Do NOT use electrical cords to lift, move or carry equipment.
- Do NOT coil or knot electrical cords, and ensure electrical cords are not trip hazards.
General Service Information
- The equipment must be serviced or repaired at authorised service centres by qualified personnel only.
- Replacement parts must be original equipment manufacturer (OEM) to ensure equipment safety is maintained.
- Do NOT attempt any maintenance or repair work not described in this manual.
- After use, the equipment and components may still be hot – allow the equipment to cool and disconnect spark plugs and/or electrical power sources and/or batteries from it before adjusting, changing accessories, or performing repair or maintenance.
- Do NOT adjust while the equipment is running.
- Perform service-related activities in suitable conditions, such as a workshop.
- Replace worn, damaged or missing warning/safety labels immediately.
Important Safety Reminders
- BE AWARE THAT THE EQUIPMENT MAY INCLUDE HAZARDOUS COMPONENTS, SUCH AS BLADES, HOT SURFACES AND MOVING PARTS.
• MOVING BLADES CAN CAUSE SERIOUS INJURY AND EVEN DEATH IF USED IMPROPERLY OR WITHOUT SUFFICIENT PPE. - DO NOT USE THIS EQUIPMENT ON UNEVEN SURFACES AND ALWAYS MAINTAIN GOOD BALANCE WHEN USING THIS EQUIPMENT. FAILURE TO DO SO MAY CAUSE SERIOUS INJURY.
- MAINTAIN A SECURE GRIP OF THE TRIGGER ASSEMBLY AT ALL TIMES.
- ATTENTION! THE DEVICE AND PACKAGING MATERIALS ARE NOT TOYS! CHILDREN MUST NOT BE ALLOWED TO PLAY WITH PLASTIC BAGS, FILM AND SMALL PARTS! THERE IS A RISK OF SWALLOWING AND SUFFOCATION!
Intended Use
- The machine is designed for digging over beds and fields. Be sure to observe the restrictions in the additional safety instructions.
- The equipment is allowed to be used only for its prescribed purpose. Any other use is deemed to be a case of misuse. The user/operator and not the manufacturer will be liable for any damage or injuries of any kind resulting from such misuse.
- Please note that our equipment has not been designed for use in commercial, trade or industrial applications. Our warranty will be voided if the equipment is used in commercial, trade or industrial businesses or for equivalent purposes.
General Safety Rules
- Understand your machine. Read and understand the operator's manual and labels affixed to the machine. Learn its application and limitations as well as the specific potential hazards peculiar to it. Be thoroughly familiar with the controls and their proper operation. Know how to stop the machine and disengage the controls quickly.
- Make sure to read and understand all the instructions and safety precautions as outlined in the Engine Manufacturer's Manual, packed separately with your unit. Do not attempt to operate the machine until you fully understand how to properly operate and maintain the Engine and how to avoid accidental injuries and/or property damage.
Work Area
- Never start or run the engine inside a closed area.
- The exhaust fumes are dangerous, containing carbon monoxide, an odorless and deadly gas. Operate this unit only in a well-ventilated outdoor area.
- Never operate the machine without good visibility or light.
- Never operate the machine on a steep slope.
• Always work transversally, not up and down.
Personal Safety
- Do not operate the machine while under the influence of drugs, alcohol, or any medication that could affect your ability to use it properly.
- Dress properly. Wear heavy long pants, boots, and gloves. Do not wear loose clothing, short pants, and jewellery of any kind.
- Secure long hair so it is above shoulder level. Keep your hair, clothing, and gloves away from moving parts. Loose clothes, jewellery or long hair can be caught in moving parts.
- Use safety equipment. Always wear eye protection.
- Safety equipment such as a dust mask, hard hat, or hearing protection used for appropriate conditions will reduce personal injuries.
- Check your machine before starting it. Keep guards in place and in working order. Make sure all nuts, bolts, etc. are securely tightened.
-
Never operate the machine when it needs repair or is in poor mechanical condition.
-
Replace damaged, missing, or failed parts before using it. Check for fuel leaks. Keep the machine in safe working condition.
- Never tamper with safety device. Check their proper operation regularly.
- Do not use the machine if the engine's switch does not turn it on or off. Any gasoline powered machine that cannot be controlled with the engine switch is dangerous and must be replaced.
- Form a habit of checking to see that the keys and adjusting wrenches are removed from machine area before starting it. A wrench or a key that is left attached to a rotating part of the machine may result in personal injury.
- Stay alert, watch what you are doing and use common sense when operating the machine.
- Do not overreach. Do not operate the machine while barefoot or when wearing sandals or similar lightweight footwear. Wear protective footwear that will protect your feet and improve your footing on slippery surfaces.
- Keep proper footing and balance at all times. This enables better control of the machine in unexpected situations.
- Avoid accidental starting. Be sure the engine is off before transporting the machine or performing any maintenance or service on the unit. Transporting or performing maintenance or service on a machine with engine on invites accidents.
Fuel Safety
- Fuel is highly flammable, and its vapours can explode if ignited. Take precautions when using to reduce the chance of serious personal injury.
- When refilling or draining the fuel tank, use an approved fuel storage container while in a clean, well-ventilated outdoor. Do not smoke, or allow sparks, open flames, or other sources of ignition near the area while adding fuel or operating the unit. Never fill fuel tank indoors.
- Keep grounded conductive objects, such as tools, away from exposed, live electrical parts and connections to avoid sparking or arcing. These events could ignite fumes or vapours.
- Always stop the engine and allow it to cool before filling the fuel tank. Never remove the cap of the fuel tank or add fuel while the engine is running or when the engine is hot. Do not operate the machine with known leaks in the fuel system.
- Loose the fuel tank cap slowly to relieve any pressure in the tank.
- Never over fill fuel tank. Fill tank to no more than 12.5mm (1/2" below the bottom of the filler neck to provide space for expansion as the heat of the engine can cause fuel to expand).
- Replace all fuel tank and container caps securely and wipe up spilled fuel. Never operate the unit without the fuel cap securely in place.
- Avoid creating a source of ignition for spilled fuel. If fuel is spilled, do not attempt to start the engine but move the machine away from the area of spillage and avoid creating any source of ignition until fuel vapours have dissipated.
- Store fuel in containers specifically designed and approved for this purpose.
- Store fuel in a cool, well-ventilated area, safely away from sparks, open flames, or other sources of ignition.
- Never store fuel or machine with fuel in the tank inside a building where fumes may reach a spark, open flame, or other sources of ignition, such as a water heater, furnace, clothes dryer, and the like. Allow the engine to cool before storing in any enclosure.
Machine Use and Care
- Never pick up or carry a machine while the engine is running.
- Do not force the machine. Use the correct machine for your application. The correct machine will do the job better and safer at the rate for which it was designed.
- Do not change the engine governor settings GB or over-speed the engine. The governor controls the maximum safe operating speed of the engine.
- Do not run the engine at a high speed when you are not tilling.
- Do not put hands or feet near rotating parts
- Avoid contact with hot fuel, oil, exhaust fumes and hot surfaces. Do not touch the engine or muffler. These parts get extremely hot from operation. They remain hot for a short time after you turn off the unit. Allow the engine to cool before doing maintenance or making adjustments.
- If the machine should start to make an unusual noise or vibration, immediately shut off the engine, disconnect the spark plug wire, and check for the cause. Unusual noise or vibration is generally warning of trouble.
- Use only attachments and accessories approved by the manufacturer. Failure to do so can result in personal injury.
- Maintain the machine. Check for misalignment or binding of moving parts, breakage of parts and any other condition that may affect the machine's operation. If damaged, have the machine repaired before use. Many accidents are caused by poorly maintained equipment.
- Keep the engine and muffler free of grass, leaves, excessive grease or carbon build up to reduce the chance of a fire hazard.
- Keep cutting tools sharp and clean. Properly maintained cutting tools with sharp cutting edges are less likely to bind and are easier to control.
- Never douse or squirt the unit with water or any other liquid. Keep handles dry, clean and free from debris. Clean after each use.
- Observe proper disposal laws and regulations for gas, oil, etc. to protect the environment.
- Store idle machine out of the reach of children and do not allow persons unfamiliar with the machine or these instructions to operate it. Machine is dangerous in the hands of untrained users.
Service
- Before cleaning, repair, inspecting, or adjusting, shut off the engine and make certain all moving parts have stopped. Disconnect the spark plug wire and keep the wire away from the plug to prevent accidental starting.
- Have your machine serviced by qualified repair personnel using only identical replacement parts. This will ensure that the safety of the machine maintained.
Specific Safety Rules
- Thoroughly inspect the area to be tilled, and remove all debris and hard or sharp objects such as stones, sticks, glass, wire, bones, etc.
-
Do not operate tiller in soil with large rocks and foreign objects which can damage the machine.
-
Do not till above underground electric cables, telephone lines, water lines, gas line, pipes, or hoses. If in doubt, contact your utility or telephone company to locate underground services.
- Keep all bystanders, children, and pets at least 23m away. If you are approached, stop the unit immediately.
- Walk, never run with the machine.
- This unit has a clutch. Squeeze the clutch control lever and check that it returns automatically to the neutral position. If it does not, have unit adjusted by a qualified repair personnel.
- Disengage clutch lever before starting the engine.
- Start the engine carefully according to instructions and with feet well away from the tines.
- The tines remain stationary when the clutch is disengaged. If it does not, have unit adjusted by a qualified repair personnel.
• Always operate the machine from behind, never pass or stand in front of the machine when the engine is running. - Always hold the unit with both hands when operating. Keep a firm grip on the handlebars.
- Be aware that the machine may unexpectedly bounce upward or jump forward if the tines should strike buried obstacles such as large stones, roots, or stumps.
- If the unit strikes a foreign object, stop the engine, disconnect the spark plug, thoroughly inspect the machine for any damage, and repair the damage before restarting and operating the machine.
- Use extreme caution when in reverse or pulling the machine towards you.
- Do not overload the machine capacity by tilling too deep in a single pass or at too fast a rate.
- Never operate the tiller at high transport speeds on hard or slippery surfaces.
- Be careful when tilling in hard ground. The tines may catch in the ground and propel the tiller forward.
- If this occurs, let go of the handlebars and do not restrain the machine.
- Use caution when tilling near fences, buildings, and underground utilities. Rotating tines can cause property damage or personal injury.
- Exercise extreme caution when operating on or crossing gravel drives, walks, or roads. Stay alert for hidden hazards or traffic. Do not carry passengers.
- Never leave the operating position when the engine is running.
• Always stop the engine when tilling is delayed or when walking from one tilling location to another. - Keep unit clean of vegetation and other materials. They may become lodged between the tines. Stop the engine and disconnect the spark plug before unclogging the tines.
Repairs
Use only the accessory and spare parts recommended by the manufacturer. If the machine suers a failure despite our quality controls and your care, have repair work carried out only by a trained electrician.
Environmental Protection
Do not simply dispose of the machine, accessories, and packaging in the dustbin, but ensure that it can be recycled. A small amount of effort on your part can do a great deal of good for our environment.
Residual Risks
Even though using the machine properly there will always remain a residual risk which cannot be eliminated. From the type and construction of the machine following dangers can occur:
- Ejection of parts of the cutting material
- Damage of hearing if no prescribed hearing protection is worn
• Inhalation of the cutting material - This electric tool generates an electromagnetic field during operation. This field can impair active or passive medical implants under certain conditions. To prevent the risk of serious or deadly injuries, we recommend that persons with medical implants consult with their physician and the manufacturer of the medical implant prior to operating the tool.
- ATTENTION: The value of vibration emitted during product usage may differ from the declared value depending on the circumstances. Safety measures to protect the operator are based on an estimate of exposure under normal conditions of use (considering all operating cycles such as the time when the tool is shut off, when operating empty or in use).
! DANGER !
Using an engine or wood/charcoal/gas fuelled appliance indoors CAN KILL YOU IN MINUTES.
Engine exhaust and wood/charcoal/gas fumes contain carbon monoxide. This is a poison you cannot see or smell.

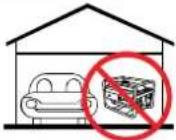
NEVER use inside a building, home, garage, boat, caravan or tent EVEN IF doors and windows are open.

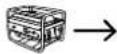
Only use OUTSIDE and far away from windows, doors, and vents.
Avoid other hazards - READ MANUAL BEFORE USE.
GENERAL:
- Do not operate in a hazardous location. Such areas include where there is a risk of explosion of petrol fumes, leaking gas or explosive dusts.
- Do not operate in a confined area where exhaust gases or wood/charcoal/gas fumes could reach dangerous concentrations.
PRODUCTS FEATURING AN ENGINE
- Follow all warnings in the section titled "GENERAL".
- Explosion hazard - never smoke while refuelling.
• Take care not to spill fuel. When refuelling the engine, ensure that the engine has been allowed to cool. Prevent spilling of fuel as this may also ignite with a hot engine. - Never refuel while engine is running.
GENERATORS
- Follow all warnings in the sections titled "GENERAL" and "PRODUCTS FEATURING AN ENGINE".
- The output of this generator is potentially lethal. The generator should not be connected to a fixed electrical installation except by an appropriately licensed person.
- Not weatherproof – protect your machine. This machine is not weatherproof and should not be exposed to direct sunlight, high ambient temperature, damp conditions, wet conditions or high humidity conditions.
Safety Symbols
The product may have safety warning labels attached to it, explained below. Understand the symbols on your product and their meanings. If any stickers become unreadable, unattached etc., replace them.
 Flammable Material HazardFlammable liquids, gases, or substances etc may present.Avoid ignition sources and open flames. Danger of fire. Flammable Material HazardFlammable liquids, gases, or substances etc may present.Avoid ignition sources and open flames. Danger of fire. |  Read User ManualRead and fully understand product safety warnings, operation, procedures etc before using the product. Read User ManualRead and fully understand product safety warnings, operation, procedures etc before using the product. |  Use Hand ProtectionWear appropriate hand protection and take due care as the product or use of the product may present hand hazards. Use Hand ProtectionWear appropriate hand protection and take due care as the product or use of the product may present hand hazards. |  Exhaust FumesCarbon-Monoxide HazardDo not use the product in confined areas or without adequate ventilation. Carbon-monoxide poisoning can be fatal. Exhaust FumesCarbon-Monoxide HazardDo not use the product in confined areas or without adequate ventilation. Carbon-monoxide poisoning can be fatal. |
 Electrocution / Electrical Shock HazardHigh voltage or high current electricity may be present or required by the product. Take due care when handling electrical products, cables, plugs and leads. Electrical shock can be fatal. Electrocution / Electrical Shock HazardHigh voltage or high current electricity may be present or required by the product. Take due care when handling electrical products, cables, plugs and leads. Electrical shock can be fatal. |  Toxic Fumes / Dust HazardUsing the product or by-products from use may produce fumes, smoke or particles that could be harmful if inhaled. Wear appropriate breathing protection and have adequate ventilation. Toxic Fumes / Dust HazardUsing the product or by-products from use may produce fumes, smoke or particles that could be harmful if inhaled. Wear appropriate breathing protection and have adequate ventilation. |  Explosive Material HazardCombustible liquids, gases, or substances etc may be present.Avoid ignition sources and open flames. Danger of explosion. Explosive Material HazardCombustible liquids, gases, or substances etc may be present.Avoid ignition sources and open flames. Danger of explosion. |  Cutting / Amputation HazardThe product may have blades, edges or mechanical devices that can cause severe cut injury to fingers, limbs etc. Take due care when handling and using the product. Cutting / Amputation HazardThe product may have blades, edges or mechanical devices that can cause severe cut injury to fingers, limbs etc. Take due care when handling and using the product. |
 Crush HazardThe product may have blades, edges or mechanical devices that can cause severe crush injury to fingers, limbs etc. Take due care when handling and using the product. Crush HazardThe product may have blades, edges or mechanical devices that can cause severe crush injury to fingers, limbs etc. Take due care when handling and using the product. |  Single Operator OnlyThe product must be operated by a single person only. More than one person operating the product may introduce additional hazards. Single Operator OnlyThe product must be operated by a single person only. More than one person operating the product may introduce additional hazards. |  Use Face ProtectionWear appropriate full-face protection and take due care as the product or use of the product may present face and eye hazards. Use Face ProtectionWear appropriate full-face protection and take due care as the product or use of the product may present face and eye hazards. |  Use Foot ProtectionWear appropriate foot protection and take due care as the product or use of the product may present foot hazards. Use Foot ProtectionWear appropriate foot protection and take due care as the product or use of the product may present foot hazards. |
 Use Eye / Ear / Head ProtectionWear appropriate eye and / or ear and / or head protection and take due care as the product or use of the product may present eye, hearing, and head hazards. Use Eye / Ear / Head ProtectionWear appropriate eye and / or ear and / or head protection and take due care as the product or use of the product may present eye, hearing, and head hazards. |  Running HazardDo not run on or near the product as doing so may present a fall hazard. Running HazardDo not run on or near the product as doing so may present a fall hazard. |  Diving HazardDo not dive into the product as doing so may present a neck / head injury hazard. Diving HazardDo not dive into the product as doing so may present a neck / head injury hazard. |  Adult Supervision RequiredAlways supervise children and other users of a product to prevent drowning or injury. Adult Supervision RequiredAlways supervise children and other users of a product to prevent drowning or injury. |
 Skin Penetration / Puncture HazardThe product may produce pressure, emit liquids or objects that can cause severe injury to fingers, limbs, blood etc. Take due care when handling and using the product. Skin Penetration / Puncture HazardThe product may produce pressure, emit liquids or objects that can cause severe injury to fingers, limbs, blood etc. Take due care when handling and using the product. |  Hot Surface HazardBe aware that the product may produce high temperatures and hot surfaces that can cause burn injuries. Hot Surface HazardBe aware that the product may produce high temperatures and hot surfaces that can cause burn injuries. |  Flying Debris HazardBe aware that the product or use of the product may present hazards produced by flying debris. Wear appropriate clothing and protective devices. Flying Debris HazardBe aware that the product or use of the product may present hazards produced by flying debris. Wear appropriate clothing and protective devices. | 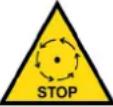 Moving Parts HazardBe aware that the product contains or uses mechanical devices that move or rotate. Always wait for moving parts to stop fully before handling the product, adjusting, maintenance etc. Moving Parts HazardBe aware that the product contains or uses mechanical devices that move or rotate. Always wait for moving parts to stop fully before handling the product, adjusting, maintenance etc. |
 Carbon-Monoxide HazardDo not use the product in confined areas or without adequate ventilation. Carbon-monoxide poisoning can be fatal. Carbon-Monoxide HazardDo not use the product in confined areas or without adequate ventilation. Carbon-monoxide poisoning can be fatal. |  Pull HazardBe aware that the product contains or uses mechanical devices that can pull in objects and can cause severe injury to fingers, limbs etc. Take due care when handling and using the product. Pull HazardBe aware that the product contains or uses mechanical devices that can pull in objects and can cause severe injury to fingers, limbs etc. Take due care when handling and using the product. |  Slope / Fall Injury HazardBe aware that using the product on sloping surfaces or in slippery conditions may present additional dangers from falls and contact with blades, moving parts, hot surfaces etc. Slope / Fall Injury HazardBe aware that using the product on sloping surfaces or in slippery conditions may present additional dangers from falls and contact with blades, moving parts, hot surfaces etc. |  "Slam Dunk" WarningDo NOT attempt "slam dunk" manoeuvres as this may result in severe injury due to falling, product breakage or collapse etc. "Slam Dunk" WarningDo NOT attempt "slam dunk" manoeuvres as this may result in severe injury due to falling, product breakage or collapse etc. |
 Electrocution / Electrical Shock Hazard - OutdoorHigh voltage or high current electricity may be present or required by the product. Do NOT use in rain, damp, or wet conditions. Electrical shock can be fatal. Electrocution / Electrical Shock Hazard - OutdoorHigh voltage or high current electricity may be present or required by the product. Do NOT use in rain, damp, or wet conditions. Electrical shock can be fatal. | 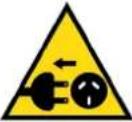 Electrocution / Electrical Shock Hazard - DisconnectHigh voltage or high current electricity may be present or required by the product. Always disconnect the product from the electrical supply before handling the product, adjusting, maintenance etc. Electrocution / Electrical Shock Hazard - DisconnectHigh voltage or high current electricity may be present or required by the product. Always disconnect the product from the electrical supply before handling the product, adjusting, maintenance etc. |  Power Line Electrocution HazardHigh voltage / high current power lines may be present. Use extreme caution to avoid contact or interference with power lines.Electrical shock can be fatal. Power Line Electrocution HazardHigh voltage / high current power lines may be present. Use extreme caution to avoid contact or interference with power lines.Electrical shock can be fatal. |  "Kick-Back" HazardHigh level of "kick-back" hazard that can cause the machine to suddenly rotate towards operator.Kick-back injury can be fatal. "Kick-Back" HazardHigh level of "kick-back" hazard that can cause the machine to suddenly rotate towards operator.Kick-back injury can be fatal. |
 Winch Operator Position HazardDo NOT stand between winch and load. Do NOT use winch to move people. Winch Operator Position HazardDo NOT stand between winch and load. Do NOT use winch to move people. |  Winch Lift HazardDo NOT LIFT load vertically. Use machine to PULL only. Winch Lift HazardDo NOT LIFT load vertically. Use machine to PULL only. |  Cable HazardEnsure that load bearing cable is not kinked or knotted. Cable HazardEnsure that load bearing cable is not kinked or knotted. | 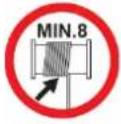 Winch Cable HazardEnsure that there is a minimum number of cable coils on winching mechanism. Winch Cable HazardEnsure that there is a minimum number of cable coils on winching mechanism. |
 Winch Hook HazardCarry hook to load – do NOT throw or run. Winch Hook HazardCarry hook to load – do NOT throw or run. |  Flash / Blinding HazardWear appropriate eye protection for welding. Direct exposure to weld arcs may cause permanent eye injury. Flash / Blinding HazardWear appropriate eye protection for welding. Direct exposure to weld arcs may cause permanent eye injury. |  Laser HazardLaser may be in use – do NOT look directly at laser or allow others to. Laser HazardLaser may be in use – do NOT look directly at laser or allow others to. |
Table of Contents
Safety....2
Safety Symbols 7
Parts Identification.... 10
Tiller....10
Parts Breakdown....11
Assembly 13
General....13
Functions....16
Operation 18
Adding Motor Oil and Petrol 18
Starting the Motor....19
Idle Speed....20
Shutting Down 21
Operating Speed 21
Working Instructions....21
Maintenance 23
Cleaning Tine Area....23
Checking the Clutch 23
Maintaining the Spark Plug....23
Replacing the Motor Oil....24
Air Filter 24
Service Information 25
Storage....26
Troubleshooting....27
Specifications....28
Parts Identification
Tiller
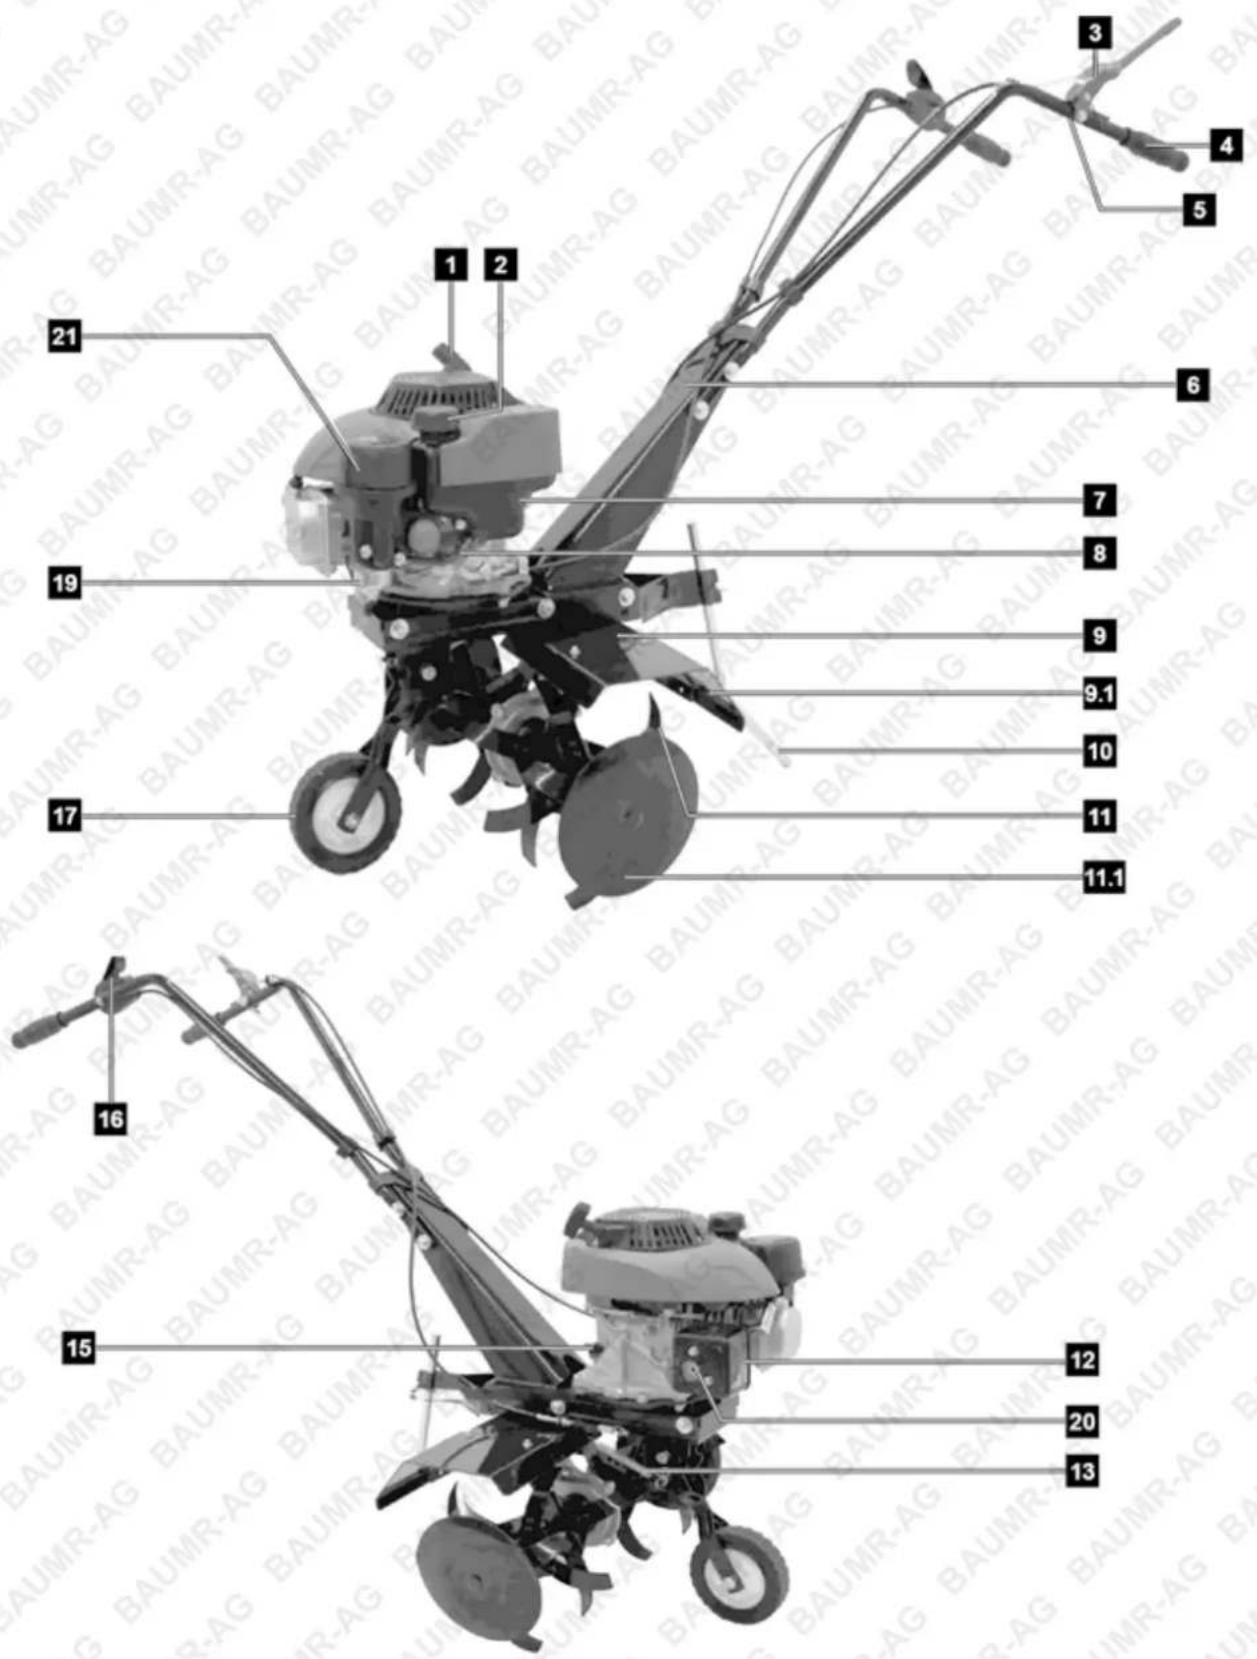
| No. | Name | No. | Name |
| 1 | Recoil starter | 11.1 | Blade extension |
| 2 | Fuel tank cap | 12 | Protective cover of the muffler |
| 3 | Clutch handle | 13 | Spring |
| 4 | Handle | 15 | Oil dipstick |
| 5 | Lock clutch lever | 16 | Accelerator |
| 6 | Handlebar mount | 17 | Wheel |
| 7 | Fuel tank | 19 | Carburettor |
| 8 | Fuel pipe | 20 | Muffler |
| 9 | Blade guard | 21 | Air filter cap |
| 9.1 | Blade guard extension | 22 | Air filter |
| 10 | Depth stop | ||
| 11 | Blades | ||
Parts Breakdown
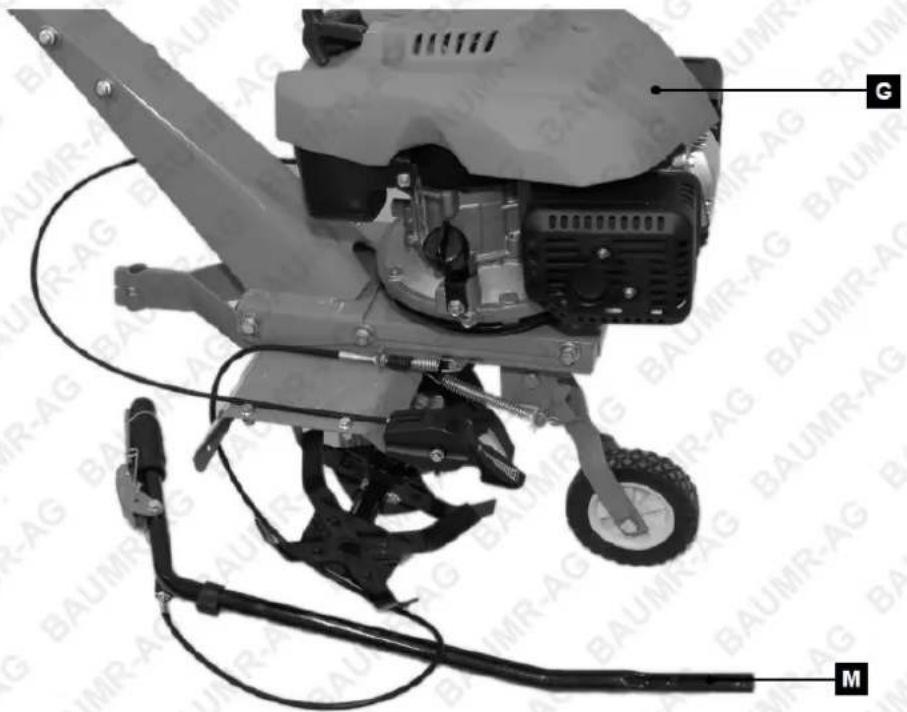
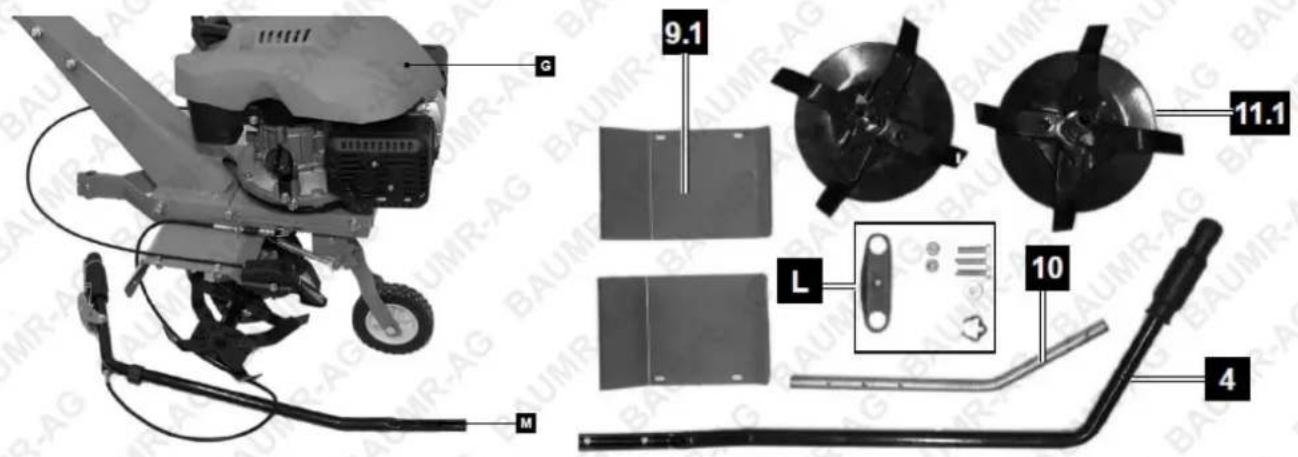
• Motorised cultivator (G) (1x)
- Spark plug socket (H) (1x)
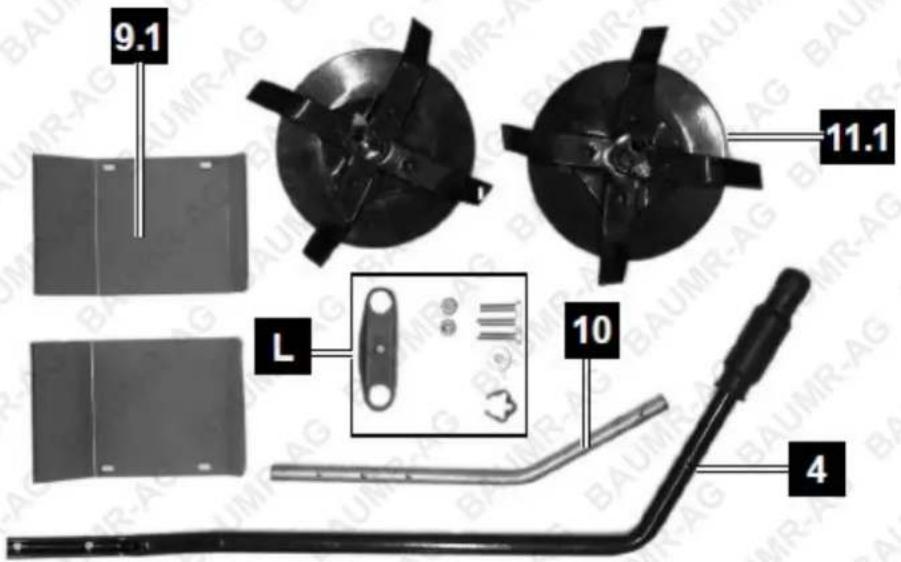
- Depth stop (10) (1x)
- Hardware bag (L)
- Handlebars (M) (2x)
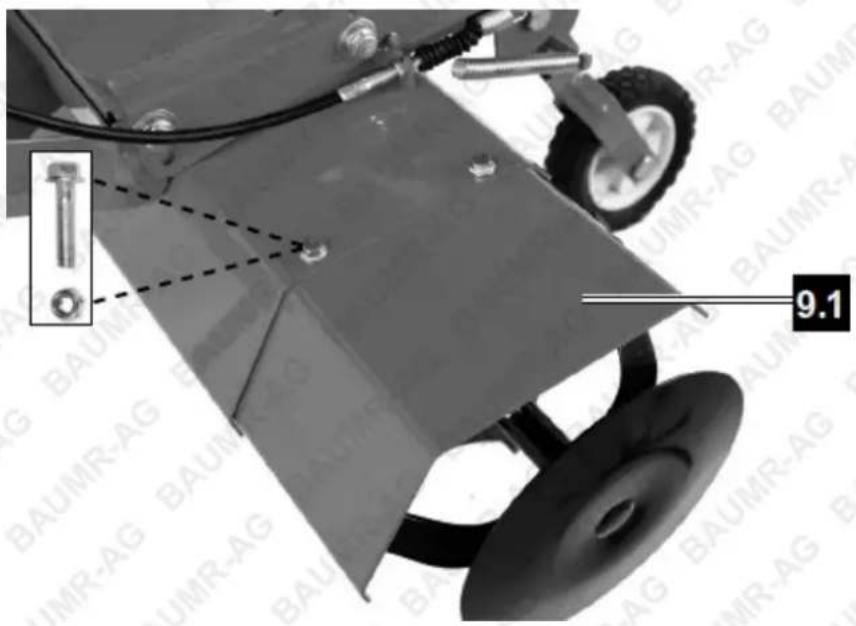
• Blade guard extension (2x) (9.1)
- Blade extension (2x) (11.1)
Spare parts available for purchase, scan QR code below:

Assembly
General
- Check all parts of the device and place them in front of you on the floor.
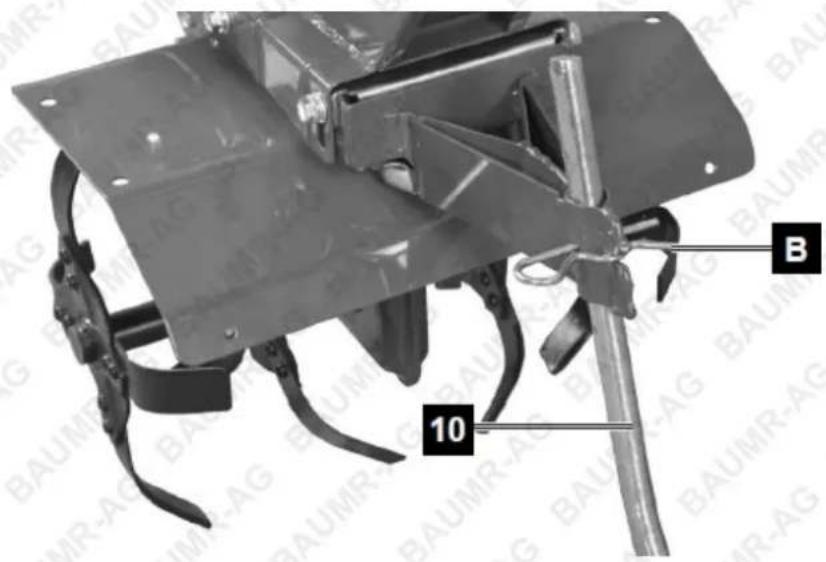
- To enhance the stability of the machine, mount the depth stop (10) and fix it with pin (B).
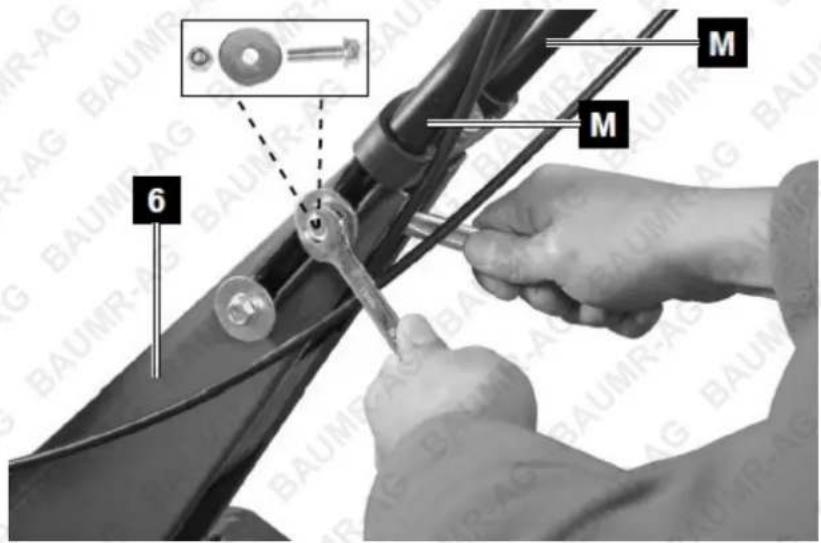
- Mount the handles (M) at the handlebar mount (6) with the delivered bolts.
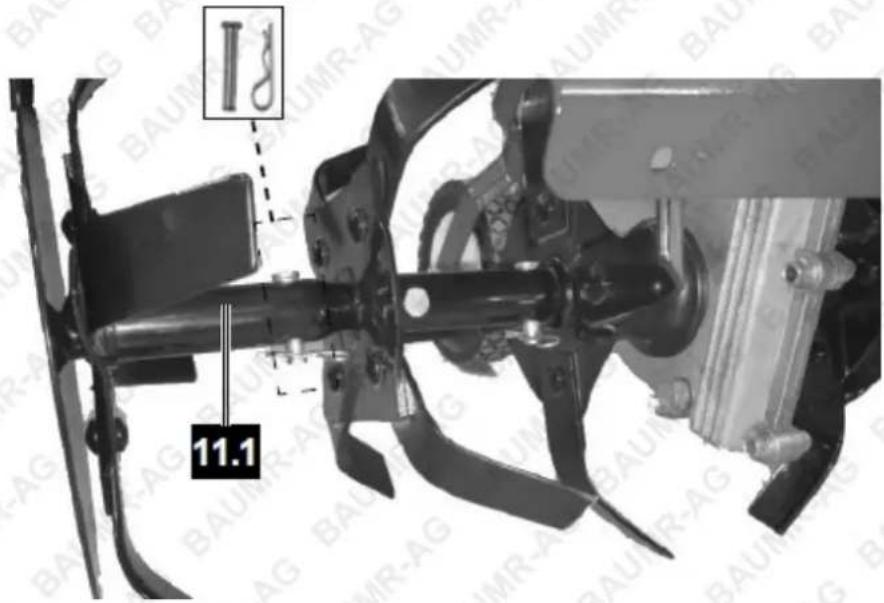
- Mount the blade extension (11.1), as shown.
- Mount the blade guard extension (9.1), as shown.
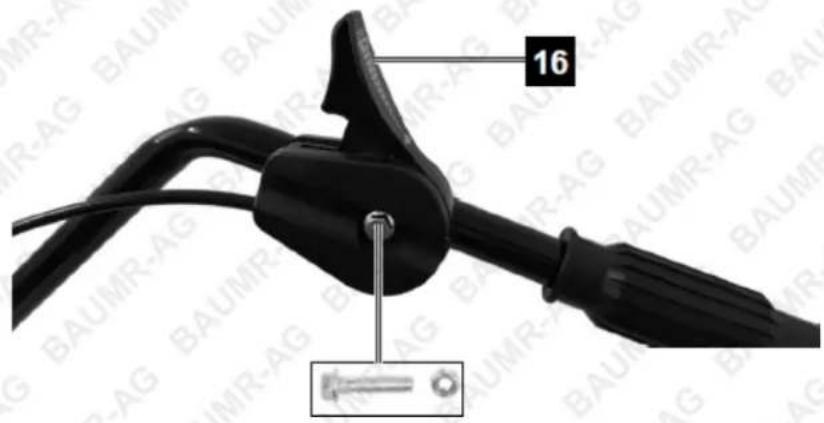
- Mount the accelerator (16), as shown.
Functions
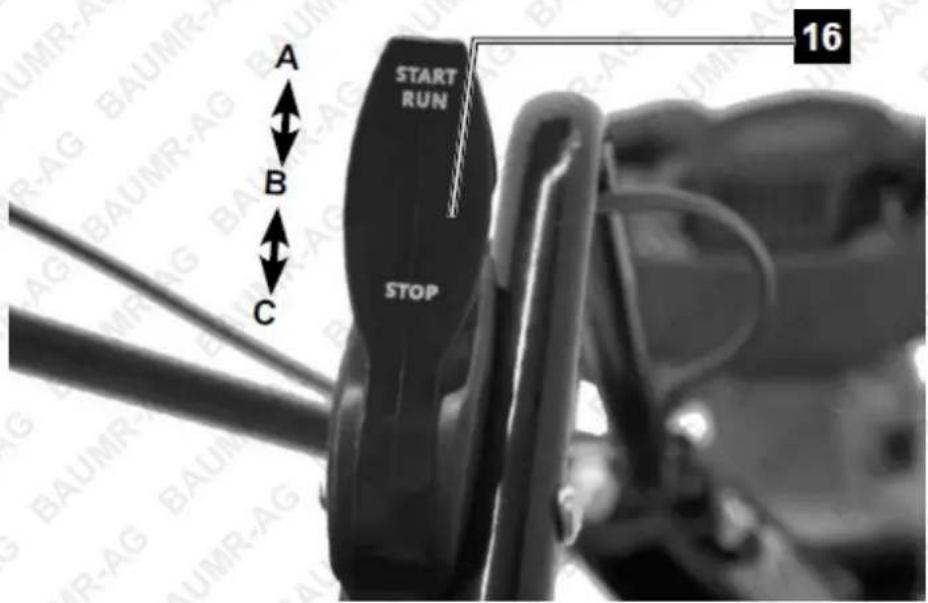
Throttle Lever
It controls engine speed. Moving the throttle lever in the directions shown makes the engine run faster or slower.
Wheel
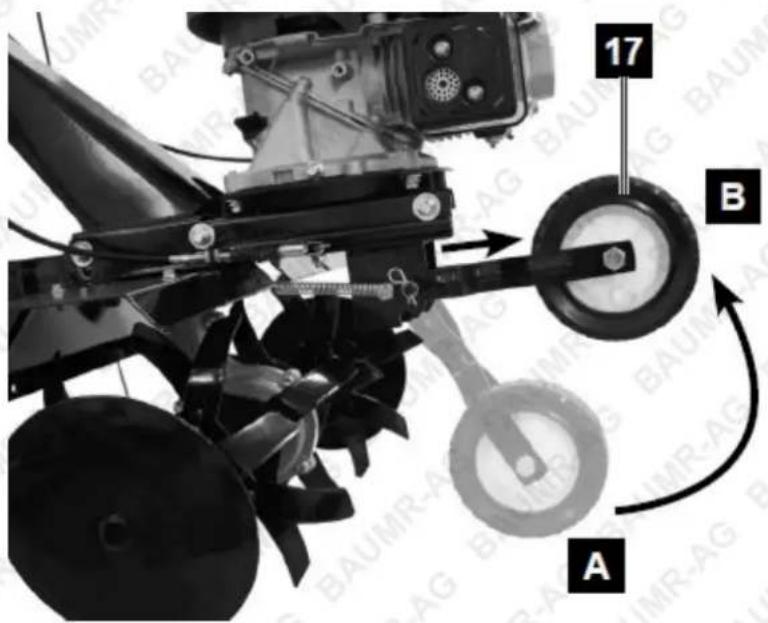
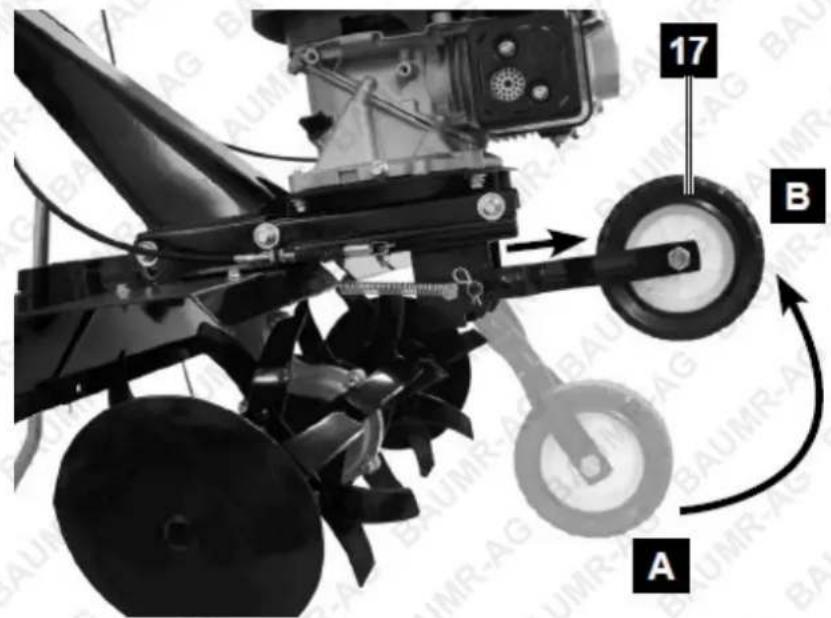
The spring locks wheel bracket at different height and distance from the tines. Pull the spring-connected wheel bracket downwards to raise the wheel in the upper groove when tilling. Set the wheel down when transporting the tiller. Tilt the machine back until the tines clear the ground. Push or pull the unit to the next location.
Depth Regulator Rod
It regulates the tilling depth and helps the operator control the direction and speed of the tiller. Insert the depth regular rod in the groove at the rear of the chassis, with the pointed end downward and the side outward. Lowering the depth regulator rod will slow the tiller and make it till deeper. Raising the depth regulator rod will allow it to move faster and till shallower.
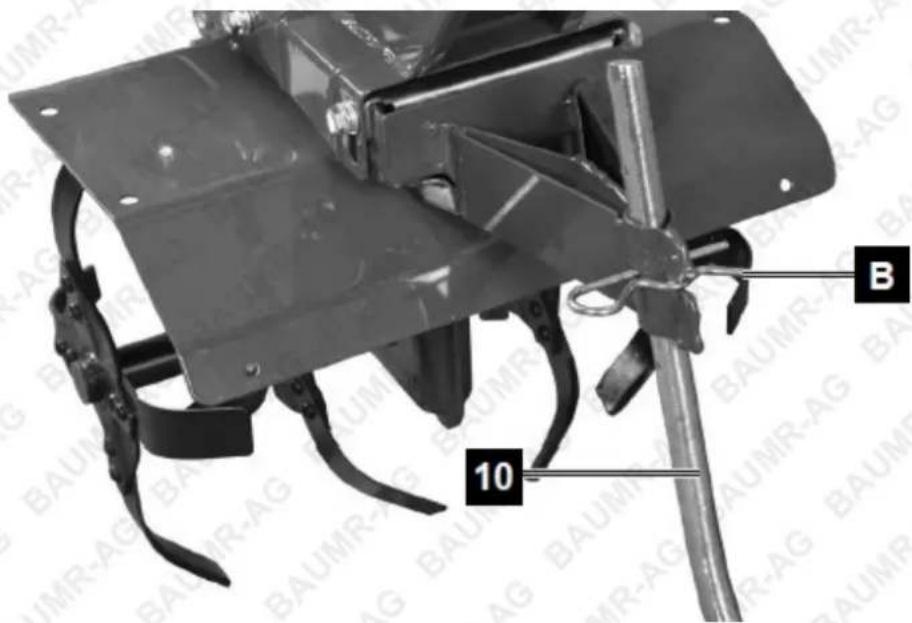
Adjusting the Tilling Depth
- Remove the pin. (Pos. B)
- Raise or lower the depth regulator rod to the desired position. (Pos. 10)
- Replace the pin. (Pos. B)
Operation
Adding Motor Oil and Petrol

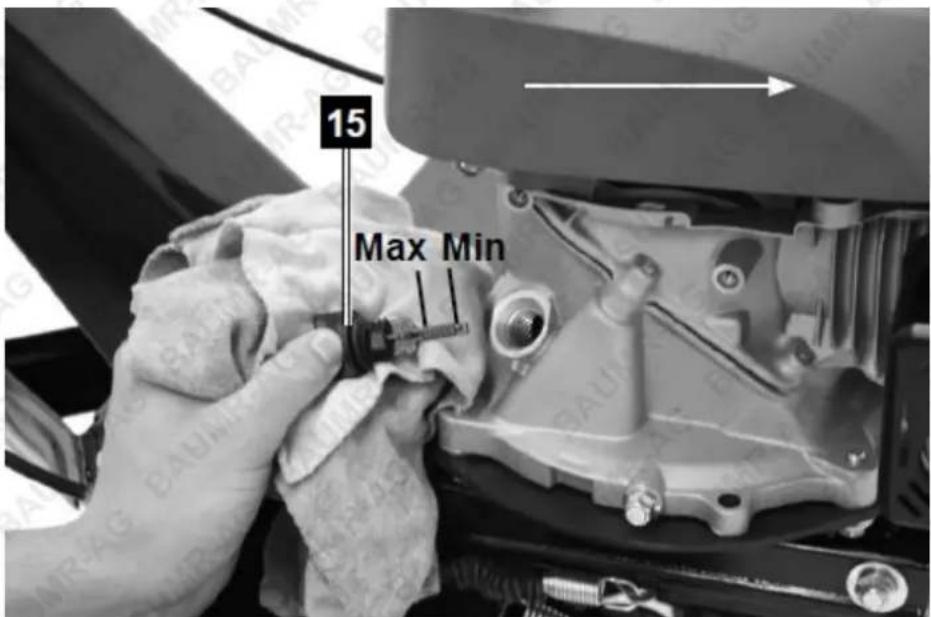
ATTENTION! OIL HAS BEEN DRAINED FOR SHIPPING. Failure to fill engine sump with oil before starting engine will result in permanent damage and void engine warranty.
- Check the oil level and top up, if necessary, with oil. (Max mark on the oil level indicator).
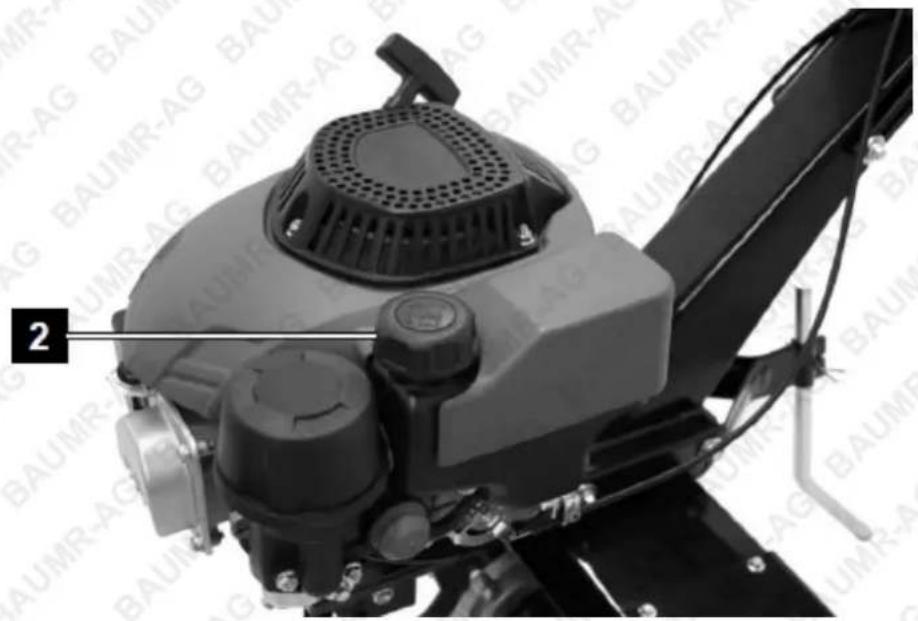
- Open the fuel tank cap (2) and fill the device with regular unleaded gasoline.
natural_image
Close-up of a mechanical device with a black top and control panel, no visible text or symbolsStarting the Motor
- Pivot the wheel (17) upwards until the locking engages on the intended recess.
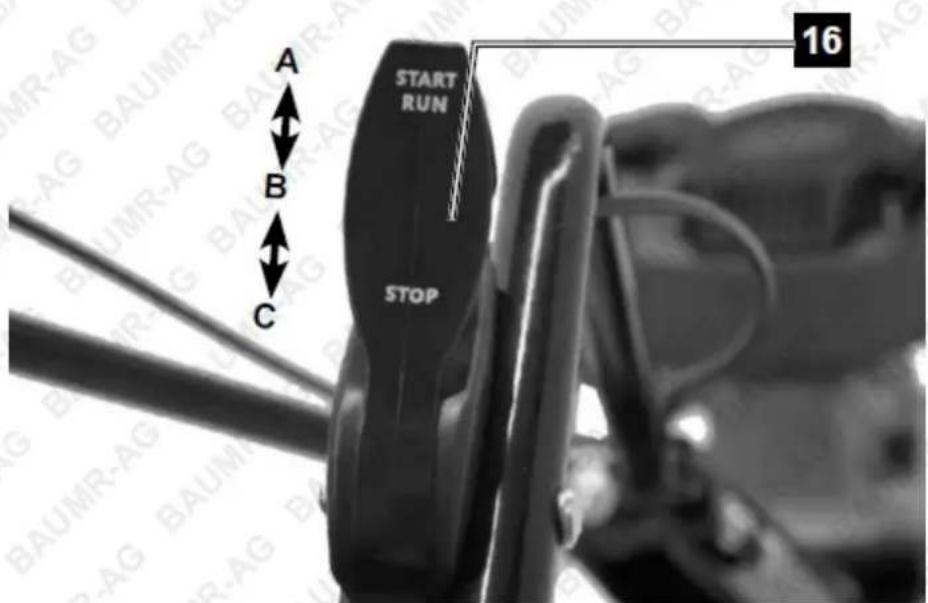
- Put the accelerator (16) into position.
• A = Full throttle
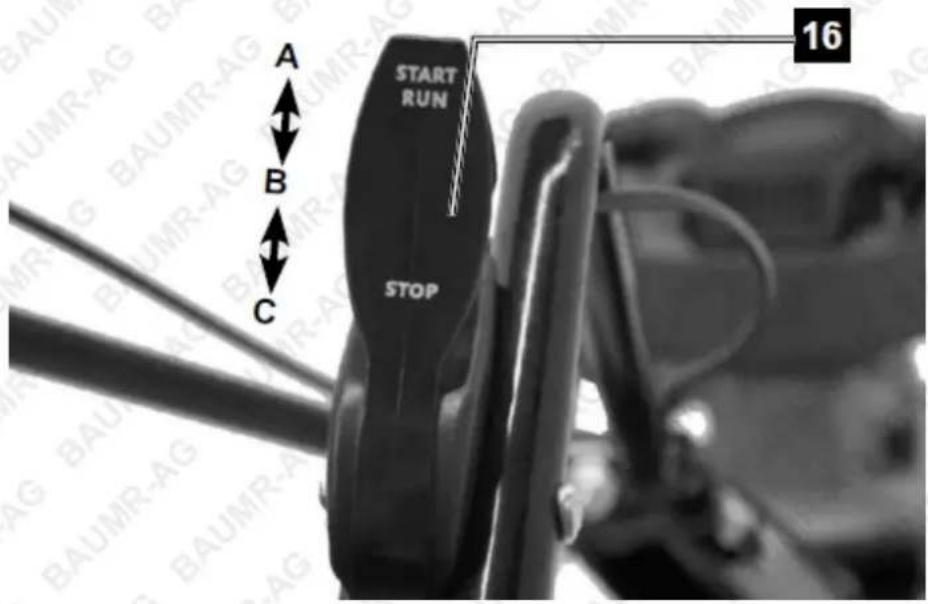
• B = Idle
• C = Stop
-
Set the throttle lever to the position "A". Start the motor using the recoil starter (1). To do this, first gently pull until you feel resistance, then pull hard all the way. Repeat this operation until the motor starts up. If the motor still does not start up after ten attempts, refer to the Troubleshooting section.
-
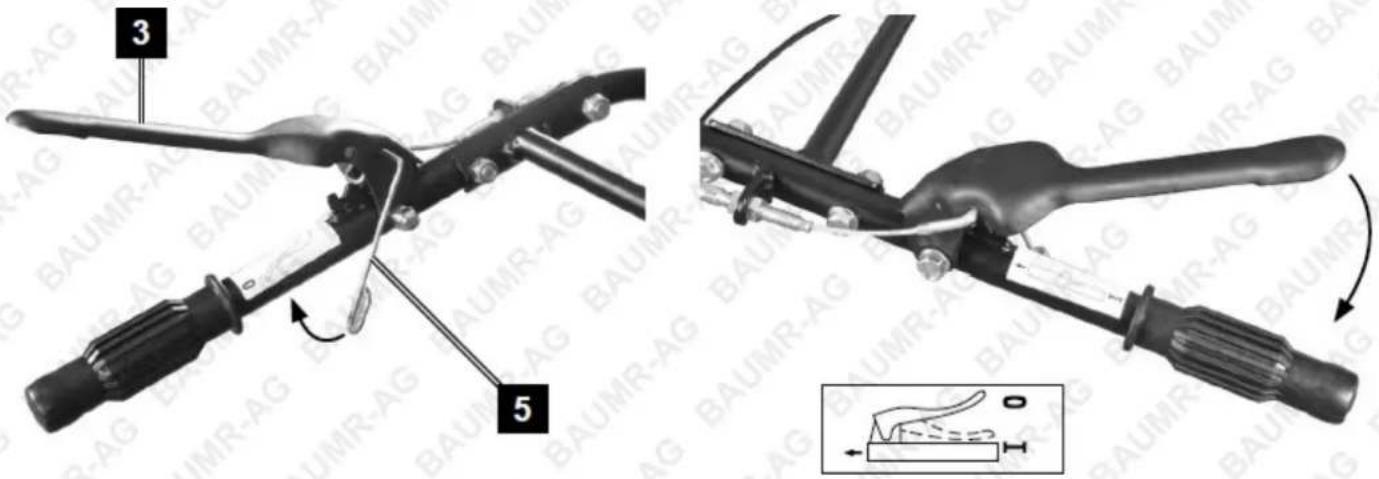
For operating the blades, withdraw the accelerator trigger lock (5) and pull the clutch handle (3) to start the rotation of the blades. Keep the clutch handle (3) pushed downwards. Release the clutch to stop the blades.
Idle Speed
Set throttle control lever (16) to its "B" position to reduce stress on the engine when tilling is not being performed. Lowering the engine speed to idle the engine will help extend the life of the engine, as well as conserve fuel and reduce the noise level of the machine.
Shutting Down
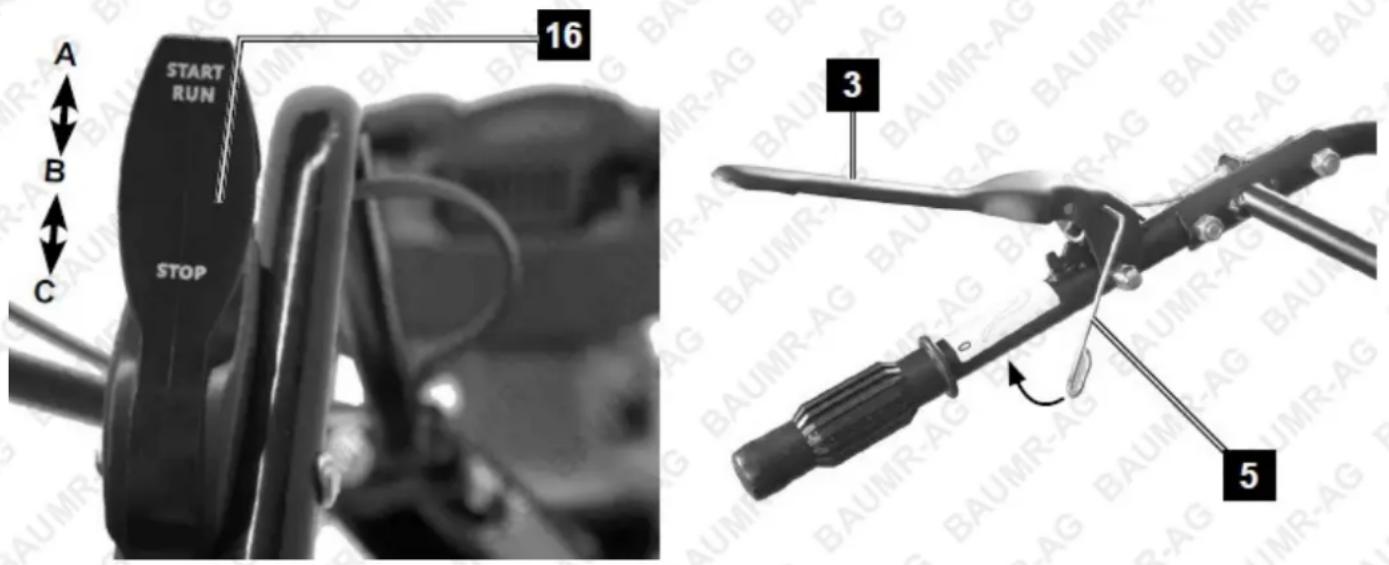
Release tine clutch control lever (3) to neutral position (C) to stop the tines. To stop the engine, switch the throttle lever to position (C).
Operating Speed
- For normal tilling: Set the accelerator (16) to the rabbit icon for best tiller action.
- For cultivating (Pos. A): The accelerator (16) should be set to control a slow walking speed (turtle icon) for cultivating. (Pos. C)
Working Instructions
Depth Regulator
Besides depth regulator rod setting, variation of pressure on the handles also helps further control of tilling depth and travel speed. A downward pressure on the handles will reduce the tilling depth and increase the forward speed. An upward pressure on the handles will increase the working depth and reduce the forward speed.
Tilling
- Tilling is digging in, turning over, and breaking up garden soil and preparing a seedbed for planting.
• Best tilling depth is 100 to 150mm.
• A tiller will also clear the soil of unwanted vegetation.
• The decomposition of this vegetation matter enriches the soil.
- Avoid tilling soil that is too dry as it will pulverize and produce a dust that will not hold water. Water a few days before tilling. Also, tilling soil that is too wet will produce unsatisfactory clods. Wait a day or two after heavy rain for the soil to dry.
- Better growth will be obtained if an area is tilled properly and used soon after tilling to preserve the moisture content.
- The type of soil and working conditions will determine the actual setting of the tilling depth. In some soils, the desired depth is reached by first passing over garden. In other soils, the desired depth is obtained by going over the garden two or three times. In later case, the depth regulator rod should be lowered before each succeeding pass over the garden. Passes should be made across the length and width of the garden alternately.
- Do not try to dig too deeply in the first pass. If the machine jumps or bucks, allow the unit to move forward at a lightly faster rate.
- If the tiller stops forward motion and tries to dig in one spot, rock the handles from side to side to start it moving forward again.
- Rocks which are turned up should be removed from the garden area.
Cultivating
Cultivating is loosening or digging around growing plants to disrupt weeds and aerate soil. Less than 50mm depth is always desirable.
Maintenance
Keeping your tiller in top running condition will prolong its life, and help you obtain optimum performance whenever you wish to till your garden.
Cleaning Tine Area
Clean the tiller underside of the tine shield after each use. The dirt washes off tines easier if rinsed off immediately instead of after it dries.
- Turn OFF engine. Engine must be cool.
- Set to "C" position and remove spark plug wire from spark plug and secure.
- Remove all vegetation, string, wire, and other materials that may have accumulated to the axle between the inside set of tines and the seal on the transmission housing.
Checking the Clutch
- As clutch wears out, the same lever could have a wider opening, being so uneasy to use. This means that it is necessary to adjust the cable, setting clutch lever on its original position acting on the adjustment device and on counter nut.
- Always towel dry the tiller afterwards and apply a light coat of oil or silicone to prevent rusting or water damage.
- Replace spark plug wire.

ATTENTION! Never use a pressure washer to clean your tiller. Water can penetrate tight areas of the tiller and its transmission case and cause damage to spindles, gears, bearings, or the . The use of pressure washers will result in shortened life and reduce serviceability.
Maintaining the Spark Plug
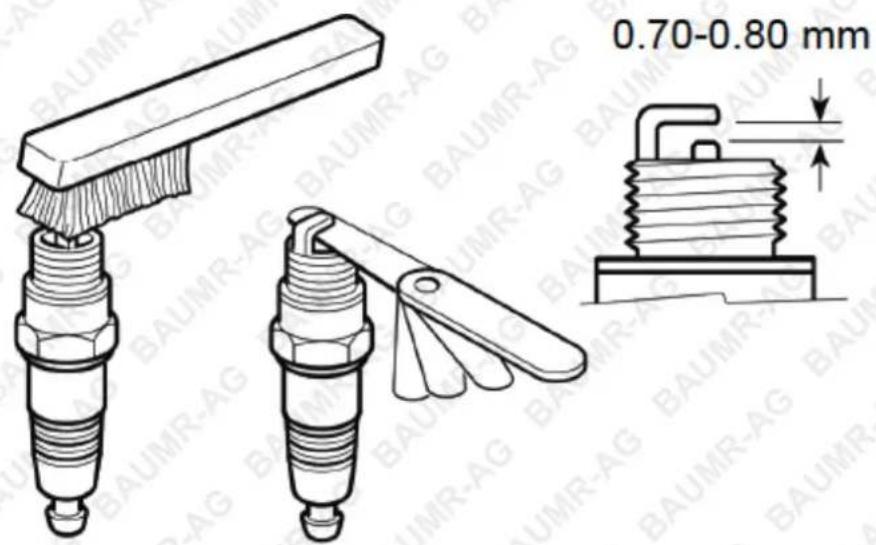
• You must inspect the spark plug after every 50 hours of actual operation.
- Check the colour of any deposits that have accumulated on the end of the spark plug, it should be light brown.
- Remove any deposits with a stiff brush, preferably a brass-wire brush. Check the gap between the spark plug electrodes and adjust it if necessary. This gap must be between 0.7 and 0.8 mm.
Replacing the Motor Oil
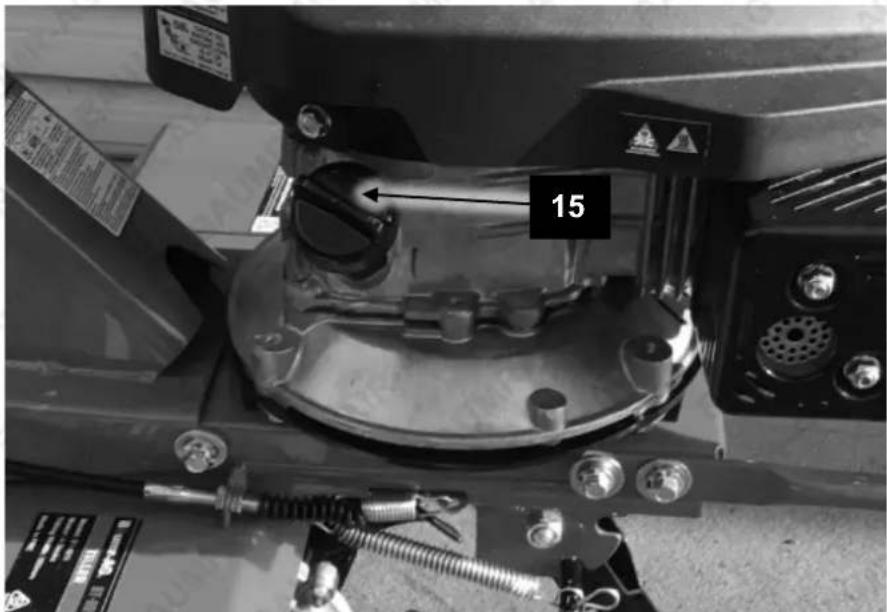
Remove / refill all oil with a syphon after every 20 hours of use.
Air Filter
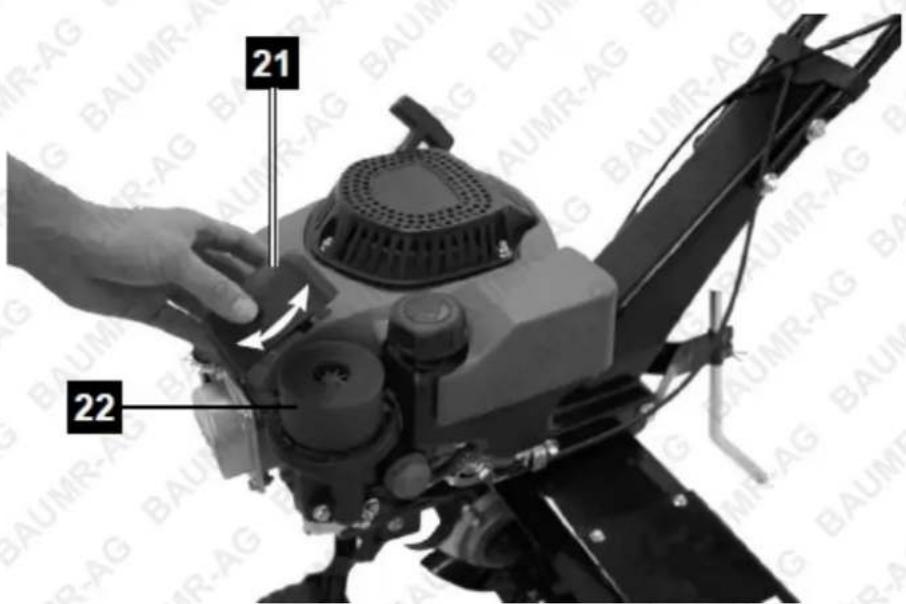
You must examine the condition of the air filter and clean it after every 50 hours of actual use or every 3 months.
- Hold the air filter while unscrewing the wing nut and remove the air filter.
- To clean it, use an environmentally friendly water-based de-greasing product.
- Let the air filter dry completely, re-assemble it and put on its cover.
CAUTION! Never run the motor without its air filter.
Service Information
Please note that the following parts of this product are subject to normal or natural wear and that the following parts are therefore also required for use as consumables.
- Wear parts*: spark plug, blades, air filter, all operating fluids/fuels
* Not necessarily included in the scope of delivery!
Storage
If the tiller will not be used for a period longer than 30 days, follow the steps below to prepare your tiller for storage.
- Drain the fuel tank completely. Stored fuel containing ethanol or MTBE can start to go stale in 30 days. Stale fuel has a high plastic content and can clog the carburettor and restrict fuel flow.
- Start the engine and allow it to run until it stops. This ensures no fuel is left in the carburettor. Run the engine until it stops. This helps prevent plastic deposits from forming inside the carburettor and possible engine damage.
- While the engine is still warm, drain the oil from the engine. Refill with fresh oil of the grade recommended in the Engine Manual.
- Allow the engine to cool. Remove the spark plug and put 30ml of high-quality motor oil into the cylinder. Pull the starter rope slowly to distribute the oil. Replace the spark plug.
ATTENTION! Remove the spark plug and drain all the oil from the cylinder before attempting to start the unit after storage.
- Use a clean cloth to clean off the outside of the tiller and to keep the air vents free of obstructions.
ATTENTION! Do not use strong detergents or petroleum-based cleaners when cleaning plastic parts. Chemicals can damage plastics.
-
Inspect for any loose or damaged parts. Repair or replace damaged parts and tighten loose screws, nuts or bolts.
-
Remove the tines. Clean and apply oil to the tines and tine shafts to prevent rusting. Mount the tines onto the tine shafts.
-
Coat the wheel axles lightly with oil. Oil the throttle cables and all visible moving parts. Do not remove the engine cover.
-
Store your tiller in upright position in a clean, dry building that has good ventilation.
ATTENTION! Do not store tiller with fuel in a non-ventilated area where fuel fumes may reach flame, sparks, pilot lights or any ignition sources. Use only approved fuel containers.
Troubleshooting
| Problem | Possible cause | Solution |
| Motor does not start up | The starter is not in the correct position for the prevailing conditions | Move the starter to the appropriate position |
| The reservoir is empty | Fill the tank | |
| The air filter components are dirty | Clean the air filter components | |
| Spark plug is loose | Tighten the plug to 25-30 Nm | |
| Spark plug wire improperly attached or disconnected from the outlet | Attach the plug wire to the plug | |
| Incorrect spark plug gap | Adjust the spacing between the electrodes to between 0.7 to 0.8mm | |
| Defective spark plug | Install a new spark plug that is correctly placed | |
| Carburettor immersed in gasoline - Gas switch is in the OFF position | Remove the air filter and pull on the starter cable continually until the carburettor cleans itself and reinstall the air filter Set the gasoline switch to the position | |
| Motor has trouble starting or loses power | Lighter module defective | Contact an authorised service centre |
| Dirt, water, or mould from the gas tank. | Drain the reservoir, clean it and fill it with clean fresh gasoline | |
| The hole in the tank stopper is obstructed. | Clean or replace the tank plug | |
| The air filter components are dirty | Clean the air filter components | |
| Motor operates irregularly | Air filter components are dirty | Clean the air filter components |
| The throttle level is blocked by debris | Remove any projectile debris | |
| Cooling fins and air passages under the motor are blocked | Remove any debris from the cooling fins and the air passage | |
| Motor locks up at high speeds | The gap between the spark plug electrodes is too small. | Adjust the spacing between the electrodes to between 0.7 and 0.8mm |
| Motor overheats | Cooling air flow is obstructed. | Remove all debris from the mounting, ventilator, air passages and cooling fins |
| Defective spark plug. | Install a new spark plug | |
| Motor vibrates abnormally | The tiller has not been properly assembled. The power tiller assembly is not balanced. | Check that all parts of the engine are properly assembled. |
Specifications
Engine Type 4-Stroke
Fuel Type
Regular Unleaded (Min 91+ RON)
Displacement 150cc
Power 3.54hp
RPM 3000 rpm
Noise Level 93dB
Fuel Tank Capacity 1L
Max Tilling Depth 130mm
Tilling Widths 360mm/560mm
Ignition CDI
Starting System
Recoil
Note: Assembly Required

Some experts believe that the incorrect or prolonged use of almost any product may cause serious injury or death. To help reduce your risk of serious injury or death, refer to the information below. For more information, see www.datastreamserver.com/safety
- Consult all documentation, packaging, and product labelling before use. Note that some products feature documentation available online. It is recommended to print and retain the documentation.
■ Before each use, check the product for loose/broken/damaged/missing parts, wear, or leaks (if applicable). Never use a product with loose/broken/damaged/missing parts, wear, or leaks.
■ Products must be inspected and serviced (if applicable) by a qualified technician every 6 months. This is based on average residential use by persons of average size and strength, and on a property of average metropolitan size. Use beyond these recommendations may require more frequent inspections/servicing.
■ Ensure that all users of the product have completed a suitable industry recognised training course before being allowed access to the product.
■ The product has been supplied by a general merchandise retailer that may not be familiar with your specific application or description of application. Be sure to attain third-party approval from a qualified specialist for your application before use, regardless of any assurances from the retailer or its representatives.
This product is not intended for use where fail-safe operation is required. As with any product (for example, automobile, computer, toaster), there is the possibility of technical issues that may require the repair or replacement of parts, or the product itself. If the possibility of such failure and the associated time it may take to rectify could in any way inconvenience the user, business, or employee, or financially affect the user, business, or employee, then the product is not suitable for your requirements. This product is not intended for use where incorrect operation or a failure of any kind, including but not limited to, a condition requiring product return, replacement, parts replacement, or service by a technician may cause financial loss, loss of employee time or an inconvenience requiring compensation.
If this product has been purchased in error when considering the information presented here, contact the retailer directly for details of their returns policy, if required.
Bäumr-AG®.com.au
©2022 Baumr-AG. All rights reserved. No part of this document, including descriptive content, concepts, ideas, diagrams, or images may be reproduced or transmitted in any form or by any means, electronic or mechanical, including photocopying, scanning, or recording, or any information storage and retrieval system, without express permission or consent from the publisher.
- User Manual
- Safety
- General Work Area Safety
- General Personal Safety
- General Fuel Safety
- General Carbon-Monoxide Safety
- General Equipment Use and Care
- General Electrical Safety
- General Service Information
- Important Safety Reminders
- Intended Use
- General Safety Rules
- Work Area
- Personal Safety
- Fuel Safety
- Machine Use and Care
- Service
- Specific Safety Rules
- Repairs
- Environmental Protection
- Residual Risks
- ! DANGER !
- GENERAL:
- GENERATORS
- Safety Symbols
- Table of Contents
- Safety....2
- Parts Identification.... 10
- Assembly 13
- Operation 18
- Maintenance 23
- Storage....26
- Troubleshooting....27
- Specifications....28
- Parts Identification
- Assembly
- General
- Functions
- Throttle Lever
- Wheel
- Depth Regulator Rod
- Adjusting the Tilling Depth
- Operation
- Adding Motor Oil and Petrol
- Starting the Motor
- Idle Speed
- Shutting Down
- Operating Speed
- Working Instructions
- Depth Regulator
- Tilling
- Cultivating
- Maintenance
- Cleaning Tine Area
- Checking the Clutch
- Maintaining the Spark Plug
- Replacing the Motor Oil
- Air Filter
- Service Information
- Storage
- Specifications
- Some experts believe that the incorrect or prolonged use of almost any product may cause serious injury or death. To help reduce your risk of serious injury or death, refer to the information below. For more information, see www.datastreamserver.com/safety
- Bäumr-AG®.com.au
Brand : Baumr-AG
Model : BT-889
Category : Tiller