LS85UHDNF - Television LINSAR - Free user manual and instructions
Find the device manual for free LS85UHDNF LINSAR in PDF.


| Product Type | 4K Ultra HD Smart TV |
| Screen Size | 85 inches (216 cm diagonal) |
| Resolution | 3840 x 2160 (4K UHD) |
| Refresh Rate | 60 Hz |
| Aspect Ratio | 16:9 |
| Smart TV Platform | webOS TV |
| HDR Support | High Dynamic Range (HDR) via HDMI, USB, and Netflix |
| Remote Control | Magic Remote with Bluetooth and IR, voice control |
| Connectivity | 2x HDMI (1 with ARC), 1x USB, Optical Audio Out, LAN, AV In, Headphone Jack, Antenna In |
| Audio Output | Internal speakers, Optical, HDMI ARC, Bluetooth, Wired Headphones |
| Power Consumption | 220W (typical) |
| Dimensions (with stand) | 1568 x 334 x 970 mm (for 70" model; approximate for 85") |
| Dimensions (without stand) | 1568 x 74 x 905 mm (for 70" model; approximate for 85") |
| Weight (net) | 24.5 kg (for 70" model; approximate for 85") |
| Power Source | AC 200-240V, 50/60Hz |
| Stand Included | Yes (two stands with screws) |
| VESA Mount Compatible | Yes, 400 x 200 mm pattern, M8 x 12mm screws |
| Warranty | 3 Years (backed by Linsar) |
Frequently Asked Questions - LS85UHDNF LINSAR
User questions about LS85UHDNF LINSAR
0 question about this device. Answer the ones you know or ask your own.
Ask a new question about this device
Download the instructions for your Television in PDF format for free! Find your manual LS85UHDNF - LINSAR and take your electronic device back in hand. On this page are published all the documents necessary for the use of your device. LS85UHDNF by LINSAR.
USER MANUAL LS85UHDNF LINSAR
natural_image
Modern white-screen TV displaying a red diagonal-striped screen against a plain white wall, placed on a white pedestal with wooden flooring (no text or symbols visible)Linsar SEEING IS BELIEVING
powered by webOS TV
70"
4K ULTRA HD SMART TV
LS70UHDNF
User Manual

Welcome
Welcome to Linsar!
This user manual tells you all you need to know about setting up your new TV.
Please take special note of any important safety and usage information presented with the symbol.
All products brought to you by Linsar are manufactured to the highest standards of performance and safety and, as part of our philosophy of customer service and satisfaction, are backed by a comprehensive 3 Year Warranty.
Contents
Welcome 2
Unpack and Prepare 4
What's in the box 4

Important Tips 5
Attaching the stand 6
Wall-mounting the TV 7
Connect to power 8
Connect your antenna 8
Controls and Connections 9
Get to know your TV 9
Buttons on the TV 9
Ports on the TV 10
Remote Control 12
Setup 12
Using the Remote Control 13
Remote Pairing 13
Magic Remote 14
Pairing the Remote 16
On-Screen Set Up 17
LG ThinQ App 18
Advanced Controls
(TV Setting Menus) 19
Picture 21
Sound 24
Programmes 26
Connection 28
General 30
Additional Settings 33
Accessibility 34
Support 35
High Dynamic Range (HDR) 36
Smart TV 37
Web Browser 38
TV Guide 39
Recording 40
Using Instant Recording 41
Using the TV Scheduler 41
Programme Scheduling 42
Manual Scheduling 42
Using Live Playback
(Real-time Playback) 42
USB Mode 43
Set up 43
Viewing Photos and Videos 44
Photo Player 44
Video Player 45
Playing Music 46
Music Player 46
Troubleshooting 47
Specifications 50
Compliance and
Responsible Disposal 51
Unpack and Prepare
What's in the box
Before installing your new TV, check you have everything needed.
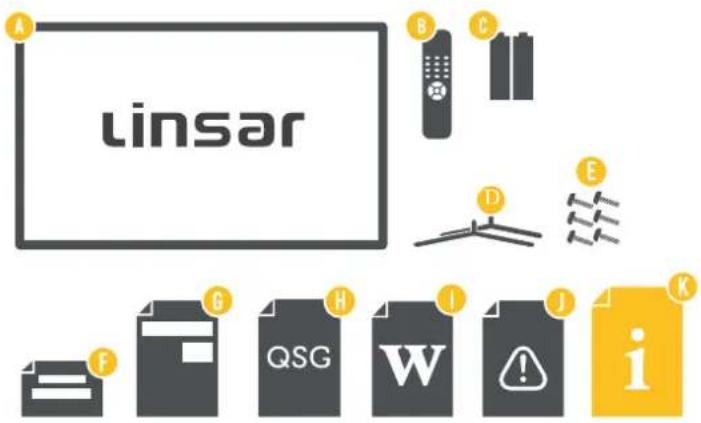
In the box you will find:
A. 70" 4K Ultra HD Smart TV
B. Magic Remote
C. AA Batteries
D. TV Stands
E. Screws for TV Stands
F. Warning Sheet
G. TV Toppling Safety Message
H. Quick Start Guide
I. Warranty Certificate
J. General Safety Warnings
K. User Manual
You will need:
• Phillips-head screwdriver (for stand installation)
- Someone to help you lift and install your TV

See the flap of the box for how to handle the TV without damaging it!
- Antenna cable (to watch live TV)
- Broadband internet connection (to use smart apps)
▲ Important Tips
- Place the TV on a level surface.
- Place the TV away from any source that may generate heat or vibrations.
- Make sure there is enough space around vents for airflow.
- The remote control works up to 5 metres away from the TV.
- Unplug the TV before cleaning it.
- Clean using a dry cloth only - do not use water or chemicals.
- Use only the power supply provided.
- It is highly recommended to use safety straps for securing the TV in place.
- Keep liquid, children and pets away from the TV at all times.
Attaching the stand
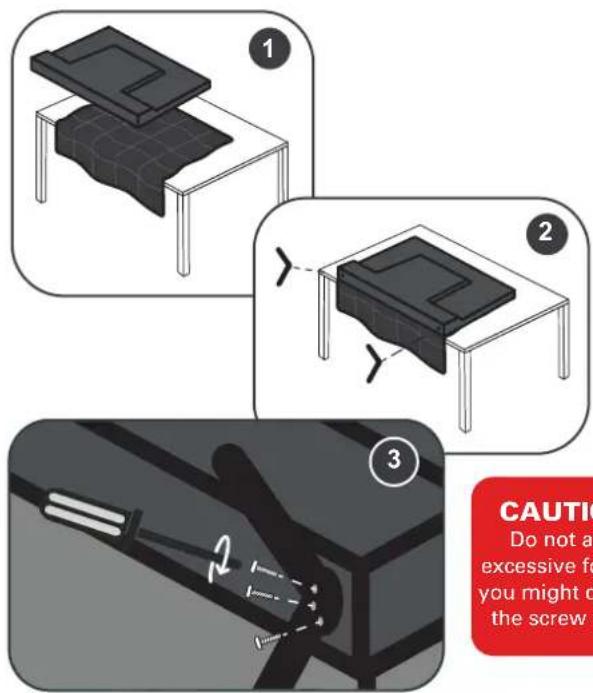
CAUTION! Do not apply excessive force as you might damage the screw holes.
!
• This TV is heavy! We recommend asking someone to help you lift it.
- Unplug the TV from the power outlet before installing or removing the stand.
- DO NOT place the TV standing upright without its stand attached; it could damage the remote sensor at the bottom of the TV.
- Only touch the frame, not the screen.
- It is highly recommended to use safety straps for securing the TV.
Unless you are wall-mounting the TV, you will need to attach its stand/legs.
- Lay the TV face-down on a soft, flat surface (like the sofa, or a towel on a table) larger than the TV itself.
- Match the stands to the installation points on the underside of the TV.
- Attach the stands to the TV at the installation points using the screws provided. (Grab a screwdriver for this bit).
Wall-mounting the TV

- Unplug the TV from the power outlet before wall-mounting.
- Contact a professional for assistance with wall-mounting the TV.
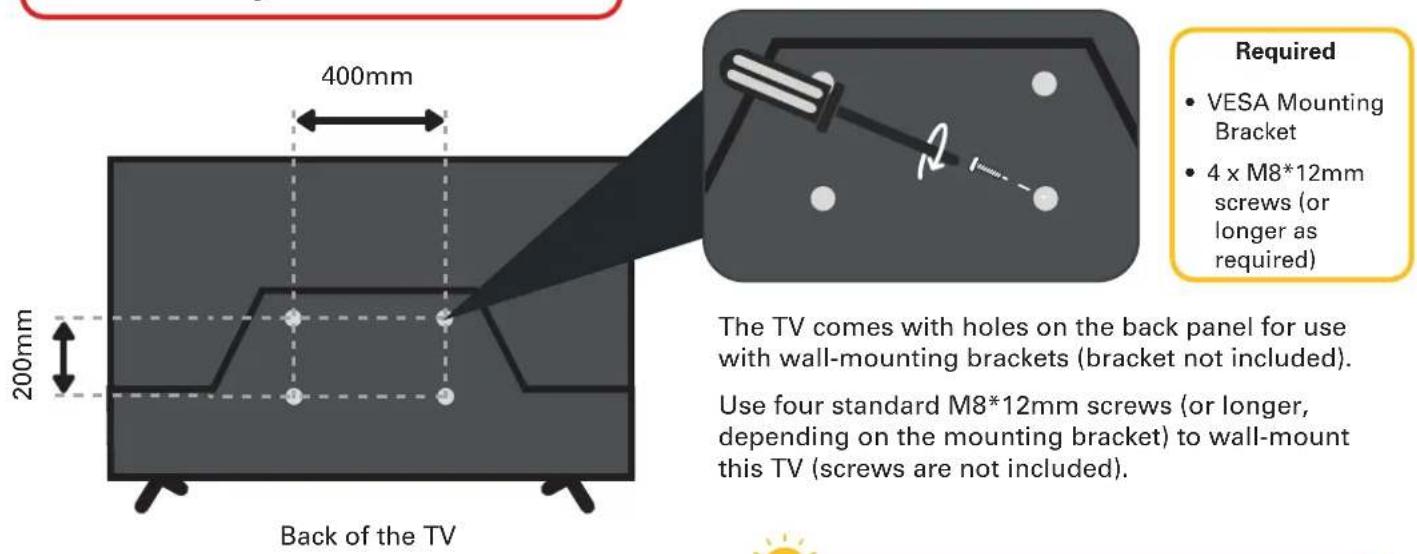

The screws in the package are for securing the TV stand only. If you are wall-mounting the TV, consult a qualified installer for advice on bracket support and wall support.
Connect to power
natural_image
Illustration of a TV cable with a plug and a small inset device (no text or symbols)Connect your antenna
Free-to-air TV in HD (High Definition)
Example
HD Channels
ABC HD
SBS ONE HD
7HD
9HD
10 HD
PRIME7 HD
WIN HD
High Definition (HD) channels provide the best viewing quality and are available with a digital antenna connection.
TV channels in Ultra HD resolution are not currently available in Australia.
Therefore when you watch HD broadcast signals on an Ultra HD TV, the picture can appear 'soft' and lacks the detail you see when watching the same content on an HD TV.

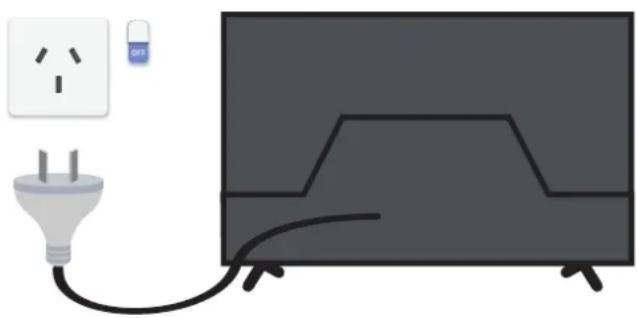
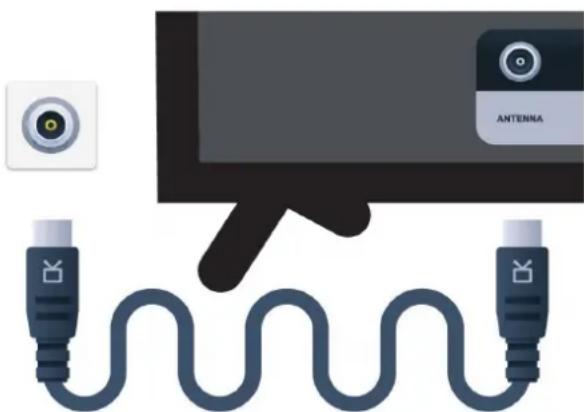
Don't forget to plug in the TV to the power outlet. Leave the power switched off until installation is finished.

Make sure the TV is switched off at the power outlet until you have finished connecting your cables.
natural_image
Illustration of a black cable with two connectors and a camera labeled 'ANTENNA' (no text or symbols on the cable itself)Antenna cable not included.
Controls and Connections
Get to know your TV
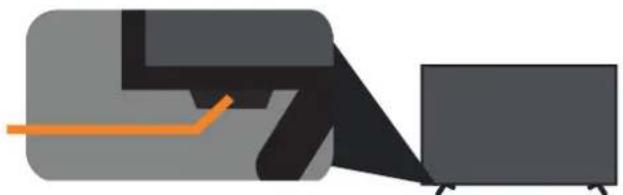
On/Standby indicator and Remote sensor
natural_image
Abstract geometric shapes with orange lines and gray blocks, no text or symbols presentFront view
Buttons on the TV
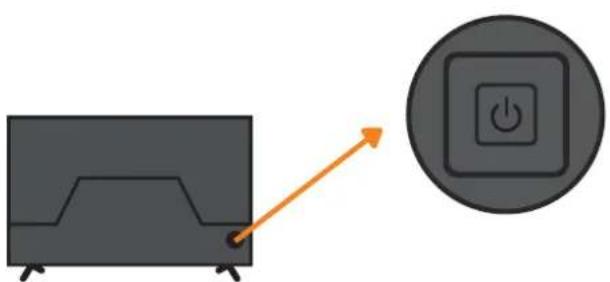
- When the TV is on standby, press this button to turn the TV on.
- When the TV is on, press once to access the on-screen control menu.
- While in this menu, press once to switch between menu options; press and hold to select.
- When the TV is on, press and hold for 3 seconds to turn the TV off.
natural_image
Diagram showing a monitor with a power button icon and an orange arrow pointing to it (no text or symbols present)Rear View
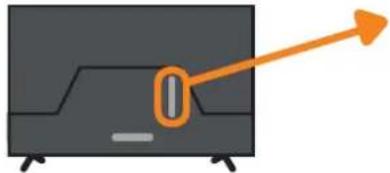
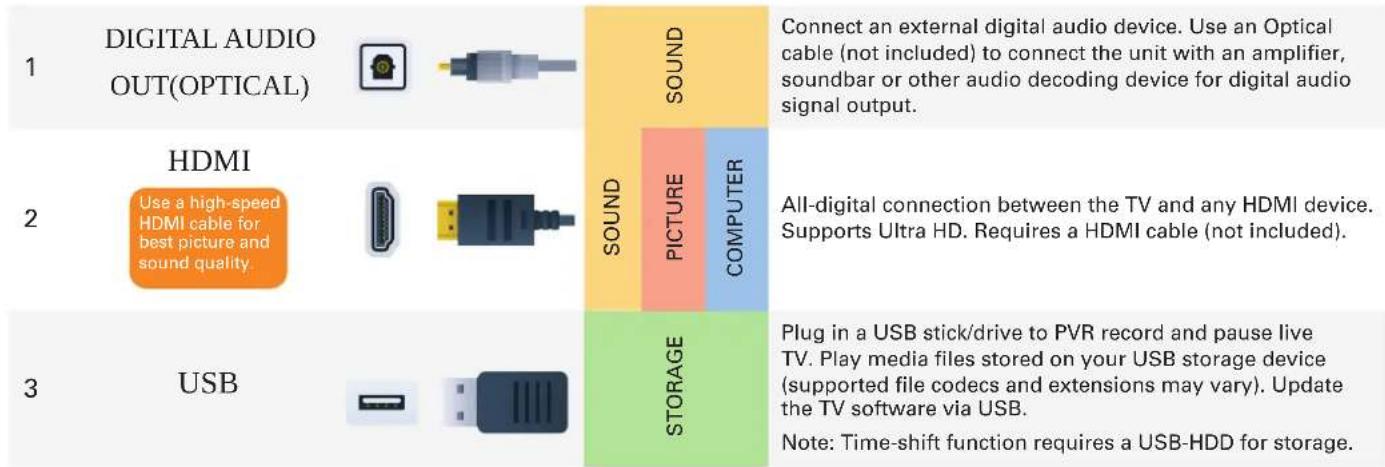
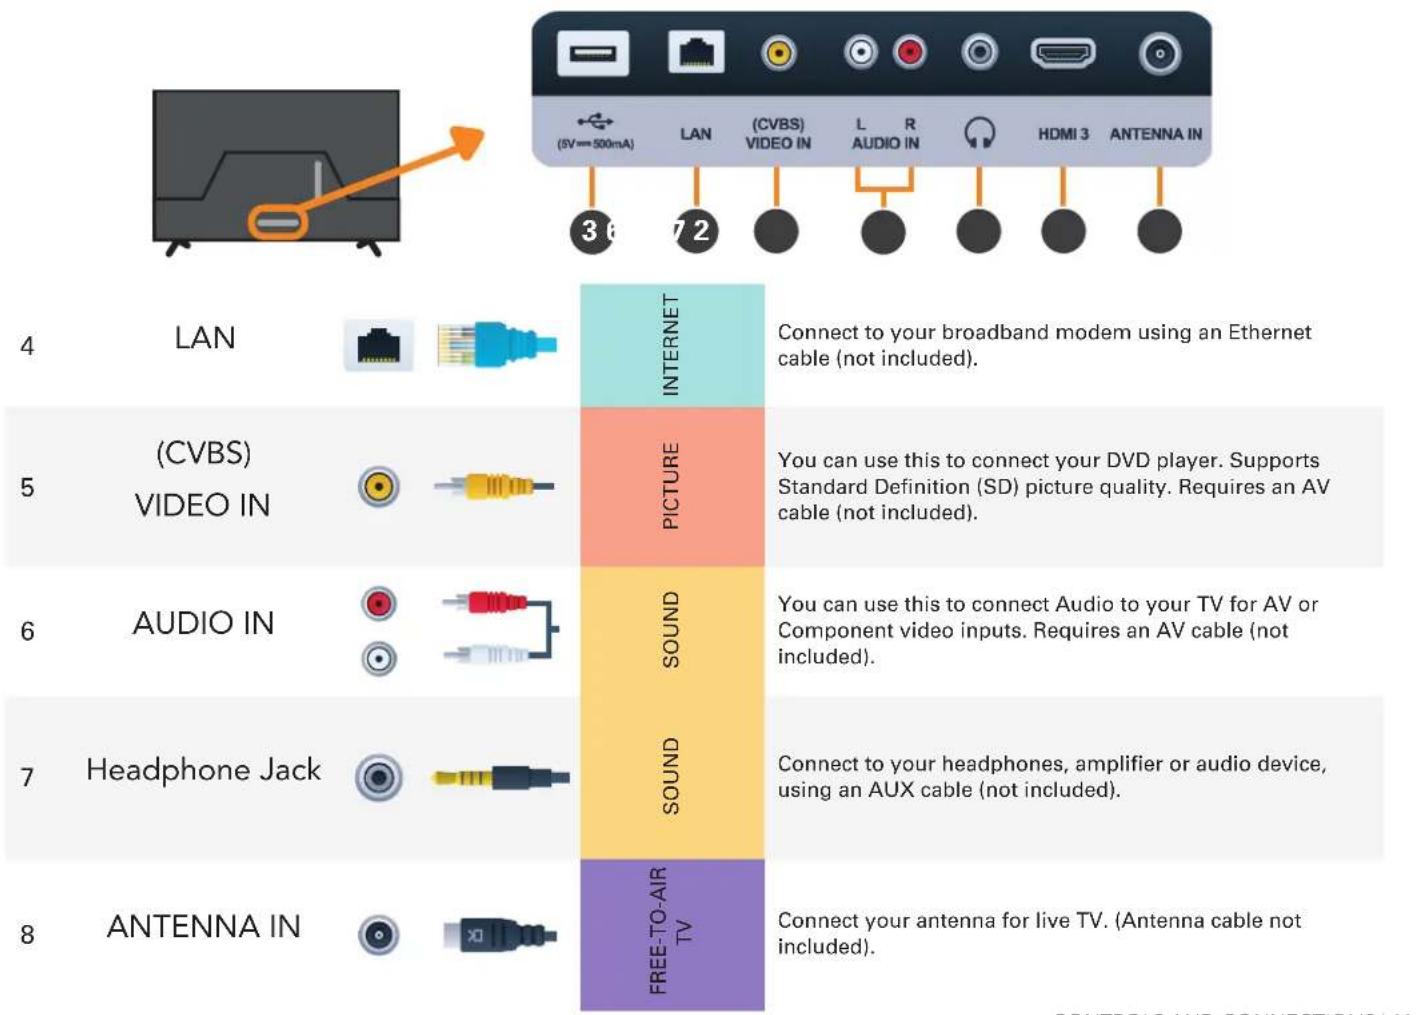
Ports on the TV
natural_image
Illustration of a monitor with an orange arrow pointing to the front panel (no text or symbols)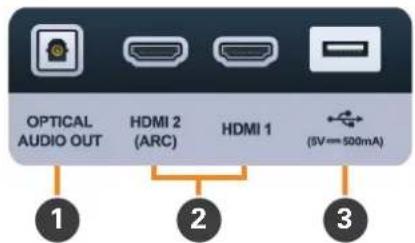
Remote Control
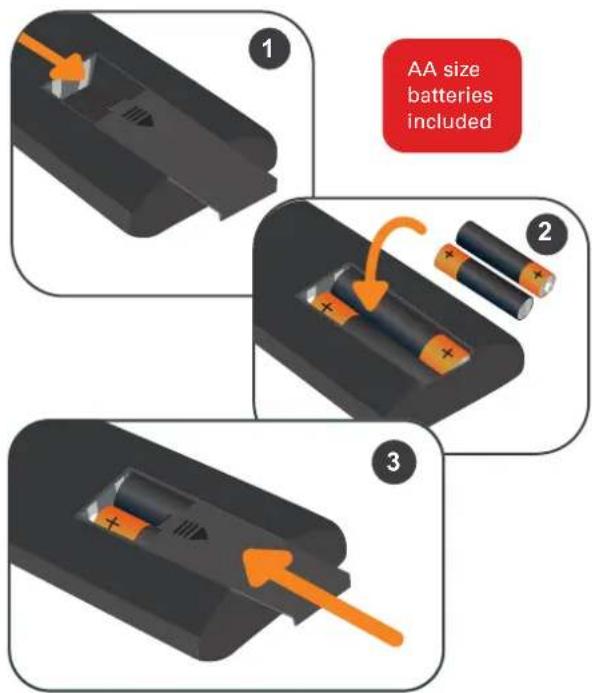
Image is for illustration purposes only. Position of battery cover/clip and polarities of batteries on your remote control may vary.
12 | REMOTE CONTROL
Setup
Insert two AA size batteries according to the polarity markings (+ / -) inside the compartment. Make sure the batteries are correctly aligned and properly pushed into place.
Precautions When Using Batteries
- Do not use old and new batteries together.
- Do not use different types of batteries (e.g. Manganese and Alkaline batteries) together.
- Remove the batteries from the remote if you do not intend to use it for a long time.
- When discarding used batteries, follow any guidelines for recycling and disposal of batteries that apply in your local area.
- Keep batteries away from children and pets.
- Never throw batteries into a fire or expose them to extreme heat.
Using the Remote Control
To use the remote, point it towards the remote sensor at the front of the TV. The remote will not operate if its path is blocked.
The remote has a range of up to about 5 metres from the TV at an angle of up to 30 degrees to either side of the sensor, as illustrated below.
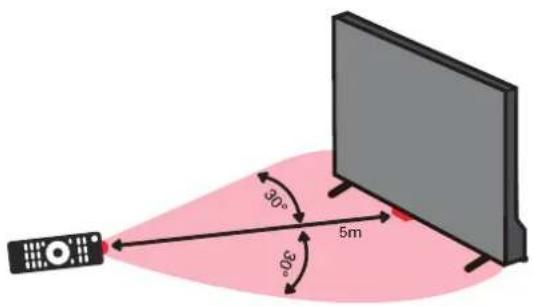
Image is an example only. Remote sensor location on TV may vary.

Remote Hints and Tips
- Do not drop, step on or otherwise impact the remote control. This may damage the parts or lead to malfunction.
- Do not place objects between the remote control and the remote sensor.
- Do not use this remote control while simultaneously operating a remote control for other devices.
Remote Pairing
This remote control uses both Bluetooth ^® and IR (infrared) to send its commands to the TV.
- You can use this remote control via IR for most operations.
- To use advanced operations like voice search, you need to pair the TV with the remote control. See page 16 for more information on pairing your remote.
Magic Remote
: Switch the TV to On or Standby
Microphone
NUMBER BUTTONS: Key in a TV channel number
- /≡ : Display channel list LIST
0/QUICK ACCESS: Press and hold to view quick access edit screen
: Mute/unmute the sound
+ 📋: Turn the volume up/down
Go to the HOME page (Smart TV)
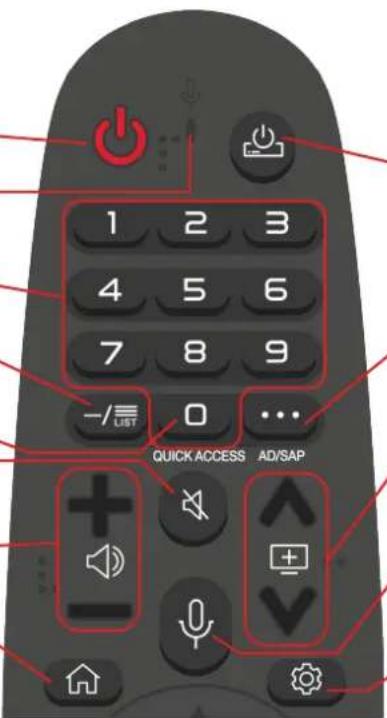
Switch the main set top box to On or Standby
•••AD / SAP : Press to display additional buttons/settings. Press and hold for audio description
▲ ⊕ ▼ : Change to the next/ previous channel
ψ: Press and hold to speak when using the voice recognition function
: Press to enter the quick settings menu. Press and hold to enter the main settings menu.
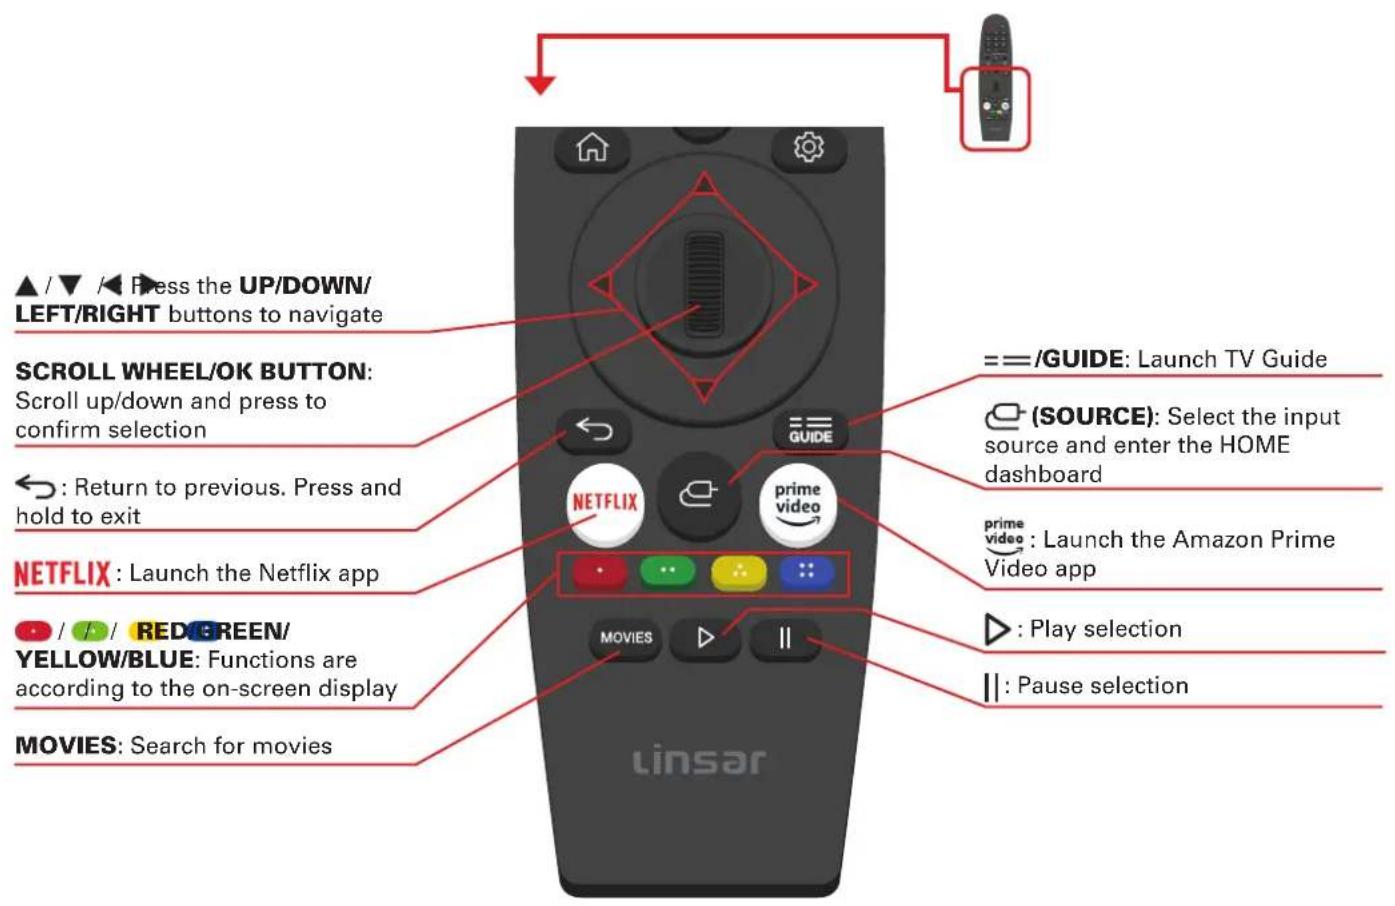
Pairing the Remote
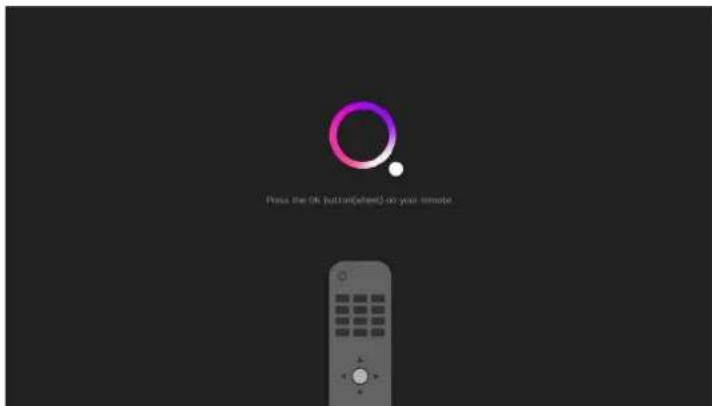
During the first time setup process, when the screen shown above appears, point the remote control towards the IR sensor of the TV and press the SCROLL WHEEL/OK button to pair the remote.
If pairing is unsuccessful, turn the TV off and turn back on and pair again.
To unpair the remote, when the TV is on, press and hold the hand because for 5 seconds (until the remote's LED is blinking), and the remote will automatically unpair with the TV.
On-Screen Set Up

Make sure equipment is properly connected (as shown on pages 10-11) before connecting the TV to power.
First Time Setup menu
When you turn the TV on for the first time, the First Time Setup menu will appear.
Follow the prompts using the ▲ ▼/AS∅ROLL WHEEL/OK buttons to select your preferences. You will be guided through:

If you make an error, you can update your preferences in the settings menu later.
2. Connect to the Internet
If you are using a wired network, connect an ethernet cable to the TV. The TV will automatically connect to the Internet.
If you are using a wireless connection, select 'Wi-Fi Network'. The TV will scan for nearby wireless networks. Make sure that the TV is within the range of your wireless modem/router, and you have your Wi-Fi password handy. Select your network, enter network password using the on-screen keyboard and select ENTER. Press OK to connect.
Or, you can connect to the internet later by going to the User Menu settings.
LG ThinQ App
You can use the LG ThinQ app to control key TV functions instead of the remote control.
Note: you need an Android device running Android 4.3 or higher to use the app.
- On your smart phone, search and download the LGThinQ app from the Play Store/App store (alternatively, scan the QR code below):


For Android For iOS
- After app has downloaded and installed, open up the app. Ensure that both your smart phone and TV are using the same Wi-Fi network.
- Select TV and it will automatically search for nearby TV.
- A PIN will appear on your TV screen, enter the PIN on your smart phone tap "Done."
- Select "LINK" on your smart phone to complete registration.
You can now use the app to control key TV functions.
Advanced Controls (TV Setting Menus)
Menu Navigation Buttons
Press the ⚙ then SCROLL WHEEL/OK BUTTON to display the TV settings menu. See the guide below for all the other buttons you'll need to use to adjust and change your settings.
Function Remote Button
Display the quick menu

Display the main menu
then SCROLL WHEEL/OK BUTTON
Enter a sub menu
SCROLL WHEEL/OK BUTTON
Adjust a value

Return to the previous menu

Exit a menu


Once you have programmed any settings, the unit will retain them in its memory until you change them, even after turning the TV off.
Menus Index

Picture
21
- Picture Mode:
- Backlight, Contrast, Brightness, Sharpness, Colour, Tint, Advanced Controls, Colour Temperature, Picture Options, Apply To All Inputs, Reset
- Aspect Ratio Settings
- Energy Saving
• Additional Settings:
- Eye Comfort Mode, HDMI Ultra HD Deep Colour, Instant Game Response

Sound
24
- Sound Mode:
• Balance, Ultra Surround Sound, Equalizer, Reset - Sound Out
• Additional Settings:
• TV Installation Type, Volume Mode, DTV Audio Setting, AV Sync Adjustment, HDMI Input Audio Format, LG Sound Sync, Digital Sound Out

Programmes
26
- Programme Tuning
- Programme Manager
- Subtitle Language
- Audio Language
- Dual Mono
• HbbTV

Connection
28
- TV Name
• Network Connection Settings: - Wired Connection (Ethernet), Wi-Fi Connection
• Device Connection Settings - Mobile Connection Management

General 30
• AI Service>AI Recommendation
- Language
- Location
- Time
- Safety
• Account Management
- Home Settings
• Additional Settings:
• Settings Help, Menu Transparency, Screen Saver, No Signal Image, Eco Mode, Quick Start+, Standby Light, Advertisement

Accessibility
34
- Audio Description
• Audio Description Volume - High Contrast
- Grayscale
- Invert Colours
- Hard of Hearing
- Subtitles

Support 35
- Software Update
• TV Information - Notifications
• Additional Settings: • User Agreements, Legal Notice, Open Source Software Notice, Set ID - Reset to Initial Settings

High Dynamic Range 36
(HDR)
Picture

To access picture settings, navigate from ⓊSCROLL WHEEL/OK BUTTON > Picture
Picture Mode
Vivid: Enhanced brightness with lower contrast, colour depth and edges for standing out in very bright places such as storefronts.
APS (Auto Power Save) : Settings are optimised to reduce power consumption.
Cinema : Settings are optimised for watching movies.
Cricket : Settings are optimised for watching sports.
Picture Mode settings
Option Description
| Backlight | Adjust the screen brightness by adjusting the backlight. The closer to 100, the brighter the screen. |
| Contrast | Adjust the contrast of the bright and dark areas of the picture. The closer to 100, the higher the contrast. |
| Brightness | Adjust the overall screen brightness. The closer to 100, the brighter the picture. |
| Sharpness | Adjust the sharpness of the picture. The closer to 50, the sharper and clearer the image. |
| Colour | Adjust the saturation. The closer to 100, the deeper the colour. |
Option Description
| Tint | Adjust the colour balance between red and green. The closer red is to 50, colour will be more 'red' dominant. The closer green is to 50, colour will be more 'green' dominant. |
| Advanced Controls | See table below for more information. |
| Colour Temperature | Adjust the on-screen colour temperature. |
| Picture Options | Noise ReductionBlack Level AutoReal CinemaTruMotion |
| Apply To All Inputs | Select to apply current picture settings to all input modes. |
| Reset | Reset picture mode settings to factory default. |
Advanced Controls
Option Description
Dynamic Contrast
Adjust the shadow balance for optimal results.
Gamma
Adjust mid level brightness of picture
Aspect Ratio Settings
- Aspect Ratio: this item is used to adjust the video size. Sizes may differ between input sources.
- Just Scan: turn just scan to auto/on/off.
Energy Saving
Adjust screen brightness to reduce power consumption (options:off/minimum/medium/maximum/screen off).
Additional Settings
Option Description
| Eye Comfort Mode | Adjust colour temperature to reduce eye fatigue |
| HDMI Ultra HD Deep Colour | Connect a playback device and turn HDMI Ultra HD Deep Colour on. (Device must support HDMI ULTRA HD Deep Colour |
| Instant Game Response | When a gaming device is connected to the HDMI port, turn Instant Gaming Response on to optimize gaming experience. (Some devices may not support this function. |
Sound

To access sound settings, navigate from ⏻ > SCROLL WHEEL/OK BUTTON > Sound
Option Description
| Sound Mode | Standard (User) | Cinema | Kiddet Voice III | Music Game |
| Balance | Adjust the audio output between the left and right speakers. | |||
| Ultra Surround Sound | Adjust surround sound effect from your TV speakers. | |||
| Equalizer | Adjust selected frequencies. These options are available when sound mode is set to user. | |||
| Reset | Reset sound settings to factory default. | |||
Sound Out
Select sound output.
Option Description
| Internal TV Speaker | Sound is played through the TV's speakers |
| Bluetooth | Connect to a Bluetooth audio device and sound will be played from the connected device. |
| Optical | Connect an optical supported audio device to the DIGITAL AUDIO OUT (OPTICAL) port on the TV. |
| HDMI ARC | Connect to an external audio device via the HDMI (ARC) port on the TV. |
24 | TV SETTING MENUS
| Wired Headphones | Connect to your wired headphones to enjoy sound only you can hear. |
| Optical + Internal TV Speaker | Sound is played through the TV's speakers and connected external audio device simultaneously. |
| Wired Headphones + Internal TV Speaker | Sound is played through the TV's speakers and connected headphones simultaneously. |
| Additional Settings | |
| Option Description | |
| TV Installation Type | Optimizes sound based on whether TV is wall mounted or on stands |
| Volume Mode | Auto volume: turn on and each programme's volume will be adjusted automatically to the same level.Volume increase amount: select Low/Medium/High to adjust the volume range. Higher values increase increments. |
| DTV Audio Setting | Select DTV audio. Options: MPEG, Dolby Digital, Dolby Digital Plus, HE-AAC, Auto |
| AV Sync Adjustment | Outputs the broadcast signals or the sound from external devices without audio delay. When "Bypass"is set to off, it will adjust synchronisation of sound from the TV or external speaker. |
| HDMI Input Audio Format | Set audio for each HDMI input. Options: Bitstream, PCM |
| LG Sound Sync | Connect the LG Sound Sync device to the optical port and set sound out to optical. With this feature on, you can adjust the volume of the connected LG Sound Sync device using the remote. |
| Digital Sound Out | Set digital sound output mode. Options: Auto, PCM |
TV SETTING MENUS | 25
Programmes

To access programme settings, navigate from ⚙> SCROLL WHEEL/OK BUTTON > Programmes
Programme Tuning
Option Description
| Auto Tuning | Automatically scans all available free-to-air TV channels. Adjust settings (default settings are set for Australia), select 'Search' and press OK. |
| Manual Tuning | Manually select and scan digital TV channels. |
| Programme Mode | Select channel type. |
| Signal Test | Display current signal information (DTV mode only). |
Programme Manager
Edit all programmes
Option Description
| Lock/Unlock | Lock/Unlock the selected programmes. |
| Skip/Restore | Set the selected programmes to be skipped when switching programmes or disable the skipping option. |
| Move | Move selected programmes. |
| Edit Programme Numbers | Change number of selected programmes. |
26 | TV SETTING MENUS
Edit favourite programmes
Option Description
| Move | Select one or more programmes in the Preferred Programmes list and select the position to move it to. |
| Change Group Name | Change the name of the favourite programmes list. |
| Sort by Programme | Sort out the favourite programmes list by programme/genre. |
Subtitle Language
Select preferred subtitle language.
Audio Language
Select preferred audio language.
Dual Mono
Switch the soundtrack when programme has dual soundtrack available.
HbbTV
Turn Hybrid Broadcast Broadband TV (HbbTV) On/Off.
Connection

To access connection settings, navigate from ⏻ > SCROLL WHEEL/OK BUTTON > Connection
TV Name
Show current TV name. You can also use the screen keyboard to set to your preferred name (up to 25 characters can be entered).
Network Connection Settings
See below.
Wired Connection (Ethernet)
If the router connected to the network supports DHCP feature, the TV will automatically connect to the network. If it does not automatically connect, select Edit to manually setup the connection.
Wi-Fi Connection
If you have set up the TV for a wireless network, you can check and connect to the available wireless Internet networks.
Option Description
Add a Hidden Wireless Network
Directly enter a network's name to add the network.
Connect via WPS PBC
Connect through Wi-Fi Protected Setup-Push Button Configuration.
Connect via WPS PIN
Connected to an access point using Wi-Fi Protected Setup PIN
Advanced Wi-Fi Settings
View connection information such as IP addres and so on.
Device Connection Settings
| Option Description | |
| Auto Device Connection | Automatically allows you to control the devices connected via HDMI with the remote control. |
| SIMPLINK (HDMI CEC) | Manage devices (i.e. set top box or soundbar) connected to a TV via HDMI with the remote control.Up to three devices can be connected and simultaneously used. |
| Auto Power Sync | When turned On, powering a SIMPLINK connected device will also turn the TV on.Turning the TV off will also power off the connected device. |
| LG Wireless Keyboard | Connect a LG wireless keyboard to your TV. |
| Universal Control Settings | Use the TVs remote control to operate other peripheral devices connected to the TV. |
Mobile Connection Management
Use a smart device connected to the TV to control the TV.
Option Description
| TV on with mobile | You can turn your TV on with your smart device.Both the TV and device must be connected to the same network and smart device must support 'TV on with mobile'. |
| Screen Share | Delete connection history of device connected to the TV via Screen Share. |
| Sound Share | Delete connection history of device connecte to the TV via Bluetooth. |
TV SETTING MENUS | 29
General

To access general settings, navigate from ⏻ > SCROLL WHEEL/OK BUTTON > General
AI Service > AI Recommendation
Option Description
Content
Recommendations
Receive content recommendations based on TV content viewing pattern.
Delete Usage Data
Reset content and app usage history by deleting user data.
Language
Option Description
Menu Language
Select on screen display language.
Primary Audio Language
Select primary audio language. Default will be used for programmes that do not support multiple languages.
Secondary Audio Language
Select secondary audio language. Default will be used for programmes that do not support multiple languages.
Keyboard Language
Select on screen keyboard language.
Teletext Language
Select teletext language.
Location
| Option Description | |
| Broadcast Country | Select the TVs broadcast country. |
| Service Area Postcode | Enter your postcode to set the TVs broadcast location. |
| Services Country | Set country manually.Note: setting the country manually must be done when not connected to a network. |

Setting the country manually must be done when not connected to a network.
Time
| Option Description | |
| Set Automatically | Use network provided time. |
| Time Zone | Adjust the time zone. |
| Timers | Sleep Timer: select the desired Auto Sleep (Standby) duration.Power On Timer: set the power on timerPower Off Timer: set the power off timer4 Hours Auto Power Off: when turned on, the TV will turn off if no buttons are pressed for 4 hours. |
Safety
Option Description

Factory Password: 0000
Master Password: 0313
General Switch
Turn on to enable lock function.
TV Rating Locks
Restrict watching programmes based on rating.
Programme Locks
Select the programmes to lock.
Application Locks
Select the applications to lock.
Input Locks
Select the inputs to lock.
Reset TV password. Factory password is "0000". To reset your password:
Press the ⏻ button on the remote control.
Reset Password
- Select the ALL SETTINGS icon, then General > Safety
- Press, and on the remote control, and the master password window will appear.
- Enter "0313" and press Enter. The password is now reset.
Account Management
Use your email address to create a new LG account.
Home Settings
| Option Description | |
| Home Auto Launch | Set Home to launch automatically when TV is turned on. |
| Home Promotion | Turn advertisements on the Home screen on/off. |
| Additional Settings | |
| Option Description | |
| Settings Help | Turn settings help on/off. (Turning on will show description text of each setting). |
| Menu Transparency | Turn on to make some menus (Live Menu, Search etc.) transparent. |
| Screen Saver | Turn screen saver on and when screen has had no activity for an hour, the display screen will show a screen saver. |
| No Signal Image | Turn on and a default image will be displayed on screen if no signal.Turn off and "no signal" will be displayed on screen if no signal. |
| Eco Mode | Set power options to reduce energy consumption.Options: On, Off |
| Quick Start+ | Turn on and the TV will be in standby mode when turned off allowing for a quicker start when next turned on. |
| Standby Light | Turn TV standby light on/off. |
| Advertisement | Turn on and the TV will help in limiting the number of times the same ad is played (some countries may not support this setting). |
TV SETTING MENUS | 33
Accessibility

To access accessibility settings, navigate from ⚙️ > SCROLL WHEEL/OK BUTTON > Accessibility
Option Description
| Audio Description | Guide menus and operations with voice for visually impaired viewers. |
| Audio Description Volume | Audio Description (AD) provides an additional audio track for visually challenged persons (DTV only, subject to program). |
| High Contrast | Turn high contrast on/off. |
| Grayscale | Change menu screen to black and white colour. |
| Invert Colours | Invert and calibrate colours in menu to enhance visibility. |
| Hard of Hearing | Display captions for hearing-impaired viewers to use the TV.Note: only works when the programme supports subtitles. |
| Subtitles | Turn subtitles on/off. |
Support

To access support settings, navigate from ⚙ > SCROLL WHEEL/OK BUTTON > Support
Option Description
| Software Update | Check for system software updates and update if desired. |
| TV Information | View device name, serial number, software version and available storage. |
| Notifications | Check notifications about user settings or TV status. |
| Additional Settings | See table below. |
| Reset to Initial Settings | Reset to factory default settings. |
Additional Settings
Option Description
| User Agreements | Read and accept/decline the User Agreements. |
| Legal Notice | Read up on legal notices and opt out of personalised ads. |
| Open Source Software Notice | View TV software information. |
| Set ID | Set the TV device ID (1-99). |
High Dynamic Range (HDR)

About the HDR feature
High Dynamic Range (HDR) is a picture feature on your TV that attempts to mimic the way visuals are perceived in real life by the human eye.
By using this feature, the TV can reproduce greater dynamic range of luminosity by capturing and then combining several different exposures.
HDR promises better picture quality thanks to brighter, more realistic highlights, more realistic colour and other improvements.
It delivers the look that the filmmakers intended to achieve, showing the hidden areas of dark shadows and sunlight with full clarity, colour and detail.
HDR on your TV
HDR is supported in HDMI and USB input sources and by Netflix app.
Smart TV
Before you start using apps, your TV must be connected to the internet.
The speed of your internet connection determines the quality of your audio/video experience when you watch streaming content.
Accessing internet content may count towards your download limit and may incur fees from third parties such as your internet service provider (ISP).

Services Country
If you don't set the country automatically, you can set manually. You must set the country manually when not connected to a network. The TV will recommend and display the applications for the selected country.
Function Remote Button
Display the Home/App screen

Select different Apps

Open your desired App
SCROLL WHEEL/OK BUTTON
NETFLIX
Netflix is a streaming service that offers unlimited viewing of a wide variety of award-winning TV shows, movies and documentaries.
A paid subscription is required.
This TV can play Netflix content in 4K Ultra HD HDR resolution, however the playback resolution may be lower depending on your subscription level and your network speed.
Streaming Netflix content will count towards the data usage of your broadband plan.
Web Browser
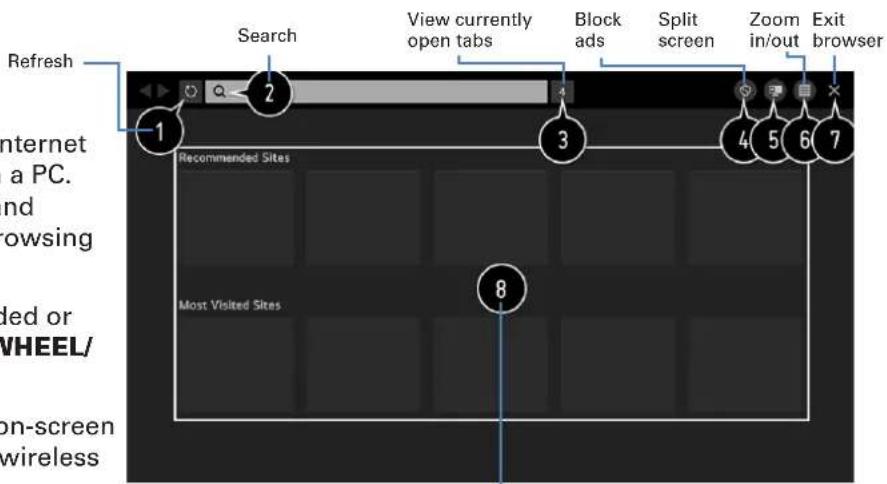
Using the web browser, you can surf the Internet on the TV similar to how you would do on a PC. NOTE: Use a wired or wireless keyboard and mouse (not provided) for an easier web browsing experience.
From the Home page, select a recommended or bookmarked site and press the SCROLL WHEEL/OK BUTTON to visit the site.
You can enter the web address using the on-screen keyboard, remote keyboard or connected wireless keyboard.
Select the 'Add to bookmark' icon and press the SCROLL WHEEL/ OK BUTTON to add the web address as a favourite.
Select the 'Settings' icon to access the browser menu settings.
Press ← to exit the web browser.
On-screen keyboard
Use ▲/▼/◄/► buttons and press the SCROLL WHEEL/ OK BUTTON button to enter the character.
View recommended and most visited sites
TV Guide
(Free to air TV)
TV Guide Functions
Function Remote Button
Switch between TV Guide/ Schedule List, Channel List and Program List

Browse Channel List and Program List

View program information, schedule for recording or reminder
SCROLL WHEEL/OK BUTTON
Exit TV Guide menu

To access the TV guide, press the ==/GUIDE button on the remote.
To activate the TV Channels use the ▲▼buttons to select a channel in the left column, then press the SCROLL WHEEL/OK BUTTON to confirm.
Recording
Important Tips:
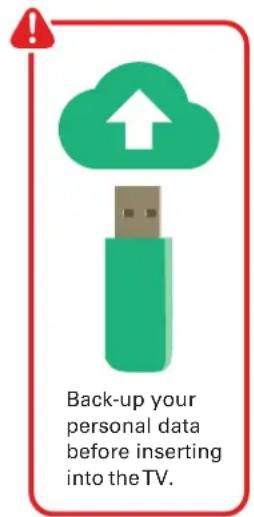
- Back-up your personal data before plugging in your USB to the TV. We do not assume liability for any loss of data due to misuse or malfunction.
- You cannot change channels while in recording mode.
- If the signal is interrupted while in recording mode, the recording will stop until the signal is established.
- Do not turn the TV off while it is in time-shift mode.
- The file recorded can only be used on this TV. Do not copy it to any other device.
- When connecting or disconnecting the USB storage device, ensure the TV is not in USB mode, otherwise the USB device or the files stored on it may be damaged.

Time-shift function requires a USB-HDD for storage.
Using Instant Recording
- Connect a USB HDD or USB stick to the USB port on the TV.
- When watching the live programme, press the SCROLL WHEEL/OK button.
- Press the button on the bottom of the screen to start recording.
- Press the button on the bottom of the screen to stop the recording.
Using the TV Scheduler
- Press the -/≡ button on the remote, and select "TV Scheduler" on the TV screen.
- Select on the top right of the screen.
• : change alignment or apply filter. - : set Delete Mode.
• : set new scheduled recording. - : set new reminder.
- : launch guide.
Programme Scheduling
- Press the -/≡ button on the remote, and select "Guide" on the TV screen.
- Select the programme and to record the programme live, select the "Record" or "Watch" button on the screen.
- For programmes yet to air, select the "Scheduled Recording" or "reminder" button on the screen.
Note: scheduled recording does not guarantee the exact recording time of the programme.
Manual Scheduling
- Press the -/≡ button on the remote, and select "TV Scheduler" on the TV screen.
- Select on the top right of the screen.
- Select either or and select "Create Manually".
- Set the date, time and programme to record or watch.
Note: scheduled recording must be at least a minute.
Using Live Playback
(Real-time Playback)
- Connect a USB HDD to the USB port on the TV.
- When watching the live programme, press the SCROLL WHEEL/ OK BUTTON button.
- Select on the bottom of the screen to display list of recorded programs.

- You cannot use a USB stick. A USB HDD with 80GB or more of storage is required for the function to work.
• Live playback function does not work for radio programmes. - Changing programmes during live playback will delete all data of the previous programme.
USB Mode


Set up
Insert your USB into a USB port on the TV.
Press the button to select 'USB' mode.
Function Remote Button
Choose a Source or File

Choose media categories
▲/▼ SCROLL WHEEL/OK BUTTON
Start playing your media
SCROLL WHEEL/OK BUTTON
Return to previous screen

Exit media mode
Press and hold

You can only play Photos in the Photo category, and Music in the Music category. Make sure you select the correct category for the file you wish to play.
Viewing Photos and Videos
- Press the button on the remote control to access the HOME page.
- Select and choose the storage device with the photos and videos to view.
- Select and view your photos and videos.
• : select viewing method and type of content. - : delete content.
• : play content (you cannot select both photos and videos to play).
• : copy to USB storage device.
• : search for specific file.
Photo Player
- Photo player will launch when viewing your photos.
• : return to content list.
• : play background music through the music player. - : zoom in/out.
• : play slide show. - : rotate photo.
• : view 360° photos (viewing on VR may distort image) - : adjust size/ratio of photo and speed/transition effect of slide show.
44 | RECORDING AND USB MODE
Video Player
• Video player will launch when playing your videos.
• : return to content list.
• : display playlist.
• : control video playback functions.
- : rotate video.
• : view 360° video (viewing on VR may distort video).
• : video repeat/shuffle settings.
• : additional options (subtitles, set audio tracks, resume from last viewed time).
Playing Music
- Press the button on the remote control to access the HOME page.
- Select and choose the storage device. Select songs and add them to "My Playlist". Play your music.
• : select type of content. - : delete song.
• : select song and add it to "My Playlist".
• : copy to USB storage device.
• : open music player.
• : search for specific song.
Music Player
• Music player will launch when playing your songs.
• : play music.
- : set repeat/shuffle.
• : music will continue to play after turning TV screen off.
• : change position of music player.
- : minimize music player.
- : close music player.
• : view lyrics if applicable.
Troubleshooting
If you experience problems with your TV, check below for advice. If you don't find a solution here, contact After Sales Support on 1300 886 649.
| Problem Solution | |
| The remote control does not work | Make sure that the batteries are installed with their poles (+/-) in the correct direction.Remove any obstacles between the remote control and remote control sensor on the TV.Check if the power indicator at the bottom of the TV blinks when you press the remote's power button.If it does not, replace the remote control's batteries.Try pointing the remote directly at the remote control sensor from 1.5-1.8m away. |
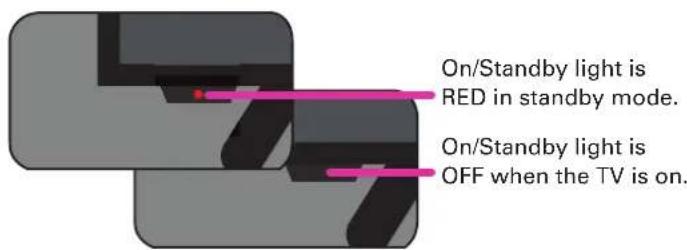
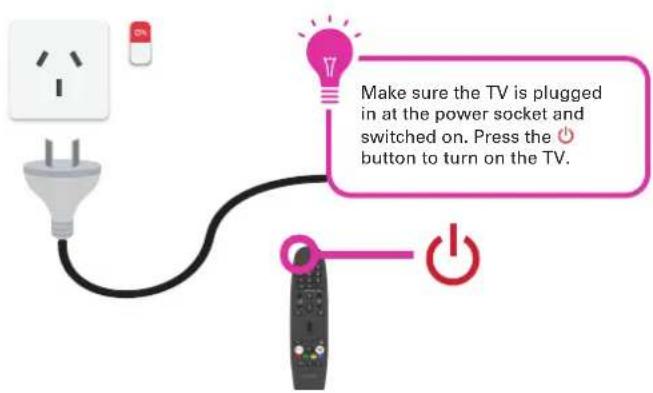
| The TV won't turn on | Make sure that the AC power cord is securely plugged into the wall outlet.Check the wall outlet is turned on and the power indicator at the bottom of the TV is lit.If using a multi-outlet, check if it is working properly. To check whether a power strip is working properly, plug the TV's power plug directly to a wall outlet and observe its operation.Try to power on using the power button on the TV. |
| There is no picture/ sound or distorted picture/sound in DTV mode | Ensure the antenna cable is securely connected to the TV and to the wall outlet.Ensure the input source is set to DTV.If "No Signal" is displayed, run Menu > Programmes > Programme Tuning > Auto TuningIf some channels are missing, run Menu > Programmes > Programme Tuning > Manual TuningTry a different antenna cable or another TV if possible.Move the TV away from electronic equipment or devices that could cause interference.Adjust the antenna position.If the picture appears fuzzy or blurry, select High Definition (HD) channels or programs. |
| There is no picture/ sound or distorted picture/sound from an external device | Ensure that connection to the device is correct and that all cables are fully inserted.Remove and reconnect all cables connected to the TV and the external devices. Try new cables if possible.Restart the connected devices by unplugging each device's power cord and then plugging it in again.If "No Signal" is displayed on the TV, ensure that the correct input source has been selected.When using a 4K playback device, ensure the cable is a High-Speed HDMI cable. |
| There is no/ distorted sound | Ensure the volume is not muted. If it is, press the VOL+ button to restore the sound.If earphones are connected, unplug them.Ensure that connection to the external audio device is correct and that all cables are fully inserted.Ensure correct input source and audio settings have been selected on the external audio device.Move the TV away from electronic equipment or devices that could cause interference.When using an external audio device via a HDMI cable, ensure that the device supports HDMI-ARC and, if applicable, the ARC setting is turned On (refer to the connection guide in the user manual of the connected device).When using an external audio device via an optical cable, check that the Menu > Sound > Sound Out > Select Optical and then Menu > Sound > Additional Settings > Digital Sound Out is set to PCM. |
| The smart apps are not working properly | Ensure the TV is connected to the Internet.Ensure the TV has a high-speed internet connection to get the best-streaming picture resolution.An unstable internet connection may cause delays or interruptions. In addition, applications may terminate automatically depending on the network environment. If this occurs, check your internet connection and try again. |
| There is no/ intermittent internet | When using Wi-Fi, make sure the Wi-Fi password is entered correctly.Turn off the access point. Wait for 2 minutes and then turn them back on.Ensure that there are no obstacles between the TV and the access point. (The Wi-Fi strength can be decreased by appliances, cordless phones, stone walls/fireplaces, etc.) Reduce interference by not using or turning off other wireless devices.If the Wi-Fi connection fails, connect the TV to the access point via a LAN cable. If the TV can connect via the wired connection, there might be a problem with the Wi-Fi access point. In this case, try using a different access point.When using a LAN cable, use one rated CAT 5 or higher. Make sure it is plugged in at both ends.When using a static IP, ensure network addresses are entered correctly.If the problem persists, contact your Internet Service Provider or modem manufacturer. |
| USB storage device is not recognised or media files don't play properly | This TV has been tested with the majority of Flash memory-based devices and hard disks (media players with HDD) on the market however, it may not be compatible with certain devices.If the external hard drive has its own power adaptor, use it.Only use a USB storage device formatted in a FAT32 file system provided with the Windows operating system. If it is formatted by a different utility program that is not supported by Windows, it may not be recognised.The TV may not be able to recognise a USB device or read the files if it is connected with a USB extension cableThe files that use an unsupported codec or container will not play on the TV.Some files may not play correctly if there is an error in the content or container.Certain files, depending on how they are encoded, may not play on the TV. |
Specifications
| Active screen size (diagonal) | 176.5cm | |
| Resolution | 3840 x 2160 | |
| Refresh rate | 60Hz | |
| Aspect ratio | 16:9 | |
| Multimedia playback formats (USB mode) | Music | MP3, WAV, FLAC |
| Photo | JPG, BMP, PNG | |
| USB output | DC 5V 500mA | |
| Power source | AC 200-240V, 50/60Hz | |
| Power consumption | 220W | |
| Dimensions (W x D x H) | With stand: 1568 x 334 x 970 mm | |
| Without stand: 1568 x 74 x 905 mm | ||
| Weight | Net 24.5 kg | |
| Gross 30.5 kg | ||
For Technical and Warranty Support
1300 886 649
www.tempo.org
info@tempo.org
Distributed by Tempo (Aust) Pty Ltd,
PO Box 6056, Frenchs Forest DC 2086
Compliance and Responsible Disposal

Packaging
The packaging of your product has been selected from environmentally friendly materials and can usually be recycled. Please ensure these are disposed of correctly. Plastic wrapping can be a suffocation hazard for babies and young children, please ensure all packaging materials are out of reach and are safely disposed of. Please recycle these materials rather than throwing them away.

Product
At the end of its working life, do not throw this product out with your household rubbish. An environmentally friendly method of disposal will ensure that valuable raw materials can be recycled. Electrical and electronic items contain materials and substances which, if handled or disposed of incorrectly, could potentially be hazardous to the environment and human health.

National Television and Computer Recycling Scheme
The careful disposal of e-waste is important because many televisions and computers contain materials which are hazardous to people and the environment. There are no fees for householders or small businesses disposing of e-waste at a scheme collection service.
Individuals can contact their local council for information on local e-waste management services, find scheme services listed on Planet Ark's website at www.recyclingnearyou.com.au, or call Planet Ark on 1300 733 712.
Compliance
This product complies with the Australian Safety Standard AS/NZS 60065 to ensure the safety of the product.
Linsar
SEEING IS BELIEVING
- Welcome
- Contents
- Welcome 2
- On-Screen Set Up 17
- Smart TV 37
- TV Guide 39
- Recording 40
- USB Mode 43
- Troubleshooting 47
- Specifications 50
- Unpack and Prepare
- What's in the box
- ▲ Important Tips
- Attaching the stand
- !
- Wall-mounting the TV
- Connect your antenna
- Controls and Connections
- Buttons on the TV
- Remote Control
- Setup
- Precautions When Using Batteries
- Using the Remote Control
- Remote Hints and Tips
- Remote Pairing
- Magic Remote
- Pairing the Remote
- On-Screen Set Up
- First Time Setup menu
- Connect to the Internet
- LG ThinQ App
- For Android For iOS
- Advanced Controls (TV Setting Menus)
- Menus Index
- Picture
- Sound
- Programmes
- Connection
- General 30
- Accessibility
- Support 35
- High Dynamic Range 36
- Picture Mode
- Picture Mode settings
- Advanced Controls
- Aspect Ratio Settings
- Energy Saving
- Additional Settings
- Sound Out
- Subtitle Language
- Audio Language
- Dual Mono
- HbbTV
- TV Name
- Network Connection Settings
- Wired Connection (Ethernet)
- Wi-Fi Connection
- General
- Language
- Safety
- Account Management
- Support
- High Dynamic Range (HDR)
- About the HDR feature
- HDR on your TV
- Smart TV
- Services Country
- NETFLIX
- Web Browser
- TV Guide
- Recording
- Important Tips:
- Using Instant Recording
- Using the TV Scheduler
- Programme Scheduling
- Manual Scheduling
- Using Live Playback
- (Real-time Playback)
- USB Mode
- Set up
- Viewing Photos and Videos
- Photo Player
- Video Player
- Playing Music
- Music Player
- Troubleshooting
- Compliance and Responsible Disposal
- Packaging
- Product
- Compliance
Brand : LINSAR
Model : LS85UHDNF
Category : Television