
MaxiIRT IR100 - Diagnostic tool Autel - Free user manual and instructions
Find the device manual for free MaxiIRT IR100 Autel in PDF.


| Product Type | Infrared thermal imaging camera (diagnostic tool) |
| Brand | Autel |
| Model | MaxiIRT IR100 |
| Dimensions | 256 mm x 97.2 mm x 128.9 mm |
| Weight | 588 g |
| Power Supply | Built-in rechargeable 26650 lithium battery (detachable); charge via Micro USB 2.0 |
| Battery Life | 3–4 hours continuous use |
| Infrared Resolution | 320 x 240 pixels |
| Visible Light Resolution | 300,000 pixels |
| Display | 3.5-inch full-view TFT, 640 x 480 resolution |
| Temperature Measurement Range | -20°C to 450°C (-4°F to 842°F) |
| Measurement Accuracy | ±2°C (≤100°C); ±2% (100-300°C); ±3% (≥300°C); ±5% (≥400°C) |
| Thermal Sensitivity | 0.07°C |
| Field of View | 56° x 42° |
| Frame Rate | 9 Hz |
| Emissivity Adjustment | 0.01 to 1.00 (preset modes: Matte, Semi-matte, Semi-glossy, Glossy; custom available) |
| Color Palettes | Rainbow, Iron Red, Cool Color, White Hot, Black Hot |
| Storage Capacity | Built-in 8 GB (JPEG format) |
| Connectivity | Micro USB 2.0; Wi-Fi (hotspot mode, name = serial number) |
| Languages | English, Chinese, Italian, German |
| Operating Temperature | 0°C to 45°C |
| Storage Temperature | -20°C to 60°C |
| Relative Humidity | 85% RH |
| Safety Features | Automatic power-off (5 min, 20 min, or off); overheat protection; water condensation warning |
| Maintenance and Cleaning | Enclosure: damp cloth with soap; lens: alcohol-based cleaner and lint-free cloth; compressed air for loose particles |
| Spare Parts and Repairability | Detachable battery; repairs only by Autel-authorized personnel; one-year limited warranty |
Frequently Asked Questions - MaxiIRT IR100 Autel
User questions about MaxiIRT IR100 Autel
0 question about this device. Answer the ones you know or ask your own.
Ask a new question about this device
Download the instructions for your Diagnostic tool in PDF format for free! Find your manual MaxiIRT IR100 - Autel and take your electronic device back in hand. On this page are published all the documents necessary for the use of your device. MaxiIRT IR100 by Autel.
USER MANUAL MaxiIRT IR100 Autel
Autel ® , MaxiSys ® , MaxiDAS ® , MaxiScan ® , MaxiTPMS ® , MaxiRecorder ® , and MaxiCheck ® are trademarks of Autel Intelligent Technology Corp., Ltd., registered in China, the United States and other countries. All other marks are trademarks or registered trademarks of their respective holders.
Copyright Information
No part of this manual may be reproduced, stored in a retrieval system or transmitted, in any form or by any means, electronic, mechanical, photocopying, recording, or otherwise without the prior written permission of Autel.
Disclaimer of Warranties and Limitation of Liabilities
All information, specifications and illustrations in this manual are based on the latest information available at the time of printing.
Autel reserves the right to make changes at any time without notice. While information of this manual has been carefully checked for accuracy, no guarantee is given for the completeness and correctness of the contents, including but not limited to the product specifications, functions, and illustrations.
Autel will not be liable for any direct, special, incidental, indirect damages or any economic consequential damages (including the loss of profits).
IMPORTANT
Before operating or maintaining this unit, read this manual carefully, paying extra attention to the safety warnings and precautions.
For Services and Support

pro.autel.com
www.autel.com

1-855-288-3587/1-855-AUTELUS (North America)
0086-755-86147779 (China)

Support@autel.com
For technical assistance in all other markets, contact your local selling agent.
Safety Information
Ensure that you have read and understood the safety precautions described in the following text before using the product so that you can operate it correctly.
The safety precautions described in the following text guides you to operate the product and its accessories correctly and safely to avoid damage and loss to you, other people and the device.
Considerations
Observe the following guide in order not to damage the product:
- Do NOT assemble or dismantle the product without permission.
The product is a type of super precise equipment. Do not try to dismantle, assemble or remodel any part of the product. Repair of the product should be made by technical personnel designated by Autel Company.
- Avoid damage to the detector of the product.
NOTE
Do NOT expose the product the sun or other strong light sources. Otherwise, it may damage its detector.
- Product crack
When the product works, light crack will be heard every several seconds. This is normal phenomenon when the lens captures images.
Warning
The warning describes the acts that may cause harm to users. Observe the following operations in order to avoid electric shock or personal injury.
- Do NOT use the product if its enclosure is damaged.
Contact our local distributors or agents of Autel under such condition.
- Stop using the product immediately if it is found with smoke, spark, or burnt smell.
In case of such condition, the product power supply should be powered off at once. After the smoke and peculiar smell disappears, contact our local distributors or agents.
- Do NOT remodel the adapter or the power cable.
Otherwise, such remodeling may cause short circuit or fire.
- Do NOT weld the battery without permission.
Such operation may damage the battery and result in leakage and explosion of the battery.
● Avoid impacting the battery (such as collusion and falling, etc).
Such condition may damage the battery case or result in battery leaks or explosion.
- Pull off the adapter from the power socket when charging is not needed.
The adapter may get overheated if it is connected with power supply for a long time. This may cause overheating, deformation or fire.
- Ensure that the plug of the adapter is inserted into the specified power socket.
The adapter plug may vary by region. Make confirmation whether the specification of the adapter is consist with the specification of electric appliances in your region. Otherwise, this may cause overheating of the equipment, electric shock, fire, chemical leakage inside the battery, explosion or other serious consequences.
- Stop using the adapter when its plug or wire is damaged.
Do not change the battery unless the plug of the charger is inserted into the socket completely.
- Do not touch the electric wire with wet hands.
Touching a wire with a wet hand can cause an electric shock. When pulling out the electric wire, hold the electric wire head rightly to pull out the wire. Do not pull off the electric wire directly. Otherwise, the electric wire may be broken, causing electric shock and fire.
- Do NOT dip the product into water or avoid being caught by water.
If the enclosure is caught by water or other liquid, dry it immediately. If water or other liquid enters the inside of the instrument, power off the product at once. Continuous use may result in product damage. - Clean the dust on the adapter plug and the data line regularly.
When it is exposed to dusty and dump environment for a long time, the dirt surrounding the electric equipment will accumulate moisture, which may cause short circuit and fire.
- Use the included adapter to charge the product.
Use of any other power supply accessories may cause serious consequences such as equipment overheating, electric shock, fire, or leakage, as well as explosion of chemicals inside the battery.
- Do NOT use grinding additives, isopropanol or gaseous organic solvents to clean the enclosure of the device.
Such operation may damage the enclosure of the device.
- The product temperature may increase after charging for a long time.
You may feel scorching heat when touching the sensors.
● Problem caused by water condensation
Do NOT bring the instrument into low temperature environment from high temperature environment or from low temperature environment to high temperature environment instantly. Otherwise, water condensation may be caused inside the instrument and the enclosure of the device. To avoid condensation, the instrument should be put into attached instrument package and taken out to use until it gradually adjusts to the ambient temperature. If the product has water condensation inside, power it off immediately and remove the battery. Otherwise, the instrument may be damaged. Operation is not allowed before water condensation is got rid of.
- Avoid impacting the product (such as collision and falling, etc).
Do NOT impact the product (such as collision and falling, etc). If not, the product will be damaged.
● Long-time storage and regular charging.
The product should be placed at a cool and dry environment if it not been used for a long time. If the product installed with battery is stored for a long time, charging should be made regularly. Otherwise, the battery will run out and its service life will be shortened.
CONTENTS
SAFETY INFORMATION ...... II
CONSIDERATIONS....II
WARNING......II
1 USING THIS MANUAL .... 1
CONVENTIONS 1
2 GENERAL INTRODUCTION....2
OVERVIEW 2
CLEANING....3
LENS MAINTENANCE ....3
CHARGING THE BATTERY AND DESCRIPTION 4
3 PRODUCT DESCRIPTION....1
FUNCTION DESCRIPTION....1
DISPLAY DESCRIPTION 3
TECHNICAL SPECIFICATIONS 4
4 GETTING STARTED....6
INITIAL OPERATION 6
IMAGE OVERLAPPING....8
IMAGE 9
COLOR PALETTE....10
EMISSIVITY....12
SETTINGS....14
6 TROUBLESHOOTING....21
7 WARRANTY....22
LIMITED ONE YEAR WARRANTY 22
1 Using this Manual
This manual contains device usage instructions.
Some illustrations shown in this manual may contain modules and optional equipment that are not included in your system.
Conventions
The following conventions are used.
Bold Text
Bold text is used to highlight selectable items such as buttons and menu options.
Example:
- Tap OK.
Notes and Important Messages
Notes
A NOTE provides helpful information such as additional explanations, tips, and comments.
Example:
NOTE
If there is no operation for longer than 6 seconds, the image overlapping mode will be automatically exited.
Important
IMPORTANT indicates a situation which, if not avoided, may result in damage to the tablet or vehicle.
2 General Introduction
For a long time, infrared thermal imaging detection technology has become an important means to ensure industrial safety in developed countries. It is widely used in many fields including electric power, metallurgy, petrochemistry, machinery, coal, traffic, fire control and national defense, etc. It can perform real-time detection at high voltage, high current and high speed to find potential problems and prevent malfunction. The "non- contact" modern detection technology is safe, reliable and quick. It is a type of technical revolution compared with traditional contact detection method.
The infrared thermal imaging technology is widely used in the following fields:
● Power equipment, transmission, transformer line inspection.
- Hidden fire source search in fire protection.
- Personnel search and rescue in the fire, and fire command. Analyze the location of leak points in heat pipes and heating equipment and heat loss.
● Determining the location of the heating fault of the operating train.
● Security department night monitoring.
Overview
This infrared thermal camera integrates surface temperature measurement and real-time thermal image. The traditional one needs to measure every component one by one, while it is not necessary for infrared thermal camera, thus saving time. The potential problems may be shown on color display screen clearly. Moreover, the central point measurement cursor is used to quickly and accurately locate and measure the temperature of the target object.
In order to increase the differentiation, the product is provided with a visible light camera. The thermal images and visible images are stored in the device and can be read through USB or stored in a computer to generate a report for print.
Compact yet rugged, the product is easy to operate and has strong function. It is the ideal selection for electric power, electronic manufacturing, industrial inspection and other fields.
The measurement accuracy and usability of the infrared thermal camera are improved with the functions below.
- The radiation coefficient may be adjusted to increase the measurement accuracy of objects with half reflection surface.
- The highest temperature and lowest temperature cursor may guide users to the areas with highest and lowest temperatures of the thermal images.
● The selectable color palette
Cleaning
Use cloth dipped with soap water to clean the enclosure of the device instead of grinding additives, isopropanol or solvent to clean. The lens and screen should be cleaned with optical glass cleaner.
Lens Maintenance
Prevent damage of the infrared lens:
- The lens is provided with refined anti-reflection coating. Clean the lens with care so as not to damage the anti-reflection coating.
- Use cleaner for lens maintenance, such as alcohol-based commercial lens cleaners, alcohol, and a lint-free cloth or tissue. Compressed air tanks can be used to remove loose particles.
Clean the lens:
- The compressed air tank or dry nitrogen ion gun (if applicable) may be used to blow the loose particles on the lens surface.
- Dip the lint free cloth in alcohol.
- Squeeze the excessive alcohol in the cloth or apply the lint free cloth on dry cloth lightly.
Wipe the lens surface by making circular motion and discard the cloth. Repeat the above steps with new cloth dipped with cleaner if necessary.
Charging the Battery and Description
Use USB cable to charge:
● The product has built-in chargeable 26650 lithium batteries.
- When battery runs low, the upper-right of the screen will display " [ ]". Recharge product in time through a Micro USB port.
- Pull off the USB cable after the product is fully charged.
To optimize the performance of lithium-ion batteries:
- Do not connect the battery to the charger for longer than 24 hours.
- The infrared thermal camera should be charged for two hours at least every three months so as to maximize the battery service life.
- Do not try to charge the battery in extremely cold environment.
3 Product Description
Function Description

Figure 3-1 Function Description – Front
- Display Screen
- Menu Key/On/Off Key
-
Navigation Key: Left
-
Navigation Key: Up
- Selection Key/Enter Key
- Navigation Key: Right
- Navigation Key: Down
- Handheld

Figure 3-2 Function Description - Back
- Micro USB (open the cap for use)
-
Visible Light Camera
-
Infrared Imaging Sensor
- Image Capture Key
- Battery
Display Description

Figure 3-3 Screen Display
- Color code: used to mark the color corresponding to the relative temperature from low to high in the field of version.
- The central point temperature cursor: used to indicate the central position in the screen area. The cursor color displays white. The temperature value is displayed at the upper-left corner of the screen.
- The highest temperature cursor: used to indicate the highest temperature position in the screen area. It will move with the change of the highest temperature point. The cursor displays red. The temperature value is displayed at the lower-left corner of the screen.
- The lowest temperature cursor: used to indicate the lowest temperature position in the screen area. It will move with the change of the lowest temperature point. The cursor displays green. The temperature value is displayed at the central position of the screen.
Table 3-1 Specifications
| Item | Description |
| Display screen | 3.5-inch full-view TFT display |
| Infrared image resolution | 320×240 |
| Visible image resolution | 300,000 pixel |
| LCD resolution | 640×480 |
| Field angle | 56° × 42° |
| Thermal sensitivity | 0.07°C |
| Frame rate of thermal images | 9Hz |
| Focus mode | Fixed |
| Wavelength coverage | 8-14um |
| Emissivity | Adjustable from 0.01 to 1.00 |
| Color palette | rainbow, iron oxide red, cold color, white hot, black hot |
| Temperature measurement range | -20°C to 450°C (-4°F to 842°F) |
| Measurement accuracy | ≤100°C: ±2°C; 100 - 300°C: ±2%; ≥300°C: ±3%; ≥400°C: ±5%; |
| Storage capacity | Built-in 8G |
| File format | JPEG |
| USB | Micro USB 2.0 |
| Power supply | Built-in chargeable 26650 battery Detachable |
| Working time | 3-4 hours |
| Setting command | Unit measurement, language, date, time, information |
| Language | English, Chinese, German, Italian |
| Automatic power-off time | Selectable: 5 minutes, 20 minutes, not power off automatically |
| Product size | 256mm× 97.2mm× 128.9mm |
| Product weight | 588g |
| Working temperature | 0°C to 45°C |
| Storage temperature | -20°C to 60°C |
| Relative humidity | 85%RH |
4 Getting Started
Initial Operation
Power On and Off
Press and hold the "ψMENU" key for more than 3 seconds to turn the infrared thermal camera on or off.
LCD Screen Display
After turning on the product, the screen shows the thermal imaging status.
NOTE
Time adjustment may be required when you move the camera between environments with widely varying ambient temperatures.
Switching Between Infrared Thermal Image and Visible Image
Press the "or" "key to switch the degree of fusion between infrared thermal images and visible images (the degree of fusion is 0%, 25%, 50%, 75% and 100% respectively).
Image Capture
Press the image capture key. When the capture is successful, the screen will display a prompt saying "save photo?". Select "Yes" to save or "No" to delete the image. Press the "◀" or "▶" key to switch the selection, then press the "SELECT/ENTER" key to confirm. You can press the capture key again if you are sure to save the image.
Hiding Highest/Lowest Temperature Column at the Screen Bottom
Under the operation after normal start up, press the "▲key and the screen bottom will display highest/lowest temperature column.
Press the "▲key to hide it."
Image Export
The saved images can be viewed on or exported to a computer after the product is connected to the computer by a Micro USB cable.
Read Images
Open the USB protective cover as shown in Figure 3-2. Connect the product to a computer with the USB cable. You may read or save the images to the computer.
You are suggested to use the included USB cable.
NOTE
To disconnect the product from a computer, pull off the USB cable after selecting "pop out device safely" to avoid causing file system damage and other problems. If "unable to save" and other problems occur, you may find the hard disc in the computer and fix it.
5 Menu Operation
Press the "/MENU" key and the menu bar appears. Options "Image overlapping", "Image", "Color palette", "Emissivity" and "Setting" are available at the menu.
Image Overlapping
Image Overlapping Description
Image overlapping enables the product to capture the visual image of every infrared image and align them to accurately display temperature distribution in the target area. This feature allows users to understand infrared images more easily.
Image Overlapping Application
Press the "MENU" key to enter the main menu, and select " " (Image overlapping) in the main menu.
Press the "SELECT/ENTER" key to enter the image overlapping adjustment mode. Press the navigation keys (up, down, left and right keys) to perform the visible image shift operation.
Press the "SELECT/ENTER" key to exit the image overlapping mode.
NOTE
If there is no operation for longer than 6 seconds, the image overlapping mode will be automatically exited.
Image Overlapping Reset Function
Enter the image overlay operation interface, press and hold the "SELECT/ENTER" key (about 1 second) to display the reset dialog box,
press the "▲", "▼", "◀", or "▶" key to switch, select "Yes", then press the "SELECT/ENTER" key. The image overlapping parameters can be reset, as shown in Figure 5-1.
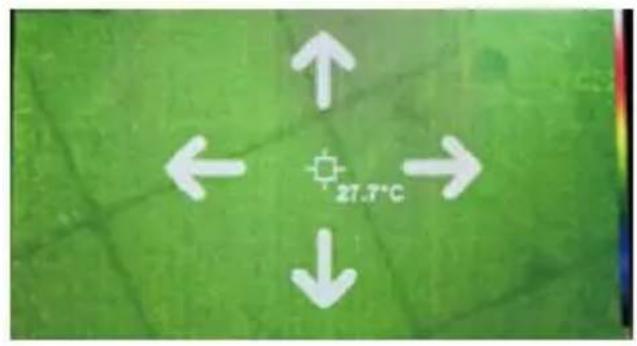

Figure 5-1 Resetting Image Overlapping
Image
View Image
Press the "ψ MENU" key to enter the main menu, and select " "(image) in the main menu.
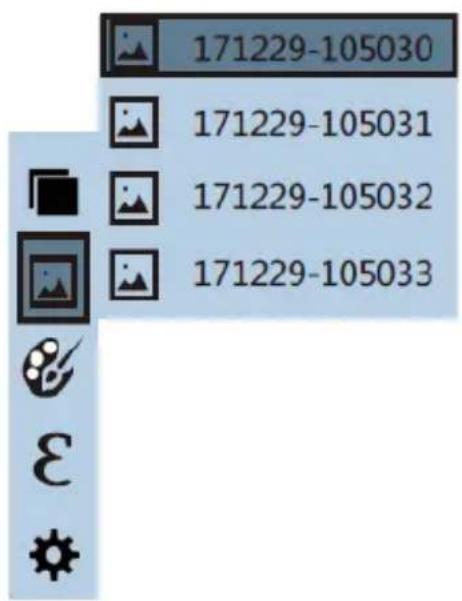
Figure 5-2 Viewing Images
Press the "key to enter image list. Press the "" or "" key to select the image, then press the "SELECT/ENTER" key to view image.
Press the "or" key to view the precious or the next image.
Press the "SELECT/ENTER" key to return. Press the "MENU" key to exit the menu.
Delete Images
At image viewing mode, press the " " key. The screen displays "Delete photo?" Select "No" to cancel or "Yes" to delete, then press the "SELECT/ENTER" key to confirm.
When all the images are deleted, "No Image" will be displayed. Press the "SELECT/ENTER" key to return to the menu and press the "/MENU" key to exit the menu.
Color Palette
Color Palette Description
The Color Palette option allows users to change pseudo-color display of the infrared image. Some color palettes are better suited for specific applications and can be set up as needed. Five color palettes are available, namely rainbow, iron red, cool color, white hot, black hot, which work best with high-contrast thermal, and color contrast between high and low temperatures will be provided.
Select the suitable color palette can display better details of the target object. Rainbow, iron oxide red and cold color palettes focus on display of color. Such color palettes are very suitable for high heat contrast and are used to enhance the color contrast between high temperature and low temperature. The white hot and black hot color palettes provide even linear color.
The following images show the same object in different color palettes.
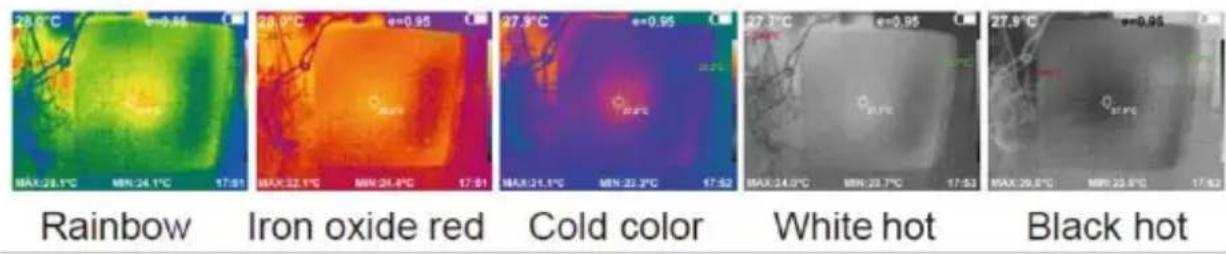
Figure 5-3 Color Palettes
Application of Color Palette

Figure 5-4 Setting Color Palettes
Press the " /MENU" key to enter the main menu and select " " (color palette) option and press the "▶key to enter the color palette list. Press the "▲" or "▼" key to select the color palette. Then press the "SELECT/ENTER" key to confirm the selection. Press "◀" to return. Press the ⏻ /MENU" key to exit the menu.
Emissivity Description
The emissivity of the infrared thermal camera can be adjusted from 0.01 to 1.00 with the default value of 0.95. Many common objects and materials (such as timber, water, skin and textile fabric) can reflect the heat energy effectively, so it is easy to obtain relatively correct measurement value. The emissivity is usually set to 0.95 when rough objects that emits energy more easily are measured. For semi-matte objects that give out less energy, the emissivity value is usually 0.85 and the emissivity value for semi-gloss objects is 0.6. Shiny objects have a lower emissivity value, which is usually set to 0.3 at the time of measurement. A proper emissivity value is very important in measuring target temperatures. The surface emissivity will produce giant impact on surface temperature measured by the product. Understanding the surface emissivity will enable you to obtain correct temperature measurement results.
Emissivity Setting
The product provides four types of object measurement modes:
- Coarse object (0.95)
- Semi-matte object (0.85)
- Semi-shiny object (0.60)
● Shiny object (0.30)
According to the characteristics of the measured objects, users may set the emissivity value using the "Custom" option (refer to the table "emissivity of common materials").
The operating steps are as follow:
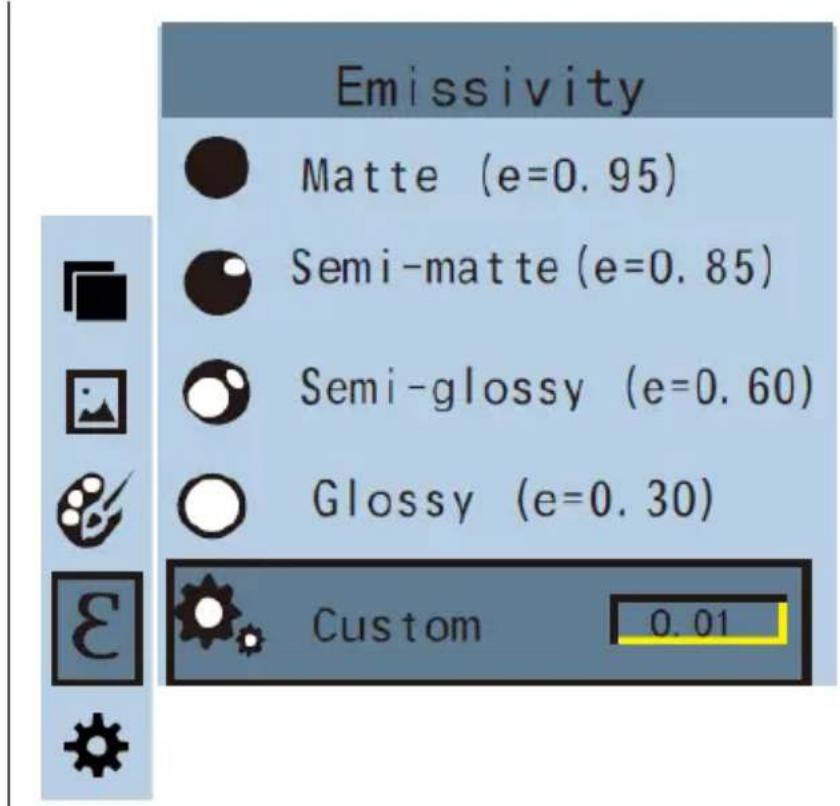
Figure 5-5 Setting Emissivity
Press the "⊕/MENU" key to enter the main menu. Then select the "E" (emissivity) option and press the "▶key to enter the emissivity list.
Press the "▲" or "▼" key to select the emissivity. Then press the "SELECT/ENTER" keyto confirm the selection. Press the ◀ "key to exit the menu.
To define your own emissivity values, select "Custom" and press the "SELECT/ENTER" key to enter the editing state. Press "◀" or "▶" to select the digit of the value to be changed, press "▲" or "▼" to change the value. When the modification is completed, press the "SELECT/ENTER" key to confirm, then press "◀" to return. Press the ⚪ /MENU"key to exit the menu.
Emissivity Values of Common Materials
Set up the emissivity for the target object before the detection.
Table 5-1 Emissivity Values of Common Materials
| Substance | Thermal radiation | Substance | Thermal radiation |
| Bitumen | 0.90~0.98 | Black cloth | 0.98 |
| Concrete | 0.94 | Human skin | 0.98 |
| Cement | 0.96 | Foam | 0.75~0.80 |
| Sand | 0.90 | Charcoal dust | 0.96 |
| Earth | 0.92~0.96 | Paint | 0.80~0.95 |
| Water | 0.92~0.96 | Matte paint | 0.97 |
| Ice | 0.96~0.98 | Black rubber | 0.94 |
| Snow | 0.83 | Plastic | 0.85~0.95 |
| Glass | 0.90~0.95 | Timber | 0.90 |
| Ceramics | 0.90~0.94 | Paper | 0.70~0.94 |
| Marble | 0.94 | Chromium hemitrioxide | 0.81 |
| Gypsum | 0.80~0.90 | Copper oxide | 0.78 |
| Mortar | 0.89~0.91 | Ferric oxide | 0.78~0.82 |
| Brick | 0.93~0.96 | Textile | 0.90 |
Settings
Press the " /MENU" key and select the " " (setting) option in the main menu. Press the " ▶key to enter the "Settings" submenu.
| Settings | ||
| Auto shutdown | Auto shutdown | NO 5min 20min |
| Intensity | Intensity | Low Medium Hight |
| Language | Language | English Chinese Italian German |
| Unit | Unit | Celsius Fahrenheit |
| Time format | Time Format | 24 hour AM/PM |
| Set time | Set time | Year 2019 Month 09 Day 18 Hour 15 Minute 15 Second 15 |
| Spot | Spot | Off On |
| WiFi | WiFi | Off On |
Figure 5-6 Settings
Auto Shutdown Setting
After entering the "Settings" submenu, select "Auto shutdown", you can press the "key in the navigation key to enter the auto shutdown setting. Three modes are available, no auto shutdown, auto shutdown in 5 minutes, and auto shutdown in 20 minutes.
Intensity Setting
After selecting "○" (brightness), press the "▶" key to enter the brightness setting option. Three modes are available, "low", "medium", and "bright".
Language Setting
After selecting " "(language), press the " " key to enter the language option.
Four languages are available: English, Chinese, Italian, and German.
Unit Setting
After selecting " (unit), press the " key to enter the temperature unit option. Two modes can be chosen, Celsius and Fahrenheit.
Time Format Setting
After you select "24" (time format), press the " " key to enter the time format option. Two modes can be chosen, 24-hour and 12-hour time systems.
Time Setting
As shown in the Figure 5-7, after selecting " "(set time), press " " to enter the time option.

Figure 5-7 Setting Time
- Press the "▲" or "▼" key to select year, Month, Day, Hour, Minute, or Second.
- Press the "SELECT/ENTER" key to enter the editing state.
- Press the "◀" or "▶" key to select the figure to be changed. Press the "▲or " "▼" key to change the value. After completing the change, press the "SELECT/ENTER" key to confirm.
- After the time setting is completed, press the " " key to return. Press the "MENU" key to exit the menu.
Spot Setting
Enable or disable the highest and lowest temperature cursors.
As shown in Figure 5-8, after selecting "♦" (cold hotspot), press the " " Key to enter the spot option.

Figure 5-8 Cursor Setting
- Press the "▲" or "▼" key to select "Off" or "On" to disable or enable the cursor. Then press the "SELECT/ENTER" key to determine the selection.
- After the setting is completed, press the " " key to return. Press the " ⏻/MENU" key to exit the menu.
Wi-Fi Setting
As shown in Figure 5-9, after selecting " (Wi-Fi), press the " key to enter the Wi-Fi option.

Figure 5-9 Wi-Fi Setting
- Press the "▲" or "▼" key to select "Off" or "On". Then press the "SELECT/ENTER" key to determine the selection.
- After the setting is completed, press the " " key to return. Press the " /MENU" key to exit the menu.
After turning on Wi-Fi, use a mobile device to search for Wi-Fi hotspot. The Wi-Fi hotspot name is the same as the product serial No. (You may check the serial No. on the camera cover or on the Wi-Fi setting page). After the mobile device is connected to the Wi-Fi, access the IP 192.168.230.1 on the mobile device's web browser to connect the mobile device to the product.
On the mobile device, you are allowed to set the color palette, blending degree, emissivity, maximum/minimum values, language, and synchronize the settings to the product. Also, the settings on the product can be synchronized to the mobile device.

NOTE
If the mobile device is not successfully connected to the product, refresh the webpage on the mobile device.
Click the camera icon on the mobile device and the image is saved on the product as shown in Figure 5-10.

Figure 5-10 Saving Images Through a Mobile Device
Click "Images" in the upper-left corner on the mobile device to enter the image view. Press an image to download it. Long press an image to save it to the mobile device. Click "IR Stream" to return to the video stream webpage, as shown in Figure 5-11.
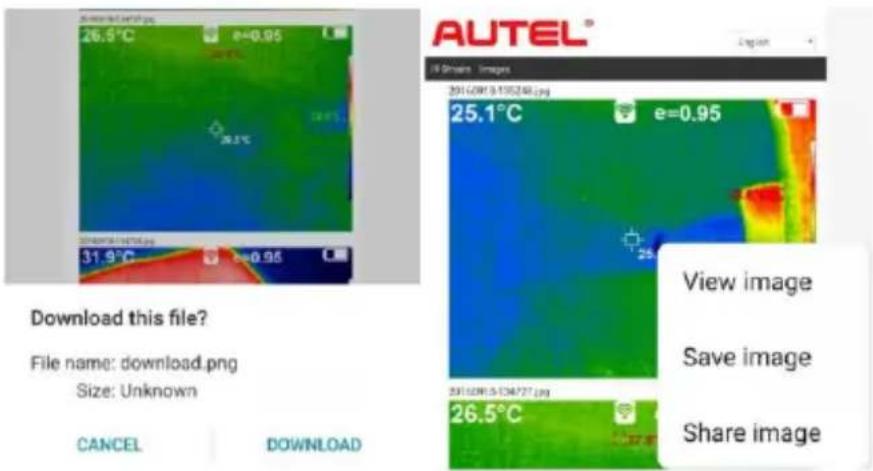
Figure 5-11 Downloading Images Through a Mobile Device
6
Troubleshooting
If you encounter any problem when using the infrared thermal camera, refer to Table 6-1 to fix the problem. If the problems are not solved, cut off the power supply and contact the manufacturer.
Table 6-1 Troubleshooting
| Failure phenomenon | Cause | Solution |
| The infrared thermal camera cannot be started | The battery is not installed | Install the battery |
| The battery is used up | Replace with new battery or charge it | |
| The infrared thermal camera powers off automatically | The battery is used up | Replace with new battery or charge it |
| The time set for automatic power off is due | Restart or change the time for automatic power off after restarting |
IMPORTANT
a) If the product malfunctions, repair or replacement with new or good product will be made according to the condition after the product is inspected.
b) One-year warranty service is offered if quality issues are confirmed by warranty personnel under the following circumstances:
- The product is operated according to requirements and relevant specification.
● The product is not dismantled or repaired since it is purchased
c) For products exceeding the warranty period, inspection will be performed to decide whether to repair them or replace the parts and components. Relevant expense will be charged for all types of repair and replacement of parts and components according to actual condition.
d) The warranty voucher should be filled in at the time of purchase and must be provided for maintenance.
7 Warranty
Limited One Year Warranty
Autel Intelligent Technology Corp., Ltd. (the Company) warrants to the original retail purchaser of this device, that should this product or any part thereof during normal consumer usage and conditions, be proven defective in material or workmanship that results in product failure within one (1) year period from the date of purchase, such defect(s) will be repaired, or replaced (with new or rebuilt parts) with Proof of Purchase, at the Company's option, without charge for parts or labor directly related to the defect(s).
The Company shall not be liable for any incidental or consequential damages arising from the use, misuse, or mounting of the device. Some states do not allow limitation on how long an implied warranty lasts, so the above limitations may not apply to you.
This warranty does not apply to:
- Unable to show the original of effective warranty voucher.
- The damage caused in the process of installation in which requirements and relevant specification are not be followed.
- Damage caused by improper use and storage or unauthorized dismantling and maintenance of the product and other reasons.
- Damage caused by natural disasters such as earthquake, flood and lightning stroke and external disasters.
- Exceed the warranty period.
- COPYRIGHT INFORMATION
- DISCLAIMER OF WARRANTIES AND LIMITATION OF LIABILITIES
- IMPORTANT
- FOR SERVICES AND SUPPORT
- SAFETY INFORMATION
- CONSIDERATIONS
- NOTE
- WARNING
- ● LONG-TIME STORAGE AND REGULAR CHARGING
- CONTENTS
- 1 USING THIS MANUAL
- CONVENTIONS
- BOLD TEXT
- NOTES AND IMPORTANT MESSAGES
- 2 GENERAL INTRODUCTION
- OVERVIEW
- CLEANING
- LENS MAINTENANCE
- CHARGING THE BATTERY AND DESCRIPTION
- USE USB CABLE TO CHARGE
- TO OPTIMIZE THE PERFORMANCE OF LITHIUM-ION BATTERIES
- 3 PRODUCT DESCRIPTION
- FUNCTION DESCRIPTION
- DISPLAY DESCRIPTION
- 4 GETTING STARTED
- INITIAL OPERATION
- POWER ON AND OFF
- LCD SCREEN DISPLAY
- SWITCHING BETWEEN INFRARED THERMAL IMAGE AND VISIBLE IMAGE
- IMAGE CAPTURE
- HIDING HIGHEST/LOWEST TEMPERATURE COLUMN AT THE SCREEN BOTTOM
- IMAGE EXPORT
- READ IMAGES
- 5 MENU OPERATION
- IMAGE OVERLAPPING
- IMAGE OVERLAPPING DESCRIPTION
- IMAGE OVERLAPPING APPLICATION
- IMAGE OVERLAPPING RESET FUNCTION
- IMAGE
- VIEW IMAGE
- DELETE IMAGES
- COLOR PALETTE
- COLOR PALETTE DESCRIPTION
- APPLICATION OF COLOR PALETTE
- EMISSIVITY DESCRIPTION
- EMISSIVITY SETTING
- EMISSIVITY VALUES OF COMMON MATERIALS
- SETTINGS
- AUTO SHUTDOWN SETTING
- INTENSITY SETTING
- LANGUAGE SETTING
- UNIT SETTING
- TIME FORMAT SETTING
- TIME SETTING
- SPOT SETTING
- WI-FI SETTING
- 6
- TROUBLESHOOTING
- 7 WARRANTY
- LIMITED ONE YEAR WARRANTY
- THIS WARRANTY DOES NOT APPLY TO
Brand : Autel
Model : MaxiIRT IR100
Category : Diagnostic tool