
N4B2ND4 - Combo DVD / magnétoscope LG - Free user manual and instructions
Find the device manual for free N4B2ND4 LG in PDF.


| Product Type | Network Attached Storage (NAS) with Blu-ray/DVD Drive |
| Brand | LG |
| Model | N4B2ND4 |
| Optical Drive | Blu-ray/DVD drive (read/write) |
| Memory Card Reader | SD, MMC, MS, xD |
| USB Ports | 2 x USB 2.0 (front and back) |
| e-SATA Port | 1 x e-SATA (back) |
| LAN Port | 1 x Gigabit Ethernet (RJ-45) |
| Display | LCD screen for status and IP setting |
| Power Supply | AC 100-240V, 50/60Hz (via AC inlet) |
| Security | Kensington lock slot, password protection |
| Supported RAID Levels | 0, 1, 5 (configurable via web menu) |
| Network File Protocols | SMB/CIFS, FTP, HTTP |
| Remote Access | DDNS support (Dynamic Domain Name Service) |
| Management Interface | Web-based UI (NAS Detector and web menu) |
| Compatible Hard Drives | 3.5" SATA II (up to 4 drives, hot-swappable) |
| Cooling | Fan (built-in) |
| Operating Temperature | 0°C to 40°C (typical) |
| Dimensions (W x H x D) | Approx. 200 x 160 x 250 mm (estimated) |
| Weight | Approx. 2.5 kg (without hard drives) |
Frequently Asked Questions - N4B2ND4 LG
User questions about N4B2ND4 LG
0 question about this device. Answer the ones you know or ask your own.
Ask a new question about this device
Download the instructions for your Combo DVD / magnétoscope in PDF format for free! Find your manual N4B2ND4 - LG and take your electronic device back in hand. On this page are published all the documents necessary for the use of your device. N4B2ND4 by LG.
USER MANUAL N4B2ND4 LG
natural_image
Front view of a silver portable electronic device with a digital display and control panel (no visible text or symbols)www.lg.com/nas
Table of Contents
- Package Contents 02
- Names of Product Parts 03
- Installing the Product
Installing LG Network Storage 04
4-1. Installing the Program Installing NAS Detector 05
4-2. Installing the Program Using NAS Detector 06
5-1. Setting LG Network Storage Running Web Menu 07
5-2. Setting LG Network Storage Adding User/Granting Authority by Folder .. 08
5-3. Setting LG Network Storage Setting Remote Control/DDNS Setting .... 09
6-1. Using LG Network Storage File Up/Download 10
6-2. Using LG Network Storage Opening Network Folder 11
6-3. Using LG Network Storage Connecting Network Drive 12
Supplementary [For Professionals]
- To Install in PC without Optical Disk Device 13
2-1. If Cannot Set up an Automatic Router (UPnp Setting) When Setting DDNS Setting Port for External Connection (Port Forwarding Setup) 14
2-2. If Cannot Set up an Automatic Router (UPnp Setting) When Setting DDNS Disable Firewall for a Router(DMZ Setup): Setting a Router 15
2-3. If Cannot Set up an Automatic Router (UPnp Setting) When Setting DDNS Disabling Firewall for a Router(DMZ Setup): How to Disable Firewall for a Router in Each Case · 16
3-1. To Install Hard Disk(For a product without a hard disk) To Mount HDD 18
3-2. To Install Hard Disk(For a product without a hard disk) Installation 19
1. Package Contents
Thank you for purchasing LG Electronics Network Storage. Before installation, please make sure you have all below.
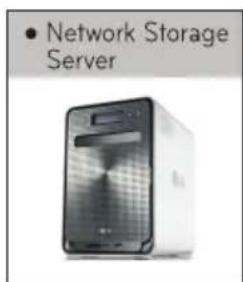
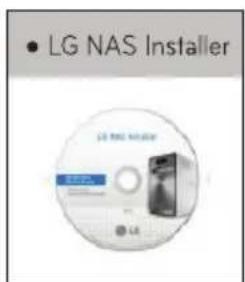
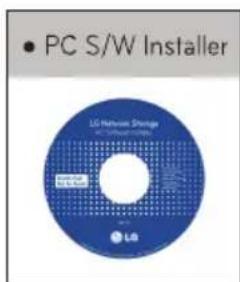
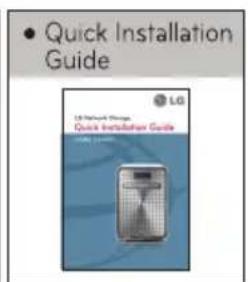
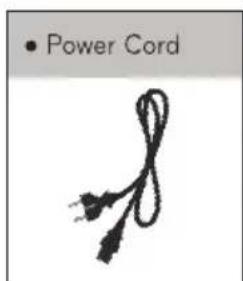
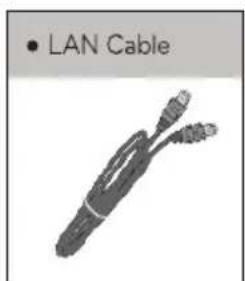
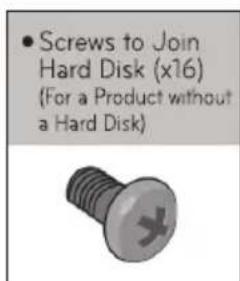
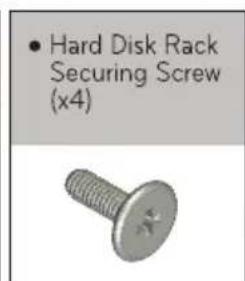
natural_image
Blank white rectangle with a gray top border (no text or symbols)* Images or Pictures on the User Guide may differ for different models.
2. Names of Product Parts
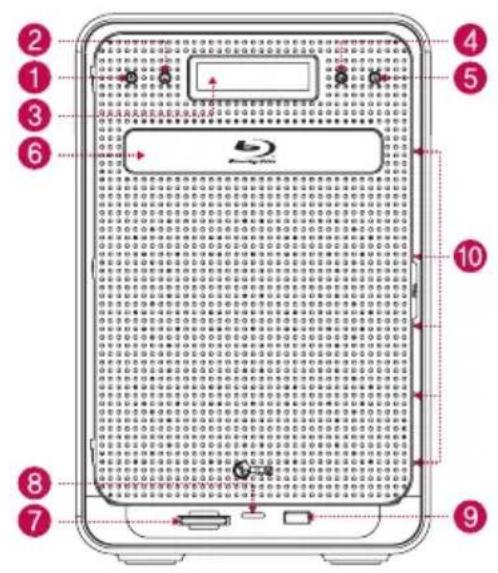
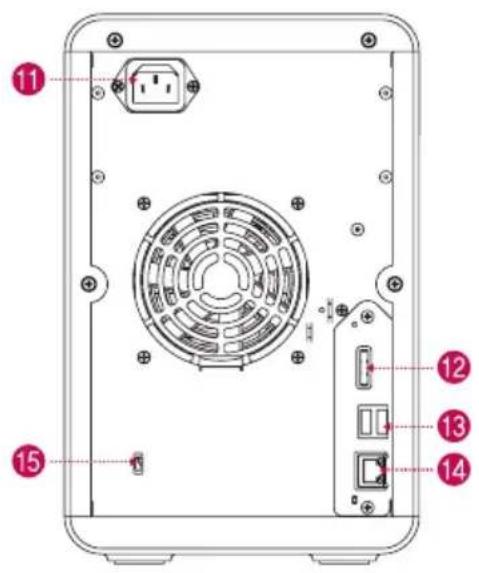
After making sure you have the whole package, please learn the names of different parts.
(Front)
(Back)
① Power button : power on and off (to turn off power, push button twice)
② Button to open a disc: This button opens and close the optical disk device.
③ LCD screen: Operation status is shown.
④ Mode(M) button: Change mode.
5 SET(S) button: This Button selects modes. You can also check and change IP.
⑥ Blu-ray/DVD drive
⑦ Memory card reader: It is possible to connect directly to SD, MMC, MS and xD.
⑧ LED that indicates memory card status - Blue: Normal operation.
⑨ USB port : USB 2.0 Interface
10 LED that indicates network/HDD/ODD status - Blue : Normal operation, Red: Abnormal operation
⑪ Inlet: AC power connection.
12 e-SATA : e-SATA supports external SATA II device.
⑬ USB port : USB 2.0 Interface
14 LAN port: LAN Port connects LAN cable.
15 Kenshington Lock : Kensington Lock is a lock for theft prevention.
3. Installing the Product Installing LG Network Storage
Install LG Network Storage as below in the numerical order.
Tip
You need a router for network.
※Refer to P. 16 for how to disable firewall for a router in different cases(DMZ setup).
※Refer to P. 18 if you purchased a product without a hard disk(Enclosure)
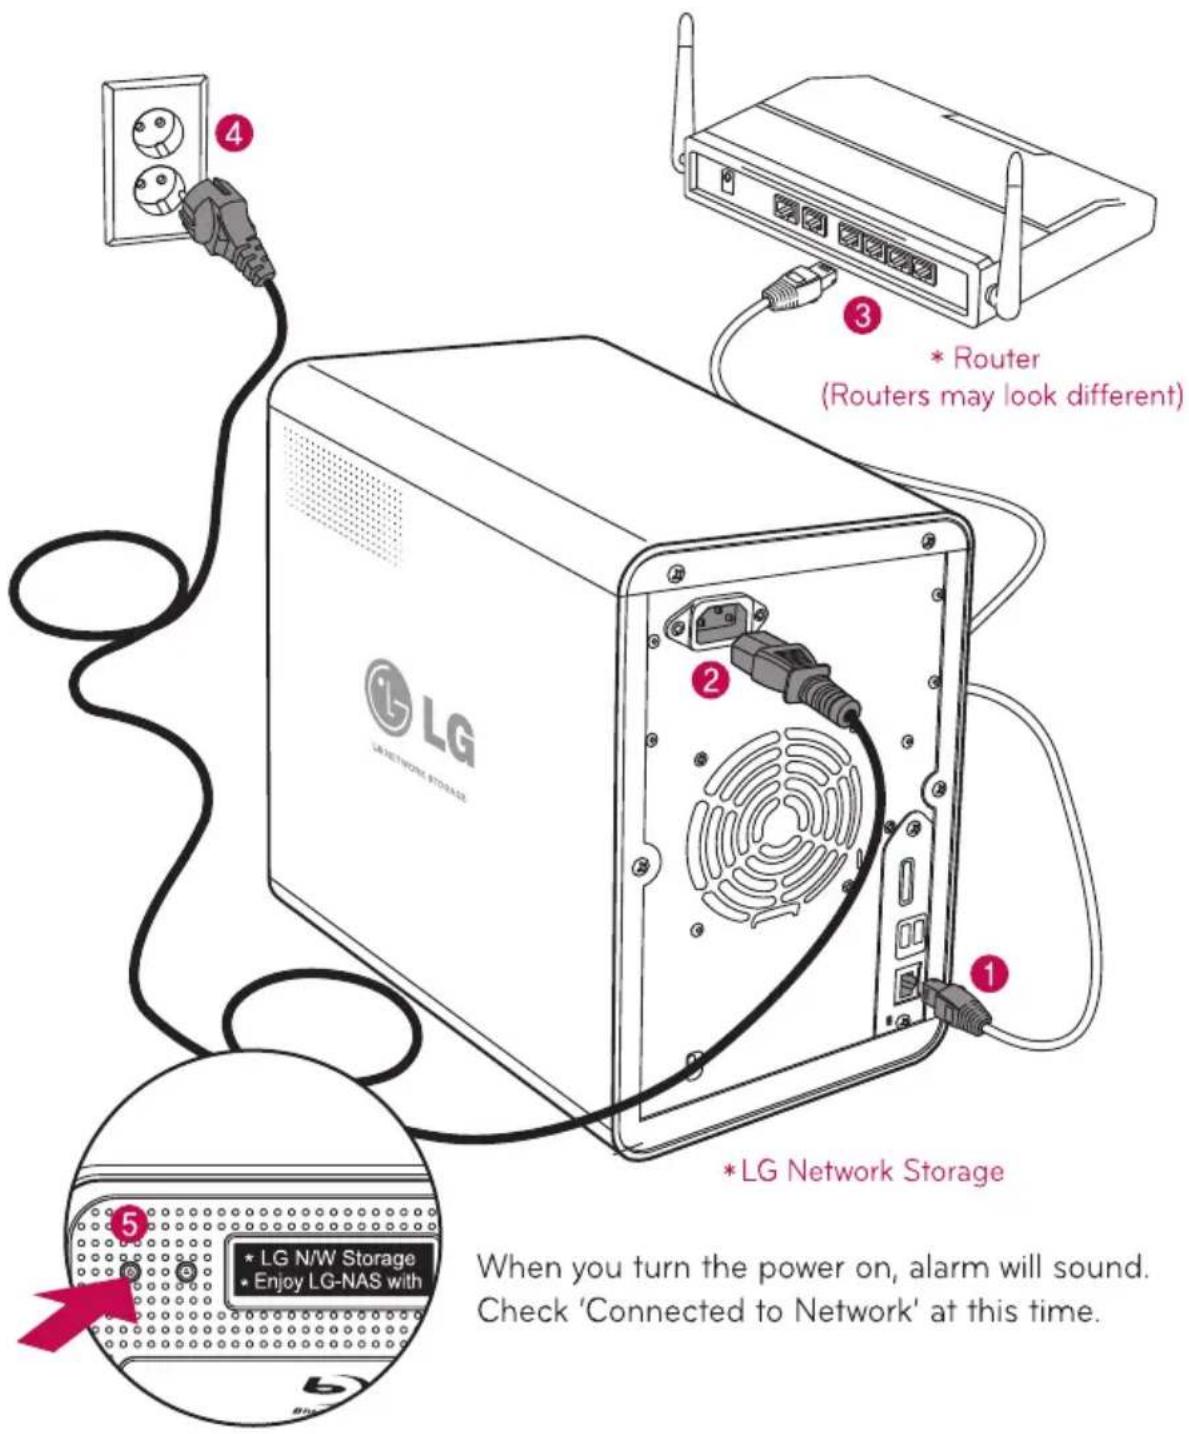
4-1. Installing the Program Installing NAS Detector
Refer to P. 18 if you purchased a product without a hard disk.
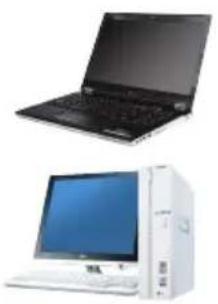
- Insert a disc 'LG Network Storage PC Software Installer' in the PC.
natural_image
Two electronic devices: a black laptop and a white desktop computer with monitor (no visible text or symbols)
※Caution
Do not insert in 'LG Network Storage'.
※Refer to P. 13 when installing in PC without an optical disc(i.e. DVD).
- A pop-up below will automatically appear.
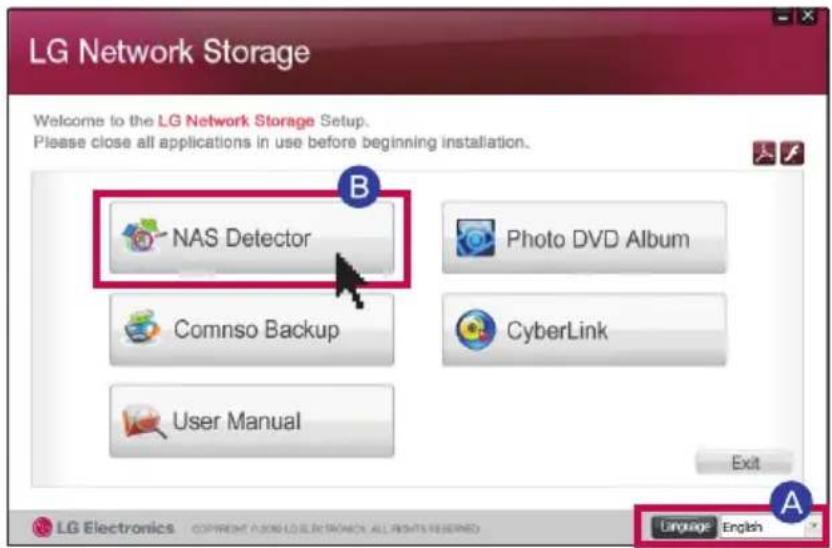
A Select a language
B Click 'NAS Detector'.
- Click the icon in case a flash player is not installed in the PC.
- Click 'User's Manual' button to view a detailed user's guide.
- Once the installation is complete, a short-cut icon will appear on the wallpaper of your PC.
4-2. Installing the Program Using NAS Detector
Tip
Refer to the manual in the program after installing the program, for more information about using a bundle program. (Comnso Backup/Photo DVD Album/Cyberlink Product Category)
- Double-click 'NAS Detector' icon.
- Click IP address.
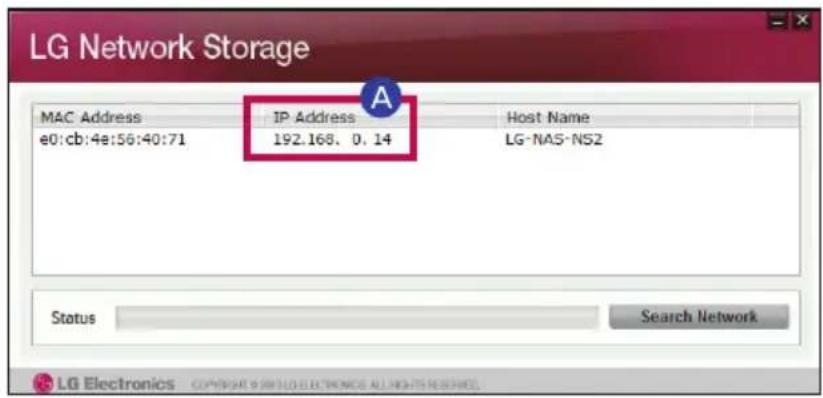
A Click IP of searched Network storage and select 'Network Storage'.
※ If you cannot find network storage, connect the network storage and PC to the same router.
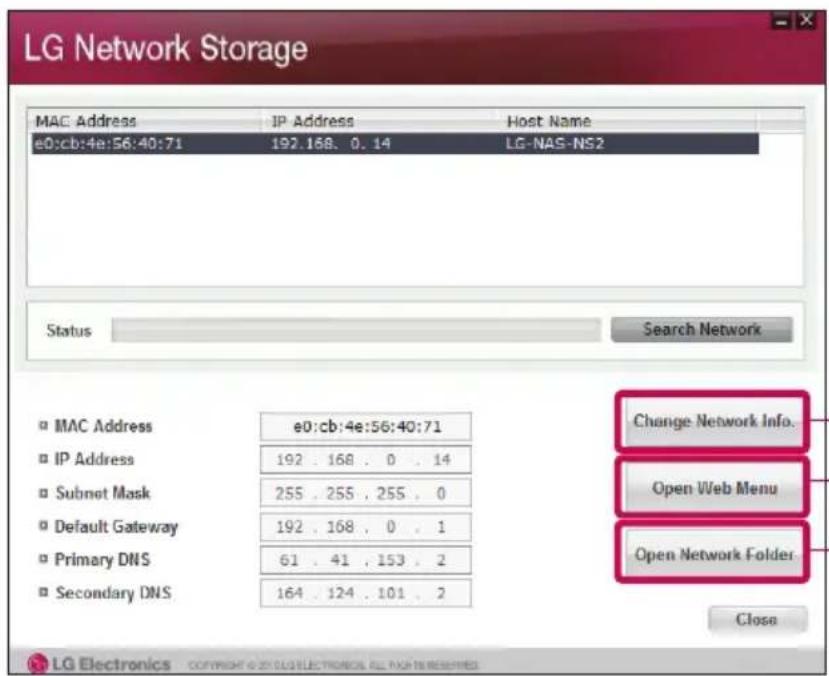
- Change information about IP address. - Open the web menu of network storage (Refer to P. 7) - Open the network folder of network storage(Refer to P. 11)
5-1. Setting LG Network Storage Running Web Menu
Tip
You can do administrative work, such as setting network information, managing sharing and service of network storage, store data using Blu-ray/DVD drive and set synchronization of a mobile device.
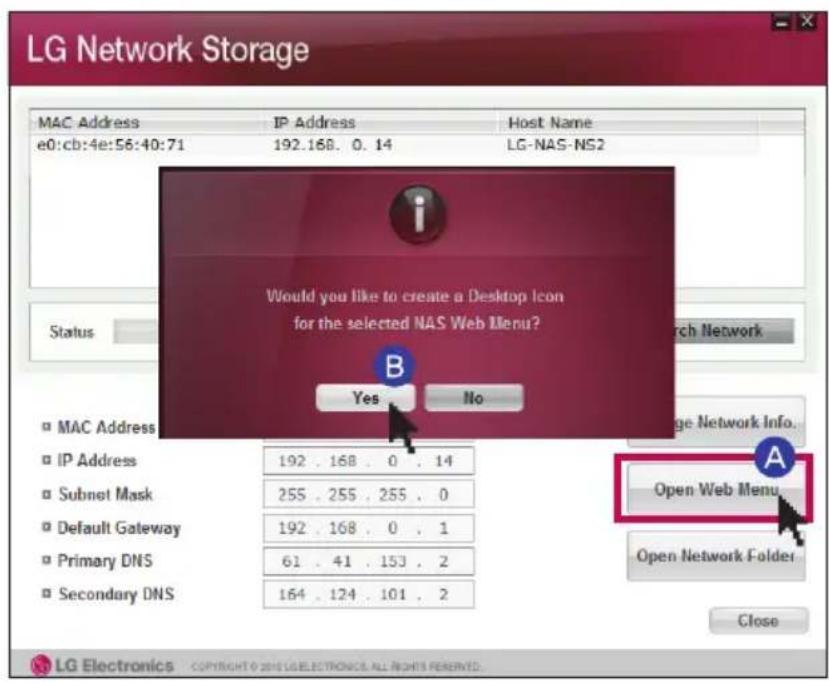
A Click 'Open web menu'.
B Select 'Go to web menu' on the pop-up screen.
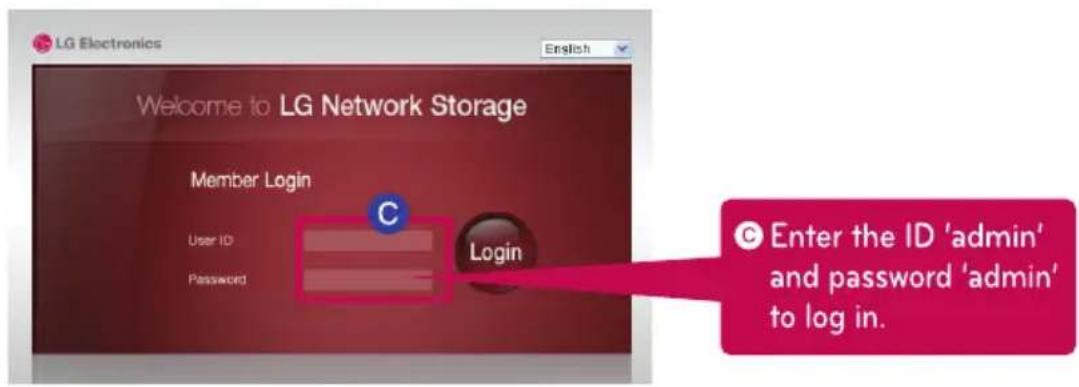
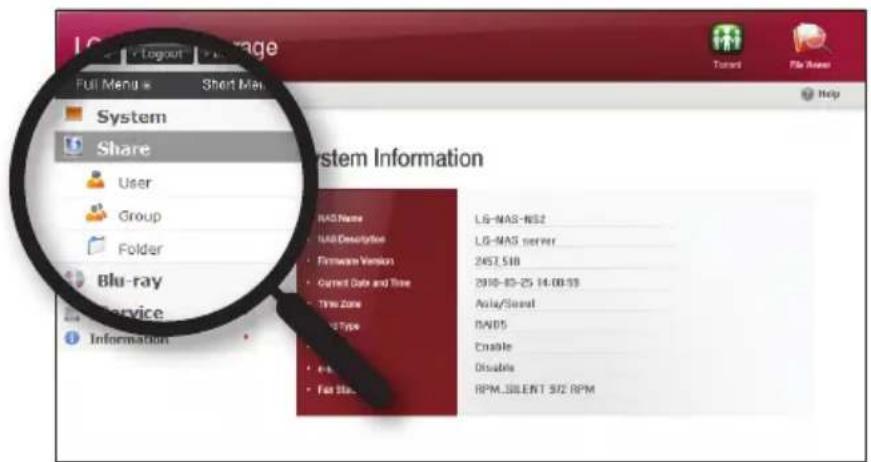
※ You can change network storage setting.
※ Change the password for security(Click web menu -> Share -> User -> 'Admin' and change the pass word).
5-2. Setting LG Network Storage
Add User/Grant Authorities by Folder
Tip
Additional users can be added, besides the administrator.
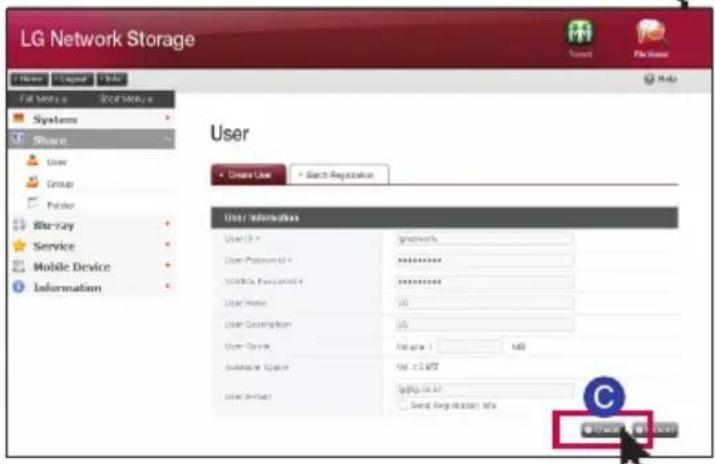
1. Adding users.
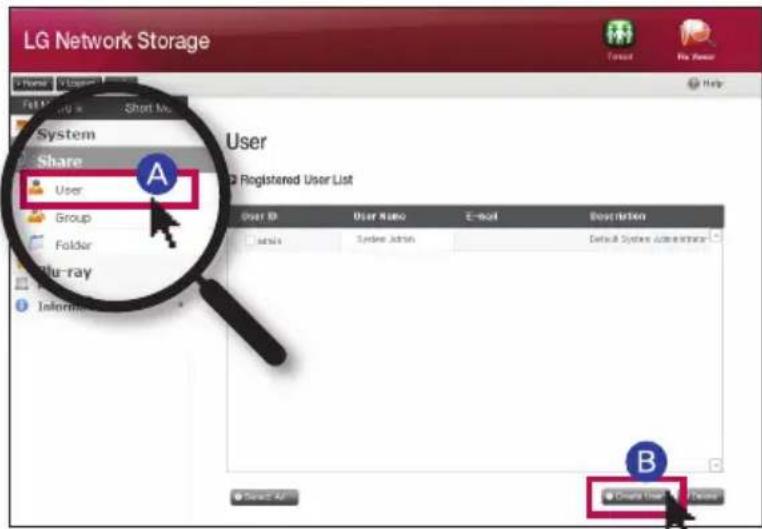
A Click Share and 'User'.
B Click 'Create User' to be added.
C Put ID of the user be added, and click 'Create'.
2. Granting Authorities by Folder
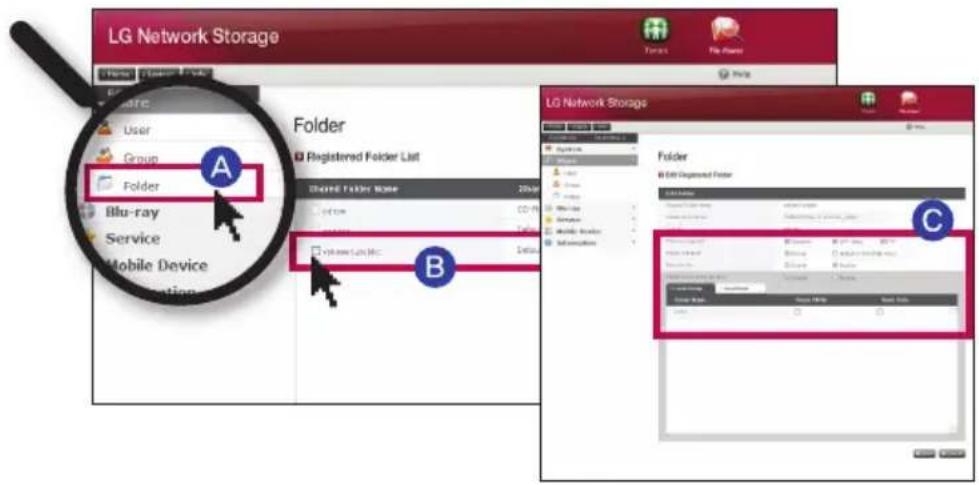
A Click 'Folder'.
B 'Click 'Folder' to authorize.
© Authorize users.
5 -3. Setting LG Network Storage
Setting Remote Control (DDNS Setting)

What is DDNS? (Dynamic Domain Name Service)
You will need a domain address in order to connect to the network in the remote controlling area.
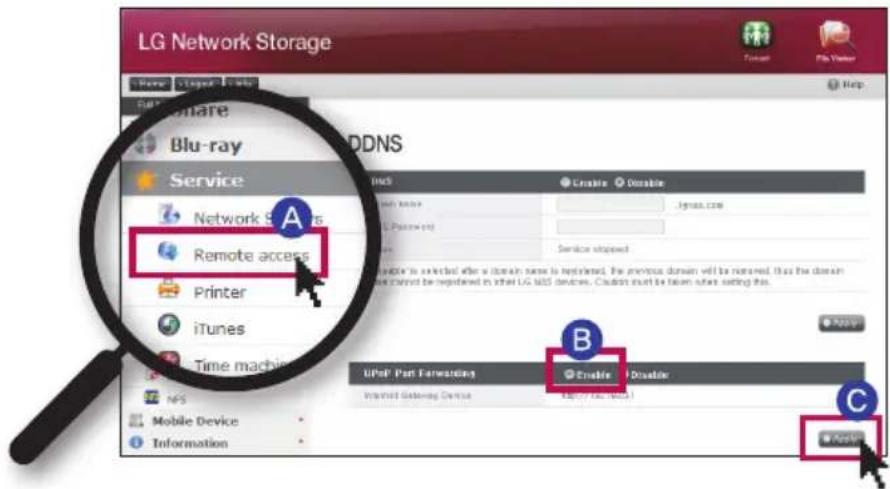
A Go to web menu, and click Service and 'Remote access'
B Select 'Enable' for UPnP port forwarding
© Click 'Apply' button.
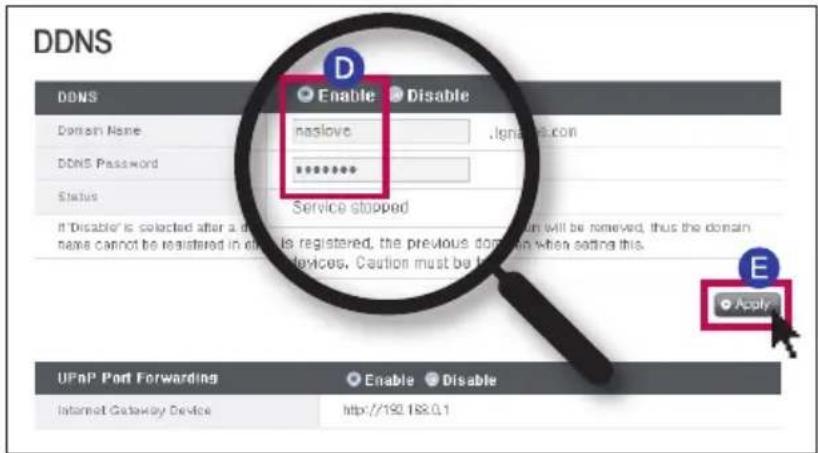
D Select 'Enable' for DDNS. Enter the domain name and password.
E Click 'Apply' button.
※Caution!
- Domain name should not include special characters or blank(Only English alphabets and numbers)
- If you select 'Disable' after registering the domain name, the existing domain will be deleted, and the domain name can be used in other network storages.
- Do not lose the password.
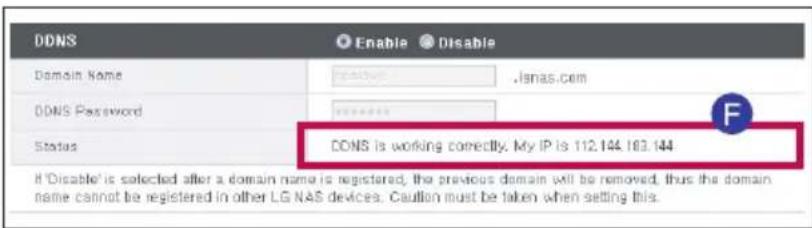
F Text that says 'DDNS is working correctly' will appear and IP address will be set upon the completion of DDSN setting.
※ Now network storage is ready to use.
※ Run a test on the external connection by connecting to IP set by DDNS. Once connected to the web menu, try connecting to the preset domain.
6-1. Using Network Storage File Up/Download
Tip
You can upload and download files from a remote-controlling area, using File Viewer.
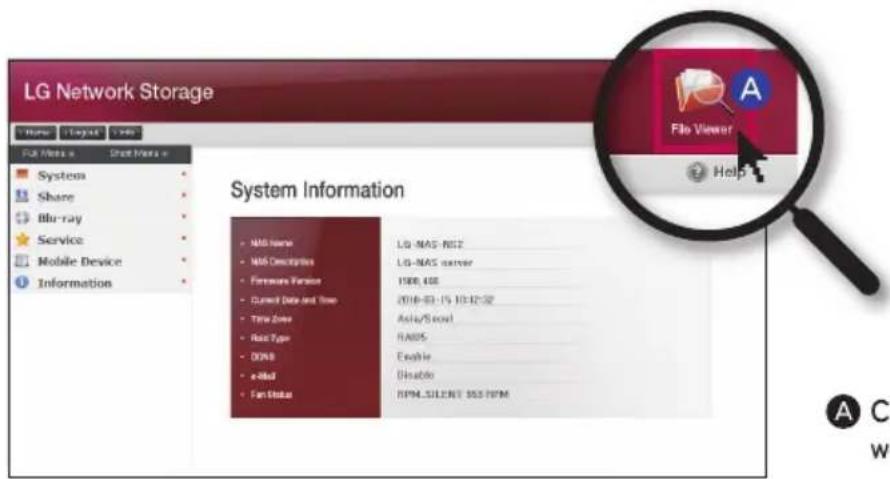
A Click 'File Viewer' from web menu.
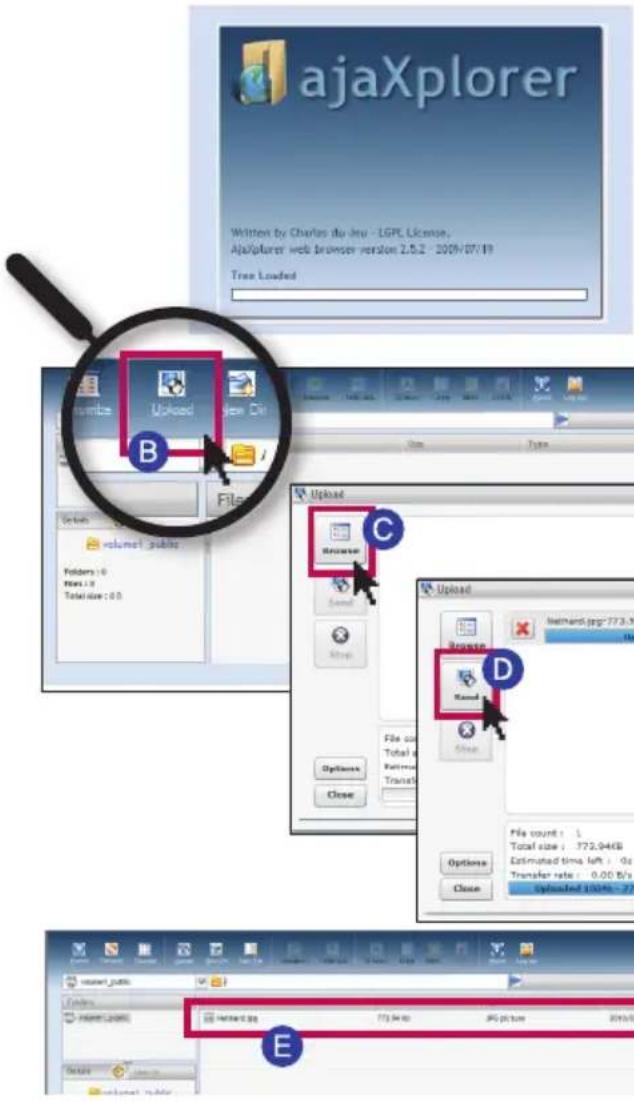
Web menu after loading
B Click 'Upload'.
© Click 'Browse' and open the file
D Click 'Send'.
E Upload is complete.
6-2. Using Network Storage Opening Network Folder

LG Network Storage can be used only at homes and offices where it is installed.
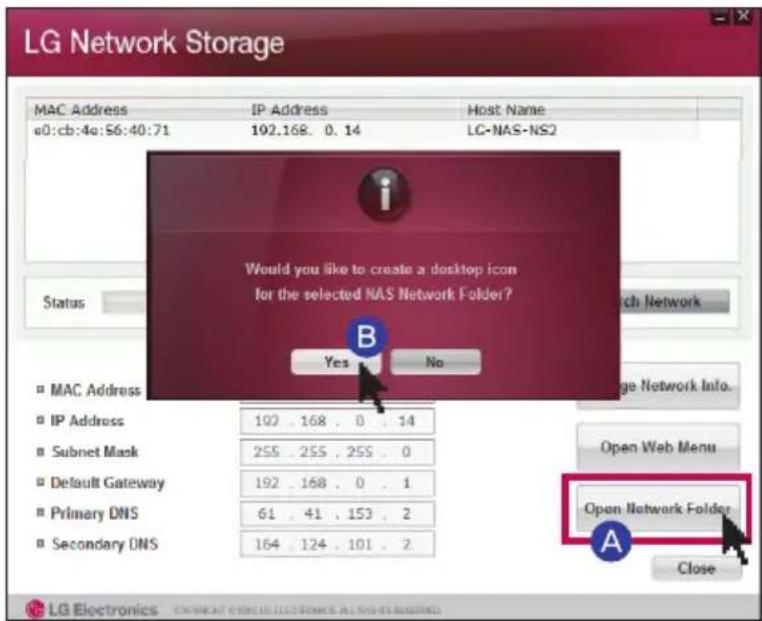
A Click 'Open Network Folder'
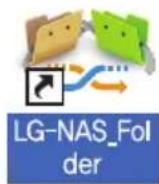
B 'Select 'Shortcut to Network Folder' on the pop-up screen
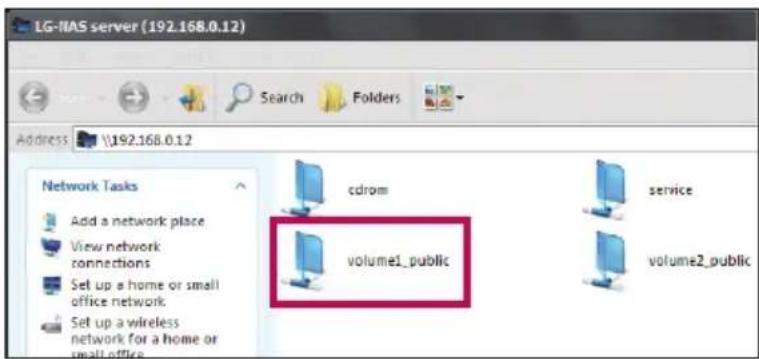
After opening the network folder, double-click 'volume 1_public' to upload and download files as below.
※ When the Log In screen appears, refer to page12 D. (User ID: admin / Password: admin)
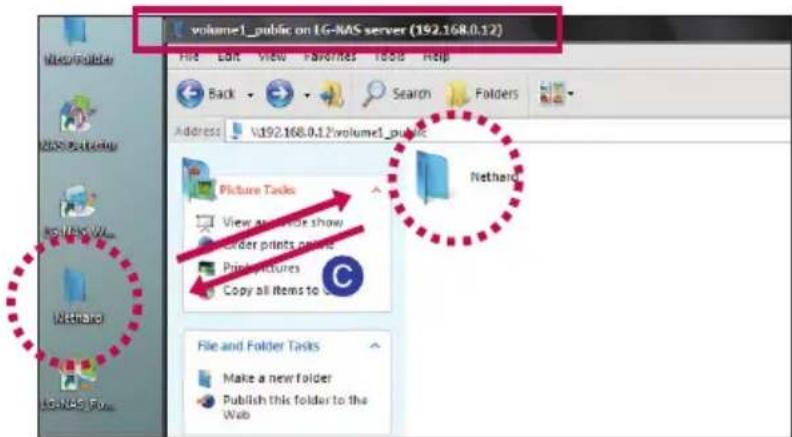
C Drag and drop to upload and download files.
6-3. Using Network Storage Connecting to Network Drive
Tip
You can connect to network folder to use it on 'My Computer' just like PC HDD. Also, Network drive can be used only at homes or offices where Network Storage is installed.
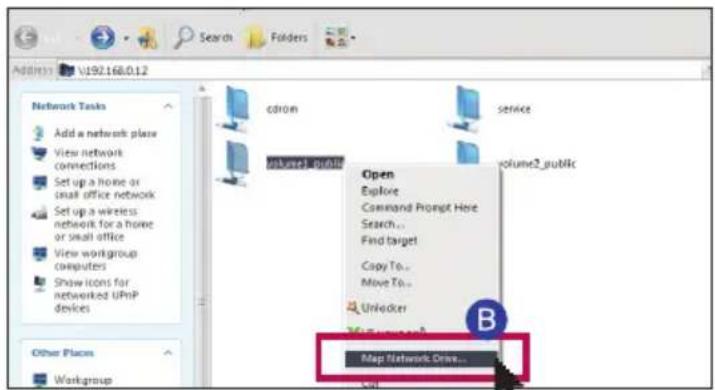
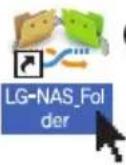
A Click 'LG NAS Folder' on the wall screen
B Click the right button of the mouse and select 'Connect to Network Drive'.
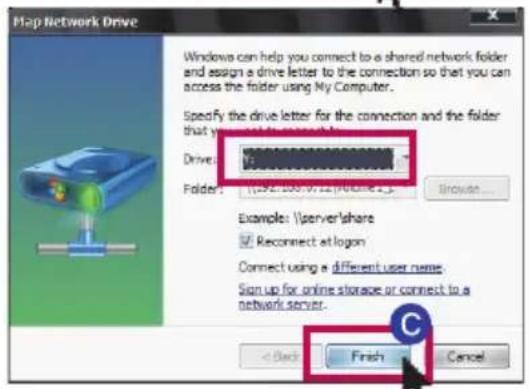
C Select Drive and folder to access on the 'Connect to Network Drive' screen, and click 'Finish'.
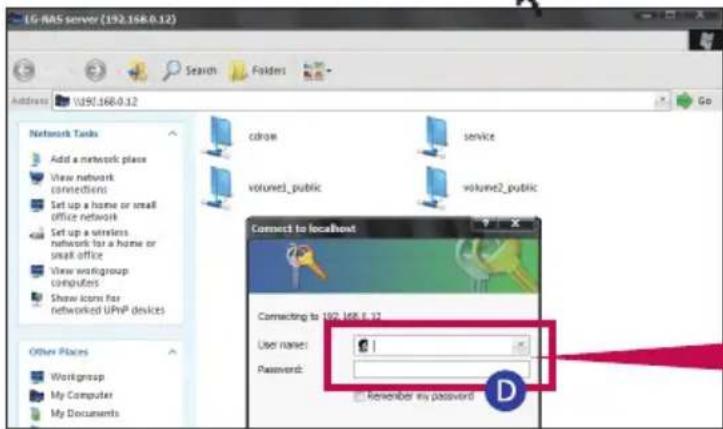
Enter the ID 'admin' and password 'admin' to log in.
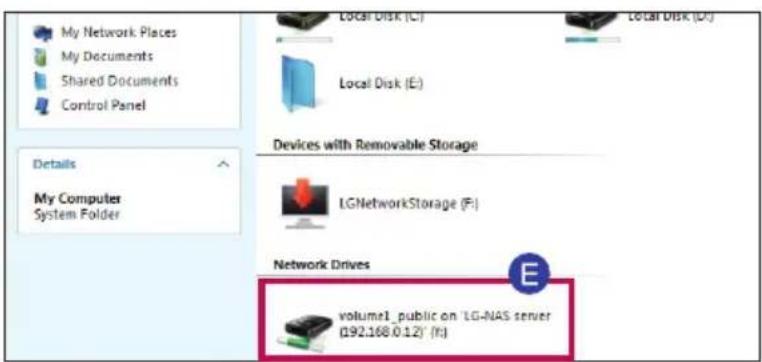
E The drive created in 'My Computer' can be used along with the hard disk.
1. To Install in PC without Optical Disk Device
Follow the instruction below to install in a PC without an optical disk device(i.e. DVD), such as a ultrathin laptop or a Netbook.
A Insert 'LG Network Storage PC Software Installer' disc in the LG Network Storage. (An alarm will beep after 15 seconds once the Network Storage recognizes the disk.)
B Check the IP of the Network Storage. (Refer to the Tip on P. 16)
C Open 'My Computer' and enter the Network Storage IP which you have checked in B, in the address.
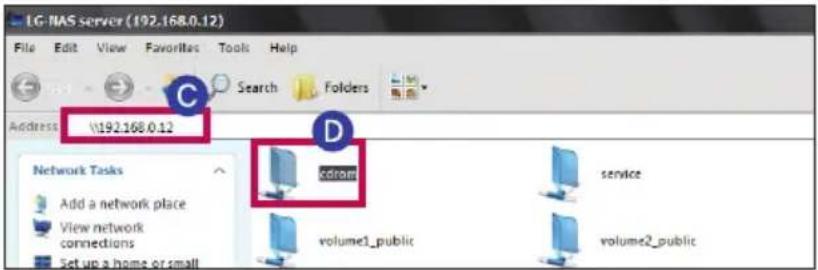
D Click 'cdrom' and click 'Windows'.
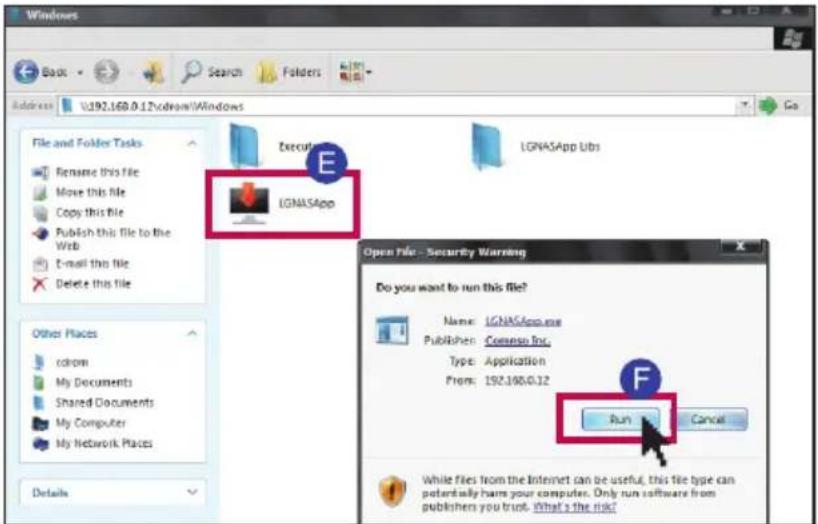
Click 'LGNASApp.exe.
F Click 'Run'.
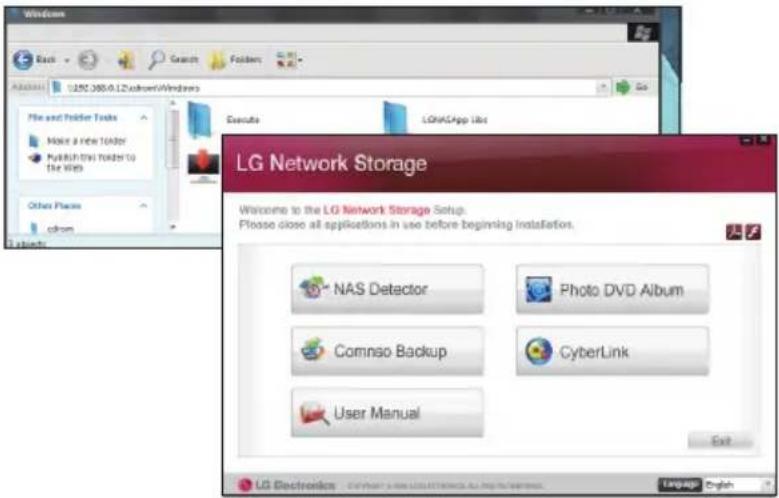
※ When a pop-up screen appears, install 'NAS Detector', referring to No. 2.
If Cannot Set up an Automatic Router(UPnp Setting) 2-1. When Setting DDNS Setting Port for External Connection(Port Forwarding Setup)
What is Port Forwarding? : It maps so that a certain port used on external internet and PC from the internal router can communicate with each other, and is safer than DMZ.
1. Check IP of the router
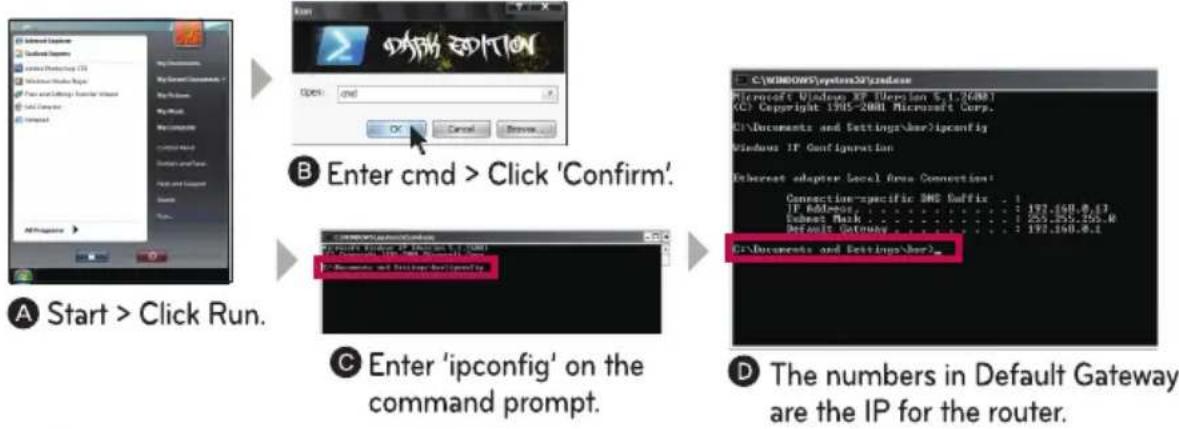
2. Log onto the router

Enter the IP in the address and log onto the router(Refer to the manual of the router when logging in with ID/Password)
3. Search for 'Port Forward' setting in the menu explorer and set as above.
※ The layout and terms may differ by router.
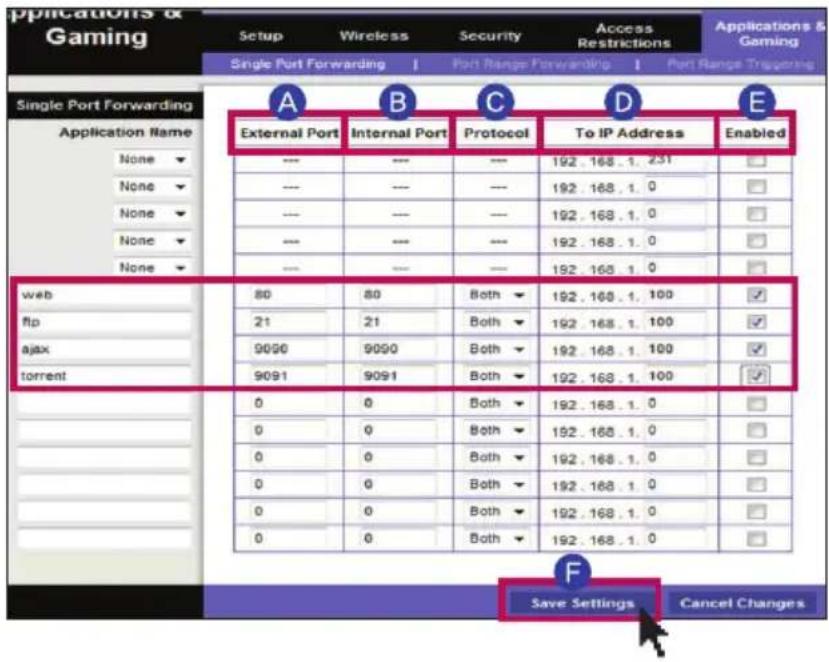
A B
External Port / Internet port - Input he same type of service port
- Web - 80
- FTP - 21
- Ajax - 9090
- Torrent - 9091
© Protocol: Select 'Both'
D To IP Address : Input the Network Storage IP for Service
Check 'Enabled'.
F Click 'Save settings'.
If Cannot Set up an Automatic Router(UPnp Setting) 2-2. When Setting DDNS Disabling Firewall for a Router(DMZ Setup): Setting a Router
What is DMZ? : DMS fixes problems that cannot be fixed externally because of a firewall from a router.
-
Refer to page 14 for IP check of the router and router login.
-
Find 'DMZ' in the menu explorer and set to the IP of LG Network Storage.
※ The layout and terms may differ by router.
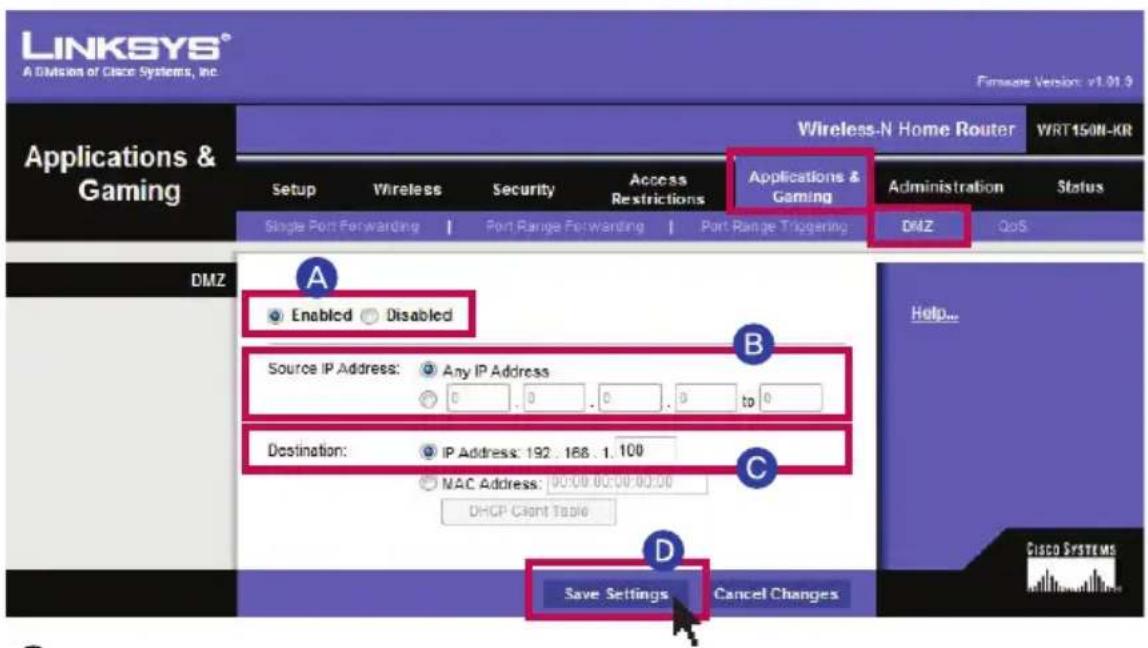
A Click 'Inabled'.
B Source IP Address : Click 'Any IP Address'.
© Destination - IP Address : Input the Network Storage IP for Service.
D Click 'Save Setting' button.
Tip
'Setting External Port (Port Forwarding Setup)' and 'Disabling Firewall for Router(DMZ Setup)': Select one from 'Setting Router' and set. (Two cannot be set at the same time)
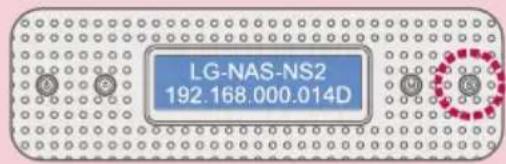
IP that has been set is shown at the touch of 'S' button.
2-3. If Cannot Set up an Automatic Router(UPnp Setting) When Setting DDNS Disabling Firewall for a Router(DMZ Setup): How to Disable Firewall for a Router in Each Case(1)
Tip
Please be aware that it may not be possible to play internet games in the PC, depending on the type of DMZ setting.
1. For Basic Connection
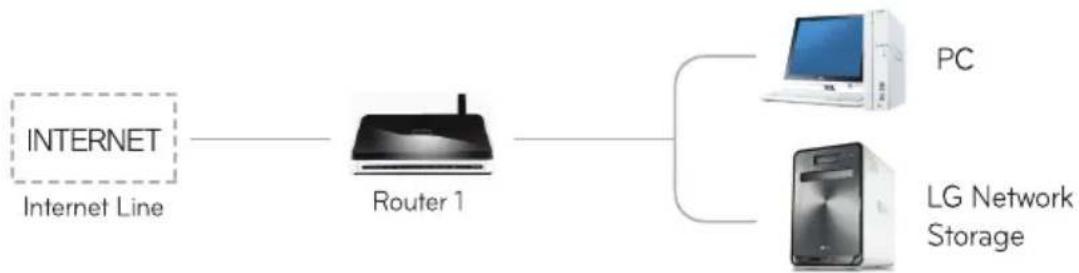
flowchart
graph LR
    A["INTERNET\nInternet Line"] --> B["Router 1"]
    B --> C["PC\nLG Network Storage"]
- Connect to the router and enter the internal IP for LG Network Storage in DMZ.
2. For Switch Hub
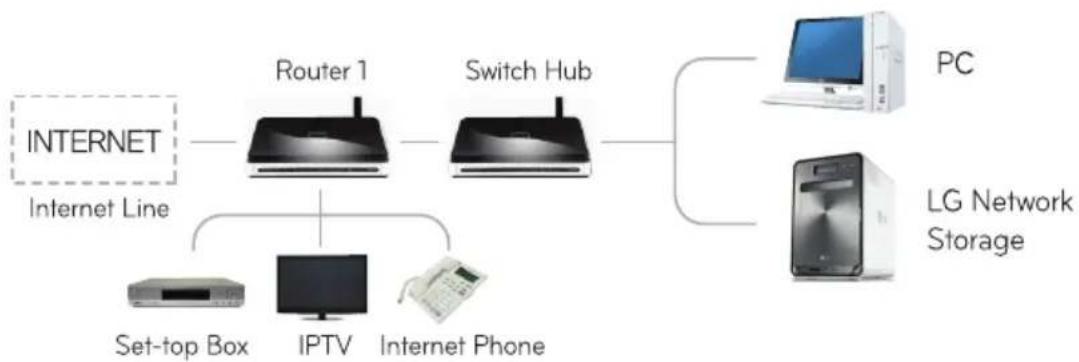
flowchart
graph TD
    A["INTERNET"] --> B["Router 1"]
    B --> C["Switch Hub"]
    D["Set-top Box"] --> E["IPTV"]
    F["Internet Phone"] --> E
    G["PC"] --> H["LG Network Storage"]
    I["Internet Line"] --> B
- Connect to the router and enter the internal IP for LG Network Storage in DMZ.
Tip
It will automatically be set to IP when connecting to LAN cable, but an administrator will need to manually set* on LCD screen in case he or she wants to designate a fixed IP.
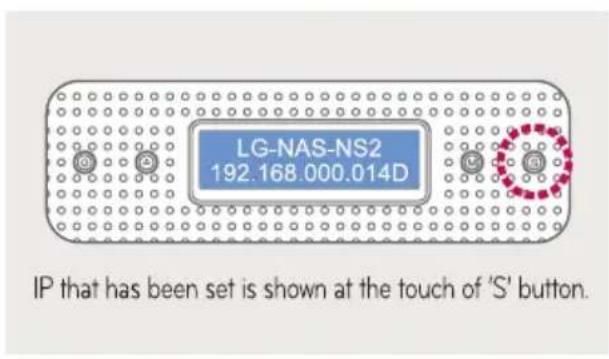
\*How to Set IP on LCD Screen
- Press 'M' to go to 'IP Setting Mode' and 'S' button.
- Press 'M' and 'S' buttons and:
(1) Static IP - Fixed IP
(2) DHCP IP - Automatic IP
(3) Cancel Setup - Cancel Select one from above.
2-3. Disabling Firewall for a Router(DMZ Setup): How to Disable Firewall for a Router in Each Case(2)
Follow the instructions below to install in case you have two routers.
3. For 2 Routers
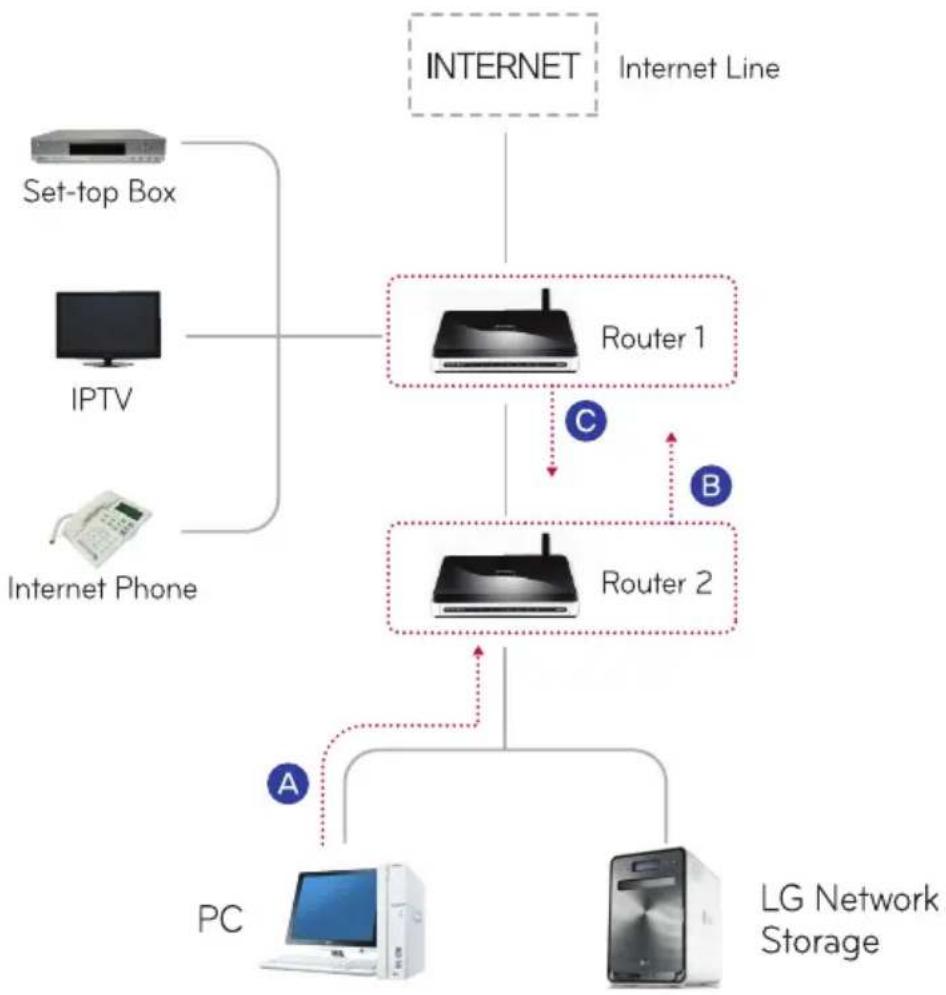
flowchart
graph TD
    A["Set-top Box"] --> B["Internet Phone"]
    C["IPTV"] --> B
    D["Internet Line"] --> E["Router 1"]
    E --> F["Router 2"]
    F --> G["PC"]
    F --> H["LG Network Storage"]
    E --> I["C"]
    F --> J["B"]
    G --> K["A"]
    H --> L["B"]
A Check IP of the router 2 in PC.
(Refer to 'Disable firewall of the router(DMZ Setup): Setting Router' on P. 15)
B Check WAN IP and gateway(IP of Router 1) on the setting screen of Router 2. ✉ Refer to the router's manual.
C Connect to Router 1 and select DMZ setting(Refer to P. 15), and enter WAN IP from Router 2 in the DMZ IP of Router 1.
※ Router 1 includes the router offered by the internet provider.
3-1. To Install Hard Disk(For a product without a hard disk) To Mount HDD
Tip
If you bought an enclosure product without a hard disk, install HDD and then Firmware(Initial) in the order below(Refer to P. 19).
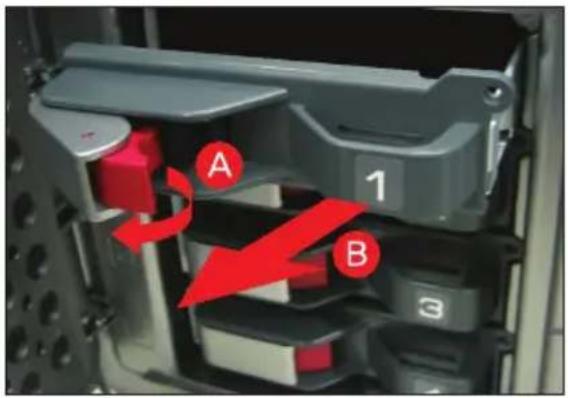
A Turn off the power, open the front door and pull the locking lever on the hard rack to unlock.
B Pull the handle on the hard rack to separate from the body.
Place the hard disc on the hard rack as shown on the picture and fix all four points.
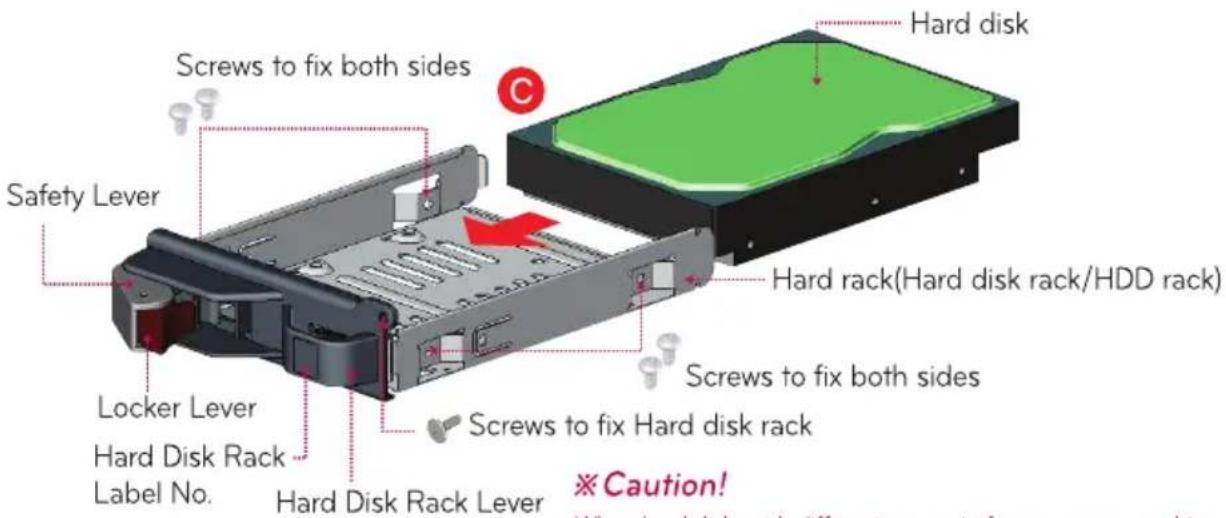
※Caution!
When hard disks with different amount of memory are used to configure RAID 5, RAID 5 will be configured on the basis of the hard disk with the smallest memory, meaning decrease in the total memory used in all hard disks and shorter life.
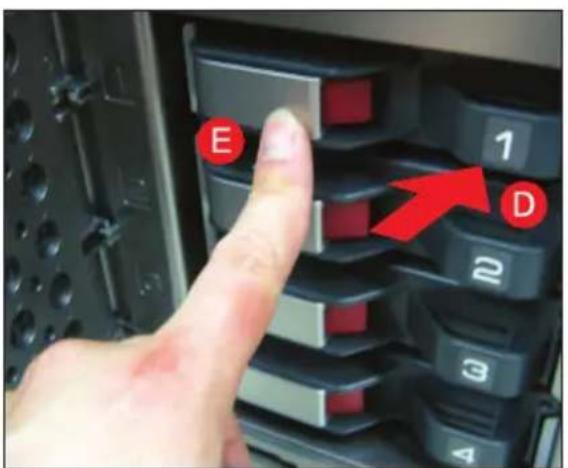
D Push into the body until you hear a clicking sound.
E Press the locking lever to fix.
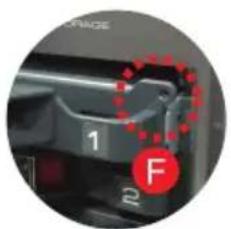
For safety, use screws for fixing a hard rack.
natural_image
Close-up of a mechanical component with labeled parts (1, 2, F) and red circular annotations highlighting features (no readable text or symbols beyond labels)※ Install remaining hard disks in the same order and manner.
3-2. To Install Hard Disk(For a product without a hard disk) Installation

All data in the hard disk will be deleted in case of using the hard disk in use.
1. Initial Installation of LG Network Storage
A Plug the power cord as shown on No. 2 and 4 on Page 4, and turn the power on.
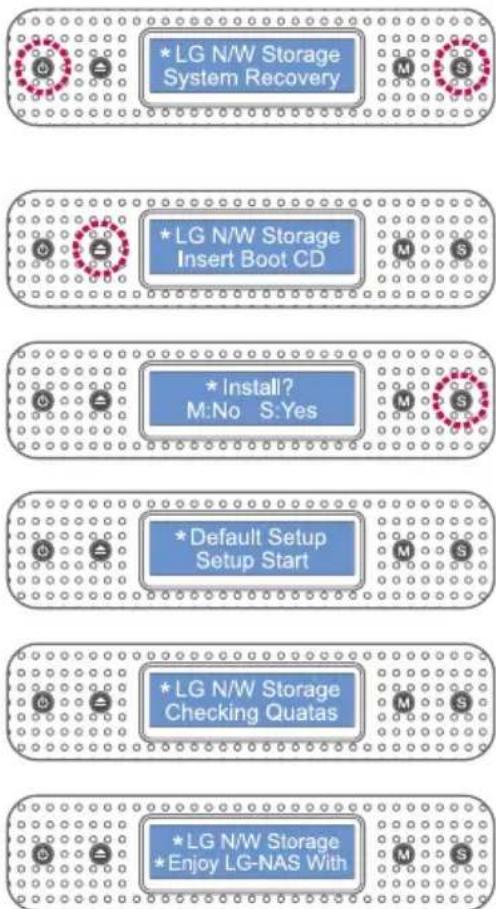
flowchart
graph TD
    A["*LG N/W Storage System Recovery"] --> B["*LG N/W Storage Insert Boot CD"]
    B --> C["*Install? M:No S:Yes"]
    C --> D["*Default Setup Setup Start"]
    D --> E["*LG N/W Storage Checking Quatas"]
    E --> F["*LG N/W Storage Enjoy LG-NAS With"]
B Pressing down the button 'S', press the power button once. Please remove your finger from the button 'S' when you see a message saying 'System Recovery'. In case of finishing erroneously before the installation completes, go back to B and run 'System Recovery' again.
When LG Network Storage runs and the tray opens, along with the message 'Insert Boot CD' after 20 seconds, insert 'LG NAS Installer' CD enclosed and press 'Disc Open' button to close the tray.
D Press 'S'(Set) button when you see a 'Install?' message after 1 minute. Please press 'S' button(for setting basic mode) later when messages 'Default?' and 'Default Sure?' appear.
E System file installation will start with the message as shown in the picture. When the system file is installed and hard disk is formatted, LG Network Storage will reboot with an alarming sound.
F When LG Network Storage starts booting, a message as shown in the picture will appear. Wait for a moment till booting finishes with a message as shown below at an alarming sound.
G Now LG Network Storage will automatically configure RAID.
※ To reconfigure RAID of the volume, follow this process; Run 'NAS Detector' -> Open 'Web Menu': 'System' -> 'Volume'. Select the volume you want and reconfigure.
※ Time that it takes to install system files, format a hard disk and configure RAID differs by sizes and numbers of hard disks.
| Total Size of HDD | Install System Files | Format a hard disk | Configure Volume and RAID |
| 2TB(500GB x 4) | Approx. 10 min | Approx. 8 min | Approx. 2 ~ 3 hr |
| 4TB(1TB x 4) | Approx. 10 min | Approx. 15 min | Approx. 4 ~ 6 hr |
| 8TB(2TB x 4) | Approx. 10 min | Approx. 30 min | Approx. 8 ~ 10 hr |
※ Refer to P. 5 if you are a first-time buyer.
※Caution!
It is advised not to use LG Network Storage during RAID configuration as it may delay processing in the system.
Regulatory Notices
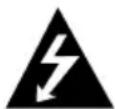
CAUTION
RISK OF ELECTRIC SHOCK DO NOT OPEN
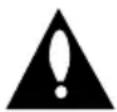
CAUTION: TO REDUCE THE RISK OF ELECTRIC SHOCK. DO NOT REMOVE COVER (OR BACK). NO USER-SERVICEABLE PARTS INSIDE. REFER SERVICING TO QUALIFIED SERVICE PERSONNEL.

This lightning flash with arrowhead symbol within an equilateral triangle is intended to alert the user to the presence of uninsulated dangerous voltage within the product's enclosure that may be of sufficient magnitude to constitute a risk of electric shock to persons.

The exclamation point within an equilateral triangle is intended to alert the user to the presence of important operating and maintenance (servicing) instructions in the literature accompanying the product.
Warnings:
- To reduce the risk of fire or electric shock, do not expose this apparatus to rain or moisture.
- To avoid shock hazard, disconnect all the cables and the power supply when you install the disconnected devices or open the covers of the system or attached devices. Electrical current form power, telephone, and communication cable is hazardous.
- To avoid electric shock, do not connect safety extra-low voltage (SELV) circuits to telephone-network voltage (TNV) circuits. LAN ports contain SELV circuits and WAN ports contain TNV circuits. Some LAN and WAN ports both use RJ-45 connectors. Use caution when connecting cables.
• Installation of the equipment must comply with local and national electrical codes. - Do not insert the conductivity material to the product.
- Do not open the optical disk drive unit: no user adjustments or serviceable parts are inside. Use of controls, adjustments, or the performance of procedures other than those specified might result in hazardous radiation exposure.
Avoid direct eye exposure with the laser beam contained in some drives.
- The apparatus power supply cord plug and appliance coupler are relied upon as the disconnect devices and shall remain readily accessible.
Safety Instructions
The appliance is not intended for use by young children or infirm persons without supervision.
Young children should be supervised to ensure that they do not play with appliance.
If the appliance is supplied from a cord extension set or an electrical portable outlet device, the cord extension set on electrical portable outlet device must be positioned so that it is not subject to splashing or ingress of moisture.
Cautions:
- Danger of explosion if battery is in incorrectly replaced. Replace only with the same or equipment type.
- If the backup battery is incorrectly replaced, there is danger of explosion.
The lithium battery contains lithium and can explode if it is not properly handled or disposed of.
Replace only with a battery of the type recommended by LG.
Risk of explosion if battery is replaced by an incorrect type. Dispose of used batteries according to the instructions.
FCC Notices (U.S. Only)
FCC, Class B
FCC WARNING: This equipment may generate or use radio frequency energy. Changes or modifications to this equipment may cause harmful interference unless the modifications are expressly approved in the instruction manual. The user could lose the authority to operate this equipment if an unauthorized change or modification is made.
REGULATORY INFORMATION: FCC PART 15
This product has been tested and found to comply with the limits for a Class B digital device, pursuant to Part 15 of the FCC Rules. These limits are designed to provide reasonable protection against harmful interference when the product is operated in a residential installation. This product generates, uses, and can radiate radio frequency energy and, if not installed and used in accordance with the instruction manual, may cause harmful interference to radio communications. However, there is no guarantee that interference will not occur in a particular installation. If this product does cause harmful interference to radio or television reception, which can be determined by turning the product off and on, the user is encouraged to try to correct the interference by one or more of the following measures:
- Reorient or relocate the receiving antenna.
- Increase the separation between the product and receiver.
- Connect the product into an outlet on a circuit different from that to which the receiver is connected.
- Consult a dealer or an experienced radio/television technician for help.
Industry Canada (Canada Only)
Industry Canada, Class B
This Class B digital apparatus complies with Canadian ICES-003.
Industry Canada, classe B
CE Notice (European Union)

LG Electronics hereby declares that this/these product(s) is/are in compliance with the essential requirements and other relevant provisions of Directive 2004/108/EC, 2006/95/EC, and 2009/125/EC.
European representative :
LG Electronics Service Europe B.V. Veluwezoom 15, 1327
AE Almere. The Netherlands
(Tel: +31-(0)36-547-8888)
Waste Electrical and Electronic Equipment (WEEE) Directive
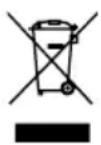
Disposal of your appliance
- When this crossed-out wheeled bin symbol is attached to a product it means the product is covered by the European Directive 2002/96/EC.
- All electrical and electric products should be disposed of separately from the municipal waste steam via designated collection facilities appointed by the government or the local authorities.
- The correct disposal of your old appliance will help prevent potential negative consequences for the environment and human health.
- For more detailed information about disposal of your old appliance, please contact your city office, waste disposal service or the shop where you purchased the product.
Laser Safety Statement
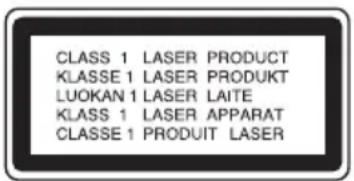
This product employs a Laser System. To ensure proper use of this product, please read the owner's manual carefully and retain it for future reference. Should the unit require maintenance, contact on authorized service centre. Use of controls, adjustments on the performance of procedures other than those specified herein may result in hazardous radiation exposure.
To prevent direct exposure to laser beam, do not try to open the enclosure. Visible laser radiation when opened. DO NOT STARE INTO BEAM.
- Table of Contents
- Supplementary [For Professionals]
- Package Contents
- Names of Product Parts
- Installing the Product Installing LG Network Storage
- Tip
- 4-1. Installing the Program Installing NAS Detector
- 4-2. Installing the Program Using NAS Detector
- 5-1. Setting LG Network Storage Running Web Menu
- 5-2. Setting LG Network Storage
- Adding users.
- Granting Authorities by Folder
- -3. Setting LG Network Storage
- What is DDNS? (Dynamic Domain Name Service)
- ※Caution!
- 6-1. Using Network Storage File Up/Download
- 6-2. Using Network Storage Opening Network Folder
- 6-3. Using Network Storage Connecting to Network Drive
- To Install in PC without Optical Disk Device
- If Cannot Set up an Automatic Router(UPnp Setting) 2-1. When Setting DDNS Setting Port for External Connection(Port Forwarding Setup)
- Check IP of the router
- Log onto the router
- Search for 'Port Forward' setting in the menu explorer and set as above.
- A B
- If Cannot Set up an Automatic Router(UPnp Setting) 2-2. When Setting DDNS Disabling Firewall for a Router(DMZ Setup): Setting a Router
- 2-3. If Cannot Set up an Automatic Router(UPnp Setting) When Setting DDNS Disabling Firewall for a Router(DMZ Setup): How to Disable Firewall for a Router in Each Case(1)
- For Basic Connection
- For Switch Hub
- \*How to Set IP on LCD Screen
- 2-3. Disabling Firewall for a Router(DMZ Setup): How to Disable Firewall for a Router in Each Case(2)
- For 2 Routers
- 3-1. To Install Hard Disk(For a product without a hard disk) To Mount HDD
- 3-2. To Install Hard Disk(For a product without a hard disk) Installation
- Initial Installation of LG Network Storage
- Regulatory Notices
- CAUTION
- Warnings:
- Safety Instructions
- Cautions:
- FCC Notices (U.S. Only)
- REGULATORY INFORMATION: FCC PART 15
- Industry Canada (Canada Only)
- CE Notice (European Union)
- European representative :
- Waste Electrical and Electronic Equipment (WEEE) Directive
- Disposal of your appliance
- Laser Safety Statement
Brand : LG
Model : N4B2ND4
Category : Combo DVD / magnétoscope