
RP4-MZ11 - Air conditioner PAC - Free user manual and instructions
Find the device manual for free RP4-MZ11 PAC in PDF.


| Product Type | Aftermarket Radio Interface / Adapter for Mazda Vehicles |
| Compatible Vehicles | Select Mazda models with MS-CAN radios (e.g., Mazda 3, CX-5, CX-7, CX-9, Miata, RX-8, Mazda 5, Mazda 6) |
| Key Functions | Retains steering wheel controls, OEM LCD clock and vehicle info, BOSE amplifier; provides RAP, VSS, illumination, reverse, parking brake outputs |
| Radio Select Switch | Rotary switch on side must be set to match aftermarket radio brand before installation |
| LED Indicator | Flashes during initialization and when SWC button is pressed; solid when operational |
| Steering Wheel Control (SWC) | Pre-programmed for default functions; customizable via programming button |
| SWC Recalibration | Possible if SWC operation is erratic; re-calibrate using programming button in specified order |
| Clock Setting | Selectable modes via SWC menu for different Mazda models; instructions in manual |
| Vehicle Settings Menu | Access via holding Mode button on SWC; allows text change, clock, display info, user options, amp settings |
| Amplifier Support | BOSE amplifier retained; fader adjustment via interface in premium sound systems |
| Rear Seat Entertainment (RSE) | Supports independent DVD and rear screen; audio via headphones, not through aftermarket radio |
| Firmware Updates | Via PAC-UP interface updater (sold separately); available at www.pac-audio.com/firmware |
| Power Supply | 12V DC from vehicle; accessory output rated 1 amp |
| Wiring Connections | Interface connector includes outputs for P.B., VSS, Acc., 2nd SWC, Reverse, Illumination; vehicle harness for power, ground, speaker inputs |
| Dimensions (Approx.) | 2.5 x 1.5 x 0.75 inches (64 x 38 x 19 mm) |
| Weight (Approx.) | 0.3 lbs (136 g) |
| Installation | Plug-and-play; requires setting radio select switch and making harness connections |
| Maintenance | No user-serviceable parts; keep dry and avoid extreme temperatures |
| Safety | Disconnect vehicle battery before installation; do not exceed electrical ratings |
Frequently Asked Questions - RP4-MZ11 PAC
User questions about RP4-MZ11 PAC
0 question about this device. Answer the ones you know or ask your own.
Ask a new question about this device
Download the instructions for your Air conditioner in PDF format for free! Find your manual RP4-MZ11 - PAC and take your electronic device back in hand. On this page are published all the documents necessary for the use of your device. RP4-MZ11 by PAC.
USER MANUAL RP4-MZ11 PAC
Introduction & Features
The RP4-MZ11 interface allows the replacement of a factory radio in select Mazda vehicles with MS-CAN radios. Using this interface will retain factory features such as steering wheel controls (SWC), programming of the clock on the OEM LCD screen, vehicle information on the OEM LCD screen and the BOSE amplifier when the original radio is removed. The RP4-MZ11 also provides data bus driven outputs such as retained accessory power (RAP), vehicle speed sensor (VSS), illumination, reverse trigger and parking brake.
Important Notes
- The radio select rotary switch on the side of the interface must be adjusted to the proper radio setting before plugging the interface into the vehicle (see below for setting chart).
- If using this interface in a Mazda CX-5, all vehicle settings must be finalized before removing the factory radio.
- When the interface is first plugged into the vehicle the LED will flash indicating that it is initializing. Once initialization is complete the LED will illuminate and should be on at all times when the interface is on.
- The following vehicles will not provide a VSS signal as this information is not on the data bus: RX-8, 2007-2009 CX-9 w/non-nav radio, Miata
- The following vehicles will not provide a reverse output as this information is not on the data bus: RX8, 2007-2009 CX7, 2010 Mazda 5, Miata
- The following vehicles will not provide a parking brake output as this information is not on the data bus: RX-8, Miata
- The following vehicles have a speed based parking brake wire that will provide a negative trigger until the vehicle is going at least 4 mph: 2007-2009 CX-9, 2007-2009 CX-7
- The LED will also flash whenever a SWC button is pressed
- The interface comes pre-programmed for all of the vehicles factory SWC functions and does not require programming unless you wish to re-assign the SWC functions to different buttons. The SWC can always be restored to default settings by pressing and releasing the program button on the side of the interface once and waiting 7 seconds for the LED to flash 4 times.
- The LED will flash whenever a SWC button is pressed.
Wiring Connection Chart Interface Connector
| Red / White P.B. Output (-) |
| Purple / White VSS Output |
| Red Acc. Output (1 amp) |
| Green/ White 2nd SWC Input(Connect to blue wire in vehicle connector in Mazda CX-5, not used in other applications) |
| Green Reverse Output (+) |
| Orange Illumination |
Vehicle Connector
| Yellow Battery +12v | |
| Black Ground | |
| Blue | Antenna On Input(connect to Green/White wire in inter-face connector inthe Mazda CX-5) |
| Orange/White | Illumination |
| White | Front L + input |
| White / Black | Front L - input |
| Grey | Front R + input |
| Grey / Black | Front R - input |
| Green | Rear L + input |
| Green / Black | Rear L - input |
| Purple | Rear R + input |
| Purple / Black | Rear R - input |
SWC Connector
| Blu/Yel | Kenwwod, Newer JVC, OEM or Blaupunkt |
| 3.5mm Jack | Alpine, JVC, Clarion, Pioneer, Sony, Fusion, Valor, Boyo, Dual, Visteon or Advent |
Illustration / Schematic
Wiring
SWC Connection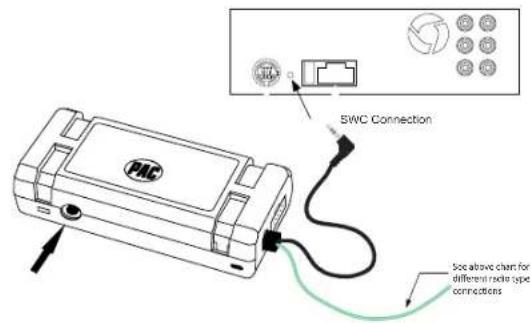
Installation Steps
SET RADIO SELECT SWITCH
| Alpine | Advent, BOYO, Dual, Visteon, Sony | Blaupunkt | Clarion | Fusion | JVC | Kenwood | OEM | Pioneer | Valor |
| 178 | 49236 | 75 |
- The radio select rotary switch on the side of the interface must be adjusted to the proper radio setting before plugging the interface into the vehicle.
- Make all connections as described in the chart on page 1. 2013+ Mazda CX5 - Connect the blue wire in the 24 pin vehicle harness to the green/white wire in the 16-pin RP harness. This is necessary for the Bluetooth SWC to function with the aftermarket radio. This vehicle must also use the orange/white wire in the Interface Connector.
- Connect the SWC wire according to the chart on page 1 (aftermarket radio MUST support a wired remote input).
- If you wish to reassign the SWC buttons to different functions follow the programming instructions in the next section.
Optional Steering Wheel Control Programming
The interface comes pre-programmed for the functions listed in the chart below and does not require programming unless you wish to re-assign the SWC functions to different buttons. The SWC can always be restored to default settings by pressing the program button on the side of the interface once and waiting for the LED to flash four times.
Default SWC Button Assignments
| Alpine | JVC | Kenwood | Clarion | Valor | OEM | Sony/Pioneer | Fusion Blaupunkt | ||
| Volume + | Volume + | Volume + | Volume + | Volume + | Volume + | Volume + | Volume + | Volume + | Volume + |
| Volume - | Volume - | Volume - | Volume - | Volume - | Volume - | Volume - | Volume - | Volume - | Volume - |
| Mode | Source | Source | Source | Source | Source | Source | Source | Source | Source |
| Track + | Track + | Track + | Track + | Search + | Track + | Next | Track + | Track + | Track + |
| Track - | Track - | Track - | Track - | Search - | Track - | Previous | Track - | Track - | Track - |
| Voice/Mute | Mute | Mute | Mute | Mute | Mute | Mute | Mute | Mute | Mute |
| Answer | Receive | Receive | Answer | Send | Cursor + | Answer | Answer | Audio | Disc + |
| End | End | Select | Play | End | OK | Hang Up | Phone Menu | Power | OK |
Optional Steering Wheel Control Programming (Cont)
If you wish to re-assign the SWC functions, the interface must be programmed in the specific order shown in the chart below. If you come across a function in the chart that your steering wheel does not have, or you do not want to program, press and release the program button on the side of the interface to skip that function. The LED will flash off and on confirming that you have successfully skipped that function and are ready to proceed to the next one.
SET RADIO SELECT SWITCH
| Alpine | Advent, BOYO, Dual, Visteon, Sony | Blaupunkt | Clarion | Fusion | JVC | Kenwood | OEM | Pioneer | Valor |
| 1 | 7 | 8 | 4 | 9 | 2 | 3 | 6 | 7 | 5 |
Optional Programming Order
| RadioAlpine | JVC Kenwood | Clarion Valor | CEM | Advent, Boyo, Dual, Visteon, Sony | Pioneer Bla | Jpunkt Fusion | ||||
| 1 | Volume + | Volume + | Volume + | Volume + | Volume + | Volume + | Volume + | Volume + | Volume + | Volume + |
| 2 | Volume - | Volume - | Volume - | Volume - | Volume - | Volume - | Volume - | Volume - | Volume - | Volume - |
| 3 | Mute | Mute | Mute | Mute | Mute | Mute | Mute | Mute | Mute | Mute |
| 4 | Preset + | Source | Source | Source | Source | Source | Preset + | Preset + | Source | Source |
| 5 | Preset - | Track + | Play | Search + | Track + | Next | Preset - | Preset - | Track + | Track + |
| 6 | Source | Track - | Track + | Search - | Track - | Previous | Source | Source | Track - | Track - |
| 7 | Track + | Band/Disc + | Track - | Band | Up Cursor | Play/Ok | Track + | Track + | Disc + | Audio |
| 8 | Track - | Preset/Disc - | Disc/FM + | Send/End | Down Cursor | Band | Track - | Track - | Disc - | Power |
| 9 | Power | Select | Disc/AM - | Send | Ok | Up Cursor | Band | Band | Ok | |
| 10 | Enter/Play | Attenuation | Answer | End | Down Cursor | Phone Menu | ||||
| 11 | Band/Program | Phone Receive | BT Answer | Answer Call | ||||||
| 12 | Receive | Phone Reject | BT Hangup | End Call | ||||||
| 13 | End | Voice Dial | Voice Activation | |||||||
| 14 | Power | |||||||||
Optional Steering Wheel Control Programming (cont.)
Step A.
Turn the vehicle ignition to the ON position.

Step B.
Press and hold the programming button.

LED will turn off.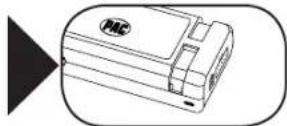
Step C.
Release the programming button.

Step D.
Within 7 seconds, press and release the button that is to be learned on the steering wheel.


The LED will turn off during this process.
Step E.
Release the button.



The LED will turn back on.
Step F.
If you need to program more buttons, repeat steps D & E for each additional function on the steering wheel.
Program remaining buttons

Step G.
After all buttons are programmed


Once programming is
completed, wait 7 seconds.
The LED will flash four times indicating the end of programming.
Testing & Verification
- Turn the ignition on. The LED on the interface will turn on & the +12v accessory wire will turn on.
- Turn on the radio & check balance & fade. Note: Premium Factory amplified Systems fader must be adjusted through the RP interface. See vehicle Settings menu below.
- Verify that the factory subwoofer (if present) is playing
- Verify that all SWC are functioning properly. If not all SWC are functioning properly, you need to re-calibrate the SWC buttons because the analog SWC are falling outside of the pre-programmed values. Please see page 7 for instructions on how to re-calibrate the SWC.
- Turn off vehicle & remove key. RAP will be active & keep the radio on for 10 minutes or until the driver's door is opened.
- The LED & radio will turn off when RAP turns off or the driver's door is opened.
Accessing Vehicle Settings (vehicles equipped with OEM LCD)
To access the vehicle setting menu, press and hold the Mode button on the SWC until "Setup Menu" is displayed on the LCD screen. Use the Arrow Down on the SWC to scroll through the options. Once the option you wish to select is displayed, press the Mode button on the SWC to advance to the next step. Follow the instructions listed below under each option to make changes.
Change Text - Allows you to enter custom text for the LCD screen's default display. Once this is selected, you can use the Volume Up & Down buttons to select the character position and the Arrow Up & Down buttons to select the character. Once you have set your custom text, do not press any buttons for 8 seconds and the programming function will time out and return to the default display.
Set Clock - Allows you to set the clock on the LCD screen. Once this is selected, you can use the Arrow Down button on the SWC to choose a clock set mode. Please find your vehicle in the chart below to determine which mode you will select. Once your mode is displayed, press the Mode button on the SWC to select. Follow the instructions on the LCD screen or in the chart below to set the clock.
PLEASE NOTE: Choosing the wrong clock set mode may cause erratic LCD screen behavior. If you choose the wrong mode, you will need to wait for the programming function to time out and start over. It may take up to one minute for the programming function to time out in clock set mode.
| Clock Set Mode | Vehicle | Clock Set Instructions |
| Mode 12009+ Mazda 62010+ CX-72009+ CX-9 | Choose Clock Set from the menu and follow the instructions on the LCD screen. | |
| Mode 2 | 2007-2009 CX-72004-2009 Mazda 3 | 1. Press and hold the Mode button on the SWC to start.2. Use the up & down arrows to select between 12 or 24 hour.3. Press the Mode button again to advance to hours.4. Use the up arrow to select the hour.5. Press the Mode button again to advance to minutes.6. Use the up arrow to select the minute.7. Press the Mode button again to exit. |
| 2009+ CX-9 & Mazda 6 with Mid-Line Radio | 1. Press and hold the Mode button on the SWC for 8 seconds to start.2. The vehicle info screen which switch to the next option3. At this point you can press the Mode button to scroll the vehicle info options (press and hold mode to reset option)or4. Use Volume Up on the SWC to select the hour.5. Use Arrow Up on the SWC to select the minute.7. When you are finished do not press any buttons for 8 seconds and the programming function will time out and return to the default display. | |
Display Info - Allows you to change vehicle info display such as MPG, miles to empty, etc. Once this is selected, follow the instructions on the LCD screen to change the vehicle info display. Once on the desired display, do not press any buttons for 8 seconds and the programming function will time out and return to the default display.
User Options - Allows you to turn off SWC text or reset options to default. SWC text shows you on the LCD screen which button you are pressing on the SWC. Resetting options to default will set the custom text back to audio and, if equipped, set the Bose amp settings back to zero. Once this is selected, you can use the Arrow Down & Up buttons on the SWC to scroll between SWC Text or Reset. To select either of these, press the Mode button. Follow the instructions on the LCD screen for each individual selection.
Amp Settings - Allows you to turn Center Point off/on (when available). Allows you to adjust Center Point gain, fader, and amp gain. This feature will only be seen in 2007+ CX-7 & CX-9.
Exit - Allows you to exit the menu and return to the default display
Rear Seat Entertainment (RSE); If equipped
The RP4-MZ11 will allow the DVD player and rear screen to function independently from the new radio. A/V will be passed from the factory DVD player to the rear screen and audio can be heard through the headphones. A/V cannot be passed from the factory DVD player to the aftermarket head unit.
SWC Recalibration
SWC re-calibration is necessary when the SWC operation is erratic or non-existent. This process re-calibrates the SWC values to the RP4 interface so it will know what they can be set to for button function assignment. The interface must be programmed in the specific order shown in the chart below. If you come across a function in the chart that your steering wheel does not have you MUST press and release the program button on the side of the interface to skip that function. The LED will flash off and on confirming that you have successfully skipped that function and are ready to proceed to the next one.
The SWC and radio command assignments can always be restored to default values by entering re-calibration mode (Steps A-C) and not pressing any buttons. After 7 seconds the re-calibration mode will time out and all default values will be restored.
Step A.
Turn the vehicle ignition to the ON position.

Step B.
Press and hold the programming button for 7 seconds

LED will begin flashing
Step C.
Release the programming button.

Step D.
Within 7 seconds, press and release the button that is to be learned on the steering wheel.


The LED will turn off during this process.
Step E.
Release the button.
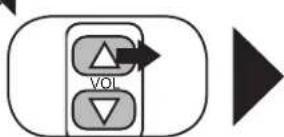

The LED will turn back on.
Step F.
If you need to program more buttons, repeat steps D & E for each additional function on the steering wheel.
Program remaining buttons

Step G.
After all buttons are programmed

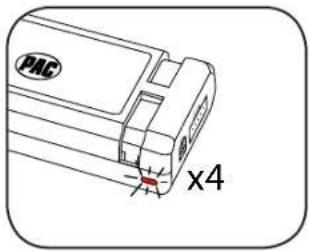
Once programming is completed, wait 7 seconds. The LED will flash four times indicating the end of programming.
| Button Programming Order |
| VolumeUp |
| VolumeDown |
| TrackUp |
| TrackDown |
| Mode |
| Mute |
| Voice |
| Phone Hang Up |
| Phone Answer |
After you have re-calibrated the SWC buttons, the default SWC button assignments will be the same as what is listed in the chart on page 3. If you wish to re-assign button functions you must also go through the programming process on page 4.
Product Updates (Firmware)
The RP4-MZ11 can be updated with new firmware as it becomes available using the PAC-UP interface updater (sold separately). Please visit www.pac-audio.com/firmware for available updates.
- INTRODUCTION & FEATURES
- IMPORTANT NOTES
- ILLUSTRATION / SCHEMATIC
- INSTALLATION STEPS
- OPTIONAL STEERING WHEEL CONTROL PROGRAMMING
- OPTIONAL STEERING WHEEL CONTROL PROGRAMMING (CONT)
- OPTIONAL STEERING WHEEL CONTROL PROGRAMMING (CONT.)
- STEP A
- STEP B
- STEP C
- STEP D
- STEP E
- STEP F
- STEP G
- TESTING & VERIFICATION
- ACCESSING VEHICLE SETTINGS (VEHICLES EQUIPPED WITH OEM LCD)
- REAR SEAT ENTERTAINMENT (RSE); IF EQUIPPED
- SWC RECALIBRATION
- PRODUCT UPDATES (FIRMWARE)
Brand : PAC
Model : RP4-MZ11
Category : Air conditioner