
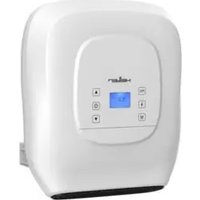
HCFWF11 - Heating Heller - Free user manual and instructions
Find the device manual for free HCFWF11 Heller in PDF.


| Product Type | Oil-filled radiator with 11 fins |
| Model | HCFWF11 |
| Power Supply | 220-240V~, 50/60Hz |
| Power Consumption | 2000W - 2400W |
| Number of Fins | 11 |
| Temperature Range | 13°C to 30°C |
| Power Levels | 3 (Low, Medium, High) + Continuous run |
| WiFi Connectivity | Yes (2.4 GHz only, via GAFSmartLife app) |
| Safety Features | Tip-over switch, overheat protection, overheat cutoff |
| Timer Function | Auto-on and auto-off timer (1-24 hours) |
| Control Type | Electronic digital controls with LCD display |
| Cleaning Instructions | Unplug, allow to cool, wipe with damp cloth; do not immerse in liquid |
| Placement Requirements | Indoor use only, not in bathrooms, min distance 50 cm from sides, 120 cm from front, room area >4 m² |
| Oil Type | Precise quantity of special oil (non-replaceable by user) |
| Warranty | Refer to purchase receipt and warranty card |
Frequently Asked Questions - HCFWF11 Heller
User questions about HCFWF11 Heller
0 question about this device. Answer the ones you know or ask your own.
Ask a new question about this device
Download the instructions for your Heating in PDF format for free! Find your manual HCFWF11 - Heller and take your electronic device back in hand. On this page are published all the documents necessary for the use of your device. HCFWF11 by Heller.
USER MANUAL HCFWF11 Heller
Read the instruction manual carefully before use and retain these instructions for reference
IMPORTANT
Read and follow the instructions in this user manual even if you feel you are familiar with the appliance and find a place to keep it handy for future reference.
For your convenience record the complete model number (located on the appliance identification plate) and the date you received the product, together with your purchase receipt and attach to the warranty and service information. Retain in the event that warranty service is required.
NOTE: The rating of this product (as marked on the appliance identification plate) is based on specific loading tests. Normal use or the use of other recommended attachments may draw significantly less power.
IMPORTANT SAFEGUARDS
CAUTION: FAILURE TO FOLLOW THESE INSTRUCTIONS MAY CAUSE INJURY AND/ OR DAMAGE AND MAY INVALIDATE YOUR WARRANTY
When using electrical appliances, in order to reduce the risk of fire, electric shock, and/or injury to persons, basic safety precautions should always be followed, including:
For Your Safety
Read all instructions carefully, even if you feel you are quite familiar with the appliance.
- This heater is hot when in use. To avoid burns, do not let bare skin touch hot surfaces. Let the heater cool before moving. Keep combustible materials such as furniture, pillows, bedding, papers, clothes and curtains at least 30cm from sides of the heater. Do not drape laundry or any other items over the heater.
- The appliance is not intended for use by young children or infirm persons without supervision.
- Young children should be supervised to ensure that they do not play with the appliance.
• Always unplug the heater when not in use. - Do not operate any heater with a damaged cord or plug, or after the heater malfunctions, has been dropped or is damaged in any manner. Return the heater to an authorised service facility for examination.
- Do not use the heater outdoors.
- This heater is not intended for use in bathrooms, laundry areas or similar moist indoor locations. Never locate the heater where it may fall into a bathtub or other water container. Do not use this heater in the immediate surroundings of a bath, a shower or a swimming pool.
- Do not run the power cord under carpeting or cover the cord with throw rugs, runners or the like. Arrange the cord away from traffic areas and where it will not be tripped over. Do not place the cord over any part of the heater.
- Do not plug this heater into an extension on lead, double adaptor or power board.
- To disconnect the heater, set controls to OFF then remove the plug from the outlet.
- Do not insert or allow foreign objects to enter any ventilation or exhaust opening as this may cause an electric shock, fire or could damage the heater.
- This heater has hot electrical parts inside. DO NOT use it in areas where gasoline, paint or flammable liquids are used or stored.
- Use the heater only as described in this booklet. Any other use not recommended by the manufacturer may cause fire, electric shock or injury to persons.
- Fully remove the power cord from the cord tidy before use. Always uncoil the power cord before applying power.
- Do not operate the radiator with damaged cord or plug, or after the product malfunctions, or is dropped or appears damaged in any way. Do not tamper with radiator or attempt to open the end panels. Return the complete unit to the place of purchase for inspection, repair or replacement.
- Use the radiator only in the upright position. The heater must not be located immediately below a socket-outlet. Do not immerse in liquid when cleaning.
- Keep the radiator away from flammable liquids and gases.
- Keep the radiator away from wet areas. Do not use this heater in the immediate surroundings of a bag, a shower or a swimming pool.
- In order to avoid overheating, DO NOT cover the heater/ Do not use it to dry clothes.
- Always keep the radiator well away from curtain, furniture and flammable materials. Always ensure there is an unrestricted airflow around the radiator.
• Always disconnect the plug form the wall socket when the radiator is not in use.
- Do not position the radiator immediately below a socket outlet.
- Do not leave the heater running unattended.
- Do not use the appliance other than its intended use.
- Do not immerse or expose the product or flexible cord to rain, moisture or any other liquid.
- Switch off and unplug from the outlet when the heater is not in use and before cleaning.
• Always allow the unit to cool down first before cleaning or storing it away.
- Do not immerse or expose the product or flexible cord to rain, moisture or any other liquid.
- Switch off and unplug from outlet when the product is not in use and before cleaning. Always allow the unit to cool down first before cleaning or storing it away.
- To avoid personal injuries or property damage, do not insert any body parts (e.g. finder) or objects through the air inlet or outlet openings when the heater is operating.
• This product is intended for normal domestic/household use only.
• Always disconnect the heater when moving it from one location to another.
- The use of attachments or accessories not recommended or sold by the product distributor may cause personal or property hazards or injuries.
- The surfaces of the heater are very hot during operation. Avoid contact with the wind outlet. Use handles and knobs if necessary.
- Do not twist or wrap the power cord around the appliance as this may cause the insulation to weaken and split, particularly where it enters the unit.
- Use of an extension cord is not recommended. However, if it is necessary ensure the cord is short as possible (long cords coiled up can overheat and cause tripping accidents).
- Do not use the appliance on the same socket or electric circuit with other electrical appliances so as to prevent the circuit from being overloaded, which will cause fire. Please do not prolong the power cords by yourself or use movable socket.
- Ensure the cord is fully extended before use and accommodate it so that it is not in touch with any part of the heater.
- Do not use the heater in areas such as garages where petrol or other flammable substances are used or stored. Do not use the heater when flammable sprays, solvents and glues are in use.
- Keep combustible materials such as furniture, pillows, bedding, clothes and curtains at least 50cm from sides of heater.
- Ensure heater is not blocked and there are spacing of at least 50cm around its sides and 120cm from the front or heat outlet.
- Avoid touching the heater body whilst the heater is on. Do not move the appliance while it is functioning in order to avoid overheating with the additional risk of fire.
- Do not use the heater to dry your laundry. Never obstruct the intake and outlet grilles (danger of overheating).
- When the appliance is used in portable version, do not place it up against the walls, furniture, curtains, etc.
- The appliance must not be positioned directly underneath a fixed power point.
- Do not use the appliance while it is cooling down, in order to avoid overheating with the attendant risk of fire.
- Do not use the appliance in rooms less than 4m^2 area.
• CAUTION: Surfaces are hot during use. Please use handle or knob.
- The installation of a residual current device (safety switch) is recommended to provide additional safety protection when using electrical appliances. It is advisable that a safety switch with a rated residual operating current not exceeding 30mA be installed in the electrical circuit supplying the appliance. See your electrician for professional advice.
• This product must always be used AND STORED in the upright position.
- The heater must not be located immediately below a socket outlet.
COMPULSORY WARNING
This heater is filled with a precise quantity of oil. Repairs requiring the opening of the oil container are only to be conducted by the manufacturer or a qualified service agent who should be contacted if there is an oil leakage.
Disposal of the oil should be in accordance with local regulations. You should contact your local council to determine the correct procedure.
If the supply cord is damaged it must be replaced by the manufacturer or its service agent or a similarly qualified person to avoid a hazard. This product has not been designed for any uses other than those specified in this booklet.
SPECIFICATIONS
| Model | HCFWF11 |
| Product Description | Oil Heater 11FIN with WIFI |
| Voltage | 220-240V~ |
| Frequency | 50/60Hz |
| Power | 2000W-2400W |
INSTALLATION & LOCATION
The appliance requires no installation; it should be used solely as a portable appliance.
NOTE: Portable appliances are not suitable for use in a bathroom. The Appliance should be placed with a minimum distance of 1 meter away from flammable objects (e.g. curtains), walls or other structures.
INSTALLATION & LOCATION
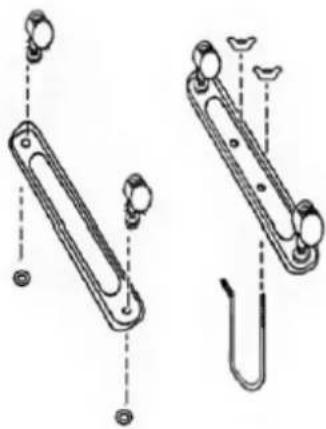
- Fix the wheels in the brackets with the screw. Refer to Fig. 1.
Turn the radiator upside down. Place the castors between the last two panels on either end. Face the wheels up towards you and attach by means of the U-bolt and wing nuts supplied. Slide the U-bolt under the radiator frame and attach to the castor brackets. Refer to figs 2 and 3.
- Turn the radiator upright before switching on.
natural_image
Technical line drawing of two mechanical components with mounting holes and a curved hook (no text or symbols)Fig. 1
Fig. 2

natural_image
Technical line drawing of a multi-stage heat exchanger or cooling unit with cooling fins and valves (no text or labels)Fig. 3
OPERATION
This heater is equipped with Electronic Digital Controls that provide the ability to set the temperature to the exact degree desired.
To operate, simply follow these instructions.
NOTE: The temperature display will not reflect the accurate room temperature until the heater has been operating for at least 20 minutes.
- Turn on Power Switch, Press the power button once to start the heater on High Power ( ), Continuous Run. If left at this setting, the unit will run continuously on High Power and will not shut off until the unit is manually turned off or the room temperature over 30°C.
- Press the power button again to change to Middle Power (11), Continuous Run. If left at this setting, the unit will run continuously on Middle Power and will not shut off until the unit is manually turned off or the room temperature over 30°C.
- Press the power button again to change to Lower Power (2), Continuous Run. If left at this setting, the unit will run continuously on Lower Power and will not shut off until the unit is manually turned off or the room temperature over 30^ C.
- Press the power button a fourth time to turn the heater OFF. The heater will run continuously if no temperature setting is selected. If it operated at the Low setting, the heater would not provide as much heat output as in the High Setting. However, the Low setting will not require as much electrical current to operate. To avoid overloading a circuit, do not plug the heater into a circuit that already has other appliances working.
Set Temperature

Press the switch ⏻ button, the heater enters standby mode,
By now, if the ambient temperature was below 4 °C , the heater can automatically start heating function.
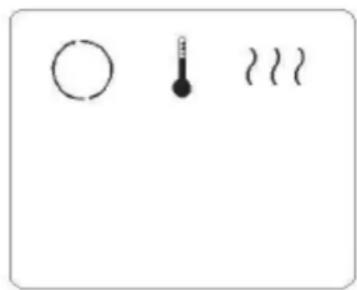
- Press the switch ⏻ button, the heater enters standby mode, the screen blinks at 1 second interval.

natural_image
Simple diagram with three symbols: a circle, a thermometer, and wavy lines (no text or labels)- Then press the "MODE" button, the heater enters heating status. The screen blinks at 1second interval.


- Press the "+" or "-" button to set the desired temperature, from 13 to 30^ C .
- For example, press "+" one time to set temperature to be 25^ .

- For example, press “-” one time to set temperature to be 23°C.

- Then press "MODE" again, the heater enters into "SET TIMER (AUTO-OFF)" status

-
To press "+" or "-" button to set the heater operation time between 1 and 24 hours. This function
• will activate once the timer icon stops blinking.
• The heater will automatically turn-off when time runs out.
• If it was set to be 10 hours, the heater will stop heating after 10 hours. -
Then press "MODE" again, the heater enters into "SET TIMER (AUTO-ON)" status.

To press “+” or “-” button to set the heater operation time between 1 and 24 hours. This function will activate once the timer icon stops blinking.
The heater will automatically turn-on when time runs out.
If it was set to be 1 hour, the heater will start heating after 1 hour.
-
After all, press "MODE" again, the heater will be back to STEP 2 status.
-
Under STEP 2 status, the heater is heating with POWER III.
Now, press ⏻ once, the heater will heat with POWER II;
OR press ⏻ twice, the heater will heat with POWER I;
OR press (1) three times, the heater will be POWER OFF.
Following are the status of Screen under Heating Power with III, II and I.

|||

||

|
When first turned on using the switch on the rear of the unit, the WIFI sign indicator will flash rapidly, showing that the unit is in Quick connection mode, and ready to set up.
Please ensure your device is in the correct Wi-Fi connection mode for the connection type you are attempting, the flashing of the power indicator on your heater will indicate this.
TURNING WIFI OFF
With the appliance in standby mode (Power switch on, but turned off), Press and hold the ON/OFF Button for 3 seconds. The unit will bleep, and the Light button will go out.
TURNING WIFI ON
Turn the appliance off using the switch. Leave turned off for 10 seconds before returning the switch to the on position. After a few seconds, the Power indicator will start to quickly flash to indicate the unit is in Quick connection mode.
WIFI CONNECTION
Download the" GAFSmartLife" App from your app store or scan the QR code in in the back of the Instruction Manual.
After registering, please do as the following steps:
- Open app and press "+" to add device or use the add device button.
- Select the type of device as "Heater" within the Home Appliance tab.
- Press on the AP mode button in the top right of the screen.
- Ensure the Ambient Light indicator on the heater is slowly flashing (once per second), then press on the orange button at the bottom of the screen to confirm.
- Enter your Wi-Fi password and press confirm.
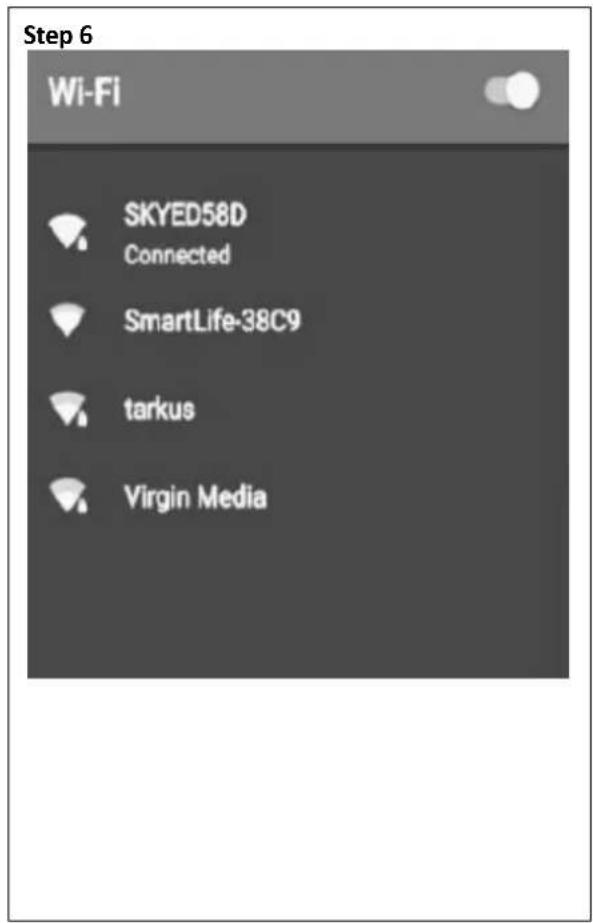
- Go to network settings in your phone and connect to the "Smart Life xxx" connection. There is no password to enter. Then return to the app to complete setup.
Step 1

Step 2


pie
Step 4 | Category | Value (%) | |---|---| | Connecting Now | 8 | ● Searching for Device ○ Registering device to the cloud ● Initializing your Device
THE HOME SCREEN
The Home screen will be the following showing in the APP after connecting to the WIFI successfully.
The device screen is the main control screen for the heater, providing access to the controls to amend the functions and settings.
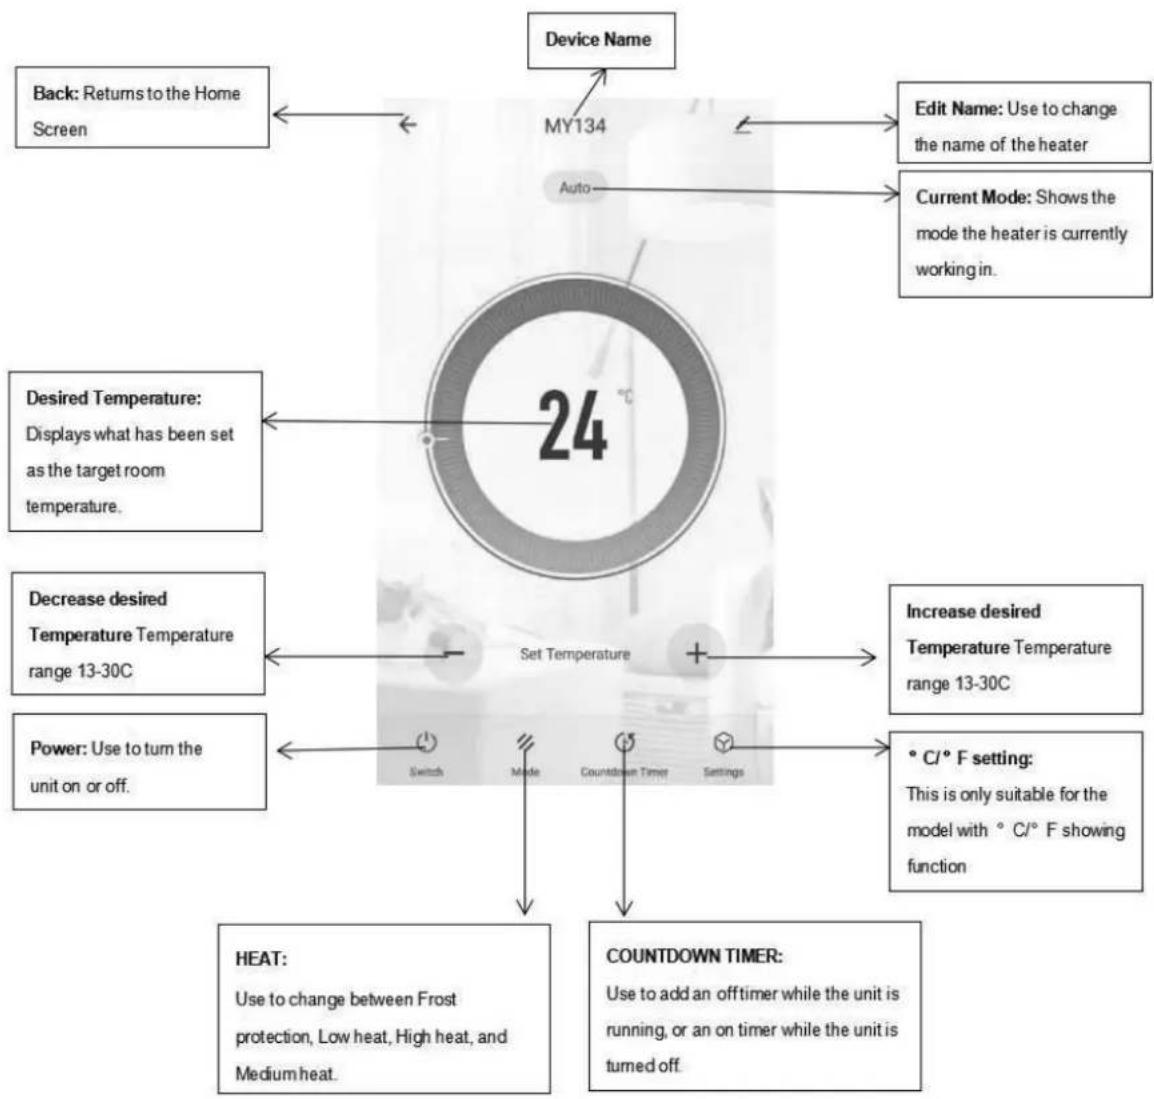
flowchart
graph TD
    A["Device Name"] --> B["Back: Returns to the Home Screen"]
    A --> C["Edit Name: Use to change the name of the heater"]
    A --> D["Current Mode: Shows the mode the heater is currently working in."]
    E["24°C"] --> F["Desired Temperature: Displays what has been set as the target room temperature."]
    E --> G["Decrease desired Temperature Temperature range 13-30C"]
    E --> H["Power: Use to turn the unit on or off."]
    E --> I["HEAT: Use to change between Frost protection, Low heat, High heat, and Medium heat."]
    E --> J["COUNTDOWN TIMER: Use to add an offtimer while the unit is running, or an on timer while the unit is turned off."]
    K["Set Temperature"] --> L["Switch"]
    K --> M["Mode"]
    K --> N["Countdown Timer"]
    K --> O["Settings"]
    P["Increase desired Temperature Temperature range 13-30C"] --> Q["° C/° F setting: This is only suitable for the model with ° C/° F showing function"]
NOTE: Due to continuous development of the app, the layout and available features may be subject to change.
SMART SCENES
Smart Scenes is a powerful tool providing the option to customize the operation of the air heater based both on conditions within the room and outside influences. This gives the user the option of specifying much more intelligent actions. These are split into two categories Scene and Automation.
SCENE
Scene allows for a one touch button to be added to the Home Screen. The button can be used to change several settings in one go and can change all the settings within the unit. Several scenes can easily be setup, allowing the user to easily change between several preset configurations.
Below is an example of how to set up a scene:


Important: Once all the functions required have been added, press the Save button in the top right corner to finalize and save your new Scene. It will then be saved to the home screen.
AUTOMATION
Automation allows an automatic action to be set up for the device. This can be triggered by the Time, and a range of other influences, depending what other GAF Smart Life enabled devices you have on the network.
The following is an example for your reference:

The following is function example for reference, and this will be different depending what other GAF Smart Life enabled devices you have on the network.

PROFILE TAB
The profile tab gives you the option to edit both your detail and use the added features of the unit.
HOME MANAGEMENT
Home Management proves options for managing your GAF Smart Life account, giving options such as adding a home, adding and removing rooms, and sharing devices with family.
MESSAGE CENTRE
View notifications from devices if alarms are set up (dependent on device).
TROUBLESHOOTING
- Check whether the device is powered on and is in the correct Wi-Fi connection mode, if not please refer to the CHANGING BETWEEN CONNECTION MODES section.
- Ensure the Wi-Fi password has been entered into the app correctly (Case sensitive)
- Check that the phone is connected to the Wi-Fi you are connecting the device to.
- Ensure the network you are connecting it to is 2.4Ghz (5Ghz Wi-Fi networks are not supported), and that there is a strong Wi-Fi signal to the item.
- If your router is dual band, ensure that the 2.4ghz network has a different network name (SSID). Further advice on changing router settings will be available from your Internet service provider / Router manufacturer.
- Check the settings on the router. Encryption should be WPA2-PSK and authorization type should be set to AES.
• Try using the alternative connection method.

TIP OVER SWITCH
This radiator is fitted with a safety tip-over which will disconnect the power to the element if the heater is knocked over. If this should occur, the heater should be put upright in the correct position, switched off and allowed to rest for approximately 10mins before being switched on again.
HINTS & TIPS
- Do not overheat your home, in winter the temperature of a heated room should be between 18-21°C
- Choose the right size heater for the room that you wish to heat.
• Zone off the unoccupied rooms by closing doors, and curtains to limit heat loss. - Use draft stoppers where possible, to keep the cold air from filtering in under doors.
- Avoid placing items or sitting too close to the heater for optimal air flow.
CLEANING & MAINTENANCE
The heater requires regular cleaning to ensure trouble free operation:
• Unplug the heater from the mains supply before cleaning.
- Ensure that the heater has been allowed to cool before cleaning.
• Use a damp cloth (not wet) to wipe the exterior of the heater to remove dust and dirt.
- Do not allow any water or other liquid to enter the housing or control panel.
- Ensure the heater is dry before plugging back into the mains supply.
CAUTION: Do not use harsh detergents, chemical cleaners or solvents as they may damage the surface finish of the heater.
WARNING: In order to avoid overheating, do not cover the heater.
Fabric, clothing or other flammable materials may ignite if placed against or near the heater. No flammable materials should be placed within 120cm of the front or heat outlet and 50cm of sides or rear of the heater. Do not cover the heater. This appliance is for indoor use only. Do not use outdoors.
IMPORTANT NOTE
This heater is filled with a precise quantity of special oil. Repairs requiring opening of the oil container are only to be made by the manufacturer or his service agent who should be contacted if there is an oil leak. When disposing of the heater, follow the regulations concerning the disposal of oil.
If the supply cord is damaged, it must be replaced by the manufacturer, its service agent or similarly qualified persons in order to avoid a hazard.
ENVIRONMENT FRIENDLY DISPOSAL

This marking indicates that this product should not be disposed of with other household waste. To prevent possible harm to the environment or human health from uncontrolled waste disposal, recycle it responsibly to promote the sustainable re-use of material resources. To dispose of your appliance correctly, please contact or take it to your local refuse/ recycling centre. Alternatively, contact your local council or information on your local re-use centre. Please make this product environmentally sale for recycling.
CUSTOMER SERVICE
Australian Customer Service
GAF Control (Sales) Pty Ltd
P.O Box 19
Altona North Victoria 3025
Phone: 1300 659 489
Hours: 9am-5pm (EST) Mon-Fri
www.gafcontrol.com.au
*This product may vary slightly to the product illustrated due to ongoing product development.
- IMPORTANT
- IMPORTANT SAFEGUARDS
- CAUTION: FAILURE TO FOLLOW THESE INSTRUCTIONS MAY CAUSE INJURY AND/ OR DAMAGE AND MAY INVALIDATE YOUR WARRANTY
- COMPULSORY WARNING
- SPECIFICATIONS
- INSTALLATION & LOCATION
- OPERATION
- TURNING WIFI OFF
- TURNING WIFI ON
- WIFI CONNECTION
- THE HOME SCREEN
- SMART SCENES
- SCENE
- AUTOMATION
- PROFILE TAB
- HOME MANAGEMENT
- MESSAGE CENTRE
- TROUBLESHOOTING
- TIP OVER SWITCH
- HINTS & TIPS
- CLEANING & MAINTENANCE
- WARNING: In order to avoid overheating, do not cover the heater.
- IMPORTANT NOTE
- ENVIRONMENT FRIENDLY DISPOSAL
- CUSTOMER SERVICE
Brand : Heller
Model : HCFWF11
Category : Heating