
GCO1CN - Gas detector FIRST ALERT - Free user manual and instructions
Find the device manual for free GCO1CN FIRST ALERT in PDF.


| Product Type | Combination Explosive Gas and Carbon Monoxide Alarm |
| Model Number | GCO1CN |
| Brand | First Alert |
| Power Source | 120V AC, 60 Hz, 0.25 A with 9V alkaline battery backup |
| Detected Gases | Natural Gas (Methane), Propane (LPG), Carbon Monoxide (CO) |
| Alarm Loudness | 85 dB minimum at 10 feet (3 meters) |
| Display | Digital display showing gas type, CO ppm, battery status, error codes |
| Test/Silence Button | Manual and remote control (IR via TV remote) |
| Peak CO Memory | Records highest CO level; can be cleared |
| Installation Options | Direct plug or wall mount with power cord |
| Recommended Mounting Height | 6-12 inches from ceiling for natural gas; near floor for propane |
| Operating Temperature | 40°F to 100°F (4°C to 38°C) |
| Battery Backup | 1 x 9V alkaline battery (e.g., Duracell MN1604, Energizer 522) |
| Warranty | 5-year limited warranty |
| Certifications | UL listed (UL 1484 for explosive gas, UL 2034 for CO) |
| Self-Diagnostics | Yes; alerts for malfunction and end-of-life (5 years) |
| Low Battery Warning | Chirps once per minute; can be silenced for 8 hours |
| Maintenance | Test weekly; clean monthly with vacuum; replace battery when low |
| Regulatory Compliance | For residential use only |
Frequently Asked Questions - GCO1CN FIRST ALERT
User questions about GCO1CN FIRST ALERT
0 question about this device. Answer the ones you know or ask your own.
Ask a new question about this device
Download the instructions for your Gas detector in PDF format for free! Find your manual GCO1CN - FIRST ALERT and take your electronic device back in hand. On this page are published all the documents necessary for the use of your device. GCO1CN by FIRST ALERT.
USER MANUAL GCO1CN FIRST ALERT
natural_image
Line drawing of a car front panel with vent slots and control buttons (no text or symbols)120VAC \~ 60Hz, 0.25 A
IMPORTANT! PLEASE READ CAREFULLY AND SAVE.
This unit was shipped with a user's manual that contains important information about its operation. If you are installing this unit for use by others, you must leave this manual—or a copy of it—with the end user.
Printed in Mexico M08-0123-002 Q 01/08
LISTED TO UL 1484 AND UL 2034 Model GCO1
© 2008 BRK Brands, Inc., a Jarden Corporation company (NYSE: JAH) 3901 Liberty Street Road, Aurora, IL 60504-8122 All rights reserved. Consumer Affairs: (800) 323-9005 www.brkelectronics.com • www.firstalert.com
BASIC SAFETY INFORMATION
IMPORTANT!
- Dangers, Warnings, and Cautions alert you to important operating instructions or to potentially hazardous situations. Pay special attention to these items.
A CAUTION!
- This combination Explosive Gas/Carbon Monoxide Alarm has two separate alarms. The CO Alarm is not designed to detect fire or any other gas. It will only indicate the presence of carbon monoxide gas at the sensor. Carbon monoxide gas may be present in other areas. The Explosive Gas Alarm will only indicate the presence of explosive gas that reaches the sensor. The Explosive Gas Alarm is not designed to sense smoke, heat or flames.
- Do not stand too close to the unit when the alarm is sounding. It is loud to wake you in an emergency. Exposure to the horn at close range may harm your hearing.
- Do not paint over the unit. Paint may clog the openings to the sensing chambers and prevent the unit from operating properly.
⚠ WARNING!
- This unit must be powered by a 24-hour circuit. Be sure the circuit cannot be turned off by a switch, dimmer, or ground fault circuit interrupter. Failure to connect this unit to a 24-hour circuit may prevent it from providing constant protection.
- This Alarm must have AC or battery power to operate. If AC power fails and the battery is dead or missing, the alarm cannot operate.
- The Alarm will check for the presence of explosive gas at the sensor less frequently when powered by the back-up battery. Explosive gas could be present during the period between checks without going into alarm, especially during a condition that results in a rapid buildup of explosive gas.
- Test the Alarm once a week. If the Alarm ever fails to test correctly, have it replaced immediately! If the Alarm is not working properly, it cannot alert you to a problem.
- This combination Carbon Monoxide and Explosive Gas Alarm is intended for residential use and is not suitable for use in hazardous locations as defined in the National Electrical Code.
- This product is intended for use in ordinary indoor locations of family living units. It is not designed to measure CO levels in compliance with Occupational Safety and Health Administration (OSHA) commercial or industrial standards. Individuals with medical conditions that may make them more sensitive to carbon monoxide may consider using warning devices which provide audible and visual signals for carbon monoxide concentrations under 30 ppm. For additional information on carbon monoxide and your medical condition contact your physician.
TABLE OF CONTENTS
Basic Safety Information....1
Installation 1-3 Where To Install This Alarm 1-2
Where This Alarm Should Not Be Installed .....2
Before You Begin Installation 2
How To Install This Gas/CO Alarm 2-3
How Your Alarm Works ....3
If Your Gas/CO Alarm Sounds ....3-4
What To Do if CO is Detected 3
What To Do if Explosive Gas is Detected ....3
Using the Silence Feature ....3
Using the Remote Control Test/Silence Feature ....3
Using the Peak CO Memory 4
Understanding the Light, Horn, and Display Patterns ....4
Weekly Testing 5
Regular Maintenance ....5
What You Need To Know About CO 5-6
What is CO? 5
Symptoms of CO Poisoning 5
Finding the Source of CO After an Alarm ....5
Potential Sources of CO in the Home ....5
How Can I Protect My Family From CO Poisoning? ....6
Regulatory Information For Explosive Gas/CO Alarms 6
Regulatory Information for CO Alarms 6
Regulatory Information for Explosive Gas Alarms 6
General Limitations Of Explosive Gas/CO Alarms 6
Troubleshooting Guide ....7
Limited Warranty 7
INSTALLATION
WHERE TO INSTALL THIS ALARM
For Gas Alarms, mounting depends on the type of explosive gas you intend to detect.
Natural Gas (methane) is typically supplied through a main utility line connected to your home. If you do not live in a rural area you are likely to be a user of natural gas. Natural gas is a fossil fuel consisting mainly of Methane. Methane is much lighter than air and will rise rapidly in air. If you are a user of natural gas, the Alarm should be mounted between 6 and 12 inches (152mm and 305 mm) away from the ceiling (using cord feature) to ensure the earliest opportunity to detect a leak.
Propane is typically supplied to homes by delivery truck in liquid form and stored near the home in propane tanks. Propane is used by homes in rural areas that do not have natural gas service. Since propane is the most commonly used Liquefied Petroleum Gas (LPG), propane and LP-Gas are often used synonymously. Unlike natural gas, propane is heavier than air and will collect at lower levels. If you are a user of propane, the Alarm should be mounted near the floor (using the direct plug-in feature) to ensure the earliest opportunity to detect a leak.
Both propane and natural gas are colorless and odorless. For safety reasons, an ordorant (Mercaptan) is added so that any leak can be detected by smell. The common detection threshold for smelling the gases is around 20% of the Lower Explosion Limit (LEL). This can vary greatly depending on the individuals sense of smell and how long they have been exposed to it. The LEL of each of these gases defines the bottom range of flammability for the gas. Your Alarm is calibrated to sound before 25% of the LEL of either gas detected.
Therefore, it is possible that you may smell gas before the Alarm is activated. If you are not sure which gas your home uses, contact your utility company.
For CO Alarms, the National Fire Protection Association (NFPA) recommends that a CO Alarm should be centrally located outside of each separate sleeping area in the immediate vicinity of the bedrooms. For added protection, install additional CO Alarms in each separate bedroom, and on every level of your home.
In general, install combination Explosive Gas and Carbon Monoxide Alarms:
• WHERE YOU CAN HEAR THE ALARM FROM ALL SLEEPING AREAS
- In or near bedrooms and living areas or wherever you suspect a gas or CO exposure is likely.
- On each level of a multi-level home.
IMPORTANT!
Improper location can affect the sensitive electronic components in this Alarm. Please see "Where this Alarm Should Not Be Installed".
Recommended Placement
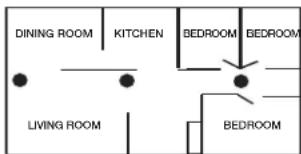
flowchart
graph TD
    A["DINING ROOM"] --> B["KITCHEN"]
    B --> C["BEDROOM"]
    C --> D["BEDROOM"]
    D --> E["LIVING ROOM"]
    E --> F["BEDROOM"]
Continued...
INSTALLATION, Continued
See "Avoiding Dead Air Spaces" for more information.
NOTE: For any location, make sure no door or other obstruction could keep carbon monoxide or gas from reaching the Alarm.
⚠ WARNING!
This unit should receive continuous electrical power. (The battery is meant for emergency back-up only). Choose an outlet where it can't be accidentally unplugged or switched off by children. Keep small children away from the unit. Teach them not to play with it or unplug it. Explain what the alarms mean.
WHERE THIS ALARM SHOULD NOT BE INSTALLED
To avoid causing damage to the unit, to provide optimum protection, and to prevent unnecessary alarms, Do NOT locate this Alarm:
- In garages, kitchens, crawl spaces and unfinished attics. Avoid extremely dusty, dirty or greasy areas. Installation in these areas could lead to nuisance alarms, may expose the sensor to substances that could damage or contaminate it, or the Alarm may not be heard by persons in other areas of the home, especially if they are sleeping.
- In the garage, vehicle exhaust can contain some carbon monoxide. These levels are higher when the engine is first started. Within hours of starting a vehicle and backing it out of the garage, the levels present over time can activate the Alarm and become a nuisance.
- In the kitchen, some gas appliances can emit a short burst of CO or gas upon start-up. This is normal. If your Explosive Gas/CO Alarm is installed too close to these appliances, it may alarm often and become a nuisance.
- Keep units at least 20 feet (6 meters) from the sources of combustion particles (stove, furnace, water heater, space heater) if possible. In areas where a 20-foot (6m) distance is not possible – in modular, mobile, or smaller homes, for example – it is recommended the Alarm be placed as far from these fuel-burning sources as possible. The placement recommendations are intended to keep these Alarms at a reasonable distance from a fuel-burning source, and thus reduce “unwanted” alarms. Unwanted alarms can occur if an Alarm is placed directly next to a fuel-burning source. Ventilate these areas as much as possible. If you must install the Alarm near a cooking or heating appliance, install at least 5 feet (1.5 meters) from appliance.
- In extremely humid areas. This Alarm should be at least 10 feet (3 meters) from a shower, sauna, humidifier, vaporizer, dishwasher, laundry room, utility room, or other source of high humidity.
- In direct sunlight.
- In turbulent air, like near ceiling fans or open windows. Blowing air may prevent CO or gas from reaching the sensors.
- In areas where temperature is colder than 40^ (4^) or hotter than 100^ (38^) . These areas include non-air-conditioned crawl spaces, unfinished attics, uninsulated or poorly insulated ceilings, porches, and garages.
- Less than 12 inches (305 mm) away from fluorescent lights. Electrical "noise" can interfere with the sensor.
- In "dead air" spaces. See "Avoiding Dead Air Spaces".
AVOIDING DEAD AIR SPACES
"Dead air" spaces may prevent gas from reaching the Alarm. To avoid dead air spaces, follow installation recommendations below.
On ceilings, install Alarms as close to the center of the ceiling as possible. If this is not possible, install the Alarm at least 4 inches (102 mm) from the wall or corner.
For wall mounting, the top edge of Alarms should be placed between 6 inches (152 mm) and 12 inches (305 mm) from the wall/ceiling line.
On a peaked, gabled, or cathedral ceiling, install Alarm within 3 feet (0.9 meters) of the peak of the ceiling, measured horizontally.
BEFORE YOU BEGIN INSTALLATION
Since CO generally mixes well with air, mounting the Alarm will depend on the type of explosive gas you intend to detect. If you are not certain which type of gas you are using in your home, please read about natural gas and propane in "Where to Install this Alarm".
⚠ WARNING!
- Make sure the alarm is not receiving excessively noisy power. Examples of noisy power could be major appliances on the same circuit, power from a generator or solar power, light dimmer on the same circuit or mounted near fluorescent lighting. Excessively noisy power may cause damage to your Alarm.
Find the pair of self-adhesive labels included with this Gas/CO Alarm.
- On each label write in the phone number of your emergency responder (like 911) and a qualified appliance technician.
- Place one label near the Gas/CO Alarm, and the other label in the "fresh air" location you plan to go if the alarm sounds.
HOW TO INSTALL THIS GAS/CO ALARM
IMPORTANT! Read all instructions before using this product. Tools you will need: Screwdriver, drill.
- Determine the best location for your Gas/CO Alarm.
- Your Alarm is equipped to be mounted as a corded unit (recommended for natural gas detection), a direct plug unit (recommended for propane gas detection). The unit can be plugged directly into a wall outlet. If your outlets are mounted horizontally, refer to "If Outlet is Mounted Horizontally (Sideways)".
If the adapter is taken out of the unit, the Alarm can be installed high on the wall, while the adapter is plugged into a wall outlet. The explosive gas you use will determine if the Alarm should be installed high on the wall (AC cord option) or low on the wall (direct plug option).
ACTIVATING THE BATTERY BACK-UP
IMPORTANT!
Activate the battery back-up by installing the battery. The battery is for back-up only and is not intended to power the Alarm for an extended period of time in the absence of AC.
The Alarm will light-up the display briefly to indicate the unit is receiving power.
DIRECT PLUG ALARM INTO AN OUTLET (for Propane Detection)
IMPORTANT!
This Alarm can be plugged directly into a wall outlet located close to the floor. This is the recommended configuration for detecting propane.
- Choose a standard UNSWITCHED 120V AC outlet.
- Plug Alarm in.
IF OUTLET IS MOUNTED HORIZONTALLY (SIDEWAYS)
If you are going to use your Alarm as a direct plug into an outlet that is mounted horizontally (sideways), you may want to rotate the adapter 90°, as follows:
- With back of unit facing you (AC blades on your left), place your left thumb on adapter release and grab AC blades with your right hand to release the left side.
- Repeat for the other side adapter thumb release. This will allow adapter to slide out.
- Remove adapter.
- Rotate the adapter 90^ and snap firmly back into place.
- Plug Alarm into AC outlet.
WALL MOUNTED ALARM (for Natural Gas Detection)
IMPORTANT!
Installation tips for power cord models: The power cord option provides more flexibility in mounting locations and allows the Alarm to be easily installed at or above eye level.
NOTE: If you mount the Alarm high on a wall, make sure it is between 6 to 12 inches (152-305 mm) down from the ceiling. Any higher than this, it will be in "dead air" space and carbon monoxide or natural gas may not reach the sensors.
NOTE: Do not cover the Alarm with a curtain.
To install for a wall-mount, you will need to pull out the removable adapter and power cord, as follows:
- Repeat steps 1 to 3 as described above in "to rotate the adapter".
- With adapter out, pull out power cord and unwrap it.
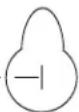
- Insert the screws provided until head is approx. 1/8 inch (3 mm) from wall (if mounting in plaster board or drywall, drill 3/16 inch (5 mm) hole and use plastic anchor provided). Use mounting guide template to locate holes as shown in diagram below.
- Hook the Alarm over the screw onto the keyhole in back of unit.
- Plug power cord into AC outlet.
SECURING THE POWER CORD TO AN OUTLET
WARNING!
DISCONNECT POWER TO THE OUTLET TO AVOID ELECTRICAL SHOCK.
- Remove the wallplate screw from the outlet and hold the wallplate in position.
- Plug the power cord into the wall outlet so that the screw hole lines up with the wallplate screw hole.
- Insert the screw through the power cord screw hole and into the wallplate screw hole.
- Tighten screw in place and restore power to the outlet.

Mounting Guide Template
3 7/8 inches (98mm)
TEST THE ALARM
-
Make sure the Alarm is receiving AC power. Under normal operation, the Green indicator light will shine continuously. If the Green power indicator light does not light, recheck connections. If connections are correct and the Green power indicator still does not light, the unit should be replaced immediately.
-
Press and hold the test button until the alarm sounds. You will hear the signal that indicates the presence of explosive gas followed by the signal for carbon monoxide.
When testing the Alarm, have someone else check that the Alarm can be heard easily from the sleeping areas. The unit should be located where it can wake you if it alarms at night.
HOW YOUR ALARM WORKS
THE COVER OF YOUR ALARM
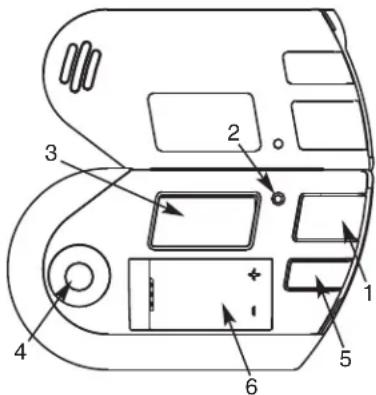
- Test/Silence Button: Press and hold to activate test, or to silence the alarm.
- POWER Light (GREEN)
- Display
- (Behind the Cover) Alarm Horn: 85dB audible alarm for test, alarm, and unit malfunction warning.
- Display Button: Press to recall highest CO level recorded
- Battery Compartment
IF YOUR GAS/CO ALARM SOUNDS WHAT TO DO IF CARBON MONOXIDE IS DETECTED
⚠ WARNING!
Actuation of your CO Alarm indicates the presence of carbon monoxide (CO) which can kill you. In other words, when your CO Alarm sounds, you must not ignore it!
IF THE CO ALARM SOUNDS:
- Operate the Test/Silence button.
- Call your emergency services, fire department or 911. Write down the number of your local emergency service here:
- Immediately move to fresh air—outdoors or by an open door or window. Do a head count to check that all persons are accounted for. Do not re-enter the premises, or move away from the open door or window until the emergency services responder has arrived, the premises have been aired out, and your CO Alarm remains in its normal condition.
- After following steps 1-3, if your CO Alarm reactivates within a 24-hour period, repeat steps 1-3 and call a qualified appliance technician to investigate for sources of CO from fuel-burning equipment and appliances, and inspect for proper operation of this equipment. If problems are identified during this inspection have the equipment serviced immediately. Note any combustion equipment not inspected by the technician, and consult the manufacturers' instructions, or contact the manufacturers directly, for more information about CO safety and this equipment. Make sure that motor vehicles are not, and have not, been operating in an attached garage or adjacent to the residence. Write down the number of a qualified appliance technician here:
WHAT TO DO IF EXPLOSIVE GAS IS DETECTED
If you hear the alarm horn sound one beep per second, gas has been detected. The word GAS will be displayed. Evacuate everyone from the building.
- Leave the house immediately, opening doors and windows as you leave.
- Do not use your telephone or appliances. Do not turn any light switches off or on. Any spark or flame could ignite the gas.
- Call 911 and your gas company from a phone that is away from your home.
- Do not re-enter the area until the source of the leak is found and corrected.
⚠ WARNING!
- If the unit alarms and you are not testing the unit, it is warning you of a potentially dangerous situation that requires your immediate attention. NEVER ignore any alarm. Ignoring the alarm may result in injury or death.
- Never disconnect the power to quiet an unwanted alarm. Disconnecting the power disables the Alarm. This will remove your protection.
⚠ WARNING!
Alarms have various limitations. See "General Limitations of Gas/CO Alarms" for details.
USING THE SILENCE FEATURE
A WARNING!
NEVER disconnect the power to your Alarm to silence the horn—use the Silence Feature. Disconnecting the Alarm removes your protection!
- The Silence Feature is intended to temporarily silence the horn while you identify and correct the problem.
- To use the Silence Feature, press the Test/Silence button until the horn is silent.
- If the Test/Silence button is pressed while the Alarm is in the silence mode, the alarm will start sounding again.
WHEN THE GAS ALARM IS SILENCED...
The Alarm will remain silent for approximately 2 minutes and then return to normal operation. If the gas has not cleared within the silence period, the unit will go back into alarm.
WHEN THE CO ALARM IS SILENCED...
The CO Alarm will remain silent for up to 4 minutes. While the Alarm is silenced, it will continue to monitor the air for CO. After 4 minutes, if CO levels remain potentially dangerous the horn will start sounding again.
IMPORTANT!
The Silence Feature is intended to temporarily silence the Alarm horn. It will not correct a CO or gas problem.
USING THE REMOTE CONTROL TEST/SILENCE FEATURE
Using the VOLUME or CHANNEL buttons on most remote controls, you can test or silence this gas/CO Alarm from up to 12 feet (3.6 meters) away.
To Test or Silence the Alarm:
- Make sure you have a clear path between you and the Alarm, free of any obstructions.
- Point the remote at the front of the Alarm.
- Press the VOLUME or CHANNEL button for at least 5 seconds.
If the Alarm does not respond to your remote control:
- You may be standing too far away.
- Your remote may not be compatible.
- You did not hold the button on your remote for at least 5 seconds.
- AC power must be present to Silence the low battery chirp.

SILENCING THE LOW BATTERY WARNING
This Silence Feature can temporarily quiet the low battery warning "chirp" for up to 8 hours if AC power is present. You can silence the low battery warning "chirp" two ways:
- Manually: Press the Test/Silence button on the Alarm cover until you see the Green LED flicker, acknowledging the button-press.
- Using Your Remote Control: Standing no further than 12 feet (3.6 meters) away from the Gas/CO Alarm, aim your IR remote at the Alarm and press the CHANNEL or VOLUME button for at least 3-5 seconds.
The display will flash "SILENCE" for 8 hours while the low battery warning "chirp" silence feature is activated. After 8 hours, the low battery "chirp" will resume. The Alarm will continue to operate as long as AC power is supplied. However, replace the battery as soon as possible, to maintain protection in event of a power outage.
USING THE PEAK CO MEMORY
The CO Memory Feature lets you check the highest level of CO recorded.
To check CO Memory:
- Press the Display button until the peak CO level is displayed.
To clear CO Memory:
- While checking CO memory, press or hold the Display button until "CLEAR" is displayed.
- Press or hold the Display button until the CO Memory is cleared.
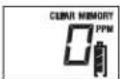
NOTE: The highest CO level will be saved, even after a power interruption, until you clear it. DO NOT clear the CO Memory reading if you plan to call someone to investigate a CO problem! Clear the CO Memory reading only after the investigator has checked your home.
UNDERSTANDING THE LIGHT, HORN, AND DISPLAY PATTERNS
| Condition LED | Horn Display | ||
| NORMAL AC POWER LED is Green. | Silent All segments | of display are turned on for a short time upon initial power. Then the battery level icon is displayed. | |
| BATTERY BACK-UP POWER LED is Off, flashing Green once every 45 seconds | Silent All segments of display are turned | On for a short time upon initial power. Then the battery level icon is displayed flashing. | |
| DURING TESTING LED flashes Red in sync with the horn, simulating an Alarm condition: first gas then CO | First, the horn pattern for gas alarm (1 beep every second) is issued, and then the CO alarm horn pattern (4 beeps, pause, 4 beeps) is issued. | During the simulated gas alarm, “GAS” is displayed along with a full alarm level.During the simulated CO alarm, “CO” is displayed along with a full alarm level.Several ppm CO levels are also displayed and the alarm level is shown increasing.   | |
| LOW OR MISSING BATTERY Normal | A chirp is issued about every minute. | Battery icon will show an empty icon. | |
| GAS ALARM CONDITION LED flashes Red in sync with horn | Repeating 1 beep every second | “GAS”, a full level, and “EVACUATE”. | |
| CARBON MONOXIDE ALARM LED flashes Red in sync with horn | Repeating 4 beeps, pause | “CO” alternating with the ppm number, a full level, and “EVACUATE”. | |
| PRE-ALARM CONDITION CO IS PRESENT | Normal | Normal | “CO” alternating with the ppm number. The level will indicate relative CO exposure level. |
| MALFUNCTION LED flashing Green 3 times in sync with 3 rapid chirps | 3 rapid chirps every minute “ERROR” is displayed. | ||
| LOW BATTERY SILENCE LED is Green. | Silent | “SILENCE” is displayed. | |
WEEKLY TESTING
A WARNING!
- NEVER use an open flame of any kind to test this unit. You might accidentally damage or set fire to the unit or to your home. The built-in test switch accurately tests the unit's operation as required by Underwriters Laboratories, Inc. (UL). NEVER use vehicle exhaust! Exhaust may cause permanent damage and voids your warranty.
- DO NOT stand close to the Alarm when the horn is sounding. Exposure at close range may be harmful to your hearing. When testing, step away when horn starts sounding.
▲CAUTION!
It is important to test this unit every week to make sure it is working properly. You can test this Gas/CO Alarm two ways:
-
Manually: Press the Test/Silence button on the Alarm cover until alarm sounds.
-
Remote Control: Aim your remote control at the Alarm and press the CHANNEL or VOLUME button.
During testing, you will hear a loud, repeating horn pattern: 1 beep every second, while the Red LED flashes and the display shows "GAS". Then you will hear a loud, repeating horn pattern: 4 beeps, pause, 4 beeps, pause, while the Red LED flashes and the display shows "CO" with an increasing CO ppm number.

If the Alarm does not test properly:
- Make sure the AC power is applied and battery is fresh and installed correctly.
- Test the unit again.
If the Alarm is still not working properly, replace it immediately. Refer to the "Limited Warranty" at the end of this manual.
⚠ WARNING!
If there is still a problem, do not try to fix the Alarm yourself. This will void your warranty!
REGULAR MAINTENANCE
⚠ WARNING!
Use only the replacement batteries listed below. The unit may not operate properly with other batteries. Never use rechargeable batteries since they may not provide a constant charge.
This unit has been designed to be as maintenance-free as possible, but there are a few simple things you must do to keep it working properly:
• Test it at least once a week.
- Clean the Alarm at least once a month; gently vacuum the outside of the Alarm using your household vacuum's soft brush attachment. Test the Alarm. Never use water, cleaners or solvents since they may damage the unit.
- Relocate the unit if it sounds frequent unwanted alarms. See "Where This Alarm Should Not Be Installed" for details.
- When the battery back-up becomes weak, the Alarm will "chirp" about once a minute (the low battery warning). You should replace the battery immediately to continue your protection. This Alarm must have AC or battery power to operate. If AC power fails, and the battery is dead or missing, the Alarm cannot operate.
⚠ WARNING!
DO NOT spray cleaning chemicals or insect sprays directly on or near the Alarm. DO NOT paint over the Alarm. Doing so may permanently damage the Alarm.
CHOOSING A REPLACEMENT BATTERY:
Your Alarm requires one standard 9V alkaline battery. The following batteries are acceptable as replacements: Duracell #MN1604, (Ultra) #MX1604; Eveready (Energizer) #522. These batteries are available at many local retail stores.
IMPORTANT!
Actual battery service life depends on the Alarm and the environment in which it is installed. All the batteries specified above are acceptable replacement batteries for this unit. Regardless of the manufacturer's suggested battery life, you MUST replace the battery immediately once the unit starts "chirping" (the "low battery warning").
WHAT YOU NEED TO KNOW ABOUT CO
WHAT IS CO?
CO is an invisible, odorless, tasteless gas produced when fossil fuels do not burn completely, or are exposed to heat (usually fire). Electrical appliances typically do not produce CO.
These fuels include: Wood, coal, charcoal, oil, natural gas, gasoline, kerosene, and propane.
Common appliances are often sources of CO. If they are not properly maintained, are improperly ventilated, or malfunction, CO levels can rise quickly. CO is a real danger now that homes are more energy efficient. "Air-tight" homes with added insulation, sealed windows, and other weatherproofing can "trap" CO inside.
SYMPTOMS OF CO POISONING
These symptoms are related to CO POISONING and should be discussed with ALL household members.
Mild Exposure: Slight headache, nausea, vomiting, fatigue ("flu-like" symptoms).
Medium Exposure: Throbbing headache, drowsiness, confusion, fast heart rate.
Extreme Exposure: Convulsions, unconsciousness, heart and lung failure. Exposure to Carbon Monoxide can cause brain damage, death.
▲WARNING!
Some individuals are more sensitive to CO than others, including people with cardiac or respiratory problems, infants, unborn babies, pregnant mothers, or elderly people can be more quickly and severely affected by CO. Members of sensitive populations should consult their doctors for advice on taking additional precautions.
FINDING THE SOURCE OF CO AFTER AN ALARM
Carbon monoxide is an odorless, invisible gas, which often makes it difficult to locate the source of CO after an alarm. These are a few of the factors that can make it difficult to locate sources of CO:
• House well ventilated before the investigator arrives.
- Problem caused by "backdrafting."
• Transient CO problem caused by special circumstances.
Because CO may dissipate by the time an investigator arrives, it may be difficult to locate the source of CO. BRK Brands, Inc. shall not be obligated to pay for any carbon monoxide investigation or service call.
POTENTIAL SOURCES OF CO IN THE HOME
Fuel-burning appliances like: portable heater, gas or wood burning fireplace, gas kitchen range or cooktop, gas clothes dryer.
Damaged or insufficient venting: corroded or disconnected water heater vent pipe, leaking chimney pipe or flue, or cracked heat exchanger, blocked or clogged chimney opening.
Improper use of appliance/ device: operating a barbecue grill or vehicle in an enclosed area (like a garage or screened porch).
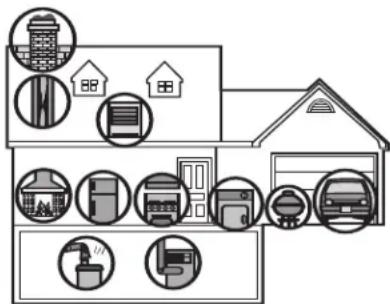
Transient CO Problems: "transient" or on-again-off-again CO problems can be caused by outdoor conditions and other special circumstances.
The following conditions can result in transient CO situations:
-
Excessive spillage or reverse venting of fuel appliances caused by outdoor conditions such as:
-
Wind direction and/or velocity, including high, gusty winds. Heavy air in the vent pipes (cold/humid air with extended periods between cycles).
- Negative pressure differential resulting from the use of exhaust fans.
- Several appliances running at the same time competing for limited fresh air.
- Vent pipe connections vibrating loose from clothes dryers, furnaces, or water heaters.
-
Obstructions in or unconventional vent pipe designs which can amplify the above situations.
-
Extended operation of unvented fuel burning devices (range, oven, fireplace).
-
Temperature inversions, which can trap exhaust close to the ground.
-
Car idling in an open or closed attached garage, or near a home.
These conditions are dangerous because they can trap exhaust in your home. Since these conditions can come and go, they are also hard to recreate during a CO investigation.
HOW CAN I PROTECT MY FAMILY FROM CO POISONING?
A Gas/CO Alarm is an excellent means of protection. It monitors the air and sounds a loud alarm before Carbon Monoxide levels become threatening for average, healthy adults.
A Gas/CO Alarm is not a substitute for proper maintenance of home appliances.
To help prevent CO problems and reduce the risk of CO poisoning:
- Clean chimneys and flues yearly. Keep them free of debris, leaves, and nests for proper air flow. Also, have a professional check for rust and corrosion, cracks, or separations. These conditions can prevent proper air movement and cause backdrafting. Never “cap” or cover a chimney in any way that would block air flow.
- Test and maintain all fuel-burning equipment annually. Many local gas or oil companies and HVAC companies offer appliance inspections for a nominal fee.
- Make regular visual inspections of all fuel-burning appliances. Check appliances for excessive rust and scaling. Also check the flame on the burner and pilot lights. The flame should be blue. A yellow flame means fuel is not being burned completely and CO may be present. Keep the blower door on the furnace closed. Use vents or fans when they are available on all fuel-burning appliances. Make sure appliances are vented to the outside. Do not grill or barbecue indoors, or in garages or on screen porches.
- Check for exhaust backflow from CO sources. Check the draft hood on an operating furnace for a backdraft. Look for cracks on furnace heat exchangers.
- Check the house or garage on the other side of shared wall.
- Keep windows and doors open slightly. If you suspect that CO is escaping into your home, open a window or a door. Opening windows and doors can significantly decrease CO levels.
In addition, familiarize yourself with all enclosed materials. Read this manual in its entirety, and make sure you understand what to do if your Gas/CO Alarm sounds.
REGULATORY INFORMATION FOR EXPLOSIVE GAS/CO ALARMS
REGULATORY INFORMATION FOR CO ALARMS UNDERWRITERS LABORATORIES INC. UL2034
WHAT LEVELS OF CO CAUSE AN ALARM?
Underwriters Laboratories Inc. Standard UL2034 requires residential CO Alarms to sound when exposed to levels of CO and exposure times as described below. They are measured in parts per million (ppm) of CO over time (in minutes).
UL2034 Required Alarm Points\*:
- If the alarm is exposed to 400 ppm of CO, IT MUST ALARM BETWEEN 4 and 15 MINUTES.
- If the alarm is exposed to 150 ppm of CO, IT MUST ALARM BETWEEN 10 and 50 MINUTES.
- If the alarm is exposed to 70 ppm if CO, IT MUST ALARM BETWEEN 60 and 240 MINUTES.
* Approximately 10% COHb exposure at levels of 10% to 95% Relative Humidity (RH).
The unit is designed not to alarm when exposed to a constant level of 30 ppm for 30 days.
IMPORTANT!
CO Alarms are designed to alarm before there is an immediate life threat. Since you cannot see or smell CO, never assume it's not present.
- An exposure to 100 ppm of CO for 20 minutes may not affect average, healthy adults, but after 4 hours the same level may cause headaches.
- An exposure to 400 ppm of CO may cause headaches in average, healthy adults after 35 minutes, but can cause death after 2 hours.
IMPORTANT!
This CO Alarm measures exposure to CO over time. It alarms if CO levels are extremely high in a short period of time, or if CO levels reach a certain minimum over a long period of time. The CO Alarm generally sounds an alarm before the onset of symptoms in average, healthy adults.
Why is this important? Because you need to be warned of a potential CO problem while you can still react in time. In many reported cases of CO exposure, victims may be aware that they are not feeling well, but become disoriented and can no longer react well enough to exit the building or get help. Also, young children and pets may be the first affected. The average healthy adult might not feel any symptoms when the CO Alarm sounds. However, people with cardiac or respiratory problems, infants, unborn babies, pregnant mothers, or elderly people can be more quickly and severely affected by CO. If you experience even mild symptoms of CO poisoning, consult your doctor immediately!
Continued...
REGULATORY INFORMATION FOR CO ALARMS, Continued
Standards: Underwriters Laboratories Inc. Single and Multiple Station carbon monoxide alarms UL2034.
According to Underwriters Laboratories Inc. UL2034, Section 1-1.2: "Carbon monoxide alarms covered by these requirements are intended to respond to the presence of carbon monoxide from sources such as, but not limited to, exhaust from internal-combustion engines, abnormal operation of fuel-fired appliances, and fireplaces. CO Alarms are intended to alarm at carbon monoxide levels below those that could cause a loss of ability to react to the dangers of Carbon Monoxide exposure." This CO Alarm monitors the air at the Alarm, and is designed to alarm before CO levels become life threatening. This allows you precious time to leave the house and correct the problem. This is only possible if Alarms are located, installed, and maintained as described in this manual.
Gas Detection at Typical Temperature and Humidity Ranges:
The CO Alarm is not formulated to detect CO levels below 30 ppm typically. UL tested for false alarm resistance to Methane (500 ppm), Butane (300 ppm), Heptane (500 ppm), Ethyl Acetate (200 ppm), Isopropyl Alcohol (200 ppm) and Carbon Dioxide (5000 ppm). Values measure gas and vapor concentrations in parts per million.
Audible Alarm: 85 dB minimum at 10 feet (3 meters).
REGULATORY INFORMATION FOR EXPLOSIVE GAS ALARMS
Standards: Underwriters Laboratories Inc. UL1484.
According to Underwriters Laboratories Inc. UL1484, this unit meets the alarm response time for gas as follows: This unit shall alarm before 25% of the LEL of either natural gas or propane is detected. In all cases, the unit will detect gas as a priority over carbon monoxide. If the device is detecting CO, then detects an amount of gas to cause an alarm, the device will stop alarming for CO and begin to alarm for gas.
GENERAL LIMITATIONS OF EXPLOSIVE GAS/CO ALARMS
This Gas/CO Alarm is intended for residential use. It is not intended for use in industrial applications where Occupational Safety and Health Administration (OSHA) requirements for Carbon Monoxide Alarms must be met. This device is not intended to alert hearing impaired residents.
Gas/CO Alarms may not waken all individuals. If children or others do not readily waken to the sound of the Gas/CO Alarm, or if there are infants or family members with mobility limitations, make sure that someone is assigned to assist them in the event of an emergency.
This Gas/CO Alarm will not sense gas or CO that does not reach the sensors. It will only sense gas or CO at the sensor. Gas or CO may be present in other areas. Doors or other obstructions may affect the rate at which CO or gas reaches the sensors.
Gas/CO Alarms may not be heard. The alarm horn loudness meets or exceeds current UL standards of 85 dB at 10 feet (3 meters). However, if the Gas/CO Alarm is installed outside the bedroom, it may not wake up a sound sleeper or one who has recently used drugs or has been drinking alcoholic beverages. This is especially true if the door is closed or only partly open. Even persons who are awake may not hear the alarm horn if the sound is blocked by distance or closed doors. Noise from traffic, stereo, radio, television, air conditioner, or other appliances may also prevent alert persons from hearing the alarm horn. This Gas/CO Alarm is not intended for people who are hearing impaired.
This Gas/CO Alarm is not a substitute for life insurance. Though this Gas/CO Alarm warns against increasing CO levels or the presence of gas, BRK Brands, Inc. does not warrant or imply in any way that they will protect lives. Homeowners and renters must still insure their lives.
This Gas/CO Alarm is not foolproof. Like all other electronic devices, this Gas/CO Alarm has limitations. It can only detect gas or CO that reaches the sensors. It may not give early warning of the source of gas or CO is in a remote part of the home, away from the alarm device.
This Gas/CO Alarm has a limited life. Although this Gas/CO Alarm and all of its parts have passed many stringent tests and are designed to be as reliable as possible, any of these parts could fail at any time. Therefore, you must test this device weekly. The unit should be replaced immediately if it is not operating properly.
TROUBLESHOOTING GUIDE
| If your Alarm does this... It means... You should... | ||
| Green light is OFF. Unit will not alarm when you press the Test/Silence button. | Unit may not be receiving any power. Check the AC power supply. Make sure a fresh 9V battery is installed to power the battery back-up*. | |
| Green light flashes ON, once a minute (horn is silent). | Alarm is not receiving AC power. Unit is operating on battery back-up. | Check the AC power supply. |
| The horn “chirps” once a minute. | Low battery warning. Battery is low or missing. | Replace the battery. Avoid interrupting AC power. |
| Once a minute, the alarm sounds 3 quick “chirps”, and the green light flashes quickly three times. | Unit malfunction. Unit needs to be replaced. Based on self-diagnostic tests, the unit has detected a fault or the Alarm has reached its end-of-life, 5 years. | Units under warranty should be returned to manufacturer for replacement. See “Limited Warranty” for details. |
| The horn sounds constantly with no pattern and cannot be silenced. | Unit malfunction. Unit needs to be replaced. Units under warranty should be returned to manufacturer for replacement. See “Limited Warranty” for details. | |
| Alarm goes back into alarm after you pressed the Test/Silence button to silence an alarm. | Gas and/or CO levels are still potentially dangerous. Refer to “If Your Gas/CO Alarm Sounds” for details on how to respond to an alarm. If anyone is feeling ill, EVACUATE your home immediately and call 911. | |
| Alarm sounds frequently even though no high levels of gas or CO are revealed in an investigation. | The Alarm may be improperly located. Refer to “Where to Install This Alarm.” | Relocate your alarm. If frequent alarms continue, have home rechecked for potential problems. You may be experiencing an intermittent gas or CO problem. |
| *For a list of acceptable replacement batteries, see “Regular Maintenance.”If you have any questions that cannot be answered by reading this manual, call Consumer Affairs: 1-800-323-9005. | ||
LIMITED WARRANTY
BRK Brands, Inc., ("BRK") the maker of First Alert ^a brand products warrants that for a period of five years from the date of purchase, this product will be free from defects in material and workmanship. BRK, at its option, will repair or replace this product or any component of the product found to be defective during the warranty period. Replacement will be made with a new or remanufactured product or component. If the product is no longer available, replacement may be made with a similar product of equal or greater value. This is your exclusive warranty.
This warranty is valid for the original retail purchaser from the date of initial retail purchase and is not transferable. Keep the original sales receipt. Proof of purchase is required to obtain warranty performance. BRK dealers, service centers, or retail stores selling BRK products do not have the right to alter, modify or any way change the terms and conditions of this warranty.
This warranty does not cover normal wear of parts or damage resulting from any of the following: negligent use or misuse of the product, use on improper voltage or current, use contrary to the operating instructions, disassembly, repair or alteration by anyone other than BRK or an authorized service center. Further, the warranty does not cover Acts of God, such as fire, flood, hurricanes and tornadoes or any batteries that are included with this unit.
BRK shall not be liable for any incidental or consequential damages caused by the breach of any express or implied warranty. Except to the extent prohibited by applicable law, any implied warranty of merchantability or fitness for a particular purpose is limited in duration to the duration of the above warranty. Some states, provinces or jurisdictions do not allow the exclusion or limitation of incidental or consequential damages or limitations on how long an implied warranty lasts, so the above limitations or exclusion may not apply to you. This warranty gives you specific legal rights, and you may also have other rights that vary from state to state or province to province.
How to Obtain Warranty Service
Service: If service is required, do not return the product to your retailer. In order to obtain warranty service, contact the Consumer Affairs Division at 1-800-323-9005, 7:30 AM - 5:00 PM Central Standard Time, Monday through Friday. To assist us in serving you, please have the model number and date of purchase available when calling. 25 Spur Drive, El Paso TX 79906
Battery: BRK Brands, Inc. make no warranty, express or implied, written or oral, including that of merchantability or fitness for any particular purpose with respect to battery.
For your records, please record:
Date Purchased: ____
Where Purchased: ____
Date Installed: ____/____Month/Year
Replacement date is five years after installation: ____/____ Month/Year
NOTE: End of Life Signal — Once the unit reaches the end of its lifecycle, the malfunction signal will sound once a minute to indicate the need to immediately replace the Alarm.
First Alert ^® is a registered trademark of the First Alert Trust.

- IMPORTANT! PLEASE READ CAREFULLY AND SAVE.
- BASIC SAFETY INFORMATION
- IMPORTANT!
- A CAUTION!
- ⚠ WARNING!
- TABLE OF CONTENTS
- INSTALLATION
- WHERE TO INSTALL THIS ALARM
- INSTALLATION, Continued
- WHERE THIS ALARM SHOULD NOT BE INSTALLED
- AVOIDING DEAD AIR SPACES
- BEFORE YOU BEGIN INSTALLATION
- HOW TO INSTALL THIS GAS/CO ALARM
- ACTIVATING THE BATTERY BACK-UP
- DIRECT PLUG ALARM INTO AN OUTLET (for Propane Detection)
- IF OUTLET IS MOUNTED HORIZONTALLY (SIDEWAYS)
- WALL MOUNTED ALARM (for Natural Gas Detection)
- SECURING THE POWER CORD TO AN OUTLET
- WARNING!
- TEST THE ALARM
- IF YOUR GAS/CO ALARM SOUNDS WHAT TO DO IF CARBON MONOXIDE IS DETECTED
- IF THE CO ALARM SOUNDS:
- WHAT TO DO IF EXPLOSIVE GAS IS DETECTED
- USING THE SILENCE FEATURE
- A WARNING!
- WHEN THE GAS ALARM IS SILENCED...
- WHEN THE CO ALARM IS SILENCED...
- USING THE REMOTE CONTROL TEST/SILENCE FEATURE
- To Test or Silence the Alarm:
- SILENCING THE LOW BATTERY WARNING
- USING THE PEAK CO MEMORY
- To check CO Memory:
- To clear CO Memory:
- WEEKLY TESTING
- ▲CAUTION!
- If the Alarm does not test properly:
- REGULAR MAINTENANCE
- CHOOSING A REPLACEMENT BATTERY:
- WHAT YOU NEED TO KNOW ABOUT CO
- WHAT IS CO?
- SYMPTOMS OF CO POISONING
- ▲WARNING!
- FINDING THE SOURCE OF CO AFTER AN ALARM
- POTENTIAL SOURCES OF CO IN THE HOME
- The following conditions can result in transient CO situations:
- HOW CAN I PROTECT MY FAMILY FROM CO POISONING?
- A Gas/CO Alarm is not a substitute for proper maintenance of home appliances.
- REGULATORY INFORMATION FOR EXPLOSIVE GAS/CO ALARMS
- REGULATORY INFORMATION FOR CO ALARMS UNDERWRITERS LABORATORIES INC. UL2034
- WHAT LEVELS OF CO CAUSE AN ALARM?
- UL2034 Required Alarm Points\*:
- REGULATORY INFORMATION FOR CO ALARMS, Continued
- Gas Detection at Typical Temperature and Humidity Ranges:
- REGULATORY INFORMATION FOR EXPLOSIVE GAS ALARMS
- GENERAL LIMITATIONS OF EXPLOSIVE GAS/CO ALARMS
- LIMITED WARRANTY
- How to Obtain Warranty Service
Brand : FIRST ALERT
Model : GCO1CN
Category : Gas detector